Chapter 11. Photomerge: Creating Panoramas, Group Shots, and More
Everyone’s had the experience of trying to photograph an awesome view—a city skyline or a mountain range, say—only to find the whole scene won’t fit into one picture because it’s just too wide. Elements, once again, comes to the rescue. With Elements’ Photomerge command, you can stitch together a group of photos you’ve taken while panning across the horizon. You end up with a panorama that’s much larger than any single photo your camera can take. Panoramas can become addictive once you’ve tried them, and they’re a great way to get those wide, wide shots that are beyond the capability of your camera lens.
Elements includes the same great Photomerge feature that’s part of Photoshop CS3, which makes it incredibly easy to create super panoramas.
Not only that, but Adobe gives you a couple of fun twists on Photomerge that are unique to Elements: Faces and Group Shot, which let you easily move features from one face to another, and replace folks in a group photo. And Elements 7 brings yet another new kind of merge: Scene Cleaner, for all those times when your almost perfect vacation shot is spoiled by strangers managing to get into your perfect scenic composition.
If you’re into photographing buildings (especially tall ones), then you know that you often need some kind of perspective correction: The building appears to be leaning backward or sideways as a result of distortion caused by your camera’s lens. This chapter shows you how to use the Correct Camera Distortion filter to straighten things back up. You’ll also learn how to use the Transform commands to adjust or warp your images.
Creating Panoramas
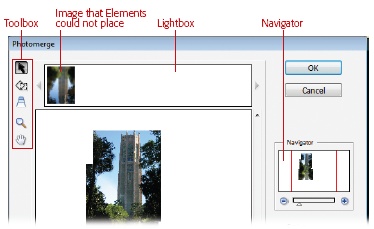
It’s incredibly simple to make fabulous panoramas in Elements. (If you’re upgrading from Elements 5 or earlier, then you know that lots of other programs made better, easier panoramas than Elements used to. Not anymore: The Elements Photomerge does an amazing job, totally automatically.) To make a panorama in Elements now, about 99 percent of the time, you just tell Elements which photos you want to use, and Elements automatically stitches together a perfect panorama. Figure 11-1 shows what a great job it does.

Elements can merge as many photos as you want to include in a panorama. The only real size limitation comes when printing out your compositions. If you create a five-photo horizontal panorama but your paper is letter size, then your printout is only a couple of inches high, even if you rotate the panorama to print lengthwise. However, you can buy a printer with an attachment that lets you print on rolls of paper, so that there’s no limit to the longest dimension of your panorama. These printers are very popular with panorama addicts. You can also use an online printing service, like the Kodak EasyShare Gallery, to get larger prints than you can make at home. See Ordering Prints Online for more about how to order online prints via the Organizer.
You’ll get the best results creating a panorama if you plan ahead when shooting your photos. The pictures should be side by side, of course, and they should overlap each other by at least 30 percent. Also, you’ll minimize the biggest panorama problem—matching the color in your photos—if you make sure they all have identical exposures. While Elements can do a lot to blend exposures that don’t match well, for the best panorama, adjust your photos before you begin, as explained in Figure 11-2. (The box on Manual Positioning with Interactive Layout has more tips for taking merge-ready shots.)
When you’re ready to create a panorama, just follow these steps:
Start your merge.
In the Editor, go to File → New → Photomerge Panorama. The Photomerge dialog box appears.
Choose your photos.
If the photos you want to include are already open, then just click Add Open Files. Otherwise, in the pull-down menu, choose Files or Folder; then click the Browse button to navigate to the ones you want. As you click them in the window that appears, Elements adds them to the list in the Photomerge window.
Add more files by clicking Browse again. To remove a file, click it in the list, and then click Remove.
Note
You can merge directly from Raw files, although of course you don’t have any controls for adjusting the file conversions. Photomerge works only with 8-bit files, so if you have 16-bit files, it asks if you want to convert them when it begins merging. For faster Raw merges, set the Raw converter to 8 bits (Choosing bit depth: 8 or 16 bits?) before you start.
From the Layout list on the left side of the window, choose a merge style.
Ninety-nine percent of the time you want to choose Auto, the first Layout option. That’s usually all you need to do. When you click OK, your completed panorama is darned near perfect. You also get some other merge style choices for use in special situations:
Perspective. Elements adjusts the other images to match the middle image using such methods as skewing and other Transform commands to create a realistic view.
Cylindrical. Sometimes when you adjust perspective, you create a panorama shaped like a giant bow tie. Cylindrical mapping corrects this distortion. (It’s called “cylindrical” because it gives an effect like looking at the label on a bottle—the middle part seems the largest, and the image gets smaller as it fades into the distance, similar to the label wrapping around the sides of the bottle.) You may want this style for very wide panoramas.
If you choose Auto, then Elements may use either Perspective or Cylindrical mapping when it creates your panorama, depending on what it thinks will do the best job for your photos.
Reposition Only. Elements overlaps your photos and blends the exposure, but it doesn’t make any changes to the perspective of the images.
Interactive Layout. This style lets you position your images manually. It takes you to a window that’s similar to the old Photomerge window in early versions of Elements; the next section gives a detailed explanation.
Click OK to create your panorama.
Elements whirls into action, combining, adjusting, looking for the most invisible places to put the seams, and whips up a completed panorama for you. That’s all there is to it.
Note
Elements has a lot of complex calculations to make when creating a panorama, especially if you have lots of images or big exposure differences between the photos, so it may take awhile. Don’t assume that Elements is stuck; give it time to think about what it’s doing. It may need a few minutes to finish everything.
You’ll probably want to crop your panorama (Cropping Pictures), but otherwise, you’re all done. You can use any of the editing tools on the final panorama once Photomerge is through, if you like. You can do anything to your panorama that you can do to any other photo.
Note
Elements has a quirk that may cause the program to give you an out-of-memory error message when saving a panorama. If you run into this, then just flatten your panorama (Layer → Flatten Image) and you should be able to save it.
Manual Positioning with Interactive Layout
If you find that you absolutely must do some manual positioning of your photos, choose Interactive Layout from the Layout list. When you click OK, Elements does its best to combine your photos, and presents them to you in the window shown in Figure 11-3.
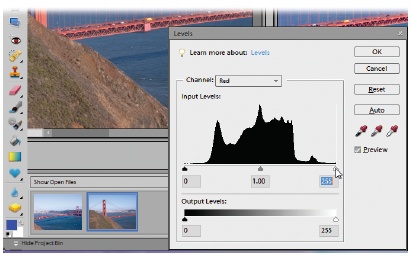
Here you can help Elements blend your photos better. Your panorama in its current state appears in the large preview area, surrounded by special tools to help you get a better merge. On the left of the window, you see a special toolbox. The Lightbox, which contains the photos that Elements couldn’t figure out how to place, is across the top, and you see special controls down the right side. You can use any combination of these features to improve your panorama.
You can manually drag files from the Lightbox into the merged photos, and also reposition photos already in your panorama. Just grab them with the Select Image tool (explained below), and then drag them to the correct location in the merge.
If you try to nudge the position of a photo and it keeps jumping away from where you’ve placed it, turn off “Snap to Image” on the right side of the Photomerge window. Then you should be able to put your photo exactly where you want it. However, Elements isn’t doing the figuring for you anymore, so use the Zoom tool to get a good look at the alignment afterward. You may need to micro-adjust the photo’s exact position.
There’s a little toolbox at the top left of the Photomerge window. Some tools are familiar, and others are special tools just for panoramas:
Select Image. Use this tool to move individual photos into or out of your merged photos or to reposition them. When the Select Image tool is active, you can drag photos into or out of the Lightbox. Press A or click the tool to activate it.
Rotate Image. Elements usually rotates images automatically when merging them, but if it doesn’t or if it guesses wrong, press R to activate this tool, and then click the photo you want to rotate. You see handles on the image, just the way you would with the regular Rotate commands (Free Rotate Layer). Just grab a corner, and then turn the photo until it fits in properly. Usually, you don’t need to drastically change a photo’s orientation, but this tool helps make the small changes often needed to line things up better.
Set Vanishing Point. To understand what this tool does, think of standing on a long, straight, country road and looking off into the distance. The point at which the two parallel lines of the road seem to converge and meet the horizon is called the vanishing point. The Vanishing Point tool in Elements tells Photomerge where you want that point to be in your finished panorama. Knowing the vanishing point helps Elements figure out the correct perspective. Press V to activate the Vanishing Point tool. Figure 11-4 shows an example of how it can change your results.
Figure 11-4. You can radically alter the perspective of your panorama by selecting a vanishing point. Top: The result of clicking in the merge’s center photo. Bottom: The result of clicking on the right-hand image. Note that the tool selects only a particular image in the merge group, not the actual point within the photo. You can click any photo to put your vanishing point there, but if you subsequently try to tweak it by clicking a higher or lower point within the same photo, then nothing happens. To change the Vanishing point you’ve set, just click a different photo.Zoom tool. This is the same Zoom tool (The Zoom Tool) you meet everywhere else in Elements. Click the magnifying glass in the Toolbox or press Z to activate it.
Move View tool. Use the Move View tool exactly the way you’d use the Hand tool (The Hand Tool) when you need to scoot your entire merged image around to see a different part of it. Click the hand icon in the Toolbox or press H to activate it. When moving an individual photo within your panorama, use the Select Image tool instead of the Hand tool.
To control your onscreen view of your panorama, on the right side of the Photomerge window, Elements gives you the Navigator, which works just like the regular Navigator described on Changing the Size of Your Image. Move the slider to resize the view of your panorama.
Drag to the right to zoom in on one area, or to the left to shrink the view so that you can see the whole thing at once. If you want to target a particular spot in your merge, then drag the red rectangle to control the area that’s onscreen.
Below the Navigator box you see two radio buttons—Reposition Only and Perspective—that adjust the viewing angle of your panorama. You can choose one or the other, but not both:
Reposition Only. This button merely overlaps the edges of your photos, with no changes to the perspective. If you don’t like the way the angles in your panorama look, then try clicking Perspective instead. (Advanced Blending is always on, so Elements always blends the exposure for a smooth transition. You can’t turn it off.)
Perspective. If you click this button, Elements tries to apply perspective to your panorama to make it look more realistic. Sometimes Elements does a bang-up job, but usually you get better results if you help it out by setting a vanishing point, as explained earlier. If you still get a totally weird result, go ahead and just create the merge anyway. Then correct the perspective yourself afterward using one of the Transform commands, covered in the next section.
Once you get your photos arranged to your satisfaction, just click OK, and Elements creates your final panorama.
Note
Elements always creates layered panoramas. If you’re sending your panorama out for printing, flatten it (Layer → Flatten Image) before doing so, since most commercial printers don’t accept layered files. Also, if you enlarge the view of your layered panorama and zoom in on the seams, then you may see what look like hairline cracks. Merging or flattening the layers gets rid of these cracks.
Merging Different Faces
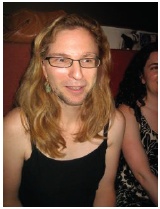
Merging isn’t just for making panoramas anymore. One of the Elements-only tools that Adobe gives you is Faces, a fun (okay, let’s be honest—silly) feature that lets you merge parts of one person’s face with another person’s face. You can use it to create caricature-like photos, or for things like pasting your new sweetie’s face over your old sweetie’s face in last year’s holiday photo. Figure 11-5 shows an example of what Faces can do. (Elements’ other special tools, Group shot and the new Scene Cleaner, are explained later in this chapter.)
Although you’d be hard put to think of a serious use for Faces, it can be fun to play with, and it’s quite simple to use:
Choose the photos to combine.
You need to have at least two photos available in the Project bin before you start.
Call up the Faces feature.
You can get to it either from File → New → Photomerge Faces, or from Guided Edit → Photomerge → Faces.
A dialog box asks you to choose the photos you want to include. In the Project bin, Ctrl+click to select the photos you want to use, or choose Open All from the dialog box. Elements then opens the Faces window, which has a preview area on the left and an instruction pane on the right.
Choose a Final photo.
This photo is the main photo into which you’re going to paste parts of the face from one or more photos. Just drag a photo from the bin into the Final Image area (on the right-hand preview).
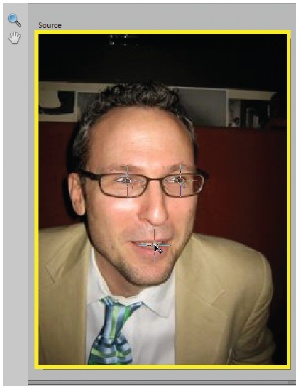
Choose your Source photo.
This is the photo from which you’re going to copy part of the face to move to the Background Image. Double-click it in the Project bin, and it appears in the left-hand preview area. You can copy from many different photos, but you can work only with one Source photo at a time. (When you’re done working with one photo, just double-click the next one you want. This way you can use the ears from one photo, the nose from another, and so on.)
Align your photos.
This step is very important, because otherwise Elements can’t adjust for any differences in size or angle between the two shots. Click the Alignment tool button in the Faces pane, and the three little targets shown in Figure 11-6 appear in each image.
Position the markers over the eyes and mouth in each photo, and then click Align Photos. (If you need help seeing what you’re doing, there’s a little Toolbox on the left with your old friends the Zoom [The Zoom Tool] and Hand [The Hand Tool] tools, so you can reposition the photo for the best view.)
Elements adjusts the photos so they’re the same size and sit at the same angle to make a good blend.
Tell Elements what features to move from the Source image to the Final Image.
Click the Pencil tool in the Faces pane and, in the Source photo, draw over the area you want to move. In a few seconds you should see the selected area appear in the Final photo. It takes only a quick line—don’t try to accurately color over all the material you want to move. In the Options bar, you can adjust the size of the Pencil tool if it’s hard to see what you’re doing, or if it’s grabbing too much of the surrounding area.
If Elements moves too much material from the Source photo, then use the Faces Eraser tool to remove part of your line. Watch the preview in the Final image to see how you’re changing the selection. If you want to start over, then click Reset.
When you’re happy, click Done.
Elements creates your merge as a layered file. Now you can edit it using any of the Editor’s tools, if you wish. You may want to clean up the edges a bit or to manually clone (The Clone Stamp) a little more material than Elements moved. And you can make your image even sillier with the Transform commands (Transforming Images), the Liquify filter (Applying the Liquify Filter to Type), and so on.
You can adjust two settings in the Faces pane:
Show Strokes. If you want to see what you’re selecting, then leave this on.
Show Regions. Turn this on, and you see a translucent overlay over the Background image, which makes it easier to tell which regions you’re copying over from your Source photo. It’s something like the overlay option for the Healing brush (The Healing Brush: Fixing Larger Areas) and the Clone Stamp (The Clone Stamp).
It would be nice if you could use this feature to merge things besides faces, but it doesn’t do a very good job at all. Even for faces, if you’re doing something important, like repairing an old photo with parts from another picture of the same person, then you may prefer to do your own selections, and manually move and adjust things (see Layer Masks). However, the alignment tools in Faces can simplify the process enough that it’s worth giving it a try to see if it can do what you need.
Arranging a Group Shot
Have you ever tried taking photos of a whole group of people? Almost every time, you get a photo where everything is perfect, except for that one person with his eyes shut. In another shot, that person is fine, but other people are yawning or looking away from the camera. You probably thought, “Dang, I wish I could move Ed from that photo to this one. Then I’d have a perfect shot.”
Adobe hears your wishes, and Group Shot is the result. It’s specifically designed for moving one person in a group from one photo to another, similar photo.
You launch Group Shot by going to File → New → Photomerge Group Shot, or Guided Edit → Photomerge → Group Shot.
The steps for using Group Shot are the same as for Faces, except that you don’t normally need to align the photos, since Group Shot is intended for those situations where you were saying, “Just one more, everybody—and hold it!” as opposed to moving people from photos taken at different times with different angles and lighting.
But if you do need to align your photos, you can do that in the advanced options. Just place the markers the same way you do in Faces (see Merging Different Faces). Another advanced option is Pixel Blending, which adjusts the moved material to make it closer in tone to the rest of the Final image.
Note
It would be great if you could use Group Shot for things like creating a photo showing many generations of your family by combining images from photos taken over many years. However, Group Shot moves someone from the Source photo and pastes that person into the same spot in the Final photo, and then creates a composite layer in the completed merge. That means the relocated person is merged into the entire Background image, and isn’t left as an extracted object, which makes it impossible to put that person in a completely different location. You need to do that the old-fashioned way, by moving each individual onto a separate layer (see Layer Masks) and then repositioning everybody where you want them.
Tidying Up with Scene Cleaner
Elements 7 brings a useful new spin to photo merging. With Scene Cleaner, you can eliminate unwanted people or elements in your photos. Think of all those travel magazine photos that show famous sights in their lonely glory, without any tourists hanging around to clutter up the scene. If you’ve ever waited patiently for what seems like hours, trying to get a shot of a famous landmark, only to give up as busload after busload of tourists keep arriving, you’ll appreciate Scene Cleaner.
Or you’ve probably had this experience when showing your vacation photos: “Here’s a shot of Jodi and Taylor at the rim of the Grand Canyon…Oh, those other people—no, no idea who they are. Just got in front of the camera somehow.” Scene Cleaner was made to fix photos like those.
Scene Cleaner is quite easy to use, but you’ll get best results if you can plan ahead when taking your photos. In order to get a people-less landscape, then you need to shoot multiple photos from nearly the same angle. All the areas you want to feature should be uninhabited in at least one photo. So, for instance, if you can get one shot of the Statue of Liberty where all the tourists are in the left side of her crown and one where they’re on the right side, you’re all set. Then, to use Scene Cleaner to create a more perfect world:
In the Editor, open the photos you want to combine.
In addition to being taken from nearly the same vantage point, they should have similar exposures. If a cloud is passing, for instance, so that one photo is bright and one is shadowy, then you’ll have to do some fancy touchups afterwards to blend the tones together. It’s usually easier to do this beforehand. Chapter 7 has the full story on exposure correction.
Call up Scene Cleaner.
In Full Edit, go to File → New → Photomerge Scene Cleaner, or go to Guided Edit → Photomerge → Scene Cleaner. In either case, you wind up in Guided Edit to create your merged image. Elements automatically aligns your photos, so there may be a slight delay before you see the Scene Cleaner window.
Choose a Final Image.
This is the base image into which you want to put parts of your other photo(s). Drag the photo you choose from the Project bin into the Final preview area (the right-hand slot).
Choose a Source Image.
Look through your photos to find a photo that has an empty area with the people or objects you want to remove from the Final photo. Click that photo in the Project bin, and it appears in the Source Image preview area (the left-hand slot). (As with Faces, you can use many Source images, but you work with only one at a time—move on to the next Source photo when you’re done.)
Align your photos manually, if necessary.
Usually you don’t need to do this, but if Elements didn’t do a good job of automatically aligning your photos, click the flippy triangle next to Advanced Options, and then click the Alignment tool. You see the three markers described in the section on Faces (Merging Different Faces). This time, instead of eyes and mouth, place them over three similar locations in each photo, and then click Align Photos.
Tell Elements what you want to move.
If the Pencil tool isn’t active, then click it in the right-hand pane of the window. Then, in the Source image, draw over the area you want to move to the Final photo. Just draw a quick line—Elements figures out the exact area to move. (You can also go to the Final preview, and draw over the area you want to cover—Elements can figure it out either way.)
Adjust the areas if needed.
Use the Pencil tool again to add more areas, and the Eraser tool to remove bits if you moved too much. You can use the Eraser in either preview, Source or Final. If you have more than two photos to work with, in the Project bin, click another photo to move it to the Source slot, and then select the area you want. If you need to see the edges of the areas that Elements is moving, then turn on Show Regions, as explained in Figure 11-7.
Figure 11-7. When you turn on Show Regions, your photo gets covered with this mask. Here the blue shows the original area from the Final photo; the yellow represents the section (without tourists) brought over from the Source photo. The mask is helpful if you have a hard time getting exactly the amount of source material you want. (If you look very closely, you still see a bit of an arm left uncovered, since the pencil tool didn’t make quite a large enough selection.) With the overlay, you get a better idea of where to erase or add material if you need to.If the exposures don’t blend well, go the Advanced Options and turn on Pixel Blending for a smoother merge.
When you’re happy, click Done.
Don’t forget to save your work. If you want to start over, then click Reset. If you decide to give up on the merge, then click Cancel.

Most of the time, you need only the Pencil tool and the Eraser, but Adobe does give you some additional options to help you out when necessary:
Show Strokes. Leave this turned on, or you can’t see where you’re drawing with the tools.
Show Regions. Scene Cleaner actually brings over chunks of the Source image. If you turn this option on, then you can see a blue and yellow overlay showing the exact size of the material you’re moving. See Figure 11-7.
Alignment Tool. This advanced option lets you manually set the comparison points. Use these points if you don’t like Elements automatic choices. Step 5 explains how to use the Alignment tool.
Pixel Blending. Just as in Faces, you turn on Pixel Blending when there’s a discrepancy in color or exposure between your photos, so that they combine more seamlessly.
It’s not always easy to get enough clear areas to blend, even with multiple photos, but when you have the right kind of source photos, you can create the impression that you and your pals had a private tour of your favorite places all to yourself.
Correcting Lens Distortion
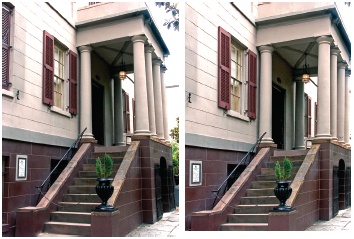
If you ever photograph buildings, then you know that it can be tough getting good shots with a fixed-lens digital camera. When you get too close to the building, your lens starts to cause distortion, as shown in Figure 11-8. Special perspective-correcting lenses are available, but they’re expensive (and if you have a pocket camera, they aren’t even an option). Fortunately, you can use Elements’ Correct Camera Distortion filter to fix photos after you’ve taken them. It’s another very popular Photoshop tool that Adobe transferred over to Elements, minus a couple of advanced options.
Correct Camera Distortion is a terrifically helpful filter, and not just for buildings. You can also use it to correct the slight balloon effect you sometimes see in closeups of people’s faces (especially in shots taken with a wide-angle setting). You can even deploy the filter for creative purposes. For example, you can create the effect of a fish eye lens by pushing the filter’s settings to their extremes.
Here are some telltale signs that it’s time to summon Correct Camera Distortion:
You’ve used the Straighten tool (Straighten Tool), but things still don’t look right.
Your horizon is straight, but your photo has no true right angles. In other words, the objects in your photo lean in misleading ways. For instance, buildings lean in from the edges of the frame, or back away from you.
Every time you straighten to a new reference line, something else gets out of whack. For example, say you keep choosing different lines in your photo that ought to be level, but no matter which one you choose, something else in the photo goes out of plumb.
Figure 11-8. Here’s a classic example of a candidate for Elements’ Correct Camera Distortion filter. This type of distortion is quite common when you’re using a point and shoot camera in a very narrow space that doesn’t let you get far enough away from your subject. You can fix such problems in a jiffy with the help of this filter.If you have a problem with vignetting—a dark, shadowy effect in your photo’s corners—you can also fix that with Correct Camera Distortion. You can also create vignetting for special effects.

Adobe’s made this filter extremely easy to use. Just follow these steps:
Open a photo, and then go to Filter → Correct Camera Distortion.
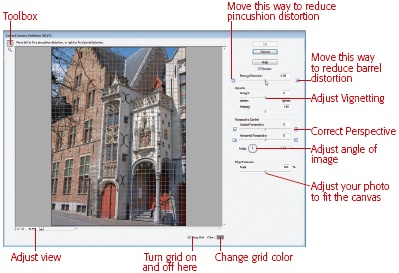
The large dialog box shown in Figure 11-9 appears.
Note
Even though Correct Camera Distortion is in the Filter menu, you can’t reapply it using the Ctrl+F shortcut, the way you can with most other filters. You always have to select it from the Filter menu.
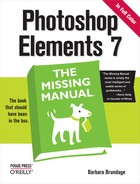
Figure 11-9. To use Correct Camera Distortion, look at the little icons next to each slider, which show you what happens when you move the slider toward the icon. For instance, if your photo suffers from barrel distortion (everything bows outwards), then move the Distortion slider toward the pinched-in pincushion. The icon illustrates exactly what you want to do to your photo—slim it down.If necessary, use the Hand tool (The Hand Tool) to adjust your photo in the window. You want a clear view of a reference line—something you know you want to correct, like the edge of a building.
If the distortion is very bad, this mission may be impossible, but try to find at least one line as closely aligned to the grid as you can, so you have a reference for changing the photo. You can also use the usual view adjustment controls (including zoom in and out buttons) in the dialog box’s lower-left corner. The Hand tool adjusts both your photo and the grid. That means you can’t use it to position your photo relative to the grid. Also, the Hand tool doesn’t do anything unless you set the view to more than 100%.
The Show Grid checkbox lets you turn the grid on and off, but since you’re going to be aligning your image, you’ll almost always want to keep it on. To change the color of the grid, next to the Show Grid checkbox, click the Color box.
Make your adjustments.
The filter lets you fix three different kinds of problems: barrel/pincushion distortion, vignetting, and perspective problems. These errors are the ones you’re most likely to run into, and correcting them is as easy as dragging sliders around. The small icons on each side of some of the sliders show you how your photo will change if you move in that direction. You may need to make only one adjustment, or you may need many (the bulleted list that follows helps you decide which controls to use).
Watch the grid carefully to see how things are lining up. When you get everything straightened to your satisfaction, you’re done. If you want to start over, Alt+click the Cancel button to change it to a Reset button, and return your photo to the state it was in when you brought it into this filter.
Scale your photo, if you wish.
As you make your adjustments, you’ll probably notice some empty space appearing on either side of your canvas (the background area of your file). This phenomenon often happens when Elements pinches and stretches your photo to correct the distortion. To make things right, you’ve got two options. You can click OK now and crop the photo yourself (using any of the options you learned about back on Cropping Pictures). Or, you can stay here and use the Edge Extension slider to enlarge your photo so that it fills up the visible window. If you use this method, then Elements crops some of the photo anyway.
Edge Extension is handy, but gives you little control over how the photo is cropped. After all the effort you made using this filter, you may as well do your own cropping to get the best possible results.
Click OK to apply your changes.
If you don’t like the way things are turning out, then you can reset your photo by Alt+clicking the Cancel button. If you just want a quick look at where you started from (without undoing your work), then toggle the Preview checkbox on and off.
The Correct Camera Distortion filter gives you a few different ways to adjust your image. Your choices are divided into sections, according to the different kinds of distortion they fix:
Remove Distortion. Use this slider to fix barrel distortion (objects in your photo balloon out, like the sides of a barrel, as shown in Figure 11-10), and its opposite, pincushion distortion (your photo has a pinched look, with the edges of objects pushing in toward the center). Move the slider to the right to fix barrel distortion, and to the left to fix pincushion distortion.
Tip
Barrel distortion is usually worst when you use wide-angle lens settings, while pincushion distortion generally appears when a telephoto lens is fully extended. Barreling’s more common than the pincushion effect, especially when you use a small point-and-shoot camera at a wide-angle lens setting. You can often reduce barrel distortion in a small camera by simply avoiding your lens’s widest setting. For instance, if you go from f2.8 to f5.6, you may see significantly less distortion.
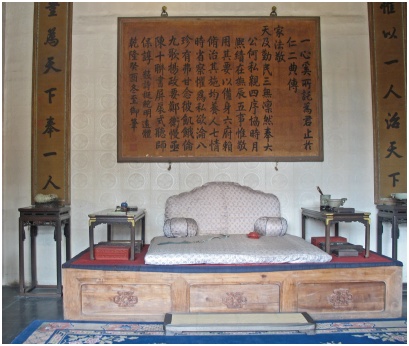
Figure 11-10. A classic case of barrel distortion. This photo has already been straightened with the Straighten tool (Straighten Tool), but things are still pretty out of plumb here. Notice how the platform seems to sag in the middle, and the side banners on the wall lean in toward the top of the photo. Barrel distortion is the most common kind of lens distortion, but fortunately, you can easily fix it with the Correct Camera Distortion filter.Vignette. If you see dark corners in your photo (usually caused by shadows from the lens or lens hood), then you need to spend time with these sliders. Vignetting typically afflicts owners of digital single-lens reflex cameras, or people who use add-on lenses with fixed-lens cameras. Move the Amount slider to the right to lighten the corners, and to the left to darken them. The Midpoint slider controls how much of your photo is affected by the Amount slider. Move it to the left to increase the area (to bring it toward the center of the photo), or to the right to keep the vignette correction more toward the edges. Also consider turning off the Show Grid checkbox, so that you have an unobstructed view of how you’re changing the lightness values in your photo. Turn it back on again if you have other adjustments to make afterward.
Perspective Control. Use these sliders to correct objects like buildings that appear to be tilted or leaning backward. It’s easiest to understand the sliders by looking at the icons at both ends; each icon shows you the effect you’ll get by moving the slider in that direction. The Vertical Perspective slider spreads the top of your photo wider as you move the slider to the left, and makes the bottom wider as you move it to the right. (If buildings seem like they’re leaning backward, move it to the left first.) The Horizontal Perspective slider is for when your subject doesn’t seem to be straight on in relation to the lens (for example, if it appears rotated a few degrees to the right or left). Move the slider to the left to bring the left side of the photo toward you, and to the right to bring the right side closer.
Angle. You can rotate your entire photo by moving the line in the circle to the angle you want, or by typing a number into the box. A very small change here has a huge effect. The circle tool is easy to work with, but if you prefer, you can type a precise angle, in degrees. Here’s how it works: There are 360 degrees in a circle. Your photo’s starting point is 0.00 degrees. To rotate your photo to the left (counterclockwise), start from 0.01, and then go up in small increments to increase the rotation. To go clockwise, start with 359.99, and then reduce the number. In other words, 350 is further to the right than 355.
Edge Extension. As explained earlier in the step on scaling your photo, when you’re done fixing your photo, you’re likely to end up with some blank areas along the edge of your photo’s canvas. Move the Scale slider to the right to enlarge your photo, thereby getting rid of the blank areas. Moving the slider to the left shrinks your photo and increases the blank areas, but you’ll rarely need to do that.
The Scale slider changes your actual photo, not just your view of it (as would be the case when using the Zoom tool). When you click OK, Elements resizes and crops your photo. If you want the objects in your photo to stay the same size they were, then don’t use this slider. Instead, just click OK, and then crop using any of the methods discussed starting on Cropping Pictures.
The most important thing to remember when using Correct Camera Distortion is that a little goes a long way. For most of the corrections, start small and work in small increments. These distortions can be very subtle, and you often need to make subtle adjustments to correct them.
Tip
The Correct Camera Distortion filter isn’t just for corrections. You can use it to make your sour-tempered boss look truly prune-y, for example, by pincushioning him (just make sure you do it at home). Or, you can add vignettes to photos for special effects. You can also use the filter on shapes (simplify them first [Ellipse]), artwork, or anything else that strikes your fancy.
Transforming Images
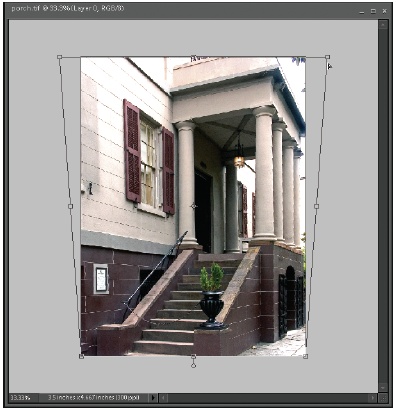
You’ll probably end up using the Correct Camera Distortion filter, as explained in the previous section, for most of your straightening and warp correction needs. But Elements also includes a series of Transform commands that you can use, as shown in Figure 11-11. For example, Transforming comes in handy when you want to make a change to just one side of a photo, or for final tweaking to a correction you made with Correct Camera Distortion. You can also apply these commands just for fun to create wacky photos or text effects.
Skew, Distort, Perspective
Elements gives you four commands, including three specialized ones—skew, distort, and perspective—to help straighten up the objects in your photos. While they all move your photo in different directions, the way you use them is the same. The Transform commands have the same box-like handles that you see on the Move tool, for example. You choose the command you want, and then the handles appear around your photo. Just drag a handle in the direction you want your photo to move. Figure 11-12 shows how to use the Transform commands.
To see the list of Transform commands, go to Image → Transform. The first one, Free Transform, is the most powerful because it includes all the others. The next section has more about Free Transform.
Note
Transform works only on layers or active selections. If you have just a Background layer, then Elements offers to turn it to a regular layer so that you can use Transform.
The other Transform commands, which are more specialized, are:
Skew slants an image. If you have a building that looks like it’s leaning to the right, then you can use Skew to pull it to the left and straighten it back up again.
Distort stretches your photo in the direction you want to pull it. Use it to make buildings (or people) taller and skinnier, or shorter and squatter.
Perspective stretches your photo to make it look like parts are nearer or farther away. For example, if a building in your photo looks like it’s leaning away from you, then you can use Perspective to pull the top back toward you.
Although Free Transform is the most capable command, it can also be trickier to use. You may find it easier to use one of the one-way commands from the previous list so you don’t have to worry about inadvertently moving a photo in an unwanted direction.
Tip
If you have an active selection in your image, then you can apply the Transform commands just to the selection, as long as you’re not working on a background layer.
All the Transform commands, including Free Transform, offer the same settings in the Options bar, shown in Figure 11-13.
From left to right, the Options bar settings control:
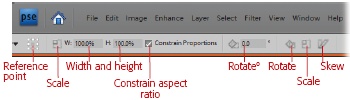
Reference Point Location. This strange little doodad (shown in Figure 11-14) lets you tell Elements where the fixed point should be when you transform something. It’s a miniature cousin of the placement grid you see in the Canvas Size dialog box (Adding Canvas). The reference point starts out in the image’s center, but you can tell Elements to move everything using the upper-left corner or the bottom-right corner as the reference point instead. To do that job, click the square you want to use as the reference.
Figure 11-14. This nine-box icon in the Options bar is where you set the reference point for transformations, which tells Elements the central point for rotations. For example, if you want your photo to spin around the lower-left corner instead of the center, then click the lower-left square. For the Transform commands, this also tells Elements the point to work from.Scale. You can resize your image by dragging, or enter a percentage in the width or height box here. Turn on the Constrain Proportions checkbox to keep the original proportions of your image.
Rotate. The box next to the little rotated squares (to the right of Constrain Proportions) in the Options bar lets you enter the number of degrees to rotate your image or selection.
Rotate. Click this next pair of rotated squares, and you can grab a corner of your image to make a free rotation (see Free Rotate Layer).
Scale. Click here if you want to resize your image by dragging—as opposed to entering numbers in the Scale boxes to the left of the Options bar.
Skew. Click here, and you can pull a corner of your image to the left or right, the way you do with the Skew command. In most cases, you can transform your object without paying much attention to these settings. Truly, you can most easily transform your photo when you grab a handle and drag. Here’s how you proceed:

Position your image to give yourself room to work.
You need to position your photo so that you have room to drag the handles far beyond its edges. Figure 11-12 is a good example of an image window that’s sufficiently expanded to make lots of transformations.
Choose how you want to transform your image.
Go to Image → Transform, and then select the command you want. It’s not always easy to tell which is best for a given photo, so you may want to try all three in turn. You can always change your mind and undo your changes by pressing Escape (Esc) before you accept a change, or undo using Ctrl+Z once the change has been made.
You can apply Transform commands only to layers, so if your image has only a Background layer, the first thing Elements does is ask you to convert that layer to a regular layer. Just say yes and go on. Once the Transform command is active, you see the handles around your image. (You can apply Transform commands to a selection on a Background layer without converting it to a regular layer, though.)
Transform your image.
Grab a handle, and then pull in the direction you want the image to move. You can switch to another handle to pull in a different direction, too. If you decide you made a mistake, then just press the Escape key (Esc) to return to your original photo.
When you’re happy with how your photo looks, accept the change.
Click the Commit button (the checkmark) in your photo, or press Enter. Click the Cancel button (the “no” symbol) instead if you decide not to apply your transformation to your photo.
Free Transform
Free Transform combines all the other Transform commands into one, and lets you warp your image in many different ways. If you aren’t sure what you need to do, then Free Transform is a good choice.
Use Free Transform exactly the way you use the other Transform tools, following the steps listed earlier. The difference is that with Free Transform, you can pull in any direction, using keystroke combinations to tell Elements which kind of transformation you want to apply. Each particular transformation, listed as follows, does exactly the same thing it would if you selected that transformation from the Image → Transform menu:
Distort. To make your photo taller or shorter, Ctrl+drag any handle. Your cursor turns into a gray arrowhead.
Skew. To make your photo lean to the left or right, Ctrl+Shift+drag a handle in the middle of a side. You cursor is the gray arrowhead with a tiny double-arrow attached to it.
Perspective. To correct the way an object appears to lean away from or toward you, press Ctrl+Alt+Shift and drag a corner. You see the same gray arrowhead that you see when you’re distorting.
The Free Transform command is the most powerful of all the Transform commands, but when you’re pulling in several different directions, it’s tricky to keep your photo from becoming distorted. Consequently, some people prefer to use the simpler Transform commands, and apply multiple transformations instead.