
Chapter 2
Getting the Gadgets To Produce a Podcast
IN THIS CHAPTER
![]() Choosing the microphone that’s best for you
Choosing the microphone that’s best for you
![]() Getting the right mixing board
Getting the right mixing board
![]() Accessorizing your studio
Accessorizing your studio
Now that you’re effectively hip as to what podcasting is and what it’s all about, you need to start building your studio. This studio can come in a variety of shapes, sizes, and price tags. What you’re thinking about doing — podcasting, in this case — is like any hobby you pursue. If it’s something to pass the time, then keep your setup simple. A modest setup with little to no investment is ideal if you want to see whether you like playing with audio. If, on the other hand, you find yourself tapping into a hidden passion or (even better) a hidden talent, you might want to upgrade to the audio gear that’s bigger, better, and badder than the basics.
If you suddenly decide you — yes, you — have a message you want to share, your next plan of action will be one of two options: picking up a digital recorder, reading the instruction manual, and then downloading some free audio-editing soft- ware; or watching the DIY Network for methods of soundproofing the basement and looking at industry-standard equipment that might require some extra homework to master.
This is the beauty of podcasting. In the long run, it doesn’t matter whether your podcasting studio is a smartphone with a plug-in microphone or comprised of the latest mixing boards, audio software, and recording equipment. Both approaches to podcasting work and are successfully implemented on a variety of podcasts.
So which one works best for what you have in mind? That’s what we take a look at in this chapter, discussing the options, advantages, and disadvantages of each setup.
Finding the Right Mic
It’s easy and affordable to make your computer podcast-capable. Your first order of business is to find the right mic. If you already have a microphone built into your laptop (and you don’t mind starting out basic), you can just download Audacity (described in Chapter 3) and take advantage of the fact that it’s free. That’s all there is to it!
At least, for starters, anyway.
However, if your desktop computer didn’t come with a mic or you’re just not happy podcasting Quasimodo-style, you’re going to want to shop around. While microphone shopping, consider the following criteria:
- What’s your price range? In many cases, especially with “cheap” mics, you get what you pay for in quality of construction and range of capabilities. You want the most affordable model of microphone that will do the job for you and your podcast.
Do you plan to use the mic primarily in the studio or on location? A high-end shock-mounted model isn’t the best choice for a walk in the park, and a lapel mic might not provide you with the quality of sound expected for an in-studio podcast. Before you purchase your mic, consider your podcasting location needs.
 There are many different types of microphones and microphone connections or jacks. Some mics are built to plug in to mixers while others connect directly to your computer’s USB port. If you’re thinking of starting with an inexpensive mic, you may not be able to plug it in to your upgraded rig later on. Similarly, if you’re upgrading to an XLR microphone (described later in this chapter), you may find yourself upgrading more than just your mic.
- What do you want this mic to do? Pick up sound? Yeah, okay, but what kind and in what surroundings? Some mics offer ease of handling for interviews. Some are good at snagging specific outdoor sounds. Others may be better at capturing live music. You need to consider multipurpose mics, guest mics, and on-location recording devices, or any kind of condition your podcast may require.
Even after narrowing your options, there are so many microphones on the market. After a while, the manufacturers, makes, and models all start to give you that kind of brain-freeze you get when you eat ice cream too quickly. The sections that follow give you the lowdown on the mic that’s right for your budget and even make a few sound recommendations along the way. Sound recommendations! Heh, Dad humor.
 Say, did you know there’s a companion podcast for this book? Yeah, it’s Podcasting For Dummies: The Companion Podcast. In Season 4, Tee and Chuck talk at length about microphones, including testing several makes and models, comparing and contrasting the sound of each. To find out more about microphones, gadgets, and concepts, listen to Podcasting For Dummies: The Companion Podcast, available at
 http://www.podcastingfordummies.com.
A Beginner's Guide to Mics
The microphone market, over the years, has seen the Universal Serial Bus (USB) microphone go from trendy tech gimmick to state-of-the-art innovation changing the way we record audio. With more than 15 years of development, one consistency has been the setup of these microphones: Plug it in and start recording. That’s it. You can go online to any of the computer equipment retailers and type USB microphones in their respective search engines. Make sure you include USB, because a search for microphones can bring up many more alternatives, including video cameras, high-end mics (which we talk about next), and other devices that may be way out of your budget.
You don’t have to sacrifice your retirement fund to get started with a USB microphone. Prices start under $20 for a simple desktop microphone. The phrase “You get what you pay for” doesn’t always apply in podcasting either. We’ve heard some pretty amazing sounds out of inexpensive microphones.
 Built-in microphones and many of the cheaper mics are in physical contact with the desk/table in front of you which means they pick up vibrations. Any noise on the surface, such as setting down a glass or drumming fingers, is going to be amplified in the microphone and recorded. Check out the “Accessorize! Accessorize! Accessorize!” section, later in this chapter, where we talk about mic stands to help reduce this issue.
You can find USB microphones online starting as low as $10. For a few dollars more, you can invest in a gaming headset like the Logitech G Pro X, pictured in Figure 2-1. The Pro X headset, priced at $130, is a standout among other gaming headsets as its mic uses the same technology found in Blue Microphones (https://www.bluedesigns.com), a pioneer in USB microphone development. This headset provides podcasters with a simple, single-purchase solution offering exceptional audio quality in the headphones coupled with clean, clear pickups only found in Blue mics.

FIGURE 2-1: The LogitechG Pro X gaming headset is equipped with a microphone running Blue Microphone technology, providing crystal clear audio in both monitoring and recording.
One advantage headsets hold over a desktop microphone is that your mouth is always the same distance away from the actual part of the microphone that picks up sound. If you’re an animated podcaster like your authors, this may be useful. On the other hand, headsets can be very sensitive to breathing sounds. If the headset’s mic boom is in the wrong position, the slightest breath from your mouth or nose will sound like an EF5 tornado passing by.
Although purchasing a USB headset is a monetary plus because you’re getting both headphones and mic together with one purchase, this isn’t all you need to monitor yourself as you record. To self-monitor your recording, you need software that offers you an on-screen mixer, a mixing board, or the option to monitor the incoming audio signal.
Once you plug in your mic or headset into a USB port and set up your audio preferences in your recording software. You’re ready for recording.
While USB microphones are quick and easy to set up, there’s no real good way to connect more than one to a computer at a time. If you’re planning to have your best friend as a cohost or have an in-studio interview guest, then consider microphones that connect to a mixing board.
Investing in a high-end mic
So you can go cheap and pick up a microphone for as little as ten dollars, but let’s be honest here: You’re going to sound like you’ve been recorded by a ten dollar microphone. Say, however, you really want that sharp, professional sound for your podcast, and the cheaper microphones just aren’t cutting it for you. As you shop for an upgrade, you see mics ranging in price from an inexpensive $70 and reaching up to $20,000! (No, you’re not seeing a typo involving a couple extra zeroes.) So what defines a microphone? Price? Manufacturer? Look?
What truly defines a microphone is how you sound on it and how it reproduces the sound coming in. Prices vary on microphones based on how they work. Plenty of high-quality microphones out there can pick up nuances and details and still remain in the range of affordability.
When you purchase a higher-end microphone, keep in mind that you probably will not receive cables for hookup, a jack that fits into your computer or a stand. That’s because you’re upgrading to professional equipment. The manufacturer is offering you the flexibility to have different bells and whistles, the whatjamajigs, and extra doodads to make this mic work. For the lowdown on what accessories you need to hook up your new mic to your computer, check out the “Accessorize! Accessorize! Accessorize!” section later in this chapter.
Remember those three questions a few pages back? Question #2 — Do you plan to use the mic primarily in the studio or on location? — helps narrow your search even more for the microphone that’s the right investment for you. At this level, there are two kinds of mics you will hear people talk about: dynamic and condenser mics.
Dynamic mics
Dynamic mics are what you see everywhere from speaking engagements to rock concerts. In fact, when someone mentions the word “microphone,” the image that comes to mind is probably a dynamic microphone. These mics work like a speaker in reverse. Sound entering a dynamic mic (by speaking directly into it) vibrates a diaphragm (a small plate) attached to a coil. This is located within proximity of a magnet, and the vibrations that this Wile E. Coyote setup makes create a small electric current. When this signal runs through a preamp or mixer, the original sound is re-created. This system sounds complicated (and if you’ve ever looked inside of a microphone, it is), but the internal makeup of dynamic microphones is such that they can take a lot of incoming signal and still produce audio clearly. They’re also rugged in build so they can be manhandled, making dynamic mics exceptional for outdoor recording.
If you’re working in-studio, consider working with Shure’s SM7B (pictured in Figure 2-2). This mic offers up a clean, rich sound, and picks up incredible details for a dynamic microphone. For microphones you may want to use out in the field, the Røde Reporter (http://www.rode.com/microphones/reporter) is specifically designed for handheld interviews, and delivers broadcast-quality results within any environment.
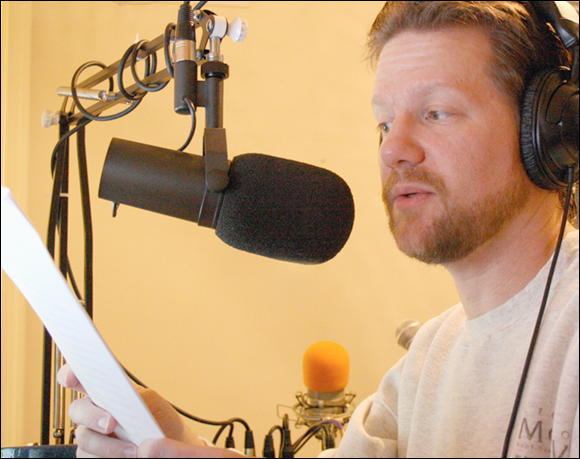
FIGURE 2-2: The Shure SM7B, a standard in the professional audio industry, captures both high and low audio ranges, giving your podcast a polished edge.
Condenser mics
When podcasting happens in studio and you're looking for the subtleties and nuances of the human voice in your recording (the more detail you get, the better!), you may want to shop for studio condenser microphones. The anatomy of a condenser microphone is similar to a dynamic one. In the condenser, a diaphragm is suspended in front of a stationary plate that conducts electricity. As a signal enters the microphone, the air between the diaphragm and the plate is displaced, creating a fluctuating electrical charge. Once given a bit more power (phantom power, which is explained later in this chapter), the movement becomes an electrical representation of the incoming audio signal.
This setup sounds very delicate, doesn’t it? Guess what — it is! This is why condenser mics are transported in padded cases, and not really built for handheld use. These microphones are best used for in-studio recordings (as shown in Figure 2-3) versus on-location podcasts. If manhandled or jostled around, plates can be knocked out of alignment or damaged, causing problems in the pick-ups.
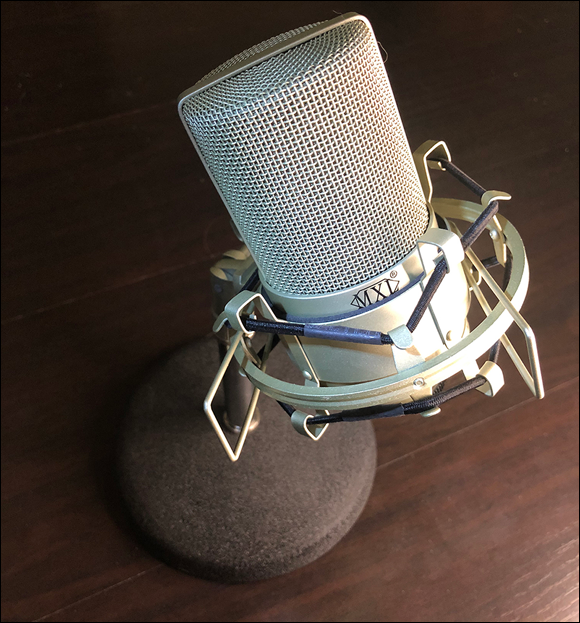
FIGURE 2-3: The MXL 990 captures professional quality sound in home studio settings for a reasonable investment.
The advantage to this delicate setup is that condenser mics are far more sensitive to sound, and they pick up a wider spectrum of audio. These microphones are so sensitive to noise around them that some come with shock mounts — spring-loaded frames that “suspend” the mic when attached to a microphone stand, providing better stability while reducing any noise or vibration from your microphone stand. Think of a shock mount as a shock absorber for your mic.
Although dynamic microphones are marketed more for on-location recording and condenser mics are considered best for in-studio recording, these aren’t hard-and-fast rules for what mics should be used where. Sometimes, podcasters use condensers in outdoor settings, and some podcasters prefer the sound of dynamic mics in studio over condensers. When picking a microphone, you want a mic that not only suits your needs but also makes you sound good. Really good.
For multi-mic podcasts in the same location, consider dynamic microphones. If you plan to have a studio with a few friends over as guests, the sensitivity of several condenser microphones can be a liability and will degrade the overall sound of your podcast. The sound from one person’s voice will be picked up not only on their mic, but also on the other mics as a “distant” sound. Overall it will sound like everyone is talking in to a single microphone across the room like one of those bad conference room calls with the mic in the center of the table. Very distracting to the listener.
Tee is a big fan of MXL microphones (http://www.mxlmics.com), mentioned earlier in this chapter. His first in-studio microphone was an MXL 990, a model he still podcasts with to this day. MXL microphones, along with being affordable, reliable, and popular, often come bundled with mixer boards (discussed later in this chapter). Online vendors like BSW (http://www.bswusa.com) are offering podcast bundles featuring another MXL microphone, the BCD-1. With each bundle offering new accessories, cost and features go up, but the high quality sound that the MXL line captures remains the same.
USB Studio condenser mics
Microphone vendors are noting the popularity of podcasting, and now USB Studio Condenser microphones are becoming more and more prevalent. Leading this movement is the previously mentioned Blue Microphones (https://www.bluedesigns.com). After the success of the Snowball iCE ($70) in the early years of podcasting, Blue went on to develop the Yeti ($130), both reliable examples of what is now available for podcasters. Blue also offers the Yeti X ($170), an impressive audio solution for podcasters, offering mixing, gain, and metering all in one simple interface built into the microphone. The Yeti X, shown in Figure 2-4, also provides a variety of pickup patterns, making the microphone versatile in recording settings and situations.
With these microphone models, podcasters can now record studio quality audio without an additional audio card, a mixer, or any of the go-betweens once considered essential for connecting audio gear to a computer. With USB condenser microphones, the audio signal now has a direct connection to the computer. It makes your podcast production extremely portable.
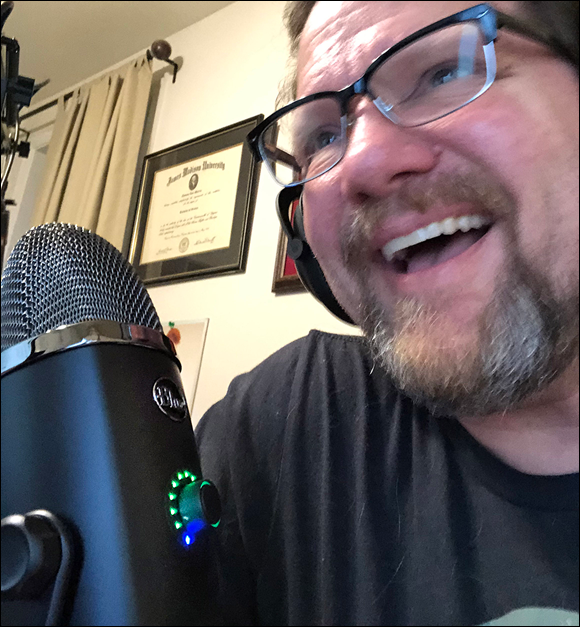
FIGURE 2-4: The Yeti X yields professional level audio and features, all in one sleek, elegant design. Within minutes of its unboxing, you are connected to your computer and ready to record.
High end is relative. Professional recording studios can spend hundreds of dollars on a single microphone. Fortunately, the MP3 format isn’t so finicky that modest-priced microphones can sometimes stick the landing. For those of you wanting to invest in your studios, we’re defining high-end microphones in this book as microphone makes and models ranging from $150 and up.
Podcasts Well with Others: The Mixing Board
If you’re looking to have more people in studio or you want to entertain guests on your podcast, you need more than just a really good microphone. (Otherwise there will be the passing back and forth of a mic, and that’ll get distracting after a while.) You also need inputs for more microphones and full control over these multiple microphones.
Along with good microphones (and probably microphone stands, discussed later in the “Accessorize! Accessorize! Accessorize!” section), you will want to invest in a mixing board. What a mixing board (or mixer) does for your podcast is open up the recording options, such as multiple hosts or guests, recording acoustic instruments, and balancing sound to emphasize one voice over another or balance both seamlessly.
You see mixers at rock concerts and in “behind the scenes” documentaries for the film and recording industry, appearing in all shapes and sizes. For example, the Behringer Q1202USB mixer, priced around $150, can connect four microphones and several additional stereo inputs and feed these audio sources directly in to the USB port on your computer.
Before you take your mixer out of its packaging, make sure you have room for it somewhere on the desk or general area where you intend to podcast. Something you’ll want to consider is how close you want to be to the mixer. An ideal reach for your mixer is a short one. Whether it’s you recording yourself or balancing the levels of those around you, clear off a section within a relaxed reach. You’ll be happier because of it.
The anatomy of a mixing board
The easiest way to look at a mixing board is as if you’re partitioning your computer into different recording studios. But instead of calling them studios, these partitions are called tracks.
A mixing board provides mono tracks and stereo tracks, and you can use any of those tracks for input or output of audio signals. No matter the make or model, mixing boards are outrageously versatile. If you’re podcasting with a friend, you can hook up two mics through a mixer so you won’t have to huddle around the same microphone or slide it back and forth as you take turns speaking. Multiple microphones are the best option when you and your friends record. A real advantage of the mixer is that it allows you to adjust the audio levels of those multiple inputs independently so they sound even.
You may also be wondering about all those wacky knobs on a mixing board. Some of the knobs deal with various frequencies in your voice and can deepen, sharpen, or soften those qualities, and perhaps even help filter out surrounding background noise (which is the sound of an empty room because even in silence, there is noise). The knobs on the mixing board that are your primary concern are the ones that control your volume or levels, as the board labels them. The higher the level, the more input signal your voice gains when recording. If one of your tracks is being used for output, the level dictates how loud the playback through your headphones is.
Heavy-metal legends Spinal Tap may prefer sound equipment that “goes to 11,” but cranking your mixing board way up and leaving it that way won’t do your podcast much good. The best way to handle sound is to set your levels before podcasting. That’s what’s going on when you see roadies at a concert do a mic check. The oh-so-familiar “Check One, Check Two, Check-Check-Check …” is one way of setting your levels, but a better method is just rambling on as if you were podcasting and then adjusting your sound levels according to your recording application’s volume unit (VU) meter. For more on setting levels, hop to Chapter 7 for all the details.
Hooking up a mixer to your computer
Now that you have your desk cleaned off (mind the dust bunnies!) and a perfect place for the mixer, set your mixer where you want it. And then make certain you can see the following items:
- Your USB mixer
- A power supply
- A USB cable
Before hooking up the new mixer, check the manufacturer’s website for any downloads (drivers, upgrades to firmware, patches, and so on) needed to make your digital mixing board work.
USB mixers are so similar in setup that we can give the same steps for both kinds of mixers. Regardless of where you fall in the Mac/PC debate, you can follow these steps to hook up your mixer board:
- Shut down your computer.
- Connect the power supply to the back of the mixer and to an available wall socket or power strip.
Find an available USB port and plug your mixer-appropriate cable into the computer.
If your computer’s ports are maxed out, we recommend investing in a PCI card that gives your computer additional USB ports. Do not run your digital mixer through a hub because that will affect the quality of the audio.
A direct connection between your mixer and computer is the best.- Plug the USB cable into the back of your mixer.
- Connect your input devices (microphones, headphones, monitors, and the like) to the mixer.
- Power up your mixer by turning on the Main Power and the Phantom Power switches. See Figure 2-5.

FIGURE 2-5: Power switches for the board and for phantom power are located on different point of your mixer board, depending on the model.
- Start your computer.
Install any drivers your USB mixer may need.
Follow the instructions according to the manufacturer’s enclosed documentation. Restart your computer if necessary.
And that’s it! You’re ready to record with your USB mixer. Now with headphones on your head and some toying around, you can set levels on your mixer good for recording.
Before filing away the reference manual that came with your mixer, be sure you know how things work. Buttons like the “Mix to Control Room” suddenly make sense to you as opposed to being “that button that needs to be down when I record.” Getting a grasp of how things work on your mixer only makes you a better podcaster, so keep that reference manual close by and set aside a few pockets of time to clock in some it.
Accessorize! Accessorize! Accessorize!
A microphone (or microphones) and a mixing board serve as the foundation of your studio. You now need to add the final touches, as Martha Stewart would no doubt tell you if she were helping you with this process. When it comes to accessories, Martha might make suggestions like a doily for the mic stand or a sweet, hand-knitted cover for the mixer. When we talk about accessories, we have something different in mind. Here are some optional add-ons that can help you produce a rock solid podcast:
Headphones: Headphones help you monitor yourself as you speak. That may seem a little indulgent, but by hearing your voice, you can catch any odd trip-ups, slurred words, or missed pronunciations before playback.
If you are torn between making an investment in either the microphone or the headphones, we suggest you invest in quality headphones before you spend a lot of money on a better mic, or else you won’t know how good a micro- phone is. Good headphones are nice to have for monitoring, but really show their value during the editing and mastering process.Another advantage with headphones is they have better sound quality than your computer’s speakers as well as reduce ambient noise around you if you purchase what are called closed-ear headphones. Keep it simple for your first time out with the Behringer HPS3000 closed-ear headphones for around $30. These headphones end in a 1/8-inch jack but come with an adaptor that makes them a 1/4-inch stereo male jack (as shown in Figure 2-7), plugging directly into your mixing board.
Bose Noise Cancelling stereo headphones are going for $300 and promise the highest quality for audio listening. Note that we say listening — not recording and editing. Any headphones you see listed as noise-cancelling are going to be terrific for listening to audio, but those headphones aren’t the best for the recording and editing process. You want to be able to hear any noise that these headphones cancel out so that you can eliminate it before a word is recorded. The best noise reduction and elimination happens before and during recording, not afterward. For podcast production, stick with closed-ear headphones sans the noise-cancelling feature.Cables: As mentioned earlier in the chapter, your newfangled microphone may arrive without any cables, and buying the wrong cable can be easy if you don’t know jack (so to speak). So check the mic’s connector before you buy.
With many high-end mics, the connectors aren’t the typical RCA prongs or the 1/4-inch jack shown in Figure 2-6; instead, you use a three-prong connection: a 3-pin XLR plug, as shown in Figure 2-7.

FIGURE 2-6: A 1/4-inch male connection, which is needed to connect headphones to a mixing board.
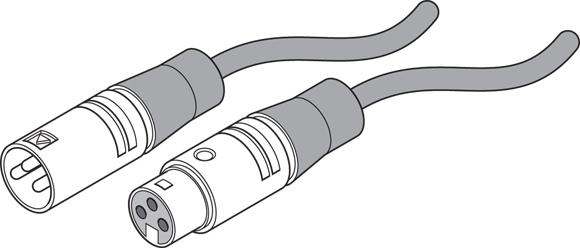
FIGURE 2-7: XLR male and female plugs, standard plugs for phantom-powered microphones.
To plug a microphone into your mixer, you want to specify a 3-pin XLR-to-XLR male-to-female cord; the female end connects to the mic, the male end to the mixer. These cables begin at $9 and work their way up, depending on the length of the cord and quality of the inputs.
Microphone stands: On receiving the microphone and possibly its shock mount, you may notice the attachment for a mic stand … but no mic stand comes with your new mic. It’s your responsibility to provide one, and although that may sound like an easy buy, your options for mic stands are many, each with their advantages.
A simple desktop mic stand can run you around $10 and is the most basic of setups. When shopping for the right height and make, you’ll notice other stands like a boom mic stand around the $100 range. The type of mic stand that is best for you depends on what you want it to do and how you want to work around it. With the inexpensive desktop stand, you’re ready to go without the extra hassle of positioning and securing a boom stand to your desk. The boom stand, though, frees up space on your desk, allowing for show notes and extra space for you to record and mix in. Consult your budget and see what works for you.
Pop filters and windscreens: Go to any music store and ask for pop filters and windscreens, which are both shown in Figure 2-8. Both devices can help soften explosive consonants (percussive ones like B and P) during a recording session. A windscreen can also reduce some ambient room noise. Using both on one mic could be overkill, but these are terrific add-ons to your microphones.
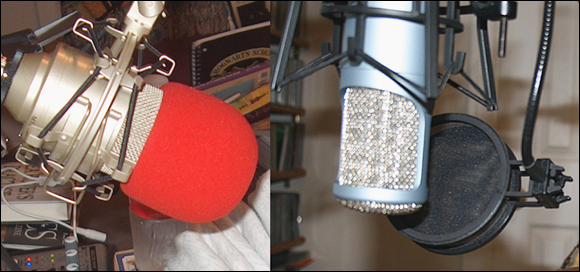
FIGURE 2-8: Windscreens (left) and pop filters (right) help you control unwanted noise and percussive consonants (such as P and B) during recording.
It is worth mentioning that there are DIY tutorials on YouTube, blogs, and elsewhere that will show you how to make pop filters with a stick and panty hose. Just remember: You get what you pay for. With the time, experimentation, and jury-rigging in order to save yourself $10-$20, it’s less stress for you to just go and pick up a proper pop filter.