
Chapter 7
So What Are You Waiting For? Record, Already!
IN THIS CHAPTER
![]() Setting your levels and parameters
Setting your levels and parameters
![]() Focusing on volume and projection
Focusing on volume and projection
![]() Capturing ambient sound
Capturing ambient sound
![]() Pacing and clock management
Pacing and clock management
![]() Going off on tangents
Going off on tangents
![]() Recording
Recording
Okay, you’ve most likely gone through the hardware and software gadgets from Chapters 2, 3, and 4. In this chapter, we make the bold assumption that you’ve made your purchasing selections, hooked up all the hardware according to the supplied documentation (you did read the documentation, right?), chosen your software, and gotten everything ready to record. This is it! You have a microphone pointing in the direction of your mouth, eagerly waiting for you to begin podcasting.
Okay then. What’s stopping you?
Perhaps you have no clue how you sound on your recording equipment, or perhaps you’re still trying to understand why your smooth and sultry voice sounds like you just finished a dozen espressos. The problem could be in your audio application’s sound settings. Too much pep in the voice, and you sound like Rob Zombie crooning a goth’s delight. Too little amplification, and you’d be better off if you just went out to your front porch and shouted your podcast’s content.
Before the podcast gets underway with your single-click or touch of the Record button, you must set levels. That’s a very fancy-schmancy way to say fiddling with knobs and sliders on your mixing board or your audio-editing software. Setting levels ensure that the signal you’re sending through the microphone is loud and clear. Once the technical side is running smoothly, give some thought to your voice — things like timing and enunciation — as how you say your message directly impacts the listeners’ interest in what you’re saying.
Did Your Sound Check Clear the Bank?
If you show up early enough for a rock concert, you see those roadies setting up microphones, playfully waving to the crowd as they speak quickly into a microphone “Check one, check two, check-check-check!” It’s a staple for rock ‘n’ rollers to do such a mic check because the fans expect a good performance — it needs to be done.
With podcasting, your own mic check should be more involved. We recommend you perform an audio diagnostic just to assure yourself (and, if applicable, your guests) that the equipment is working and sound is, in fact, reaching your computer. The goal is not only to confirm that your mic is picking up sound, but also to check the volume of the voices — yours and that of whoever else is involved in this podcast.
Understanding dB levels
Setting levels is quite easy, provided you know where your decibel (dB) input levels are displayed on your software. The decibel unit is used to express the intensity of sound, beginning at -9 dB for the least perceptible sound to approximately 130 for an intensely loud sound level. Your readout measures how hot you are (in this instance, that’s the power of your voice, not how good you look) on the microphone. Audio signal strength (measured in decibels) is the amount of power that goes into the signal, which affects how clearly it can be heard and how hard it hits the ears. “Loud and clear” is good; too much signal strength causes distortion, and that’s a pain to listen to.
In vintage radio and audio equipment, a dB signal was represented in a volume unit (VU) meter — the little needle that bounced in response to your voice. Later on, the needle was replaced by lights that react to your voice or to sounds around you, going from green to yellow to orange to red. What the lights represent is pretty easy to translate:
- Green: Well, I can hear you, but wow, are you quiet!
- Yellow-Orange: You’re coming in loud and clear.
- Red: You’re in danger of hitting the distortion level (clipping).
- Red with double bars: Your audio is going to sound distorted.
Across hardware and software, volume meters appear different (Figure 7-1 shows the volume meter display for Audacity), but they all serve the same purpose: to make sure your content is heard clearly. Your aim, as you speak and watch the indicators speak back, is to keep your dB levels bouncing in the high level (low red) without lighting up those double bars. When you attain that average, your voice is rising and falling within a good balanced dynamic range. Try to keep things a little lower — in the red and orange range — with only the high points (when you raise your voice) going in to the red occasionally. You can always bring up the low spots with some simple post-production tips (described later in this chapter).

FIGURE 7-1: The input level meters for Audacity (shown in the upper-right corner) respond to your voice and allow you to monitor how loud you are when recording.
Because microphones, audio-capture cards, and mixing boards all work at different sensitivity levels, it’s best to test your voice before you record. If your levels are in the green, it means you’re loud enough to be heard by your equipment but still so soft that people will have to crank up the volume on their computers or portable MP3 players, consequently blowing out their eardrums on the next podcast or playlist.
If your recording is too loud (or hot), it tends to cause problems for listeners. Listeners have their MP3 players set for a pleasant, comfortable volume … and suddenly your show begins with guns blazing and bagpipes blaring. As your levels reach deep into the red, listeners fumble for their players and try to turn down the sound so the program can be understandable through its own distortion. Sadly, the modulation is such a problem that your voice crackles and growls as it tramples the volume limits of your recording equipment, even at the lower volume. Even worse, some programs and microphones will even cut the signal from the mic for a second, leaving you with chunks of missing audio — and you may not discover this until after your precious recording is over!
 You want to avoid clipping to prevent that distorted sound. Clipping is when you’re feeding too much signal to your equipment. It can come from many sources including incorrect settings on a microphone or other audio input, incorrect settings on a mixer, or the preferences in your software. Once audio is clipped, you can’t get the original (or intended) quality back.
In achieving a balance in your audio, you could spend the day setting and resetting those levels in quest of dB nirvana. That’s time spent, but not well spent. It makes more sense to practice till you get a pretty good sense of what your best working level is and get comfortable speaking into a mic at that level. Time to go mano-a-mano with setting the levels.
Setting your levels
Your mission, should you choose to accept it, is to keep your levels in the neighborhood of 0 dB, dipping and spiking when necessary. For podcasting, consistency is key. You have your mixer turned on (if you have one), your mic is plugged in and turned on — check — and your software is running. Now follow these steps to check levels:
Begin talking into the mic about your podcast topic or plans.
You can do a scripted test read or just talk off the top of your head, but be sure to speak in the manner and mood of your podcast.
Instead of speaking to thin air in the vague direction of the mic (or the person next to you), speak in the exact direction of the mic (as shown in Figure 7-2). Even if the mic is omnidirectional (meaning it picks up sounds from all directions at once), it can pick up your voice better this way.

FIGURE 7-2: Set your microphone at a comfortable distance, close enough to overpower ambient noise, but far enough to avoid microphone contact. Boom mic stands, like the one included with MXL’s Overstream bundle, tend to be the easiest to adjust.
 If you speak directly into the microphone, you might hear some sounds — particularly ps and bs — causing an effect known as popping. An investment of less than $20 in a windscreen or pop filter can fix that. This device is a foam or nylon filter that stops the wind made by your mouth from hitting the microphones diaphragm and causing distortion.
While you’re talking (or if you’re monitoring by playing back your test takes), keep an eye on your dB levels on the computer screen.
If the levels are spiking into the double-red/red area or remaining in the green, check your input volume settings on your mixing board or audio-editing software. This might require a bit of multitasking on your part, but continue to adjust the input levels while talking, as you watch the input meters.
Re-record your voice at the new settings.
Try to speak in the same manner and inflection as you did on the first recording.
As you review the second take, watch the dB input levels and adjust accordingly.
When in doubt, err on the side of caution on the input levels. Record your volume a little low. You can always correct it in post-production. One way to increase the volume later, using Audacity, is to select your audio and use the Effect ⇒ Amplify feature to bring it up.
After you set your levels, make a note of the settings somewhere other than your computer (using, say, a smartphone or its retro ancestor — a legal pad and pen), in case your preferences are lost or fiddled out of whack by somebody’s child or best friend playing spaceship in your studio. (Yes, even adults enjoy playing spaceship with really super-cool-looking equipment!) That way, even if something awful happens to your application’s preferences or your mixing board, you always have your last known settings to reference.
Noises Off: Capturing Ambient Noise
Part of the charm that is podcasting is just how varied the content is, as well as how spontaneous the shows tend to be when the Record button is hit. Some podcasters believe that a “true” podcast (whatever that is!) must record everything in one take and deliver its content to listeners completely unedited. This supposed mark of authenticity includes any background noise (also called ambient noise) you happen to capture while recording — from comforting sounds like rustling trees and birdcalls to the more grating ones like pounding car stereos and jackhammers.
Hey, if that’s the style of your show, that’s great. However, if you’re trying to take listeners to a place in their imagination, read on to find out how to reduce or eliminate ambient noise.
Identifying ambient noise
As we discuss in Chapter 8, how much you edit depends on what kind of content you’re presenting. For example, if you’re doing an off-the-cuff, off-the-wall podcast about your life and a typical day in it, you may just grab the VideoMic Me-L, plug it into your iPhone, and head out the door, recording every step along the way. This kind of podcast can be (note we said can be) easiest to record. You’re podcasting a slice of Americana … or Britanniana, if you’re in the United Kingdom … or Kiwiana if podcasting from the Land of Hobbits, Championship Rugby, and Pavlova. Especially if your goal is to capture the look and feel of your culture, ambient noise is not only welcomed, but desired. Up to a point.
Some podcasters cringe at the mere mention of ambient noise — ambient noise like … well, what was in Tee's very first podcast. When he podcasted MOREVI: The Chronicles of Rafe & Askana back in 2005, he worked to create a magical setting with voice, story, music, special effects … a world that was completely shattered by real-world interference like school buses, kids at recess, UPS trucks, the Virginia Commuter Rail system, and air traffic from two nearby airports. Even if you love the source of the ambient noise, sometimes it just doesn’t fit what the podcast is trying to do.
The best noise reduction happens in pre-production. If your podcast could do without input from the outside world, strategically scheduling recording sessions is the start of your production. Try recording at night or early morning. You’ll find that traffic is lighter, the kids are in bed, construction crews aren’t running those earlier-mentioned jackhammers, animals typically are less active — all adding up to less ambient noise, hence fewer takes on the mic.
Minimizing ambient noise
To reduce the intrusion of the outside world, record anytime during the day, and still maintain a budget, some creativity is in order.
Truth be told, there really isn’t an easy solution to podcasting in a noisy world. One not-so-cost-effective answer is to rent a studio and record your podcast there. Unless you have a sponsor who bankrolls the costs, your “hobby” could easily max out credit cards and cast a hungry eye upon your nest egg. (Let’s not even go there.)
A somewhat-less-expensive option is to soundproof your home-based recording room. That may sound simple, but it can involve a lot of home improvement before you have one room in which you can be sure the only sound is yours. But is it impossible or impractical? Not really. P.G. Holyfield of the podcast novel Murder at Avedon Hill (https://scribl.com/books/P4C82/murder-at-avedon-hill) built his own studio for podcasting.
Holyfield’s do-it-yourself adventure began with a house hunt, so a studio in a finished basement was on the list of what the house needed. The studio eventually came about from a large storeroom, a few new walls, and the addition of an air vent. The newly created 7-x-8 foot room was then soundproofed with foam tiles. Holyfield found the effort worthwhile. “The studio is working out great. It was amazing to hear the difference as the foam went up. Now I have a completely silent room, except when the A/C turns on (which I can turn off most times, since the basement is pretty cool).” Figure 7-3 shows the process he went through. The advantage of being in the basement is far less outside noise entering through the walls. The advantage of the acoustic foam is to reduce sound waves bouncing off the walls and creating unwanted effects.

FIGURE 7-3: P.G. Holyfield’s D.I.Y. studio adventure: the arrival of acoustical foam (left), measuring twice and cutting once (center), and the studio (right).
Renovation, especially if you’re a fan of D.I.Y. projects, makes this kind of home-built studio a possibility, but still may not be a practical solution for all homeowners — and this kind of aggressive home improvement is seriously frowned upon if you’re renting an apartment.
You can keep this home renovation affordable and within the lease agreement terms:
- Stuff towels under the door. It decreases the amount of sound from inside your house filtering into your recording area.
- Keep the microphone as far away from your computer as possible. Its fan (if audible) simply becomes part of the natural ambiance for the podcasting room.
- Turn off any ceiling fans, floor heaters, additional air conditioners, or room ionizers. With fewer appliances running, you have less chance of additional ambient sound being created.
- If you do encounter ambient noise that you don’t want in your podcast, simply give it a few moments. Wait until the noise subsides, pause, and then pick up your podcast a few lines before the interruption. That’s for the sake of post-production: With a substantial gap in your podcast activity, you can easily narrow down where your edits are needed.
When noise interferes with your podcast, leaving gaps of silence so you know where to edit isn’t exactly a foolproof method. Always set aside enough time to listen to your podcast — and really listen, not just play it back while you clean the office or call a friend. Make sure levels are even, no segments are repeated, and the final product is ready for uploading and posting.
Many podcasts rely on ambient noise to set a mood, but sometimes reality just doesn’t cut it. If you want to put more craft into the setting for your podcast, the ideas in this section should help you keep the background down to a dull roar.
When holding podcasts on location, make sure the ambiance — be it a particularly busy crosswalk at a street corner, a frequented bar, or backstage at a concert — does not overwhelm your voice. Background noise belongs in (well, yeah) the background. Its intent is to set a tone for the podcast, not to become the podcast itself. It would also be a good idea, if possible, to do a few test recordings in the space to see how much volume you’ll need and how close to the mic you have to be in order to be heard.
Now Take Your Time and Hurry Up: Pacing and Clock Management
Podcasts, whether short and sweet or epic and ambitious, all share something in common: the need for pacing. As a rule, you don’t want to blurt out the aim or intent of your podcast in the opening 5 minutes and then pad the remaining 10 or 15 with fluff. Nor do you want to drone on and on (and on …) till suddenly you have to rush frantically into why you’re podcasting on this particular day about this particular topic. Give yourself ample time to set the mood comfortably and competently and make it to the intent without dawdling. Enjoy your podcast but respect your listeners’ time. Make certain you don’t overstay your welcome. The trick in pacing is to understand how much time you have to get your message across.
The big question is how to grasp how much time you really have. Where to start?
It’s a good idea to get a grasp of how much time you really have in one whole minute. To do this, find a clock, watch, or a stopwatch and for one minute (and only one minute) sit quietly and do nothing, say nothing, and remain perfectly still. That one minute will feel like a short eternity. Now imagine that one-minute times 15. (No, no, no — do not repeat this exercise for 15 minutes. There’s a fine line between an exercise and a complete waste of time.)
Fifteen minutes (for a start) is a good amount of time on your hands, so you should make certain that you take your time to get to the message of your podcast. The journey you take your listeners on doesn’t necessarily have to occupy all of that time — be it 15, 20, or 30 minutes — but you have time to play. That’s the most important thing to remember as you set your best podcasting pace.
Take the potato out of your mouth and enunciate
It isn’t out of the ordinary to fire up the mic and launch into your podcast with enough energy and vitality to power a small shire in England. Nothing wrong with that — until you go back and listen to yourself. Your words, phrases, and thoughts are running together and forming one turbulent, muddy stream-of-thought. Yes, that is your voice, but even you are having a tough time understanding what the podcast is about and what the podcaster is saying … and you’re the podcaster!
One way of getting a grip on pacing yourself through a podcast is enunciation — pronouncing your words distinctly, explaining your topic clearly — and there is no better way to do that than to slow your speech slightly and listen carefully to certain consonants (for example, the t, s, and d sounds). Proper enunciation can help you set a comfortable pace and keep you from rushing through your presentation. In fact, it isn’t a bad idea to over-enunciate. In the excitement of recording, over-enunciation actually forces you to slow down, clean up your pronunciation, and make your voice easily understandable. That same excitement is likely to increase your pace of speaking. Again, if the rapid pace is part of your presentation, stick with it, but if you’re doing anything like a narration for an audio book, slow down. If you think you’re speaking just a little too slowly, you’re probably going just the right speed.
Speaking a few tongue-twisters before going on mic helps your enunciation and also warms up your voice and prepares it for the podcast you’re about to record. Here are some easy ones that emphasize the problem consonants lost when speaking too quickly:
- Toot the tin trumpet, Tommy, in time.
- Pop prickly pickles past the peck of parsley.
- See sand slip silently through the sunlit seals.
- The sixth sheik’s sheep is sick.
- Will Wendy remember wrecking the white rocker?
If you perform a search online for tongue twisters, you can find a wide variety of classic and original warm-ups for the voice. You can also take the twisters you find and compose your own.
And now let’s take a break for station identification
Ever notice that certain podcasts suddenly break in with a show ID or take some other marked break and then (if they’re lucky enough to have sponsors) play their sponsors’ spots? They’re trying to emulate — and maybe make themselves easily syndicated by — conventional radio. You know, the broadcasting industry. Clock management is the careful, standardized interruption of a typical radio broadcast — usually every 15 minutes in a one-hour slot — for such necessities as station identification, show identification, public-service announcements (PSAs), and (of course) commercials.
Another nice bonus of following clock management is you have several points in your show to give a quick show ID (something like “You’re listening to Technorama with Chuck and Kreg …”) that lets people know who you are. Chuck and Kreg like to collect audio clips from celebrities for their show IDs because, as seen in Figure 7-4, astronauts are cool! This show ID is a great way to catch the attention of people who may be walking into the middle of your podcast, and just as they ask the podcast listener “What are you listening to?” the show ID drops. Although show IDs are usually expected at the top of the hour and on the half-hour, you can drop in a show ID anytime you feel like it.
FIGURE 7-4: Always have your recorder ready! Video game developer and astronaut Richard Garriott graciously gave Chuck an audio ID for his podcast at Dragon Con 2012.
A good general rule for clock management for each hour is
- :00 — programming break, station identification, show ID, PSAs, advertisements
- :15 — programming break, PSAs, advertisements
- :30 — programming break, station identification, show ID, PSAs, advertisements
- :45 — programming break, PSAs, advertisements
These breaks vary in length but can last anywhere from 30 seconds to 5 minutes. No surprise that this is where the old-school podcasters get a bit restless. They find clock management and show ID redundant, if not frivolous. Why bother with a show ID or clock management? People have downloaded your feed specifically. They know what they’re listening to, so what purpose does clock management serve?
It all comes back to what you see for your podcast’s future. If you intend to remain in the podosphere, it really comes down to your format, your way. No constraints from the FCC. It’s just you, the microphone, your listeners, and throwing caution to the wind. However, if you set your sights on taking your passion project to the airwaves — be it AM, FM, satellite radio, or online streaming — you have to format your show to fit the standards.
Think about the possibilities of your podcast and where you see yourself with it several months (or years) down the road. Maybe a bit of management and organization will aid your podcast in jumping to the airwaves.
Concerning Tangents and Their Val — Oh, Look, a Butterfly!
It’s hardly surprising that broadcasters who have no experience in broadcasting tend to stray from their topic once the microphone goes hot, and then they lose themselves in the thickets and thorns of tangents. Defensive podcasters claim that’s part of the charm of podcasting, but that charm fades as the topic gets closer to serious. If (for example) you launch a podcast dedicated to The Witcher series, but wander into a discussion over the growing concern of television violence, don’t be surprised if your audience wanders away.
 It’s worth repeating: Stay focused on the intent of your podcast. Remaining true to your podcast’s subject matter isn’t just about staying within your running time; it also makes clear to your listeners that, yes, you have a message and you will deliver it. You haven’t promised something substantial only to let your mind and commentary wander aimlessly. When people listen, you want them to feel assured that what they hear is exactly what you’ve offered.
Read on to find out how you can make tangents work and how to smoothly get back on topic after you’ve taken your side trip.
“Say, that reminds me of something …”
Tangents can be creative opportunities. You don’t necessarily treat tangents as strictly verboten in podcasting. If your tangent is directly related to, or benefits your topic, it can be effective and engaging.
Say your commentary begins with “Anyone notice how smartphones are no longer just phones but tiny personal digital assistants that can be easily monitored and hacked into?” You cover that for a bit, and then break off on a tangent about phone etiquette and the lack of manners it brings out of people. This is a tangent that will keep your listeners engaged, and that can count as much as staying on topic.
What if your podcast isn’t so structured, though? There’s nothing wrong with hitting Record and forging ahead into the great unknown of the next 15 or 20 minutes, so long as you have an idea of where you want to go. Tangents are terrific in moderation, but keep them at least (well, yeah) tangentially related to the subject matter of your podcast. If, say, your podcast is about movies but your review of Doctor Strange suddenly goes into the decline of the comic book industry (regardless of the onslaught of comic-books-to-film productions), then you still have a sense of focus. However, if your review of Doctor Strange wanders off into how your cat is throwing up hairballs every time you podcast or that your car’s sunroof chose to stop working, blah, blah, blah, what the heck is going on here? Your audience may grow frustrated enough to stop listening.
“But getting back to what I was saying earlier …”
When you’re podcasting for 15 or 20 minutes (or longer …), it’s okay to take the scenic route with your discussion, but make sure that you return to the point you wanted to make in this particular (weekly, biweekly, or monthly) installment. The listener’s delight in podcasts is often the revelation that individuals who (in many cases) have never set foot in a recording studio can produce entertaining, and even informative, shows. Sometimes meandering back to the point is part of that delight.
For instance, a podcast might begin with something read in the headlines — say, a new marketing strategy launched by Apple for the iPhone to reach a wider client base. This can lead to a variety of topics in the discussion, such as the following:
- Smartphones that begin extending into other functionality like playing games on the PlayStation Network or providing Wi-Fi hotspots
- Costs for iPhone services from AT&T, Sprint, and other carriers
- Ways that carriers could bring down the costs of services
- Continued shortcomings and disappointments from the smartphone industry
But in the last five to ten minutes, a simple segue like “So, to recap our thoughts on this bold marketing strategy from Apple…” can successfully steer you, or you and your co-hosts, back to the aim and intent of your podcast. If you return deliberately from a tangent, your listening audience arrives back at the point and knows the destination as well as the scenery they went through to get there.
Get your listeners there and back again. Not only will they appreciate it, but they’ll tell others about your podcast, and your subscribers will grow in numbers.
We hit on the topic of using a script versus an outline in Chapter 5. When it comes to staying on track, clearly, a script has a distinct advantage over an outline. Regarding interviews (see Chapter 6), having a list of questions is important, but don’t be afraid to ask impromptu questions — you can always go back to your prepared list.
Time to Push the Big Red Button!
Whew — there certainly is a lot to think about before you get started. That’s what makes a great podcast — someone did some planning. Now it’s time to put that planning and practicing into action.
Getting started with GarageBand
When you first start GarageBand, you’re asked to start an Empty Project. A simple Audio project where a microphone is the main input source (pictured in Figure 7-5) is an available option. Selecting this option populates your GarageBand with a single audio track with a variety of vocal effects, some are practical if you are doing dramatic presentations, while others are comical effects for the fun of it. You can choose to utilize any of these effects and edit them using the GarageBand interface to cater to your needs.

FIGURE 7-5: When starting off a podcast recording, GarageBand asks what kind of project you want to create. Single-click the microphone to set up your podcast episode.
We recommend changing a few settings that work better for music composition than they do for podcast recording:
 Turn off the Count-In and Metronome feature. The Count-In sets a tempo and is most often used when recording music, but as you will probably not be concerned with a set tempo, you probably don’t need this feature. After turning off the Count-In feature, turn off the metronome. If you don’t turn it off, you’ll hear a click-click-click while you’re speaking. Annoying, to say the least.
 Hide the Library. By default, a window will be made available on the left-hand side called the Library. The Library is a collection of effects for different kinds of recording. To hide the Library, click the Library icon, located in the top-left corner of the application window.
- Show Time in the LCD. In the top-center of the GarageBand window is an LCD showing Beats & Measures. For your podcast, time is more appropriate so switch it by clicking on the music note/metronome icon. You will get a drop menu that offers the Time option (see Figure 7-6). Select that and your LCD now measures in time.
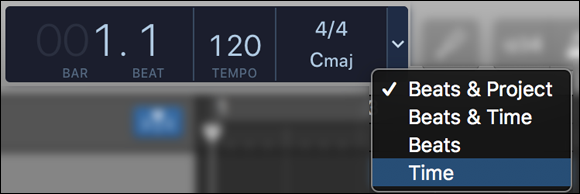
FIGURE 7-6: Select Time to measure in time.
Now you have a clean slate to start with. There’s just one more thing to check before you throw the switch, and that’s to confirm GarageBand knows where to get input from. Choose GarageBand ⇒ Preferences and click Audio/Midi at the top of the window that pops up. Check to make sure your Audio Input is selected correctly. The setting varies depending on your actual input (USB microphone, mixer, preamp, and so on). After that’s taken care of, close the window.
Return to your project window, click the big red Record button located at the top of the screen, and begin speaking. When you’re ready to stop, click the Stop button or the spacebar. Note, clicking the Record button again stops recording, but GarageBand continues playing.
Congratulations, you’ve made your first recording in GarageBand!
Getting started with Audacity
Audacity was meant to be simple. To record a podcast in Audacity, follow these simple steps:
Set your input.
At the top of the screen you can find a drop-down list with several choices — Line In, Microphone, and so on. Your settings depend on your system setup. Audacity is pretty good at detecting what inputs it can use on your system. Go ahead and pick the proper one. Just make sure that your microphone is plugged in before launching Audacity: Otherwise, it won’t know your mic exists.
Click the Record button.
Audacity creates a new track and begins recording. As you speak your words of wisdom to the world, you should see the meters moving and the waveform being created.
Audacity comes with a terrific function called Noise Reduction which digitally attempts to identify the offending noise and remove it from the recording. To do this effectively and efficiently, though, Audacity needs to have a clean sample of the room’s natural audio, called an audio floor or noise floor in professional settings. Record 5 to 10 seconds of your recording environment, either at the beginning or end of your recording. Hit Record and leave the mics open but say nothing for a chunk of time, and that is the sample of your room noise. Use this clip when you are working with the audio in post, and Audacity’s Noise Reduction asks for a sample of the background noise you want to eliminate.Click the Stop button.
When you’re done, just click Stop.
Congratulations, you’ve made your first recording using Audacity. Now you know why so many podcasters love it!
And just like that, you’re recording a podcast.