
Chapter 1. Introducing portals and portlets
- An overview of portals and the Java portlet technology
- Installing and using Liferay Portal
- Setting up the Eclipse IDE and creating the project structure
- Developing a Hello World portlet
When the internet first came about, “content” reigned supreme. Then the “user experience” took over. If you’ve been an internet user for the last couple of years, this transformation didn’t go unnoticed. During this transformation, most websites got a facelift intended to enrich the user experience by providing user-customizable themes and features that allow users to control what content is presented and how it’s presented.
The lack of a standard approach and technology to address user-experience requirements, such as personalization, customization, and content aggregation in web applications, led to ad hoc ways of implementing these features. The result was maintenance nightmares, lost developer productivity, and longer turnaround time for incorporating new features. With the arrival of the Java portlet technology, this has changed. The Java portlet technology provides a standard approach to incorporating user-experience features in web applications.
The Java portlet technology isn’t a standalone technology, and using JSPs and servlets (along with portlets) in portal development is common. The Java portlet technology not only helps you quickly build a web portal but also provides service orchestration, in which distinct services can be integrated seamlessly at the user interface layer, allowing businesses to quickly adapt to changes.
This chapter will first introduce you to web portals and the portlet technology, and to the infrastructure you need to deploy a web portal that uses portlet technology. Most of the latter half of this chapter is dedicated to quickly getting started with Liferay Portal and setting up the Eclipse IDE. Towards the end of this chapter, you’ll see how to deploy a Hello World portlet on Liferay Portal.
The concepts behind portlets can be best understood through deploying example portlets on a portal server and adding them to a portal page. We use Liferay Portal in this book because of its ease of installation, intuitive interface, low memory footprint, and more importantly, you can download and use the Community Edition of Liferay Portal for free. This book touches upon some of the features of Liferay Portal at a high level, but it shouldn’t be considered a reference or user guide for Liferay Portal.
Note
Even though this book uses Liferay Portal for deploying and running portlets, the concepts covered in the book are generic and can be used for developing portlets for any Portlet 2.0–compliant portal server.
If you’re already familiar with the concepts behind portals and portlet technology, you may want to skim or skip this chapter. If you’re new to portlets, this chapter will give you a solid foundation for the rest of the book.
As portals and portlet technology go hand in hand, we’ll first look at what a web portal is and how portlets can be used to develop a web portal.
1.1. What is a portal?
Everyone who’s been using the internet knows something about portals. It’s not a new concept, but there was no formal definition until recently.
A portal is a collection of mini web applications, called portlets. A portal supports features like personalization, content aggregation, authentication, and customization. Portlets act as windowed web applications within the portal, and each window in a portal web page (called a portal page) represents a portlet.
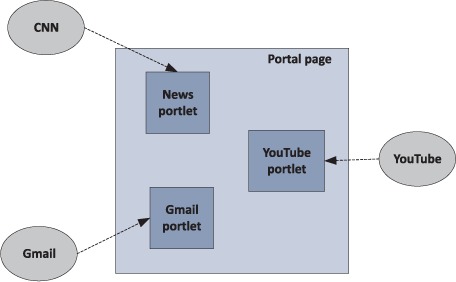
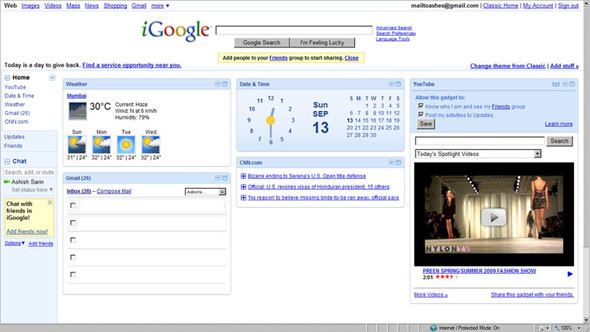
To get a feel for portals, you can visit the iGoogle portal (http://www.google.com/ig). Figure 1.1 shows the iGoogle portal home page after a user logs into it. You can see portlets showing emails from Gmail, headlines from CNN, content from YouTube, and so on. The portlets can be personalized by users to change the number of emails displayed in the portlet, the number of CNN headlines they want to view, the location they want to receive RSS feeds from, and so on. Users can drag and drop these portlet windows on the portal page to customize the way information is organized. They can also choose to add more portlets or remove one or more of them from the portal page.
Figure 1.1. The iGoogle home page containing portlets that show information from different sources: CNN, YouTube, Gmail, and so on. The portlets display the most relevant content and provide limited features to the user, in contrast to full-fledged web applications.

The take-away from figure 1.1 is that the user gets a unified view of information from different sources. This is similar to a TV showing different channels in distinct windows on the screen.
Note
I’ve referred to portlets as mini web applications because they provide limited information and features to the user compared to the original web applications they represent. For example, in figure 1.1, the Gmail portlet displays email and provides options to compose or delete emails, but it doesn’t provide an option to add emails to your tasks list, which is provided by the original Gmail web application.
The core business functionality provided by a portal is no different from what a set of distinct web applications would provide. In figure 1.1, the content (information or service) provided by the Gmail, YouTube, and CNN portlets is also provided by the Gmail, CNN, and YouTube applications.
But if the business functionality remains the same, what’s the business value in creating a portal? In figure 1.1, the information displayed to the user comes from disparate data sources (as depicted in figure 1.2), and the portal aggregates the information to provide a consolidated view to the user.
Figure 1.2. Portals aggregate content from different information sources. The portlets on the iGoogle portal page generate content for the page by retrieving information from the CNN, YouTube, and Gmail applications.
The use of portals to aggregate content from different sources results in increased efficiency for the user, and an enriched user experience, because the user doesn’t need to go to distinct web applications to access the content. In figure 1.2, the portlets on the iGoogle portal page display the most frequently accessed information or features from the applications they represent.
Note
Developing a web portal makes good business sense if you need to gather and present information from various data sources, applications, and systems to users based on their identity. It’s expected that the user experience will be enhanced by a single point of entry to the information, and by the flexibility to customize and personalize the information that’s provided.
Now that you know about portals, let’s take a look at the benefits of using portals, compared to web applications, for content aggregation and personalization.
1.2. Benefits of web portals
Web portals provide benefits beyond those of a group of distinct web applications that serve content. In this section, we’ll look at how end users access content from different information sources using distinct web applications, and how web portals and web applications can coexist to take the user experience to new heights.
For instance, a user might access content from different sources by directly accessing different web applications, or by accessing those web applications from an intranet website, or by using a combination of web portals and web applications.
1.2.1. Enriched user experience
Let’s say that as an employee of an organization you need to frequently access organization-specific business-to-employee (B2E) applications (like time card, help desk, knowledge management, and service request applications) so you can keep track of missing time cards, recently published articles, closed help desk tickets, and so on. These different web applications have their own data sources, and you’d usually need to go to each of these different applications to access this information. This interaction between employee and B2E applications is represented in figure 1.3.
Figure 1.3. In this scenario, the user interacts with multiple web applications to access content. A separate web application exists to access content from each of the distinct sources of information.
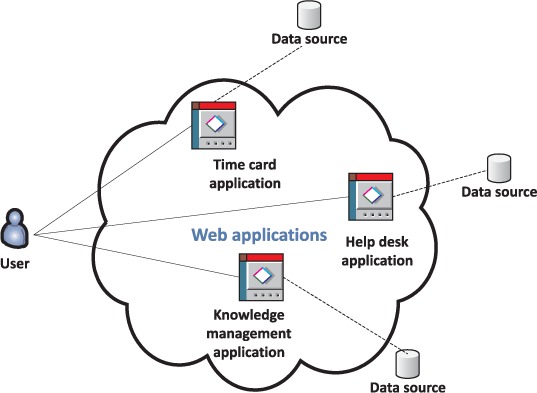
This isn’t an optimal way of accessing information and services, because you need to go to different web applications and authenticate each time. An intranet site that provides a single sign-on feature and access to all these different applications would be a better solution.
Suppose the organization takes a step ahead and provides a single sign-on solution and access to the different web applications from an intranet site, as represented in figure 1.4. By providing the single sign-on feature, the organization has provided easy access to the B2E applications, but you still need to filter the information that interests you. For example, if you’re interested only in automobile-related articles, you’ll have to search for the articles in the knowledge management application; if you’re only interested in your open help desk tickets, you’ll need to search for them in the help desk application; and so on.
Figure 1.4. The organization’s intranet makes it easy for users to access different web applications by redirecting users to the original web applications. In this scenario, the user is still interacting with individual web applications for information and services.

These individual B2E applications may provide some level of personalization and customization based on your identity and preferences, but this approach still fails to provide a unified view of information and easy access to services offered by different B2E applications. For instance, you still need to go to the help desk application to access its information and services.
The ideal scenario for an employee is to view information and access the most commonly used services from distinct B2E applications in a single application. This scenario is represented in figure 1.5 and is achieved using intranet portals. Here, the user mostly interacts with the portal, and in some cases also with the original web application. For instance, the portal directs the user to the knowledge management web application if certain features or details are requested by the user.
Figure 1.5. The organization’s intranet portal gathers content from different data sources, which means that users don’t need to access different web applications for information or services. In figure 1.4, the intranet website simply redirected users to the original web applications, but when using portals, the user is taken to the original web application only if little-accessed information or services are requested by the user.

Usually, portals provide users with the most-used features of the original web application, and when less-used features are requested, the portal redirects the user to the original application. The portal may not even display the least-used features but may instead provide an option to visit the original application.
Some of the web portal’s functionality may be built into the portal itself, so that no external web applications or systems are involved. For instance, if you don’t have a separate content management system available, you could develop it as part of your web portal.
Note
The design of existing systems greatly affects how quickly a business can start using portals. In figure 1.5, information for the knowledge management and time card applications comes from the databases that were used by these applications, which requires rewriting the business logic. In contrast, the help desk application’s business logic is accessed using Web Services because the application was designed as a set of services that can be reused by other applications—a service-oriented architecture (SOA) approach. It’s recommended that applications make use of SOA internally, because it allows you to expose business functionality as a service in the future, saving you the effort of redoing the business logic.
Portlets in a web portal provide limited content compared to the dedicated web applications they represent, which means portals have to be used along with web applications to provide content to the user.
Portals aren’t a replacement for web applications but are meant to extend the functionality of existing web applications. Portals gather relevant content from the existing information systems and display it to users based on their identity and preferences. When certain information or features are requested by the user, the portal redirects the users to the original web applications.
1.2.2. Unified information view
Web applications generally target a part of the business process and not the complete business. For example, there would be separate web applications for customer management, inventory, order processing, and so on. These web applications give a disjointed view of the business, because the inventory application doesn’t know about orders placed, and the customer management application doesn’t know about the inventory status.
These web applications don’t need to know about information managed by other web applications, but a business user might need a unified view of the business. A web portal can bridge the information gap between these individual web applications by bringing information together from the different data sources used by these web applications, and presenting it to a business user, providing the unified view that’s required.
The portlets in a web portal are dynamic, and they may interact with each other to show relevant information in response to user actions. For instance, in a Weather portal (which contains Location and Weather portlets), if a user selects a city from the Location portlet, the Weather portlet updates the content to display the weather forecast for the selected city. In contrast, web applications communicate with each other using databases or messaging middleware. The result of such communication isn’t immediately visible and requires users to access the web applications separately to view the effects of the communicated information.
Portals aren’t the answer to every business requirement; organizations should consider carefully whether there is a business case for developing a portal. If the business requirement doesn’t require gathering content from distinct information systems to loosely integrate disparate systems, the business should consider developing independent web applications to meet the business requirement.
The personalization and customization features of portals are important from the user’s perspective. From the business’s perspective, the most important requirement to consider is content aggregation.
A portal consists of multiple portal pages, just as web applications consist of multiple web pages. The only way content can be added to a portal page is via portlets.
1.3. What is a portlet?
A portlet is a pluggable user interface component that provides specific content, which could be a service or information from existing information systems. Portlets provide the user interface of the portal by accessing distinct applications, systems, or data sources and generating markup fragments to present their content to portal users. Some examples of portlets are a Weather portlet that provides weather information for a city by accessing a Yahoo! Weather RSS feed, or a Help Desk portlet that displays the pending help desk tickets from a database.
The primary responsibility of a portlet is to generate a markup fragment (such as HTML, XML, or WML), which is then displayed on a portal page within a window, called a portlet window. A portal page usually displays multiple portlets in distinct portlet windows, each with its own title and set of buttons to change its look and feel, set its preferences, and maximize, minimize, or remove the window.
Figure 1.6 shows what a portlet window looks like when rendered on a portal page. The options available for a portlet, such as changing window state, preferences, and configuration, may vary based on the user’s permissions and the configuration of the portlet in the portal.
Figure 1.6. An Articles portlet with buttons to configure, minimize, maximize, and close the portlet window. The options shown for a portlet will vary depending upon its configuration and the user’s access permissions.

Portlets are pluggable user interface components, which means a portlet is responsible for generating the user interface specific to that component, unlike servlets, where the user interface isn’t componentized. So what makes portlets pluggable user interface components?
A portlet generates a markup fragment, and not the complete portal page. The responsibility of displaying the complete portal page rests with the portal server, which aggregates fragments generated by portlets and displays them in the portlet windows on the portal page. This division of responsibility makes it possible for a portlet to focus on generating its own user interface.
Like any software component, portlets can be combined with other portlets to create a web portal, bringing pluggability to the user interface. For instance, a News portlet that shows news from the CNN website can be used in any web portal that intends to show news from CNN.
Note
A web application that contains portlets is referred as a portlet application. In the rest of the book, I’ll use web application to refer to applications consisting of servlets and JSPs and portlet application to refer to a web application consisting of portlets (which may also contain servlets and JSPs). A portlet application usually also contains servlets and JSPs.
Portlets generate user interfaces and so do servlets. It’s possible to create a web portal using Java servlet technology, but there are limitations. In the next section, we’ll look at the reasons for choosing portlets over servlets and widgets or gadgets. We’ll also look at why portlets are best suited for creating mashups.
The two versions of the Java Portlet Specification that currently exist are 1.0 (described by JSR 168) and 2.0 (described by JSR 286). The 2.0 specification addresses most of the frequently required features of portlets that were missing from the 1.0 specification, such as resource serving (discussed in chapter 12), inter-portlet communication (chapter 11), and portlet filters (chapter 13). Most portlet containers support both specifications, and the 2.0 specification is backward compatible with the 1.0 specification.
1.4. Why use portlets?
In the service-oriented architecture (SOA), service orchestration (or collaboration) makes it possible to develop applications from existing services. As portlets represent services and are pluggable components, you can get plug and play behavior using portlets. Because portlets can interact with each other at the user interface layer (a process referred to as inter-portlet communication), they play a crucial role in developing SOA applications.
If the services represented by portlets in a portal need to interact with each other to orchestrate a service, the portlets need to communicate. The portlet specification enables this inter-portlet communication using events and public render parameters. The portlet container is responsible for handling the communication between portlets, keeping communicating portlets and the distinct services they represent independent of each other.
Note
The integration between services is only at the presentation layer; services don’t interact directly with each other, but through the presentation layer provided by the portlets.
One of the most important features of portlets is inter-portlet communication, which is built into the portlet architecture.
1.4.1. Inter-portlet communication vs. inter-servlet communication
Inter-portlet communication makes it possible to develop web portals in which portlets can update their content based on actions taken by users in other portlets.
Let’s say there are three portlets:
- Location portlet— Allows users to search for and select a city
- Weather portlet— Provides weather information service for a city
- Businesses portlet— Provides information about businesses in a city
The location, weather, and businesses services are distinct services, and each of the portlets wrapping these services generates a user interface specific to the service, as shown in figure 1.7. For instance, the Location portlet will generate a user interface that allows users to search for and select a city, and the Businesses portlet will display information about a business based on predefined categories. The Location portlet can interact with the Weather and Businesses portlets via the inter-portlet communication mechanisms provided by the portlet container, resulting in seamless integration of the services.
Figure 1.7. The Location, Businesses, and Weather portlets interact with each other. The city information is passed from the Location portlet to the other portlets using the inter-portlet communication mechanism, resulting in seamless integration of the services represented by the portlets.

Servlets generate complete web pages, not markup fragments, and they can’t work in collaboration with other servlets to generate a complete web page. A servlet can be designed to encapsulate a service, but it will be a standalone service because the web container doesn’t allow communication between servlets unless they’re directly dependent upon each other.
Let’s now look at how widgets compare to portlets.
1.4.2. Portlets vs. widgets
Widgets (commonly also called gadgets) are similar to Java portlets in the sense that they’re used to aggregate content from distinct data sources on a web page, and they provide some level of personalization of content and behavior. You can quickly develop a widget if you know JavaScript and XML; there’s a steeper learning curve involved with the Java portlet technology.
Portlets, in contrast, are well suited for medium to complex application requirements, which are often seen in enterprise portals. Portlets provide a sophisticated API to standardize inter-portlet communication, request processing, and server-side session management. The portal infrastructure, which includes a portlet container and portal server, provides portlet instance lifecycle management, instance pooling, content caching, security, a consistent look and feel, and single sign-on features to your web portal.
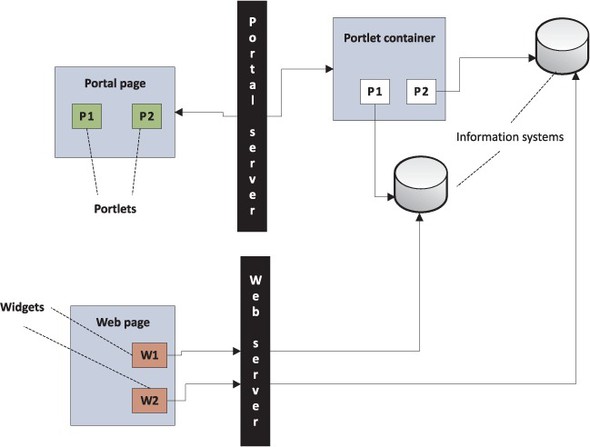
It is important to note that widgets in a web page typically interact directly with information systems to generate their content. The web page shows aggregated content because it contains different widgets, which interact with different information systems, so no special mechanism is employed by a web page containing widgets to show aggregated content. In contrast, a portal server aggregates content generated by portlets to form a portal page.
Figure 1.8 highlights the difference in how aggregated content is displayed using widgets and portlets. It shows a portal page containing portlets P1 and P2 and a web page containing widgets W1 and W2. The portal page is generated by the portal server after aggregating content generated by the portlets. The web page doesn’t need any special mechanism to show aggregated content because W1 and W2 generate their content by directly interacting with their information systems.
Figure 1.8. A portal server aggregates content generated by different portlets to form a portal page. Widgets in a web page interact with different information systems to obtain their content.
If you’re using portlets, that doesn’t mean you can’t use widgets in your web portal. Portal servers like Liferay Portal and WebSphere Portal, provide built-in portlets that integrate with Google gadgets to provide access to the services offered by the gadgets.
Note
With the use of portlet bridges, which we’ll discuss in chapter 14, you can also develop portlets as web applications, using well-established frameworks like Spring MVC, JSF, Wicket, and Struts, without learning portlet technology.
Let’s now look at what a mashup is and how portlets can be used to create mashups.
1.4.3. Creating mashups
A mashup is an application that uses data or services from distinct sources and combines them to produce a new user service. Portlets can be used to create mashups by aggregating data from different data sources and combining it.
An important distinction between mashups and portals is that portals don’t really combine information from different sources to provide a new user service; instead they show information from different sources in different portlets. Mashups, on the other hand, combine information to provide a new service. An application that searches several different shopping engines to find the lowest price for a product is an example of a mashup.
Because portlets are responsible for interacting with data sources to provide information to users, you can create portlets that interact with multiple data sources, and combine the data to provide a new service to the user. Additionally, users can specify preferences about the data source or the type of information they’re interested in, resulting in a personalized mashup.
Now that you know what a portal is and how portlets provide content for a portal, let’s see what’s involved in deploying portals.
1.5. Portal infrastructure
When creating web applications using servlets, the web container provides the environment that manages the servlet and the web server is responsible for serving web pages to the web browser. Similarly, portlets are managed by the portlet container, and the portal server is responsible for serving portal pages to the web browser. The portlet container and portal server together form part of the portal infrastructure required for deploying web portals.
Let’s look at the portal server and portlet container features in detail and at how they work together to deliver content.
1.5.1. The portlet container
A portlet on a portal page is represented by a portlet instance inside the portlet container. Figure 1.9 shows the portal infrastructure components and how they fit together.
Figure 1.9. The portal infrastructure consists of a portal server and a portlet container. The portlet container manages the portlet instances and hands over the markup fragments generated by the portlets to the portal server. The portal server aggregates the markup fragments to create the portal page.

A portlet container’s responsibilities include managing portlet instances and sending the fragments generated by the portlets to the portal server for aggregation.
Lifecycle Management
The portlet container is responsible for invoking lifecycle methods on the portlet instances and providing them with the required runtime environment. A portlet container is an extension to a servlet container; it provides what a servlet container provides, and it additionally manages the portlet instances. The portlets access their runtime environment using the PortletContext object (similar to ServletContext), which allows portlets to share data with other portlets and with servlets in the same portlet application.
Portlet Portability
A portlet container must follow the requirements laid down by the Portlet 2.0 specification in order for portlets to be portable across portlet containers. Most portlet containers provide extensions to the base set of requirements detailed in the specification, and it’s the choice of the portlet developer whether to use such features or not. Using these extensions will make the portlets noncompliant with the specification, so they won’t be portable across different portlet containers. If you’re developing portlets targeted to a specific portlet container, and they don’t need to be portable, you should consider using container-specific extensions.
1.5.2. The portal server
The portal server is responsible for submitting user requests received from the portal page to the portlet container, and for aggregating responses generated by portlets to form the portal page. A portal server is responsible for generating the portal page, so the responsibility of providing a consistent look and feel for the portal lies with the portal server.
Note
You can consider a portal server as a component that sits between the user requests from the portal page and the portlet container.
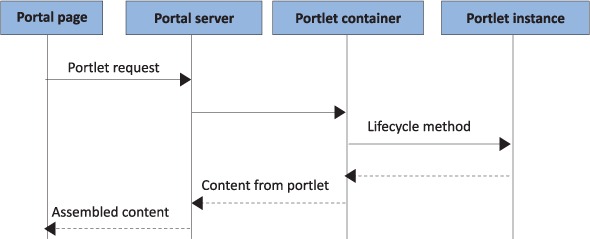
A portlet container isn’t responsible for generating the portal page; it hands over the content generated by the portlets to the portal server, which aggregates the content and displays the portal page. Figure 1.10 shows the interaction between portal page, portal server, portlet container, and portlet instance when handling a portlet request.
Figure 1.10. The portal server and portlet container roles in handling a portlet request. The portlet container is responsible for invoking lifecycle methods and handing over the portlet content to the portal server. The portal server assembles the content from different portlets to generate the portal page.
There are many open source portal servers (such as Liferay Portal and GateIn Portal) and commercial ones (such as IBM’s WebSphere Portal) that provide a wide range of features (administration, content management, search, single sign-on, and so on) to portal developers, making it easy to quickly set up a fully functional portal. The choice of portal server plays an important role in portal projects, because it can help you reduce the development time by providing built-in portlets, integration with external systems (LDAP, SAP, and so on), and the ability to access portal server functionality from your custom portlets.
Choosing a Portal Server
A portal server’s biggest assets are the built-in portlets that it provides. The choice of a portal server should be driven by comparing your portal requirements with the features that are provided out of the box by the various portal servers. For instance, if your portal requires a discussion forum, a document library, and announcements, you should evaluate portal servers based on whether they have built-in portlets for these functions.
The requirements of a portal may change over a period of time as business requirements evolve, and it may be difficult to implement certain functions that weren’t considered when selecting the portal server. To take care of such scenarios, you should also consider how easy it is to customize the behavior and information displayed by the built-in portlets, and whether portlets can access the portal server’s features (document storage facility, workflow services, and so on) to address new business requirements.
Now that you have some understanding of portals and portlet technology, let’s install and use Liferay Portal.
Note
If you prefer to use GateIn Portal for developing and deploying portlets, please refer to appendix A for details on how to install and use that portal server. Separate source directories have also been provided, containing examples tailored for deployment on GateIn Portal. You’ll find that there’s hardly any difference in the example code for GateIn and Liferay. The examples for GateIn Portal contain a README.TXT file that highlights the changes that were made to the configuration or source code to adapt Liferay Portal examples to work on GateIn Portal.
1.6. Getting started with Liferay Portal
Regardless of which portal server you’re using, the basic steps for creating a portlet and setting it into action are the same:
1. Install the portal server and portlet container. In most cases, the portlet container and portal server are packaged together as a single component.
2. Create portal pages, which you can think of as blank web pages with no content.
3. Set up your favorite IDE to create a portlet application project.
4. Write a portlet class that contains the logic to generate the markup fragment.
5. Create portlet configuration files to register the portlet with the portal server.
6. Create a portlet deployment descriptor.
7. Package portlets in a WAR file using a build tool like Ant or Maven.
8. Deploy the portlet WAR file on the portal server.
9. Add portlets to the portal page.
In this section, we’ll cover steps 1 and 2. You’ll see how to install Liferay Portal (Community Edition), and we’ll cover some of the basic Liferay Portal features. You’ll create a portal page called “My Home Page” (which you’ll later add portlets to).
Step 3 is covered in section 1.7, and steps 4–9 are covered in section 1.8. If you already have a portal server installed and your favorite IDE configured, you can go directly to section 1.8 to learn how to create a simple Hello World portlet.
1.6.1. Installing Liferay Portal 6.x
Liferay Portal comes prepackaged with widely used application servers like Glassfish, JBoss, and Tomcat. In this book, we’ll be using Liferay Portal with Apache Tomcat, which is a lightweight application server that’s easy to install.
You can download the bundle containing Liferay Portal and Tomcat from the Liferay Portal website (http://www.liferay.com/downloads/liferay-portal/available-releases), which maintains a list of all the downloadable versions of Liferay Portal. Download the zip file with the name Liferay-portal-tomcat-6.x, which means Liferay Portal version 6.x bundled with Tomcat.
Installing the prepackaged bundle involves unzipping the downloaded file in a local directory. This will result in a single directory, liferay-portal-6.x (which we’ll refer to as LIFERAY_HOME).
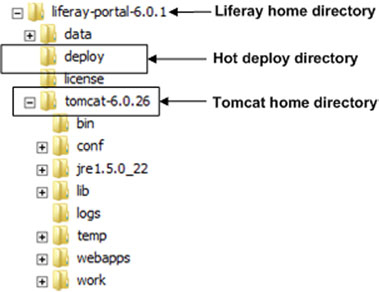
You should familiarize yourself with the two most important directories inside LIFERAY_HOME (both of which are shown in figure 1.11):
- deploy— This directory is used for hot deployment of portlets. If you copy your portlet WAR file into the deploy folder while the server’s running, the server hot deploys the portlets, which saves you the time of restarting the server to deploy portlets.
- tomcat-6.x— This is the Tomcat application server directory, which contains startup and shutdown scripts for the application server. Because Liferay Portal runs on top of the application server, you need to run the Tomcat server’s startup script to use Liferay Portal.
Figure 1.11. The directory structure for the Liferay-Tomcat prepackaged bundle. The deploy directory is the hot deployment directory, and tomcat-6.0.26 is the Tomcat home directory.
All portal servers (such as GateIn Portal, Liferay Portal, and WebSphere Portal) come with their own internal database, which contains the initial configuration data required by the portal server, the portal user information, the portlet preferences, and a lot more. As you add users, portlets, portlet preferences, and web content to your portal, the information is saved in the portal’s database. By default, Liferay Portal comes with an embedded HSQLDB database, which is lightweight and has a small memory footprint. HSQLDB isn’t meant to be used in production and is ideally suited for development purposes only. If you’re planning to use HSQLDB for development purposes (where multiple developers need to access the same HSQLDB database instance), running the HSQLDB in server mode is recommended. For more information regarding HSQLDB, see the HSQLDB website (www.hsqldb.org).
Before running the portal server, check that Java SE 5 or later is installed on your system and that the JAVA_HOME environment variable is set to the installation directory of Java SE 5. Verify that the installation is correct by running the startup.bat (on Windows) or startup.sh (on UNIX) script in the LIFERAY_HOME/tomcat-6.0.26/bin directory.
It may take some time for the server to start the first time, because Liferay Portal creates its internal database and populates it with the setup data required to use the sample application that comes with it. This only happens the first time it’s run; after this, the server startup is faster.
If the server startup is clean—without errors—the server will start up the system’s default browser and open the Liferay Portal home page. You can also directly access the Liferay Portal home page at http://localhost:8080 using your favorite browser. If you see the Liferay Portal home page (shown in figure 1.12), it indicates that you have successfully installed Liferay Portal.
Figure 1.12. The Liferay Portal home page shows information about the portal server along with information about the sample website and the preconfigured users.

Once the server starts, you can start playing around with the sample application that comes with the Liferay Portal installation.
Liferay Portal provides a feature-rich, intuitive administrator user interface for adding users, organizations, and roles; associating roles to users; adding portlets; creating portal pages; and so on. The next few sections will familiarize you with some of these management capabilities.
1.6.2. Registering users with Liferay Portal
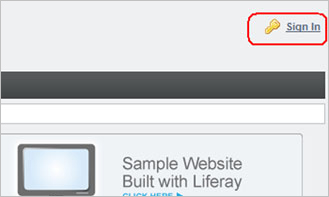
A guest user (an unauthenticated user) in Liferay Portal will see an option to sign in at the top-right corner of the home page, as shown in figure 1.13.
Figure 1.13. The Sign In option on the Liferay Portal home page
Clicking on the Sign In option will display a Sign In page. Because you don’t have an account with Liferay Portal when you access it for the first time, you can select the Create Account option (as shown in figure 1.14).
Figure 1.14. The Create Account option is for creating a user account with Liferay Portal
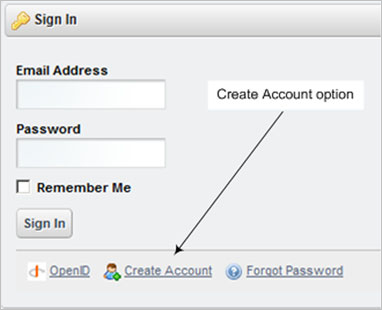
You can create an account by entering all the information that’s asked for. If the account is created successfully, Liferay Portal displays a success message along with the initial password assigned to the newly created user. Use the newly created userid (which is your email ID) and password to log in to the portal.
Let’s now look at how you can create a public portal page in Liferay Portal.
1.6.3. Creating a public portal page in Liferay Portal
Once you log in to Liferay Portal, it shows you a dockbar, which offers options available to an authenticated user, as shown in figure 1.15.
Figure 1.15. Authenticated users can do more things than unauthenticated users in Liferay Portal, such as changing their account settings and managing their public and private portal pages.

The Manage > Control Panel option allows authenticated users to manage their account and create public or private portal pages. A public page is accessible to all users (including anonymous users) of the portal, and a private page is accessible only to the logged-in user who created the private page.
A private page may be created by the user, or it may be set up for the user by the portal administrator. An example of a private page set up by an administrator is the iGoogle home page that a user sees after logging in, as shown in figure 1.16. (Figure 1.1, earlier in this chapter, showed a customized portal page with additional portlets.)
Figure 1.16. The iGoogle home page that users see when they log in. By default, the portal page has preconfigured portlets in it, which users can customize or personalize. A user-customized version of the iGoogle home page was shown in figure 1.1.
The content of a private page can be customized or personalized by the user. Similarly, a user who creates a public page can customize or personalize the page, and the changes will be visible to other users of the portal.
To view the public and private pages set up by an administrator or created by you, select Manage > Control Panel from the dockbar (see figure 1.15). The Control Panel page shows My Account, My Pages, and other options. Figure 1.17 shows the information displayed when the user selects the My Pages option.
Figure 1.17. The My Pages option allows you to manage your public and private pages. The page information is displayed in a tree structure. You also have the option to create new pages for the portal.
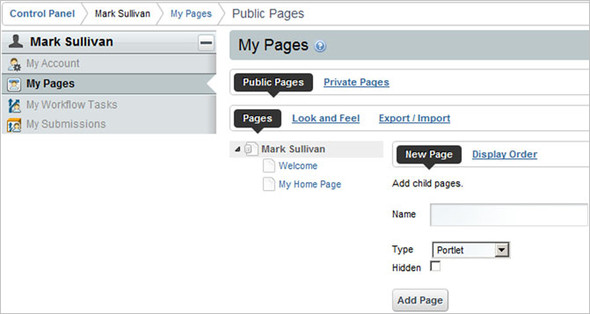
The Public Pages and Private Pages options provide information about the user’s public and private pages. As you can see in figure 1.17, a public Welcome page already exists by default. By default, Liferay Portal creates public and private Welcome pages for each user.
To create a new public page named “My Home Page,” enter My Home Page in the Name field of the form shown in figure 1.17. Keep the Type as Portlet and leave the Hidden check box unchecked. The newly created public page will appear in the list of public pages, as shown in figure 1.17. Now you’re ready to look at your newly created portal page and add portlets to it.
The dockbar of Liferay Portal provides an option to visit your public and private pages, as shown in figure 1.18. To view public pages, select Go To > My Public Pages.
Figure 1.18. The My Public Pages and My Private Pages options allow users to access the public and private portal pages associated with the organizations that the user has access to.

You’ll see a My Home Page tab in the Liferay Portal header, along with a Welcome tab, when you first visit your public portal pages. My Home Page will appear completely blank at the beginning, because no content has been added to it.
Let’s now see how you can add a portlet to My Home Page.
1.6.4. Adding portlets to a Liferay Portal page
Liferay Portal comes with many built-in portlets that can help you quickly create your own portal pages. To add a portlet, use the dockbar menus and select Add > More under the Applications category, as shown in figure 1.19. Liferay Portal will display a list of portlets registered in Liferay Portal, organized by category (Collaboration, Community, Content Management, News, and so on). Portal administrators can create new portlet categories and add portlets to it, or add portlets to existing portlet categories.
Figure 1.19. The More option in the Applications category allows authenticated users to add portlets to a portal page. Users can add portlets to portal pages only if they have permission to do so. By default, users can add or remove portlets from portal pages they created.
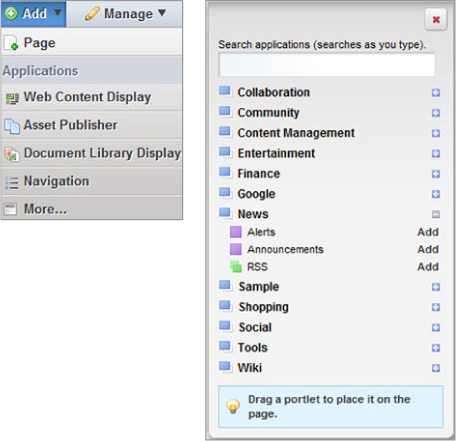
Adding a portlet to a portal page in Liferay Portal is easy: drag and drop a portlet from the list shown in figure 1.19, or click the Add link next to the portlet in the list. To see how this works, add the RSS portlet from the News category to the My Home Page portal page, which by default shows news from Yahoo.
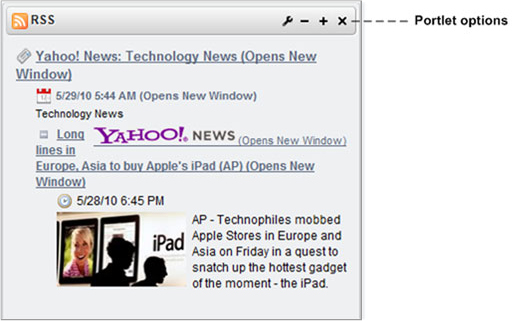
Once you have added the RSS portlet to the My Home Page portal page, you’ll see options to customize the portlet content (to change its look and feel, and to change the location of RSS feeds), to change permissions, and to minimize, maximize, or remove the portlet from the page. The portlet options available to a user depend upon the user’s role and associated permissions. Figure 1.20 shows the options for the newly added RSS portlet.
Figure 1.20. In most cases, portlets you add will have configure, minimize, maximize, and close options for customizing the portlet. The availability of these options depends upon the design of the portlet and the access permissions of the user.
Let’s now look at some of the roles defined in Liferay Portal and their associated permissions.
1.6.5. Roles and permissions in Liferay Portal
In Liferay Portal, the default roles associated with authenticated users are User and Power User, and the default role associated with unauthenticated users is Guest. A Power User role simply indicates that the user has the privileges to create public and private portal pages.
Liferay Portal administrators can create new roles and manage permissions associated with these roles based on the business requirements of the web portal. Adding a portlet to a public portal page allows unauthenticated users—users with the Guest role—to view that page and its portlets, unless the permissions for the portlet don’t allow unauthenticated users to view it. For example, if a guest user wants to view the public My Home Page, they could do so using the following URL:
http://<host-name>:<port-number>/web/<users-screen-name>/<portal-page-name>
For example, if you try to access My Home Page without authenticating with Liferay Portal, the URL will be
http://localhost:8080/web/mark123/my-home-page
In this URL, mark123 is the screen name of the user whose public portal page you want to view, and my-home-page is the name of the public portal page.
Note
To create portal page URLs, Liferay Portal converts the page names to lowercase and replaces spaces between words with hyphens, so the name of the My Home Page portal page becomes my-home-page.
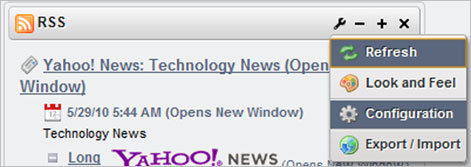
When guest users view My Home Page, they don’t by default have permission to customize the portlet, but they can view its contents. To prevent guest users from viewing the portlet, select the Configuration option for the portlet (as shown in figure 1.21) and select the Permissions option.
Figure 1.21. The Configuration option for portlets in Liferay Portal allows you to set the access permissions for the portlet.
The Permissions table (shown in figure 1.22) shows that the Guest role has View permission but not Configuration permission for the RSS portlet, which means Guest users can view the content of the portlet but can’t customize the portlet’s content, look and feel, permissions, and so on. Uncheck the View permission for the Guest user, and click the Save button. If you now go to My Home Page (http://localhost:8080/web/mark123/my-home-page) as a Guest user, you’ll receive a message indicating that you don’t have the role required to access the portlet.
Figure 1.22. Permissions assigned to the RSS portlet. View permission allows the user to view the content generated by the portlet, and Configuration permission allows the user to configure the portlet’s look and feel and permissions.

Now that you’ve installed Liferay Portal and created a portal page, it’s time to set up the development environment for creating portlets.
1.7. Setting up the development environment
In this section, you’ll learn how to set up the development environment and see the structure of the ch1_HelloWorld Eclipse project in the book’s source code. The configuration steps described in this section will help you quickly build, deploy, and debug the example portlets that accompany this book. If you’re using Eclipse IDE, the setup described here should be sufficient to quickly get you started with developing your own portal project.
1.7.1. Configuring Eclipse IDE
First you need to download the Eclipse IDE for Java EE Developers from www.eclipse.org. Installing the Eclipse IDE is a simple matter of unzipping the contents of the downloaded zip file to a directory.
Note
Eclipse Galileo was used during the writing of this book, but the steps described in this section are also applicable to the Eclipse Helios IDE.
Now import the ch1_HelloWorld Eclipse project, which accompanies this book. To import an existing Eclipse project, select the File > Import menu option and select the Existing Projects into Workspace option under the General category.
The ch1_HelloWorld project contains the Hello World portlet class, the configuration files, and the Ant buildfile. An Ant build tool comes bundled with Eclipse IDE, so you don’t need to separately download and install it.
To configure the Eclipse IDE to work with Liferay Portal (which you installed in section 1.6.1), you need to do the following:
1. Create a new server profile in Eclipse.
2. Specify the installation directory of the Tomcat server.
3. Configure the server.
You should also configure the Eclipse IDE to use JDK 5.0 or later and to check the source code for Java 5 compatibility, in order to work with the examples in this book. We’ll look at each of these steps in turn.
Creating a New Server Profile in Eclipse
Start by opening the Eclipse IDE’s Servers view by selecting Window > Show View > Servers. Right-click in the Servers view and choose the option to create a new server; this will open the New Server dialog box.
In the Define a New Server dialog box, shown in figure 1.23, select the version of Tomcat that your Liferay Portal bundle is using (the Tomcat version is 6.0.26 if you’re using Liferay Portal 6.x). Then click Next.
Figure 1.23. In the New Server dialog box, select the Tomcat version used by your Liferay Portal installation. If you’re using Liferay Portal 6.x, Tomcat v6.0 Server should be selected.

Specifying the Installation Directory of the Tomcat Server
The next step is to specify the installation directory of the Tomcat server, which I’ll refer to as TOMCAT_HOME in the rest of this chapter. In the Tomcat Server page of the New Server dialog box, shown in figure 1.24, specify the Tomcat installation directory and the JDK that you want to use for running the Tomcat server.
Figure 1.24. Specify the Tomcat home directory and the JDK for the server. The Tomcat home directory is located inside the Liferay Portal home directory.

It’s important to select an installed JDK as the value for the JRE option, to help with compilation of Java sources, debugging, and so on. To select JDK 1.5 or later, click the Installed JREs button and configure a JDK to use with the Eclipse IDE.
Click Finish to complete the server definition in Eclipse. If the server is successfully created, it will be displayed in the Servers view, as shown in figure 1.25.
Figure 1.25. The Servers view shows the newly created server definition in Eclipse.

Now, you’re ready to configure the server.
Configuring the Server
The newly created server needs to be configured so the ch1_HelloWorld project can be deployed on the Tomcat server and debugged at runtime.
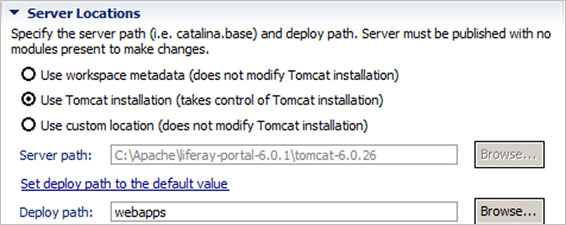
Select the server in the Servers view, right-click, and select Open, which shows the server configuration information. On the server configuration page, on the Server Locations tab, select Use Tomcat Installation (Takes Control of Tomcat Installation), and set Deploy Path to be webapps, as shown in figure 1.26.
Figure 1.26. On the Server Locations tab, the Use Tomcat Installation option must be selected, and the Deploy Path setting must be webapps, which corresponds to the webapps directory inside the Tomcat installation.
To ensure that enough memory is available to the server at runtime, click the Open Launch Configuration hyperlink in the General Information tab of the server configuration page to open the Edit Configuration dialog box, where you can edit the server launch configuration properties, and on the Arguments tab, add the following virtual memory arguments, as shown in figure 1.27:
Figure 1.27. Specifying additional virtual memory arguments in the launch configuration properties. If these additional arguments aren’t set, chances are good that you’ll get an out-of-memory error when you start Liferay Portal.

-Xms128m -Xmx512m -XX:MaxPermSize=256m
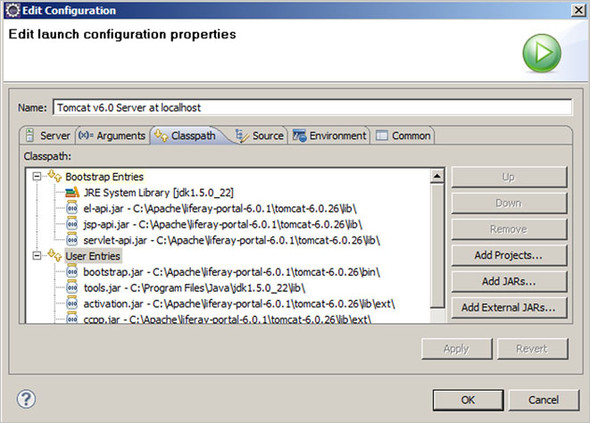
Next, select the Classpath tab, and add servlet-api.jar, el-api.jar, and jsp-api.jar to the Bootstrap Entries from the TOMCAT_HOMElib directory. Add all the JAR files from the TOMCAT_HOMElibext directory to User Entries, as shown in figure 1.28.
Figure 1.28. Adding libraries in the Edit Launch Configuration Properties page of the Edit Configuration dialog box. The libraries added here are used by Eclipse IDE to launch the server.
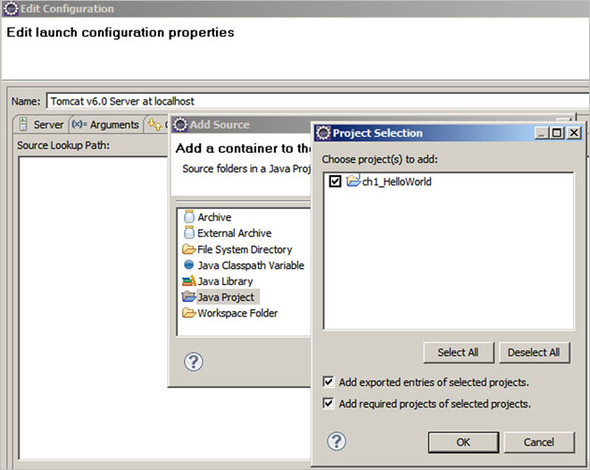
Select the Source tab and add the ch1_HelloWorld Java project that you imported into the Eclipse IDE at the beginning of this section (as shown in figure 1.29). You need to add the source so that you can debug the source code during development.
Figure 1.29. Adding the ch1_HelloWorld source in the Edit Launch Configuration Properties page of the Edit Configuration dialog box. This ensures that you can debug the source code.
If you start the server now, you’ll probably receive a timeout error because, by default, the server configuration in Eclipse expects the server to start within 45 seconds. Depending on your machine’s configuration, it may be possible for Tomcat to start within 45 seconds, but it’s safer to increase the startup and shutdown times for Tomcat server to around 180 seconds and 120 seconds respectively.
To increase the startup and shutdown times of the server, select the server in the Servers view, right-click, and select Open. This will show the server configuration page. Now, go to the server configuration and select the Timeouts tab, as shown in figure 1.30.
Figure 1.30. Specifying timeouts for the server. If the timeout has a lower time limit than it takes to start the portal server, an exception will be thrown during server startup.

To verify the setup, start the server and check if it starts cleanly and opens the home page of Liferay Portal.
Configuring Eclipse for JDK 5 or Later
The examples in this book make use of Java SE 5 features like annotations and generics, so your Eclipse IDE should be configured to use JDK 5.0 or later, and the source code compliance should be set to 5.0.
To configure the JDK that should be used by Eclipse IDE, select the Window > Preferences menu option. In the Preferences dialog box, select the Java > Installed JREs option from the list, as shown in figure 1.31.
Figure 1.31. The Installed JREs preference allows you to set the JDK that will be used by the Eclipse IDE for all projects. The Add button allows you to add a new JDK to the Eclipse IDE.

Figure 1.31 shows the JREs that are available to the Eclipse IDE. If JDK 5 or later is available in the list, make sure that it’s checked. If JDK 5 or later isn’t in the list, click the Add button to start the wizard for adding a new JDK.
Figure 1.32 shows the JRE Type page of the Add JRE wizard. Select the Standard VM option and click Next.
Figure 1.32. The Add JRE wizard will help you add a new JDK to the Eclipse IDE.

In the JRE Definition wizard page, select the home directory of the JDK that you want to add, as shown in figure 1.33. Click Finish to complete the process of adding a new JDK.
Figure 1.33. The Compiler preferences let you specify compliance level for source code and generated class files.

The newly added JDK will now be available in the list of installed JREs shown earlier in figure 1.31.
The examples in this book make use of Java SE 5 features, so you also need to instruct the Eclipse IDE to check the source code for compatibility with Java 5, and that the generated class files are compatible with Java 5.
Setting Source and Generated Class File Compliance
To set the compliance level for all the projects to Java 5, select the Window > Preferences menu option in the Eclipse IDE, and select the Compiler option, as shown in figure 1.34.
Figure 1.34. Specifying the home directory of the JDK you want to add to the Eclipse IDE

In figure 1.34, select 1.5 as the value for the Compiler Compliance Level, and select the Use Default Compliance Settings check box. Click OK to save the changes. This instructs Eclipse to ensure that the source code of Eclipse projects and their class files are Java 5 compatible.
Now it’s time to create a project structure in Eclipse, which will help organize your portlet project files.
1.7.2. Setting up the project structure
The project structure that we’ll discuss in this section is for the Hello World portlet application, but the structure is generic, and we’ll use the same structure in the rest of the book for other examples. You’ve already imported the ch1_HelloWorld Eclipse project in section 1.7.1. Figure 1.35 shows the project structure and some of the files that form the Hello World portlet application.
Figure 1.35. The ch1_HelloWorld project structure is a generic project structure that we’ll use consistently in this book for creating portlet applications.

The project structure presented here is generic and can be used in most portal projects with little or no modification. Let’s go through the directories in the project:
- src— Contains the source code of the project, which includes portlet and utility classes.
- test— An empty directory in which you can create your test classes for the project.
- build— The build directory is created when you first run the Ant build for the project. It contains the WAR file that’s generated when the project is built using Ant.
- css— Contains CSS files for the project to define the look and feel for the portlets. You can also use the look and feel feature provided by the portal server to change the look and feel of the portlet.
- images— Contains the images that are used by the portlets in the project.
- js— Contains the JavaScript files used by the portlet. Portlets may also make use of JavaScript libraries like DWR, Dojo, and jQuery, which are normally packaged in a JAR file and accessed directly by the portlets. In most cases, portlets consist of multiple pages of information, and the JavaScript may be required for creating HTML widgets on the fly or using Ajax.
- lib— Contains the JAR files required at build time but that don’t need to be packaged with the generated WAR file, such as JUnit and portlet JAR files. The JUnit JAR file is required to run unit tests at build time, and a portlet JAR file is required for compiling the portlet classes.
- WEB-INF/jsp— Contains the JSP files used in the project. We’ll be using JSP as the view technology in this book, but you can use other view technologies like Velocity and Facelets to create portlet pages.
- WEB-INF/lib— Contains JAR files required by the portlets at build time and at runtime.
With the development environment set up, it’s time to look at the different files in the Hello World portlet example.
1.8. The Hello World portlet example
We’re now ready to look at our first portlet application, which consists of a simple Hello World portlet, as shown in figure 1.36. This section will familiarize you with the Java source files and configuration files that are involved in a typical portlet application, how to deploy and undeploy a portlet, and how to use the Ant and Maven build tools.
Figure 1.36. A simple Hello World portlet that displays the message “Hello World” when added to a portal page

In the context of the Hello World portlet, you’ll learn how to perform the following activities:
- Create the necessary portlet files
- Build the portlet project using either Ant or Maven, and deploy the portlet application WAR file on the portal server
- Add the deployed portlet to a portal page
- Undeploy a portlet from the portal server
We’ll look at each of these in turn.
1.8.1. Creating a Hello World portlet
To create the Hello World portlet, you need the following files:
- HelloWorldPortlet class— This is the portlet class.
- portlet.xml file— This is the configuration file that defines settings for the portlet, like the portlet request handler (the portlet class), supported modes, supported locales, supported MIME types, and the resource bundle.
- Language-ext.properties file— This is the properties file used by the portlet to support localization. In the Hello World example, this file is used to specify the portlet title and to assign a category under which the Hello World portlet should be displayed in Liferay Portal (refer to figure 1.19).
- liferay-display.xml and liferay-portlet.xml files— These are Liferay Portal–specific configuration files for configuring the portlet. These files are optional and you aren’t required to provide them with your project’s WAR file. In this example, we’ll create these configuration files to keep things simple.
- web.xml file— This is a deployment descriptor for the web resources (like servlets), except for portlets.
If you’ve imported the ch1_HelloWorld project into your Eclipse workspace, these files will already exist; otherwise you’ll need to create them. But even if you imported the ch1_HelloWorld project and don’t need to create the files, it’s important that you understand their contents.
Note
If you want to develop the Hello World portlet using the Spring portlet MVC framework, you can jump directly to section 7.3 in chapter 7 to create the portlet files, and then return to this section to create the Liferay Portal–specific configuration files and build and deploy the portlet.
The Portlet Class
A portlet class must implement the javax.portlet.Portlet interface, directly or indirectly. The portlet API has a GenericPortlet abstract class that implements the Portlet interface and provides a default implementation for its methods. Developers will usually subclass the GenericPortlet class and override one or more methods to provide a specific implementation. The HelloWorldPortlet class is an example of a portlet class.
The portlet class requires Portlet 2.0 API classes and interfaces, so you should add the portlet.jar file, located in TOMCAT_HOMElibext, to the project’s classpath.
This listing shows the HelloWorldPortlet class.
Listing 1.1. The HelloWorldPortlet class

At ![]() , you import the classes needed to create the HelloWorldPortlet class. The HelloWorldPortlet class extends the GenericPortlet abstract class of the Portlet 2.0 API
, you import the classes needed to create the HelloWorldPortlet class. The HelloWorldPortlet class extends the GenericPortlet abstract class of the Portlet 2.0 API ![]() .
.
The HelloWorldPortlet class defines the sayHello method ![]() , which accepts javax.portlet.RenderRequest and javax.portlet.RenderResponse objects as parameters. The sayHello method writes the “Hello World” message to the output stream. The getWriter() method of RenderResponse is similar to the getWriter() method of HttpServletResponse, which returns a PrintWriter object. The PrintWriter object is used by the sayHello method to write the “Hello World” character data to the response.
, which accepts javax.portlet.RenderRequest and javax.portlet.RenderResponse objects as parameters. The sayHello method writes the “Hello World” message to the output stream. The getWriter() method of RenderResponse is similar to the getWriter() method of HttpServletResponse, which returns a PrintWriter object. The PrintWriter object is used by the sayHello method to write the “Hello World” character data to the response.
At ![]() , the @RenderMode annotation for the sayHello method informs the Java runtime that the sayHello method is the portlet’s render method in VIEW mode (we’ll come back to this in chapter 2).
, the @RenderMode annotation for the sayHello method informs the Java runtime that the sayHello method is the portlet’s render method in VIEW mode (we’ll come back to this in chapter 2).
Portlet Settings
The portlet.xml file contains portlet settings including portlet name, portlet class, supported locales, initialization parameters, and so on. The following listing shows the portlet.xml file for the Hello World portlet.
Listing 1.2. The portlet.xml file
<portlet-app
xmlns="http://java.sun.com/xml/ns/portlet/portlet-app_2_0.xsd"
xmlns:xsi="http://www.w3.org/2001/XMLSchema-instance" version="2.0"
xsi:schemaLocation="http://java.sun.com/xml/ns/portlet/portlet-app_2_0.xsd
http://java.sun.com/xml/ns/portlet/portlet-app_2_0.xsd">
  <portlet>
    <portlet-name>HelloWorldPortlet</portlet-name>
    <display-name>Hello world</display-name>
    <portlet-class>chapter01.code.listing.HelloWorldPortlet</portlet-class>
    <supports>
      <mime-type>text/html</mime-type>
      <portlet-mode>view</portlet-mode>
     </supports>
     <resource-bundle>content.Language-ext</resource-bundle>
  </portlet>
</portlet-app>
Here are some of the important elements of the portlet.xml file in listing 1.2:
- <portlet-app>— The root element of the portlet.xml file
- <portlet>— The element that defines a single portlet in the portlet application
- <portlet-class> —The fully qualified name of the portlet class
- <portlet-mode>— The supported portlet mode; possible values include VIEW, EDIT, and HELP (the value is case insensitive)
- <resource-bundle> —The resource bundle for the portlet
The Resource Bundle
The Language-ext.properties file is the resource bundle used by the Hello World portlet. The properties defined in the file include the following:
category.chapter01.helloWorld=Chapter 01 Portlets
javax.portlet.title=My Hello World portlet
Let’s look at these properties:
- category.chapter01.helloWorld— This specifies the name of the category under which the portlet is displayed by Liferay Portal (as illustrated in figure 1.19).
- javax.portlet.title— This specifies the title of the portlet. It’s important to note that only a property named javax.portlet.title in the portlet resource bundle is considered by the portlet container as a candidate for the portlet title.
Liferay Portal has a Language.properties file, located under the content directory in the portal-impl.jar file (which can be found in the {TOMCAT_HOME}webappsROOTWEB-INFlib directory), that defines the names of predefined categories in Liferay Portal (apart from labels, messages, and portlet titles). But if you don’t want to use the predefined categories or override the names of predefined categories, you can create a Language-ext.properties file and place it in the portlet’s classpath. To localize the category name, you can create other Language-ext files with a naming convention similar to the resource bundles. For example, the Language-ext_pt_BR.properties file would be used for the Portuguese language in Brazil.
Liferay Portal Category
The liferay-display.xml file allows you to specify the category under which you want the portlet to be displayed. The content of liferay-display.xml file is as follows:
<display>
    <category name="category.chapter01.helloWorld">
        <portlet id="HelloWorldPortlet" />
    </category>
 </display>
These are the most important elements of the liferay-display.xml file:
- <category>— The name attribute refers to a key in the Language-ext.properties file that identifies the category under which the portlet needs to be displayed (as illustrated in figure 1.19).
- <portlet>— The id attribute must be the name of a portlet, defined by the <portlet-name> element in the portlet.xml file.
Liferay Portal–Specific Features
The liferay-portlet.xml file allows you to configure Liferay Portal–specific features for the portlet. In Hello World, this file contains a liferay-portlet-app element, as follows:
<liferay-portlet-app>
    <portlet>
        <portlet-name>HelloWorldPortlet</portlet-name>
        <instanceable>true</instanceable>
        <remoteable>true</remoteable>
    </portlet>
 </liferay-portlet-app>
These are the important elements of the liferay-portlet.xml file:
- <portlet-name>— The name of the portlet as defined by the <portlet-name> element in the portlet.xml file.
- <instanceable>— If true, the same portlet can appear on a portal page more than once. The default value is false.
- <remoteable>true</remoteable>— If true, the portlet can be exposed as a remote portlet by a WSRP producer. We’ll discuss WSRP (Web Services for Remote Portlets) in detail in chapter 15.
Those are all the necessary files for the ch1_HelloWorld project. You’re now ready to build the project.
1.8.2. Building the Hello World project with Ant
The source code of this book can be built using either Ant or Maven. If you want to use Maven to build the examples, jump ahead to section 1.8.3.
The Ant Build Tool
Ant is an open source Java tool that provides a flexible and cross-platform build utility for Java projects. Ant makes use of an XML configuration file (called a buildfile), containing instructions about tasks to be performed while building the project.
The tasks in the buildfile may include cleaning output directories, compiling Java sources, copying files to appropriate directories, and creating a WAR file. These tasks are logically grouped into targets, which may depend on other targets. For instance, there can be a build target (which takes the Java classes and configuration files as inputs and creates a WAR file), and it is dependent upon the clean (which removes the class files from the output folder of the project) and compile (which compiles the Java source files and creates the corresponding class files in the output folder of the project) targets.
The following XML fragment shows how the build target is defined in an Ant buildfile:
<target name="compile">
    ...tasks to compile the source code
</target>
<target name="clean">
    ...tasks to remove the class files from the output folder
</target>
<target name="build" depends="clean,compile">
    ...tasks to create the WAR file
</target>
The depends attribute of a target element specifies the dependent targets. The execution order of targets in the depends attribute is important when creating a build file. In the preceding code fragment, the build target depends on the clean and compile targets, which instruct Ant to execute the clean target first, and then the compile target, before executing the build target.
A buildfile contains one project element and at least one target element. There are other useful elements like fileset (for defining a group of files), property (for defining properties, which may be read from an external properties file), and so on.
Ant targets contain tasks, which are like instructions in a program. The targets represent a program, and tasks represent programming instructions in that program. Examples of tasks are war (for creating a WAR file), delete (for deleting files), and copy (for copying files).
The Ant Build Script
The build.xml file is the Ant buildfile in our ch1_HelloWorld project, and it contains information on how to compile and build a WAR file from Java sources and other resources in the ch1_HelloWorld project. This listing shows the build target in ch1_HelloWorld’s build.xml file.
Listing 1.3. The build.xml file for Hello World

At ![]() , you define the project name and the default target to be used when no target is specified for running the build script.
, you define the project name and the default target to be used when no target is specified for running the build script.
In build.xml, it’s possible to define properties directly or to load properties from an external properties file. The build.xml
file defines a property with the name build.dir and value build ![]() . Line
. Line ![]() instructs the Ant build tool to load the build.properties file and use the properties defined in the file if the build.xml
file references them.
instructs the Ant build tool to load the build.properties file and use the properties defined in the file if the build.xml
file references them.
The build script specifies the creation of a WAR file named ch1_HelloWorld.war ![]() , and it specifies that the generated WAR file should be copied to {liferay.portal.home}/deploy
, and it specifies that the generated WAR file should be copied to {liferay.portal.home}/deploy ![]() , which refers to Liferay Portal’s hot deploy directory.
, which refers to Liferay Portal’s hot deploy directory.
The build.properties file in the Hello World project contains a single property that refers to the home directory of the Liferay Portal installation (LIFERAY_HOME):
liferay.portal.home=C:/liferay-portal-6.0.1
Note
Make sure that you edit the liferay.portal.home property in the build.properties file to point to the Liferay Portal installation directory or the build won’t work as expected.
Building the Hello World project requires you to add the necessary JAR files to the project’s lib directory and then to run the build Ant target in the build.xml file.
Adding JARs
The ch1_HelloWorld project’s build.xml file requires the portlet API classes to be available when the HelloWorldPortlet class is compiled. As discussed in section 1.7.2, the JAR files that are required at compilation time are copied to the lib directory (and not to the WEB-INFlib directory). You can copy portlet.jar from TOMCAT_HOMElib ext to the project’s lib directory.
Building the Project
Before you initiate the build process for ch1_HelloWorld, check that all the necessary JAR files are available in the project’s lib and WEB-INF/lib directories and that the liferay.portal.home property in the build.properties file refers to the Liferay Portal installation directory on your system.
To build the ch1_HelloWorld project, right-click on the build.xml file, choose Run As > Ant Build, and select the build target from the list of available targets, as shown in figure 1.37.
Figure 1.37. Ant targets defined in build.xml. The build target is selected by default. The compile and clean targets can also be executed separately, if you want to compile or clean the project.

The Ant build tool takes the following actions when the build target is executed:
1. It removes the generated WAR file from the build directory by executing the clean target.
2. It compiles the Java source to the WEB-INF/classes directory, creates a content directory, and copies the Language-ext.properties file to it. This is all done by executing the compile target.
3. It creates the WAR file in the build directory and copies the generated WAR file to LIFERAY_HOME/deploy (which is Liferay Portal’s hot deploy directory). This is done by executing the build target.
4. If your Liferay Portal is already running, the build target will hot deploy the Hello World portlet. If the server isn’t running, the portlet will be deployed when the server is started. At deployment time, the information from liferay-display.xml is used to register the portlet with Liferay Portal.
1.8.3. Building the Hello World project with Maven
The source code for each chapter also comes with a pom.xml file, which is meant for readers who want to build the source code using the Maven build tool. In this section, you’ll learn how to build source code using the Maven distribution. Keep in mind that when you’re using Maven, you need to ensure that you’re connected to the internet so you can download any JAR dependencies of projects and the Maven build tool.
Note
If you want to use the Maven Eclipse Plugin, please refer to the Apache Maven Project (http://maven.apache.org/eclipse-plugin.html).
If you don’t already have Maven installed, the first thing you need to do is download Maven from the Apache Maven Project website (http://maven.apache.org/download.html). The current version of Maven is 3.x, and we’ll use it as the reference for developing the Hello World portlet and other portlet examples in this book.
Once you’ve downloaded Maven, follow these steps to prepare for building the example source code:
1. Unzip the downloaded zip file into a directory.
2. Set the JAVA_HOME environment variable to point to your Java SE 5 installation directory.
3. Add Maven’s bin directory to the PATH environment variable.
You’re now ready to build the ch1_HelloWorld source code using Maven. You can either use the Maven Eclipse Plugin to build your project from within the Eclipse IDE, or you can use Maven from the command prompt to build the project. If you’re using Maven from command prompt, follow these steps:
1. Open a command prompt and go to the ch1_HelloWorld folder in your local filesystem. Make sure that the ch1_HelloWorld folder contains a pom.xml file.
2. Run the following command: mvn clean install.
When you execute the mvn clean install command, Maven looks for a pom.xml file in the current directory and kicks off the build process. During the build process, many artifacts are downloaded from the internet, including dependencies specified in the pom.xml file. If the build is successful, you’ll see a “BUILD SUCCESSFUL” message at the command prompt.
Successful execution of the Maven build process will generate a file named ch1_HelloWorld.war in the portlets-in-action subdirectory of the local Maven repository. The local Maven repository is a directory in your local file system where all the relevant artifacts and dependencies are downloaded by the Maven build tool. It’s identified as <user-home>/.m2/repository, where user-home is the home directory of the user. On UNIX this refers to the ~/.m2/repository directory and on a Windows machine this is usually C:Documents and Settings<yourUserName>.m2 epository.
To learn more about the Maven build tool, please refer to the Apache Maven Project website at http://maven.apache.org.
Let’s now add the Hello World portlet to a portal page.
1.8.4. Adding the Hello World portlet to a portal page
When a portlet is deployed in Liferay Portal 6.x, it isn’t immediately available to users. To make the newly added Hello World portlet available to authenticated users of Liferay Portal so that they can add it to their portal page, you must log in as administrator and grant Add to Page permission to the user. Let’s go step by step and grant Add to Page permission to the User role.
The Liferay Portal administrator can access all the portlets that are deployed in Liferay Portal. If you want to test the Hello World portlet without granting Add to Page permission to authenticated users, then log in as administrator, and add the Hello World portlet by going directly to the Add > More option under the Applications category (as shown earlier in figure 1.19).
Liferay Portal comes preconfigured with an administrator user, Bruno, as shown in figure 1.38.
Figure 1.38. Bruno is the default administrator of Liferay Portal. Click the Login as Bruno link to log in to Liferay Portal as the portal administrator.

Click the Login as Bruno link, as shown in figure 1.38, to access features that are only available to the Liferay Portal administrator. Once you’re logged in, the dockbar will show additional options that are available to the portal administrator. Select the Manage > Control Panel option from the dockbar, as shown in figure 1.39, to view the administrative features available.
Figure 1.39. The Control Panel provides administrative options, which include granting access to portlets to roles defined in Liferay Portal.
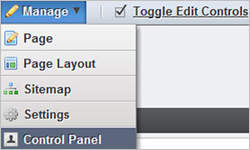
In the control panel, select the Roles option from the left navigation bar, as shown in figure 1.40. The Roles option lets you view existing roles in Liferay Portal, create roles, edit role permissions, and so on.
Figure 1.40. The Roles option lets the administrator view, edit, and create roles. The administrator can also modify permissions associated with different roles in the portal.

Because the User role is associated with authenticated users, you should provide the User role with permission to add the Hello World portlet to a portal page. To do so, select the Actions > Define Permissions option corresponding to the User role, as shown in figure 1.41.
Figure 1.41. The Define Permissions option lets a portal administrator define permissions for a role, including permission to add a portlet to a portal page.

Selecting the Define Permissions option displays the list of portlets currently deployed in Liferay Portal for which you can define permissions. Select the My Hello World Portlet from the Add Permissions drop-down list (under the Applications category), as shown in figure 1.42.
Figure 1.42. The Add Permissions drop-down list shows the portlets currently deployed in Liferay Portal under the Applications category. You can select the portlet for which you want to modify permissions.

Selecting My Hello World Portlet in figure 1.42 displays the permissions that can be specified for the portlet, as shown in figure 1.43.
Figure 1.43. Permissions defined for the My Hello World portlet. Add to Page permission allows a user to view and add portlets from the Add > More option (under the Applications category).

In figure 1.43, check the Add to Page check box to allow users with the User role to add My Hello World Portlet to a portal page. Save the permissions, and log out from Liferay Portal.
Now, if you log in with the account you created in section 1.6.2 and go to the My Home Page portal page, you’ll be able to view and add the My Hello World portlet, as shown in figure 1.44.
Figure 1.44. The My Hello World Portlet listed under the Chapter 01 Portlets category, and the Hello World portlet on the portal page

In figure 1.44, you can see that a new Chapter 01 Portlets category was added to the list of available categories. The title assigned to the Hello World portlet is shown under that category. When the Hello World portlet is added to the portal page, it shows the message “Hello World.”
The files that you created as part of this Hello World portlet are required for creating most portlets in real projects.
1.8.5. Undeploying a portlet application
In a typical web application scenario, removing the WAR file from the filesystem undeploys the web application. In the case of portlet applications, when you add a portlet to a portal page, the portlet instance information is saved to the portal’s internal database, which also needs to be cleaned up when undeploying.
To undeploy a portlet, you must first remove all the portlet instances from all portal pages by using the remove icon, as you saw in figure 1.6. In the case of Liferay Portal, when you remove the portlet from the portal page, the portlet instance information is also removed from the internal database. After removing the portlet instance from all the portal pages, you can delete the portlet application’s WAR file from the {TOMCAT_HOME}/webapps directory to undeploy the portlet application.
In this section, you saw how a typical portlet application is developed, built using Maven or Ant, deployed on a portal server, and added to a portal page. We also touched upon some Liferay Portal–specific configurations that you need to provide in order to add a deployed portlet to a portal page. If you’re using a different portal server than Liferay Portal, all you need to do is to replace the Liferay Portal–specific configuration and steps described in this section with the configuration and steps that apply to your portal server.
1.9. Summary
The portlet technology is promising in terms of its reach and impact. The focus on portals has increased in recent years, and has gained momentum with the release of the Portlet 2.0 specification. It’s important to understand the unique features of a portal (personalization, content aggregation, customization, and authentication) to get a feel for how Java portlet technology makes it easy to develop portals.
In this chapter, you were introduced to portals and Java portlet technology using a simple Hello World example. The information covered in sections 1.6 (“Getting started with Liferay Portal”) and 1.7 (“Setting up the development environment”) provide the foundation for developing and deploying example portlets in the rest of this book.
Now that you have some understanding of portals and portlets, the next chapter introduces the portlet lifecycle and the foundation concepts of portlet technology.