
Chapter 4. Portlet 2.0 API—caching, security, and localization
- Using expiration- and validation-based content caching
- Localizing portlet labels and messages
- Portlet modes and window states
- Programmatic security
- Uploading files using portlets
- Using portlet request and response wrapper objects
- Using the PortletURLGenerationListener interface
- Designing portable portlets
In chapter 3, we discussed some of the common Portlet 2.0 API concepts and applied them to the example Book Catalog portlet. But we haven’t yet looked at how portlets can show localized content to users in different locales, cache content for better performance, make use of a custom portlet mode or window state for showing content, upload files, and so on. In this chapter you’ll see how Portlet 2.0 API concepts are applied to the Book Catalog portlet to use caching, show content in fr_FR locale, upload TOC files, and use custom portlet modes and window states. Portlets may also depend on portal server–specific APIs to achieve some of their features, so we’ll conclude this chapter by discussing how to design portlets so that they can easily be adapted to different Portlet 2.0–compliant portal servers.
Code Reference
The Book Catalog example in chapters 3 and 4 share the same code base, so you’ll find the source code references in this chapter in the ch3_BookCatalog folder. Before you build or deploy the portlet, make sure you change the value of the uploadFolder initialization parameter in the portlet deployment descriptor. Also, before you build the project, set the liferay.portal.home property in the build.properties file to point to your Liferay Portal installation directory.
4.1. Caching generated content
Content generated by a portlet may be cached by the portlet container to allow the web portal faster access to it. There are two main approaches to improve portal performance: caching portlet data and caching portlet content.
You’ve seen in earlier examples that a portlet generates content when it services a render request. In most cases, portlets retrieve data from one or more databases, web services, or other data sources, and then display it using JSPs (or any other view technology). In some cases, portlets delegate the generation of content to a servlet, which is then responsible for retrieving data from data sources. In either case, the portlet or servlet component is responsible for retrieving data every time a render request is sent to the portlet. One way to reduce this performance overhead is by caching the data using caching libraries like Ehcache. If you were using an actual database in the Book Catalog portlet, you could cache the catalog data to reduce the portlet’s rendering time.
When using data caching to improve portal performance, the portlet retrieves data from the cache instead of firing a query to the database or invoking web services. But while caching data improves performance, the data still needs to be retrieved from the cache, transformed, and displayed by the portlet. If the request processing is computationally or resource intensive, you may still not achieve the desired performance benchmarks for your web portal.
Data caching can also have a negative impact on performance if there are many portlets on your portal page and each portlet retrieves data from the cache every time a render request is received. For instance, consider a portal page with five portlets: A, B, C, D, and E. Suppose a user sends an action request to portlet A, and while rendering the portal page the render methods of portlets B, C, D, and E are invoked. Even if each portlet has its data cached, the cumulative effect of rendering five portlets could have a substantial effect on the performance of the portal.
Note
Portlets that show real-time data should get their data from the data sources every time the render request is received by the portlet container. It would be bad design to use data caching in such scenarios, unless the data cache is actively synched with the data source holding the real-time data. Chapter 12 shows how Comet (or Reverse Ajax) can be used to push data from the server to create a portlet which shows real-time data.
If you’re convinced that data caching isn’t good enough to boost your portal’s performance, you can use content caching. Content caching involves caching the markup generated by the portlet. If the markup is cached, your portlet doesn’t even need to access the data cache to generate content. Portlet containers are responsible for caching the markup generated by the portlet and sending it to the portal server when a render request is received for the portlet.
A portlet is responsible for specifying whether it wants to use content caching or not. You can’t specify at the portlet application level that the content of all the portlets must be cached by the portlet container.
Note
Portlet containers cache portlet content and not portal page content.
You may have multiple portlets on your portal page, where some portlets show fresh content and some cached content. Portlets that are meant to show real-time data shouldn’t use content caching and should generate fresh content every time they receive a render request.
A portlet may also specify whether its cached content can be shared by the portlet container with different users of the portal, or whether the content should be cached on a per-user basis. If a portlet shows content that isn’t specific to a user, such as public announcements, the cached content of the portlet could be shared with different portal users.
The portlet specification defines two types of content caching strategies: expiration-based and validation-based.
4.1.1. Expiration-based content caching
In the expiration-based caching strategy, the cached content of the portlet is valid only for a predefined period of time. Once the time expires, the portlet is asked to generate fresh content, which is again cached by the portlet container for a period of time.
Note
The expiration-based caching strategy must not be used in portlets that show content based on real-time data. It’s ideally suited for portlets that generate content based on computationally or resource-intensive request-processing operations.
As long as the portlet content is cached, the portlet container doesn’t invoke the portlet’s render method (with exceptions we’ll discuss shortly). Instead, the portlet container returns the cached content when it receives a render request for the portlet. After the content expires, if the portlet container receives a render request for the portlet, it invokes the portlet’s render method. If at any time the portlet container receives an action or event request for the portlet, the portlet container immediately expires the portlet’s cached content and sends the action or event request to the portlet instance.
Code Reference
At this time, it’s recommended that you import ch3_BookCatalog Eclipse project into your Eclipse workspace so you can follow the code references in the rest of this chapter.
You can specify expiration-based caching in the portlet deployment descriptor or set it programmatically. The following XML fragment shows how the Book Catalog portlet defines expiration-based caching in portlet.xml:
<portlet>
   ...
   <expiration-cache>60</expiration-cache>
   <cache-scope>private</cache-scope>
   <supports>
    ...
   </supports>
   ...
</portlet>
In this code, the <expiration-cache> element defines how long (in seconds) the portlet content is cached by the portlet container. The value 60 indicates that the Book Catalog portlet defines 60 seconds as its cache expiration time. The <cache-scope> element defines the scope of the cache—whether it’s shared across all portal users (public) or it’s user-specific (private). The value private indicates that the Book Catalog portlet’s cache is user-specific.
You can also set the cache expiration time and scope programmatically in one of the following ways:
- Use the CacheControl object’s setExpirationTime and setScope methods (CacheControl is obtained from MimeResponse).
- Set the EXPIRATION_CACHE and CACHE_SCOPE properties in RenderResponse. The MimeResponse interface defines EXPIRATION_CACHE and CACHE_SCOPE constants. It also defines PRIVATE_SCOPE and PUBLIC_SCOPE constants, which can be specified as values for the CACHE_SCOPE property.
You can override the cache expiration settings in the portlet deployment descriptor by setting the cache expiration information programmatically.
Understanding Portlet Behavior
Figure 4.1 highlights some of the important elements of the Book Catalog portlet that we’ll discuss in this section.
Figure 4.1. Initial content of the Book Catalog portlet, showing current date and time, books in the catalog, and the options to search for books in and add books to the catalog

The current system date and time is displayed ![]() in MM-dd-yyyy HH:mm:ss format. If a user clicks the Refresh Search Results hyperlink
in MM-dd-yyyy HH:mm:ss format. If a user clicks the Refresh Search Results hyperlink ![]() , a render request is sent to the portlet. If a user clicks the Search button
, a render request is sent to the portlet. If a user clicks the Search button ![]() , an action request is sent to the portlet. If a user clicks the Print, Help, or Preferences hyperlink
, an action request is sent to the portlet. If a user clicks the Print, Help, or Preferences hyperlink ![]() , a render request is sent to the portlet.
, a render request is sent to the portlet.
A render request is dispatched to the Book Catalog portlet in a couple of scenarios:
- When the user refreshes the portal page containing the Book Catalog portlet by using the browser’s Refresh button.
- When user interaction with the Book Catalog portlet results in a render request being sent to the portlet. For instance, clicking the Refresh Search Results or Print hyperlink sends a render request to the portlet.
- When the user interacts with some other portlet on the same portal page. In this case, a render request is sent to all portlets on the portal page, including the Book Catalog portlet.
Because the Book Catalog portlet defines 60 seconds as its cache expiration time, render requests received within 60 seconds of content generation will always result in showing the cached content. The current date and time displayed by the Book Catalog portlet can be used to identify whether the content is fresh or cached.
Table 4.1 shows the behavior of the Book Catalog portlet when it’s deployed on Jetspeed 2.2 and Liferay Portal 5.2.3/6.x. A user who isn’t logged in to the Liferay Portal will see the current date and time change even when actions are taken on other portlets or when the page is refreshed using the browser’s Refresh button. This is because Liferay Portal currently supports private caching scope only.
Table 4.1. Effect of expiration caching on the behavior of the Book Catalog portlet
|
User action |
Jetspeed 2.2 |
Liferay Portal 5.2.3/6.x |
|---|---|---|
| User clicks the browser’s Refresh button | Current date and time displayed by the Book Catalog don’t change. | Current date and time displayed by the Book Catalog don’t change. |
| User clicks the Refresh Search Results or Print hyperlink, or any other hyperlink that sends a render request to the portlet | Current date and time displayed by the Book Catalog change if the render URL isn’t the one that generated the content; to generate fresh content, there should be a difference in the render parameters or portlet mode of the URLs. | Current date and time displayed by the Book Catalog change to reflect that the content is freshly generated. |
| User takes any action on another portlet on the same portal page as the Book Catalog portlet | Current date and time displayed by the Book Catalog change to reflect that the content is freshly generated. | Current date and time displayed by the Book Catalog don’t change. |
Warning
In Jetspeed 2.2, some of the Book Catalog portlet’s functionality won’t work because Jetspeed 2.2 caches content based on the render URL that generated the content. Re-invoking the portlet using the same render URL won’t have any effect until the content expires. To use the Book Catalog portlet on Jetspeed 2.2, set the expiration time for the cache to 0 so that the content is always considered expired.
Configuring Expiration Caching Support
The expiration caching support is optional for portlet containers. The portlet container can disable portlet content caching at any time to reclaim the memory held by the cached content.
GlassFish Server 3.0.1 (with OpenPortal Portlet Container 2.1.2), Liferay Portal 5.2.3/ 6.x, and Jetspeed 2.2 support expiration-based caching strategy.
Note
In multipage portlets, like the Book Catalog portlet, it’s sometimes preferable to cache content for specific pages, instead of caching content for all the portlet’s pages. Some portal servers, like WebSphere, allow the caching of content for specific portlet pages.
Let’s now look at the validation-based caching strategy, which is an extension of the expiration-based caching strategy.
4.1.2. Validation-based content caching
The validation-based caching strategy extends the expiration-based caching strategy by allowing portlets to validate the cached content after the expiration time has passed. If the portlet finds that the cached content is still valid, it instructs the portlet container to use the cached content for another expiration period. If the cache has become invalid, the portlet generates fresh content.
In validation-based caching, a validation token is used to validate the cached content; the value of the validation token is unique to the cached content. The token is set by the portlet and stored by the portlet container when the content is cached, and it’s made available to the portlet once the cached content expires. The portlet then compares the value of the token with that of the current state of the system to determine whether the cached content is still valid or not. If the cached content is still valid, the portlet instructs the portlet container to continue using it. Otherwise, the portlet generates fresh content.
Figure 4.2 illustrates the steps that are followed in validation-based caching for the Book Catalog portlet. The portlet uses the number of books in the data store as the value of the validation token. If the number of books in the data store changes, the Book Catalog portlet generates a fresh list of books.
Figure 4.2. Validation caching in the Book Catalog portlet. The portlet obtains the value of the validation token (which represents the record count value when the portlet content was last cached) from RenderRequest using the getETag method. The portlet then compares that value with the current record count in the database or data store.
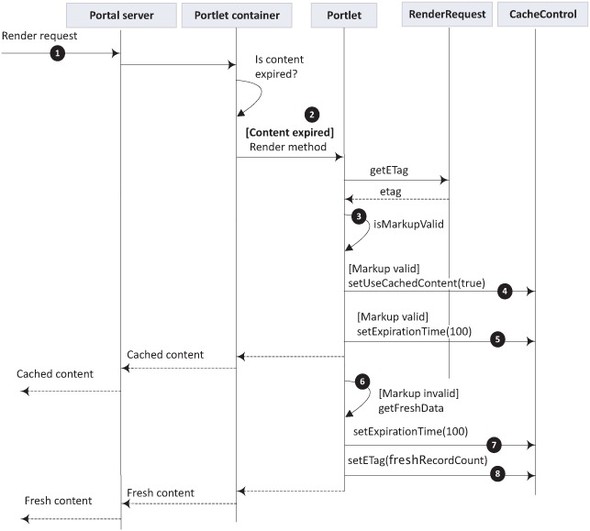
A render request is sent to the Book Catalog portlet ![]() , and the portlet container checks whether the cached content’s expiration time has passed or not. If the expiration time
has passed, the portlet’s render method is invoked
, and the portlet container checks whether the cached content’s expiration time has passed or not. If the expiration time
has passed, the portlet’s render method is invoked ![]() .
.
In the Book Catalog portlet, the number of books stored in the data source is used as a validation token value. In the isMarkupValid method ![]() , the portlet uses the RenderRequest’s getETag method to obtain the validation token’s value, which is the number of books when the content was cached. The portlet checks
how many books are currently in the data store and compares that with the validation token’s value.
, the portlet uses the RenderRequest’s getETag method to obtain the validation token’s value, which is the number of books when the content was cached. The portlet checks
how many books are currently in the data store and compares that with the validation token’s value.
If the validation token’s value is the same as the number of books currently stored in the database, the portlet instructs
the portlet container to use the already cached content by calling the CacheControl object’s setUseCachedContent method ![]() . The Portlet 2.0 CacheControl object allows you to programmatically set scope, expiration time, and validation token value, and also to instruct the portlet
container to use cached content. If the expiration time isn’t set
. The Portlet 2.0 CacheControl object allows you to programmatically set scope, expiration time, and validation token value, and also to instruct the portlet
container to use cached content. If the expiration time isn’t set ![]() , the content will be considered always expired, which means that the portlet container will invoke the portlet’s render method when it receives a render request.
, the content will be considered always expired, which means that the portlet container will invoke the portlet’s render method when it receives a render request.
If the validation token’s value and the current number of books in the data store don’t match, that means the cached content
is no longer valid, so the portlet retrieves fresh data ![]() from the data source and generates fresh content for the portlet.
from the data source and generates fresh content for the portlet.
The portlet uses the CacheControl object’s setETag method ![]() to set the current number of books in the data store as the new value of the validation token. The Book Catalog portlet
to set the current number of books in the data store as the new value of the validation token. The Book Catalog portlet ![]() sets the expiration time to 100 for the newly generated content.
sets the expiration time to 100 for the newly generated content.
Listing 4.1 shows how the Book Catalog portlet implements the isMarkupValid method shown in figure 4.2. The BookCatalogPortlet class’s isMarkupValid method is responsible for checking whether the content cached by the portlet container is still valid.
Listing 4.1. The BookCatalogPortlet class’s isMarkupValid method

The isMarkupValid method ![]() gets the number of books that are currently in the catalog. The validation token’s value
gets the number of books that are currently in the catalog. The validation token’s value ![]() is obtained from the request and is compared with the current book count. If the values match, it’s assumed that the book
catalog hasn’t changed since the last time content was cached.
is obtained from the request and is compared with the current book count. If the values match, it’s assumed that the book
catalog hasn’t changed since the last time content was cached.
The following listing shows how the isMarkupValid method is used by the BookCatalogPortlet class’s render method.
Listing 4.2. The BookCatalogPortlet class’s showBooks render method

If the cached content is found valid (if the isMarkupValid method returns true), the Book Catalog portlet’s showBooks render method ![]() instructs the portlet container to use the cached content, via the CacheControl object’s setUseCachedContent method. A new expiration time is also set for the cached content. If the expiration time isn’t set for the cached content,
the content is treated as always expired.
instructs the portlet container to use the cached content, via the CacheControl object’s setUseCachedContent method. A new expiration time is also set for the cached content. If the expiration time isn’t set for the cached content,
the content is treated as always expired.
If the cached content isn’t valid, the current book count is obtained from the data store ![]() , and the validation token value is set to the current book count.
, and the validation token value is set to the current book count.
Tip
The Book Catalog portlet makes use of the record count as a validation token value to introduce you to the concept of validation tokens. In real-world portlets, you’ll need to choose an appropriate validation token value for the portlet’s cached content. Some examples of values you could use are the last modified timestamp of a record, or the hash code value of an object. The setETag method accepts String as the value of the validation token, which may not be sufficient for your portlets to identify whether the cached content is valid or not. To address scenarios where a String value doesn’t meet your requirements, you can store your actual validation token value (a complex object) in the PortletSession and store a dummy validation token value using the setETag method. When the portlet’s render method is invoked, you could then obtain the actual validation token from PortletSession and validate the cached content.
Configuring Validation Caching Support
Validation caching support is optional for portlet containers. None of the servers I discuss in this book—GlassFish Server 3.0.1 (with OpenPortal Portlet Container 2.1.2), Jetspeed 2.2, and Liferay Portal 5.2.3/6.x—support validation caching; the CacheControl object’s getETag method always returns null.
In some scenarios, you may need a portlet to display content in different languages depending upon the locale associated with the web portal user. Let’s look now at how portlets support localization.
4.2. Localizing portlet content
The Book Catalog portlet described in chapter 3 requires that the messages and labels displayed as part of the portlet content should also be displayed in the French locale, fr_FR. In this section, we’ll look at how the Book Catalog portlet can be localized using localization support available in the Java portlet technology, and we’ll also see how a web portal user can change their locale.
You can localize portlets based on the user’s locale either by using the xml:lang attribute in the deployment descriptor or by using portlet resource bundles.
The xml:lang attribute isn’t supported for portlet window titles, so you can define localized portlet window titles in the portlet resource bundles using the javax.portlet.title key, as you saw in the Hello World portlet in chapter 1.
If you aren’t using a portlet framework, you can use the JavaServer Pages Standard Tag Library (JSTL) formatting tags to localize texts and labels. To localize messages displayed by the portlet, you can programmatically load resource bundles and retrieve messages, as you’ll see later in this chapters. If your portlet class extends the GenericPortlet class, you can get access to the resource bundle configured in the deployment descriptor (using the <resource-bundle> tag) by calling the GenericPortlet class’s getResourceBundle method. The recommended approach to localizing your portlets is to use resource bundles.
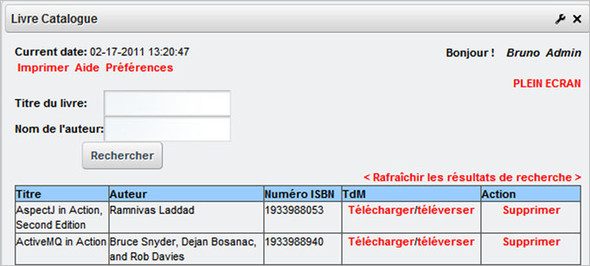
Figure 4.3 shows the Book Catalog portlet content in the fr_FR locale. In this figure, labels and buttons are shown in the French locale. The data itself isn’t localized because we aren’t storing localized data in the data store. If you want to show localized data along with labels and messages, you must also save localized data in the data store.
Figure 4.3. The Book Catalog portlet displays labels in French when the locale is fr_FR.
4.2.1. Implementing portlets to support localization
If your portlet needs to be localized, you need to create locale-specific resource bundles. The locale-specific resource bundle has the following naming convention:
<resource-bundle-name>_<language>_<country>.properties
Here, <resource-bundle-name> is the name of the resource bundle, as specified by the <resource-bundle> element of the portlet.xml file, <language> is the ISO language code, and <country> is the ISO country code. For the Book Catalog portlet, you’d need to create a resource bundle with the name Language-ext_fr_FR.properties.
The following entry in the Book Catalog portlet’s portlet.xml file shows how you would configure a resource bundle for a portlet:
<resource-bundle>content.Language-ext</resource-bundle>
The resource bundle configured in the portlet definition can either be retrieved programmatically or by using JSTL formatting tags. You can programmatically retrieve a resource bundle in your portlet class by using the PortletConfig object’s getResourceBundle method, as shown here:
ResourceBundle bundle =
   getPortletConfig().getResourceBundle(request.getLocale());
In this code, the GenericPortlet class’s getPortletConfig() method returns the PortletConfig object whose getResourceBundle method returns a java.util.ResourceBundle object referring to the locale-specific resource bundle. The PortletRequest’s getLocale method returns the current locale used for the request. Once you obtain the ResourceBundle for the specific locale, you can programmatically retrieve messages for that locale using the ResourceBundle object’s getString methods.
The following code shows how a portlet can set the window title by retrieving it from the resource bundle based on the current locale:
response.setTitle(getResourceBundle(request.getLocale()).
       getString("portlet.title.books"));
That’s all there is to programmatically retrieving messages from the resource bundle and using them in a portlet to show locale-specific titles and messages.
To localize the labels used in JSP pages, you can make use of JSTL formatting tags to load locale-specific resource bundles. In chapter 2, the JSPs in the User Registration portlet used the JSTL setBundle tag to load labels from the Language-ext.properties resource bundle. The setBundle tag lets JSP pages load the resource bundle, but it always loads the default resource bundle identified by the basename attribute of the setBundle tag. To load a locale-specific resource bundle, you must set the locale for which the setBundle tag should load the resource bundle, as shown here:
<fmt:setLocale value="<%=request.getLocale()%>"/>
<fmt:setBundle basename="content.Language-ext"/>
The setLocale tag is used to set the locale used by the setBundle tag.
Code Reference
Refer to Language-ext_fr_FR.properties (the resource bundle for the fr_FR locale), portlet.xml (which defines support for the fr_FR locale for the Book Catalog portlet), and the home.jsp file to see how localization is implemented in the Book Catalog portlet.
4.2.2. Changing locales using built-in portlets
The locale for a web portal is associated with the complete web portal and not with a single portlet on a portal page. Most portal servers provide built-in portlets that allow you to easily change the locale of the web portal.
Figure 4.4 shows the Liferay Portal’s built-in Language portlet and Jetspeed’s built-in Locale Selector portlet, both of which can be used to change the locale of the portal.
Figure 4.4. The Language and Locale Selector portlets built into Liferay Portal and Jetspeed, respectively. You can select the locale by selecting one of the locale icons displayed in the portlets.

Note
If you’re using a portlet framework to develop portlets, you can use the framework’s built-in localization strategy. Chapter 8 describes how you can use the Spring Portlet MVC framework’s localization strategy by using the MessageSource bean.
In previous chapters, we touched on portlet modes. Let’s now look at portlet modes in detail.
4.3. Portlet modes in depth
In chapter 2, we discussed the basics of portlet modes. In this section, we’ll look at
- Custom portlet modes
- Portal-managed and portlet-managed portlet modes
The PortletMode class defines three constants—VIEW, EDIT, and HELP—corresponding to the VIEW, EDIT, and HELP portlet modes, which we discussed in chapter 2. It’s mandatory for portlets to support VIEW mode; the other two are optional. Support for optional portlet modes must be specified in the portlet deployment descriptor, as mentioned in chapter 2.
Apart from those three standard portlet modes, you can also use custom portlet modes supported by your portal server. The portlet specification allows portal server vendors to provide additional portlet modes, like config, print, and so on.
In the context of the Book Catalog portlet, we’ll look at how Liferay Portal’s custom print portal-managed portlet mode can be used to display a printable (with no form elements) book catalog.
4.3.1. Custom portlet modes
A portal may define support for additional portlet modes supported by the portal server or by the portlet. For instance, Liferay Portal 5.2.3/6.x provides config, edit_defaults, preview, and print custom portlet modes.
You can use a custom portlet mode in a portlet by defining its support in the portlet deployment descriptor and providing an implementation for that mode in your portlet class. For instance, the Book Catalog portlet (see figure 4.5) provides links to view portlet preferences, help information, and a printable catalog.
Figure 4.5. The Book Catalog portlet shows Help and Preferences links to view the portlet in HELP and EDIT portlet modes. The Print hyperlink displays the portlet in print custom portlet mode supported by Liferay Portal.

The Help and Preferences links change the portlet mode to HELP and EDIT, respectively. The Print link displays the Book Catalog portlet in print portlet mode, which allows users to view a list of all the books on a single page without any form elements, like text fields and buttons. This display is suitable for printing a list of books in the catalog.
Defining Support for Custom Portlet Modes in Portlet.XML
If your portlet is going to use a custom portlet mode (or any portlet mode other than VIEW mode), you must specify it in the portlet deployment descriptor using the <portlet-mode> subelement of the <supports> element. The following snippet shows this for the Book Catalog portlet:
<portlet>
  <portlet-name>bookCatalog</portlet-name>
  <portlet-class>
     chapter03.code.listing.base.BookCatalogPortlet</portlet-class>
   <supports>
     <mime-type>text/html</mime-type>
     <portlet-mode>print</portlet-mode>
     ...
   </supports>
   ...
</portlet>
The <portlet-mode> element specifies the name of the portlet mode supported by the portlet. You can specify multiple <portlet-mode> elements to list all the portlet modes supported by the portlet. In the preceding XML fragment, the <portlet-mode> element informs the portlet container that the print portlet mode is supported by the bookCatalog portlet.
A custom portlet mode must also be defined at the portlet application level, as shown here for the Book Catalog portlet:
<portlet-app ...>
  <portlet>
    <portlet-name>bookCatalog</portlet-name>
    <portlet-class>
      chapter03.code.listing.base.BookCatalogPortlet</portlet-class>
    <supports>
       <mime-type>text/html</mime-type>
       <portlet-mode>print</portlet-mode>
       ...
    </supports>
    ...
  </portlet>
  <custom-portlet-mode>
    <portlet-mode>print</portlet-mode>
  </custom-portlet-mode>
</portlet-app>
The <custom-portlet-mode> subelement of <portlet-app> specifies the custom portlet modes that are available to portlets in the portlet application. The portlets that want to use these custom portlet modes can specify them in their definition (using the <portlet-mode> subelement of <supports>, as shown previously).
If you define a custom portlet mode for your portlet application, it must be supported by the portal server on which the portlet is deployed. You can find out which portlet modes are supported by your portal server by using the PortalContext’s getSupportedPortletModes method. If a custom portlet mode isn’t supported by the portal server, any attempt to use the portlet in that mode will result in an exception.
Setting the Portlet Mode Programmatically
The Book Catalog portlet uses print portlet mode, which isn’t supported by GlassFish Server. If you intend to set custom portlet modes (or predefined portlet modes) programmatically in your action (or event) methods, you should have your code check whether the portlet mode is allowed, by using the PortletRequest object’s isPortletModeAllowed method. The isPortletModeAllowed method not only checks whether a particular portlet mode is supported by the portal server, but also whether the portlet mode is supported by the portlet and the user is allowed to switch to that portlet mode.
The following code fragment shows how to use the isPortletModeAllowed method:
if(PortletRequest.isPortletModeAllowed(new PortletMode("print"))) {
    actionResponse.setPortletMode(new PortletMode("print"));
}
The preceding code checks whether the print portlet mode is allowed for the request. If it’s allowed, it uses the StateAwareResponse interface’s setPortletMode method to set the print portlet mode. StateAwareResponse is the interface implemented by the ActionResponse and EventResponse objects. If the portlet mode is set in the action method, the following render method is invoked in the changed portlet mode.
Warning
There’s no guarantee that the following render request received by the portlet will be in the same portlet mode that you set in the action method. A portlet container or portal server may override the portlet mode and invoke the portlet in a different mode.
If a portlet mode isn’t applicable for the portlet because it’s not supported by the portlet or by the portal server or the user doesn’t have access to the mode, a PortletModeException will be thrown. You should use the isPortletModeAllowed method before setting the portlet mode to ensure that exceptions won’t be thrown because the portlet mode isn’t allowed.
Implementing a Custom Portlet Mode
If a custom portlet mode is supported by your chosen portal server, and you’ve specified in portlet.xml that the custom portlet mode is supported by your portlet, the next step is to provide an implementation of the portlet’s behavior in the custom portlet mode. Just as you implement action and render methods to perform appropriate tasks for the standard portlet modes (for example, EDIT mode should allow users to set preferences for the portlet), your custom portlet mode needs to be implemented to perform tasks that match the purpose of the portlet mode.
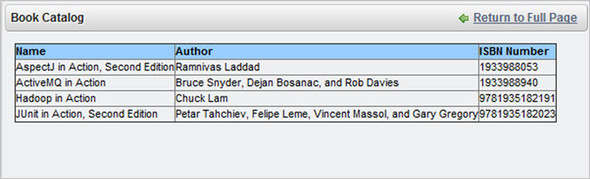
In the Book Catalog portlet, clicking the Print hyperlink shows the list of books in the catalog without any form elements, making it easy for users to print the list of books in the catalog. This display is shown in figure 4.6.
Figure 4.6. The Book Catalog portlet in print mode shows no form elements, making it easier for users to print out the book catalog.
Note
The printout of the web page shown in figure 4.6 won’t look pretty because of the window decoration and possible presence of other portlets on the portal page. We’ll address this issue in section 4.4, where we’ll discuss portlet window states.
How do you go about generating the content for the print portlet mode, as shown in figure 4.6? You saw in chapter 2 that you can associate a portlet’s render method to a particular portlet mode using the @RenderMode annotation. In the same way, you can write a render method for the print portlet mode, as shown here:
@RenderMode(name="print")
public void showPrint(RenderRequest request,
  RenderResponse response) throws IOException, PortletException {
    showPrintableCatalog(request, response);
}
The @RenderMode(name="print") annotation identifies the showPrint method as the render method for the print portlet mode. The showPrintableCatalog method generates the list of books without form elements.
Code Reference
The Book Catalog portlet uses the print portal-managed portlet mode, which is supported both by Liferay Portal 5.2.3/6.x and Jetspeed 2.2. Refer to the portlet.xml file for the configuration of the print portlet mode, and see the BookCatalogPortlet class’s showPrint render method for the print portlet mode implementation.
Setting the Portlet Mode in the URL
You can set the portlet mode in the action (or event) request and not in the render request. If the Print hyperlink in the Book Catalog portlet refers to the portlet’s action URL, the corresponding action method can set the portlet mode to print, and the following render method for the print portlet mode will generate the necessary content.
It may be unnecessary to use an action method just to change the portlet mode. A simpler way to do this is to create a render URL that requires the portlet mode to be changed to print when the user submits the request to the render URL. In chapter 2, we created render URLs using the RenderResponse object’s createRenderURL method, which returned a PortletURL object. In the same way, you can create a render URL and set the portlet mode to print, as shown here:
PortletURL printModeUrl = response.createRenderURL();
if(PortletRequest.isPortletModeAllowed(new PortletMode("print"))) {
  printModeUrl.setPortletMode(new PortletMode("print"));
}
request.setAttribute("printModeUrl", printModeUrl);
The setPortletMode method accepts a PortletMode argument, which you can create by passing the name of the portlet mode (print, in this case) to the PortletMode constructor. As you can see, the isPortletModeAllowed method checks whether the print portlet mode is allowed or not, before setting it on the PortletURL object.
In the Book Catalog portlet, most portlet URLs are created programmatically and then set as request attributes. The JSP pages of the Book Catalog portlet retrieve portlet URLs from the request and use them in hyperlinks and in action attributes of form tags. For instance, the printModeUrl that was set in the request is used by the home.jsp page of the Book Catalog portlet to show the Print hyperlink:
<a class="anchor" href="${printModeUrl}"><b> Print </b></td>
Code Reference
Refer to the BookCatalogPortlet class’s generateUrls method for more examples of setting the portlet mode programmatically in a portlet URL.
There are two types of portlet modes: portal-managed and portlet-managed portlet modes. We’ll discuss them next.
4.3.2. Portal-managed and portlet-managed portlet modes
Portlet modes can either be managed by a portal server or by the portlet itself. If the portal server is responsible for managing the portlet mode, the portlet mode is referred to as portal-managed. If the portlet is responsible for managing the portlet mode, it’s referred to as portlet-managed. The list of portlet modes that you get by calling the PortalContext’s getSupportedPortletModes method contains portal-managed portlet modes.
As a developer, you can use the existing portal-managed portlet modes, but you can also create your own portlet-managed portlet modes. (You can’t create a portal-managed portlet mode because the portal server is responsible for providing them.) Portlet-managed portlet modes are useful when you want to split the portlet VIEW mode’s rendering functionality along the lines of custom portlet modes.
In most portlets (if not all), most of the content generation responsibility is coded in the VIEW portlet mode, because it encloses the main business functionality of the portlet. For instance, in the Book Catalog portlet, you could split the business functionality of the portlet into the following:
- Search— User searches book catalog based on author and book name
- Show catalog— User is shown the list of books in the catalog
- Add book— User adds book to the catalog
The action processing methods are easier to split up because the @ProcessAction annotation allows you to specify the name of the action for which the method is defined. The preceding three functions can be written in three different action methods, as shown here:
@ProcessAction(name="search")
public void search(...) { ... }

@ProcessAction(name="showCatalog")
public void showBooks(...) { ... }

@ProcessAction(name="addBook")
public void addBook(...) { ... }
...
The render requests that follow the execution of the action methods invoke the same render method: doView. The portlet specification doesn’t provide any mechanism to define a one-to-one relationship between action and render methods, so the complete content generation logic needs to be written in a single method: doView or a method annotated with the @RenderMode(name="VIEW") annotation.
Writing complete content generation logic in a single method will not only significantly affect the readability and maintainability of the code; it will also affect the testability of the portlet class. A simpler approach is to make your doView method be the first point of contact for the render request, after which control is transferred to more specific methods that know how to handle the content generation, as shown in figure 4.7.
Figure 4.7. The portlet’s doView or @RenderMode(name="VIEW") annotated method delegates render requests to more specific methods for content generation.
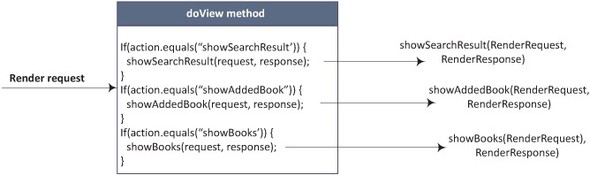
In figure 4.7, the doView method checks what content needs to be generated, and delegates the content generation responsibility to specific methods, such as showSearchResult, showAddedBook, and showBooks.
Your code would be much cleaner if you could directly invoke the content generation methods, rather than indirectly invoking them via doView. You can easily achieve this if you define custom portlet-managed portlet modes for your portlet application. Let’s say you define a custom portlet-managed portlet mode named search in the portlet deployment descriptor of your portlet application, as shown here:
<custom-portlet-mode>
  <portlet-mode>search</portlet-mode>
  <portal-managed>false</portal-managed>
</custom-portlet-mode>
In this code, <portlet-mode> is the name of the custom portlet mode and <portal-managed> identifies whether the custom portlet mode is portlet- or portal-managed.
The preceding search portlet mode is portlet-managed because the value of the <portal-managed> element is false. If you don’t specify the <portal-managed> element, the portlet container assumes that the custom portlet mode is portal-managed.
If you define a custom portlet mode that’s portal-managed, your portal server must support that portlet mode, like the print portlet mode we discussed earlier in this section. A portlet-managed portlet mode isn’t required to be supported by the portal server because it’s meant to be used internally by the portlet.
As for portal-managed portlet modes, a portlet must define its support for the portlet-managed portlet mode, as shown here:
<portlet-app ...>
 <portlet>
   <portlet-name>bookCatalog</portlet-name>
   <portlet-class>
     chapter03.code.listing.base.BookCatalogPortlet</portlet-class>
   <supports>
     <mime-type>text/html</mime-type>
     <portlet-mode>search</portlet-mode>
     ...

   </supports>
   ...
 </portlet>
 ...
</portlet-app>
In the preceding portlet deployment descriptor, the bookCatalog portlet specifies that it supports the search portlet-managed portlet mode.
Code Reference
Refer to the Book Catalog portlet’s portlet.xml file for examples on configuring portlet-managed and portal-managed portlet modes.
This is all you need to do to make your portlet support a custom portlet-managed portlet mode. After that, all you need to do is use the newly introduced search portlet mode in your portlet class, as shown here:
@RenderMode(name="search")
public void showSearchResult(RenderRequest request,
  RenderResponse response) throws IOException, PortletException {
    //-- generate search results content
}
The @RenderMode(name="search") annotation identifies the showSearchResult method as the render method for the search portlet mode. If the action method responsible for performing the book search changes the portlet mode of the current portlet request to search (by calling the ActionResponse’s setPortletMode method), the following render method will be in search portlet mode. That means the method annotated with @RenderMode(name="search") will be called; in the method shown above, that’s the showSearchResult method.
Note
Check your portal server to determine whether or not it honors the custom portlet-managed portlet mode set programmatically in action requests (or set in the PortletURL using the setPortletMode method) before using this approach to create your portlets. As of Liferay Portal 5.2.3/6.x, custom portlet-managed portlet modes are ignored. Jetspeed 2.2 allows you to use custom portlet-managed portlet modes.
A portlet must define the portlet mode supported for a particular markup type (HTML, WML, and so on) generated by the portlet. Next, we’ll look at how portlets define this support in the portlet deployment descriptor.
4.3.3. Portlet modes and markup types
A portlet can generate different markup types, like HTML for regular browsers and WML for mobile devices. The portlet specification provides the option to define portlet modes for a particular markup type. For instance, when displaying a portlet on a mobile device, you may prefer not to allow the predefined EDIT portlet mode.
You define supported portlet modes for a particular markup type by using the <supports> element in the portlet definition. Earlier in this chapter, you saw how you can use <supports> to define support for a portlet mode in portlets. You’ll also notice that every <supports> element has a mandatory <mime-type> element that identifies the markup type generated by the portlet. Because the <supports> element allows only one <mime-type> subelement, you need to define multiple <supports> elements to indicate that the portlet supports multiple markup types, as shown here:
<portlet>
  <portlet-name>bookCatalog</portlet-name>
  <portlet-class>
    chapter03.code.listing.base.BookCatalogPortlet</portlet-class>
  <supports>
    <mime-type>text/html</mime-type>
    <portlet-mode>edit</portlet-mode>
    <portlet-mode>help</portlet-mode>
    <portlet-mode>print</portlet-mode>
  </supports>
  <supports>
    <mime-type>text/vnd.wap.xhtml+xml</mime-type>
  </supports>
  ...
</portlet>
The preceding bookCatalog definition shows that it supports two different markup types: text/html and text/vnd.wap.xhtml+xml. The text/html markup (used for regular browsers) supports all the predefined portlet modes and the print custom portlet mode. The text/vnd.wap.xhtml+xml markup (used by mobile devices) only supports the VIEW portlet mode.
Let’s now look at the WindowState class of the Portlet API and see how you can use a custom window state.
4.4. Portlet window states in depth
In this section, we’ll look at the WindowState class and how to define support for custom window states. We’ll also look at how the Book Catalog portlet makes use of Liferay Portal’s custom pop_up window state to show a printable book catalog with no window decoration.
The window state of a portlet is represented by the Portlet API’s WindowState class. This class defines (as constants) the three standard window states that portlets support: NORMAL, MINIMIZED, and MAXIMIZED.
Note
If the portlet is in MINIMIZED state, the default behavior of GenericPortlet is to ignore render request calls on the portlet; the render methods (doView, doEdit, doHelp, or the @RenderMode annotated methods) aren’t invoked.
A portlet’s window state can be useful in customizing the content of the portlet; if a portlet’s window state is maximized, the portlet can show additional information to the user that it didn’t display when the portlet was in the normal window state. For instance, in the Book Catalog portlet, you can show the last-modified date for the book when the window state is maximized. You can also consider showing rich user interface components (like the components offered by the Dojo toolkit) when the window is maximized.
Note
The standard window states must be supported by portlets, unlike portlet modes. You can’t limit which standard window states a portlet supports.
Let’s look at how custom window states can be used by a portlet.
4.4.1. Custom window states
If your portal server defines additional window states, you can discover them by using the PortalContext object’s getSupportedWindowStates method. For instance, Liferay Portal 5.2.3/6.x supports two custom window states, one of which is pop_up.
The pop_up window state is used to represent a browser window that contains only the content generated by the portlet, with no window decorations or portal page headers. The pop_up window state is ideal when you want to print out the portlet’s content, as in the case of the Book Catalog portlet.
If your portlet uses custom window states, your portlet definition must include support for them, as shown here for the Book Catalog portlet:
<portlet>
  <portlet-name>bookCatalog</portlet-name>
  <portlet-class>
    chapter03.code.listing.base.BookCatalogPortlet</portlet-class>
  <supports>
    <mime-type>text/html</mime-type>
    <window-state>pop_up</window-state>
    ...
  </supports>
  ...
</portlet>
The <window-state> element specifies the name of the window state supported by the portlet. You can specify multiple <window-state> elements to list all the window states supported by the portlet. In the preceding XML fragment, the <window-state> element informs the portlet container that the pop_up window state is supported by the bookCatalog portlet.
As in the case of custom portlet modes, you must define the custom window states that apply to your portlet application, as shown here for the portlet application to which the Book Catalog portlet belongs:
<portlet-app ...>
  <portlet>
    <portlet-name>bookCatalog</portlet-name>
    <portlet-class>
      chapter03.code.listing.base.BookCatalogPortlet</portlet-class>
    <supports>
      <mime-type>text/html</mime-type>
      <window-state>pop_up</window-state>
      ...
    </supports>
    ...
  </portlet>
  <custom-window-state>
    <window-state>pop_up</window-state>
  </custom-window-state>
  ...
</portlet-app>
The <custom-window-state> subelement of <portlet-app> defines the custom window states that are available to the portlets in the portlet application. The portlets that want to use these custom window states can specify them in their definitions using the <window-state> subelement of <supports>, as shown previously.
If you define a custom window state for your portlet application, it must be supported by the portal server on which the portlet is deployed. If a custom window state isn’t supported by the portal server, attempting to use the portlet in that window state will result in a WindowStateException. If you’re programmatically setting the window state, you should first check whether the window state is allowed by calling the PortletRequest object’s isWindowStateAllowed method. A window state may not be allowed for a request for three reasons: the portlet definition doesn’t define support for the window state, the portal server doesn’t support the window state, or the user isn’t allowed to access the portlet in the window state.
Unlike custom portlet modes, there are no portlet-managed window states.
Code Reference
Refer to the portlet.xml file and the BookCatalogPortlet class’s generateUrls method to see how the Book Catalog portlet makes use of the pop_up custom window state supported by Liferay Portal 5.2.3/6.x.
Like portlet modes, a portlet must define which window states are supported for a particular markup type. Let’s look at how portlets define this in the portlet deployment descriptor.
4.4.2. Portlet window states and markup types
The Book Catalog portlet’s portlet.xml file shows that the pop_up window state is supported only if the markup type is text/html:
<portlet>
  <portlet-name>bookCatalog</portlet-name>
  <portlet-class>
    chapter03.code.listing.base.BookCatalogPortlet</portlet-class>
  <supports>
    <mime-type>text/html</mime-type>
    <portlet-mode>edit</portlet-mode>
    <portlet-mode>help</portlet-mode>
    <portlet-mode>print</portlet-mode>
    <window-state>pop_up</window-state>
  </supports>
  <supports>
    <mime-type>text/vnd.wap.xhtml+xml</mime-type>
  </supports>
  ...
</portlet>
The preceding bookCatalog definition supports two different markup types: text/html and text/vnd.wap.xhtml+xml. The text/html markup (used for regular browsers) supports the predefined window states and the pop_up custom window state. The text/vnd.wap.xhtml+xml markup (used by mobile devices) supports only the predefined window states.
As in any web application, programmatic security plays an important role in securing portlets from unauthorized access. Let’s take a look at the programmatic security in portlet applications and how it affects how you write your portlets.
4.5. Programmatic security
Securing portlets from unauthorized access in a web portal is important, and it must be considered for any portlet application. In this section, we’ll only discuss the programmatic approach to securing portlets. In chapter 5, you’ll see how the portal server can help address security concerns without requiring you to write a single line of code.
The PortletRequest interface defines the following methods that can be used to programmatically secure your portlets:
- getRemoteUser—This method can be used to check whether the user is authenticated or not. For an authenticated user, this method returns a non-null value that is the login name of the user.
- getUserPrincipal—This method can be used to obtain the name of the authenticated user. It returns a java.security.Principal object that defines the getName method which you can use to obtain the name of the authenticated user.
- isUserInRole—This method is used to implement role-based security in your portlets. It accepts a role name (specified using the <role-name> subelement of the <security-role-ref> element in the portlet deployment descriptor), and it checks whether the authenticated user belongs to that role.
The getRemoteUser and getUserPrincipal methods return values that usually have portal server–specific semantics. The isUserInRole method is the most useful in the real portlet world, because you’ll generally group portal users based on their roles and define access rights for those roles in the system.
Suppose the Book Catalog portlet has the following security requirements:
- Users belonging to the User role must not be able to download the table of contents (TOC) of the book. Also, a User isn’t allowed to add books to the catalog.
- Users belonging to the Administrator role can download the TOC and add books to the catalog.
To address the preceding requirements, you can use the PortletRequest’s isUserInRole method to restrict users from accessing or allow them to access different features of the portlet.
The first step in using role-based security is to define the roles in the portlet deployment descriptor file using the <security-role-ref> element, as shown here:
<security-role-ref>
  <role-name>administrator</role-name>
  <role-link>Administrator</role-link>
</security-role-ref>
Here, the <role-name> element is the name of the user role that will be used by the isUserInRole method to check whether the authenticated user belongs to the Administrator role. The <role-link> element links the role name specified in the <role-name> element with the role that exists in the deployment environment.
Your portlet code depends on the <role-name> element and not on the <role-link> element. That’s advantageous, because if the portlet is deployed in a different environment, the roles available in the deployment environment may change, but your portlet code won’t be impacted. If you move to a different deployment environment, you only need to change the <role-link> element to map to the roles available in the new environment.
In Liferay Portal, liferay-portlet.xml does the mapping of the <role-name> specified in the portlet.xml file to the roles available in the Liferay Portal deployment environment:
<role-mapper>
  <role-name>administrator</role-name>
  <role-link>Administrator</role-link>
</role-mapper>
<role-mapper>
  <role-name>user</role-name>
  <role-link>User</role-link>
</role-mapper>
The <role-mapper> element maps the administrator role name to the Administrator role in Liferay Portal, and the user role name to the User role in Liferay Portal.
Note
If you define your own roles in Liferay Portal, you can provide their mapping in liferay-portlet.xml and use the roles in your portlets for programmatically performing role-based security.
The next step is to use the <role-name> specified in portlet.xml to programmatically check the user role, as shown here:
if(request.isUserInRole("administrator")) {
    //-- allow user to add book
} else {
   //-- throw security exception
}
In the preceding code, if the user’s role is Administrator, the isUserInRole method returns true; otherwise it returns false.
In chapter 5 we’ll discuss Liferay Portal security in more detail, and you’ll see how you can use Liferay Portal’s security features to secure portlets.
Code Reference
Refer to the Book Catalog portlet’s portlet.xml and liferay-portlet.xml files for examples of how to define roles that are used to restrict access to features.
Let’s now look at how you can upload files using portlets, how you can wrap request and response objects to modify the default behavior of their methods, and how you can use PortletURLGenerationListener to customize all the render, action, and resource URLs generated by the portlet container.
4.6. Uploading files, wrapping requests and responses, and creating po- ortlet URL generation listeners
In this section, we’ll look at how you can upload TOC files in the Book Catalog portlet using the Apache Commons FileUpload library. We’ll also look at portlet request and response wrapper objects and how they can be used to modify the behavior of the underlying portlet request and response objects. We’ll conclude this section by taking a look at the PortletURLGenerationListener, which you can use to universally set properties on all portlet URLs generated by the portlet container.
Note
In this chapter, the Book Catalog portlet doesn’t make use of request and response wrappers, but you’ll find a more detailed example of them in chapter 13. The Book Catalog portlet does use the PortletURLGenerationListener to set the window state to MAXIMIZED for all its action and render portlet URLs.
Let’s first see how to go about uploading files in portlets.
4.6.1. Uploading files
The Book Catalog portlet in chapter 3 requires that a user should be able to upload the TOC of a book, and that the size of the uploaded TOC file must not be more than 1 MB. You can upload files using the ClientDataRequest object or by using a file upload library, like Apache Commons FileUpload. In this section, we’ll look at uploading files using the Apache Commons FileUpload library.
Tip
If you want to upload files using the ClientDataRequest object, some of the tasks you’ll have to perform in your code include checking whether the request is a multipart request or not, obtaining the name of the file to be uploaded from the portlet request, extracting the content type from the request (if you want to restrict uploads to certain content types), and so on. Using a file upload library like Apache Commons FileUpload saves you the effort of writing logic to perform these tasks.
Uploading Files Using Apache Commons Fileupload
The Apache Commons FileUpload library provides convenience classes that provide easy access to a variety of information, such as whether the portlet request is a multipart request or not and what the name of the file to be uploaded is, and it also provides access to the input stream where the file can be uploaded. Listing 4.3 shows how the BookCatalogPortlet makes use of the Apache Commons FileUpload classes to read an uploaded file and write it to disk.
Note
The PortletFileUpload class was introduced in the Apache Commons FileUpload library in version 1.1. If you want to use this library in your portlets, you need to use FileUpload version 1.1 or later.
Listing 4.3. Uploading files using Apache Commons FileUpload

You create an instance of the PortletFileUpload class ![]() and set the maximum size of the file that can be uploaded. The PortletFileUpload class is the central class in the Apache Commons FileUpload library, and it returns a FileItemIterator from ActionRequest and allows you to set the maximum size of the file that can be uploaded.
and set the maximum size of the file that can be uploaded. The PortletFileUpload class is the central class in the Apache Commons FileUpload library, and it returns a FileItemIterator from ActionRequest and allows you to set the maximum size of the file that can be uploaded.
A FileItem object represents a form field or file field in your HTML form. A file field represents an HTML form element of type file, as shown here:
<input type="file" name="tocFile"/>
The PortletFileUpload class’s isMultipartContent(ActionRequest) method is used to verify that the portlet request is a file upload request. The isMultipartContent method returns true if the content type header for the ActionRequest is multipart/form-data. The HTML form that you use to upload files must specify the content type as multipart/form-data using the enctype attribute of the HTML form tag, as shown here:
<form name="uploadTocForm" method="post"
    action="${uploadTocActionUrl}" enctype="multipart/form-data">
It may seem trivial to check whether the request contains multipart content, but it’s important. If a request isn’t a multipart request, it’ll result in an exception when parsing ActionRequest using the getItemIterator method to obtain file fields in the submitted form. If you’re directly using ClientDataRequest to upload the file, the getPortletInputStream and getReader methods will throw an IllegalStateException if the request isn’t a multipart request.
The PortletFileUpload class’s getItemIterator(ActionRequest) method returns a FileItemIterator, which lets you iterate over the FileItems present in the action request. The FileItemStream object provides access to the content of the FileItem instance using the openStream method. The isFormField method is used to check whether the FileItem represents a form field or a file field. The contents of a file field represents the uploaded file. As you’re only interested
in file fields in this example, you read the contents of the FileItem representing a file field into a byte array ![]() .
.
Code Reference
See the BookCatalogPortlet class’s uploadToc action method to see the Apache Commons FileUpload library being used to upload a file in the Book Catalog portlet. The sample code uploads a file to a folder in the portal server’s local filesystem, the location of which is specified by the uploadFolder portlet initialization parameter in portlet.xml. The TOC file is saved with the name <ISBN number>.<extension>, where ISBN Number is the ISBN number of the book for which you’re uploading the TOC, and extension is the file extension of the TOC file uploaded.
Next, we’ll look at the request and response wrapper classes.
4.6.2. Using wrapper classes
Like the servlet API, the Portlet 2.0 API introduced the concept of wrapper classes for portlet requests and responses. These wrapper classes hold references to the request or response object and implement all the methods of the request or response. The wrapper class is an example of a decorator pattern, where the decorating or wrapping class delegates all method calls to the wrapped request or response object.
Tip
Use wrapper classes when you want to override the default functionality of a request or response object’s methods. This is particularly useful when working with portlet filters. Chapter 13 discusses how RenderResponseWrapper can be used to modify the response generated by the Book Catalog portlet.
The Portlet 2.0 API provides request and response wrappers for each request and response type, such as PortletRequestWrapper, ActionRequestWrapper, ResourceResponseWrapper, RenderRequestWrapper, and so on.
Warning
In Liferay Portal 5.2.3, the support for request and response wrapper objects is broken, and it results in a ClassCastException.
The following code fragment shows how you can override the RenderRequest object’s getAttribute method to return the value of the myparam request parameter:
public class MyRenderRequestWrapper extends RenderRequestWrapper {
  public MyRenderRequestWrapper(RenderRequest request) {
    super(request);
  }
  public Object getAttribute(String attributeName) {
    Object attribute;
    if("myparam".equalsIgnoreCase(attributeName)) {
      attribute = getRequest().getParameter(attributeName);
    } else {
       attribute = getRequest().getAttribute(attributeName);
    }
    return attribute;
  }
}
In the preceding code, the RenderRequestWrapper’s getAttribute method is overridden to get the value of the myparam attribute from the request parameters, instead of the request attributes. The getRequest method in the preceding code returns the wrapped RenderRequest instance.
Code Reference
See the MyRenderRequestWrapper and MyActionRequestWrapper classes in the ch3_BookCatalog folder for examples of how to create your own wrapper classes. For a working example of wrapper objects, see chapter 13.
Listeners in a web application allow applications to listen to events that indicate when a context is initialized, when an attribute is added or removed from a session, and so on. Portlet applications can use some of the listeners defined by the Servlet specification, like ServletContextListener, HttpSessionListener, and others (see chapter 3). Let’s look at the PortletURLGenerationListener listener, which is specific to portlet applications.
4.6.3. Using the PortletURLGenerationListener interface
The concept of listeners isn’t limited to web applications. The Portlet 2.0 API added PortletURLGenerationListener, which is specific to portlets. In portlets, you can create a portlet URL either by using portlet tag library tags (described in chapter 6) or programmatically by using the create URL methods (createActionURL, createRenderURL, and createResourceURL) defined in the MimeResponse interface. The PortletURLGenerationListener allows you to intercept the portlet URL generation and take specific actions before it’s written out as part of the content, helping you centralize actions that you want to perform on all the portlet URLs generated in a portlet application.
Note
The PortletURLGenerationListener is supported in Liferay Portal 6.x and OpenPortal Portlet Container 2.1.2 with GlassFish Server.
The PortletURLGenerationListener defines methods that you can implement to take specific actions on portlet URLs. Listing 4.4 shows an example PortletURLGenerationListener that modifies the action and render URLs so that they send the action or render requests over a secure connection (that is, HTTPS) and the portlet is displayed in MAXIMIZED window state. If these settings are applied to all portlet URLs, the portlet will always be accessed over a secure connection and the portlet will always be in a maximized state when the render and action requests are sent to a portlet.
Listing 4.4. PortletURLGenerationListener example

The MyUrlGenerationListener class implements PortletURLGenerationListener. The PortletURLGenerationListener’s filterActionURL method is implemented ![]() . It sets the window state to MAXIMIZED for portlets receiving the action request, and it uses the PortletURL’s setSecure method to instruct the portlet container that all action request invocations must be transferred over a secure connection
(HTTPS). At
. It sets the window state to MAXIMIZED for portlets receiving the action request, and it uses the PortletURL’s setSecure method to instruct the portlet container that all action request invocations must be transferred over a secure connection
(HTTPS). At ![]() and
and ![]() , the MyUrlGenerationListener implements the PortletURLGenerationListener’s filterRenderURL and filterResourceURL methods.
, the MyUrlGenerationListener implements the PortletURLGenerationListener’s filterRenderURL and filterResourceURL methods.
Warning
In Liferay Portal 6.x, the portal server doesn’t honor the window state set on the PortletURL object by PortletURLGenerationListener.
The PortletURLGenerationListener defines methods that take specific actions on the render, action, and resource URLs of portlets, as shown in listing 4.4. The MyUrlGenerationListener must be registered in the portlet deployment descriptor to instruct the portlet container to invoke the listener before the URLs are written out.
The following XML fragment shows how you can configure listeners in the portlet deployment descriptor:
<portlet-app ...>
  <portlet>
    ...
  </portlet>
  <listener>
    <listener-class>
      chapter03.code.listing.utils.MyUrlGenerationListener
    </listener-class>
  </listener>
</portlet-app>
Note
In Portlet 2.0, the render and action URLs belong to the same type, PortletURL. The resource URL belongs to the ResourceURL type.
The <listener> element is a subelement of <portlet-app>, so the listeners are applied to all portlets in the portlet application.
Code Reference
Refer to the MyUrlGenerationListener class and the portlet deployment descriptor in the source code’s ch3_BookCatalog folder to see an example of the PortletURLGenerationListener in use. In this case, it sets the window state to MAXIMIZED for all action and render URLs.
In this chapter and the previous one, we’ve seen that there could be many reasons why a portlet might work differently on different portal servers; different servers have varying features, different limitations and bugs, and differing support for optional features. In most cases, you’ll be able to find an intermediate solution that works on all platforms. For instance, if expiration- and validation-based content caching isn’t supported, you can use data caching to boost portal performance, and if adding JavaScript or CSS files isn’t supported using the RenderResponse object’s MARKUP_HEAD_ELEMENT, you can check for its support in the portlet code before injecting JavaScript and CSS in the portal page.
But in some scenarios, using portal server–specific APIs and databases is the only way to address a particular business requirement. Even if you don’t plan to deploy the portlet across different portal servers, you should design it so that it can be easily adapted for different portal servers, in case it becomes necessary to migrate portlets from one portal server to another. The downside of this is that it requires an additional initial effort to create the portlet.
4.7. Designing portable portlets
In order to design portlets that are portable across different portal servers, the following points should be taken into account during development:
- Portal server features and limitations
- Portal server–specific code should be separated out from common code
Let’s discuss these two points in detail.
4.7.1. Portal server features and limitations
The key to developing portable portlets is to know your target portal servers.
Suppose you have been assigned to develop the Book Catalog portlet for the Jetspeed 2.2 and Liferay Portal 6.x portal servers. You start developing the portlet using Jetspeed, and you use custom portlet-managed portlet modes. If you deploy that portlet on Liferay Portal, it would be bound to behave differently, because Liferay Portal’s support for custom portlet-managed portal modes is broken. If you discover a problem with your portal server at a later stage in development, the code may require a major rewrite, and the overall design of the portlet may need to be changed. You can minimize the effort required to develop portable portlets if you invest some time up front in learning the features and limitations of your portal servers.
Knowing your target portal servers isn’t only important for developing portable portlets; it’s also helpful in deciding what portlets you should build, and which of the built-in portlets offered by your portal server you should reuse or customize. For instance, if your target portal server provides a built-in Discussion Forum portlet, it may be better to reuse that portlet, because the effort required to create a discussion forum portlet is significant.
Reusing Built-in Services
In many scenarios, you may want to reuse the portal server services used by the built-in portlets, but not the user interface offered by the portlets. For instance, Liferay Portal offers a Document Library portlet that you can use to store your documents. If users of your portlet have to upload and retrieve documents (like the book TOC in the Book Catalog portlet), you can reuse the Document Library portlet’s service classes to upload or download files.
Figure 4.8 shows the built-in Document Library portlet in Liferay Portal, which allows you to organize your documents. You can create folders (and subfolders) to define categories under which you want to keep your documents. The Search option allows you to search for documents within the document library.
Figure 4.8. Liferay Portal’s built-in Document Library portlet allows you to manage documents. You can create folder structures and search for documents maintained by the library.

Reusing built-in services tightly couples your portlet with the portal server, which affects the portability of your portlets across portal servers. Nevertheless, you can still design your portlets to adapt to new portal server environments by using service adapters.
Directly Using Portal Databases
If the documentation for your portal server provides details about the internal database used by the portal server, you could use the database tables directly to retrieve or store data, but this isn’t recommended. Accessing database tables that are used internally by your portal server may result in data inconsistency if the documentation doesn’t provide sufficient details about the links between various tables.
Directly using the portal database also affects the portability of your portlets, because each portal server has its own specific database for storing portal information like user roles, user groups, and more. But you can still design your portlets to be portable by using data access adapters.
4.7.2. Designing for change
If you want to use your portlets across different portal servers, you need to customize the code at three levels, depending upon what you’re trying to customize. In this section, we’ll look at these three levels and at what type of customization is performed in each.
Customizing Request-Handling Logic
Your request-handling logic may need some customization to address limitations or bugs specific to the portal server your portlet uses. For instance, you’ll need to add JavaScript and CSS to the head section of the markup if you have Jetspeed 2.2 using MimeResponse’s MARKUP_HEAD_ELEMENT property. Liferay Portal 5.2.3/6.x doesn’t support adding JavaScript and CSS using the MARKUP_HEAD_ELEMENT property; to address this, you’ll need to customize your request-handling logic so that JavaScript and CSS elements are added to the head section of the markup only if the portal server is Jetspeed.
To customize request-handling logic, you can use the PortalContext’s getPortalInfo method to determine which portal server the portlet is deployed on.
Customizing the Service Layer
If you’re using an existing portal service while developing your portlets, the service implementation needs be customized for different portal server environments. For instance, if you’re using Liferay Portal’s Document Library service in the Book Catalog portlet to manage the book TOCs, you need to provide a replacement service that can be used when the Book Catalog portlet is deployed on Jetspeed.
Customizing the Data Access Layer
If you’re using portal server–specific database tables to store and retrieve information, you need to customize the data access logic when the portlet is deployed on a different portal server. For instance, if you’re directly using the announcement tables in the Liferay Portal database to store or retrieve announcement details in your Announcement portlet, the logic for storing and retrieving data needs to be altered when the Announcement portlet is deployed on Jetspeed or some other portal server.
The request-handling logic specific to a portal server can’t be easily separated out, because it’s tightly coupled with the portlet request and response. Service and data access logic can easily be separated out from the portlet code because it’s not tightly coupled with the web tier.
To design portlets that are dependent on a portal’s internal database tables or portal server–specific services, you should use adapters for the data access and service. Figure 4.9 shows how you can implement a service adapter for each portal server.
Figure 4.9. The PortalService interface defines methods that invoke portal server–specific methods. LiferayPortalService and JetspeedPortalService are concrete implementations of PortalService and provide service implementations specific to Liferay Portal and Jetspeed.

In figure 4.9, the PortalService interface defines the methods that use portal server–specific services. LiferayPortalService and JetspeedPortalService represent PortalService implementations specific to Liferay Portal and Jetspeed, respectively. Similarly, you’ll need data access implementations specific to each portal server, if your portlets directly interact with portal server–specific databases.
The signatures of the portal server–specific methods defined in the PortalService interface are as follows:
Map <method_name> (Map parameters)
Here, method_name is the name of the method in the portal server–specific service interface.
One of the important things to notice in the service method signatures is that the argument and return types of the method are of type java.util.Map. The use of the Map type argument makes the service interface methods generic in nature, so you can pass any arguments, regardless of what the portal service–specific services might need for processing. Similarly, the Map return type ensures that you can return multiple types as the return value. The use of Map as the argument and return type also means you can change the parameters without affecting the method signature.
Figure 4.10 shows how you can use portal server–specific services and data access objects from portlet-specific services. In this figure, MyBookCatalogPortlet represents the portlet class for the Book Catalog portlet. BookCatalogService provides the implementation of services required by the Book Catalog portlet. PortalServiceFactory and DataAccessObjectFactory are factories for creating portal server–specific services and data access objects.
Figure 4.10. The BookCatalogService class implements the business functionality of the Book Catalog portlet. The BookCatalogService uses factory classes to obtain portal server–specific DAOs and services.

MyBookCatalogPortlet is directly dependent upon BookCatalogService and not on portal server–specific services, so if the portal server–specific services change over time, the impact of that change can be addressed in the service layer.
The sequence diagram shown in figure 4.11 shows how a portal server–specific method invocation takes place in the design described in figures 4.9 and 4.10.
Figure 4.11. A sequence diagram showing how MyBookCatalogPortlet accesses the Liferay Portal–specific services. BookCatalogService has a reference to the appropriate implementation of the PortalService interface (LiferayPortalService, in this case), which invokes the addFile method of the DLLocalServiceUtil Liferay Portal service class.

In figure 4.11, MyBookCatalogPortlet invokes the BookCatalogService’s uploadTOC method. BookCatalogService contains a reference to the appropriate PortalService instance that needs to be used for the current portal server, which it obtained using a service factory (refer to figures 4.9 and 4.10). If the portal server is Liferay Portal, the uploadTOC method of LiferayPortalService is called. Next, LiferayPortalService is responsible for invoking the Liferay Portal–specific portal service, which is DLLocalServiceUtil’s addFile method. The DLLocalServiceUtil class represents a utility class in Liferay Portal that implements services used by Liferay Portal’s built-in Document Library portlet. So, in a way, by invoking the DLLocalServiceUtil’s methods, you’re reusing the services offered by Liferay Portal.
This completes our two-chapter discussion of the Portlet 2.0 API.
4.8. Summary
In this chapter, you saw how to create portlets that show localized content and how to make use of custom portlet modes and window states. We also looked at how you can programmatically secure portlets, and how you can design portlets that can easily be adapted to different portal servers.
In the next chapter, we’ll look at how to create a portal in Liferay Portal using the Book Catalog portlet and Liferay Portal’s built-in portlets. We’ll also look at how knowledge of the target portal server can help reduce the effort involved in creating custom portlets, like the Book Catalog portlet.