
Chapter 8. Annotation-driven development with Spring
- Spring Portlet MVC annotations
- Dependency injection using JSR 330 and JSR 250
- Validation using Spring Validation API and JSR 303
- Using Spring’s form tag library
- Localization and file upload support
- Unit testing with Spring’s TestContext framework
In the previous chapter, you created Spring controllers and provided a HandlerMapping bean definition in the web application context XML file to map portlet requests to appropriate controllers. But wouldn’t it be easier if you could specify which portlet request is handled by a controller in the controller class itself? In this chapter, we’ll expand on the core concepts covered in the previous chapter and see how Spring’s annotation support helps you reduce the amount of configuration information in the application context XML files and simplify application development.
The annotations covered in this chapter span multiple aspects of portlet development using Spring, from writing request handlers, to dependency injection, to validation and testing. This chapter demonstrates these aspects in the development of the Book Catalog portlet, to show how Spring simplifies portlet development using annotations.
In the first half of this chapter, we’ll look at Spring Portlet MVC annotations and discuss dependency injection using Spring’s @Autowired annotation, JSR 330’s @Inject annotation, and JSR 250’s @Resource annotation. As we go through the implementation of the Book Catalog portlet, you’ll see how Spring Portlet MVC annotations reduce the direct dependency of portlet request handlers on the portlet API.
Most of the second half of this chapter focuses on the Spring Validation API, JSR 303’s bean validation features, Spring’s form tag library, and how you can test Spring Portlet MVC controllers. Because testing controllers is an important aspect of developing portlets, we’ll look at how Spring simplifies testing using mock objects and the TestContext framework. Toward the end of this chapter, we’ll look at how you can localize content using Spring Portlet MVC, upload files from a portlet, and add JavaScript and CSS to the portal page that contains the portlet.
The version of the Book Catalog portlet that we’ll develop in this chapter is a multipage portlet that does the following:
- Uses Spring Portlet MVC annotations to develop controllers
- Uses dependency injection annotations to wire services
- Uses the Spring form tag library to create portlet pages
- Uses JSR 303 to validate domain objects
- Uses the Spring TestContext framework to unit test and integration test controllers
If you’re new to Java annotations, you may be wondering what they are, how they’re used, and what benefits they offer. The next section will provide a brief overview of annotations to set the stage for the rest of the chapter.
8.1. An overview of annotations
Annotations define metadata (data about data) that’s specified in the application source code. You can think of annotations as instructions to the compiler and runtime environment about tasks that should be performed during compilation or at runtime.
Support for annotations was added to Java in Java 5. Annotations are represented by the @ symbol followed by the name of the annotation (like @Controller or @Resource).
Annotations can be used by tools to do any of the following:
- Generate boilerplate code
- Write configuration information in configuration files
- Provide information about application code to tools
- Modify program behavior at runtime
In most application development scenarios, metadata about the application is specified in external configuration files:
- Web application deployment descriptor— Contains information about servlets and the URL they map to
- Web application context XML file— In Spring Portlet MVC (discussed in the previous chapter), contains bean definitions
Annotations may have compile-time or runtime semantics, depending upon their definitions; when you create an annotation, you specify whether it’s applied at runtime or during the compilation of the application’s source code. For instance, the @Deprecated built-in Java annotation is a compile-time annotation that informs the Java compiler that a Java element, such as a method, field, interface, or class, is deprecated. If an @Deprecated Java element is used anywhere in the application, the Java compiler issues a warning specifying that the application source code makes use of a deprecated Java element.
Annotations with runtime semantics are meant to be read at runtime, using reflection, to change program behavior. For instance, the @RequestMapping annotation in Spring Portlet MVC has runtime semantics. It’s used by Spring Portlet MVC controllers to specify the portlet request that’s handled by the controller. At runtime, the Spring Portlet MVC framework makes use of the information provided by the @RequestMapping annotation to identify the controllers that will handle the incoming portlet requests.
Let’s take a look at the requirements of this chapter’s version of the Book Catalog portlet.
8.2. Developing the Book Catalog portlet using annotations
Figure 8.1 shows the Book Catalog portlet’s home page, which displays the list of books in the catalog.
Figure 8.1. The Book Catalog portlet’s home page listing the books in the catalog. The page gives the option to edit or remove an existing book’s information or to add a new book to the catalog.

In figure 8.1, the Edit and Remove hyperlinks allow the user to edit or remove the selected book. If the user clicks Add Book, the Book Catalog portlet displays a form where the user can enter details about the book to be added, as shown in figure 8.2. This figure shows that book title, author, and ISBN fields are mandatory. If a user attempts to save the book information without completing any of the mandatory fields, or if the entered value for the ISBN isn’t numeric, an error message is displayed, as shown in figure 8.3.
Figure 8.2. The form for adding a new book to the catalog. Book title, author, and ISBN information must be supplied to add a new book to the catalog. The Home link takes the user back to the home page of the portlet.

Figure 8.3. When editing an existing book’s information or adding a new book to the catalog, error messages are shown if the required fields aren’t completed or the ISBN value is non-numeric.
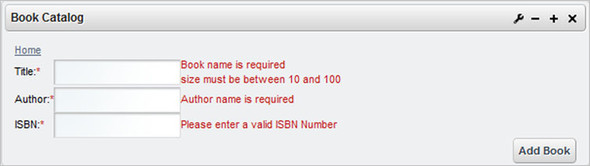
Because each book in the catalog has a unique ISBN, an attempt to add a book with an existing ISBN will display the following error message: “A book with the same ISBN number already exists. Please enter a different ISBN number.” If the book information is successfully added, the user is taken to the portlet’s home page (shown in figure 8.1).
The Book Catalog portlet represents a real-world portlet consisting of multiple pages and requiring form submission functionality. In the rest of this chapter, we’ll develop this portlet using Spring Portlet MVC concepts, focusing primarily on using Spring annotations to reduce boilerplate code and configuration.
8.3. Spring Portlet MVC annotations
In Spring 2.5, annotations were introduced to create controllers that support form handling and command object functionality without requiring controllers to extend or implement framework-specific classes or interfaces. This new breed of controllers (referred to as annotated controllers) makes use of annotations at the type level (which is the class or interface level), method level, and method parameter level to provide the controller functionality.
Note
A command object acts as a placeholder for HTTP request parameters that can be entered in a portlet page. Storing request parameters in a command object makes the information independent of the HTTP protocol.
In this section we’ll look at a variety of things you’ll need to develop portlets using annotations:
- An annotation that identifies a class as a Spring Portlet MVC controller
- Spring’s classpath-scanning feature for autoregistering Spring components
- Spring’s annotations for autowiring dependencies by name or type
- JSR 250 and JSR 330 annotations for dependency injection
- Annotations for mapping requests to handlers and handler methods
- An annotation that binds request parameters to handler method arguments
- An annotation that identifies a model attribute
- An annotation that stores model attributes in a handler’s conversational state
- An annotation that identifies a method as an exception handler
- An annotation that initializes WebDataBinder, setting the property editor and validator
Take a deep breath. We’ll start with the @Controller Spring Portlet MVC annotation.
Code Reference
If you haven’t yet done so, you should now import the ch8_BookCatalog Eclipse project from the source code that accompanies this book. This will allow you to follow along with the code references in the rest of this chapter. The SomeController handler, shown later in this chapter, isn’t available as part of the source code and is only used to explain the concepts.
8.3.1. Identifying controllers with @Controller
The @Controller annotation is a type-level annotation, which indicates that the annotated class is a Spring component of type controller. The following listing shows the @Controller annotation in use in AddBookController.
Listing 8.1. An @Controller annotation

The @Controller type-level annotation ![]() accepts an optional value element, which specifies the logical name of the controller component. The value element is the same as the id attribute of a bean element, which you used in chapter 7 to define objects in the web application context XML file. As you can see, AddBookController doesn’t extend or implement a Spring-specific class or interface. The showAddBookForm method is a render method of the controller. The addBook method represents an action method of the controller.
accepts an optional value element, which specifies the logical name of the controller component. The value element is the same as the id attribute of a bean element, which you used in chapter 7 to define objects in the web application context XML file. As you can see, AddBookController doesn’t extend or implement a Spring-specific class or interface. The showAddBookForm method is a render method of the controller. The addBook method represents an action method of the controller.
Annotating a handler with the @Controller annotation doesn’t automatically register it with the portlet’s web application context. You’ll need to use Spring’s classpath-scanning feature to register your controllers. The key point in listing 8.1 is that if you’re using the @Controller annotation, your controller class doesn’t need to implement or extend any framework-specific class or interface.
Note
In listing 8.1, annotations for identifying action and render methods in the controller class have been intentionally omitted. Later in this chapter, you’ll see how the action and render methods of Spring Portlet MVC controllers are identified using annotations.
Let’s look at the Spring’s classpath scanning and autodetection, which make the use of Spring annotations worthwhile.
8.3.2. Classpath scanning and autoregistration
The @Controller annotation is typically used along with Spring’s classpath-scanning feature to allow automatic registration of controller classes. The classpath-scanning feature scans for Spring components in the classpath—components that are annotated with @Component, @Service, @Controller, or @Repository annotations—and automatically registers them with the web application context. This effectively means that if you’re using classpath scanning along with Spring’s component annotations, you don’t need to explicitly declare beans in the web application context XML file.
Note
The @Component annotation is used to annotate a class as a component. The @Controller, @Service, and @Repository annotations are more specialized forms of @Component and are meant to annotate controllers, services, and DAOs (data access objects), respectively. In this chapter, we’ll make use of the @Controller and @Service annotations. Refer to chapter 9 for examples of using the @Repository annotation.
To enable Spring’s classpath-scanning feature for your portlet, you need to use the component-scan element of Spring’s spring-context schema. The following element in the Book Catalog portlet’s web application context XML file shows how the component-scan element is used:
<context:component-scan base-package="chapter08.code.listing"/>
Here, context is the namespace with which elements of the spring-context.xsd schema are available in the web application context XML file. The base-package attribute lists comma-separated names of packages under which the Spring container will look for Spring components. This component-scan element will scan all the classes inside the chapter08.code.listing package and its subpackages, and autoregister any @Component, @Repository, @Controller, or @Service annotated classes with the web application context. For example, the controller in listing 8.1 is annotated with the @Controller annotation and resides in the chapter08.code.listing.controller package, so it will be autoregistered with the web application context.
Note
You can also use the include-filter and exclude-filter subelements of component-scan to include or exclude components from scanning.
When you use classpath scanning to autoregister Spring components, the name with which a component is registered in the web application context is defined by the value element of the annotation. In listing 8.1, the @Controller annotation’s value element is set to addBookController, so the AddBookController controller is registered with the name addBookController in the web application context. This is same as defining AddBookController in the web application context XML with the id attribute’s value set to addBookController, as shown here:
<bean id="addBookController"
    class="chapter08.code.listing.controller.AddBookController"/>
You can also specify the value of the value element without explicitly mentioning the element in the annotation, as shown here:
@Controller("addBookController")
The @Controller("addBookController") and @Controller(value = "addBookController") declarations are same.
Note
If a Spring component doesn’t specify the value element, Spring registers it with the web application context as a bean whose name is the same as of that of the component class, but it begins with a lowercase letter. It’s recommended that you use the value element to specify a custom name for Spring components because it’s useful when injecting components “by name” into other beans using Spring’s dependency injection facility. (We’ll discuss this dependency injection feature and the benefits of specifying a custom name for the components in the next section.)
As you’ve seen, if you’re using the classpath-scanning feature, controller beans aren’t explicitly declared in the web application context XML file. So how are the dependencies of the controller beans defined? Let’s look at how dependencies are injected in autoregistered Spring components using the @Autowired, @Resource (from JSR 250), and @Inject (from JSR 330) annotations.
8.3.3. Dependency injection using @Autowired and @Qualifier
The @Autowired annotation is used with a field, setter method, or constructor to instruct the Spring container to inject the dependency. For instance, the AddBookController handler uses the @Autowired annotation to instruct the Spring container to inject the BookService bean, as shown here:
import org.springframework.beans.factory.annotation.Autowired;

@Controller(value="addBookController")
public class AddBookController {
    @Autowired
    private BookService bookService;
    ...
}
This code assumes that a class of type BookService is registered in the web application context. The BookService may be registered either by defining BookService in the web application context XML file or by being autoregistered by the classpath-scanning feature.
The @Autowired annotation resolves dependencies by type and not by name. If multiple implementations of BookService beans are available in the web application context, the preceding code would result in an exception because the Spring container would be unable to find a unique implementation of the BookService interface.
When multiple implementations of a bean are available in the web application context, you need to resolve dependencies by name, by using the @Autowired annotation along with the @Qualifier annotation. The @Qualifier annotation, in its simplest form, accepts the id of the bean to be injected. The following code snippet demonstrates how to resolve dependencies by name:
import org.springframework.beans.factory.annotation.Autowired;
import org.springframework.beans.factory.annotation.Qualifier;

@Controller(value="addBookController")
public class AddBookController {
    @Autowired
    @Qualifier("myBookService")
    private BookService bookService;
    ...
}
In the preceding code, @Qualifier accepts a String element that corresponds to the name of the BookService bean that is to be injected into AddBookController. The BookService bean may be defined in the web application context XML file with the myBookService id or it may be defined as a Spring component using an @Service annotation whose value element’s value is myBookService.
You can also inject dependencies in Spring components using the @Resource and @Inject annotations.
8.3.4. Dependency injection using @Resource and @Inject
You can also autowire dependencies by name by simply using the @Resource annotation from JSR 250 (Common Annotations). The @Resource annotation can only be applied to a class, field, and setter method (as compared with the @Autowired annotation, which can also be used with a constructor).
The following code shows the @Resource annotation in use:
import javax.annotation.Resource;

@Controller(value="addBookController")
public class AddBookController {
    @Resource(name="myBookService")
    private BookService bookService;
    ...
}
You can also use the @Inject annotation from JSR 330 (Dependency Injection for Java), instead of the @Autowired Spring annotation, as shown here:
import javax.inject.Inject;

@Controller(value="addBookController")
public class AddBookController {
    @Inject
    private BookService bookService;
    ...
}
The @Inject annotation can be applied to constructors, methods, and fields, just like @Autowired. The @Inject annotation exhibits the same behavior as @Autowired; both throw an exception if a unique bean implementation isn’t found.
Note
To use the @Resource and @Inject annotations, you must include the JSR 250 (http://jcp.org/en/jsr/detail?id=250) and JSR 330 (http://jcp.org/en/jsr/detail?id=330) JAR files in the project’s build path and in the classpath of the deployed WAR file. In the ch8_BookCatalog example folder, these JAR files are located in the WEB-INF/lib directory.
Once your controller is ready, the next step is to map portlet requests to your controller using the @RequestMapping, @ActionMapping, @RenderMapping, @ResourceMapping, and @EventMapping annotations.
A few years back, when I was working for the first time on a Spring-based project, doing anything in Spring involved two steps: coding and configuring. If I wrote a controller, I had to define that controller in the web application context XML. If I wrote a setter method for a service used by my controller, I had to go back to the web application context XML and define the dependency of the controller on the service. If I wrote a property editor, I had to configure it in the web application context XML.
Annotations let you focus on one thing: the code. The configuration information is captured as part of the source code, so you don’t need to keep going back and forth between your code and XML configuration files.
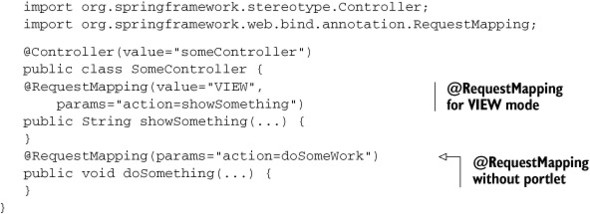
8.3.5. Mapping requests to handlers and methods using @RequestMapping
The @RequestMapping annotation maps portlet requests to appropriate handlers and handler methods. @RequestMapping at type level maps portlet requests to handlers based on the current portlet mode and request parameters.
The following listing shows how you can use the @RequestMapping annotation to map all portlet requests received in VIEW mode to the AddBookController handler.
Listing 8.2. A type-level @RequestMapping annotation

In listing 8.2, the @RequestMapping annotation is used at the type level to indicate that the AddBookController handler is responsible for handling portlet requests that are received in VIEW mode.
Let’s now discuss the @RequestMapping annotation in detail and look at the different ways it can be used in controllers.
@Requestmapping Annotation Options
In the previous example you saw that the @RequestMapping annotation is used to map portlet requests to a handler based on portlet mode. The @RequestMapping annotation can also be used to map requests to a handler based on the value of a request parameter. Let’s say you want to map the SomeController handler to all portlet requests that are received in VIEW mode and that contain a request parameter named action with a value of showSomething. Here’s how you can use the @RequestMapping annotation to achieve this behavior.
Listing 8.3. A type-level @RequestMapping annotation using the params element

In listing 8.3, the value element of the @RequestMapping annotation specifies the portlet mode that’s supported by the SomeController handler. The params element specifies the request parameter name-value pairs, which must be present in the portlet request for SomeController to handle the request. As you may have guessed, the @RequestMapping annotation is doing what the PortletModeParameterHandlerMapping handler mapping was responsible for doing in chapter 7.
Method-level @RequestMapping annotations are meant to narrow down the @RequestMapping specified at the type level to a particular method in the handler class. It’s not mandatory that your controller has a type-level @RequestMapping; if it doesn’t, the method-level @RequestMapping annotations must specify the portlet mode to which the method is mapped.
Warning
The sample code in the ch8_BookCatalog Eclipse project makes use of @RenderMapping and @ActionMapping method-level annotations instead of @RequestMapping method-level annotations. The @RenderMapping, @ActionMapping, @EventMapping, and @ResourceMapping annotations were introduced in Spring 3.0 and are the preferred means of mapping requests to methods in handlers.
The following listing shows a modified SomeController class that uses @RequestMapping annotations at the method level.
Listing 8.4. Correct and incorrect method-level @RequestMapping annotations
In listing 8.4, the SomeController handler contains @RequestMapping annotations only at the method level. The @RequestMapping annotation for the doSomething method doesn’t specify the portlet mode in which the method is invoked. This is an exception condition, because every handler method must map to VIEW, EDIT, or HELP portlet mode.
In a typical scenario, the type-level @RequestMapping annotation defines the portlet mode and (if required) the request parameter combination to specify portlet requests mapped to the handler, and the @RequestMapping annotations at the method level define request parameters to further narrow down the portlet request to a particular method in the handler. It’s an exception condition if the method-level @RequestMapping defines a portlet mode that’s different from the one defined at the type level.
The next listing shows another incorrect usage of @RequestMapping at the method level.
Listing 8.5. Correct and incorrect method-level @RequestMapping annotations

In listing 8.5, the type-level @RequestMapping annotation specifies that SomeController handles requests in VIEW portlet mode. But the @RequestMapping for the showSomething method specifies that it’s meant to handle requests in EDIT portlet mode, which is contradictory to what is specified by the type-level @RequestMapping annotation. This difference in portlet mode definitions for the @RequestMapping annotation at type and method levels results in an exception condition.
Warning
Spring 3.0 Portlet MVC doesn’t treat it as an error if a portlet request ends up mapping to different methods of the same or different controllers. If you get a response that isn’t expected, verify that the portlet request doesn’t map simultaneously to different methods of the same or different controllers.
If a method-level @RequestMapping annotation doesn’t specify the portlet mode and request parameter to which the method maps, the method is the default action or render method of the controller. For instance, the following method-level @RequestMapping annotation indicates that the doSomething method is the default render or action method of the handler class:
@RequestMapping
public void doSomething(...) {
   ...
}
One of the advantages evident from looking at the @RequestMapping annotation is its flexibility in defining multiple render and action methods in the controller class. If you implement the Controller interface or extend the AbstractController class to create your controllers, you’re restricted to having only one render and one action method. Refer to chapter 7 to see examples that make use of the Controller interface and AbstractController class to create handlers.
Identifying Render and Action Methods Using @RequestMapping
You saw earlier that the @RequestMapping annotation is used to map requests to a handler method. You also saw that the method-level @RequestMapping annotation doesn’t specify whether the annotated method is an action or render method. So when it comes to invoking a controller’s render or action method, how does Spring Framework know which method is a render method and which is an action method?
Spring identifies a method as an action, render, resource, or event method based on method arguments and return type. The following listing shows the SomeController handler, in which the method arguments are specified.
Listing 8.6. Method-level @RequestMapping annotations

In listing 8.6, the showSomething method is a render method, but it hasn’t been defined to accept RenderRequest and RenderResponse objects; the doSomething method is an action method that only accepts an ActionRequest parameter. You can define action and render methods with such signatures because annotated controllers allow you to have flexible method signatures; you can pass arguments and define return types appropriate for your request-handling method.
In listing 8.6, the showSomething method is a render method because it defines its return type as String, which is a logical name of the view to be rendered by the portlet. An action method in annotated controllers can’t have a non-void return type.
The doSomething method is an action method because it accepts an ActionRequest as a method argument.
Note
In chapter 7, you saw how the ViewResolver bean is used to resolve a logical view name to an actual view. Similarly, in annotated controllers, the ViewResolver configured in the application context XML is responsible for resolving the String value returned by the render method to an actual view name. There are other return types possible for render methods in annotated controllers, but we’ll only be using render methods that return String values.
The possible arguments that you can pass to a method annotated with the @RequestMapping annotation include ActionRequest, ActionResponse, RenderRequest, RenderResponse, Model, command objects, and request parameters annotated with @RequestParam (discussed later in this chapter). The possible return types a method annotated with @RequestMapping can have include ModelAndView, View, String, and void. For a more detailed list of possible arguments and return types, refer to the Spring 3.0 API documentation.
Tip
If the @RequestMapping annotated handler methods provide flexibility with method arguments and return types, they also add a little bit of confusion to the process of distinguishing a handler class’s render methods from its action methods. The simplest way to distinguish your render and action methods from each other is by passing RenderRequest or RenderResponse arguments to your render method, and ActionRequest or ActionResponse arguments to your action method, and keeping the return type of the action method as void.
Your action method must be defined to return void. Any other return type will result in an error. A common misconception is that an @RequestMapping annotated method that returns void is an action method, but that’s incorrect because you may have a render method that returns void and yet accepts a RenderResponse object as an argument to write directly to the output stream. For example, the following method is a render method, not an action method:
@RequestMapping(params="action=doSomeWork")
public void doSomething(RenderResponse response) {

     PrintWriter writer = response.getWriter();
     writer.println("Hello World");
}
In the preceding code, the RenderResponse object is passed to the doSomething method, which writes directly to the output stream and so acts as a render method.
@RequestMapping Annotation and Portlet Lifecycle Phases
In Portlet 1.0, a portlet had only two lifecycle phases: RENDER_PHASE and ACTION_PHASE (refer to the Portlet API’s PortletRequest interface). Portlet 2.0 introduced two additional lifecycle phases: RESOURCE_PHASE (a phase in which a resource is served by the portlet, like a binary file) and EVENT_PHASE (a phase in which an event received by other portlets or the portlet container is processed by the portlet; this is useful in inter-portlet communication). These latter two lifecycle phases aren’t addressed by method-level @RequestMapping annotations.
Spring 3.0 introduced additional annotations to help clearly distinguish the action and render methods of a portlet and to address new portlet lifecycle phases. In this chapter, we’ll only discuss the newly introduced annotations for render and action methods (@RenderMapping and @ActionMapping). The event and resource phases in the portlet lifecycle are discussed in detail in chapters 11 and 12 respectively.
8.3.6. Identifying render methods with @RenderMapping
You earlier saw that the @RequestMapping annotation makes it a bit difficult to distinguish render methods from action methods in annotated controllers. Spring 3.0 introduced the @RenderMapping annotation, which is used to specify a handler method as a render method. @RenderMapping is a method-level annotation that maps render requests to a handler class’s render methods. You can still use the @RequestMapping annotation to annotate your render methods, but using the @RenderMapping annotation is recommended.
Tip
In an annotated controller, you can also use a combination of @RenderMapping and @RequestMapping to annotate different render methods of the same handler, but it’s not recommended.
The following listing shows the @RenderMapping annotation used in the AddBookController controller.
Listing 8.7. An @RenderMapping annotation

In listing 8.7, the @RenderMapping annotation marks the showAddBookForm method as a render method of the AddBookController handler. The optional params element specifies request parameter name-value pairs, which should be present in the portlet request to invoke the handler method. For instance, the showAddBookForm method is invoked when the current portlet mode is VIEW (see the AddBookController’s @RequestMapping type-level annotation in the above listing) and the value of the myaction request parameter is addBookForm.
Let’s now discuss the @RenderMapping annotation in detail and look at the different ways it can be used in controllers.
@Rendermapping Annotation Options
@RenderMapping additionally provides the value element, which is used to map the window state that applies to the method, as shown here.
Listing 8.8. An @RenderMapping annotation
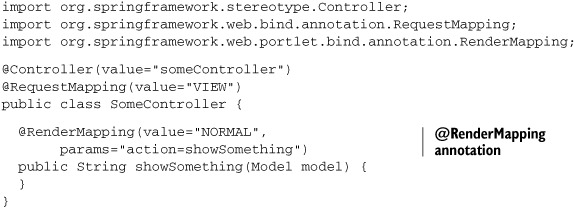
In listing 8.8, the @RenderMapping annotation marks the showSomething method as the SomeController handler’s render method. The optional value element of @RenderMapping specifies the portlet window state to which the render method applies. The value element takes standard window states (like NORMAL, MAXIMIZED, and MINIMIZED) or custom window states (discussed in chapter 4) supported by the portal as values. If you don’t specify the value element, the render method applies to all window states.
The showSomething method in listing 8.8 is invoked when the current portlet mode is VIEW (see the @RequestMapping type-level annotation of SomeController), the window state is NORMAL, and the value of the action request parameter is showSomething.
Because both value and params elements are optional in the @RenderMapping annotation, if neither is specified, the handler method becomes the handler’s default render method for the portlet mode specified by the type-level @RequestMapping annotation. For instance, if the params and value elements were removed from the @RenderMapping annotation in listing 8.8, the showSomething method would become the render method for all render requests received in VIEW mode.
@Rendermapping and Method Signatures
Methods annotated with the @RenderMapping annotation enjoy the same flexibility in terms of their signature as the @RequestMapping–annotated render methods. If you’re using the @RenderMapping annotation in your handler class, the class must have an @RequestMapping annotation at the type level because @RenderMapping doesn’t have the option to specify the portlet mode with which the method is associated.
As mentioned earlier, render and action methods in a portlet must be associated with a portlet mode, and if you define the @RequestMapping annotation at the type level for your handler class, all the methods (action and render) in the handler class are by default associated with the portlet mode specified by the type level @RequestMapping annotation.
The following listing shows the SomeController handler, which doesn’t use an @RequestMapping annotation at the type level.
Listing 8.9. An @RenderMapping annotation

In listing 8.9, the SomeController handler doesn’t have a @RequestMapping annotation at the type level, so the showSomething render method isn’t associated with any portlet mode (@RenderMapping doesn’t have the option to specify a portlet mode for the method). This results in an exception condition.
Let’s now look at how we can specify a handler method as an action method using the @ActionMapping annotation.
8.3.7. Identifying action methods with @ActionMapping
@ActionMapping is a method-level annotation that maps action requests to handler methods. This annotation was introduced in Spring 3.0 and is the preferred way to annotate action handler methods.
The following listing shows how AddBookController makes use of the @ActionMapping annotation.
Listing 8.10. An @ActionMapping annotation
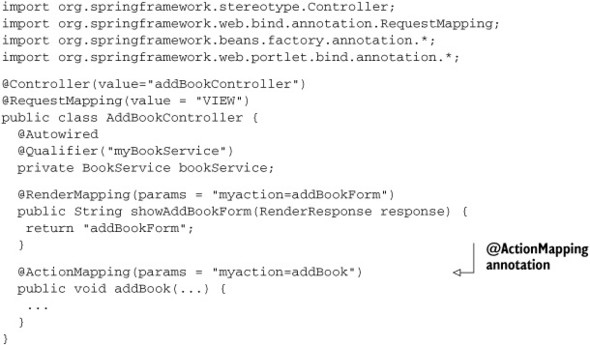
In listing 8.10, the @ActionMapping annotation marks the addBook method as an action method of AddBookController. The optional params element specifies request parameter name-value pairs, which must be present in the portlet request to invoke the addBook method. The addBook method is invoked if the portlet mode is VIEW and the value of the myaction request parameter is addBook.
Let’s now discuss the @ActionMapping annotation in detail and look at different ways it can be used in controllers.
@Actionmapping Annotation Options
In addition to the params element, @ActionMapping accepts an optional value element, which refers to the value of the javax.portlet.action request parameter.
The following listing shows the SomeController handler, which uses the value element of the @ActionMapping annotation.
Listing 8.11. An @ActionMapping annotation with a value element

In listing 8.11, the @ActionMapping annotation marks the doSomething method as an action method of SomeController. The value element specifies the value of the javax.portlet.action request parameter.
In the listing, the doSomething method is invoked when a portlet request meets the following requirements:
- The value of the javax.portlet.action request parameter is doSomeWork
- The value of the work request parameter is laundry, and the value of time is enough
Tip
In your handler class, you can use a combination of @ActionMapping and @RequestMapping to annotate different action methods, but the use of @ActionMapping is recommended.
Methods annotated with the @ActionMapping annotation enjoy the same flexibility in terms of their signature as the @RequestMapping annotated action methods. As with @RenderMapping, the handler class that uses the @ActionMapping annotation must have a type-level @RequestMapping annotation. If value and params elements aren’t specified for the @ActionMapping annotation, the corresponding method becomes the default action method of the handler.
The annotations that we’ve discussed so far are meant to map portlet requests to handler classes or methods. If you use these annotations, you don’t need to specify the handler mapping configurations in the web application context XML file. The remaining annotations discussed in this chapter help in implementing controller functionality by providing access to form-backing or command objects, request parameters, and so on.
8.3.8. Passing request parameters using @RequestParam
@RequestParam is a method-parameter-level annotation meant for binding a request parameter to a method argument. It’s useful when you want to pass a request parameter value as an argument to your handler method. If your handler method is annotated with @RequestMapping or any other annotation (like @ActionMapping, @RenderMapping, or @ModelAttribute), you can use the @RequestParam annotation; if your handler method isn’t annotated, you can’t use @RequestParam.
The following listing shows the EditBookController handler, which makes use of an @RequestParam annotation to obtain the ISBN of a book from a portlet request.
Listing 8.12. An @RequestParam annotation
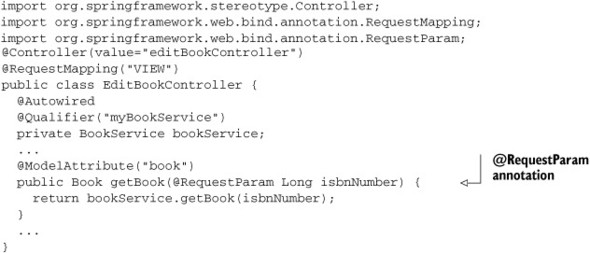
In listing 8.12, the @RequestParam annotation binds the value of the isbnNumber request parameter to the getBook method’s isbnNumber argument. The name of the method argument is used implicitly by @RequestParam to find a request parameter with the same name; if the isbnNumber request parameter is found in the request, its value is assigned to the getBook method’s isbnNumber argument.
The @RequestParam annotation precedes the method argument whose value comes from the request parameter. In listing 8.12, @RequestParam is also responsible for the type conversion of the request parameter value from String to the method argument’s java.lang.Long type.
One of the mains benefits of using @RequestParam is that your method isn’t directly dependent on the Portlet API. For instance, in listing 8.12, you don’t directly use the RenderRequest object to obtain the value of the isbnNumber request parameter.
Let’s now discuss the @RequestParam annotation in detail and see how it can be used in controllers.
@Requestparam Annotation Options
The @RequestParam annotation defines the required, value, and defaultValue elements, which you can use to customize its behavior. The following code snippet shows how you can use the required and value elements:
@RenderMapping(params="action=showPart")
public String showPart(@RequestParam(required=true,value="partNumber")
          long partNumber) {
  ...
}
In the preceding code fragment, the required element indicates whether the request parameter specified using the value element is mandatory or not. The value element specifies the name of the request parameter whose value needs to be assigned to the method argument. If the required element’s value is true and the request parameter is missing from the portlet request, an exception is thrown.
To take care of such situations, you can specify a default value for the method argument, which is passed to the method if the request parameter is missing from the portlet request. For instance, in the following code snippet, 1234567 is passed as the value of the partNumber request parameter if it’s missing from the portlet request:
@RenderMapping(params="action=showPart")
public String showPart(@RequestParam(required=true,
      value="partNumber", defaultValue="1234567")
      long partNumber) {
  ...
}
In this code, the defaultValue element specifies the default value of the request parameter.
Code Reference
To see an example of the use of the @RequestParam annotation, refer to EditBookController and RemoveBookController in the ch8_BookCatalog folder.
You saw in chapter 7 that data is stored as model attributes in the Model object, and it’s used by views like JSP pages to show portlet content. We’ll now look at how you can obtain or set model attributes using the @ModelAttribute annotation.
8.3.9. Identifying model attributes using @ModelAttribute
In chapter 7, you programmatically added model attributes to Spring’s Model object, which is then used by JSP pages to show content. You can achieve the same functionality in annotated controllers using the @ModelAttribute annotation. (See sections 7.3.1 and 7.3.2 for more on model attributes.)
The @ModelAttribute annotation is responsible for adding and retrieving model attributes to and from the Model object. @ModelAttribute is a method-level, as well as a method-parameter-level, annotation. If used at the method level, it binds the return value of the method to a model attribute, that is, it stores the value returned by the method into the Model object. If used at the method-parameter level, it retrieves the model attribute from the Model object and binds it to the method argument.
Model attributes in Spring consist of command objects and reference data (if any). Reference data is the additional information that’s required by the portlet to display the page. For instance, if you add a book category to each book in the Book Catalog portlet, the Book Catalog portlet’s Add Book form would need to display a combo box displaying a list of categories. The list of book categories would be reference data required to display the Add Book form.
Views (like JSP pages) in Spring Portlet MVC usually get their data from model attributes, so to show the Book Catalog portlet’s page (see figure 8.1), you need to obtain the list of books from the data source and store it as a model attribute. The following listing shows how BookController stores the list of books as a model attribute using the @ModelAttribute method-level annotation.
Listing 8.13. A method-level @ModelAttribute annotation

In listing 8.13, the @ModelAttribute annotation instructs the Spring container to store the object returned by the getBooks method in a model attribute named books. The value element specifies the name of the model attribute used to store the method’s returned value in the Model. The @ModelAttribute(value="books") annotation can be shortened to @ModelAttribute("books").
Note
If a handler class contains @ModelAttribute annotated methods, these methods are always called before the render or action method of the handler.
Creating Command Objects Using @Modelattribute
You saw in chapter 7 that Spring controllers that deal with command and form-backing objects are deprecated as of Spring 3.0 Portlet MVC, in favor of annotated controllers. In annotated controllers, the @ModelAttribute annotation allows you to create command or form-backing object.
Figure 8.2 shows the Add Book form, which is used to add a book to the catalog. What we’ll do is create an empty command object when the Add Book form is displayed by the portlet, and bind the user-entered values to this command object when the form is submitted. The command object will then be used by the action method of a handler to perform validation and save the book information in the data store. Let’s see how we can do this using the @ModelAttribute annotation.
Note
Depending upon the approach you follow, you may be using domain objects as command objects in your application. In the Book Catalog portlet, Book is a domain object that’s being used as a command object.
The following listing shows how the AddBookController creates a Book command object using the @ModelAttribute annotated method.
Listing 8.14. A method-level @ModelAttribute annotation for creating command object

In listing 8.14, the showAddBookForm method is the render method that’s invoked when the user clicks the Add Book button on the home page of the Book Catalog portlet. The getCommandObject method is annotated with @ModelAttribute, so it will be invoked before the handler invokes an action or render method. The getCommandObject creates a new Book object that’s stored in the Model object with an attribute named book, which means a new command object is created before the render request is received by the AddBookController class.
Note
Methods annotated with the @ModelAttribute annotation have the same flexibility in their signature as methods with the @RequestMapping annotation. The @ModelAttribute method-level annotation is supported for handler classes that use the @RequestMapping type-level annotation.
In listing 8.14, an empty Book command object was created and bound to the Model object with the name book. When a user submits the Add Book form, you need to bind the user-entered values in the form to the book model attribute and make it available to the AddBookController’s action method, which is responsible for saving the book information. The binding of user-entered values to the book model attribute is handled by the Spring form tag library tags, which we’ll discuss later in this chapter. For now, you can assume that when the Add Book form is submitted, the values entered by the user are bound to the book model attribute.
The @ModelAttribute annotation at the method-parameter level is used to bind a model attribute to a method argument. The following listing shows how @ModelAttribute is used by AddBookController to bind the book model attribute to the addBook action method’s book argument.
Listing 8.15. An @ModelAttribute annotation

In listing 8.15, the @ModelAttribute method-parameter-level annotation binds the model attribute named book to the book argument of the addBook method. If you don’t specify the value element of the @ModelAttribute annotation, the name of the model attribute to be bound is derived from the nonqualified name of the method parameter type. For instance, if you exclude the value element of the @ModelAttribute method-parameter-level annotation in listing 8.15, the model attribute named book (derived from the nonqualified name of the chapter08.code.listing.domain.Book argument type by changing the nonqualified name to lowercase) is bound to the book argument. This means that using @ModelAttribute(value="book") has the same effect as using the @ModelAttribute annotation without the value element in listing 8.15.
As mentioned earlier, a method annotated with @ModelAttribute is invoked every time a handler’s action or render method is called. In some situations, this isn’t desirable, because the command object may be created from data retrieved from a database. In such cases, command object creation is expensive, and creating the object at every render and action request would adversely impact the performance of the portal. To address such scenarios, the @SessionAttributes annotation is used.
8.3.10. Reusing model attributes using @SessionAttributes
The @SessionAttributes type-level annotation is used to store model attributes in a handler’s conversational state. If a model attribute, specified using the @ModelAttribute method-level annotation, is found in a handler’s conversational state, it’s reused. A handler’s conversational state is maintained in the PortletSession, and when the conversational session ends, the model attributes stored in it are removed from PortletSession.
Tip
If your model attribute is created based on information retrieved from a database or any other computation-intensive source, you should store the model attribute in the handler’s conversational state.
In the following listing, the EditBookController handler uses the @SessionAttributes annotation to store book information, retrieved from the data store, in the handler’s conversational state.
Listing 8.16. An @SessionAttributes annotation

The @SessionAttributes annotation ![]() lists the book model attribute as an attribute that should be stored as part of the handler’s conversational state. The method-level @ModelAttribute
lists the book model attribute as an attribute that should be stored as part of the handler’s conversational state. The method-level @ModelAttribute ![]() specifies that the Book command object returned by the getBook method should be bound to a model attribute named book. The book model attribute
specifies that the Book command object returned by the getBook method should be bound to a model attribute named book. The book model attribute ![]() is passed as a method argument to the editBook action method. The showEditBookForm method
is passed as a method argument to the editBook action method. The showEditBookForm method ![]() is the render method responsible for showing the Edit Book form of the Book Catalog portlet.
is the render method responsible for showing the Edit Book form of the Book Catalog portlet.
In listing 8.16, the EditBookController’s methods are invoked in the following sequence, depending upon whether the request received by the handler is a render or action request:
- The handler receives a render request— The getBook method is called, followed by the showEditBookForm method. The getBook method accepts an ISBN as an argument and returns the Book object corresponding to the ISBN. The getBook method is annotated with @ModelAttribute("book"), which means that the returned Book is bound to the Model with the name book. The @SessionAttributes(value="book") attribute at type level specifies that the book model attribute is preserved as part of the conversational state (maintained in the PortletSession) of the EditBookController handler.
- The handler receives an action request— The editBook method is invoked. The getBook method isn’t invoked this time, because the book model attribute is available in the conversational state (maintained in the PortletSession) of the handler. The book model attribute is retrieved from the handler’s conversational state and is passed to the editBook action method.
Note
It’s important to note that the model attributes stored in the PortletSession when using @SessionAttributes are removed from the PortletSession when the conversational session with the handler completes, which you have to explicitly do using the SessionStatus object. The SessionStatus object’s setComplete method clears all model attributes that were stored in the PortletSession by the @SessionAttributes annotation. As of Spring Framework 3.1 M1, the setComplete method only works if it’s called from the render method of the portlet. It’s expected that in a future Spring Portlet MVC release, the setComplete method will also work when called from an action method.
Storing Multiple Model Attributes of the Same Type
In listing 8.16, the @SessionAttributes annotation uses the value element to specify the model attributes that need to be stored as part of the handler’s conversational state. If there are multiple model attributes of the same type, it may be cumbersome to specify the name of each attribute as part of the @SessionAttributes annotation. To address such situations, @SessionAttributes also provides the types element, which defines model attribute types that should be stored as part of the handler’s conversational state.
The @SessionAttributes annotation shown in listing 8.16 can alternatively be written to store all Book type model attributes in the handler’s conversational state, as shown here:
@SessionAttributes(types=Book.class)
In this line, the types element specifies an array of model attribute types to be stored in the handler’s conversational state.
If you use the @SessionAttributes(value="book") annotation, only the model attribute named book is stored in the handler’s conversational state. If you use @SessionAttributes(types=Book.class), all model attributes of type Book will be stored.
Code Reference
To see examples of the @SessionAttributes annotation in use, refer to EditBookController and AddBookController in the ch8_BookCatalog folder.
In any application, exception handling plays an important role. The @ExceptionHandler annotation is used in annotated controllers to handle exceptions gracefully.
8.3.11. Handling exceptions with @ExceptionHandler
In chapter 7, you used HandlerExceptionResolver to resolve exceptions to the appropriate model and view. When using annotated controllers, exception handling is done within the handler itself by the @ExceptionHandler annotated method.
@ExceptionHandler is a method-level annotation that handles exceptions thrown by handlers. The following code snippet shows how @ExceptionHandler is used:
  @ExceptionHandler({MyException.class,
    IllegalStateException.class})
  public String handleException() {
    return "errorPage";
  }
In this code, @ExceptionHandler specifies an array of exception types that it handles. The handleException method returns a String that represents the logical name of a view. It’s resolved to an actual view by ViewResolver, and it’s rendered by ViewRendererServlet.
Note
You can also return a ModelAndView object from an @ExceptionHandler annotated method. As with most annotated methods, @ExceptionHandler annotated methods can have flexible signatures. Refer to the Spring 3.0 API for complete details about @ExceptionHandler annotated method signatures.
If the @ExceptionHandler annotation doesn’t define the exception types handled by the annotated method, the method is assumed to handle the exception types defined as method arguments, as shown here:
@ExceptionHandler
public String handleException(MyException myException,
   IllegalStateException illegalStateException) {
  return "errorPage";
}
In the preceding code, the @ExceptionHandler annotation is empty, but the handleException method accepts arguments of MyException and IllegalStateException types, so it will handle both these exceptions.
Let’s now look at the @InitBinder annotation, which is used to initialize WebDataBinder.
8.3.12. Initializing WebDataBinder using @InitBinder
The WebDataBinder object in Spring Framework is used to control how the binding of request parameters to model attributes happens. WebDataBinder controls binding by specifying which PropertyEditor to use for binding request parameters to a particular property type. WebDataBinder may also specify the validator to be used to validate model attributes or command objects. If binding or validation errors occur during request processing, they’re stored in Spring Framework’s Errors object, which is then used by the JSP page to display appropriate binding or validation error messages. The error messages displayed in figure 8.3, earlier in this chapter, are generated this way.
Because the request parameters are of type String, WebDataBinder is usually initialized with custom property editors that are responsible for transforming String type request parameters to the type defined for that parameter in the model attribute or command object. You may also want to validate the populated command object or model attribute before the handler method is executed. WebDataBinder can be initialized with custom validators that validate the populated model attribute or command object before the handler method is invoked. The @InitBinder method-level annotation is used to initialize the WebDataBinder instance.
The WebDataBinder gives you control over how request parameters are bound to model attributes. For instance, you can specify request parameter fields that are allowed to be bound, request parameters that must be present in the request during binding, custom property editors, custom formatters and validators to be used during binding, and so on.
The following code snippet uses the @InitBinder annotation in the EditBookController:
@InitBinder("book")
public void initBinder(WebDataBinder binder) {
    binder.registerCustomEditor(Long.class,
      new LongNumberPropertyEditor());
    binder.setDisallowedFields(new String[]{"isbnNumber"});
}
The @InitBinder("book") annotation means that the initBinder method will initialize the WebDataBinder instance for the book command object or model attribute. The setDisallowedFields method instructs WebDataBinder not to bind the isbnNumber request parameter to the book model attribute (because the book’s ISBN must not be changed when the book is edited by a user). The registerCustomEditor method registers the LongNumberPropertyEditor custom property editor for Long type properties in the book model attribute.
Note
You can have multiple @InitBinder annotated methods in your controller if you want to configure distinct WebDataBinder instances for different model attributes. This can be useful when request parameters are meant to be bound to different model attributes or command objects. Also, if you don’t specify the model attribute in the @InitBinder annotation, the WebDataBinder instance configured by the @InitBinder annotated method applies to all model attributes of the handler.
@InitBinder methods have the same flexibility in terms of method arguments as @RequestMapping methods, except that they can’t be defined to accept model attributes and the corresponding BindingResult object (discussed in section 8.5). The return type of an @InitBinder annotated method must be void.
Globally Initializing WebDataBinder Instances
An @InitBinder annotated method initializes the WebDataBinder for the handler in which it’s defined. In some cases, WebDataBinder may need to be initialized globally so that the WebDataBinder configuration applies to all the handlers of the portlet. You can achieve this by defining the WebDataBinder initialization in the portlet’s web application context XML file.
In the Book Catalog portlet, the ISBN is numeric, and it’s defined as a Long type in the Book command object. The WebDataBinder should be initialized with a custom PropertyEditor (LongNumberPropertyEditor) that converts String to Long and vice versa, to support the ISBN property of Book. If LongNumberPropertyEditor is to be used by all the WebDataBinder instances in different handlers, you’ll need to define an @InitBinder annotated method in all the handlers of the portlet and set the LongNumberPropertyEditor property editor in WebDataBinder using its registerCustomEditor method. In this situation, it’s more appropriate to define a WebDataBinder that applies to all the handlers in the portlet.
You can set a custom property editor by using the WebDataBinder’s registerCustomEditor method or by using a PropertyEditorRegistrar object. The PropertyEditorRegistrar is useful when you have multiple property editors and you want to apply all those editors to a WebDataBinder. This saves you the effort of individually setting custom property editors on a WebDataBinder instance, and it also helps in reusing the same set of custom property editors in other scenarios.
Listing 8.17 shows how the Book Catalog portlet configures the WebDataBinder in the web application context XML file, and how it makes use of the PropertyEditorRegistrar to set the LongNumberPropertyEditor on the WebDataBinder instance. Because this defines the WebDataBinder in the web application context XML file, it applies to all the handlers in the Book Catalog portlet.
Listing 8.17. The WebDataBinder initialization

You saw earlier that using the @Controller annotation along with the classpath-scanning feature autoregisters a handler with the web application context. In listing 8.17 the AnnotationMethodHandlerAdapter ![]() is responsible for providing access to annotated handlers that are autoregistered or manually registered with the portlet’s
web application context. The webBindingInitializer property
is responsible for providing access to annotated handlers that are autoregistered or manually registered with the portlet’s
web application context. The webBindingInitializer property ![]() represents a WebBindingInitializer object that initializes a WebDataBinder. An implementation of the WebBindingInitializer interface
represents a WebBindingInitializer object that initializes a WebDataBinder. An implementation of the WebBindingInitializer interface ![]() , ConfigurableWebBindingInitializer, is used to initialize the WebDataBinder. Alternatively, you could create a custom implementation of the WebBindingInitializer interface to configure WebDataBinder. The propertyEditorRegistrars property
, ConfigurableWebBindingInitializer, is used to initialize the WebDataBinder. Alternatively, you could create a custom implementation of the WebBindingInitializer interface to configure WebDataBinder. The propertyEditorRegistrars property ![]() of the WebBindingInitializer is used to set the list of PropertyEditorRegistrar objects that apply to the WebDataBinder.
of the WebBindingInitializer is used to set the list of PropertyEditorRegistrar objects that apply to the WebDataBinder.
Spring’s PropertyEditorRegistrars are used to register custom property editors (like LongNumberPropertyEditor in the Book Catalog portlet) with the property editor registry maintained by the WebDataBinder. The following code shows the implementation of MyPropertyEditorRegistrar, which registers LongNumberPropertyEditor with the WebDataBinder:
public class MyPropertyEditorRegistrar implements PropertyEditorRegistrar {
  public void registerCustomEditors(PropertyEditorRegistry registry) {
    registry.registerCustomEditor(Long.class,
                      new LongNumberPropertyEditor());
  }
}
In the preceding code fragment, MyPropertyEditorRegistrar implements Spring’s PropertyEditorRegistrar interface and its registerCustomEditors method to register LongNumberPropertyEditor with WebDataBinder’s property editor registry.
Code Reference
To see an example of the @InitBinder annotation in use, refer to the AddBookController and EditBookController handlers in the ch8_BookCatalog folder.
Phew! That was a lot to take in. So far we’ve covered the annotations that you need to know to develop Spring Portlet MVC portlets. If you want to see these concepts in practice, refer to the source code of the ch8_BookCatalog project that accompanies this book.
The Spring Portlet MVC framework uses built-in beans to support annotated handlers in portlets. In some cases, you may need to change the default behavior of these built-in beans to meet your portlet application’s requirements. Let’s take a look at these built-in beans and how you can customize them.
8.4. Configuring beans that provide annotation support
In chapter 7, you configured the HandlerMapping bean in the web application context to enable the mapping of portlet requests to appropriate handlers and handler methods. You also configured the HandlerExceptionResolver bean to resolve exceptions thrown by handlers during request processing. When using annotated controllers in this chapter, you didn’t need to configure the HandlerMapping or HandlerExceptionResolver beans because that’s taken care of by default when DispatcherPortlet is initialized by the Spring container. In this section, we’ll look at the special beans in Spring that are autoregistered when using annotated controllers, and you’ll see how you can modify their default configuration. (Chapter 7 didn’t focus on using annotated controllers, so I didn’t cover these special beans in that chapter.)
Table 8.1 describes the built-in beans that are registered, by default, in the web application context of DispatcherPortlet to support annotated controllers.
Table 8.1. Default beans registered for annotated controllers
|
Implementation class |
Description |
|---|---|
| DefaultAnnotationHandlerMapping | Implementation of the HandlerMapping interface that defines the handler mapping strategy for annotated controllers. This class maps portlet requests to the appropriate handler based on the portlet mode defined in the @RequestMapping annotation at the type or method level. |
| AnnotationMethodHandlerAdapter | Implementation of the HandlerAdapter interface that maps portlet requests to the appropriate handler method based on the portlet mode, any request parameters, and the portlet’s lifecycle phase. As a result of this handler adapter, DispatcherPortlet is able to invoke annotated methods in handler classes. |
| AnnotationMethodHandlerExceptionResolver | Implementation of the HandlerExceptionResolver interface that uses @ExceptionHandler annotated methods for handling exceptions. |
In some scenarios, you may have to explicitly configure DefaultAnnotationHandlerMapping, AnnotationMethodHandlerAdapter, and AnnotationMethodHandlerExceptionResolver in the web application context because the default configuration doesn’t meet your application’s requirements.
For instance, as of Spring 3.0, there’s no annotation that specifies that a class is a HandlerInterceptor and/or identifies which handlers it applies to. The following @HandlerInterceptor dummy annotation shows what such an annotation would look like:
@HandlerInterceptor(handlers="{bookController, editController}")
public class MyHandlerInterceptor {
    @AfterRenderCompletion
    public void afterRenderRequestComplete(RenderRequest request,
       RenderResponse response, Object handler) {
      ...
    }
}
In the preceding code, the @HandlerInterceptor annotation identifies the MyHandlerInterceptor class as being of type HandlerInterceptor, and its handlers element identifies the handlers to which the handler interceptor applies. The @AfterRenderCompletion annotation identifies the afterRenderRequestComplete method as the method that’s called after the render request is complete.
Unfortunately, the @HandlerInterceptor and @AfterRenderCompletion annotations don’t exist as of Spring 3.0. But this doesn’t mean that you can’t configure handler interceptors when using annotated controllers.
You can configure handler interceptors by explicitly overriding the default configuration of DefaultAnnotationHandlerMapping in the web application context XML, as shown here.
Listing 8.18. Configuring a handler interceptor

Listing 8.18 shows how the ParameterMappingInterceptor handler interceptor class (discussed in chapter 7) can be configured with the DefaultAnnotationHandlerMapping handler mapping class to intercept portlet requests targeted towards annotated controllers. Similarly, you can configure a default handler for the mapping by using DefaultAnnotationHandlerMapping’s defaultHandler property, which is invoked when no matching handler is found for the portlet request.
You can also configure AnnotationMethodHandlerAdapter and AnnotationMethodHandlerExceptionResolver (as you can DefaultAnnotationHandlerMapping) to customize the default configuration provided by these classes. Listing 8.17 showed an example where AnnotationMethodHandlerAdapter was explicitly defined in the web application context to configure the WebDataBinder instance.
Code Reference
For an example configuration of the AnnotationMethodHandlerAdapter, see the bookCatalog-portlet.xml application context XML file in the ch8_BookCatalog folder.
Now that we’ve covered the Spring annotations required to create annotated controllers, it’s time to look at validation support in Spring Portlet MVC. The Book Catalog portlet uses this validation support to validate the book details entered by the user.
8.5. Validating forms using Spring and JSR 303
Validating user-entered data helps maintain data consistency. In the Book Catalog portlet, the Add Book form is validated to ensure that the book title, author name, and ISBN are provided by the user. If any of this information is missing, or if the ISBN entered already exists in the catalog or it isn’t a valid number, an error message is shown to the user, as shown in figure 8.3. In this section, you’ll see how you can use Spring Validation API and JSR 303 (Bean Validation) to validate form-backing and command objects.
The Spring Validation API is part of Spring Framework and provides validation for form-backing and command objects. JSR 303 defines a standard approach for validating objects, irrespective of the application layer.
Let’s look first at the Spring Validation API.
8.5.1. The Spring Validation API
Spring Framework comes with its own Validation API, which is used for validating form-backing and command objects. The org.springframework.validation.Validator interface is central to the Spring Validation API, and it allows you to create custom validators for your applications.
Prior to Spring 3.0, annotated controllers were responsible for explicitly validating command objects, as shown here.
Listing 8.19. A Spring Validation API example

The SomeValidator object is created ![]() ; it implements Spring’s Validator interface and is responsible for validating the SomeObject model attribute. SomeValidator’s validate method is invoked
; it implements Spring’s Validator interface and is responsible for validating the SomeObject model attribute. SomeValidator’s validate method is invoked ![]() , and the validation results are stored in the BindingResult (a subinterface of the Errors interface) object, which is passed to the validate method.
, and the validation results are stored in the BindingResult (a subinterface of the Errors interface) object, which is passed to the validate method.
Code Reference
To view an example of the Spring Validator, see the MyValidator class in the ch8_BookCatalog folder.
In listing 8.19, the doSomething method is defined to accept a BindingResult object that provides the method with data binding results. If an error occurs during data binding, you can check for it by calling the BindingResult object’s hasErrors method. If the data binding phase results in errors, you can skip validating the SomeObject model attribute. It is important to note that annotated handler methods can be defined to accept arguments of type BindingResult or Errors.
Warning
In the handler method signature, the Errors or BindingResult type argument must be preceded by the model attribute corresponding to which binding results are needed in the handler method implementation code.
In Spring 3.0, you don’t need to programmatically validate your model attributes. Instead, you can use the @Valid annotation to validate the arguments of handler methods. The following listing shows the modified doSomething method, which makes use of the @Valid annotation.
Listing 8.20. The SomeController handler using the @Valid annotation

In listing 8.20, the @Valid annotation instructs Spring to validate the SomeObject model attribute. The validation and binding results are available to the doSomething method through the BindingResult object.
Note
The @Valid annotation is part of JSR 303 (Bean Validation) and is not Spring-specific.
When using the @Valid annotation to validate a handler method argument, the validator is specified in the @InitBinder method or in the WebDataBinder initialization configuration in the web application context XML file. The following listing shows how a portlet can set a validator as part of the WebDataBinder initialization configuration in the web application context XML.
Listing 8.21. The WebDataBinder configuration in the web application context XML
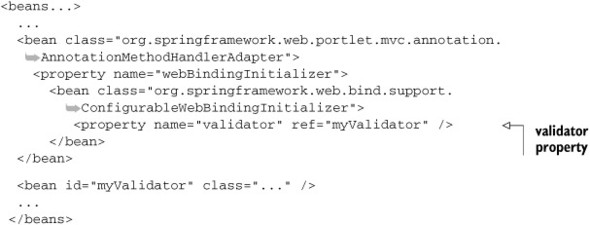
Listing 8.21 shows that ConfigurableWebBindingInitializer’s validator property accepts an object of type org.springframework.validation.Validator. It’s here that you need to set the validator that should be applied to all the WebDataBinder instances in the portlet. The Validator injected in the WebDataBinder initialization definition applies to all the handlers in the portlet.
The approach used in listing 8.21 works well when you need a validator to apply to all WebDataBinder instances. To restrict the validator to a single controller, inject the validator bean into your controller and set it on the WebDataBinder instance inside the @InitBinder annotated method, as shown here.
Listing 8.22. Setting the validator in the @InitBinder method

To use the @Autowired annotation, as shown in listing 8.22, you need myValidator to be available in the web application context. You can either define myValidator in the web application context XML file, or you can annotate the corresponding Validator class with the @Component annotation.
Code Reference
To see an example of the Spring Validation API in use, refer to the MyValidator and EditBookController classes in the ch8_BookCatalog folder.
Now that you have an understanding of the Spring Validation API it’s time to look at JSR 303 (Bean Validation).
8.5.2. Validating beans with JSR 303
JSR 303 defines the Bean Validation API, which allows you to validate JavaBeans components in your application, irrespective of the application layer to which these components belong. In this section, we’ll look at how you can use Spring with JSR 303 to validate model attributes. These model attributes can be form-backing or command objects (which could be domain objects).
The JSR 303 Bean Validation framework allows you to use annotations to define constraints on the properties of your beans, making validation constraints that apply on bean properties more informative and natural compared to the Spring Validation API. When using the Spring Validation API, you apply constraints on your application objects in the validator class.
The following listing shows an example AddBookValidator class that makes use of the Spring Validation API to validate a Book domain object. We’ll later look at how AddBookValidator can be replaced with annotations defined in JSR 303.
Listing 8.23. Validating Book domain object using Spring Validation API
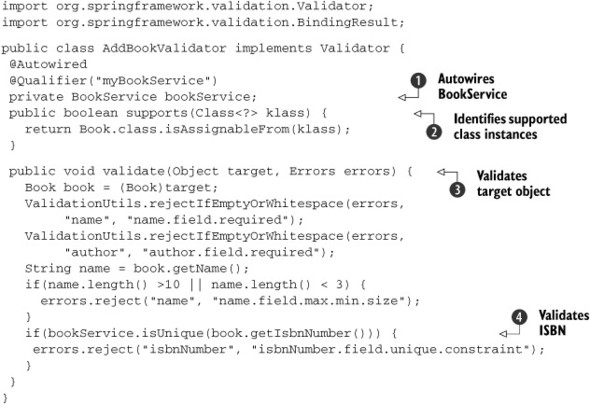
The BookService bean is autowired by name into the AddBookValidator object ![]() . The BookService is used by AddBookValidator to validate that the ISBN doesn’t already exist in the catalog. The supports method
. The BookService is used by AddBookValidator to validate that the ISBN doesn’t already exist in the catalog. The supports method ![]() checks whether the object to be validated belongs to the Book class or its superclass. The validate method
checks whether the object to be validated belongs to the Book class or its superclass. The validate method ![]() does the actual validation of the target object (the Book object). The BookService’s isUnique method is called
does the actual validation of the target object (the Book object). The BookService’s isUnique method is called ![]() to validate the uniqueness of the ISBN.
to validate the uniqueness of the ISBN.
As you can see, the Spring Validation API constraints that apply to the Book domain object aren’t defined in the Book class but in the AddBookValidator class. If you use JSR 303, the constraints are specified on the domain object itself, using annotations, as shown next.
Listing 8.24. Using JSR 303 with the Book domain object
import org.hibernate.validator.constraints.NotEmpty;
import javax.validation.constraints.Size;
import chapter08.code.listing.catalog.constraints.Unique;
...
public class Book {
    @NotEmpty
    @Size(max=100, min=10)
    private String name;

    @NotEmpty
    private String author;

    @Unique
    private Long isbnNumber;

    public Book(String name, String author, long isbnNumber) {
        this.name = name;
        this.author = author;
        this.isbnNumber = isbnNumber;
    }
    ...
}
In this code, the annotations check a variety of things:
- @NotEmpty—Checks that title of the book isn’t null and that its length is greater than 0
- @Size—Checks that length of the book title is at least 10 and no more than 100
- @NotEmpty—Checks that author name isn’t null and that its length is greater than 0
- @Unique—Checks that the book’s ISBN is unique—that no book already exists in the catalog with that ISBN
In listing 8.24, one of the interesting things to notice is the source of the annotations used in the Book class:
- The @NotEmpty annotation comes from the Hibernate Validator framework, which implements the Bean Validation API and provides additional annotations, like @NotEmpty, to put constraints on bean properties.
- The @Size annotation is defined as part of JSR 303.
- @Unique is a custom annotation defined as part of the Book Catalog portlet.
Note
To use JSR 303, the Book Catalog portlet uses Hibernate Validator’s (http://hibernate.org/subprojects/validator) hibernate-validator-4.x.x.jar and validation-api-1.x.x.jar JAR files.
Configuring JSR 303 with Spring
Once you have defined constraints that apply to the properties of your command object or model attribute, the next step is to configure JSR 303 to work with Spring Framework. To allow easy access to JSR 303 validation, Spring provides the LocalValidatorFactoryBean, which is responsible for bootstrapping the JSR 303 framework.
The LocalValidatorFactoryBean implements both the javax.validation.Validator and org.springframework.validation.Validator interfaces, giving you the flexibility to use Spring Validation API or JSR 303 to perform validation.
You can declare LocalValidatorFactoryBean in your web application context XML, as shown here:
<bean id="validator" class="org.springframework.validation.beanvalidation.LocalValidatorFactoryBean" />
As described earlier, you can inject the org.springframework.validation.Validator bean into the WebDataBinder definition in the application context XML (if the validator applies to all the handlers of the portlet—see listing 8.21) or you can set the WebDataBinder’s validator property in the @InitBinder method of your handler (see listing 8.22). The LocalValidatorFactoryBean implements Spring’s Validator interface, making it possible to set the WebDataBinder’s validator property with an instance of LocalValidatorFactoryBean.
Note
In most cases, you’ll use the JSR 303 Bean Validation API to apply to all your application’s objects. You’ll generally configure WebDataBinder with LocalValidatorFactoryBean in the web application context XML so that it’s available to all the handlers of the portlet.
The following listing configures JSR 303’s LocalValidatorFactoryBean in the Book Catalog portlet’s web application context XML file and injects it into the WebDataBinder instance.
Listing 8.25. Configuring LocalValidatorFactoryBean in application context XML
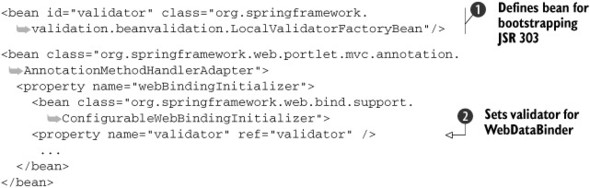
The LocalValidatorFactoryBean is defined ![]() ; it’s responsible for bootstrapping the JSR 303 Bean Validation API. The WebBindingIntializer object’s validator property is used
; it’s responsible for bootstrapping the JSR 303 Bean Validation API. The WebBindingIntializer object’s validator property is used ![]() to set the LocalValidatorFactoryBean as the validator for the WebDataBinder instance.
to set the LocalValidatorFactoryBean as the validator for the WebDataBinder instance.
To perform validation using JSR 303, a validator class that implement’s JSR 303’s javax.validation.Validator interface must be created. Spring’s LocalValidatorFactoryBean implements JSR 303’s Validator interface, so it can be used for validating model attributes.
You saw in listing 8.21 that the validator property accepts objects of type org.springframework.validation.Validator. You can set the validator property to LocalValidatorFactoryBean, and it will work because LocalValidatorFactoryBean implements Spring’s Validator interface, as well as the javax.validation.Validator interface.
The validator set in listing 8.25 applies to all the model attributes of the portlet. The validation of a model attribute, which makes use of JSR 303 constraints, won’t happen unless the @Valid annotation is specified for the handler argument representing the model attribute. This next listing shows how AddBookController makes use of the @Valid annotation to validate the Book model attribute.
Listing 8.26. Using the @Valid annotation in the AddBookController
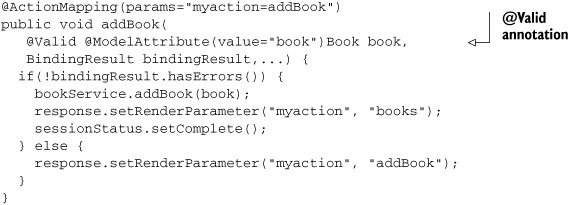
In listing 8.26, the @Valid annotation validates the Book model attribute when the AddBookController’s addBook handler method is invoked. The validation results are stored in the BindingResult object, like when you use the Spring Validation API. If you’re looking to programmatically validate your application objects using JSR 303, then you’ll have to deal directly with the JSR 303 API.
Listing 8.27 shows how AddBookController can be rewritten to programmatically perform validation. It’s important to note that when you’re using programmatic validation, you don’t need to configure the LocalValidatorFactoryBean for WebDataBinder (as was done in listing 8.25) or use the @Valid annotation in your handler method (as in listing 8.26). The LocalValidatorFactoryBean only needs to be defined in the web application context XML so that it’s available to the AddBookController handler.
Listing 8.27. Programmatic validation using the JSR 303 Validator

The LocalValidatorFactoryBean is autowired ![]() . The validate method of javax.validation.Validator is invoked
. The validate method of javax.validation.Validator is invoked ![]() , which refers to the LocalValidatorFactoryBean instance configured in the web application context XML file. The constraint violations (if any) reported during validation
are obtained
, which refers to the LocalValidatorFactoryBean instance configured in the web application context XML file. The constraint violations (if any) reported during validation
are obtained ![]() . The property path and validation error message are obtained
. The property path and validation error message are obtained ![]() from the ConstraintViolation object using the getPropertyPath and getMessage methods respectively, and set in the BindingResult object.
from the ConstraintViolation object using the getPropertyPath and getMessage methods respectively, and set in the BindingResult object.
Both the javax.validation.Validator and org.springframework.validation.Validator interfaces define validate methods, but their signatures are different. The org.springframework.validation.Validator’s validate method returns void, and the javax.validation.Validator’s validate method returns a set of ConstraintViolations (refer to listing 8.27) reported during validation. In listing 8.27, you can see that the @Valid annotation wasn’t specified for the Book argument in the addBook handler method. That’s because the Book object is being validated programmatically; you’re not asking Spring Framework to validate the Book object when the addBook method is invoked.
Note
The @Valid annotation should only be specified for a handler method argument if you want Spring Framework to do the validation. If you’re validating objects programmatically, you must not specify the @Valid annotation.
If you don’t want to deal with the JSR 303 API directly when programmatically validating your application objects, you can use Spring’s Validator interface, instead of JSR 303’s Validator interface, to invoke the JSR 303 validation API. The following listing shows how the AddBookController can be rewritten so that Spring’s Validator performs the JSR 303 validation.
Listing 8.28. Programmatic validation using the Spring Validator
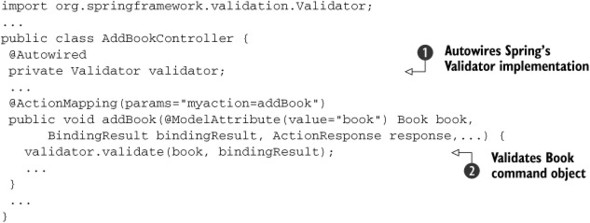
The LocalValidatorFactoryBean is autowired ![]() . Because LocalValidatorFactoryBean implements Spring’s Validator interface, it’s possible to store a reference to LocalValidatorFactoryBean in a variable of type Validator. The addBook method invokes the LocalValidatorFactoryBean’s validate method
. Because LocalValidatorFactoryBean implements Spring’s Validator interface, it’s possible to store a reference to LocalValidatorFactoryBean in a variable of type Validator. The addBook method invokes the LocalValidatorFactoryBean’s validate method ![]() , passing the Book command object and BindingResult object as method arguments.
, passing the Book command object and BindingResult object as method arguments.
The addBook method in listing 8.28 is much simpler than the version in listing 8.27. In listing 8.28, the validate method of Spring’s Validator is responsible for validating the Book object, which makes use of JSR 303 constraints. During validation, the BindingResult object is populated with property paths and messages that were received as part of ConstraintViolations reported during validation. This saves the effort of iterating over ConstraintViolations and populating the BindingResult object, as was done in listing 8.27.
Hibernate Validator comes with many built-in constraints, like @NotEmpty, @Size, and so on, but you’ll often need to create your own custom constraints, like the @Unique constraint that applies to the isbnNumber property of the Book domain object. Let’s look at JSR 303’s support for creating custom constraints.
JSR 303 Custom Constraints
You can create a custom constraint in two steps:
1. Create a constraint annotation. The annotation is used to annotate the properties, methods, and so on.
2. Create a validator class for the constraint. The validator class contains the actual validation logic.
The following listing shows how the @Unique annotation in the Book Catalog portlet is defined.
Listing 8.29. Defining the @Unique constraint annotation

Listing 8.29 shows how you can create a constraint annotation. The @Target annotation specifies that only attributes of a class can be annotated with the @Unique annotation. The @RetentionPolicy indicates that the @Unique annotation has runtime semantics and that at runtime it can be accessed using reflection. You must specify message, groups, and payload attributes in your constraint definition. To learn more about groups and payload attributes, refer to the JSR 303 specification and Hibernate Validator reference documentation.
The @Constraint annotation ![]() links the constraint annotation with the validator responsible for implementing the actual validation logic. In this case,
the @Constraint annotation specifies that if an attribute of a class is annotated with @Unique, the MyUniqueConstraintValidator class is responsible for validating that field.
links the constraint annotation with the validator responsible for implementing the actual validation logic. In this case,
the @Constraint annotation specifies that if an attribute of a class is annotated with @Unique, the MyUniqueConstraintValidator class is responsible for validating that field.
The default attribute ![]() identifies the message’s error code that will be used to resolve the error message if the constraint is violated. The error
message corresponding to the error code must be defined in a ValidationMessages.properties file, which must be in your portlet’s classpath.
identifies the message’s error code that will be used to resolve the error message if the constraint is violated. The error
message corresponding to the error code must be defined in a ValidationMessages.properties file, which must be in your portlet’s classpath.
Note
If you want to use a different properties file as the resource bundle for your messages, you’ll have to create a custom MessageInterpolator. For more information on the MessageInterpolator, refer to the JSR 303 specification and API.
Once your constraint annotation is ready, the next step is to write the validator that’s responsible for validating the constraint. The following listing shows the implementation of the MyUniqueConstraintValidator class, which is responsible for providing the actual validation logic behind the @Unique constraint.
Listing 8.30. The MyUniqueConstraintValidator validator

MyUniqueConstraintValidator ![]() implements JSR 303’s ConstraintValidator interface. The ConstraintValidator specifies two parameters: the constraint’s annotation type (which is Unique in this case) and the object type to which the validator is applicable. In the case of MyUniqueConstraintValidator, the object type is Long because the ISBN is defined as a Long in the Book Catalog portlet’s Book domain object.
implements JSR 303’s ConstraintValidator interface. The ConstraintValidator specifies two parameters: the constraint’s annotation type (which is Unique in this case) and the object type to which the validator is applicable. In the case of MyUniqueConstraintValidator, the object type is Long because the ISBN is defined as a Long in the Book Catalog portlet’s Book domain object.
MyUniqueConstraintValidator ![]() defines its dependency on the BookService bean using Spring’s @Autowired and @Qualifier annotations. This is one of the main highlights of Spring’s integration with the JSR 303 framework; you can inject dependencies
into your ConstraintValidators just as you do in a typical Spring bean.
defines its dependency on the BookService bean using Spring’s @Autowired and @Qualifier annotations. This is one of the main highlights of Spring’s integration with the JSR 303 framework; you can inject dependencies
into your ConstraintValidators just as you do in a typical Spring bean.
The initialize method ![]() is responsible for initializing the MyUniqueConstraintValidator instance. Because there’s nothing to initialize, the method implementation is empty. In the initialize method you’ll usually obtain the values of attributes defined in the annotation and store them in the validator instance.
is responsible for initializing the MyUniqueConstraintValidator instance. Because there’s nothing to initialize, the method implementation is empty. In the initialize method you’ll usually obtain the values of attributes defined in the annotation and store them in the validator instance.
The isValid method ![]() implements the validation logic for the constraint annotation. The isValid method can make use of the information that was stored in the validator instance during initialization.
implements the validation logic for the constraint annotation. The isValid method can make use of the information that was stored in the validator instance during initialization.
So far in this chapter, we’ve discussed annotations that can help you create annotated controllers and validate command or form-backing objects. Spring Portlet MVC not only makes it easy to write controllers and provides features like dependency injection, validation, and so on, but it also provides a form tag library, which makes it easy for you to create your JSP pages and bind form fields to your command or form-backing objects. In a typical situation, you’ll use the portlet tag library (discussed in chapter 6) along with Spring’s form tag library to create your JSP pages. Let’s look at Spring’s form tag library and see how the Book Catalog portlet makes use of it.
8.6. Spring’s form tag library
Spring’s form tag library is a set of tags that can help you create JSP pages. Spring’s form tag library defines tags for creating various input form elements (like text fields, text areas, combo boxes, check boxes, radio buttons, and so on) on the JSP page and for binding the input form elements on the JSP page to command or form-backing objects. The benefit of using the form tag library instead of writing plain HTML in JSP pages is the library’s support for internationalization, data binding (to command and form-backing objects), and showing error messages.
The following listing shows how the addBookForm.jsp page of the Book Catalog portlet makes use of Spring’s form tag library tags.
Listing 8.31. The addBookForm.jsp page
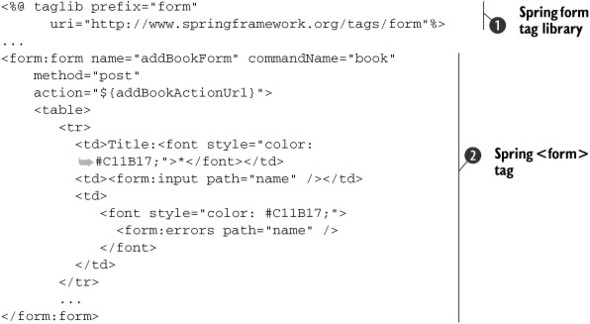
The Spring form tag library is included ![]() by the @taglib directive.
by the @taglib directive.
The <form> tag of Spring’s form tag library is used ![]() to create an HTML form that binds form fields to the book command object. The commandName attribute identifies the command object to which the form fields are bound; this object must be available as a model attribute
to allow the WebDataBinder instance to control the binding of form fields to the command object. The action attribute specifies that the form is submitted to the addBookActionUrl, which is an action URL.
to create an HTML form that binds form fields to the book command object. The commandName attribute identifies the command object to which the form fields are bound; this object must be available as a model attribute
to allow the WebDataBinder instance to control the binding of form fields to the command object. The action attribute specifies that the form is submitted to the addBookActionUrl, which is an action URL.
The Spring form tag library’s <input> tag is used to create an HTML input field. The path attribute identifies the path to the property in the command object to which the value of this field is bound when the form is submitted. When the form is rendered, the path attribute is used to read the property value from the command object, so it can be displayed on the form.
The <errors> tag of the Spring form tag library is used to display binding or validation errors associated with the property identified by the path attribute.
Testing plays an important role in any application’s development. Spring provides multiple ways in which you can test handlers. In the next section, we’ll look at unit testing handlers using mock objects and Spring’s TestContext framework.
8.7. Unit testing with mock objects and TestContext
A developer’s job isn’t over until the unit testing of handlers is complete. Spring Portlet MVC provides mock objects that you can use to test your portlet handlers. Mock objects mimic real objects like ActionRequest, ActionResponse, RenderRequest, RenderResponse, PortletURL, and others, making it possible to unit test handlers outside the portlet container. In this section, we’ll discuss unit testing using JUnit 4.5+ and Spring’s TestContext framework.
Before we get started writing unit test classes, let’s take a quick look at how to configure our Ant buildfile (discussed in chapter 1) to run JUnit tests.
8.7.1. Ant buildfile to run unit tests
Unit tests are executed immediately after the compilation of source files and before the WAR file for your portlet application is generated. The following listing shows JUnit Ant task for running batch tests for your portlet project.
Listing 8.32. The build.xml JUnit ant task

In listing 8.32, the <junit> element runs JUnit tests identified by the <batchtest> element. The build target depends upon clean and compile, which means that JUnit tests are executed after the clean and compile targets are complete.
The following listing shows the AddBookController handler of the Book Catalog portlet that we’ll unit test using JUnit and the TestContext framework.
Listing 8.33. The AddBookController handler to be tested
@Controller("addBookController")
@RequestMapping(value="VIEW")
@SessionAttributes(types=Book.class)
public class AddBookController {
@Autowired
@Qualifier("mybookService")
private BookService bookService;
public void setBookService() {
this.bookService = bookService;
}
@ModelAttribute("book")
public Book getCommandObject() {
return new Book();
}
@RenderMapping(params="myaction=addBook")
public String showAddBookForm(RenderResponse response) {
return "addBookForm";
}
@ActionMapping(params = "myaction=addBook")
public void addBook(@Valid @ModelAttribute(value="book") Book book,
BindingResult bindingResult, ActionResponse response,
SessionStatus sessionStatus) {
if (!bindingResult.hasErrors()) {
bookService.addBook(book);
response.setRenderParameter("myaction", "books");
sessionStatus.setComplete();
} else {
response.setRenderParameter("myaction", "addBookForm");
}
}
}
8.7.2. Unit testing with mock objects
If you’re directly using JUnit for unit testing, your tests will be responsible for creating application objects and for dependency injection. For instance, to test AddBookController, shown in listing 8.33, you’ll need to create an instance of AddBookController and a mock implementation of BookService that is explicitly set in AddBookController.
The following listing shows how the Book Catalog portlet’s AddBookControllerTest class uses mock objects to test the AddBookController handler.
Listing 8.34. A JUnit test for AddBookController


An instance of the MockBookService class ![]() is created; it’s a custom class for testing the AddBookController handler. MockBookService implements the BookService interface and provides mock implementations for the methods. For example, when you call the MockBookService’s addBook method, it simply stores the book information in an instance variable. The @Before annotation specifies that the setUp method is executed before any other method of the AddBookControllerTest class; setUp initializes the AddBookControllerTest instance with object instances that are used by the @Test methods of the class.
is created; it’s a custom class for testing the AddBookController handler. MockBookService implements the BookService interface and provides mock implementations for the methods. For example, when you call the MockBookService’s addBook method, it simply stores the book information in an instance variable. The @Before annotation specifies that the setUp method is executed before any other method of the AddBookControllerTest class; setUp initializes the AddBookControllerTest instance with object instances that are used by the @Test methods of the class.
The BookService dependency of AddBookController ![]() is fulfilled by MockBookService. The @Test annotation indicates that testShowAddBookForm is a JUnit test method.
is fulfilled by MockBookService. The @Test annotation indicates that testShowAddBookForm is a JUnit test method.
Spring Portlet MVC’s built-in MockRenderResponse object ![]() is instantiated to pass the MockRenderResponse instance to the showAddBookForm method of AddBookController. Spring Portlet MVC’s built-in MockActionResponse object
is instantiated to pass the MockRenderResponse instance to the showAddBookForm method of AddBookController. Spring Portlet MVC’s built-in MockActionResponse object ![]() is instantiated to pass the MockActionResponse instance to the AddBookController’s addBook method. Because the addBook method accepts a SessionStatus object, Spring’s built-in SimpleSessionStatus object (an implementation of the SessionStatus interface) is created and passed to the addBook method.
is instantiated to pass the MockActionResponse instance to the AddBookController’s addBook method. Because the addBook method accepts a SessionStatus object, Spring’s built-in SimpleSessionStatus object (an implementation of the SessionStatus interface) is created and passed to the addBook method.
WARNING
JUnit invokes the @Before annotated method before each test method of the class is executed. If you want to perform a one-time initialization for all the tests, you should perform that initialization in a public static void method annotated with the @BeforeClass JUnit annotation.
8.7.3. Unit testing with Spring’s TestContext framework
The test cases in listing 8.34 run outside the Spring container, requiring the test class to explicitly instantiate a controller and provide it with the dependencies it needs. But if your portlet makes use of complex object structures, it’s cumbersome to create such structures programmatically. Spring’s TestContext framework makes it easier to write unit and integration tests by providing you with a framework that resides on top of testing frameworks like JUnit and TestNG, and that lets you take advantage of Spring container features.
The following listing shows the Book Catalog portlet’s AddBookControllerTestContext class, which makes use of the TestContext framework to test the AddBookController handler.
Listing 8.35. A JUnit test for AddBookController using the TestContext framework

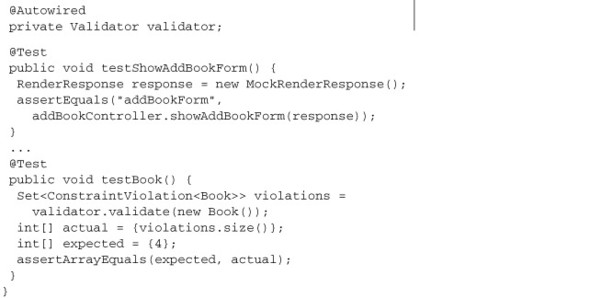
The @RunWith JUnit annotation ![]() instructs JUnit to use SpringJUnit4ClassRunner as the runner for the test cases. SpringJUnit4ClassRunner is a JUnit 4.5+ compliant runner that supports JUnit 4.5+ annotations, like @Test, @Ignore, and so on.
instructs JUnit to use SpringJUnit4ClassRunner as the runner for the test cases. SpringJUnit4ClassRunner is a JUnit 4.5+ compliant runner that supports JUnit 4.5+ annotations, like @Test, @Ignore, and so on.
The @ContextConfiguration annotation ![]() specifies the application context that’s used in running the tests. The locations attribute specifies the location of the application context XML that will be used by the test cases in the class. If you’re
doing integration testing, you can specify the actual web application context XML file of your portlet. In the case of unit testing, you’ll usually create a simplified application context XML with the bare minimum configuration
expected by your tests. For instance, you won’t be using your actual business services in unit testing, so they shouldn’t
be part of the application context XML that’s provided to your unit test cases. This example uses the bookCatalogTest-portlet.xml
file (shown in listing 8.36), which only contains bean definitions used by the test cases.
specifies the application context that’s used in running the tests. The locations attribute specifies the location of the application context XML that will be used by the test cases in the class. If you’re
doing integration testing, you can specify the actual web application context XML file of your portlet. In the case of unit testing, you’ll usually create a simplified application context XML with the bare minimum configuration
expected by your tests. For instance, you won’t be using your actual business services in unit testing, so they shouldn’t
be part of the application context XML that’s provided to your unit test cases. This example uses the bookCatalogTest-portlet.xml
file (shown in listing 8.36), which only contains bean definitions used by the test cases.
The @TestExecutionListeners that are configured for executing the test ![]() are specified. In unit testing, you’ll mostly use DependencyInjectionTestExecutionListener, which provides support for dependency injection in your tests. TestExecutionListeners, like DependencyInjectionTestExecutionListener, TransactionalTestExecutionListener and DirtiesContextTestExecutionListener are invoked by the TestContext framework, giving these listeners an opportunity to respond to events that occur during test
preparation or execution. It’s because of the DependencyInjectionTestExecutionListener that AddBookControllerTestContext in listing 8.35 can use the @Autowired and @Qualifier annotations to inject dependencies into the test class.
are specified. In unit testing, you’ll mostly use DependencyInjectionTestExecutionListener, which provides support for dependency injection in your tests. TestExecutionListeners, like DependencyInjectionTestExecutionListener, TransactionalTestExecutionListener and DirtiesContextTestExecutionListener are invoked by the TestContext framework, giving these listeners an opportunity to respond to events that occur during test
preparation or execution. It’s because of the DependencyInjectionTestExecutionListener that AddBookControllerTestContext in listing 8.35 can use the @Autowired and @Qualifier annotations to inject dependencies into the test class.
The test class ![]() extends Spring’s AbstractJUnit4SpringContextTests class, which allows the integration of JUnit tests with the application context. This is a JUnit 4.5+ specific class.
extends Spring’s AbstractJUnit4SpringContextTests class, which allows the integration of JUnit tests with the application context. This is a JUnit 4.5+ specific class.
The AddBookController, BookService, and JSR 303 validator beans ![]() are autowired into the tests from the application context. The JSR 303 validator is defined in the application context as
shown in listing 8.36. The testBook method shows how the Book domain object is validated programmatically using the JSR 303 (Bean Validation) framework.
are autowired into the tests from the application context. The JSR 303 validator is defined in the application context as
shown in listing 8.36. The testBook method shows how the Book domain object is validated programmatically using the JSR 303 (Bean Validation) framework.
The following listing shows the bookCatalogTest-portlet.xml application context XML file that’s used by the AddBookControllerTestContext class shown in listing 8.35.
Listing 8.36. The bookCatalogTest-portlet.xml application context XML file
<beans ...>
<bean id="addBookController"
class="chapter08.code.listing.domain.AddBookController"/>
<bean id="myBookService"
class="chapter08.code.listing.controller.test.MockBookService"/>
<bean id="validator" class="org.springframework.validation.beanvalidation.
   LocalValidatorFactoryBean" />
</beans>
Listing 8.36 defines the addBookController, myBookService, and validator beans only. The LocalValidatorFactoryBean class is configured as the validator because it does the bootstrapping of the JSR 303 Bean Validation framework, as discussed in section 8.5.2. The testBook method in listing 8.35 makes use of the validator bean configured in the bookCatalogTest-portlet.xml file to programmatically validate the Book domain object, saving the effort of explicitly bootstrapping the JSR 303 Bean Validation framework.
The unit testing described in this section sets the stage for doing both unit and integration testing using Spring’s TestContext framework. Let’s now look at some miscellaneous topics that you may need to know about when developing portlets using the Spring Portlet MVC framework.
8.8. Localizing content, uploading files, and adding CSS and JavaScript
In this section, we’ll address the three most common requirements you’ll come across in portlet applications: localizing content based on the user’s locale, adding custom JavaScript and CSS to the portal page, and uploading files.
8.8.1. Localizing content
If you’re using the Spring Portlet MVC framework, you can use Spring’s ResourceBundleMessageSource implementation to access messages, labels, and texts stored in a resource bundle. If the properties defined in your resource bundles are expected to change after the portlet is deployed, you may prefer to use Spring’s ReloadableResourceBundleMessageSource implementation of the resource bundle. If you want to programmatically access resource bundles in your controller classes, you can have your handler implement the MessageSourceAware interface or you can simply use the @Autowired annotation to autowire the MessageSource bean.
The MessageSourceAware interface defines a single setter method, setMessageSource(MessageSource messageSource), that lets you set the messageSource property. If you define a bean of type MessageSource, with the name messageSource, in your web application context, any object that implements the MessageSourceAware interface will be able to access the resource bundle. Because ResourceBundleMessageSource and ReloadableResourceBundleMessageSource are concrete implementations of the MessageSource interface, you can define a messageSource bean in the application context XML that makes use of either of these MessageSource implementations.
The following application context XML fragment shows how you can define a MessageSource bean in your portlet’s web application context XML file:
<bean id="messageSource"
   class="org.springframework.context.support.ResourceBundleMessageSource">
  <property name="basenames">
    <list>
      <value>content.messages</value>
    </list>
  </property>
</bean>
Note that the name of the bean is messageSource in the preceding code fragment. The basenames property identifies the fully qualified name of the resource bundle. For instance, in the preceding code content.messages refers to the resource bundle with the name messages that resides in the content package in the classpath.
The following listing shows how the SomeController handler can access a resource bundle using the MessageSourceAware interface. Alternatively, you can use the @Autowired annotation to inject the MessageSource bean into the SomeController instance.
Listing 8.37. The SomeController handler using the MessageSourceAware interface

SomeController implements the MessageSourceAware interface ![]() and provides the implementation of the setMessageSource method. SomeController defines a property named messageSource
and provides the implementation of the setMessageSource method. SomeController defines a property named messageSource ![]() of type MessageSource. Spring Framework is responsible for setting the messageSource property using the SomeController class’s setMessageSource method. SomeController uses the messageSource bean
of type MessageSource. Spring Framework is responsible for setting the messageSource property using the SomeController class’s setMessageSource method. SomeController uses the messageSource bean ![]() to retrieve the title for the portlet from the resource bundle referenced by messageSource. The getLocale method of PortletRequest returns the user’s locale information, which is then used to retrieve a localized message for the user’s locale.
to retrieve the title for the portlet from the resource bundle referenced by messageSource. The getLocale method of PortletRequest returns the user’s locale information, which is then used to retrieve a localized message for the user’s locale.
As listing 8.37 shows, the MessageSource defined in the web application context isn’t autowired. Instead, Spring Framework is responsible for calling the setMessageSource method of SomeController and passing the messageSource bean defined in the web application context XML file.
Let’s now look at how to add a JavaScript or CSS file to the portal page when using Spring Portlet MVC.
8.8.2. Adding external JavaScript and CSS files
To add custom JavaScript and CSS files to the head section of a portal page, you need to extend the DispatcherPortlet class (which extends the GenericPortlet class) and override the doHeaders method, as shown here:
public class MyDispatcherPortlet extends DispatcherPortlet {
  protected void doHeaders(RenderRequest request, RenderResponse response)
  {
    super.doHeaders(request, response);
    Element cssElement = ...
    ...
    response.addProperty(MimeResponse.MARKUP_HEAD_ELEMENT,...);
  }
}
In the preceding code, the doHeaders method of the MyDispatcherPortlet class includes a call to DispatcherPortlet’s doHeaders method to ensure that if DispatcherPortlet adds any property or headers to the response, they aren’t lost. As of Spring 3.0, DispatcherPortlet doesn’t override the GenericPortlet class’s doHeaders method to add additional properties or headers to the response, so it’s fine if you don’t invoke the doHeaders method of DispatcherPortlet from your subclass.
Let’s now look at how Spring Portlet MVC simplifies uploading files.
8.8.3. Uploading files using PortletMultipartResolver
In chapter 4, you saw that you can use the PortletFileUpload class of the Apache Commons FileUpload library to upload files in portlets. Chapter 4 showed the complete code to check for multipart requests and convert the file input stream to a byte array, before writing it to a local filesystem folder. If you’re using Spring Portlet MVC, implementing file upload feature in portlets is simplified. The Spring Portlet MVC framework provides a PortletMultipartResolver bean that you can use to resolve multipart portlet requests.
Like ViewResolver and ExceptionResolver, PortletMultipartResolver is an interface—you can implement it to create your own multipart resolver or you can use a built-in implementation provided by Spring. Spring provides a concrete implementation of PortletMultipartResolver, called CommonsPortletMultipartResolver, which makes use of Apache Commons FileUpload to upload files.
Note
If you’re using Spring’s PortletMultipartResolver to upload files, ensure that you’re using Apache Commons FileUpload 1.2 or above.
You can configure PortletMultipartResolver in your application context XML file, like any other bean. As with ViewResolver and ExceptionResolver, you don’t need to explicitly associate PortletMultipartResolver with handlers that define action methods to upload files. That is taken care by the Spring Framework itself.
The PortletMultipartResolver gets applied to the multipart portlet requests received by DispatcherPortlet. The PortletMultipartResolver transforms the incoming ActionRequest to MultipartActionRequest, which provides additional methods to deal with multipart content. The action methods that are responsible for handling file uploads in a handler can cast the ActionRequest to MultipartActionRequest to deal with the multipart content.
8.9. Summary
This chapter showed how annotation-driven development can save you the effort of maintaining the application configuration in separate configuration files. You saw how various Spring features can be accessed using annotations to simplify portlet development. For instance, the classpath-scanning feature can autoregister Spring components, JSR 303’s @Valid annotation can validate objects, and other annotations can map portlet requests to handlers, store model attributes in the handler’s conversational session, autowire objects by type or by name, and so on. The example Book Catalog portlet showed how these features can be combined together to build a multipage portlet. We also looked at how Spring’s TestContext framework simplifies performing unit and integration testing of controllers.
In the next chapter, we’ll look at how Spring simplifies interacting with a database.