
Chapter 12. Ajaxing portlets
- Developing highly responsive portlets using Ajax
- Serving resources with the ResourceServingPortlet interface
- Sending resource requests with resource URLs
- Resource serving support in Spring Portlet MVC
- Pushing data with Comet (or Reverse Ajax)
Developing highly responsive portlets is crucial for an enriched user experience. In this chapter, we’ll see how Ajax can be used to that end. This chapter provides a gentle introduction to Ajax, and it should be sufficient if you’re new to Ajax. The chapter does, however, assume that you have a basic understanding of JavaScript, CSS, and DOM (the Document Object Model). If you’re new to JavaScript, CSS, and DOM, please refer to resources that cover these topics.
We’ll also look at how the ResourceServingPortlet interface provides Ajax support to portlets, and how you can secure Ajax requests in the portal world. The ResourceServingPortlet interface serves the dual purpose of handling Ajax requests and serving binary content, so we’ll also look at how to download a binary file from a portlet that implements the ResourceServingPortlet interface.
Once you have a good grip on the basics of Ajax and how it can be used to develop portlets, we’ll look at how Ajax can be used to develop rich user interfaces in the context of the Book Catalog portlet. We’ll use the Ajax support available in the Dojo, jQuery, and DWR JavaScript frameworks—the three most popular frameworks for developing applications using Ajax.
At the end of the chapter, we’ll also look at the emerging Comet (or Reverse Ajax) and the traditional polling approach to creating portlets that display real-time data. We’ll look at how the Book Catalog portlet example uses Comet to notify users every time a book is added or removed from the catalog.
Note
Downloading binary content isn’t related to the concept of Ajax, but it’s covered in this chapter because the ResourceServingPortlet interface’s serveResource method isn’t only responsible for handling Ajax requests, but also for serving binary content.
You may be wondering why Ajax is important in developing highly responsive portlets. Let’s say that you create a portal page that consists of multiple portlets. Each portlet on this portal page retrieves its data from one or more databases during the render phase, so the load time of the portal page is high.
Now, imagine that one of the portlets on this portal page is the Book Catalog portlet. If a user clicks the Add Book button on the Book Catalog portlet’s home page, an HTTP request is sent to the portal server, and the portal page may disappear momentarily from your computer screen as the whole portal page is submitted to the server. The portlet request corresponding to the Add Book button click is processed by the portlet container and additionally invokes the render methods of all the portlets on the portal page. This portlet request handling process results in a significant delay in displaying the Add Book form.
As you can see, sometimes even the simplest of user actions on the portal page results in significant overhead on the portal server. If the processing for the submitted portlet request takes a long time, the user can’t do anything with the portal page during that time. We need some mechanism to address these issues with submitting and reloading the complete portal page. This is where Ajax comes into the picture.
Ajax is short for Asynchronous JavaScript and XML. It isn’t a single technology but a set of technologies, like JavaScript, CSS, DOM, and so on, that allows you to create highly interactive portlets. When using Ajax, the entire portal page isn’t submitted to the portal server. Instead, portlets send only the necessary request details over the HTTP protocol to the portal server. The response returned by the portal server represents data that’s used by JavaScript embedded in the portal page to update the dynamic content of the portlet, and not the complete portal page.
Note
When an HTML form of a portlet is submitted, only that form is submitted to the portal server, and not the entire portal page. Because the complete portal page disappears from the browser on submitting a form, I’ve mentioned that the entire portal page is submitted.
These are the benefits of using Ajax in portlets:
- Reduced network traffic— Requests contain only relevant request information, so the amount of request data sent to the server is less than submitting the complete portal page. Also, the portal server doesn’t generate the complete portal page but sends only limited data to the client browser. As a result of this reduced network traffic, portals that use Ajax provide an enriched user experience even over slow networks.
- Enriched user experience— The user experience takes a hit in web portals if the portal page is reloaded every time the user interacts with a portlet. Because the entire portal page isn’t reloaded to display updated content when using Ajax, the user experience is improved.
- Asynchronous request processing— A typical Ajax request is asynchronous; portal users need not wait for a request to be processed to initiate a new request. We’ll see an example of this feature later in the chapter.
- Highly interactive portlets— You can use Ajax to create highly interactive portlets that deliver rich user interfaces. For instance, you can show information in a data grid (as in Microsoft Excel) that users can directly modify, and let Ajax take care of persisting changes in the background.
It’s difficult to find a popular website these days that doesn’t make use of Ajax. Gmail, Flickr, Facebook, and Twitter, among others, make use of Ajax to make web pages more responsive.
Let’s now look at what makes Ajax ideal for developing highly responsive portlets.
12.1. Ajax basics
Building portlets using Ajax is a slightly more involved process than building conventional portlets, which is why I’ve waited until this chapter to go into it. In a typical Ajax-based portlet, a servlet or portlet component is responsible for processing the request and returning response data. JavaScript in the web browser is responsible for sending the request and processing the response data to update the portlet content.
Figure 12.1 shows how the various Ajax technologies work together to create dynamic portlets.
Figure 12.1. Ajax request handling. JavaScript in the portal page sends an asynchronous request to a servlet or portlet component, which processes the request and returns an HTML, XML, text, or JSON response to the browser. JavaScript in the portal page makes use of the response data to update a part of the portlet’s content.

The user performs some action on the portlet ![]() by clicking a button or a hyperlink. The JavaScript that was loaded as part of the portal page
by clicking a button or a hyperlink. The JavaScript that was loaded as part of the portal page ![]() initiates an asynchronous HTTP or HTTPS request in response to the user action. This request is referred to as an Ajax request. The servlet or portlet component that is the target of this request is responsible for processing the request and returning
a response to the web browser.
initiates an asynchronous HTTP or HTTPS request in response to the user action. This request is referred to as an Ajax request. The servlet or portlet component that is the target of this request is responsible for processing the request and returning
a response to the web browser.
As part of the request processing, the portlet or servlet component ![]() retrieves data from a data store, and
retrieves data from a data store, and ![]() it returns the response to the Ajax request in one of the following formats: XML, HTML, plain text, or JSON (JavaScript Object
Notation). The JavaScript that was loaded as part of the portal page
it returns the response to the Ajax request in one of the following formats: XML, HTML, plain text, or JSON (JavaScript Object
Notation). The JavaScript that was loaded as part of the portal page ![]() processes the returned response to update the portlet content. The updated portlet content
processes the returned response to update the portlet content. The updated portlet content ![]() is made visible to the portal user.
is made visible to the portal user.
You saw in earlier chapters that servlet and portlet components are used to return an HTML response. Figure 12.1 shows that when dealing with Ajax requests, servlet and portlet components can return HTML, XML, JSON, or plain text, depending upon the portlet or servlet developer’s choice.
Figure 12.1 also shows a scenario in which response data is obtained from a data store. Ajax isn’t limited to retrieving data from portlet or servlet components—you can also use Ajax to perform update operations in portlet or servlet components. For instance, you can use Ajax to submit an HTML form to a servlet or portlet that updates the data store with the user-entered values in the form.
Enough theory! Let’s get started with writing a simple portlet using Ajax, and along the way you’ll learn how Ajax can be used in web portals.
12.2. Your first Ajax portlet
In this section, we’ll use Ajax to develop a Date/Time portlet that displays the server’s current date and time. We’ll first look at the requirements for the Date/Time portlet, and then we’ll implement it step by step.
Figure 12.2 shows a Date/Time portlet that displays a “Hello World” message and the server date and time when a user clicks the Refresh hyperlink.
Figure 12.2. A Date/Time portlet that displays a “Hello World” message and the server’s current date and time when the Refresh hyperlink is clicked

Suppose for a moment that we were building the Date/Time portlet in the same way we built the portlets in previous chapters. We would write a render method in the portlet class that generates content consisting of a Refresh hyperlink and the server’s date and time, as shown in Figure 12.2. The Refresh hyperlink would refer to the portlet’s render URL, so when a user clicked the Refresh hyperlink, the render method of the portlet would be invoked to generate the Refresh hyperlink and the server date and time. This would achieve the functionality we expect from the Date/Time portlet—but at a cost. The render methods of all the portlets on the portal page would be invoked when the Refresh hyperlink was clicked, resulting in reduced portal performance. It would also adversely affect the user experience of the web portal, because the user would have to wait for the portal page to be reloaded by the browser to show the server date and time.
Instead, as you saw in Figure 12.1, we need to do the following to develop an Ajax portlet:
- Create a portlet that displays the server’s date and time.
- Write JavaScript that will send an asynchronous Ajax request to a servlet or to the portlet instance.
- Write a servlet that processes the Ajax request. You can also use the portlet instance itself to handle Ajax requests, as you’ll see later in this chapter.
- Write Ajax request-handling logic in the servlet or portlet to process the Ajax request and return a response in one of the following formats: JSON, XML, HTML, or plain text.
- Write JavaScript that will process the response returned by the portlet or servlet and update the portlet content.
For the sake of simplicity, we’ll develop a Date/Time portlet in which the Ajax request is handled by a servlet and that returns an HTML response. Let’s see how each of the above-mentioned functions is realized in our example Date/Time portlet.
Code Reference
You should now import the ch12_DateTime Eclipse project that accompanies this book in order to see how the code references in this section are used in the example portlet.
12.2.1. Creating a portlet that displays date and time
The first thing that you need to do is create a portlet that will show the server date and time.
DateTimePortlet in the ch12_DateTime project is a simple portlet that shows the home.jsp JSP page when a render request in VIEW portlet mode is received.
Listing 12.1. The DateTimePortlet class

As you can see, DateTimePortlet is like any regular portlet with no Ajax-specific request-handling code. You’ll see later in this chapter how Ajax request-handling code can also be defined within the portlet class itself. In this example, though, we’ll use a servlet component to do the Ajax request handling.
12.2.2. Sending Ajax requests using the XMLHttpRequest object
The XMLHttpRequest object is the backbone of Ajax—it’s used for sending and receiving HTTP requests and responses. The XMLHttpRequest object is provided by the web browser, so if you’re using a browser, you can access the XMLHttpRequest object via JavaScript. Most modern web browsers, like Internet Explorer, Firefox, Chrome, Safari, and so on, support the XMLHttpRequest object.
Note
In this chapter, we’ll refer to the HTTP request sent by the web browser’s XMLHttpRequest object as the Ajax request.
The DateTimePortlet’s home.jsp page, which contains a JavaScript function to send an Ajax request, is shown next.
Listing 12.2. Sending an Ajax request with the XMLHttpRequest object

The setCurrentDateTime JavaScript function is defined ![]() , which is responsible for sending an HTTP request to a servlet component.
, which is responsible for sending an HTTP request to a servlet component.
A new instance of XMLHttpRequest is created ![]() and an Ajax request is sent to DateTimeServlet. The url variable specifies the URL of the DateTimeServlet servlet that’s responsible for handling the request sent by XMLHttpRequest. The XMLHttpRequest’s open method is used to initialize the XMLHttpRequest object instance with the HTTP request method, the URL to which the request is sent, and a flag to indicate whether the request
is asynchronous or synchronous. For instance, the xhr.open("GET", url, true) method invocation indicates the following:
and an Ajax request is sent to DateTimeServlet. The url variable specifies the URL of the DateTimeServlet servlet that’s responsible for handling the request sent by XMLHttpRequest. The XMLHttpRequest’s open method is used to initialize the XMLHttpRequest object instance with the HTTP request method, the URL to which the request is sent, and a flag to indicate whether the request
is asynchronous or synchronous. For instance, the xhr.open("GET", url, true) method invocation indicates the following:
- The request uses the HTTP GET method.
- The DateTimeServlet, identified by the url argument, is responsible for handling the request.
- The request must be sent asynchronously, as specified by the true argument.
The XMLHttpRequest’s send method sends the request to the specified URL. Because the previous line has already specified that the request is sent asynchronously, the send method returns immediately. If the request is sent synchronously, the send method would return only after the response is received from the target servlet.
Note
Some browsers may cache response generated by Ajax requests. Though it’s not shown in listing 12.2, current date and time (obtained using the JavaScript Date object) is appended to the DateTimeServlet servlet URL so that the browser treats each Ajax request to DateTimeServlet as unique.
The Refresh hyperlink ![]() invokes the setCurrentDateTime JavaScript function when it’s clicked; an Ajax request is dispatched to DateTimeServlet each time the user clicks the Refresh hyperlink.
invokes the setCurrentDateTime JavaScript function when it’s clicked; an Ajax request is dispatched to DateTimeServlet each time the user clicks the Refresh hyperlink.
An empty HTML div element ![]() is defined with an id of <portlet:namespace/>messageText, which is a placeholder to show the current server date and time. You’ll see shortly how the current server date and time,
received from DateTimeServlet, is placed inside this div element.
is defined with an id of <portlet:namespace/>messageText, which is a placeholder to show the current server date and time. You’ll see shortly how the current server date and time,
received from DateTimeServlet, is placed inside this div element.
Because you can specify in the XMLHttpRequest’s open method that the request is synchronous, you can have both synchronous and asynchronous Ajax requests. In listing 12.2, the GET HTTP asynchronous request is sent to the DateTimeServlet to retrieve date and time information from the server. XMLHttpRequest also supports sending POST, HEAD, PUT, DELETE, and OPTIONS HTTP requests to servlet and portlet components.
Note
When using Ajax, it’s important to uniquely identify HTML elements and JavaScript functions that belong to the portlet, to avoid calling another portlet’s function or updating another portlet’s content. Listing 12.2 uses the <namespace> tag of the portlet tag library to uniquely identify HTML elements and JavaScript functions. For more information on the <namespace> tag, refer to chapter 6.
Now that you know how to send an asynchronous HTTP request using the XMLHttpRequest object, you’re ready to look at how DateTimeServlet handles the request and returns a response.
12.2.3. Handling Ajax requests using portlet or servlet components
A portlet or a servlet component can handle the requests sent by the XMLHttpRequest object. The DateTimeServlet servlet, which is responsible for processing the GET HTTP request sent by the XMLHttpRequest object, is shown next.
Listing 12.3. Ajax request handling in the DateTimeServlet

In listing 12.3, DateTimeServlet returns an HTML fragment as a response in its doGet method. The DateTimeServlet’s doGet method ![]() handles GET HTTP requests received from the XMLHttpRequest object. A string containing the “Hello World” message followed by the server date and time
handles GET HTTP requests received from the XMLHttpRequest object. A string containing the “Hello World” message followed by the server date and time ![]() is created. The use of the <i> HTML tag, which shows the server date and time in italics, reflects that it is indeed an HTML response. This is the data
that we need to send to the calling XMLHttpRequest object. The response data
is created. The use of the <i> HTML tag, which shows the server date and time in italics, reflects that it is indeed an HTML response. This is the data
that we need to send to the calling XMLHttpRequest object. The response data ![]() is written out to the HttpServletResponse object.
is written out to the HttpServletResponse object.
Note
The only difference between a plain text response and an HTML response is that a plain text response doesn’t contain HTML tags.
The DateTimeServlet in listing 12.3 returns an HTML response to XMLHttpRequest, which you need to put in the <div> element identified by the messageText id in the home.jsp page (refer to listing 12.2). The XMLHttpRequest object provides the means to obtain the response from the target servlet or portlet component.
Let’s look at how the home.jsp page makes use of the response from the DateTimeServlet to show the server date and time.
12.2.4. Retrieving the servlet response to update portlet content
The XMLHttpRequest object provides an event listener, onreadystatechange, that’s invoked during asynchronous request processing. As the request passes through each phase, the JavaScript function identified by the onreadystatechange event listener is invoked, allowing you to perform custom actions.
For instance, in the following code fragment, the showDateTime method is invoked whenever a request enters a particular phase:
function <portlet:namespace/>refreshDateTime() {
  var xhr = new XMLHttpRequest();
  xhr.onreadystatechange = showDateTime;
  ...
}
You can use the XMLHttpRequest object’s readyState attribute to determine the current phase of the request. The following code fragment shows how the showDateTime method can use the readyState attribute to find the current request phase and perform a specific action if the value of readyState is 4. (The possible values of the readyState attribute are outlined in table 12.1.)
Table 12.1. XMLHttpRequest phases
|
XMLHttpRequest phase |
readyState attribute value |
Description |
|---|---|---|
| Opened | 1 | Indicates that the open() method of XMLHttpRequest has been invoked |
| Sent | 2 | Indicates that the send() method of XMLHttpRequest has been invoked |
| Loading | 3 | Indicates that the response headers have been received and that the loading of the response data is about to start |
| Complete | 4 | Indicates that the request processing is complete and that the response data is now available |
function showDateTime() {
  if(this.readyState == 4) {
    ... do something
  }
}
In this code, this refers to the XMLHttpRequest object with which the JavaScript function is associated.
Instead of separately defining the showDateTime function, you can also define it as an inline JavaScript function, as shown here:
function <portlet:namespace/>refreshDateTime() {
  var xhr = new XMLHttpRequest();
  xhr.onreadystatechange = function() {
    if(this.readyState == 4) {
      ...do something
    }
  };
  ...
}
The various phases of an asynchronous request sent by XMLHttpRequest are described in table 12.1. In most scenarios, you’ll be interested in performing an action only after the request processing is complete, when the readyState attribute value is 4.
Once the request processing is complete, you need some way to access the response data. This data can be obtained using the following methods of the XMLHttpRequest object:
- responseText—Returns response data as plain text. You’ll use this method to obtain HTML, plain text, or JSON response data.
- responseXML—Returns response data as a DOM Document object.
Because we’re returning an HTML response from DateTimeServlet, we’ll use the responseText method. The following listing shows how the setCurrentDateTime JavaScript function of the home.jsp page displays the server date and time received from DateTimeServlet.
Listing 12.4. Displaying the server date and time on the home.jsp page

The onreadystatechange event listener ![]() defines an inline JavaScript function that handles events generated as the request goes through different phases of processing.
defines an inline JavaScript function that handles events generated as the request goes through different phases of processing.
If the request processing is complete—if the value of the XMLHttpRequest object’s readyState property is 4—the response received from DateTimeServlet ![]() will be displayed. The document object’s getElementId method
will be displayed. The document object’s getElementId method ![]() is used to obtain a reference to the messageText element in the HTML. The innerHTML property of the <div> element with the messageText id is used to set the HTML fragment inside the <div> tag.
is used to obtain a reference to the messageText element in the HTML. The innerHTML property of the <div> element with the messageText id is used to set the HTML fragment inside the <div> tag.
You’ve now created your first portlet using Ajax. If you deploy the example Date/Time portlet and click the Refresh hyperlink, you’ll find that it fetches the server date and time without reloading the complete portal page. The Date/Time portlet demonstrates that by using Ajax you can create portlets that are dynamic but that don’t need to reload your complete portal page, resulting in enriched user experience.
In this Date/Time portlet, you’ve used a servlet component to handle requests sent by the XMLHttpRequest object. The main drawback with using servlets to handle Ajax requests is security. A servlet component is outside the portal permission system, which only applies to portlets, making it accessible to anonymous users. For instance, if you enter the URL of the DateTimeServlet in your web browser, it will execute its doGet method and return the server date and time.
Let’s now look at how you can deal with security issues related to Ajax in the portlet environment.
12.3. Securing Ajax requests
Security is an important aspect of applications, including portals, that use Ajax. A portal server provides a security framework for the web portal, and it’s responsible for authenticating and authorizing portlet requests.
Servlets fall outside the portal security framework provided by the portal server, and it’s up to the portal server to provide proprietary ways of securing servlets or to leave it to the portlet developer to implement a custom security framework for securing servlets. If the portlet developer is responsible for implementing servlet security, then the developer is responsible for creating portlets that can share authentication and authorization data with servlets using portlet sessions.
In the context of the Date/Time portlet, let’s see how you can secure Ajax requests dispatched to a servlet.
12.3.1. Date/Time portlet’s security requirements and possible solutions
Let’s say that you want the server date and time to be visible in the Date/Time portlet only for registered users of the portal. By default, Liferay Portal assigns the User role to registered users, so you need to secure the DateTimeServlet from users who don’t have the User role.
A simple way to achieve this is by storing the role of the logged-in user in the PortletSession’s APPLICATION_SCOPE scope in the DateTimePortlet, and then checking for the User role in the DateTimeServlet.
Note
Alternatively, you can restrict the portlet so it’s displayed only to registered users. The Date/Time portlet shows an invented scenario in which we want to secure only the Ajax requests that will be processed by a servlet component. In real-world portlets, only a portion of the portlet content is shown using Ajax requests, so hiding the portlet in such a scenario isn’t an option.
It’s possible that the servlet component responsible for processing Ajax requests is outside the portlet application. In such cases, you’ll have to rely on a portal server–specific feature to share the PortletSession across different web applications. For instance, in Liferay Portal you can share APPLICATION_SCOPE session attributes with portlets in other portlet applications by setting the session.shared.attributes property in the portal-ext.properties file (discussed in appendix B) and the <private-session-attributes> element in the liferay-portlet.xml file. Note that such features are portal server–specific and will result in portability issues.
Code Reference
This is a good time to import the ch12_DateTimeSecured Eclipse project into your Eclipse IDE. To compile the project, add the portal-service.jar JAR file, located in the TOMCAT_HOME/lib/ext directory of your Liferay Portal installation, to the build path of the project, and also add it to the lib directory of the project.
Let’s now look at how the Date/Time portlet is secured using Liferay Portal–specific APIs.
12.3.2. Implementing security using portal server–specific APIs
To secure the Date/Time portlet, you first need to obtain the role of the logged-in user in the render method of DateTimePortlet, and then store that user’s role in the PortletSession’s APPLICATION_SCOPE scope so that it’s available to DateTimeServlet when the servlet receives the Ajax request.
The next listing shows how the DateTimePortlet class obtains the role of the current user using Liferay Portal’s RoleLocalServiceUtil class and stores it in the PortletSession’s APPLICATION_SCOPE.
Listing 12.5. Storing user roles in PortletSession

The empty userRoles list ![]() is defined to hold the different role names associated with the current web portal user.
is defined to hold the different role names associated with the current web portal user.
The getUserRoles(long userId) method ![]() of Liferay Portal’s RoleLocalServiceUtil class returns the roles that the current user is associated with. The PortletRequest’s getRemoteUser method returns the login ID of the logged-in user or null for unauthenticated users. The login ID isn’t the username that you enter during login but the userid that’s assigned to
the authenticated user on successful login. In the case of Liferay Portal, the userid is a long number, stored in its USER_table (refer to appendix B). The list returned by RoleLocalServiceUtil is used to populate the userRoles list with the role names associated with the user. The userRoles list is then set in the PortletSession’s APPLICATION_SCOPE so that it’s accessible to DateTimeServlet, which is responsible for handling Ajax requests.
of Liferay Portal’s RoleLocalServiceUtil class returns the roles that the current user is associated with. The PortletRequest’s getRemoteUser method returns the login ID of the logged-in user or null for unauthenticated users. The login ID isn’t the username that you enter during login but the userid that’s assigned to
the authenticated user on successful login. In the case of Liferay Portal, the userid is a long number, stored in its USER_table (refer to appendix B). The list returned by RoleLocalServiceUtil is used to populate the userRoles list with the role names associated with the user. The userRoles list is then set in the PortletSession’s APPLICATION_SCOPE so that it’s accessible to DateTimeServlet, which is responsible for handling Ajax requests.
The portlet request ![]() is dispatched to the home.jsp page so the portlet content can be rendered.
is dispatched to the home.jsp page so the portlet content can be rendered.
As you saw in chapter 4, Liferay Portal’s *Util utility classes provide static methods for accessing Liferay Portal services. Listing 12.5 uses the RoleLocalServiceUtil class to obtain user roles based on the userid. Behind the scenes, RoleLocalServiceUtil looks into the _USER, _ROLE, and USERS_ROLES tables in Liferay Portal to find out which roles a logged-in user is associated with.
Note
Java EE doesn’t provide any standard approach for obtaining role information for an authenticated user, so you’re limited to using portal server–specific APIs or database tables to find that role information.
Now that you’ve stored the user’s role information as a session attribute, it’ll be accessible to DateTimeServlet while it’s processing the Ajax request. The following listing shows how DateTimeServlet provides programmatic security based on the user’s role.
Listing 12.6. Role-based programmatic security in DateTimeServlet

The role information for the authenticated user is obtained from the HttpSession object ![]() . If the user isn’t authenticated, no role information is available. A check is made to determine whether the incoming HTTP
request is from an authenticated user who belongs to the User’ role
. If the user isn’t authenticated, no role information is available. A check is made to determine whether the incoming HTTP
request is from an authenticated user who belongs to the User’ role ![]() . If the user meets the criteria in the preceding check, a response message containing the server date and time is created
. If the user meets the criteria in the preceding check, a response message containing the server date and time is created
![]() ; otherwise, a response message saying, “You are not authorized to view server date/time” is created. The response content
is then written out to the HttpServletResponse.
; otherwise, a response message saying, “You are not authorized to view server date/time” is created. The response content
is then written out to the HttpServletResponse.
Listing 12.6 demonstrates that you can achieve role-based security in portlets that use Ajax by embedding the security logic in the servlet component. Most portal servers offer sophisticated access-control features to control which actions a user can perform on a portlet. If you want to use the same access control to secure Ajax requests, it will involve additional overhead to retrieve access control data and use it in the servlet component.
Portlet 2.0 introduced a new lifecycle interface, ResourceServingPortlet, which allows an implementing portlet to handle Ajax requests. Let’s look at the Ajax support in Portlet 2.0 and see how it simplifies the development of Ajax portlets.
12.4. Ajax support in Portlet 2.0
Portlet 1.0 didn’t provide any support for serving resources, like binary content. For instance, if you wanted to download a PDF file or a GIF image from a portlet, you had to use a servlet to implement the download functionality. Similarly, if you wanted to use Ajax in your portlets, the only option was to use a servlet component to handle the Ajax requests. To address these limitations, Portlet 2.0 introduced the ResourceServingPortlet lifecycle interface, which portlets can implement to handle Ajax requests.
Let’s look at this interface in detail.
12.4.1. Serving resources using the ResourceServingPortlet interface
<ResourceServingPortlet is a lifecycle interface that your portlet must implement if it needs to serve binary content or use Ajax to create a highly interactive user interface. If your portlet implements the ResourceServingPortlet interface, then your portlets don’t need to use a servlet to serve binary content or handle Ajax requests. Because the portlet itself handles Ajax requests, they are secured by the portal’s security infrastructure.
Even though Portlet 2.0 provides support for using Ajax, you may still prefer to use servlets to handle Ajax requests in some scenarios. For instance, if multiple portlets in your web portal need access to common functionality delivered via Ajax, it may make sense to deliver it via a servlet. If your Ajax request-handling logic is inside a portlet, it can’t be reused by other portlets (because portlets can’t create URLs referring to other portlets). In contrast, if the Ajax request-handling logic is inside a servlet, multiple portlets can easily access the servlet and reuse the logic. Also, if you’re using an Ajax framework, like DWR (Direct Web Remoting), which uses a servlet to process Ajax requests dispatched by portlets, you need to secure that servlet using the approach discussed in the previous section.
ResourceServingPortlet, like the EventPortlet interface, is an optional lifecycle interface. It defines a single method that has the following signature:
void serveResource(ResourceRequest request,
   ResourceResponse response)
     throws PortletException, IOException
As you can see, the serveResource method accepts ResourceRequest and ResourceResponse objects as arguments. It’s invoked when the portlet container receives a resource request for a portlet.
The ResourceRequest object provides information that the portlet requires to process a resource request, including the resource identifier, portlet mode, render parameters, and so on. The resource identifier is a String value that uniquely identifies the resource to be served by the portlet.
The ResourceResponse object is used by a portlet to render a resource, such as an image. Like other request and response objects in portlets, the ResourceRequest and ResourceResponse objects are created by the portlet container and are made available to the serveResource method.
In chapter 3 you saw that ResourceResponse and RenderResponse are subinterfaces of MimeResponse, which means you can’t publish portlet events, issue a redirect, or change window state, portlet mode, or render parameters during a serveResource method invocation. As in the render method, you can use PortletRequestDispatcher in the serveResource method to render markup using JSPs or servlets. This also means you can render markup as well as serve binary content, like images and PDF documents, in the serveResource method, but you need to be careful about choosing when to return markup and when to return binary content. We’ll discuss that shortly.
Let’s look at how resource requests are handled by portal servers. Suppose you have a portal page with two portlets, Portlet A and Portlet B. Figure 12.3 shows how a resource request for Portlet A is processed by the portal server.
Figure 12.3. A sequence diagram of the resource request-processing lifecycle. The resource request doesn’t result in the invocation of the render methods of other portlets on the portal page.

A user performs some action on Portlet A on a web portal ![]() , which kicks off a resource request. The resource request results in the invocation of Portlet A’s serveResource method
, which kicks off a resource request. The resource request results in the invocation of Portlet A’s serveResource method ![]() . The response is returned from Portlet A—this could be HTML markup, XML, JSON, plain text, or any binary content
. The response is returned from Portlet A—this could be HTML markup, XML, JSON, plain text, or any binary content ![]() . The resource is served via the web portal
. The resource is served via the web portal ![]() .
.
One of the interesting things to notice in Figure 12.3 is that the portlet container completely ignores Portlet B and doesn’t invoke its render method. It doesn’t even invoke the render method of Portlet A. This means that whenever a resource request is dispatched to a portlet, neither the target portlet nor any other portlets on the portal page are rerendered by the portlet container.
You saw in chapter 2 that the portal server is responsible for combining the portlet content, putting window decoration around the content, composing the portal page, and so on. Because the portlet render methods aren’t invoked and the window state, render parameters, and portlet mode can’t be changed in the serveResource method, the portal page doesn’t need to be updated by the portal server in response to the resource request. This means the role of portal server, in resource-request processing, is to simply dispatch the resource request to the portlet container and deliver the resource response directly to the web portal.
Because the resource response is delivered directly to the web portal, without any updates to the portal page, this makes it ideal for handling Ajax requests. The following advantages come with using the serveResource method to handle Ajax requests:
- Security— The portlet is within the portal’s security infrastructure, so the call to serveResource is secured and can utilize the access controls defined by the portal’s security framework.
- Access to portlet state— The ResourceRequest object provides portlet mode, window state, and render parameters, so the serveResource method can make use of this information while generating resource responses.
- Access to PortletContext— If you’ve defined any initialization parameters in your portlet, they’re available in the serveResource method.
- Access to PortletSession— The portlet can make use of the PortletSession to obtain session data while processing Ajax requests in the serveResource method.
- Access to PortletPreferences— The portlet can access the PortletPreferences object associated with the portlet for the logged-in user, so the serveResource method can be used to customize responses based on preferences or to update user preferences.
The disadvantages of using the serveResource method to handle Ajax requests include these:
- Performance— Because the resource request is like any other portlet request and it’s processed by multiple layers of the portal framework, it’s slow compared to processing Ajax requests with a servlet.
- Not reusable— Because the Ajax request-processing logic is located within the portlet, it isn’t reusable across multiple portlets. If you’re using a servlet, it can be accessed by multiple portlets in the same or different portlet applications.
So far we’ve discussed how the ResourceServingPortlet interface can be used to address Ajax use cases and to download binary content, but how can you send a resource request to a portlet? Let’s look at the self-referencing resource URL in portlets, which is used to send resource requests.
12.4.2. Sending a resource request using a resource URL
Like action and render URLs, a resource URL is a self-referencing URL that’s used to send a resource request to a portlet. To create a resource URL, you can use the createResourceURL method of the RenderResponse or ResourceResponse object or you can use the portlet tag library’s <resourceURL> tag. In either case, you should uniquely identify the resource that needs to be served by specifying a resource ID.
Code Reference
This is a good time to import the ch12_DateTimeSecuredResource Eclipse project into your Eclipse IDE. The code listings discussed in this section are used in that project’s implementation of the Date/Time portlet.
Figure 12.2 showed that in the Date/Time portlet the Refresh hyperlink is responsible for retrieving the current server date and time. If you want to use the portlet’s serveResource method to return the date and time information, the Refresh hyperlink must send an Ajax request to the resource URL of the portlet. Listing 12.7 shows how the DateTimePortlet class uses the RenderResponse object to create a resource URL, which is later used by the home.jsp page to send an Ajax request to the resource URL when the Refresh hyperlink is clicked.
Listing 12.7. Creating a resource URL in the DateTimePortlet class

The RenderResponse’s createResourceURL method ![]() creates a ResourceURL object, which represents a resource URL. The setResourceID method of ResourceURL is used to uniquely identify the resource to be served. The resource URL is set as a request attribute
creates a ResourceURL object, which represents a resource URL. The setResourceID method of ResourceURL is used to uniquely identify the resource to be served. The resource URL is set as a request attribute ![]() , and the request is dispatched to the home.jsp page. The Refresh hyperlink in home.jsp sends an Ajax request to the resource
URL set in the request.
, and the request is dispatched to the home.jsp page. The Refresh hyperlink in home.jsp sends an Ajax request to the resource
URL set in the request.
If you compare the showHomePage render method shown in listing 12.7 with the showHomePage render method from listing 12.5, you’ll see that we no longer need to worry about passing role information from the portlet to the servlet component. The security of the Ajax request is taken care of by the serveResource method itself, as you’ll see shortly.
The DateTimePortlet’s serveResource method processes the Ajax request that’s received when the Refresh hyperlink is clicked, shown next.
Listing 12.8. The DateTimePortlet’s serveResource method

The ResourceResponse’s getPortletOutputStream method ![]() is used to obtain the OutputStream to which the serveResource method writes response data. The ResourceRequest’s isUserInRole method
is used to obtain the OutputStream to which the serveResource method writes response data. The ResourceRequest’s isUserInRole method ![]() is used to check whether the logged-in user belongs to the User role. The rest of the code listing is similar to the DateTimeServlet’s doGet method shown in listing 12.6.
is used to check whether the logged-in user belongs to the User role. The rest of the code listing is similar to the DateTimeServlet’s doGet method shown in listing 12.6.
Note
To get a better understanding of how programmatic security works in portal servers and how Liferay Portal maps a logical role name to a role available in the deployment environment, please refer to chapter 4.
Listings 12.7 and 12.8 show that using the portlet’s serveResource method to handle Ajax requests simplifies development, because the security of the Ajax request is taken care of by the portal’s security infrastructure.
Let’s now look at how to serve resources using Spring Portlet MVC.
12.4.3. Serving resources the Spring Portlet MVC way
If you’re using the Spring 3.0 Portlet MVC framework to develop portlets, you can serve resources from a handler method annotated with the @ResourceMapping annotation.
Here’s what the handler method for serving resources will look like:
@ResourceMapping(value="myResourceId")
public void myServeResourceMethod(ResourceRequest request,...)...{
  ...
}
As you can see, the @ResourceMapping annotation accepts a single value element that identifies the resource ID associated with the incoming resource request. Like other annotated request-processing handler methods in Spring Portlet MVC, the @ResourceMapping annotated method can have a flexible signature.
Code Reference
To see the @ResourceMapping annotation in use, import the ch12_SpringPortletDateTime Eclipse project into your Eclipse IDE. The Date/Time portlet in this project is created using Spring Portlet MVC’s @ResourceMapping annotation.
If the @ResourceMapping annotation doesn’t specify the resource ID to which it applies, then by default the handler method applies to all incoming resource requests that map to the handler.
So far, we’ve discussed how resource requests can be used to create portlets that use Ajax to show dynamic content. The Ajax response data is in HTML, XML, JSON, or plain text format. As mentioned earlier, the ResourceServingPortlet interface can also be used to serve binary content, such as images and PDF documents. Let’s now look at how this interface is used to download binary content from a portlet.
12.5. Downloading binary content using portlets
You’ll seldom come across real-world portlets that don’t need to serve binary content. For instance, the Book Catalog portlet needs to serve the Table of Contents (TOC) of each book in the catalog, which could be in PDF or MS Word format. Similarly, a picture viewer portlet needs to serve images; an announcement portlet needs to provide announcement-related details in PDF or MS Word format.
To download binary content, you can either use a direct link to the resource or a resource URL pointing to the resource. Direct links are created by the portlet and encoded using the encodeURL method of the PortletResponse object. If the resource is located within the portlet application, you can access the resource using a direct link. In previous chapters, you used direct links to add portlet application resources, like CSS and JavaScript files, to the portal page. In the Book Catalog portlet, if the TOCs of all the books are located within the portlet application, direct links can be used to download them.
Code Reference
To see how direct links are used to download TOCs, you should now import, build, and run the ch12_BookCatalogDirectLinks Eclipse project. The TOC files are located in the toc directory of the portlet application; their filenames are the ISBNs of the books.
There are downsides to using direct links for downloading resources:
- The resource must be located within the portlet application directory structure.
- No pre- or post-processing can be performed, before or after the resource is served.
- Direct links are outside portal security framework, so access to resources isn’t secured.
If you’re using resource URLs to download binary content, you can have resources that are outside the portlet application, you can perform pre- and post-processing in the serveResource method, and the resource is protected by the portal’s access control features. The only downside of using resource URLs is that they affect the portal’s performance. Because the resource URL has to pass through the portal infrastructure, resources are served more slowly than when you’re serving resources using direct links.
The Book Catalog portlet in chapter 6 uploaded TOCs to the folder identified by the value of the uploadFolder portlet initialization parameter in the portlet.xml file. Let’s now look at how these TOCs can be downloaded using resource URLs.
Code Reference
You should now import the ch12_BookCatalogResourceURL Eclipse project so you can see how resource URLs are used to download TOCs. TOC files are located in the folder that you specified as the value of the uploadFolder initialization parameter.
The next listing shows how the TOC files can be served using the BookCatalogPortlet’s serveResource method.
Listing 12.9. Serving TOC files with the serveResource method
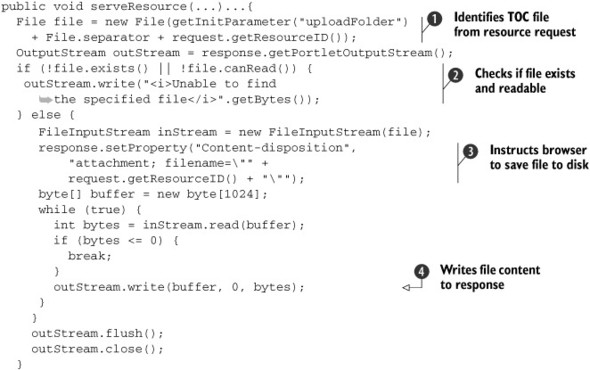
The resource ID is obtained ![]() from the resource request by using the getResourceID method. In our example portlet, the resource ID represents the name of the TOC file associated with the book. There’s a check
from the resource request by using the getResourceID method. In our example portlet, the resource ID represents the name of the TOC file associated with the book. There’s a check
![]() to make sure the TOC file exists and is readable. If the TOC file doesn’t exist or can’t be read, an error message is sent
to the portal user. If the file exists and is readable, the Content-disposition HTTP header is used
to make sure the TOC file exists and is readable. If the TOC file doesn’t exist or can’t be read, an error message is sent
to the portal user. If the file exists and is readable, the Content-disposition HTTP header is used ![]() to instruct the web browser to prompt the user to save the TOC file to disk. The TOC file content
to instruct the web browser to prompt the user to save the TOC file to disk. The TOC file content ![]() is written out to the response.
is written out to the response.
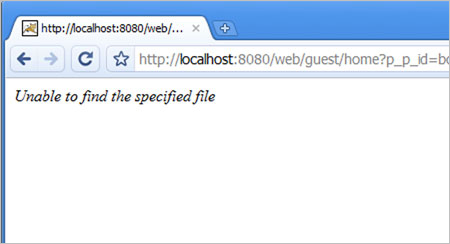
Listing 12.9 shows a scenario in which you may want to write HTML or binary content to the response. If the TOC file doesn’t exist or is unreadable, the following HTML string is written to the response: <i>Unable to find the specified file</i>. If the TOC file exists and is readable, the content of the file is written to the response.
In the case of an Ajax resource request, the response is manipulated by JavaScript in the browser to update a portion of the portlet content. In the case of a non-Ajax resource request, the response is written directly to the web browser; when HTML is written to the resource response, it’s the only HTML the user gets to see in the web browser. Figure 12.4 shows that when a TOC file isn’t found or is unreadable, the only response received from the portal server is the HTML written out by the serveResource method.
Figure 12.4. In the case of a non-Ajax resource request, the only HTML displayed in the web browser is the HTML written to the ResourceResponse.
Let’s now look at how you can improve the performance of your web portal by caching served resources.
12.6. Resource URLs and caching
Let’s say that a portlet serves resources that are independent of the current state of the portal page or portlet. In that case, you don’t need a portlet container to create resource URLs that contain the portal page or portlet state information. If the resource URL doesn’t contain details about the portal page or portlet state, it increases the browser’s ability to cache the response, because the response isn’t dependent on the state of the portal page or portlet.
Note
Resource caching is an optional feature for portlet containers. Please refer to your portal server’s documentation to see if your portal server supports resource caching.
You can specify the portal page or portlet state information that should be made available to the serveResource method by using the cacheability attribute of the resourceURL tag or the setCacheability method of the ResourceURL object. Table 12.2 describes the valid cacheability values that you can specify for a resource URL.
Table 12.2. Resource cacheability description
|
Cacheability value |
Description |
|---|---|
| cacheLevelFull | Instructs the portlet container to create a resource URL that doesn’t include portal page and portlet state information. This means that you shouldn’t access the portlet mode, window state, render parameters, or portal page state in the serveResource method triggered by this resource URL. |
| Using the cacheLevelFull value for a resource URL means that the response generated by the corresponding serveResource method must contain resource URLs with cacheability set to cacheLevelFull and must not contain render and action URLs. If the portal page and portlet state remain unchanged, the resource will be served from the browser cache in response to a resource request. | |
| cacheLevelPortlet | Instructs the portlet container to create a resource URL that only includes portlet state (window state, portlet mode, and render parameters) in the generated URL. |
| Using the cacheLevelPortlet value for a resource URL means that the response generated by the corresponding serveResource method must contain resource URLs with cacheability set to cacheLevelFull or cacheLevelPortlet and must not contain render and action URLs. If the portlet state remains unchanged, the resource will be served from the browser cache in response to a resource request. | |
| cacheLevelPage | Results in the creation of a resource URL that includes the state of the portal page in the generated URL. |
| Using cacheLevelPage allows any type of portlet URL to be generated by the corresponding serveResource method. If the state of the portal page remains unchanged, the resource will be served from the browser cache in response to a resource request. |
If the cacheability value is set to cacheLevelFull, the browser’s ability to cache the resource is maximum because the cached resource is independent of the state of the portal page or portlet.
If no cacheability value is set for a resource URL, the default value depends upon the portlet lifecycle method in which the resource URL was created. For instance, if the resource URL is created in the render method of a portlet, cacheability is set to cacheLevelPage; if the resource URL is created in the serveResource method, the value of cacheability is set to the cacheability value of the resource URL that triggered the serveResource method.
You saw earlier how the Date/Time portlet makes use of Ajax to retrieve the current server date and time. That portlet demonstrates a simple use of Ajax in a portlet. The real benefit of Ajax is realized when it’s used to create highly interactive user interfaces.
In section 12.7, we’ll look at the Book Catalog portlet, which shows a rich user interface for displaying catalog data, uploading TOC files, and adding books to and removing them from the catalog. In section 12.8 you’ll see how the Book Catalog portlet makes use of Dojo, DWR, and jQuery to create a highly responsive user interface. Section 12.9 explores how polling and Comet approaches can be used to show real-time data in portlets. We’ll also look at how the Book Catalog portlet makes use of Comet to display notification messages to users when a book is added or removed from the catalog.
12.7. Creating a rich interface for the Book Catalog portlet
Rich user interfaces are like desktop applications—highly responsive and interactive. In this section, we’ll redefine the Book Catalog portlet’s user interface to use Ajax technologies to create a highly responsive user interface and display real-time data.
Figure 12.5 shows what the new initial page of the Book Catalog portlet looks like.
Figure 12.5. The Book Catalog portlet uses a tabbed pane to divide up content in the user interface. If a new book is added or removed from the catalog, a notification is displayed to the user.

The Catalog and Add Book tabs ![]() are used to divide up the content displayed by the Book Catalog portlet. The Catalog tab shows catalog data, as shown in
Figure 12.5. The Add Book tab shows an HTML form for adding a new book to the catalog. The notification message
are used to divide up the content displayed by the Book Catalog portlet. The Catalog tab shows catalog data, as shown in
Figure 12.5. The Add Book tab shows an HTML form for adding a new book to the catalog. The notification message ![]() , "Book Catalog data has been modified" (followed by a Refresh hyperlink that will retrieve the latest catalog data from the data store) is displayed to inform the
viewer that a book has been added to or removed from the catalog; the book could have been added or removed by the same user
or by another user of the portlet. The Download link is used to download the TOC file associated with the book, the Upload link
shows a file-upload form for uploading a TOC file, and the Remove link is used to remove a book from the catalog
, "Book Catalog data has been modified" (followed by a Refresh hyperlink that will retrieve the latest catalog data from the data store) is displayed to inform the
viewer that a book has been added to or removed from the catalog; the book could have been added or removed by the same user
or by another user of the portlet. The Download link is used to download the TOC file associated with the book, the Upload link
shows a file-upload form for uploading a TOC file, and the Remove link is used to remove a book from the catalog ![]() . The Add Book link opens the Add Book tab, which displays an HTML form for adding a new book to the catalog
. The Add Book link opens the Add Book tab, which displays an HTML form for adding a new book to the catalog ![]() .
.
Figure 12.6 shows the HTML form that’s displayed when the user clicks on the Upload link.
Figure 12.6. Form for uploading a book’s TOC file. This form is displayed when the user clicks on the Upload link for a book (see Figure 12.5).
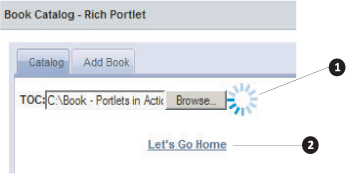
When a user selects the TOC file for uploading ![]() , a GIF image is displayed to inform the user that the file upload process has been initiated. Once the file upload is complete,
the GIF image is removed from the screen. The file upload process is asynchronous, so users don’t need to wait for the upload
to complete. Clicking the Let’s Go Home link
, a GIF image is displayed to inform the user that the file upload process has been initiated. Once the file upload is complete,
the GIF image is removed from the screen. The file upload process is asynchronous, so users don’t need to wait for the upload
to complete. Clicking the Let’s Go Home link ![]() takes the user back to the catalog list shown in Figure 12.5.
takes the user back to the catalog list shown in Figure 12.5.
In Figure 12.5, after the file upload process completes, a message is displayed at the top of the window to confirm that the TOC file was uploaded successfully. In the Book Catalog portlet, the name of the TOC file is the same as the book’s ISBN. For instance, the ISBN of Portlets in Action is 9781935182542, so the TOC file for Portlets in Action is stored with the name 9781935182542.
Figure 12.7 shows the Add Book tab, which displays the form for adding a new book to the catalog.
Figure 12.7. Form for adding a new book to the catalog. The form is displayed when the user selects the Add Book tab or clicks the Add Book link shown on the catalog page (see Figure 12.5).
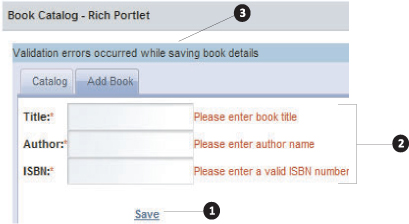
The Save link is used ![]() to asynchronously save the details of the new book. Validation errors that are reported while saving book details are displayed
to asynchronously save the details of the new book. Validation errors that are reported while saving book details are displayed
![]() . A notification message is displayed
. A notification message is displayed ![]() to inform the user that validation errors occurred while saving book information.
to inform the user that validation errors occurred while saving book information.
The Book Catalog portlet in this chapter is highly interactive and makes use of Ajax technologies to create a rich user interface, resulting in an improved user experience. Figures 12.6 and 12.7 indicate one of the most important features of this version of the Book Catalog portlet—it asynchronously executes user actions. For instance, in Figure 12.6 you can enter new book details and click Save; then, while the book data is being saved, you can click the Catalog tab to view the book catalog. While you’re viewing the catalog data, the Book Catalog portlet informs you of whether your new book was successfully added to the catalog or if any validation errors occurred while saving it. The asynchronous uploading of files and saving of book data improves the user experience by many notches.
Note
For the sake of simplicity, the security of the Book Catalog portlet is not part of the requirements.
Now that we’ve seen the requirements, let’s look at how the Book Catalog portlet can be implemented using Ajax technologies.
12.8. Creating rich user interfaces using Ajax
Using Ajax in developing portlets requires myriad skills, including a good understanding of JavaScript, CSS, HTML, DOM, the XMLHttpRequest object, and so on. As we go through the implementation details of the Book Catalog portlet in this section, we’ll look at the JavaScript libraries that hide Ajax-related details from the developer and hence simplify the development of Ajax applications. We’ll also look at some of the important concepts in various Ajax technologies that are involved in developing highly interactive portlets using Ajax.
Table 12.3 provides an overview of some of the libraries that enable you to build web applications and portlets with Ajax. Later in this section, we’ll discuss how these libraries can be used to implement the Book Catalog portlet.
Table 12.3. Java and JavaScript libraries that enable Ajax development
|
JavaScript library |
Description |
|---|---|
| Dojo Toolkit | The Dojo Toolkit is an open source cross-browser JavaScript library that provides rich UI widgets and Ajax support. For more information about the Dojo Toolkit, refer to its official website: http://dojotoolkit.org/. |
| jQuery | jQuery is an open source cross-browser JavaScript library that provides Ajax support. It also has a user interface library that provides widgets for developing interactive web pages. Refer to the official jQuery website for more information: http://jquery.com/. |
| DWR (Direct Web Remoting) | DWR is a servlet-based Java library that generates JavaScript code based on Java classes, making it easy for Java developers to use Ajax in Java-based web applications and Java portlets. Refer to the official DWR website for more information: http://directwebremoting.org/. |
As you can see in table 12.3, jQuery, Dojo Toolkit, and DWR provide support for developing Ajax portlets. So what’s the main distinction between these frameworks? The jQuery and Dojo Toolkit JavaScript libraries provide cross-browser support for sending Ajax requests and processing responses, but they’re different from DWR, which provides features like Comet (or Reverse Ajax), exposing Java classes as JavaScript objects, handling conversions between JavaScript and Java objects, integrating with Spring and JSF beans, and so on.
Starting with Dojo, let’s begin our discussion of how the Book Catalog portlet can be implemented using Dojo, DWR, and jQuery.
Code Reference
You should now import the ch12_ResourceServing Eclipse project, which accompanies this book, to see how the code referenced in this section is used in the Book Catalog portlet. To use the Book Catalog portlet, you must change the location of the upload directory (specified in the project’s dwr.properties file) for TOC files.
12.8.1. Simplified Ajax with Dojo
Dojo provides a multitude of features, including Ajax, a rich UI widget library, DOM utilities, animation effects, and so on. You can think of Dojo as consisting of three parts: a core Dojo library, Dijit (a UI widget library), and Dojox (an extensions library). For the purposes of this chapter, we’ll focus only on Dijit and Ajax support (available in the core Dojo library).
The core Dojo library acts as the foundation for Dojo’s Dijit library, which provides rich UI widgets, like the menu, tree, calendar, and so on. It also provides layout widgets that allow you to place UI widgets in different sections of the layout. For instance, the BorderContainer layout widget provides the layout for putting widgets in five different compartments (left, right, top, bottom, and center), and the TabContainer layout widget is useful for showing a tabbed pane. A portlet developer can make use of widgets available in the Dijit library to quickly add rich content to portlets.
The Book Catalog portlet requires a tabbed pane to display the catalog details and to add books, so we can use Dijit’s TabContainer layout widget to show a tabbed pane.
Including Necessary JavaScript and CSS in a Portal Page
To use the Dijit TabContainer widget, you need to include the Dojo JavaScript library in your portal page along with the CSS file that identifies the theme to be used for styling Dijit widgets. Dijit provides four built-in themes: soria, tundra, nihilo, and a11y. You can use one of these built-in themes to give your Dijit widgets a consistent look and feel, or you can create your own custom theme.
The liferay-portlet.xml file, which shows the JavaScript and CSS files used by the Book Catalog portlet to render Dijit widgets, is shown next.
Listing 12.10. JavaScript and CSS files for using Dijit widgets in liferay-portlet.xml

The soria.css file from the Dijit library ![]() specifies that the Soria theme will be used to give the Dijit widgets used by the portal page a consistent look and feel.
The dojo.js file
specifies that the Soria theme will be used to give the Dijit widgets used by the portal page a consistent look and feel.
The dojo.js file ![]() is the core Dojo JavaScript library on top of which Dijit widgets are created.
is the core Dojo JavaScript library on top of which Dijit widgets are created.
Note
The Book Catalog portlet makes use of version 1.4.2 of the Dojo Toolkit library. The Dojo Toolkit 1.4.2 download consists of three subdirectories: dojo, dijit, and dojox. The dojox directory contains extensions to dojo, which you can use based on your application’s requirements. For instance, if your Ajax request returns data in JSON format, you can use the JSONQuery support available in dojox for parsing JSON data. To include a single copy of dojo.js by default on the portal pages, include dojo.js as part of your portal theme (refer to chapter 5 for portal themes).
Adding Widgets to a JSP Page
Now that you’ve included the necessary JavaScript and CSS files for using Dojo and Dijit, let’s look at the JSP page that uses Dijit widgets to render a tabbed pane. The home.jsp page of the Book Catalog portlet, which uses the TabContainer layout widget to show a tabbed pane, is next.
Listing 12.11. Adding widgets to the home.jsp JSP page

Listing 12.11 shows that a Digit layout widget can be used in combination with other Digit layout widgets to create the layout of a portlet
page. The class attribute’s value of soria ![]() specifies the name of the theme that applies to the Dijit widgets inside the div tag. BorderContainer
specifies the name of the theme that applies to the Dijit widgets inside the div tag. BorderContainer ![]() specifies a layout widget from the Dijit library. Then the TabContainer layout widget
specifies a layout widget from the Dijit library. Then the TabContainer layout widget ![]() is added to the center partition of the BorderContainer layout. Because no other components have been added to the BorderContainer, the TabContainer widget fills the complete area defined by the enclosing BorderContainer widget. The ContentPane layout widget
is added to the center partition of the BorderContainer layout. Because no other components have been added to the BorderContainer, the TabContainer widget fills the complete area defined by the enclosing BorderContainer widget. The ContentPane layout widget ![]() is used to add the Catalog and Add Book tabs inside the TabContainer layout.
is used to add the Catalog and Add Book tabs inside the TabContainer layout.
The JSP page in listing 12.11 uses the dojoType and region attributes in the <div> tag, but the HTML <div> tag doesn’t provide any dojoType or region attributes. So why use these attributes, and how are these attributes used to create a UI widget? It’s evident from the value of the dojoType attribute that it identifies a widget, and the attributes specified along with dojoType provide additional information about the widget. For instance, the region attribute of the TabContainer widget specifies that it’s positioned at the center of the enclosing BorderLayout container. When the home.jsp page is loaded in a web browser, Dojo reads the HTML page and interprets the dojoType attribute to create the user interface.
The JavaScript that you must have in your home.jsp page to allow Dojo to parse the HTML page and create the user interface is shown next.
Listing 12.12. JavaScript in home.jsp that parses HTML and creates user interface
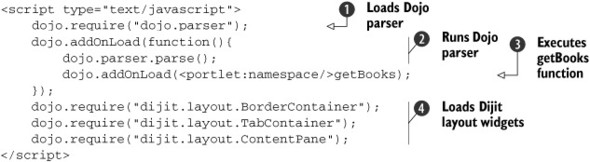
The require function ![]() loads the Dojo parser. The addOnLoad function
loads the Dojo parser. The addOnLoad function ![]() is executed when all require function calls are complete, meaning that all the necessary dependencies have been loaded for parsing the HTML. It’s immaterial
whether the require function call is before or after the addOnLoad function call because addOnLoad is fired only after all the require function calls are complete. The parse function parses the HTML and creates the widgets using the dojoType information in the HTML DOM.
is executed when all require function calls are complete, meaning that all the necessary dependencies have been loaded for parsing the HTML. It’s immaterial
whether the require function call is before or after the addOnLoad function call because addOnLoad is fired only after all the require function calls are complete. The parse function parses the HTML and creates the widgets using the dojoType information in the HTML DOM.
A nested addOnLoad method ![]() is used to invoke the getBooks function. Later in this section, you’ll see the purpose of the getBooks function and why it’s called from inside the addOnLoad function. The require function
is used to invoke the getBooks function. Later in this section, you’ll see the purpose of the getBooks function and why it’s called from inside the addOnLoad function. The require function ![]() is used to load the BorderContainer, TabContainer, and ContentPane widgets. These require function calls are executed before the addOnLoad function.
is used to load the BorderContainer, TabContainer, and ContentPane widgets. These require function calls are executed before the addOnLoad function.
In listing 12.12, the ContentPane widget represents a basic widget that contains the actual content of a tab in the tabbed pane. Let’s now look at how you can retrieve HTML content for ContentPane by sending an Ajax request to the portlet’s resource URL.
Ajax Support in the Dojo Toolkit
The Dojo Toolkit provides support for Ajax as part of its core library. The Book Catalog portlet makes use of Dojo’s Ajax support to show the content of the Catalog and Add Book tabs, as described here:
- The Catalog tab shows a list of books from the catalog, which is obtained by sending an Ajax request to the portlet’s resource URL.
- The Add Book tab shows an HTML form that’s used to add a new book to the catalog. The HTML form is retrieved by sending an Ajax request to the portlet’s resource URL.
The following listing shows home.jsp page’s getBooks JavaScript function, which retrieves content for the Catalog tab. It uses Dojo’s Ajax features.
Listing 12.13. Displaying catalog data with the getBooks JavaScript function

The getBooks function is responsible for retrieving the content for the Catalog tab. It’s invoked after Dojo parses the loaded HTML DOM, as shown in listing 12.12.
As you can see in listing 12.13 ![]() , Dojo’s xhrGet function is responsible for sending an HTTP GET request to the URL passed in the xhrArgs argument to the method. The getBooks function defines the xhrArgs object, which specifies the properties that the xhrGet function needs to send the Ajax request and process the response.
, Dojo’s xhrGet function is responsible for sending an HTTP GET request to the URL passed in the xhrArgs argument to the method. The getBooks function defines the xhrArgs object, which specifies the properties that the xhrGet function needs to send the Ajax request and process the response.
The mandatory url property ![]() identifies the URL to which the Ajax request needs to be sent. The URL must point to the same server from which the page was downloaded, because browsers can send Ajax requests only to the server in the same domain from which the page was downloaded. The value of the url property is the resource URL of the Book Catalog portlet, which means that the Ajax request is dispatched to the serveResource method of the portlet class.
identifies the URL to which the Ajax request needs to be sent. The URL must point to the same server from which the page was downloaded, because browsers can send Ajax requests only to the server in the same domain from which the page was downloaded. The value of the url property is the resource URL of the Book Catalog portlet, which means that the Ajax request is dispatched to the serveResource method of the portlet class.
The mandatory handleAs property specifies how to handle the response data received from the Ajax call. The value text indicates that the response data is handled as text. If your serveResource method returns data in JSON or XML format, you can specify json or xml as the value of the handleAs property.
The optional preventCache property indicates that the browser should be prevented from caching the response. If the response data is cached, the browser will return the cached response data without hitting the request URL (identified by the url property). The value of true for the preventCache property indicates that browser caching should be prevented.
The load property identifies the callback function that’s executed after the response data is received from the server ![]() . The response data is passed to the function, and its format is driven by the value of the handleAs property.
. The response data is passed to the function, and its format is driven by the value of the handleAs property.
The byId Dojo utility function returns an HTML element with a particular id attribute. The dojo.byId("<portlet:namespace/>catalogData") call returns the <div> element, which represents the Catalog tab of the Book Catalog portlet.
The innerHTML property of an HTML element is used to specify the HTML that exists inside the tag. The catalogDataContainer.innerHTML = data; statement means that the HTML response that was received from the call to the serveResource method is placed inside the <div> element representing the Catalog tab.
The error property identifies the function responsible for handling errors, like HTTP 404, that might occur during request processing. The error argument to the function provides information about the error that occurred during request processing.
Note
Listing 12.13 shows the basic Dojo properties and functions that you need for sending Ajax requests and for processing response data. You should refer to the Dojo reference documentation for more details on the Ajax features available in the Dojo Toolkit.
The Add Book tab is populated in the same way as the Catalog tab, the only difference being that the Ajax request for populating the Add Book tab is fired when the user clicks the Add Book hyperlink in the Catalog tab (see Figure 12.5) or when the user selects the Add Book tab.
The implementation of the Book Catalog portlet’s serveResource method, which handles the Ajax request fired by the getBooks JavaScript function, is shown next. It returns an HTML response containing the book catalog data.
Listing 12.14. Serving catalog data with the serveResource method

The resource ID ![]() is retrieved from the resource request. A check is made
is retrieved from the resource request. A check is made ![]() to determine whether the request is for a resource with an ID of books. If the request is for a books resource, a list of books is obtained using the BookService’s getBooks method, and it’s stored as a request attribute. The resource request
to determine whether the request is for a resource with an ID of books. If the request is for a books resource, a list of books is obtained using the BookService’s getBooks method, and it’s stored as a request attribute. The resource request ![]() is dispatched to the bookList.jsp page, which displays the catalog.
is dispatched to the bookList.jsp page, which displays the catalog.
Listing 12.14 shows that the serveResource method dispatches the resource request to a JSP page. If the resource request is sent by the XMLHttpRequest object, the HTML generated by the JSP page is sent as response data to the callback function of the XMLHttpRequest responsible for handling response data. The benefit of using a JSP page to generate a response for an Ajax request is realized when you have to show complex HTML in response to an Ajax request.
If JSP is used for generating the response, you can use portlet tag library tags, like resourceURL, renderURL, and actionURL, to create the response HTML that contains HTML elements referring to portlet URLs. For instance, catalog data in the Catalog tab shows Download links for downloading TOC files (refer to Figure 12.5), which must be resource URLs.
Note
If you’re using the serveResource method to process Ajax requests, you can create portlet URLs programmatically or by using the portlet tag library, but if you’re using a servlet component to handle Ajax requests, you can’t easily create content containing portlet URLs.
Let’s now move on to see how the Book Catalog portlet makes use of jQuery to send an Ajax request to the resource URL of the portlet.
12.8.2. Simplified Ajax with jQuery
The jQuery JavaScript library provides support for sending Ajax requests and for processing responses. To use jQuery in your portlet, you first need to include the jQuery JavaScript library in your portal page.
You can download jQuery from the official jQuery website (http://jquery.com/) and include the jquery.js file in the head section of your portal page, as described in chapter 3. If multiple portlets on one or more portal pages need to make use of jQuery, it’s best to add the jquery.js file as part of your portal theme.
Note
Liferay Portal 5.2.3 uses jQuery as its core JavaScript library for implementing its user interface, so it’s included in portal pages by default. If you’re using Liferay Portal server 6.x, you’ll need to explicitly include jquery.js in the portal page. If you aren’t using Liferay Portal server, please refer to chapter 3 to determine which approach to including JavaScript files fits your portal server.
jQuery can be used to send an Ajax request to the Book Catalog portlet’s resource URL to remove a book from the catalog, shown here.
Listing 12.15. Removing a book with the home.jsp page’s removeBook function
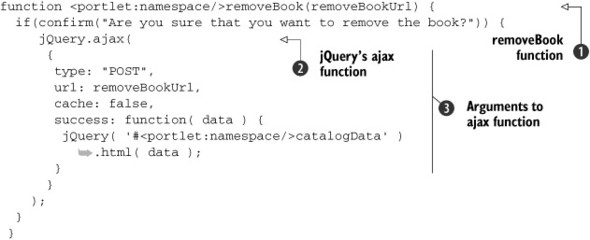
When the Remove hyperlink for a book is clicked, the removeBook function is invoked. The removeBook function accepts a resource URL ![]() as an argument. The jQuery object’s ajax method
as an argument. The jQuery object’s ajax method ![]() is invoked. The jQuery variable provides access to jQuery functionality. This variable is available by default when the portal page loads the jQuery
JavaScript library.
is invoked. The jQuery variable provides access to jQuery functionality. This variable is available by default when the portal page loads the jQuery
JavaScript library.
The parameters that are passed to the ajax function ![]() are as follows:
are as follows:
- type identifies the HTTP request type (GET, POST, PUT, and so on).
- url specifies the URL to which the Ajax request is sent. Because you’re going to use the serveResource method to handle the Ajax request, the value of the url parameter is the Book Catalog portlet’s resource URL.
- cache is similar to the preventCache parameter in Dojo, and it’s meant to prevent the browser from caching response data.
- success identifies the function that’s invoked after the response data is received. In this example, the data argument to the function defined by the success parameter represents the response data, which is the updated HTML that shows the current state of the catalog.
Within the success parameter, jQuery('#<portlet:namespace/>catalogData') represents a jQuery selector, which selects elements that have the ID #<portlet:namespace/>catalogData from the HTML DOM. Listing 12.11 shows that this ID corresponds to the <div> element representing the Catalog tab, so the statement jQuery('#<portlet:namespace/>catalogData').html(data) means that jQuery’s html method should be applied to elements returned by the jQuery selector.
The argument passed to the html method is set between the beginning and closing tags of the HTML element. This means that the behavior of jQuery’s html method is similar to the behavior of the innerHTML property of the HTML element.
To summarize, the jQuery('#<portlet:namespace/>catalogData').html(data) statement first obtains the Catalog tab HTML element in the portal page and then sets the response data received from the serveResource method inside the Catalog tab HTML element.
Listing 12.15 shows that with jQuery you can quickly incorporate Ajax features in your portlet. Let’s see how the various pieces of the Book Catalog portlet fit together to create the remove book functionality. When the Book Catalog portlet is loaded, Dojo loads the catalog data in the Catalog tab. Dojo sends a resource request to the Book Catalog portlet and receives the catalog HTML, showing each book in the catalog along with hyperlinks for downloading and uploading TOCs and for removing books from the catalog. The key point is that these hyperlinks are part of the HTML that was received in response to the Ajax request, which means that the JavaScript functions that these hyperlinks invoke must be already available in the downloaded portal page—this creates some performance overhead the first time the portal page is loaded by the web browser. The other critical point to notice is that the catalog HTML was served by a portlet, so it was possible to send the resource URL, which identifies the book it’s associated with, as an argument to the removeBook JavaScript function call.
Note
Listing 12.15 shows the basic jQuery properties and methods that you require for sending Ajax requests and for processing response data. You should refer to the jQuery documentation for more details on the Ajax features available in the jQuery library.
The jQuery code for showing the upload TOC form is similar to the code shown in listing 12.15, except that the HTTP method used is GET, as shown here:
function <portlet:namespace/>showUploadToCForm( resourceUrl ) {
    jQuery.ajax(
    {
      type: "GET",
      url: resourceUrl,
      cache: false,
      success: function( data ) {
       jQuery( '#<portlet:namespace/>catalogData' ).html( data );
      }
    }
   );
 }
The Book Catalog portlet also uses jQuery to create a fade-in and -out effect for the notification message that’s displayed when a book is added to or removed from the catalog. jQuery provides easy-to-use functions that can quickly add animation to your portlets.
The next listing shows how jQuery displays the message, “Book Catalog data has been modified”, followed by a Refresh hyperlink.
Listing 12.16. Displaying a message with the showBookUpdateMsg JavaScript function

The <div> element with a bookUpdateMsg ID ![]() is a placeholder for the message that’s set when the showBookUpdateMsg function is invoked. You’ll see how showBookUpdateMsg is invoked in our discussion of Comet (or Reverse Ajax) in section 12.9.2.
is a placeholder for the message that’s set when the showBookUpdateMsg function is invoked. You’ll see how showBookUpdateMsg is invoked in our discussion of Comet (or Reverse Ajax) in section 12.9.2.
The innerHTML property of the <div> element ![]() sets the notification message. Because the style attribute specifies display:none, the message is initially invisible.
sets the notification message. Because the style attribute specifies display:none, the message is initially invisible.
The jQuery("#<portlet:namespace/>bookUpdateMsg") selector ![]() selects the <div> element and invokes jQuery’s fadeIn function. This function accepts two arguments: the length of time in which the element should be made completely visible
to the user, and the function that should be fired once the message is completely visible. In this case, the content of the
<div> element containing the notification message is faded in over a period of 2000 milliseconds (2 seconds). Once the message
is visible, the <div> element is again selected using the jQuery selector and the fadeOut jQuery function is invoked. The fadeOut function does the reverse of what fadeIn does—it makes the <div> element invisible. Like fadeIn, the fadeOut function accepts two arguments: the length of time in which the element should be made completely invisible, and the function
that should be fired when the element is completely invisible. In this case, the <div> element is made completely invisible over a period of 10000 milliseconds (10 seconds). Once the <div> element is completely invisible, the notification message is removed from the <div> element to reclaim the space taken up by the message.
selects the <div> element and invokes jQuery’s fadeIn function. This function accepts two arguments: the length of time in which the element should be made completely visible
to the user, and the function that should be fired once the message is completely visible. In this case, the content of the
<div> element containing the notification message is faded in over a period of 2000 milliseconds (2 seconds). Once the message
is visible, the <div> element is again selected using the jQuery selector and the fadeOut jQuery function is invoked. The fadeOut function does the reverse of what fadeIn does—it makes the <div> element invisible. Like fadeIn, the fadeOut function accepts two arguments: the length of time in which the element should be made completely invisible, and the function
that should be fired when the element is completely invisible. In this case, the <div> element is made completely invisible over a period of 10000 milliseconds (10 seconds). Once the <div> element is completely invisible, the notification message is removed from the <div> element to reclaim the space taken up by the message.
Listing 12.16 shows how quickly and easily you can add animation to your web page with the jQuery JavaScript library.
Note
jQuery provides a vast number of plugins that are built on top of the jQuery core library and provide features related to Ajax, animation, drag and drop, UI widgets, and so on. Refer to the jQuery website for more information on the available plugins: http://jquery.com/.
Let’s now look at DWR, which allows you to access server-side Java objects as JavaScript objects.
12.8.3. Simplified Ajax with DWR
Dojo and jQuery provide Ajax support, which simplifies adding Ajax capabilities to your portlets, but they don’t provide any mechanism for transparently invoking methods of Java objects. DWR (Direct Web Remoting) is a framework that lets you expose a Java object as a JavaScript object to your portal page. The JavaScript object can then be used by portlets to asynchronously invoke methods of the Java object.
Let’s say you define a ProfileBean Java object as part of your portlet application:
public class ProfileBean {
  private ProfileService profileService;

  public Profile searchProfile(SearchCriteria criteria) {
    return profileService.searchProfile();
  }
}
Now, assume that you want to invoke the ProfileBean object’s searchProfile method using the XMLHttpRequest object. If you follow the raw approach for invoking methods of a server-side object using the XMLHttpRequest object, you’ll need to send the object and method details to the servlet or portlet component that creates or retrieves an instance of the object, invokes the method by converting the request parameters to argument types expected by the method, and so on.
Figure 12.8 shows the sequence of steps required to invoke the searchProfile method of the ProfileBean object.
Figure 12.8. Sequence diagram that shows the steps required in calling a remote Java object using the XMLHttpRequest object and parsing the results to update the portal page. The web browser sends a request to a portlet or servlet component which creates the SearchCriteria object and passes it to the searchProfile method of the ProfileBean object.

The Ajax request ![]() is sent to a servlet or portlet component. That component makes use of the information contained in the request to discover
that the searchProfile method of ProfileBean needs to be invoked.
is sent to a servlet or portlet component. That component makes use of the information contained in the request to discover
that the searchProfile method of ProfileBean needs to be invoked.
The servlet or portlet ![]() creates a ProfileBean object. Then
creates a ProfileBean object. Then ![]() the servlet or portlet creates an instance of SearchCriteria, which needs to be passed to the searchProfile method.
the servlet or portlet creates an instance of SearchCriteria, which needs to be passed to the searchProfile method.
The ProfileBean object’s searchProfile method ![]() is executed. Because it returns an object of type Profile, the servlet or portlet component converts the returned Profile object into XML or JSON format
is executed. Because it returns an object of type Profile, the servlet or portlet component converts the returned Profile object into XML or JSON format ![]() , which is then sent back to the web browser. The callback JavaScript function of XMLHttpRequest
, which is then sent back to the web browser. The callback JavaScript function of XMLHttpRequest ![]() is responsible for parsing the JSON or XML response data and updating the portal page.
is responsible for parsing the JSON or XML response data and updating the portal page.
Phew! That’s a lot of work to do to invoke a method of a remote Java object. This is where DWR makes your life easy. DWR generates a JavaScript object that represents the server-side Java object.
For instance, if you want to access the ProfileBean object, DWR will generate a ProfileBean.js file that contains a ProfileBean JavaScript object, which in turn contains a JavaScript function named searchProfile. All you need to do is invoke the ProfileBean JavaScript object’s searchProfile function and leave it up to DWR to invoke the searchProfile method of the remote ProfileBean Java object. You can say that DWR creates a proxy JavaScript object that hides the details of how methods of a remote Java object are invoked.
The Book Catalog portlet makes use of DWR in implementing the following features:
- TOC file upload— The Book Catalog portlet makes use of the DWR asynchronous file upload feature to upload TOC files.
- Add book to catalog— When a user clicks Save in the Add Book tab (refer to Figure 12.7), DWR is used to save the book information in the data store.
- Notification message— When a book is added to or removed from the catalog, the notification message is displayed using the Comet (or Reverse Ajax) feature of DWR.
Let’s explore how the Book Catalog portlet implements these features using DWR.
Warning
The Book Catalog portlet uses the 3.0 RC1 version of DWR. If you’re using an older version of DWR, please refer to the DWR website to find out which features are supported in that version: http://directwebremoting.org/.
Configuring DWR
Before delving into the details of DWR configuration, let’s first look at the Java object we’ll invoke using Ajax.
The BookCatalogAjaxBean whose methods we’ll invoke using the XMLHttpRequest object is shown next.
Listing 12.17. Invoking methods in a simple Java object—BookCatalogAjaxBean
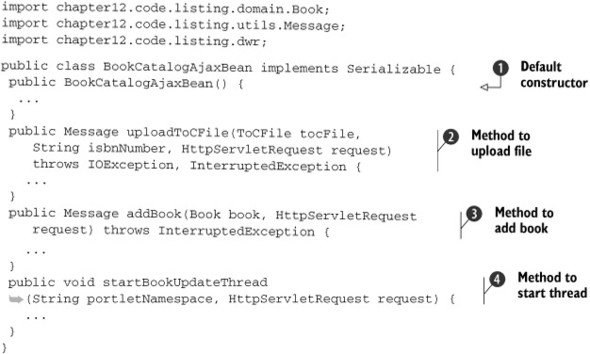
The default constructor is defined ![]() . The uploadTocFile method is defined
. The uploadTocFile method is defined ![]() to upload the TOC file, and
to upload the TOC file, and ![]() the addBook method saves a new book in the catalog. The startBookUpdateThread method is used
the addBook method saves a new book in the catalog. The startBookUpdateThread method is used ![]() to start a Java thread that monitors catalog data and issues a notification message in case a book is added to or removed
from the catalog.
to start a Java thread that monitors catalog data and issues a notification message in case a book is added to or removed
from the catalog.
Listing 12.17 shows that the BookCatalogAjaxBean’s methods accept complex object types as arguments, such as Book and ToCFile, and they return complex types, such as Message. You’ll see later in this section how DWR converters make it easy to transform JavaScript objects to Java objects, and vice versa.
Let’s now look at how you can configure BookCatalogAjaxBean in DWR. The first step towards using DWR is to configure the Java objects that you want to expose to the web browser as JavaScript objects, and configure converters to convert the data exchanged between JavaScript and Java objects.
By default, DWR configuration information is stored in the dwr.xml file, which must be located in the portlet application’s classpath. The following listing shows the contents of the dwr.xml file that configures the BookCatalogAjaxBean object.
Listing 12.18. The DWR configuration file—dwr.xml

In listing 12.18, the <dwr> element is the root element of the dwr.xml file. It contains an <allow> subelement that contains definitions of Java objects that are accessible remotely, and it may also define DWR filters that perform certain actions before and after the Java object’s methods are invoked.
The <create> element is used ![]() to create an instance of a Java object and expose it as a JavaScript object. The creator attribute specifies how the Java object is created. For instance, if the value of the creator attribute is new, the Java object must be created using the default constructor of the object. The javascript attribute specifies the JavaScript object name by which the Java object is available in the web browser. For instance, if
the value of the javascript attribute is MyAjaxBean, the Java object is accessed from the web browser using the MyAjaxBean JavaScript object.
to create an instance of a Java object and expose it as a JavaScript object. The creator attribute specifies how the Java object is created. For instance, if the value of the creator attribute is new, the Java object must be created using the default constructor of the object. The javascript attribute specifies the JavaScript object name by which the Java object is available in the web browser. For instance, if
the value of the javascript attribute is MyAjaxBean, the Java object is accessed from the web browser using the MyAjaxBean JavaScript object.
The <param> element provides configuration information ![]() that’s used by the DWR creator to create or retrieve the Java object. For instance, if you’re using the new DWR creator, the <param> element specifies the fully qualified name of the class of the Java object that needs to be exposed as a JavaScript object.
Because we want to access the BookCatalogAjaxBean Java object from the web browser, the <param> element specifies the fully qualified class name of the BookCatalogAjaxBean.
that’s used by the DWR creator to create or retrieve the Java object. For instance, if you’re using the new DWR creator, the <param> element specifies the fully qualified name of the class of the Java object that needs to be exposed as a JavaScript object.
Because we want to access the BookCatalogAjaxBean Java object from the web browser, the <param> element specifies the fully qualified class name of the BookCatalogAjaxBean.
The <include> elements specify the methods ![]() that are available for remote access—these are the methods that can be invoked using the JavaScript object corresponding
to the Java object. For instance, only the uploadToCFile, addBook, and startBookUpdateThread methods of BookCatalogAjaxBean can be invoked using the MyAjaxBean JavaScript object.
that are available for remote access—these are the methods that can be invoked using the JavaScript object corresponding
to the Java object. For instance, only the uploadToCFile, addBook, and startBookUpdateThread methods of BookCatalogAjaxBean can be invoked using the MyAjaxBean JavaScript object.
The <convert> elements specify DWR converters ![]() that apply to objects that are exchanged between the MyAjaxBean JavaScript and BookCatalogAjaxBean Java objects. As you can see, there’s a converter for every complex data type that’s exchanged between the MyAjaxBean JavaScript and the BookCatalogAjaxBean Java objects. The match attribute identifies the Java type to which the converter applies, and the converter attribute identifies the DWR converter that’s responsible for performing the conversion. The bean converter is responsible for converting a JavaScript object to a Java bean object, and vice versa.
that apply to objects that are exchanged between the MyAjaxBean JavaScript and BookCatalogAjaxBean Java objects. As you can see, there’s a converter for every complex data type that’s exchanged between the MyAjaxBean JavaScript and the BookCatalogAjaxBean Java objects. The match attribute identifies the Java type to which the converter applies, and the converter attribute identifies the DWR converter that’s responsible for performing the conversion. The bean converter is responsible for converting a JavaScript object to a Java bean object, and vice versa.
Note
DWR also allows programmatic and annotation-driven configuration. For details on how to use them, refer to the DWR reference documentation.
The other thing you need to do before you can use DWR is to configure DwrServlet, which is responsible for receiving Ajax requests from the web browser and passing them to the appropriate Java object. Here we see the configuration of DwrServlet in the Book Catalog portlet application’s web.xml file.
Listing 12.19. DwrServlet configuration in the web.xml file

DWR’s DwrServlet ![]() is defined. Active Reverse Ajax
is defined. Active Reverse Ajax ![]() is enabled, as is DWR’s debugging feature. You’ll see later in this chapter what the active Reverse Ajax feature is and how
it’s used in the Book Catalog portlet. By enabling DWR debugging, you can view the debugging messages logged by DWR. DwrServlet
is enabled, as is DWR’s debugging feature. You’ll see later in this chapter what the active Reverse Ajax feature is and how
it’s used in the Book Catalog portlet. By enabling DWR debugging, you can view the debugging messages logged by DWR. DwrServlet ![]() is mapped to the /dwr/* URL pattern.
is mapped to the /dwr/* URL pattern.
Warning
Because DWR uses a servlet component, Ajax requests sent using DWR are outside the portlet context and are not protected by the portal server’s security infrastructure.
Now that you’ve defined the Java object that you want to access remotely and have configured the necessary DWR creator and converters in the dwr.xml file, it’s time to see how you can invoke methods of the remote Java object using the JavaScript object generated by DWR.
Including Necessary Javascript Files
To use the MyAjaxBean JavaScript object, you need to include the following JavaScript files in your portal page:
- engine.js— JavaScript file provided by DWR that contains functions for handling communications between the local JavaScript object and the remote Java object. Including this JavaScript file in your portal page is mandatory.
- util.js— JavaScript file containing utility functions that you can use in your JavaScript code. Including this JavaScript file in your portal page is optional.
- MyAjaxBean.js— JavaScript file generated by DWR based on the configuration defined in the dwr.xml file. The MyAjaxBean.js file defines the MyAjaxBean JavaScript object, which is used by JSP pages to invoke methods of the BookCatalogAjaxBean object.
The following XML fragment from the liferay-portlet.xml file shows how the preceding JavaScript files are included in the Book Catalog portlet application:
<liferay-portlet-app>
 <portlet>
  <portlet-name>bookCatalog</portlet-name>
  <header-portlet-javascript>/dwr/engine.js</header-portlet-javascript>
  <header-portlet-javascript>/dwr/util.js</header-portlet-javascript>
  <header-portlet-javascript>/dwr/interface/MyAjaxBean.js
     </header-portlet-javascript>
   ...
 </portlet>
</liferay-portlet-app>
As you can see, the built-in DWR JavaScript files, engine.js and util.js, are located inside the ${contextPath}/dwr directory, and the autogenerated JavaScript file, MyAjaxBean.js, is located inside the ${contextPath}/dwr/interface directory, where ${contextPath} represents the context path of the portlet application.
Using DWR
To start using DWR, you must understand how the bean converter works, and what the Message class does in the Book Catalog portlet application. A bean converter converts a Java bean to a JavaScript object and vice versa. The Message class defines the response message and data that’s sent in response to the invocation of the uploadToCFile and addBook methods (refer to listing 12.17).
The next listing shows attributes and methods defined in the Message class.
Listing 12.20. The Message class
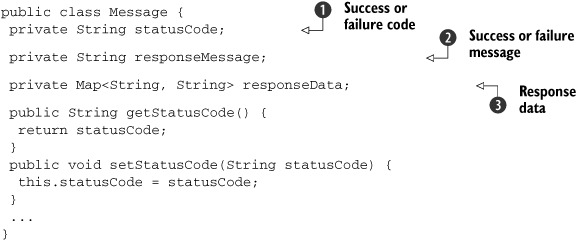
The statusCode ![]() indicates whether the request was processed successfully or not. The responseMessage
indicates whether the request was processed successfully or not. The responseMessage ![]() is a text message, which could be a success or failure message. The responseData
is a text message, which could be a success or failure message. The responseData ![]() is the data that’s sent with the Message object. The responseData can be used by the calling JavaScript object to update the portlet content.
is the data that’s sent with the Message object. The responseData can be used by the calling JavaScript object to update the portlet content.
Listing 12.20 shows that Message is a simple bean, which makes the Message class an ideal candidate to use a bean converter; it’s converted to a JavaScript associative array when it’s returned by methods of the BookCatalogAjaxBean object, and vice versa. Book and ToCFile are also simple beans, so they’re also configured to make use of the bean converter.
Note
If you’re passing a custom object to a method argument or returning a custom object type from a method, you must configure an appropriate DWR converter in dwr.xml for the custom object. By default, DWR enables a couple of converters that you don’t need to configure. For instance, converters for primitive types, String, Date, InputStream, and so on, are enabled by default. If you want to create a custom converter, you can also do so. Refer to the DWR reference documentation for more details on DWR converters.
Let’s now look at how DWR is used to add a book to the catalog, using the BookCatalogAjaxBean’s addBook method. The addBook JavaScript function in the home.jsp page, which makes use of the MyAjaxBean JavaScript object to invoke the addBook method of BookCatalogAjaxBean, is shown here.
Listing 12.21. addBook JavaScript function in home.jsp page
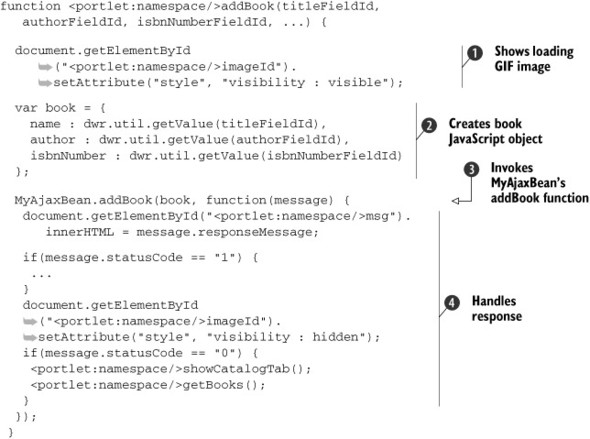
The addBook function accepts HTML ids of form elements that are displayed inside the Add Book tab (shown in Figure 12.7)—these include the book’s title text field, author text field, ISBN text field, and so on. The addBook function is called when the user clicks Save in the Add Book tab.
The hidden “loading” GIF image inside the Add Book tab is made visible ![]() to suggest to the user that request processing has begun. The book JavaScript object is created
to suggest to the user that request processing has begun. The book JavaScript object is created ![]() , which has the same properties as the corresponding Book Java object—this allows the book JavaScript object to be passed to the remote addBook method of BookCatalogAjaxBean. The dwr.util.getValue function (defined in the DWR util.js file) is used to retrieve the values of elements from the HTML form.
, which has the same properties as the corresponding Book Java object—this allows the book JavaScript object to be passed to the remote addBook method of BookCatalogAjaxBean. The dwr.util.getValue function (defined in the DWR util.js file) is used to retrieve the values of elements from the HTML form.
The MyAjaxBean JavaScript object’s addBook function is invoked ![]() . Because MyAjaxBean represents a JavaScript proxy object for BookCatalogAjaxBean, invoking MyAjaxBean’s addBook function effectively means invoking the addBook method of BookCatalogAjaxBean. Notice that MyAjaxBean’s addBook function accepts both a book JavaScript object and the callback function that’s invoked when the response is received from the invocation of the remote
BookCatalogAjaxBean’s addBook method.
. Because MyAjaxBean represents a JavaScript proxy object for BookCatalogAjaxBean, invoking MyAjaxBean’s addBook function effectively means invoking the addBook method of BookCatalogAjaxBean. Notice that MyAjaxBean’s addBook function accepts both a book JavaScript object and the callback function that’s invoked when the response is received from the invocation of the remote
BookCatalogAjaxBean’s addBook method.
When MyAjaxBean’s addBook function is invoked, the request is sent to DwrServlet (see listing 12.19). DwrServlet is responsible for using the request details and the converter information in dwr.xml to create the Book Java object and for invoking BookCatalogAjaxBean’s addBook method. The result of invoking the addBook method is a Message object, which is converted into a JavaScript associative array and made available to the callback function.
The callback function displays the responseMessage attribute value ![]() of the Message object (see listing 12.20). If a validation error occurs, the callback function shows an error message. Because the response has been received, the
callback function hides the “loading” GIF image to indicate to the user that the request processing is complete. Finally,
the Catalog tab is programmatically selected and the latest list of books is obtained from the book catalog.
of the Message object (see listing 12.20). If a validation error occurs, the callback function shows an error message. Because the response has been received, the
callback function hides the “loading” GIF image to indicate to the user that the request processing is complete. Finally,
the Catalog tab is programmatically selected and the latest list of books is obtained from the book catalog.
Listing 12.21 shows that DWR simplifies using Ajax in portlets. You only need to use DWR’s autogenerated JavaScript object to invoke remote object methods and let DWR handle the conversion of JavaScript objects to Java objects, and vice versa. If you compare the arguments passed to MyAjaxBean’s addBook function and BookCatalogAjaxBean’s addBook method, you’ll notice that the addBook method accepts an extra argument: HttpServletRequest. DWR is responsible for making servlet objects like HttpServletRequest, HttpSession, and so on, available to the target method without requiring you to explicitly code for it.
Another interesting thing to notice about the Message object is that even though it contains a responseData attribute of type Map<String,String>, there’s no converter defined for it in the dwr.xml file. This is because DWR’s map converter is enabled by default; it converts java.util.Map type objects into JavaScript associative arrays.
DWR 3.0 introduced a converter for InputStreams, which can be used for uploading files asynchronously. The Book Catalog portlet makes use of this feature to upload TOC files. The home.jsp page’s uploadToCFile function, which uses DWR to upload TOC files, is shown here.
Listing 12.22. The home.jsp page’s uploadToCFile function

The file JavaScript object is created ![]() , and it needs to be passed to the uploadToCFile function of the MyAjaxBean JavaScript proxy object. The fileName property represents the name of the file selected by the user. The tocFile property represents the value of the <input type="file"/> element, which is meant for uploading files.
, and it needs to be passed to the uploadToCFile function of the MyAjaxBean JavaScript proxy object. The fileName property represents the name of the file selected by the user. The tocFile property represents the value of the <input type="file"/> element, which is meant for uploading files.
The uploadToCFile function of MyAjaxBean is invoked ![]() , which in turn invokes the BookCatalogAjaxBean’s uploadToCFile method.
, which in turn invokes the BookCatalogAjaxBean’s uploadToCFile method.
The BookCatalogAjaxBean’s uploadToCFile method accepts a ToCFile object and ISBN of the book for which the TOC file is being uploaded. The ToCFile object defines two properties: fileName (of type String) and tocFile (of type InputStream). The file JavaScript object in listing 12.22 is converted to a ToCFile Java object by the bean converter configured for the ToCFile object in the dwr.xml file (see listing 12.18). The converters for the String and InputStream types are enabled by default in DWR, so you don’t need to configure them in the dwr.xml file.
Let’s now look at Comet and see how you can use DWR’s Comet feature to push data from the server to the web browser.
12.9. Creating real-time portlets using Polling and Comet
So far in this chapter, we’ve focused on using Ajax to pull data from the server in response to user actions. If the Ajax pull approach is used to show real-time information, this will require sending requests at frequent intervals to the server to retrieve the latest updates.
Let’s say we wanted to create a Live Commentary portlet that shows live commentary for a sporting event. To provide the real-time commentary, the portal page would need to send an Ajax request to the server every few seconds to check for updates. This approach of sending requests to the server at regular intervals to check for updates is referred to as polling. If, at a given time, 1000 users are viewing the portal page containing the Live Commentary portlet, a few hundred concurrent requests would be received by the server.
The Comet approach, on the other, hand makes use of long-lived HTTP connections, which are kept open by the server for a considerable amount of time, and the browser receives the data written by the server to the HTTP connection. As soon as the response is received, the browser sends another request to the server to receive more data.
Let’s take a deeper look into the polling approach, and then we’ll focus on the Comet approach.
12.9.1. Polling—pulling data at regular intervals
When a request is received by a Java EE container (which could be either a portlet or servlet container), a thread is associated with the request for the duration of the request processing. Let’s see how this thread-per-request approach limits the number of concurrent requests that can be handled by the container.
Most Java EE servers allow you to specify the maximum number of threads that can be created by the server instance to process incoming requests. For instance, in Tomcat 6.x, the HTTP connector configuration in the server.xml file specifies the maximum number of threads that can be created to handle concurrent requests. Suppose the maximum number of threads that can be reasonably created in our server instance, without making the server unstable, is 200. If we set the maximum number of threads as 200 and we receive 300 concurrent requests, the server will create 200 threads and store the remaining 100 requests in the server to be processed when threads become available. If processing of a request takes 2 seconds, a request in the waiting list will be processed in 4 seconds: the 2 seconds that it spends waiting for a thread to become available, and 2 more seconds in processing.
This example shows that Ajax requests sent to the server at frequent intervals will overload the server, resulting in reduced performance. One way to address this issue is by increasing the interval between Ajax requests, the downside of which is high latency. For instance, in the Live Commentary portlet mentioned earlier, if the commentary is updated every few seconds at the server and if the Ajax request is sent from the web browser every 30 seconds, the result will be unwanted delay in displaying updates.
There are also other issues associated with polling:
- Increased network traffic— Because the requests are sent to the server at regular intervals, network traffic increases.
- Unnecessary requests— Requests are sent to the server for processing even when the server doesn’t have any fresh updates available. In such cases, the server returns nothing to the web browser.
Even though issues exist with the polling approach, it’s useful in scenarios where high latency isn’t a constraint in providing updated information to users.
Let’s now look at how Comet simplifies the creation of portlets that show real-time data.
12.9.2. Comet or Reverse Ajax—pushing data when it’s available
When you use Comet, data is pushed by the server to the web browser. In general, when an HTTP request is sent from a browser to a server, an HTTP connection is created, a response is written out, and the HTTP connection is closed. Comet makes use of long-lived connections, which are kept open by the server for a considerable amount of time. When the server needs to send updates to the web browser, it simply writes the response to the held-open connection. The browser processes the response, updates the portal page, and immediately sends another HTTP request to the server for more updates.
Let’s say we were to develop a Live Commentary portlet using long-lived HTTP connections. When a portal page containing the Live Commentary portlet is loaded, a long-lived connection would be established with the server, which the server uses to send a response to the portal page as soon as updates are available. The JavaScript embedded in the portal page is responsible for updating the contents of the Live Commentary portlet to show the commentary in real time. Because the response is written to the connection as soon as the data becomes available, this Comet approach results in low latency in showing real-time data.
Scalability—Problem and Solution
An open connection on the server means that a dedicated server thread is associated with the connection until it’s closed; the thread is blocked and unavailable for processing any other requests. If 10,000 users are viewing the Live Commentary portlet, the server must be able to maintain 10,000 active threads at a given time. This gives the impression that using Comet is even more resource intensive than the polling approach and can’t scale to an increased load.
In classic Java I/O, a thread reads the stream from start to finish and is locked until the stream is completely exhausted and the connection is closed. Thanks to the Java NIO API (the java.nio package), it’s possible to perform nonblocking I/O. A Java EE server that makes use of Java NIO reads the available data from the stream and releases the thread held by the open connection for serving other requests. Events are fired when data is again available for reading, and a thread is again associated with the open connection to read data. The process of releasing and associating threads to an open connection continues until the connection is closed by the server. This makes it possible for a few threads to serve a large number of requests. Because no standards exist for performing nonblocking I/O, the Comet approach relies on server-specific APIs for using nonblocking I/O to achieve high scalability.
Note
Tomcat 6.x provides a CometProcessor interface (in the org.apache.catalina package), which you can implement to create your own servlet that performs asynchronous I/O. You’ll also need to configure the org.apache.coyote.http11.Http11NioProtocol protocol instead of HTTP/1.1 in the <Connector> element of server.xml to instruct Tomcat to use Java NIO in processing streams. Similarly, Jetty 6 has the concept of Continuations, which use Java NIO to allow you to write scalable Comet applications. Servlet 3.0 has introduced the concept of asynchronous request processing, which standardizes how HTTP requests can be handled asynchronously, thus addressing the much-needed support for writing Comet applications without getting tied up with server-specific APIs like CometProcessor (in Tomcat 6.x) and Continuations (in Jetty 6).
12.9.3. Comet support in DWR
DWR provides support for building Comet applications using long-lived HTTP connections. In the case of the Book Catalog portlet, when a book is added to or removed from the catalog, the portal page makes use of DWR’s Comet support to display a notification message to all users.
Let’s first cover a few basic concepts that you’ll need to be aware of when implementing Comet applications using DWR.
- Script session— A script session is similar to an HttpSession, but it’s managed by the engine.js file included in the portal page. A script session is created when a user visits a portal page (that includes engine.js) for the first time, and it’s uniquely identified with a script session ID. It’s represented by a ScriptSession object on the server side, which is used to push JavaScript code from Java objects to a portal page and also for selectively sending updates.
- Script session manager— A script session manager is represented by a Script-SessionManager object, and it’s responsible for managing the lifecycle of ScriptSession objects on the server side. The JavaScript in engine.js interacts with the ScriptSessionManager implementation to create, retrieve, and invalidate ScriptSessions.
- Script session listener— A script session listener provides notification when a ScriptSession is created or destroyed.
Figure 12.9 shows how DWR is used in the Book Catalog portlet to display the notification message when a book is added to or removed from the catalog.
Figure 12.9. The Comet implementation in the Book Catalog portlet using DWR. The web browser creates a ScriptSession when the portal page containing the Book Catalog portlet is loaded. Every 60 seconds, a long-lived HTTP connection is created by sending a request containing the ScriptSession ID to the server. UpdateSender writes JavaScript code to ScriptSession, which is sent to the browser for execution.

The web browser ![]() loads the portal page containing the Book Catalog portlet. Because the portal page includes the DWR engine.js file, it sends
a request to DwrServlet to create a ScriptSession on the server. You can think of ScriptSession as an object that represents a portal page on the server side. A ScriptSession is associated with a unique ID that’s also available to the web browser as a JavaScript variable.
loads the portal page containing the Book Catalog portlet. Because the portal page includes the DWR engine.js file, it sends
a request to DwrServlet to create a ScriptSession on the server. You can think of ScriptSession as an object that represents a portal page on the server side. A ScriptSession is associated with a unique ID that’s also available to the web browser as a JavaScript variable.
BookCatalogAjaxBean’s startBookUpdateThread method ![]() is invoked using DWR. The startBookUpdateThread is responsible for starting a thread, represented by the UpdateSender object, which continuously monitors changes in the number of books in the catalog.
is invoked using DWR. The startBookUpdateThread is responsible for starting a thread, represented by the UpdateSender object, which continuously monitors changes in the number of books in the catalog.
The UpdateSender object’s getInstance method ![]() is used to create (if required) an instance of the UpdateSender object and to start the UpdateSender thread. UpdateSender is a singleton, so getInstance creates a new UpdateSender instance
is used to create (if required) an instance of the UpdateSender object and to start the UpdateSender thread. UpdateSender is a singleton, so getInstance creates a new UpdateSender instance ![]() if it doesn’t exist.
if it doesn’t exist.
UpdateSender’s addScriptSession method ![]() is used to add the portal page’s ScriptSession object to the list of ScriptSessions maintained by the UpdateSender object. The UpdateSender thread iterates over the ScriptSessions it maintains internally, to send JavaScript to the portal page for execution.
is used to add the portal page’s ScriptSession object to the list of ScriptSessions maintained by the UpdateSender object. The UpdateSender thread iterates over the ScriptSessions it maintains internally, to send JavaScript to the portal page for execution.
The web browser ![]() sends a request to DwrServlet to check for updates to the ScriptSession associated with the portal page. The request contains the unique ScriptSession ID, which is used by ScriptSessionManager to return the corresponding ScriptSession.
sends a request to DwrServlet to check for updates to the ScriptSession associated with the portal page. The request contains the unique ScriptSession ID, which is used by ScriptSessionManager to return the corresponding ScriptSession.
If JavaScript has been added to the ScriptSession ![]() , it’s executed by the web browser. The JavaScript in the ScriptSession
, it’s executed by the web browser. The JavaScript in the ScriptSession ![]() is executed by the web browser to update the portlet content. In the case of the Book Catalog portlet, UpdateSender sends the name of the JavaScript function that needs to be invoked to ScriptSessions. The browser executes the JavaScript function to show the notification message to all users who are currently viewing the
Book Catalog portlet.
is executed by the web browser to update the portlet content. In the case of the Book Catalog portlet, UpdateSender sends the name of the JavaScript function that needs to be invoked to ScriptSessions. The browser executes the JavaScript function to show the notification message to all users who are currently viewing the
Book Catalog portlet.
In this example, the web browser repeatedly sends requests to the server to retrieve updates via the ScriptSession object, but this doesn’t mean that it’s using the polling approach to retrieve updates. In this case, a request sent to retrieve updates opens a long-lived connection with the server, which is closed every 60 seconds or so, to check that the browser was not closed by the user. If the browser is closed, the ScriptSession is invalidated after a predefined timeout period. When the request returns, a fresh request is sent to the server to again open a long-lived connection. This process continues until the web browser is closed or the portal page is unloaded.
Let’s now look at the source code of the Book Catalog portlet to see how the Comet approach is realized using DWR. The following listing shows the home.jsp page of the Book Catalog portlet, which defines the necessary JavaScript to initiate Reverse Ajax.
Listing 12.23. JavaScript in home.jsp that begins Reverse Ajax
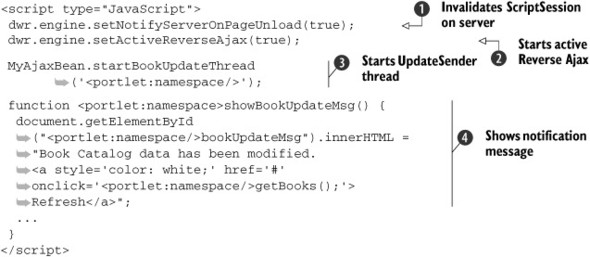
When the portal page containing the Book Catalog portlet is loaded, engine.js is responsible for creating a ScriptSession on the server. The setNotifyServerOnPageUnload function ![]() notifies the ScriptSessionManager to invalidate the corresponding ScriptSession when the portal page is unloaded.
notifies the ScriptSessionManager to invalidate the corresponding ScriptSession when the portal page is unloaded.
The setActiveReverseAjax function ![]() creates a long-lived connection with the server that’s closed every 60 seconds by the server. The setActiveReverseAjax method sends an Ajax request containing the script session ID (created earlier by engine.js), which is used by ScriptSessionManager to retrieve the corresponding ScriptSession. If JavaScript code is added to the ScriptSession, it’s executed by the web browser.
creates a long-lived connection with the server that’s closed every 60 seconds by the server. The setActiveReverseAjax method sends an Ajax request containing the script session ID (created earlier by engine.js), which is used by ScriptSessionManager to retrieve the corresponding ScriptSession. If JavaScript code is added to the ScriptSession, it’s executed by the web browser.
MyAjaxBean’s startBookUpdateThread function ![]() invokes the BookCatalogAjaxBean object’s startBookUpdateThread method on the server side. It starts an UpdateSender thread, which listens for modifications to book catalog data and adds a call to the showBookUpdateMsg function to ScriptSession if it finds that a book has been added to or removed from the catalog.
invokes the BookCatalogAjaxBean object’s startBookUpdateThread method on the server side. It starts an UpdateSender thread, which listens for modifications to book catalog data and adds a call to the showBookUpdateMsg function to ScriptSession if it finds that a book has been added to or removed from the catalog.
The showBookUpdateMsg function ![]() is invoked when a book has been added to or removed from the catalog.
is invoked when a book has been added to or removed from the catalog.
Server-side configuration is also required for using Reverse Ajax, which includes adding the following initialization parameters to DwrServlet in the web.xml file:
- activeReverseAjaxEnabled—A true value enables Comet and the polling feature in DWR.
- maxWaitAfterWrite—A value of -1 indicates that as soon as a response is written out, the connection is closed. If no response is written out, the connection is kept open for a maximum of 60 seconds.
BookCatalogAjaxBean’s startBookUpdateThread method, which is responsible for registering a ScriptSession with the UpdateSender thread, is shown next.
Listing 12.24. The BookCatalogAjaxBean class’s startBookUpdateThread method

UpdateSender’s getInstance method ![]() is used to retrieve an instance of UpdateSender. The ScriptSession associated with the current request
is used to retrieve an instance of UpdateSender. The ScriptSession associated with the current request ![]() is added to the list of ScriptSessions maintained by the UpdateSender thread.
is added to the list of ScriptSessions maintained by the UpdateSender thread.
The next listing shows the UpdateSender class, which is responsible for sending updates to web browsers using ScriptSession.
Listing 12.25. The UpdateSender class

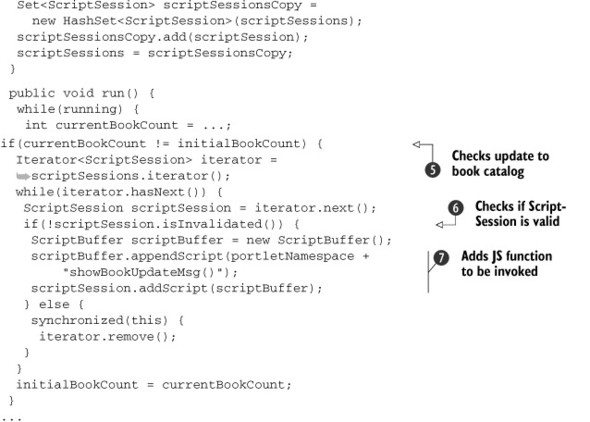
The scriptSessions variable ![]() stores the ScriptSession objects that are currently registered with the UpdateSender thread for receiving responses. The getInstance method
stores the ScriptSession objects that are currently registered with the UpdateSender thread for receiving responses. The getInstance method ![]() returns the UpdateSender instance. Because UpdateSender represents a singleton, getInstance creates a new instance if an instance doesn’t exist. Using a single thread to send notifications to all the portal pages
is a more scalable approach than having a dedicated thread for each portal page. The UpdateSender thread
returns the UpdateSender instance. Because UpdateSender represents a singleton, getInstance creates a new instance if an instance doesn’t exist. Using a single thread to send notifications to all the portal pages
is a more scalable approach than having a dedicated thread for each portal page. The UpdateSender thread ![]() is started as a daemon thread.
is started as a daemon thread.
The addScriptSession method ![]() is used to add a ScriptSession to the internally managed ScriptSession list, scriptSessions.
is used to add a ScriptSession to the internally managed ScriptSession list, scriptSessions.
The UpdateSender thread ![]() checks if there has been any change in the book count in the catalog. A ScriptSession in the scriptSessions variable
checks if there has been any change in the book count in the catalog. A ScriptSession in the scriptSessions variable ![]() is checked to see if it’s still valid. A ScriptSession may be invalid because a user may have closed the web browser. The ScriptSession’s addScript method
is checked to see if it’s still valid. A ScriptSession may be invalid because a user may have closed the web browser. The ScriptSession’s addScript method ![]() is used to instruct the web browser to invoke the showBookUpdateMsg function of the JavaScript that was included as part of the portal page.
is used to instruct the web browser to invoke the showBookUpdateMsg function of the JavaScript that was included as part of the portal page.
Listing 12.25 shows that all you need to do to send notifications to users is to send the name of the JavaScript function using the ScriptSession object. The ScriptBuffer object is used to inform the web browser to invoke the showBookUpdateMsg function. You can also use ScriptBuffer’s appendData method to send data to the JavaScript function. ScriptSession also has a provision to selectively send updates to users. For instance, you can send updates to particular users whose HttpSession contains a certain value for a particular attribute.
Another important point to notice in listing 12.25 is the presence of the portlet namespace. Because you send the name of the JavaScript function to the web browser for execution, you need to prefix the value of the portlet namespace to the JavaScript function. DWR is a servlet-based solution, so you need to explicitly send the portlet namespace to the UpdateSender thread.
Warning
Because the Book Catalog portlet doesn’t use server-specific extensions (like CometProcessor or Continuations) to scale when server load increases, the Book Catalog portlet doesn’t represent a scalable Comet application. If you’re using Jetty 6, DWR transparently uses Jetty’s Continuations to handle Reverse Ajax, making the Book Catalog portlet scale well when the load on the server increases.
12.9.4. DWR integration with other frameworks
DWR can easily be used along with frameworks like Spring, Hibernate, and JSF. For instance, you can use a DWR creator, which uses a Spring bean or a JSF bean. You can also return a Hibernate object using HibernateBeanConverter. You should refer to the DWR website to learn more about the various integration options available for the framework you’re using (http://directwebremoting.org/).
Let’s now take a brief look at cross-domain Ajax and the issues involved.
12.10. Cross-domain Ajax
Cross-domain Ajax refers to a scenario in which an Ajax request is sent from a web page or portal page, downloaded from domain X, to a server that is in domain Y.
Let’s say your web portal’s domain name is www.my-bookportal.com (domain X), and one of the portlets in your web portal needs to asynchronously access a servlet hosted by www.your-bookportal.com (domain Y). You might think that you could easily go ahead and create an XMLHttpRequest object and send an Ajax request to www.your-bookportal.com, but it isn’t so simple. Web browsers limit Ajax requests from a web page or portal page to the server from which the web page or portal page was downloaded. So, in this scenario, you could only send Ajax requests to www.mybookportal.com.
One approach to handling the cross-domain issue is to send an Ajax request to the server from which the portal page was downloaded, and then forward the request to a server in another domain, as shown in Figure 12.10.
Figure 12.10. A cross-domain request can be proxied through the server from which the portal page was downloaded, in order to address security issues related to cross-domain requests.

Sometimes you may still want to directly send a request to the other domain, without going through the same-domain server. In such cases, you can consider using JSONP (JSON with Padding), which contains JSON data wrapped inside a function call.
jQuery provides support for JSONP to send cross-domain Ajax requests, Dojo provides the iFrame proxy to perform cross-domain Ajax, and DWR provides the ScriptTag, which simplifies using cross-domain Ajax in your application. For more details on how to use cross-domain Ajax in your portal, refer to the jQuery, Dojo, and DWR websites.
Cross-domain issues are also faced when using Reverse Ajax (or Comet). If you’re developing portlets that use Ajax or Comet, you should choose an Ajax toolkit that provides support for cross-domain Ajax or Comet.
Let’s now look at how we can achieve inter-portlet communication when using Portlet 2.0’s Ajax support.
12.11. Ajax and inter-portlet communication
You saw earlier in this chapter how the serveResource method of the ResourceServingPortlet lifecycle interface is used to implement Ajax use cases in portlets. In many scenarios, you’d like to perform certain tasks in the serveResource method of a portlet and trigger other portlets on the portal page to update their content. For instance, you might want to use Ajax to add a book to the catalog using the Book Catalog portlet and then communicate the ISBN of the newly added book to the Recently Added Book portlet, so that it can show the most recently added book.
In the serveResource method, a portlet can’t publish events, so it can’t communicate with other portlets when responding to an Ajax request. This leaves us with no option but to implement custom approaches to perform inter-portlet communication.
To implement inter-portlet communication using Ajax, you need to do the following things:
- Inform the target portlet that it should update its content.
- Send data that the target portlet requires to update its content.
- Update the content of the target portlet.
In most scenarios, the approach followed by the target portlet to update its content determines how the target portlet is triggered to update its content and how the necessary information is passed. There are two approaches that can be employed by the target portlet to update its content:
- Pushing data via Comet
- Pulling data via a JavaScript function
Let’s first look at how Comet can be used in inter-portlet communication.
12.11.1. Inter-portlet communication using Comet
Figure 12.11 shows one of the possible ways in which inter-portlet communication can be achieved between the Book Catalog and Recently Added Book portlets. In this case, Comet is used to push information about the most recently added book to the Recently Added Book portlet, and ActiveMQ (or any other messaging middleware) is used to communicate information from the Book Catalog portlet to the Recently Added Book portlet.
Figure 12.11. Inter-portlet communication using Comet. The UpdateSender thread retrieves communicated information from the in-memory ActiveMQ JMS destination.

In this figure, the Book Catalog portlet’s serveResource method adds a book to the catalog (represented by the database) ![]() . The serveResource method sends the ISBN number of the newly added book to a JMS destination configured in the in-memory ActiveMQ
. The serveResource method sends the ISBN number of the newly added book to a JMS destination configured in the in-memory ActiveMQ ![]() . The UpdateSender thread (similar to what you saw in listing 12.25) retrieves the ISBN from the JMS destination
. The UpdateSender thread (similar to what you saw in listing 12.25) retrieves the ISBN from the JMS destination ![]() . The UpdateSender thread retrieves details of the book from the database
. The UpdateSender thread retrieves details of the book from the database ![]() based on the ISBN received from the JMS destination, and it pushes the book details to the web browser
based on the ISBN received from the JMS destination, and it pushes the book details to the web browser ![]() to let the Recently Added Book portlet show the details of the newly added book.
to let the Recently Added Book portlet show the details of the newly added book.
There could be multiple variants of the approach shown in Figure 12.11:
- You may not use JMS at all if the UpdateSender thread is constantly checking the database to find out whether a new book has been added to the catalog.
- If the Book Catalog portlet’s serveResource method sends the complete details of the newly added book as a JMS message, the UpdateSender thread won’t need to hit the database to retrieve book details.
Tip
If you’re using Spring, you can easily configure in-memory ActiveMQ and use Spring-JMS integration to send and receive messages.
The Comet approach to inter-portlet communication is quite involved compared to using JavaScript functions. The main advantage of the Comet approach is that the portlets don’t need to be aware of other portlets in the portal, resulting in loose coupling between portlets.
12.11.2. Inter-portlet communication using a JavaScript function
The Comet approach to inter-portlet communication relies on the server-side pushing of data. Inter-portlet communication can also be achieved if a portlet defines a JavaScript function that updates the content of the portlet.
Figure 12.12 shows the Book Catalog portlet invoking a getRecentBook JavaScript function defined by the Recently Added Book portlet after a new book is added to the catalog. The getRecentBook JavaScript function retrieves the most recently added book information from the catalog and updates the content of the Recently Added Book portlet.
Figure 12.12. Inter-portlet communication using a JavaScript function. The Book Catalog portlet invokes the getRecentBook method of the Recently Added Book portlet, which updates the content.

Code Reference
You should now import the ch12_ResourceServing_Ajax_ipc Eclipse project that accompanies this book in order to see how the code references in this section are used in the example portlets. The ch12_Resource-Serving_Ajax_ipc project contains a Book Catalog portlet and a Recently Added Book portlet. The Book Catalog portlet is almost the same as the Book Catalog portlet discussed in the ch12_ResourceServing project.
The Book Catalog portlet will invoke the Recently Added Book portlet’s getRecentBook JavaScript function, so the Recently Added Book portlet stores its namespace value in the PortletContext or in a central cache, ![]() so that it’s accessible to the Book Catalog portlet. Then a new book is added to the catalog using DWR or the serveResource method of the portlet class
so that it’s accessible to the Book Catalog portlet. Then a new book is added to the catalog using DWR or the serveResource method of the portlet class ![]() . Refer to chapter 6 for more information on portlet namespaces.
. Refer to chapter 6 for more information on portlet namespaces.
After the book is added, the Ajax callback function processes the response received from the server. If the response indicates
that the book was successfully added to the catalog, another Ajax call is made by the Book Catalog portlet to retrieve the
namespace value of the Recently Added Book portlet from the PortletContext or cache ![]() . The Book Catalog portlet prepends the Recently Added Book portlet’s namespace to the getRecentBook JavaScript function name and invokes it
. The Book Catalog portlet prepends the Recently Added Book portlet’s namespace to the getRecentBook JavaScript function name and invokes it ![]() , which results in the invocation of the Recently Added Book portlet’s getRecentBook function. Finally, the getRecentBook function updates the content of the Recently Added Book portlet by fetching the most recently added book information from
the catalog
, which results in the invocation of the Recently Added Book portlet’s getRecentBook function. Finally, the getRecentBook function updates the content of the Recently Added Book portlet by fetching the most recently added book information from
the catalog ![]() .
.
Let’s now see how the Book Catalog and Recently Added Book portlets in the ch12_ResourceServing_Ajax_ipc project implement inter-portlet communication as defined in Figure 12.12.
The following code shows the render method (in VIEW portlet mode) of the RecentlyAddedBookPortlet class, which shows how the namespace value for the Recently Added Book portlet is stored in PortletContext:
@RenderMode(name = "VIEW")
public void showRecentlyAddedBook(
    getPortletContext().
       setAttribute("recentlyAddedBookPortletNamespace",
         response.getNamespace());
   ...
}
The preceding code shows that the namespace value of the Recently Added Book portlet is stored as a PortletContext attribute with the name recentlyAddedBookPortletNamespace. It’s not necessary to use PortletContext for storing namespace information. If the portlets are located in different portlet applications, you’d need to store the information in a central cache that can be accessed by the communicating portlets. You should avoid storing namespace information in a database because the portlet’s render method is invoked every time the portal page is refreshed, which would result in performance issues.
The following code shows the addBook JavaScript function defined in the Book Catalog portlet’s home.jsp page, which adds a new book to the catalog:
function <portlet:namespace/>addBook(...) {
  ...
  MyAjaxBean.addBook(book, function(message) {
    ...
    if(message.statusCode == "0") {
      ...
      MyAjaxBean.getObserverPortlet(function(namespaceValue) {
        var fnName = namespaceValue + "getRecentBook";
        window[fnName]();
      });
    }
  });
}
In the preceding code, MyAjaxBean represents the JavaScript object corresponding to the BookCatalogAjaxBean object on the server side (see section 12.8.3 for the details of MyAjaxBean and BookCatalogAjaxBean). The addBook function of MyAjaxBean saves the new book information entered by the user. If the book is saved successfully (that is, if message.statusCode == "0"), the getObserverPortlet function of MyAjaxBean is invoked, which returns the namespace value of the Recently Added Book portlet. Once this namespace value is obtained, the getRecentBook JavaScript function is invoked using the window[fnName]() function; where fnName is the name of the JavaScript function to be invoked.
The following code shows the getObserverPortlet method of the BookCatalogAjaxBean class, which is invoked when the getObserverPortlet function of MyAjaxBean is invoked:
public String getObserverPortlet(HttpServletRequest request) {
  ServletContext ctx = request.getSession().getServletContext();
  String portlet = (String) ctx.getAttribute
     ("recentlyAddedBookPortletNamespace");
  return portlet;
}
An attribute stored in PortletContext can be accessed from ServletContext, so in the preceding code the recentlyAddedBookPortletNamespace attribute is obtained via the ServletContext object.
Inter-portlet communication using JavaScript functions results in tight coupling between communicating portlets. For instance, the Book Catalog portlet needs to know about the JavaScript function of the Recently Added Book portlet.
12.12. Summary
In this chapter you saw how portlets with rich user interfaces can be created using Ajax. Ajax adds complexity to portlet development, which can be accommodated by using frameworks like jQuery, Dojo, and DWR.
We took a deep dive into the DWR framework to show that it’s a one-stop solution for your Ajax needs. You can use it to create Ajax or Comet portlets, and it also helps you take care of cross-domain Ajax issues. We focused only on the use of open source Ajax frameworks to create rich user interfaces, but you can also consider using commercial frameworks like Adobe Flex.
In the next chapter, we’ll look at a new addition to Portlet 2.0—portlet filters, which are used to preprocess portlet requests and post-process portlet responses.