
Appendix A. Getting started with GateIn Portal
GateIn Portal is an open source portal server that merges the JBoss Portal and eXo Portal projects. In this appendix, we’ll look at how to install GateIn Portal and create a web portal, the Book Portal. This example will demonstrate how to create a new web portal, create portal pages, add portlets to portal pages, programmatically secure portlet actions, create users and user groups, associate groups to roles, and define permissions for the web portal, its portlets, and portal pages. For more detailed documentation on GateIn Portal, please refer to the GateIn Portal website (http://www.jboss.org/gatein).
A.1. Installing GateIn Portal
To install GateIn Portal, all you need to do is download the bundle of your choice from the GateIn Portal web-site and unpackage it into an appropriate folder on your system. GateIn Portal comes prepackaged with JBoss AS and Tomcat. In this appendix, we’ll use the GateIn-Tomcat bundle to demonstrate how to deploy portlets on GateIn Portal.
Figure A.1 shows the top-level directories that you’ll see when you unpackage the GateIn-Tomcat bundle. In this figure, the bin directory contains batch files or shell scripts for starting GateIn Portal. The webapps directory is Tomcat’s hot deploy directory where you need to copy your WAR files containing portlets. The gatein directory contains the data that’s used internally by GateIn Portal.
Figure A.1. The GateIn-Tomcat bundle’s directories. The gatein directory contains configuration and portal data used by GateIn Portal. The webapps directory is Tomcat’s hot deploy directory, which contains the WAR files.

Before running the portal server, check that Java SE 5 or newer is installed on your system, and that the JAVA_HOME environment variable is set to the installation directory of Java SE 5. Verify that the installation is correct by executing run from the command prompt (on Windows) or the run.sh script in the bin directory (on UNIX). It may take some time for the server to start for the first time, as GateIn Portal creates its internal database and populates it with the setup data.
If the server starts up without errors, you can open your favorite web browser and point it to the home page of the GateIn Portal: http://localhost:8080/portal. If you see the home page of the GateIn Portal, you have successfully installed GateIn Portal on your system. Figure A.2 shows the GateIn Portal home page that you’ll see if the server starts without errors.
Figure A.2. The GateIn Portal home page. The Administrator option allows you to log in to the GateIn Portal as an administrator. The Sign In option allows you to provide your own login credentials to log in.

To log in to the GateIn Portal, you can either choose the Sign In option at the top of the home page or you can log in as one of the predefined users in the system: Administrator, Manager, User, or Demo.
Let’s now gain some familiarity with GateIn Portal before we get started creating a web portal.
A.2. Getting familiar with the GateIn Portal user interface
In this section, we’ll look at the various options that are available to logged-in GateIn Portal users.
First, click the Administrator link on the home page, or click the Sign In option and log in with a username of root and a password of gtn. The Administrator is the superuser in GateIn Portal and has full control over the portal server instance. When you log in to the GateIn Portal, you’ll see a toolbar at the top of the window that shows the options available to the logged in user, along with the portal pages that the logged in user can view. Figure A.3 shows the home page that’s displayed when you log in as Administrator.
Figure A.3. A logged-in user sees a toolbar with various additional options determined by the access permissions defined for the user. Additional portal pages are also displayed, depending upon the user’s access permissions.
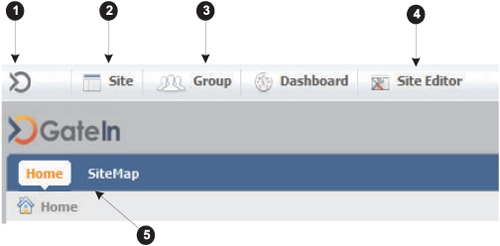
The link ![]() provides options to change the language or skin of the portal and to sign out.
provides options to change the language or skin of the portal and to sign out.
The Site option ![]() shows the various web portals available to the logged in user. An administrator can modify navigation hierarchy, add and
remove web portals, change the skin and language of a web portal, and define permissions to restrict access to a web portal.
shows the various web portals available to the logged in user. An administrator can modify navigation hierarchy, add and
remove web portals, change the skin and language of a web portal, and define permissions to restrict access to a web portal.
The Group option ![]() lets the user access special pages in the web portal, like Blog, Google, and Facebook. An administrator can additionally
use the Application Registry option to import portlets from portlet applications that are deployed in the Tomcat webapps directory
and to remove portlets that are registered with the GateIn Portal. Also, an administrator can use the Group option to manage
pages, users, groups, and user-to-group relationships.
lets the user access special pages in the web portal, like Blog, Google, and Facebook. An administrator can additionally
use the Application Registry option to import portlets from portlet applications that are deployed in the Tomcat webapps directory
and to remove portlets that are registered with the GateIn Portal. Also, an administrator can use the Group option to manage
pages, users, groups, and user-to-group relationships.
The Site Editor option ![]() is displayed only to portal administrators, and it’s used for managing the portal pages and their layout.
is displayed only to portal administrators, and it’s used for managing the portal pages and their layout.
The Home and SiteMap options ![]() represent the top-level portal pages that are accessible to every logged-in user.
represent the top-level portal pages that are accessible to every logged-in user.
Now that you know when to use the different toolbar options, let’s look at how to create the Book Portal using GateIn Portal.
A.3. Creating the Book Portal web portal
In this section we’ll develop a fully functional Book Portal web portal. To create a fully functional web portal in GateIn Portal, you first need to tell GateIn Portal about the web portal and then map the portal to the groups of users who should be able to access it. Additionally, you can define permissions for mapping portlets and portal pages to specific groups of users.
The Book Portal we’ll create in this section will have the following features:
- It consists of two portal pages—Home and Catalog:
- The Home page shows GateIn Portal’s built-in calendar and calculator gadgets. The Home page will be accessible to everyone, including anonymous users.
- The Catalog page shows the Book Catalog portlet (the appendixA_BookCatalog Eclipse project). The Catalog page will only be accessible to users who are registered with the web portal and belong to a group named BookUser. Refer to the README.TXT file in the appendixA_BookCatalog project to copy GateIn Portal–specific JAR files in the project to remove build errors that show up when you import the project into Eclipse IDE for the first time.
- Only users belonging to the BookPortalAdmin group are allowed to add and remove books and to upload a TOC for a book. The users belonging to the BookPortalAdmin group are the overall administrators for the Book Portal and can perform all actions on the Book Portal.
- The web portal should support the French locale and show all the content in French if the user chooses to view the web portal in French.
Let’s now look at the steps required to create the Book Portal.
A.3.1. Setting up a new web portal
In GateIn Portal, only administrators have permission to create a new web portal. As mentioned earlier, GateIn Portal comes with a predefined Administrator user who belongs to the administrator group. Log in as Administrator, as described in section A.2, and select the Site option from the toolbar to view the option for adding a new web portal.
Note
If you hover your mouse over the Site option, it will show the list of web portals that are currently configured in the GateIn Portal instance. As you haven’t created any web portals so far, it shows a single web portal named Classic, which refers to the default web portal in GateIn Portal.
Clicking the Site option in the toolbar displays the web portals created in the GateIn Portal instance and the option to create a new web portal, as shown in Figure A.4.
Figure A.4. The Site option is used to manage web portals created in the GateIn Portal instance. The Add New Portal option is used to add a new portal to the GateIn instance.

Figure A.4 shows that the Site option lets you manage the portals created in the GateIn Portal instance. The following options are available for existing web portals:
- Edit Layout— For editing the layout of the portal pages of a web portal
- Edit Navigation— For editing the overall navigational structure of a web portal
- Edit Portal’s Config— For editing a web portal’s name, skin, locale, and access permissions
Apart from the preceding options, an Add New Portal button is also available for creating a new web portal in the GateIn Portal instance. Click the Add New Portal button to add the Book Portal details, as shown in Figure A.5.
Figure A.5. The form for entering details to create a new web portal

Figure A.5 shows the form in which you enter details about the web portal you want to create in the GateIn Portal instance. The three tabs display different categories of information that you can specify for the web portal at creation time:
- Portal Setting— Specify the name, skin, and locale of the web portal to be created
- Properties— Specify how the session timeout is handled for the web portal
- Permission Setting— Specify the user groups and roles of the users who can access the web portal and the groups and roles of the users who can make modifications to the web portal
Let’s now look at what details you need to specify in each of the tabs to create the Book Portal.
The Portal Setting Tab
In the Portal Setting tab (shown in Figure A.5), specify “Book-Portal” as the name of the web portal, and select the SimpleSkin portal skin. Because the content of the Book Portal will be displayed in English, keep English as the setting for the locale.
The Properties Tab
In the Properties tab, you specify how GateIn Portal should handle the timeout of user sessions. It provides you with the following timeout options: Never, On Demand, and Always. For the Book Portal, keep the default value, On Demand, as shown in Figure A.6.
Figure A.6. The Properties tab lets you specify the timeout property for the user session.

If you don’t want the session to ever expire, you can select Never from the drop-down list.
Permission Setting Tab
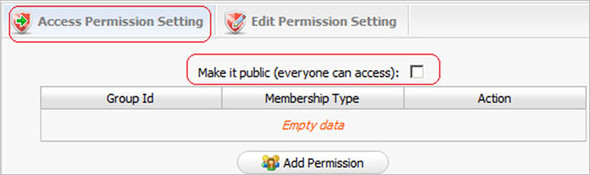
In the Permission Setting tab, check the Make It Public (Everyone Can Access) check box from the Access Permission Setting subtab, as shown in Figure A.7. This means that, by default, all Book Portal pages and portlets will be accessible to anonymous users. We’ll see later in this section how you can specify permissions for individual Book Portal pages and portlets to override these default permission settings.
Figure A.7. The Access Permission Setting subtab is used to specify access permissions for the web portal.
The Edit Permission Setting subtab is used to specify the groups and roles of users who have permission to make changes to the web portal. The Book Portal requirements clearly mention that users belonging to the BookPortalAdmin group are responsible for performing administration tasks on the Book Portal, so we need to assign edit permission to users in the BookPortalAdmin user group. As we haven’t yet created the BookPortalAdmin group, let’s assign the edit permission to the Administrator user.
The Administrator user belongs to the Administrators subgroup of the Platform group, and it has the manager role. (In GateIn Portal terminology, a role is referred to as a membership.) To assign edit permission to the Administrator user, select the Edit Permission Setting subtab and click the Select Permission button.
In Figure A.8, clicking the Select Permission button displays the Permission Selector form that lets you select groups and roles, as shown in Figure A.9.
Figure A.8. Clicking the Select Permission button allows you to select the user groups and roles you wish to grant permission to make modifications to the web portal.
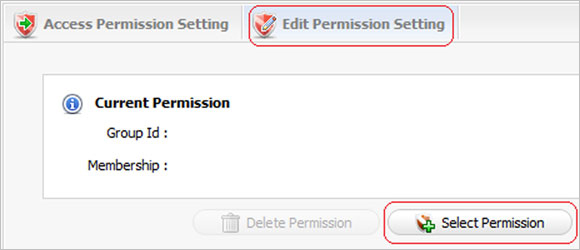
Figure A.9. The Permission Selector shows the user groups on the left side and the memberships (or roles) on the right side. Select the user groups on the left, and then the roles you want to assign to those groups on the right.
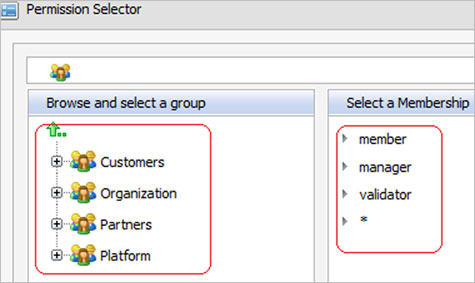
In Figure A.9, the Browse and Select a Group pane on the left shows the user groups defined in the GateIn Portal, and the Select a Membership section on the right shows the roles or memberships that are defined. In this case, the figure shows the predefined groups and memberships in GateIn Portal.
Figure A.10 shows the selections that you need to make to assign edit permission to the Administrator user. This figure shows that to assign edit permission to the Administrator user, you expand the Platform group and select the Administrators group. The Administrator user has manager membership in the Administrators group, so to assign edit permission to the Administrator user you need to select manager as the membership. When you select the membership, the selected permission is displayed in the Edit Permission Setting tab, as shown in Figure A.11.
Figure A.10. Select Platform > Administrators as the user group and manager as the membership to assign edit permission to the Administrator user.
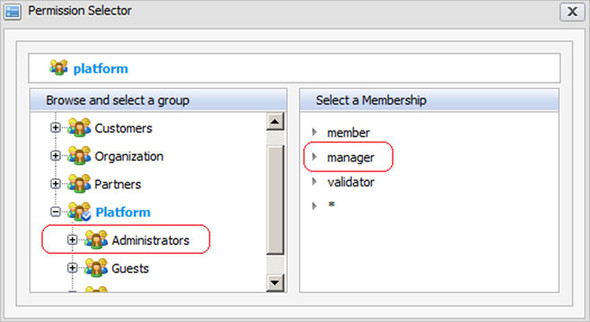
Figure A.11. Selected permission settings are displayed in the Edit Permission Setting subtab.

Now that you’ve provided appropriate values for creating the Book Portal, click the Save button (shown in Figure A.5) to create the Book Portal. The newly created Book Portal will now show up in the list of web portals that the Administrator user can manage, as shown in Figure A.12.
Figure A.12. The newly created Book Portal is displayed in the list of web portals that the Administrator can manage.

Note
The newly added Book Portal is also visible when you hover your mouse over the Site option in the toolbar (see Figure A.3).
This is all you need to do to set up a portal. Now let’s create a user who belongs to the BookPortalAdmin group.
A.3.2. Creating a web portal user
In a web portal, some users are created automatically when users register with the web portal, and some are created manually, like the user responsible for administering the web portal. The registering users are usually associated with a group and role when they register, but manually created users need to be associated with an appropriate group and role by the portal administrator. In this section, we’ll look at how you can create a user in GateIn Portal, and in section A.3.3 we’ll look at how you can associate the newly created user with the BookPortalAdmin group and to an appropriate role.
To create a web portal user, select the Groups > Organization > New Staff option from the toolbar. The New Staff option displays the form shown in Figure A.13, where you can enter user details.
Figure A.13. The form for entering user details. The user’s account details are entered on the Account Setting tab, and personal information about the user is entered on the User Profile tab.

Enter portal.admin in the User Name field, fill out the rest of the details for the user in both tabs, and click Save to create a new user in GateIn Portal.
Note
By default, all users created by GateIn Portal belong to the Users subgroup of the Platform group and have member as their membership type.
Let’s now look at how to create a new BookPortalAdmin group in GateIn Portal.
A.3.3. Creating a custom user group
GateIn Portal allows you to create custom user groups and custom memberships (or roles). Also, the groups created in GateIn Portal can be hierarchical; you can have a top-level group that contains subgroups, which can further contain subgroups, and so on. In this section, we’ll look at how to create a custom BookPortalAdmin group in GateIn Portal.
To manage groups and memberships, select the Groups > Organization > Users and Groups management option. Figure A.14 shows the various options that are available for managing groups and memberships.
Figure A.14. User, group, and membership management options available to administrators
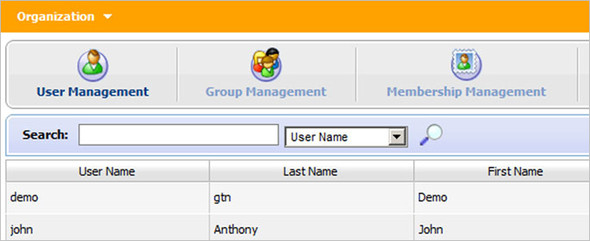
Figure A.14 shows that an administrator can manage users, groups, and memberships that are defined in GateIn Portal:
- User Management— Allows administrators to modify or delete users. If you successfully created the portal.admin user in the previous section, it will now show up in the User Management page.
- Group Management— Allows administrators to add, modify, or delete groups. As each group is usually associated with a set of users, this option is also used to view users in each group, remove users from a group, and associate users with a group.
- Membership Management— Allows administrators to manage memberships (or roles) defined in GateIn Portal. By default, GateIn Portal defines manager, validator, and member memberships. Administrators can create new memberships (or roles) and assign them to different users in the portal using the Group Management option.
To create the new BookPortalAdmin group, go to the Group Management tab and click the plus sign (+) button to add a new group, as shown in Figure A.15.
Figure A.15. The + button in the Groups pane is for adding a new group or subgroup to GateIn Portal.

Enter the new group’s details in the Add New Group form, as shown in Figure A.16.
Figure A.16. The Add New Group form lets you add a new group or subgroup to GateIn Portal.

Enter BookPortalAdmin in the Group Name field, Book Portal Administrator as the Description, and click Save to save the new group. If the BookPortalAdmin group is successfully created, it’s displayed in the list of groups.
Repeat these steps to create the BookUser group, to which the registered users of the portal belong. Later in this appendix, you’ll see how registered users are automatically mapped to the BookUser group.
Now that you’ve created the portal.admin user and the BookPortalAdmin group, let’s look at how you can associate portal.admin with the BookPortalAdmin group.
A.3.4. Associating users to groups
To associate a user to a group, go to the Group Management tab shown in Figure A.14 and select the BookPortalAdmin group.
Figure A.17 shows that when you select a group, the users associated with the group are displayed, along with the option to add more users to the group. Enter portal.admin as the user name, keep the membership option as member, and click Save to save the association between the BookPortalAdmin group and the portal.admin user.
Figure A.17. Selecting a group shows the users that belong to that group, their memberships, and an option to search for and add users to the group.

Now you should modify the permissions for the BookPortalAdmin group in the Book Portal web portal. This is done on the Edit Permission Setting tab (discussed earlier in section A.3.1 and shown in Figure A.8). Click the Site option in the toolbar, and click the Edit Portal’s Config option corresponding to the Book Portal, as shown in Figure A.18.
Figure A.18. The Edit Portal’s Config option allows you to change the access and edit permission settings for a web portal.

You should now see the dialog box shown earlier in Figure A.5. All you have to do is go to Edit Permission Setting and assign edit permission (as described in section A.3.1 and shown in Figure A.8) to the BookPortalAdmin group and member membership. As the portal.admin user belongs to the BookPortalAdmin group and has a membership setting of member, this means that permission to modify the Book Portal is now granted to the portal.admin user and not the Administrator user.
Note
Edit permission for a web portal in GateIn Portal can only be assigned to a single group and to a particular membership in that group. It can’t span multiple groups and memberships.
To confirm the options that are now available to the portal.admin user, log in with the credentials of the portal.admin user and check out the toolbar options that are now available when you go to the Book Portal. You’ll notice that the Book Portal already has a home page, and all the options like Site, Group, Dashboard, and Site Editor are available in the toolbar, but with limited functionality. For instance, portal.admin can’t perform the following actions:
- Create a new web portal
- Create portal users, groups, or memberships, or associate existing users to existing groups
- Add or remove portlets from the predefined home page of the Book Portal
Let’s now look at how the portal.admin user can remove Book Portal’s default home page to create a new custom home page.
A.3.5. Removing the portal’s default home page
When you login as portal.admin, you’ll find that the Book Portal web portal already has a home page that shows general information about the GateIn Portal product. As the requirements of the Book Portal stated that the Book Portal home page should show GateIn Portal’s built-in calendar and calculator gadgets, we need to edit the default home page of the Book Portal.
To remove portlets from the current portal page and add new portlets to it, GateIn Portal provides the Site Editor > Edit Page option. But if you look for the Edit Page option for the Book Portal home page, you won’t find it because the Book Portal instance was created by the Administrator user, and Administrator is the owner of the home page. You first need to remove Book Portal’s default home page and then create a new home page to meet the Book Portal requirements.
To remove the default home page, click the Site option in the toolbar and select the Edit Navigation option corresponding to the Book Portal. In the Navigation Management window, you can see and define the navigational structure of your web portal. The only navigation node that currently exists for Book Portal is Home, as shown in Figure A.19. Right-click the Home navigation node and select Delete Node from the popup menu to delete that node and its associated portal pages.
Figure A.19. The web portal’s Navigation Management window allows you to modify the navigational structure of the web portal. Right-clicking a navigation node allows you to perform various actions on a node.
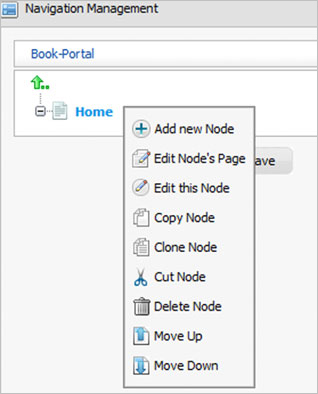
Once you’ve deleted the Home node, save the changes to the navigation structure. Now if you go to the Book Portal, you’ll find that the default home page has been removed.
It’s now time to create the Home and Catalog portal pages and add the portlets.
A.3.6. Creating portal pages and adding portlets
To create a portal page, select Site Editor > Add New Page. This starts the Page Creation wizard, which allows you to enter page and node details for the new page.
As shown in Figure A.20, enter the details for the navigation node and page and click Next. The next step is to select the layout for the portal page, which you don’t need at this time. Click Next again to reach the last step of the wizard, where you can add containers for portlets, set portal page permissions, and add portlets.
Figure A.20. The Page Creation wizard for entering navigation node and page details

Figure A.21 shows the Page Editor panel. You can set portal page permissions by clicking the View Page Properties button, add portlets and gadgets from the Applications tab, and organize portlets and gadgets on the portal page using containers via the Containers tab. You can also go back to the previous step in the Page Creation wizard, save changes to the portal page, or cancel the Page Creation wizard using the icons in the top-right corner of the panel.
Figure A.21. Page Editor shows portlets/gadgets that you can drag and drop on the portal page, view page properties, save changes to the portal page and add container(s) to the portal page to organize portlets/gadgets on the portal page.

To set up the Book Catalog portal’s home page, drag and drop the calendar and calculator widgets from the Applications tab, and save the changes to the portal page. You don’t need to set the permissions for the Home portal page because it’s accessible to anonymous users by default.
Similarly, you can create the Catalog portal page using the Page Creation wizard and add portlets to it. But even though you can create the Catalog page, you can’t add the Book Catalog portlet to it because you first need to make that portlet available to the Page Editor. For now, create an empty Catalog portal page and set permissions for it so that it’s accessible only to the BookUser group. To set permissions for the Catalog page, navigate to the Catalog page and select the Site Editor > Edit Page option from the toolbar. Selecting the Edit Page option displays the Page Editor panel (shown in Figure A.21) for the Catalog portal page. Figure A.22 shows the dialog box that’s displayed when you click the View Page Properties button on the Page Editor panel.
Figure A.22. The View Page Properties button opens this dialog box, which allows you to set permissions for the portal page.
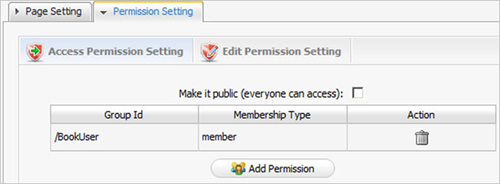
As shown in Figure A.22, uncheck the Make It Public (Everyone Can Access) check box. This means the Catalog portal page won’t be accessible to everyone. Then click the Add Permission button to set the access permission for users in the Book-User group having member as their membership in the group.
In this section, you created the Home and Catalog portal pages and made the Catalog portal page accessible only to the BookUser group. Now, we’ll look at what changes need to be made to the Book Catalog portlet so that the add and remove book and upload TOC functions are only available to users who belong to the BookPortalAdmin group and have member membership.
Code Reference
You should now import the appendixA_BookCatalog project into your Eclipse IDE in order to follow along with how programmatic security is implemented using GateIn Portal–specific classes.
A.3.7. Programmatically securing a custom portlet
The Book Portal’s requirements mention that the Book Catalog portlet should only allow add and remove book and upload TOC functions to be performed by users having a member role in the BookPortalAdmin group. GateIn Portal provides a UserACL class, which helps with implementing programmatic security in portlets. The UserACL object is at the center of implementing programmatic security in portlets. It provides methods, like hasPermission, which let you check whether a logged-in user belongs to a particular group and has a particular membership in that group.
The following listing shows the BookCatalogPortlet class’s removeBook action method, which shows how programmatic security is implemented in GateIn Portal.
Listing A.1. The BookCatalogPortlet class’s removeBook method

GateIn Portal’s UserACL object is obtained from the ExoContainer object ![]() . The UserACL object’s hasPermission method is used
. The UserACL object’s hasPermission method is used ![]() to check whether the logged-in user is a member in the BookPortalAdmin group. The hasPermission method accepts a permission expression that takes the following format,
to check whether the logged-in user is a member in the BookPortalAdmin group. The hasPermission method accepts a permission expression that takes the following format,
<membership>:<group>
where <membership> is the membership that the user has with a group, and <group> identifies the group to which the user belongs. While specifying the group, ensure that you specify the complete path to the group. For instance, if a user belongs to the administrators subgroup of the platform group, the path to the administrators group is/ platform/administrators.
Now that you’ve seen how to use programmatic security in implementing portlets, let’s look at how to install custom portlets in GateIn Portal.
A.3.8. Importing custom portlets into GateIn Portal
To add a custom portlet to a portal page, you first need to import the custom portlet into GateIn Portal. These are the steps for importing a portlet:
1. Deploy the portlet application WAR file. If you’re using the GateIn-Tomcat bundle, copy the WAR file to the webapps directory, as described in section 3.1.
2. Log in as an Administrator user and go to Group > Administration > Application Registry to import the custom portlets that form part of the portlet application. The Application Registry shows all the portlets that have been imported into the GateIn portal.
3. Import the deployed portlets by clicking the Import Applications button shown in Figure A.23.
Figure A.23. The Add Category panel shows the portlets that are currently registered with GateIn Portal. Clicking the Import Applications option imports the portlets defined in the deployed portlet applications.
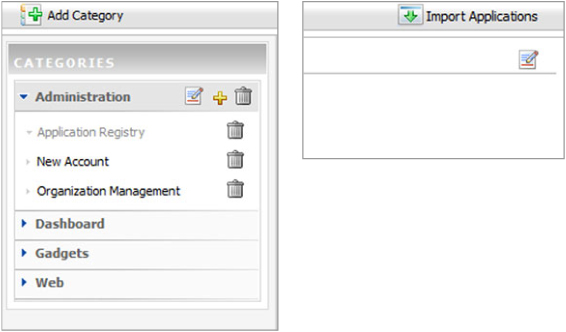
4. Once the portlets are installed, they will appear in the Add Category panel.
To import the Book Catalog portlet, deploy the portlet application that contains the portlet and click the Import Applications button. Once it’s imported, the Book Catalog portlet will appear in the Add Category panel and it’ll also be available in the Page Editor panel when you go about creating or editing a portal page. Refer to section A.3.6 for more information on the Page Editor panel.
Now that the Book Catalog portlet has been imported, you can log in as portal.admin and select Site Editor > Edit Page to edit the Catalog portal page and add the Book Catalog portlet.
Let’s now look at how you can associate the BookUser group and member membership with users who register with the GateIn web portal.
A.3.9 Defining default groups and memberships for registered users
GateIn Portal provides numerous configuration options to let you personalize its default behavior. In this section, we’ll look at how you can configure the GateIn web portal so that users who register with the portal are automatically assigned the BookUser group and member membership in the group.
The GateIn portal’s organization-configuration.xml XML file defines the group and membership with which newly created users are associated. In case of the GateIn-Tomcat bundle, the file is located in <gatein-install-dir>webappsportalWEB-INFconforganization directory, where <gatein-install-dir> is the directory in which you extracted the GateIn-Tomcat bundle archive.
The next listing shows the <component-plugin> element, which is responsible for defining the default group and membership with which newly created users are associated.
Listing A.2. The organization-configuration.xml file

The new.user.event.listener plugin component ![]() is responsible for assigning the default group and membership to newly created users. The <field> elements
is responsible for assigning the default group and membership to newly created users. The <field> elements ![]() identify the default group and membership that are assigned to new users.
identify the default group and membership that are assigned to new users.
To change the default group and membership, all you need to do is to change the value of the <field> elements. The <field> elements in the following snippet indicate that newly created users will be associated with the BookUser group and with member membership.
<object type="org.exoplatform.services.organization.
     impl.NewUserConfig$JoinGroup">
  <field  name="groupId"><string>/BookUser</string></field>
  <field  name="membership"><string>member</string></field>
</object>
impl.NewUserConfig$JoinGroup">
<field name="groupId"><string>/BookUser</string></field>
<field name="membership"><string>member</string></field>
</object>