
Appendix B. Configuring Liferay Portal with MySQL database
Liferay Portal comes with an embedded HSQLDB database, which isn’t meant to be used in production. Liferay Portal provides support for many production-ready databases that you can configure easily. In this appendix, we’ll look at how to configure Liferay Portal to use the MySQL database. If you want to use another database with Liferay Portal, refer to the Liferay Portal documentation.
Before you get started configuring MySQL with Liferay Portal, you need to install the following software on your machine:
- MySQL database server— Download the Community Edition of the database from http://dev.mysql.com/downloads/.
- HeidiSQL client for MySQL— The screenshots in this appendix use the HeidiSQL client, but you can use any other MySQL client to go through the tables described in this appendix. You can download the HeidiSQL client for free from http://www.heidisql.com/.
B.1. Installing MySQL database and HeidiSQL client
The first step toward integrating Liferay Portal with MySQL is to install the MySQL database server on your local machine. The most important step in the installation process is configuring the MySQL Server instance. This is where you specify the password for the root user, as shown in Figure B.1.
Figure B.1. The MySQL Server Instance Configuration Wizard allows you to specify the root user’s password.

The root user is a superuser in MySQL and it’s created during installation. The Current Root Password input field in Figure B.1 may confuse you if you choose to configure the MySQL Server instance separately, instead of doing it during the installation process. By default, MySQL creates a root user with a blank password during the installation process. When you come across Figure B.1, you don’t need to try out obvious passwords like admin, root, and so on. Simply leave the Current Root Password field blank and enter the password you want to use in the New Root Password and Confirm fields.
If you have installed the MySQL database and the HeidiSQL client, you should first check whether the MySQL installation was successful. To do so, open the HeidiSQL client and connect to the MySQL Server instance you want to use with Liferay Portal. Figure B.2 shows the HeidiSQL client’s Session Manager screen where you need to enter the MySQL information for the instance you want to connect to.
Figure B.2. The HeidiSQL client screen for connecting to a MySQL instance
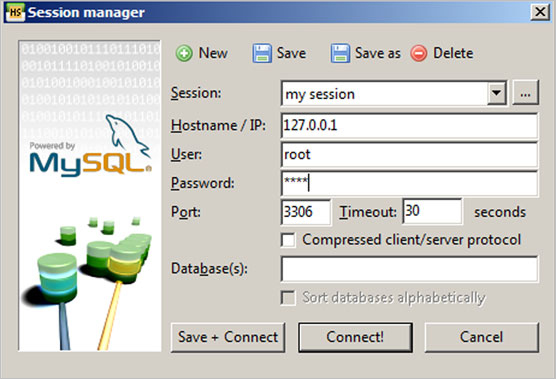
The HeidiSQL client’s Session Manager window accepts the following input:
- Session— A name for the session that you are about to start.
- Hostname/IP— The hostname or IP address of the machine on which the MySQL database instance is running. If you have installed MySQL locally, you can specify localhost as the hostname or 127.0.0.1 as the IP address.
- User— The username you want to use to create the session with the MySQL instance. You can connect with the root username or any username that has permission to create a new database in the MySQL Server instance. The root user, being a superuser, has the permission to create a new database.
- Password— The password corresponding to the username. If you’re trying to log in using the root username, the password would be the one you set for the root user during the configuration of your MySQL Server instance.
- Database(s)— The database to which you want to connect. Because you’re connecting for the first time, you don’t need to specify the database name.
Once you’re connected to the MySQL Server instance, you’ll see a list of databases that currently exist in the instance, as
shown in Figure B.3. The databases that currently exist in the MySQL Server instance ![]() are displayed. You can select any database from the list to perform additional actions on the selected database. The Query
tab displays an SQL editor
are displayed. You can select any database from the list to perform additional actions on the selected database. The Query
tab displays an SQL editor ![]() where you can write SQL queries that you want to execute. The pane at
where you can write SQL queries that you want to execute. The pane at ![]() is like the Console in the Eclipse IDE, which displays a log of activities you perform using the HeidiSQL client user interface.
is like the Console in the Eclipse IDE, which displays a log of activities you perform using the HeidiSQL client user interface.
Figure B.3. The HeidiSQL client user interface lists databases in the MySQL Server instance, lets you run SQL queries, and offers many other features.

Now that you are connected to the MySQL Server instance, you’re ready to do something useful—create a database in the MySQL Server instance. The database that you’ll create will be used by the Liferay Portal server to store information.
B.2. Getting started with your own portal database
To create a database using the HeidiSQL client, right-click in the pane that lists the databases (![]() in Figure B.3). You’ll see a popup menu, as shown in Figure B.4, which gives you an option to create a new database.
in Figure B.3). You’ll see a popup menu, as shown in Figure B.4, which gives you an option to create a new database.
Figure B.4. The Create Database option is available when the user right-clicks inside the window pane listing databases in the MySQL Server instance.

As shown in Figure B.4, the Create Database option is available to users who have permission to create new databases in the MySQL Server instance. When you select the Create Database option, you’ll see the dialog box in Figure B.5, which asks for the name of the database that you want to create.
Figure B.5. The Create Database dialog box, where you enter the database name

As shown in Figure B.5, enter myportaldb as the name of your new database and click OK. This will create a new database named myportaldb in the MySQL Server instance. The newly created database will immediately be added to the list of databases in the MySQL Server instance. The myportaldb database is currently empty but soon Liferay Portal will populate it with tables, triggers, and so on.
Now that you have created myportaldb, you’re ready to configure Liferay Portal to use this database, instead of HSQLDB.
B.2.1. Configuring Liferay Portal with MySQL
Liferay Portal provides a fairly simple approach to configuring the MySQL database as its primary database—you specify connection properties in the portal-ext.properties file and restart the Liferay Portal server. That’s all you need to do.
Let’s take a step back and understand the purpose of the portal-ext.properties file in Liferay Portal. Liferay Portal contains a portal.properties file in one of its JAR files, which defines properties that apply to the portal server and are meant to customize the behavior of the server. If you want to override the properties specified in portal. properties, you must create a portal-ext.properties file and specify the properties that you want to override. If you’re using Liferay Portal bundled with Tomcat, the portal-ext.properties file must be located in the {TOMCAT_HOME}/webapps/ROOT/WEB-INF/classes directory.
The portal.properties file specifies HSQLDB as the database to be used by the Liferay Portal server. This means that if you want to use MySQL instead of HSQLDB, you have to override the database properties by redefining them in portal-ext.properties. Listing B.1 shows a portal-ext.properties file that instructs Liferay Portal to connect to the MySQL Server instance you created earlier.
Listing B.1. Overriding database properties in the portal-ext.properties file

The jdbc.default.driverClassName property ![]() defines the fully qualified name of the driver class that’s used by the portal server to connect to the database. Because
you’re using MySQL in this case, the name of the driver class is com.mysql.jdbc.Driver.
defines the fully qualified name of the driver class that’s used by the portal server to connect to the database. Because
you’re using MySQL in this case, the name of the driver class is com.mysql.jdbc.Driver.
jdbc.default.url ![]() defines the database connection URL that’ll be used for establishing a connection with the database. Because you want to
use the myportaldb database, the connection URL points to that database. You don’t need to worry at this point about the information that follows the question mark (?) in the connection URL.
defines the database connection URL that’ll be used for establishing a connection with the database. Because you want to
use the myportaldb database, the connection URL points to that database. You don’t need to worry at this point about the information that follows the question mark (?) in the connection URL.
The jdbc.default.username and jdbc.default.password properties ![]() define the credentials that will be used by Liferay Portal to connect to the MySQL Server instance. For simplicity, you can
use MySQL’s root superuser to connect with the myportaldb database. You can alternatively use any other user, as long as the
user has permissions to create tables, indexes, and so on, in the database.
define the credentials that will be used by Liferay Portal to connect to the MySQL Server instance. For simplicity, you can
use MySQL’s root superuser to connect with the myportaldb database. You can alternatively use any other user, as long as the
user has permissions to create tables, indexes, and so on, in the database.
After you’ve entered the database properties in the portal-ext.properties file, you must restart the Liferay Portal server. During startup, Liferay Portal picks up the new database properties and creates the necessary database elements in the myportaldb database. If your Liferay Portal server starts without any errors, you can safely assume that Liferay Portal has been successfully configured to use myportaldb as the portal database.
Let’s now look at some of the tables that Liferay Portal creates in the MySQL database.
B.2.2. Exploring the Liferay Portal database tables
When the Liferay Portal server starts up for the first time, it checks for the existence of Liferay Portal–specific tables that store configuration information, like the default portal administrator, in the database. If the database is empty, Liferay Portal creates the necessary tables and loads setup data into them. In this section, we’ll look at some of the tables that Liferay Portal creates for internal use.
Warning
The tables discussed in this section may be different for different versions of Liferay Portal. The tables discussed here are generic in nature and show what information a portal server usually saves in its internal database. The example tables shown in this appendix are from Liferay Portal 6.0.5.
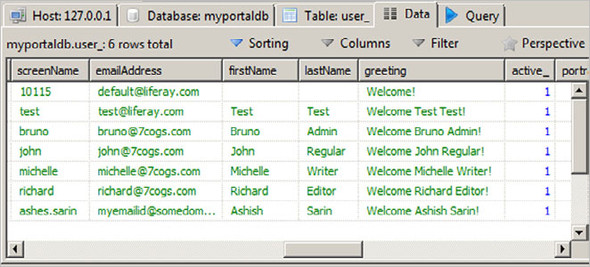
Portal User Information in the User_Table
A web portal stores information about the registered users in persistent storage. The USER_table stores information about the users that are registered with Liferay Portal.
To view data inside a table using HeidiSQL, all you need to do is select the table in HeidiSQL and click on the Data tab, as shown in Figure B.6. In this figure, you can see that the USER_table contains user information such as first name, last name, active/inactive status, screen name, email address, greeting message, and so on.
Figure B.6. The_USER table lists the registered users in Liferay Portal.
Portal Role Information in the Role_Table
To provide access to resources based on user roles, every user in the portal is assigned a role. The ROLE_table in Liferay Portal stores the roles defined in Liferay Portal, as shown in Figure B.7. In this figure, you can see that the ROLE_table contains role information such as role name and description.
Figure B.7. The ROLE_table stores the roles defined in Liferay Portal.

Permissions Information in the Permission_Table
Liferay Portal provides a fine-grained permissions system for managing permissions in the web portal. A portlet, for example, is a protected resource in a web portal, and by using the Liferay Portal permission system, you can control access to a particular portlet’s functionality. For instance, you can define permissions to control access to the Add Book functionality of the Book Catalog portlet.
Figure B.8 shows the PERMISSION_table, which defines the associations between actions and the resources protected by the portal. In this figure, the PERMISSION_table contains permission definitions, which map user actions to the resource to which the action applies. For instance, the Add Discussion action applies to the Message Board portlet, which is a resource in the web portal.
Figure B.8. The PERMISSION_table stores permission definitions for resources in Liferay Portal

Warning
Even though it is possible to directly access Liferay Portal database tables to retrieve or store data, doing so may result in inconsistencies and security issues. For instance, when directly retrieving data from a Liferay Portal database table, Liferay Portal’s permission system is completely bypassed. This poses a serious data security risk.