Devlin Basilan Duldulao1 and Ruby Jane Leyva Cabagnot1
(1)
Oslo, Norway
In the last chapter, we’ve shown how to create, delete, and update our app’s events using Redux Toolkit. We’ve learned how efficient and convenient it is to do CRUD with our Store, which holds all our application’s global state.
In this chapter, we are going to build a login and a registration form for our application. We will start with the fake Node json-server, which we have installed in the previous chapter. The json-server allows us to send HTTP methods or HTTP requests.
Setting Up the Fake Server
Setting up the fake server only takes us a few minutes, and it’s a big help in building our UI; we don’t need to wait for our back-end dev team to give us the API. We can just create a fake API and use it to test out the UI.
So that’s what we’re doing in our json-server. We will also use the json-server-auth, a plugin or module, to create an authentication service inside the json-server.
Aside from the json-server-auth, we are using concurrently.
Concurrently allows us to run two npm commands simultaneously in one run.
So we will need to modify our scripts.
Go to the package.json, and edit the back-end script and add a start:fullstack script, as shown in Listing 12-1.
We will use it later for logging in. The user’s endpoint is an array of the user’s object. It has the login details, including the hashed password.
API: Login and Register
Next, in the axios.ts file, let’s update the endpoints, as shown in Listing 12-3.
export const EndPoints = {
sales: 'sales',
products: 'products',
events: 'events',
login: 'login',
register: 'register',
};
Listing 12-3
Updating the Endpoints in axios.ts
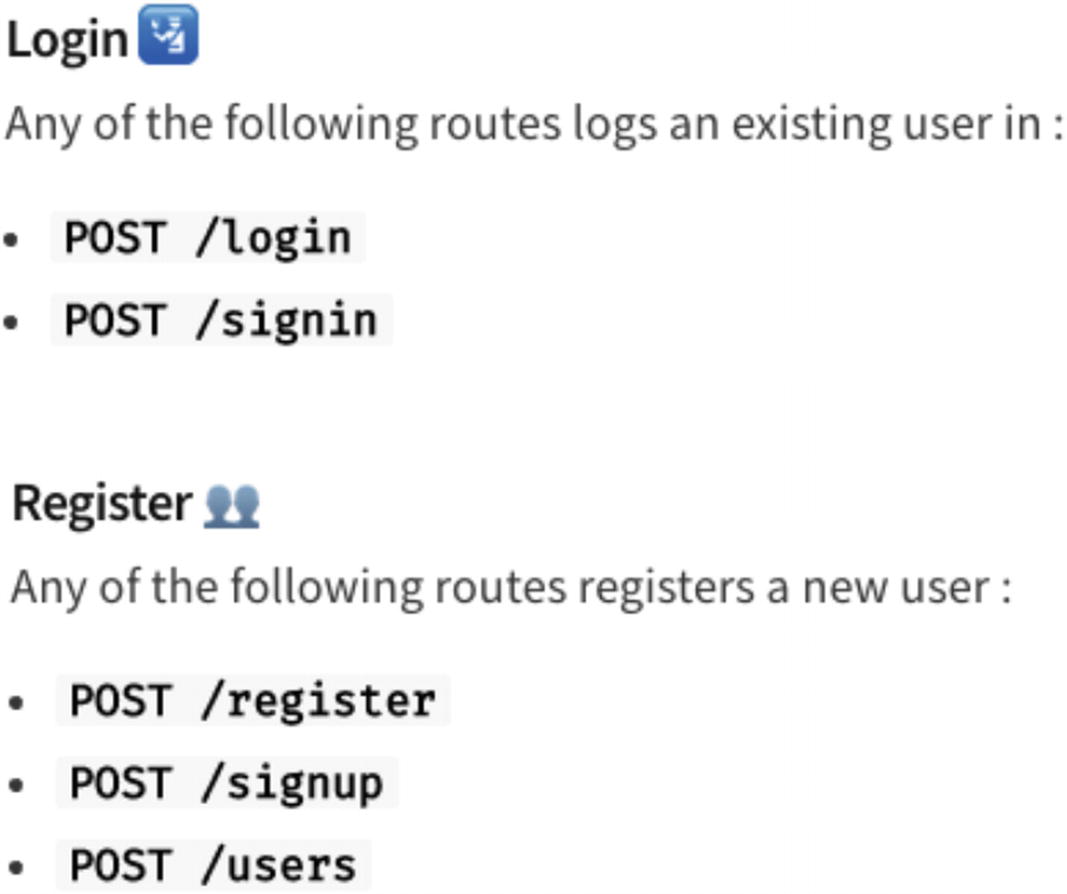
Both the “login” and “register” are part of the json-server-auth. If you go to npmjs.org and search for json-server-auth, you’ll see that we can use any of the following routes in the authentication flow.
In this case, we went with login and register, as shown in Figure 12-1.
Figure 12-1
Authentication flow in json-server-auth
authService
We can now update the service. In the services folder, create a new file called authService.ts.
The authService is a file that contains our logging and registering services with the use of axios.
import axios, { EndPoints } from 'api/axios';
export type UserModel = {
email: string;
password: string;
};
/*The return object will be an object with an access token of type string. We're expecting an access token from the json-server-auth */
export async function loginAxios(userModel: UserModel) {
export async function registerAxios(registerModel: RegisterModel) {
return await axios.post<{ accessToken: string }>(
EndPoints.register,
registerModel,
);
}
Listing 12-4
Creating the authService.ts
In Listing 12-4, we have the loginAxios – requests a userModel – and we’re defining it in the type UserModel, which requires an email and password of type string. We also have the registerAxios – requests a registerModel – and we’re describing it in the RegisterModel, which requires email, password, name, mobile, and policy.
Let’s move on now to the creation of the Login page.
Inside the views ➤ pages folder, create a new folder and name it auth, and inside the auth, add another folder and name it components.
In the auth folder, create a new file and name it LoginPage.tsx:
app ➤ views ➤ pages ➤ auth ➤ LoginPage.tsx
In the components folder, create a new file and name it LoginForm.tsx:
Let’s build up first the LoginForm. Import the named components, as shown in Listing 12-5.
import React, { useState } from 'react';
import * as Yup from 'yup';
import { Formik } from 'formik';
import { Alert } from '@material-ui/lab';
import { useHistory } from 'react-router-dom';
import {
Box,
Button,
FormHelperText,
TextField,
CardHeader,
Divider,
Card,
} from '@material-ui/core';
import { loginAxios } from 'services/authService';
Listing 12-5
Importing Named Components of LoginForm.tsx
We have the usual suspects of named imports in Listing 12-5. Let’s see what else we have here that is new:
Alert: We’re importing Alert from Material-UI for the first time here. Alert is used to display a short and important message to get the user’s attention without interrupting the user’s task.
useHistory: This is a Hook that we import from the React-Router-DOM; this allows us to access the history instance and lets us navigate back.
We also imported the loginAxios from the authService.
Then let’s create the function for the LoginForm and another function to save the user’s auth details. And, of course, we will name it as such, as shown in Listing 12-6.
As a best practice, we should name our functions and methods as descriptively as possible to make it easy on ourselves and other developers reading our code.
LoginForm: In here, we’re defining the “token” as the key and using the useHistory and the useState for the error.
saveUserAuthDetails: A function that saves users’ details in the local storage. The local storage is a native part of the browser, so we have access to it. It’s a first-class citizen supported, so we don’t need to import it anymore.
Next, let’s add the return statement of our LoginForm, which contains Formik and its required props, as shown in Listing 12-7.
Let’s review some of what we have done here in Listing 12-7:
initialValues: A required prop of Formik. We are initializing it with the value of email and password.
validationSchema: A Yup validation schema. We’re defining the email as a string with a valid email address with a max character of 255 and the password a string with a max character of 255.
onSubmit: An async function that takes on values and formikHelpers. Since it’s an async function, we are wrapping it in a try-catch block.
Inside the try, we’re using the loginAxios to see if we can log in. The result we need is just this data, which is a destructuring of a big object result. We don’t need to get all the properties of this enormous object.
We then save the data to the saveUserAuthDetails, which means keeping it in our local storage.
Then we have a set of formikHelpers such as resetForm, setStatus, and setSubmitting that we are using.
For the catch, we put the setError in case of an unsuccessful login.
We’re using the Card component from Material-UI to style the login UI, and we are using two TextFields, one each for the Email and the Password.
Creating a Register Form
After that, we’ll need to create another component under the auth ➤ components folder. Let’s name it RegisterForm.tsx.
Again, let’s do the named components first, as shown in Listing 12-8.
import React, { useState } from 'react';
import * as Yup from 'yup';
import { Formik } from 'formik';
import { Alert } from '@material-ui/lab';
import {
Box,
Button,
Card,
CardContent,
CardHeader,
Checkbox,
CircularProgress,
Divider,
FormHelperText,
Grid,
Link,
TextField,
Typography,
} from '@material-ui/core';
import { useHistory } from 'react-router-dom';
import { registerAxios } from 'services/authService';
Listing 12-8
Importing Named Components in RegisterForm.tsx
The Register Form needs the same as the Login except for a few more modules from Material-UI. We’re also adding the registerAxios from authService.
Next, let’s create the functions to register the user and save their auth details in the local storage, as shown in Listing 12-9.
In the initialValues, you can leave it an empty string or pass an example value. Note that we don’t save or store the password here. We are just doing it for demo purposes.
Also, the initialValues and validationSchema are typically saved in a separate file for a cleaner code, especially a long file.
So that’s it for now in the Register Form; we’ll test it out later. Let’s build up the Login page now.
Adding the Login Page
Let’s now create the LoginPage, and we’ll start with importing the named components that we need, as shown in Listing 12-11.
import React, { useState } from 'react';
import { makeStyles } from '@material-ui/styles';
import { Box, Button, Container, Divider } from '@material-ui/core';
import LoginForm from './components/LoginForm';
import RegisterForm from './components/RegisterForm';
import Page from 'app/components/page';
Listing 12-11
Importing the Named Components in LoginPage.tsx
We imported the LoginForm and RegisterForm that we’ve just created. We also have the Page template.
So, next, let’s create the LoginPage component function, as shown in Listing 12-12.
const LoginPage = () => {
const classes = useStyles();
const [isLogin, setIsLogin] = useState(true);
Listing 12-12
Creating the LoginPage Function
isLogin: A local state, and it’s a Boolean that is set to true by default because we’re logging in. If this is false, we are showing the Register Form. How do we do that? By doing this: {isLogin ? <LoginForm /> : <RegisterForm />}.
So now, let’s make that return statement next, as shown in Listing 12-13.
Let’s test it in our browser. Click the refresh button or go to your localhost:3000/login, and you should see the Login page, as shown in Figure 12-2.
Figure 12-2
Screenshot of the Login page
Click the Register Form and create your account, as shown in Figure 12-3.
Figure 12-3
Screenshot of the Register Form
To check for a successful login or sign-up, go to Network of Chrome DevTools, and you should see under the Headers Status Code OK, and in the Response, you’ll see the access token.
Copy the access token, and let’s see what’s inside. And for that, we will go to this excellent site jwt.io and paste our access token there.
JSON Web Token (JWT)
The JWT has the Header, Payload, and Signature. In the Header, you’ll see the alg or algorithm and the typ or type. In the Payload, data are the decoded values of the access token or the JWT. The decoded values are what we need inside our React app in the next chapter.
Figure 12-4
Checking the access token response from the server
Simply, JSON Web Tokens or JWTs are token-based authentications used to get access to a resource. Token-based authentication, which is stateless, is different from session-based authentication, which is stateful and requires a cookie with the session ID placed in the user’s browser.
This is a vast topic, so I urge you to read more about it.
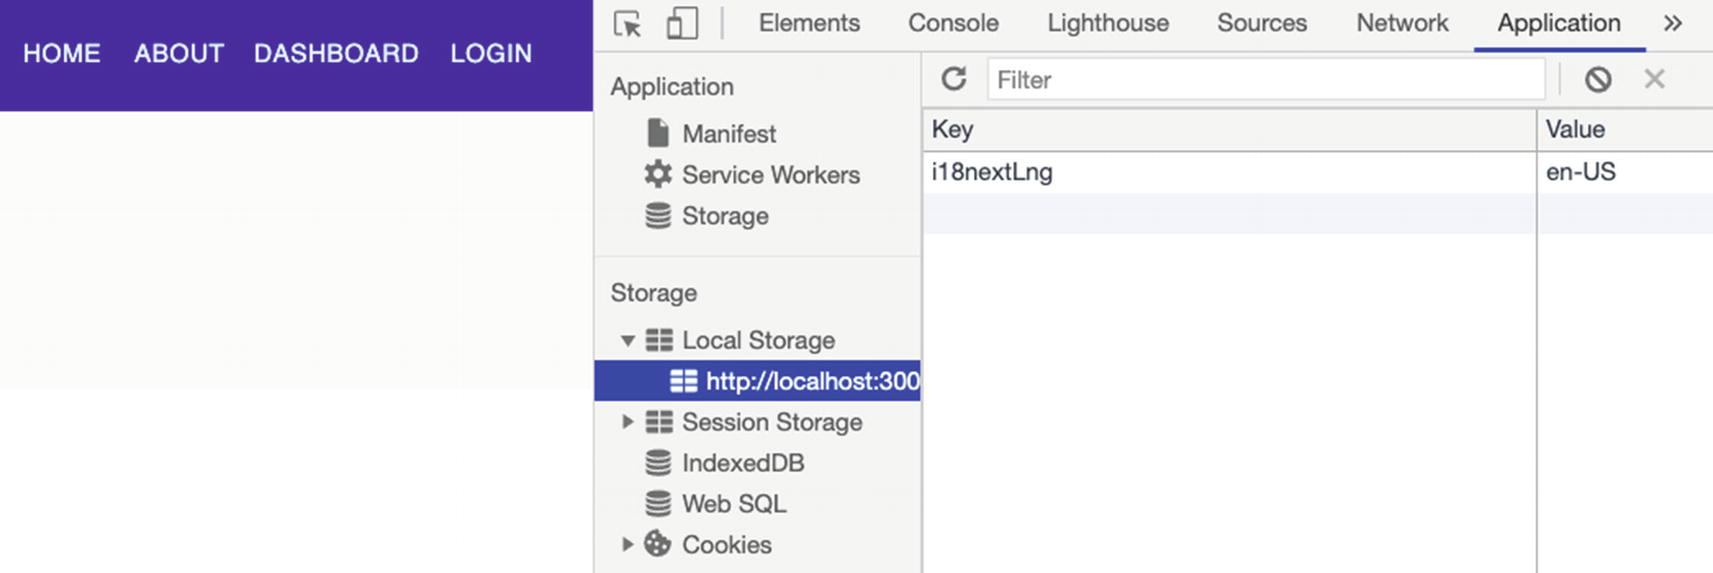
Let’s go back to our app’s Chrome DevTools and click Application ➤ Local Storage and the localhost.
Figure 12-5
Screenshot of the token being stored in the local storage
The token indicates that we’ve successfully stored the JWT or the JSON Web Token in our local storage.
Creating a ProtectedRoute Component
Next, we need to protect our routes so that an unauthenticated user cannot access or see the dashboard. To do this, let’s create a protected route.
Inside the app directory, go to components, and inside that, create a new component and name it protected-route.tsx:
app ➤ components ➤ protected-route.tsx
Open the protected-route.tsx file and copy the following code, as shown in Listing 12-15.
import React from 'react';
import { Redirect, Route } from 'react-router-dom';
const ProtectedRoute = props => {
const token = localStorage.getItem('token');
return token ? (
<Route {...props} />
) : (
<Redirect to={{ pathname: '/login' }} />
);
};
export default ProtectedRoute;
Listing 12-15
Creating the protected-route.tsx
In Listing 12-15, we keep it simple for now, but we will update it later as the authentication gets more complicated.
We imported the Redirect and Route from the React-Router-DOM. And we have the ProtectedRoute – a function that takes props and retrieves the user token from the localStorage.
In the return statement, we’re checking if there’s an existing token ? If this is true, the user is directed to a specific path inside the dashboard; otherwise, the user is redirected to the Login page.
After doing that, we can now use the ProtectedRoute component to wrap the dashboard route.
Updating the Routes.tsx
Go to routes.tsx, and we will use the ProtectedRoute component, as shown in Listing 12-16.
import ProtectedRoute from './components/protected-route';
Check if it’s working. Open a new window and go to localhost:3000/dashboard. Since the token is already in our local storage, we can access the dashboard right away without being redirected to the Login page.
Updating the Dashboard Sidebar Navigation
After this, we will need to update the logout.
Go to the dashboard-layout ➤ dashboard-sidebar-navigation.tsx.
We will create a new handle event function for the logout. Put it just below the handleClick function, as shown in Listing 12-17.
const handleLogout = () => {
localStorage.clear();
};
Listing 12-17
Updating the dashboard-sidebar-navigation.tsx
handleLogout: A function that is clearing the localStorage by removing all the stored values
Inside the same file, go to the logout, and let’s add an onClick event on the button so we can trigger it, as shown in Listing 12-18.
<ListItem button onClick={handleLogout}>
<ListItemIcon>
<LogOutIcon />
</ListItemIcon>
<ListItemText primary={'logout'} />
</ListItem>
Listing 12-18
Adding an onClick Event for the handleLogout
Let’s test it.
Time to Test
Go to the dashboard and also open your Chrome DevTools and click Application.
Click the logout button, and the browser should refresh, and you’ll be directed to the main page; and if you look at the Chrome DevTools, the token should get deleted.
Figure 12-6
Screenshot of the LocalStorage after the token was deleted after logout
So this is how we can create a simple authentication.
We will be improving on this in the coming chapters as our app gets complicated.
I want to emphasize that it’s vital that we know the basics of authentication and how it works. But these days, to be honest, I would highly recommend authentication as a service or an identity provider.
Some reasons why I would recommend a third-party identity as a service:
1.
Decentralizing the identity from your applications. The user’s identity info will not be stored in your database.
2.
Allows developers to focus on developing the application’s business value instead of working for weeks building the authentication and authorization service.
3.
Most third-party identity as a service companies such as Auth0, which I also personally use and recommend, are very secure and reliable. Auth0 also has good documentation, lots of open source projects that you can build on, and a strong community support.
Other excellent identity as a service providers that I’ve tried are AWS Cognito, Azure AD, and Okta. Many of them offer a free tier program, which is best for small projects, so you can understand how it works.
(Full disclosure: I'm currently an Auth0 Ambassador. No, I'm not an employee of the company, nor do I get any monetary compensation. I occasionally get some swags and other excellent perks whenever I speak at a conference and mention them. BUT I became an Auth0 Ambassador precisely because I've been using it and recommending them even before.)
4.
Lastly, these third-party identity providers are being developed and maintained by security engineers or those specializing in security. They are more updated on what’s going on in the world of cybersecurity, including the best practice, trends, and issues.
Summary
This chapter built the Login and Registration Forms with the styling help from the Material-UI components. We used the library json-server-auth inside our pseudo Node json-server to simulate the implementation flow of authenticating and protecting our routes. We also made it easy for ourselves to run and build our app when we added concurrently in our scripts.
In the next chapter, we will be building more components and functionalities in our React application. We begin with creating a Profile Form and then syncing it to different deep layer components in our app – all with the powerful help of Redux.
Lastly, we will show that not all of our components need to be tied up to Redux. If we don’t need the added complexity, then it does not make sense to use it. Some people have this mistaken notion that once we add Redux to our app, all our components must include it. Use it if you need it; otherwise, you don’t have to.