
C H A P T E R 6
Audio, Video, and Slide Shows
The first part of this chapter deals with the use and misuse of audio and video in web sites. The chapter then provides instructions for embedding an audio clip into a web page and for recording a speech clip. The current file formats for video are mentioned briefly and this is followed by information about the HTML5 <video> tag, the files that it uses, and instructions for embedding video clips into an HTML5 web page.
The problem presented by the lack of support in IE 7 and IE 8 for the <video> tag are resolved by various fallback methods, fully worked examples of fallbacks are provided. These include YouTube and Vimeo because they provide a relatively easy way of adding video to a web site. You will discover how these two online video stores can be used either alone or as fallbacks.
The chapter then provides two other methods of dealing with HTML5 video for IE 7 and IE 8 using the free downloadable JavaScript files, Flowplayer and OS FLV.
The chapter concludes with various methods for creating and embedding slideshows.
When to Use Audio and Video (AV)
Great care should be taken not to use audio and video gratuitously. Some web site designers insert a video just because they can and because it is fun. Creating and embedding a video can enliven a ho-hum day, but it may not please the client who commissioned the web site. The following are some valid reasons for including AV in a web site:
- An AV clip can sometimes explain something much better than text or images, providing there is no background music drowning the speaker’s commentary.
- If the client is a film/TV production unit, a video clip can illustrate the quality of the product.
- If your page gives instructions for programming, making, fitting, or repairing something, then an AV clip could be helpful. However, most users will not remember the instructions on the video when they come to put them into practice (unless they have two computers, one to show the video and the other to carry out the instructions). Always provide a printable set of instructions in addition to the video.
- Audio can be used to good effect if your web site sells ringtones or doorbells with various sounds. Prospective customers can listen to the options and choose the one that pleases them.
- A video can present a product or service, but be warned: a poorly produced video will have a negative effect. Avoid inappropriate background music like the plague, as this is the biggest turn off. Why video and documentary makers wish to drown the presenter’s commentary is a mystery.
- A slide show or video is ideal for displaying hotel accommodations, real estate, or tourist attractions.
- Pop groups, folk bands, and choirs looking for fixtures can give a brief sample of their stage presentation and music style by using a video clip; or the web site could just present an audio clip of music.
- As an example of the helpful use of AV, a web site for bird watchers could incorporate a video of birds and birdsong.
Using Other People’s Video, Music, or Sound
Don’t steal AV clips. You will need a genuine license (or permission from a non-commercial source) to incorporate AV on your web site. Musicians and filmmakers will certainly sue you and you may have to sell your house to pay the penalty. Owning a video tape, a CD, or DVD does not give you the right to use the music or video on it. Downloaded clips cannot be used without a genuine license, or unless they are offered for free use. So-called “royalty-free clips” are misnamed and normally have to be paid for.
If using video from another URL (with permission, of course), the owner of the source would supply you with the URL that points to the video file on her web site.
Test Your AV
Some AVs work on the internet, but they fail or misbehave when tested on your local computer. Always upload and test on the internet.
What to Avoid
Videos can be intensely annoying if used at the wrong time or in the wrong place.
- Strongly resist the temptation to put a video on the home page. It will dictate the focus and distract the viewer’s attention away from the more important items on the page, such as your navigation menu. In addition, a video or audio clip might cause a MIME type problem or a coding error; both problems would prevent proper access to your all-important home page.
- Do not use autostart. Autostart causes the sound or video to automatically begin when the page is loaded. It is particularly bad practice on the home page and a bad idea on any page. The sudden burst of sound can startle users, especially blind users. Users will either immediately switch away from your web site or frantically search for a way to turn off the AV clip. They will probably never return to your site again.
- Video and audio clips must have user controls. Make sure the AV can only begin when the user clicks the start button on the video controls. Autostart might be acceptable if it loads a short but quiet arpeggio. Perhaps a quiet and soothing piece of background music might be tolerable in a video as long as it does not repeat in a never-ending loop, and as long as it is appropriate. At the first hint of a thumping, disco-type background, the great majority of users will hit the mute button, or more likely, abandon the site.
- Do not use
onmouseoversounds or videos. A blind or partially-sighted person will receive a fright if she inadvertently mouses over anonmouseoversound link. Even sighted persons can accidentally mouse over a sound link and they won’t be pleased with the sudden burst of sound. For the user’s sake, always useonmousedownor a control console to launch audio or video.
Audio for a Non-Semantic HTML5 Page
Audio clips can be embedded in non-semantic HTML5 pages to save having to convert audio files to other formats. However, I encourage you to start using semantic tags as soon as practicable to keep up with modern web design techniques.
Figure 6-1 shows the controls for three sounds depicted in Internet Explorer 8.
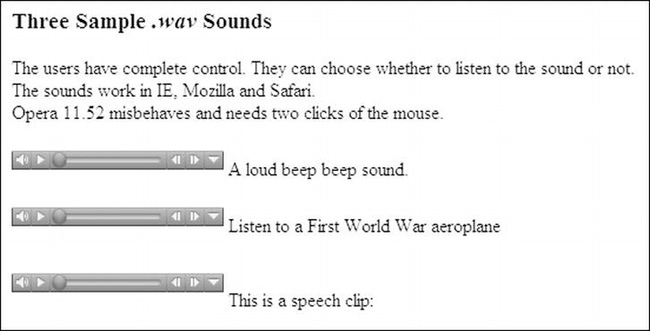
Figure 6-1. Screenshot of three, non-semantic HTML5 pages
Listing 6-1 uses the once deprecated <embed> tag. These three .wav sounds are audible in Internet Explorer, Mozilla, Safari, and Chrome; therefore, about 95 percent of computer owners will be able to hear the sounds. Unfortunately, to start the sounds in Opera 11.5, the user needs to click the starter button twice.
Listing 6-1. Creating Three Sounds in a Non-semantic Page (example-sound1.html)
<!doctype html>

<html>

<head>

<title>Sounds example 1</title>

<meta charset=utf-8>

</head>

<body>

<h3>Three Sample <i>.wav</i> Sounds</h3>

The users have complete control. They can choose whether to listen to the sound or

not.<br>The sounds work in IE, Mozilla and Safari.<br>Opera 11.52 misbehaves and needs two

clicks of the mouse.<br><br>

<embed src="sounds/beepbeep.wav" width="180" height="25" autostart="false"

repeat="false" loop="false"> A loud beep beep sound.
</embed><br><br>

<embed src="sounds/planeflyby.wav" width="180" height="25" autostart="false"

loop="false"> Listen to a First World War aeroplane

</embed><br><br>

<embed src="sounds/adrianspoem.wav" width="180px" height="40" autostart="false"

loop="false">This is a speech clip:

</embed>

</body>

</html>
Audio for a Semantic HTML5 Page
The next project demonstrates how the three sounds can be played using an HTML5 page using semantic tags. Figures 6-2a and 6-2b show the controls displayed in IE 7 and IE 8 and in Mozilla Firefox.
![]() Tip The .wav files were converted to
Tip The .wav files were converted to .mp3 and .ogg files using the online converter at http://media.io/ For best results, convert the files first to .mp3 then convert the .mp3 files to .ogg. These two file formats are necessary to enable the HTML5 audio tag to support browsers other than IE 7 and IE 8.
The .ogg file will arrive with about half a mile of figures and letters appended like this:
beep-beep.ogg;jsessionid=0113CF8JM5SD16M37… and so on. Rename the file and delete everything after .ogg
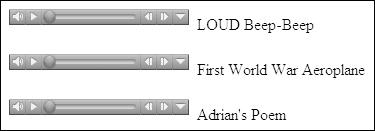
Figure 6-2a. The controls displayed in IE 7 and IE 8
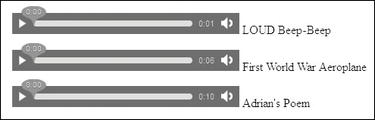
Figure 6-2b. The controls in Firefox
In Listing 6-2a/2b, the three sounds and their controls are contained in three <div>s. Each <div> contains a semantic audio section and a fallback for IE 7 and IE 8. The latest HTML5 spec seems to suggest that autobuffer will be replaced by preload="auto". Some designers are playing safe and including both, as follows:
<audio controls autobuffer preload="auto">
Listing 6-2a/2b. Creating Three Sounds in a Page with Semantic Tags (example-sound2a-and-2b.html)
<!doctype html>

<html>

<head>

<title>Example sound2a and 2b</title>

<meta charset=utf-8>

        <style type="text/css">

        div { margin-left: 20px;

        }
</style>
</head>
<body>
#container { margin-left: 20px; width:500px;
}
<div>
<p>
<audio controls autobuffer>
<source src=sounds/beepbeep.ogg type="audio/ogg">
<source src=sounds/beepbeep.mp3 type="audio/mp3">
<object>
<embed src="sounds/beepbeep.wav" width="180" height="25"
autostart="false" repeat="false" loop="false">
</embed>
</object>
</audio> LOUD Beep-Beep</p>
</div>
<div>
<p>
<audio controls autobuffer>
<source src=sounds/planeflyby.ogg type="audio/ogg">
<source src=sounds/planeflyby.mp3 type="audio/mp3">
<object>
<embed src="sounds/planeflyby.wav" width="180" height="25"
autostart="false" loop="false">
</embed>
</object>
</audio> First World War Aeroplane</p>
</div>
<div>
<p>
<audio controls autobuffer>
<source src=sounds/adrianspoem.ogg type="audio/ogg">
<source src=sounds/adrianspoem.mp3 type="audio/mp3">
<object>
<embed src="sounds/adrianspoem.wav" width="180" height="25"
autostart="false" loop="false">
</embed>
</object>
</audio> Adrian's Poem
</p>
</div>
</div>
</body>
</html>
Creating a Speech Clip
Windows has in-built voice recorder software. Laptop computers have integral microphones, but a desktop computer will usually need a cheap microphone. Microphone/earphone kits have two plugs attached to them; use only the pink plug. Insert the pink plug into the pink socket on the computer. If the computer’s sockets are not color-coded, look for the microphone symbol next to the socket. Some internal dial-up modems have colored sockets, but don't plug into those.
Starting the Recording
To start the recording in XP, do the following: Click Start ![]() All Programs
All Programs ![]() Accessories
Accessories ![]() Entertainment
Entertainment ![]() Sound Recorder.
Sound Recorder.
To start the recording in Windows 7, do the following: Click Start ![]() All Programs
All Programs ![]() Accessories
Accessories ![]() Sound Recorder.
Sound Recorder.
For either operating system, click the stop/start button and speak your message. Your message can be up to one minute long. Speak naturally and clearly with the microphone about six inches from your mouth. Click the button with the black rectangle to stop recording.
In XP, click the button with the right-pointing triangle to hear your message.
Then, click File ![]() Save As... Give the file a name and save it.
Save As... Give the file a name and save it.
In Windows 7, save the file with an appropriate name in the appropriate folder. Find the file and double-click it to hear it.
Video Overview: Yesterday’s Video Formats
Video was a web designer’s nightmare. With fourteen video file formats, four popular media players, and five main browsers with four plug-ins, the best description would be “a dog’s breakfast”. Personally, video and audio caused me more head scratching and frustration than any other aspect of web design and production. The following are a few of the common video formats current at the time of writing:
- The
.flvformat is a Flash file from Adobe. It must be located within an.swfcontainer.- The
.movformat was developed by Apple and the files are known as QuickTime movies. The free QuickTime player has to be installed to play these movies on a Windows computer.- The
.rmor .ramformat is produced by RealMedia for streaming online radio and internet TV. Its low bandwidth requirement means that it is good, but not top quality.- The
.swfformat (Shockwave Flash) is the container for playing.flvFlash video or animation files.- The .
wmaformat from Microsoft is very versatile and can be highly compressed. It can be tailored to any download speed. It can be any size and is used for streaming radio and video.- The
.wmvformat from Microsoft is popular, but can only be played on Windows computers using the Windows Media Player.
But Things Have Improved!
The following four methods for embedding videos are available right now:
- The new HTML5
<video>tag.- Online video hosting (YouTube or Vimeo).
- HTML5 using the new video tag with only three file types and a fallback for IE 7 and IE 8.
- JavaScript players such as Flowplayer or OS FLV.
File Types for the HTML5 Semantic Video Tag
HTML5 introduces a <video> tag that will eliminate the need for plug-ins and JavaScript. It is supported in all the latest browsers, but not in IE 7 or IE 8. The HTML5 video tag uses only three video formats; a welcome reduction from 14 file types. To play a video, the browser unzips a video file.
![]() Tip For a useful resource, read The Definitive Guide to HTML5 Video by Silvia Pfeiffer (Apress, 2010).
Tip For a useful resource, read The Definitive Guide to HTML5 Video by Silvia Pfeiffer (Apress, 2010).
HTML5 video uses the new video containers (files).webm, .mp4, and .ogv. A video container has several components; a video component, one or more audio tracks, some metadata specifying various dimensions, the title and the file language. A video player uses codecs that enables the video player to decode the information in the container so that it a can be seen and heard.
Browsers that support HTML5 video use one or more of the following file types:
- Safari, Chrome and IE 9 play
.mp4(aka H.264).- Mozilla Firefox and Chrome play
.webm.- IE 9 plays
.webmusing a plug-in (the WebM Media Foundation components), which rather defeats the purpose of the HTML5 video tag because it was intended to remove the need for plug-ins.- Mozilla Firefox, Chrome, and Opera play
.ogv.
HTML5 video is remarkably simple, but you will need some video file conversion programs.
Converting File Formats
To convert between .flv and .swf, download the free FoxTab video converter from http://www.foxtab.com. This is my favorite converter because it can convert almost any format.
To convert files to .webm, .ogv, and .mp4, download the free Miro Video Converter at http://mirovideoconverter.com Apparently, Miro will eventually offer an iPad version of their converter.
To convert files to .wmv format, download the free program, Freemake, from http://freemake.com; this site also offers a useful sound file converter.
To convert files to .mp4, .webm, and .ogv formats, download HandBrake, a free program, from http://handbrake.fr.
The first three video converters mentioned are easy to use. The last one is trickier, but it gives complete control of the conversion process. I have managed so far without HandBrake. For an excellent, fully detailed, and illustrated set of instructions on HandBrake, visit Mark Pilgrim’s site at http://diveintohtml5.info/video.html. You should also check out Mark Pilgrim’s book, HTML5: Up and Running (O’Reilly Media, 2010).
The Base HTML5 Video Code Format
The new <video> tag can be used right now provided you have a fallback to enable IE 7 and IE 8 users to view your videos. When users eventually cease using IE 7 and IE 8, the HTML5 video tag will make life so much easier for web designers. Then the fallback for IE can be abandoned and only three file formats will be needed. Later in this chapter you will learn how to use various fallbacks. The next snippet of code demonstrates the simplicity of the markup when using the HTML5 video tag without a fallback.
   <video width="320" height="240" controls>

        <source src=somevideo.mp4 type='video/mp4; codecs="avc1, 42Eo1E, mp4a.40.2" '>

        <source src=somevideo.webm type='video/webm; codecs="vp8, vorbis" '>

        <source src=somevideo.ogv type='video/ogg; codecs="theora, vorbis" '>

   </video>
I have found that the codecs can be omitted because they seem to be embedded in the browsers, but they are shown in the previous snippet for completeness. The sources can therefore be written as:
   <video width="320" height="240" controls>

        <source src=somevideo.mp4 type='video/mp4;'>

        <source src=somevideo.webm type='video/webm;'>

        <source src=somevideo.ogv type='video/ogg;'>

   </video>
Eventually, IE 7 and IE 8 will dwindle away and die; when this happens, you can see from the previous code snippets that embedding video will be as simple as adding an image to a web site page. Let’s hope that one day soon, the media player creators will get together and agree to use only one audio format and one video format.
The wagon and butterfly video clips used in the following projects were kindly provided by the artist Roger Laughton and his daughter Helena of the Dolphin House Gallery, Colyton, Devon, United Kingdom. Their web site is at http://www.dolphinhousegallery.co.uk
You can try out the new <video> tag by downloading the files for this chapter from the book’s page at http://www.apress.com, then load video-tag.html with any browser other than IE 7 or IE 8. Figure 6-3 shows a screenshot of the video using the new <video> tag and created by the Listing 6-3.

Figure 6-3. The HTML5 <video> tag displays a video in Mozilla Firefox. Note that no logo or other unwanted markings are shown.
Mozilla Firefox, IE 9, Chrome, Opera, and Safari support the new <video> tag and each browser has controls that are familiar to the user. Listing 6-3 is the markup for Figure 6-3 and the video files are assumed to be in a folder named video.
![]() Note The dimensions in the listing line
Note The dimensions in the listing line <video width="480" height="385" controls="controls"> are important. When you produce the three video files, the videos must have the same frame size, and the frame dimensions must be included in the markup, otherwise the videos may not play.
Listing 6-3. Using the HTML5 Video Tag Without a Fallback for IE 7 and IE 8 (video-tag.html)
<!doctype html>

<html lang=en>

<head>

<title>Using the new HTML5 video tag</title>

<meta charset=utf-8>

<style type="text/css">

body { text-align: center; font-family:Arial; font-size:100%; font-weight:bold;

}

</style>

</head>

<body><br><p>HTML5 video tag with embedded YouTube fallback</p>

<video width="480" height="385" controls="controls">

                <source src=" video/wagon3.mp4" type="video/mp4">
                <source src=" video/wagon3.webm" type="video/webm">
                <source src=" video/wagon3.ogv" type="video/ogg">

</video>

</body>

</html>
Mixing Pages
Just because a new W3C standard is released, does not mean you have to change a whole web site to meet that standard. Provided the DOCTYPE for each individual page is correctly specified, a web site can contain a mixture of pages in HTML, HTML5, XHTM, and XHTML5. This can be useful if you only wish to use the new <audio> and <video> tags on one or two pages of an existing web site. Just use HTML5 on the video pages until you are ready to change the other pages to HTLM5. Meanwhile, in the next section we will investigate interim solutions that will allow IE 7 and IE 8 users to watch your videos.
What About the Problem of IE 7 and IE 8?
Internet Explorer 7 and IE 8 do not understand the HTML5 <video> tag; therefore, various solutions have been developed using workarounds called fallbacks. For the next few years, because it will take a while for IE 7 and IE 8 to be replaced by IE 9, you should continue to ensure that videos play in IE 7 and IE 8.
Meanwhile, don’t panic! Your current pages using the <object> and <embed> tags in HTML4 and XHTML 1.0 pages will continue to function for the next decade or even longer.
The next two projects provide instructions for using YouTube and Vimeo as the sole video players and also as fallback solutions when using the HTML5 <video> tag.
Online Solutions: Using YouTube or Vimeo
Storing short video clips online in YouTube or Vimeo makes good sense because when the code for the video is added to an HTML5 page, the videos can be viewed in all the main browsers. We can be sure that, for commercial reasons, YouTube and Vimeo will keep abreast of any new web standards. YouTube and Vimeo codes now use the <iframe> tag and this works in all browsers, including IE 7 and IE 8.
![]() Caution Regularly check the YouTube and Vimeo web sites for changes in registration and upload/download procedure, and especially for changes in the terms and conditions under which you can use these products. There may be a charge (or a change in the cost) for using the videos on a web site that sells goods or services. The permitted size of a video file may also change.
Caution Regularly check the YouTube and Vimeo web sites for changes in registration and upload/download procedure, and especially for changes in the terms and conditions under which you can use these products. There may be a charge (or a change in the cost) for using the videos on a web site that sells goods or services. The permitted size of a video file may also change.
The next two projects describe how to create a YouTube or Vimeo account, how to upload a video to YouTube or Vimeo, and how to embed the YouTube or Vimeo code into a web page.
Using YouTube
When uploading your video files, YouTube prefers MPEG-2 or H.264 (aka MPEG-4, aka .mp4). YouTube will also accept .wmv files. Videos should have 30 frames per second, and a size of 640 × 360 (at 16:9 aspect ratio) or 480 × 360 (4:3 aspect ratio). The preferred audio format is MP3 or ACC.
Hosting Limits on the Size of a Video
Web site hosts restrict the size of a web site. A basic low cost web site hosting package will probably allow a total upload of 1GB (including all the other web site files). The most expensive hosting packages will allow up to 20 GB. Video files can be huge; therefore, storing videos elsewhere, such as on YouTube, can keep a web site within the limit specified by the host.
Warn prospective clients that each video on YouTube is limited to a maximum of 1 GB, with a maximum play time of 15 minutes (1 to 3 minutes is preferred). To keep up-to-date on these limits, visit http://www.youtube.com and look for the Help button, since Google completely revised the YouTube web site the help link seems to have been relegated to the bottom of a very lengthy home page. It may even be easier to visit the Google home page and click the YouTube item on the top menu. Again you will then need to scroll down to the bottom of a very long page to find the Help button.
Signing up for a YouTube Account
If you have a Google account, use the Google login details to login because Google owns YouTube. Otherwise, on the YouTube home page, click Create an Account and fill in the details required. Give the email address of your client (or yourself if the video is for your web site) so that your client (or you) can receive the email verifying the account details. You will be asked to invent a username and password. When you receive the e-mail, click the verification link to activate your new account.
![]() Caution You cannot upload a duplicate of something you have already uploaded; this applies even if you change the file name. Google/YouTube tends to change things occasionally, so the following procedure will probably go out of date. At the time of writing Google has made what was a user-friendly site into a magical mystery tour. All the configuration tricks have vanished. The most irritating omission is the user’s ability to refuse a gallery of related videos being displayed when your own video plays. This has made YouTube a non-starter for my clients.
Caution You cannot upload a duplicate of something you have already uploaded; this applies even if you change the file name. Google/YouTube tends to change things occasionally, so the following procedure will probably go out of date. At the time of writing Google has made what was a user-friendly site into a magical mystery tour. All the configuration tricks have vanished. The most irritating omission is the user’s ability to refuse a gallery of related videos being displayed when your own video plays. This has made YouTube a non-starter for my clients.
To host a video with YouTube, log in at http://www.youtube.com, click the Upload item on the top menu. At this point the previous, more user-friendly version allowed you to configure the video before uploading it, sadly that feature has now been removed.
After clicking Upload on the top menu bar, click the button labelled Select files from your computer. A small window will allow you to navigate to where your video is stored on your hard drive. Click the video and then click the Open button. On the right of the next screen select Unlisted, anyone with the link can view. After a while the video will have finished uploading and you will see a message saying that the upload of your video is complete. Write down the URL for the video for future reference. Click the Embed button. A small window will show the code highlighted in blue. Copy and paste the code into your web page. You may have to wait a few minutes before you can view the video.
Since early 2012 the YouTube code snippet has been simplified and it can be made to validate. The following is an example of the new <iframe> format of the YouTube downloadable code:
<iframe width="420" height="315" src="http://www.youtube.com/embed/xxxxxxxxxxx?rel=0"

frameborder="0" allowfullscreen>

</iframe>

You will appreciate the simplicity of the <iframe> method which has replaced the former

<object> <embed> method.
Figure 6-4 shows a typical YouTube-hosted video.
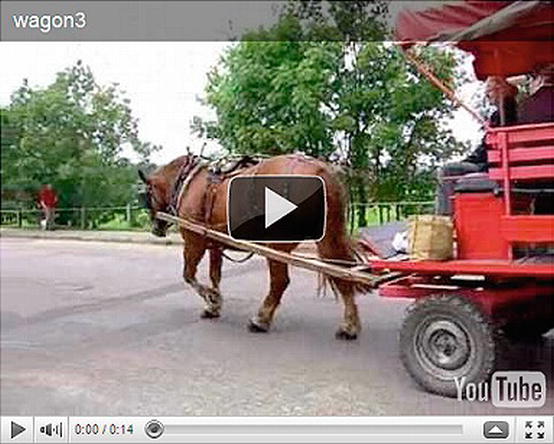
Figure 6-4. A typical YouTube-hosted video. Note the YouTube logo.
Listings 6-4a and 6-4b are included in this chapter’s downloadable files, but the YouTube video will not play for security reasons. The identity number has been replaced in the listing with xxxxxxxxxxx. However, you can still view the video in any browser other than IE 7 and IE 8. Also, if you insert your own YouTube-hosted video into the file, you will be able to view the result in any browser including IE 7 and IE 8; just make sure the code snippet is in the <iframe> format.
You can use a YouTube clip on its own, or you can use a YouTube clip as a fallback in a page that uses the HTML5 <video> tag.
To use the YouTube clip alone, simply delete the code shown bold in Listing 6-4a. Either way, when using your own YouTube-hosted video, it will display in all browsers, including IE 7 and IE 8.
Listing 6-4a. Creating a Page with HTML5 Videos and an Embedded YouTube Video (wagon-YT.html)
<!doctype html>

<html lang=en>

<head>

<title>An embedded video stored on YouTube plus video tag</title>

<meta charset=utf-8>

meta details go here

</head>

<body>

<video width="400" height="300" controls="controls">

<source src=" video/wagon3.mp4" type="video/mp4">

<source src=" video/wagon3.webm" type="video/webm">

<source src=" video/wagon3.ogv" type="video/ogg">

<iframe width="420" height="315" src=http://www.youtube.com/embed/xxxxxxxxxx?rel=0

 frameborder="0" allowfullscreen></iframe>

</video>

</body>

</html>
Although this works in all browsers, something odd happens when you try to validate it; the W3C HTML5 validator finds errors that will horrify strict HTML4 and XHTML aficionados. If you want the code to validate, you must remove some items as shown next. When I commented-out those items to make it validate, it still worked in all browsers.
The amended Listing 6-4b has some items (shown bold) commented-out to make the file validate.
Listing 6-4b. An Embedded YouTube Video that Validates (wagon-YT-validated.html)
<!doctype html>

<html lang=en>

<head>

<title>Wagon embedded YouTube video validated</title>

<meta charset=utf-8>

<!--<meta details go here>-->

<!--</head>-->

<body>

<video width="400" height="300" controls=”controls”>

<source src=" video/wagon3.mp4" type="video/mp4">

<source src=" video/wagon3.webm" type="video/webm">

<source src=" video/wagon3.ogv" type="video/ogg">

<iframe width="420" height="315" src="http://www.youtube.com/embed/xxxxxxxxxxx?rel=0">

<!--frameborder="0" allowfullscreen--></iframe>

<!--</body>-->

</html>
Using Vimeo
The Vimeo interface is easier to understand and use than the new You Tube interface. For both online services, the code is easy to download and embed into a page. There appears to be no difference in their performance.
The basic version of Vimeo video is free, but it cannot be used for commercial advertisements, such as selling products or services. Personal use, non-commercial, and small scale production units are permitted. For commercial use, the pro version costs $60 per year or $9.95 a month.
Whichever you sign up for, Vimeo provides an easy uploader. First read the three rules on the web site, then click Upload Item on the top menu. You will see a window that will enable you to navigate your hard drive to find the video. Embedding your code is simple, just hover over the video or click it, then click the Embed button (second one down on the right) on the opening frame of the video. The code will then appear. Copy and paste the code into your web page. You can choose the player’s colors and size. Vimeo is probably the easiest service to use and customize.
Clear advice is found at http://vimeo.com/faq#what_is_embedding.
![]() Note Just as I finished writing this book, Vimeo released an updated web site. The web site was not quite complete in all details, but the signup and uploading procedure appear to be similar to the previous instructions.
Note Just as I finished writing this book, Vimeo released an updated web site. The web site was not quite complete in all details, but the signup and uploading procedure appear to be similar to the previous instructions.
Figure 6-5 shows a Vimeo-hosted butterfly movie embedded using Listing 6-5.
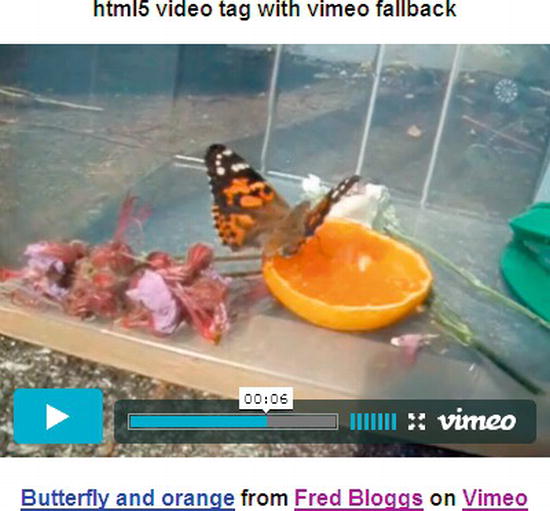
Figure 6-5. A Vimeo-hosted video. Note the Vimeo logo.
The embedded Vimeo code for Figure 6-5 can be found in Listing 6-5 (I have changed some detail for security). As with YouTube, a video page can be incredibly simple when using the Vimeo code alone without a semantic video tag or a fallback. This is an easy way of putting a video on a web site because it avoids the need to convert the video file to the three file formats .mp4, .webm, and .ogg.
The file won’t validate in the HTML5 validator because some deprecated attributes such as webkitallowfullscreen are not allowed with the <iframe> tag. However, your clients will probably not care whether the video validates as long as it plays.
Listing 6-5 is included in this chapter’s downloadable files, but the video will not play in IE 7 or IE 8. For security, the Vimeo identity number has been replaced in the listing with xxxxxxxx. However, using the version that includes the <video> tag, you can still view the video in any browser other than IE 7 and IE 8. Also, if you insert your own Vimeo-hosted video into the file, you will be able to experiment and view the result in any browser.
You can use the Vimeo clip on its own, or you can use the Vimeo clip as a fallback in a page that uses the HTML5 <video> tag.
To use the Vimeo clip alone, simply delete the code shown in bold in Listing 6-5. Either way, using your own Vimeo-hosted video, the video will display in all browsers, including IE 7 and IE 8.
Listing 6-5. Using the HTML5 Video Tag with an Embedded Vimeo Video (video-tag-and-vimeo.html)
<!doctype html>
<html lang=en>
<head>
<title>HTML5 video tag with Vimeo fallback code</title>
<meta charset=utf-8>
<style type="text/css">
body { text-align: center; font-family:Arial; font-size:100%; font-weight:bold;
}
</style>
</head>
<body><br><p>html5 video tag with vimeo fallback</p>
<video width="400" height="300" controls="controls">
<source src=" video/butterfly-movie.mp4" type="video/mp4">
<source src=" video/butterfly-movie.webm" type="video/webm">
<source src=" video/butterfly-movie.ogv" type="video/ogg">
<iframe src="http://player.vimeo.com/video/xxxxxxxx?title=0&byline=0&portrait=0"
width="400" height="300" frameborder="0" webkitAllowFullScreen mozallowfullscreen
allowFullScreen></iframe><p><a href="http://vimeo.com/33108823">Butterfly and orange</a> from
<a href="http://vimeo.com/userxxxxxxx">Fred Bloggs</a> on <a href="http://vimeo.com">
Vimeo</a></p>
</video>
</body>
</html>
The next section describes two, simple JavaScript methods for allowing videos to be viewed in any browser, including IE 7 and IE 8. They both need a small JavaScript file or two and these can be downloaded from the book’s page at www.apress.com
The Flowplayer and the OS FLV Fallbacks for IE 7 and IE 8
If your client does not wish to use YouTube or Vimeo, two other solutions are described next. These use the HTML5 video tag and a small piece of JavaScript:
Adobe claims that 98 percent of Windows computers have the Adobe Flash video player installed. Therefore, a Shockwave Flash file can be used as the fallback for IE 7 and IE 8. The Flash video player will be activated only if the browser cannot play any of the HTML5 source files. IE 7 and IE 8 do not understand the HTML5 video tag; therefore, they will ignore the HTML5 source elements and play the fallback video.
Using the Video for Everybody (VfE) Solution
The fallback file for IE 7 and IE 8 is an .mp4 file enabled in the Shockwave Player with the help of a JavaScript snippet from Flowplayer. This solution was devised by Kroc Camen, who named it Video for Everybody. He invented VfE to encourage developers to use HTML5 and a fallback for IE 7 and IE 8, and to discourage them from relying on Flash and from wrapping .mp4 (aka H.264) in a Flash container. To quote Camen: “It’s shocking to think that so many web sites already have H.264 video files that they want to show you, yet insist on wrapping them in a crashy, unreliable, and slow Flash shell without any kind of fallback.”
His second reason for inventing VfE was the advent of iPhones and iPads, which do not use Flash. He also urged developers to provide links as a last resort for downloading the video files. VfE has been remarkably successful, but as Kroc Camen says, “Video for Everybody is a vanishing mediator. It exists to bridge the gap between the disparity of Flash and HTML5.”
Unfortunately, at the time of writing his web site shows only the HTML code and not the web pages. His URL is http://camendesign.co.uk/code/video_for_everybody.html.
The video will appear as shown in Figure 6-6.
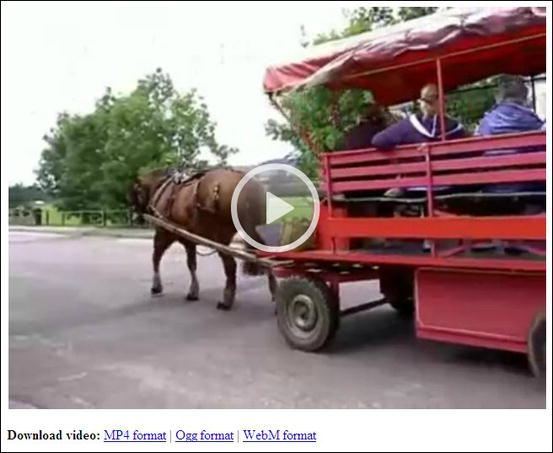
Figure 6-6. The video as it appears in IE 7 and IE 8. Note the downloadable video files listed beneath the picture.
Jonathan Neal produced an online code generator for Video for Everybody that is fun and informative. It is at http://sandbox.thewikies.com/vfe-generator/
The following are the requirements for the Kroc Camen solution:
- A poster: Create a picture or title page as an opening screen for the video. To use a still from the video, run the video and stop it at a suitable point. Right-click it and save the picture as a
.jpgfile.- Three video files: Using your file converters, make three versions of your video to produce files with the formats
.mp4,.ogv, and.webm. Listing 6-5 assumes that the poster and the three video files are located in a folder namedvideo.- The Flowplayer files: Go to the Flowplayer web site at
http://flowplayer.org/download/index.htmlOr download the free version of Flowplayer from the companion web site at the book’s page at
http://www.apress.com. The free version is available for commercial use. More comprehensive commercial versions are also available. Place the two files,flowplayer-3.2.7.swfandflowplayer.controls-3.2.5.swf, in the folder that will eventually contain the web page. (The FlowPlayer version number may have changed by the time you read this).
The web page: Listing 6-6 is an adaptation of Kroc Camen’s Video for Everybody. It creates a typical web page, but for clarity, the page contains only the video. The page validates in the W3C HTML5 validator.
Listing 6-6. Creating a Page with Embedded Video Using VfE (camen-flowplayer-wagon.html)
<!doctype html>

<html>

<head>

<title>Camen-flowplayer-wagon</title>

<meta charset=utf-8>

</head>

<body>

<!-- "Video For Everybody" http://camendesign.com/code/video_for_everybody-->

<video controls="controls" poster="video/wagon-poster.jpg" width="640" height="480">

   <source src="video/wagon3.mp4" type="video/mp4">

   <source src="video/wagon3.webm" type="video/webm">

   <source src="video/wagon3.ogv" type="video/ogg">

        <object type="application/x-shockwave-flash" data="flowplayer-3.2.7.swf"

        width="640" height="480">

        <param name="movie" value="flowplayer-3.2.7.swf">

        <param name="allowFullScreen" value="true">

        <param name="wmode" value="transparent">

        <param name="flashVars" value="config={'playlist':

        ['video/wagon-poster.jpg',{'url':'video/wagon3.mp4','autoPlay':false}]}">

        <img alt="Colyton Wagon Wanderer" src="video/wagon-poster.jpg" width="640"

        height="480" title="No video playback capabilities, please download the video

        below">

        </object>

</video>

<p>

<strong>Download video:</strong> <a href="video/wagon3.mp4">MP4 format</a> | <a

href="video/wagon3.ogv">Ogg format</a> | <a href="video/wagon3.webm">WebM format</a>
</p>

</body>

</html>
![]() Caution Video for Everybody works in IE 7 and IE 8, as well as all the modern browsers. However, I have sometimes experienced a problem in IE 7 and IE 8 when Adobe updates the security settings for the Flash Player. This can result in an error message saying that it cannot find the .
Caution Video for Everybody works in IE 7 and IE 8, as well as all the modern browsers. However, I have sometimes experienced a problem in IE 7 and IE 8 when Adobe updates the security settings for the Flash Player. This can result in an error message saying that it cannot find the .mp4 file and it suggests that you should try “loosening the security settings.” This means accessing:
http://www.macromedia.com/support/documentation/en/flashplayer/help/settings_manager04.html#117502 There you will find an online security manager panel. Select the Always Allow radio button, then click Edit Location. Add a location (i.e., the folder where your video files are held), then wait until a green circle with a white tick appears in the lower window. This means your security settings are reset. This is one of the reasons why I will be glad to say goodbye to Flash Player.
We will now look at another JavaScript solution to the problem of allowing IE 7 and IE 8 users to enjoy your videos. This method can be used with or without the semantic video tag.
The OS FLV Free Video Player
The free, open-source player OS FLV was produced and sponsored by Jambo Media. This came complete with a code generator. The generated code could be easily embedded into the web page. This worked without any hassle and showed no brand mark. But my euphoria was short-lived as I eventually found some bugs. Also, it seemed that the site administrator was no longer answering queries. Being a free program and open source, the producers were under no obligation to maintain their forums beyond the point where the feedback had solved most of the bugs.
The most annoying bug caused the Replay button to remain on the video after it was clicked. The other bug was that the volume control needed a double-click to close it. Also, the progress indicator stopped short before reaching the end of its slot.
Eureka! Then I stumbled across an RSS feed from the Italian web designer Gianluca Guarini. He had fixed the bugs and was offering the revised code to anyone for free. This solution worked out-of-the-box. It also worked in any browser and in versions 4 and 5 of HTML.
Gianluca Guarini has kindly given me permission to include the OS FLV files in the companion web site for this book’s page at http://www.apress.com The files will be included when you download this chapter’s zip file. Gianluca Guarini’s web site can be found at http://www.gianlucaguarini.com The original OS FLV project can be found at: http://www.osflv.com
![]() Note Gianluca Guarini does not provide any support for his code; nor does this book’s companion web site. This should not be a problem, however, because the code is easy to apply and works without any snags.
Note Gianluca Guarini does not provide any support for his code; nor does this book’s companion web site. This should not be a problem, however, because the code is easy to apply and works without any snags.
Figures 6-7a and 6-7b show this player in action. It has a Chrome-like set of controls.
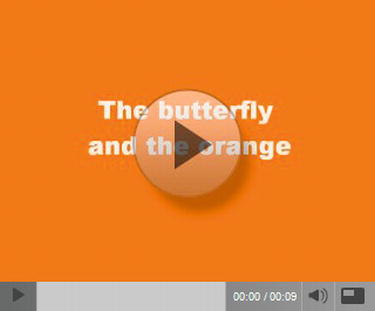
Figure 6-7a. The OS FLV player’s opening screen
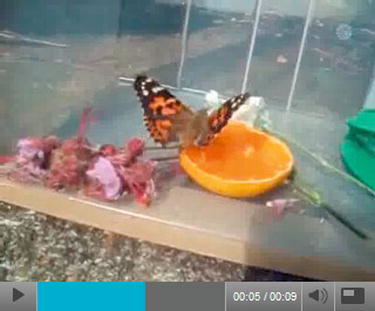
Figure 6-7b. Showing the progress bar
Procedure
For this video player you will need to insert a few script files into the folder for the HTML page that contains your video code. They are the JavaScript files for OS FLV that will power your video and make it available to everyone including users of IE 7 and IE 8. Following these steps will not be difficult, but you do need to download this chapter’s files from the companion web site at the book’s page on http://www.apress.com
- Create a folder called
osflv-folderin the root folder of your web site. - In the download for this chapter, you will find a folder called
osflv-player. - Open the folder named
osflv-playerand copy its files into yourosflv-folder. - The contents of the
osflv-foldershould now be as follows:- Two JavaScript files:
AC_RunActiveContent.jsandrac.js - Three OSplayer files:
Osplayer.as,Osplayer.fla,Osplayer.swf - The code generator: firefox_codegen.html
- Two JavaScript files:
- Convert your video file into the
.flvformat and place it in theosflv-folder. - Create and place a poster in a folder named
imagesand place that folder in theosflv-folder(optional). The poster isbutterfly.jpgin my listing. - Use Mozilla Firefox to view
firefox_codegen.html. Fill out the form to generate the code. - Or, a quicker method would be to download my code from the companion web site and insert your own file names to replace the items shown in bold type in Listing 6-7a. Only two file names need replacing.
- Embed the generated (or downloaded) code into your web page.
- Add your web page and its CSS file to the
osflv-folder.
Listing 6-7a shows the generated code embedded into an HTML5 page. I have moved the first bit of generated script to the <head> section (the generator placed it in the <body> section). Listing 6-7a provides identical controls in every browser.
Listing 6-7a. Using The OS FLV Script to Play a Video (osflv-butterfly-identical-controls.html)
<!doctype html>

<html lang=en>

<head>

<title>osflv-butterfly-identical-controls</title>

<meta charset=utf-8>

<script src='AC_RunActiveContent.js' type="text/javascript">

</script>

</head>

<body>

<script type="text/javascript">

 AC_FL_RunContent('codebase', 'http://download.macromedia.com/pub/shockwave/cabs/flash/

swflash.cab#version=9,0,0,0', 'width', '320', 'height', '265', 'src',

 ((!DetectFlashVer(9, 0, 0) && DetectFlashVer(8, 0, 0)) ? 'OSplayer' : 'OSplayer'),

'pluginspage', 'http://www.macromedia.com/go/getflashplayer', 'id', 'flvPlayer',

'allowFullScreen', 'true', 'movie', ((!DetectFlashVer(9, 0, 0) && DetectFlashVer(8, 0, 0))

? 'OSplayer' : 'OSplayer'), 'FlashVars', 'movie=video/butterfly-movie.flv

&btncolor=0x333333&accentcolor=0x20b3f7&txtcolor=0xffffff&volume=70&previewimage=images

/butterfly.jpg&autoload=on'),

</script>

<!--<noscript>

 <object width='320' height='265' id='flvPlayer'>

  <param name='allowFullScreen' value='true' />

  <param name='movie' value='OSplayer.swf?movie=video/butterfly-movie.flv&

btncolor=0x333333&accentcolor=0x20b3f7&txtcolor=0xffffff&volume=70&

previewimage=previewimageurl&autoload=on'>

  <embed src='OSplayer.swf?movie=video/butterfly-movie.flv&btncolor=0x333333&

accentcolor=0x20b3f7&txtcolor=0xffffff&volume=70&previewimage=previewimageurl&

autoload=on' width='320' height='265' allowFullScreen='true'

type='application/x-shockwave-flash'>

 </embed>

 </object>

</noscript>-->

 </body>

 </html>
![]() Caution I have placed all the relevant files in one folder for convenience. Set the menu button that connects to the video page so that it links to the correct folder.
Caution I have placed all the relevant files in one folder for convenience. Set the menu button that connects to the video page so that it links to the correct folder.
The OS FLV player overrides the player incorporated within each browser. This results in identical controls in every browser. Some web site designers prefer this; but some users may not. Some users would prefer to see the controls they are accustomed to when using their preferred browser. IE 7 and IE 8 show the OS FLV player controls, but to ensure that the users’ traditional controls are displayed in other browsers, use the generated code in an HTML5 page like this.
Listing 6-7b preserves the browser’s native controls using IE 9, Mozilla Firefox, Chrome, Safari, and Opera. In IE 7 and IE 8, the appearance will be identical to Figures 6-7a and 6-7b. Place the .mp4, .webm, and .ogg versions of the video in a folder called video and put that folder inside your osflv-folder.
Listing 6-7b. Using the OS FLV script as a Fallback with the Video Tag (osflv-butterfly-native.html)
<!doctype html>

<html lang=en>

<head>

<title>osflv-butterfly-native-controls</title>

<meta charset=utf-8>

<script src='AC_RunActiveContent.js' type="text/javascript">

</script>

<link type="text/css" rel="stylesheet" href="position-video.css">

</head>

<body>

<div id="position-video">

<video width="320" height="240" controls="controls">

                <source src=video/butterfly-movie.mp4 type="video/mp4">

                <source src=video/butterfly-movie.ogv  type="video/ogg">

                <source src=video/butterfly-movie.webm type="video/webm">

<script type="text/javascript">

 AC_FL_RunContent('codebase',

'http://download.macromedia.com/pub/shockwave/cabs/flash/swflash.cab#version=9,0,0,0',

'width', '320', 'height', '265', 'src', ((!DetectFlashVer(9, 0, 0) &&

DetectFlashVer(8, 0, 0)) ? 'OSplayer' : 'OSplayer'), 'pluginspage',

'http://www.macromedia.com/go/getflashplayer', 'id', 'flvPlayer',

'allowFullScreen', 'true', 'movie', ((!DetectFlashVer(9, 0, 0) &&

DetectFlashVer(8, 0, 0)) ? 'OSplayer' : 'OSplayer'), 'FlashVars',

'movie=video/butterfly-movie.flv&btncolor=0x333333&accentcolor=0x20b3f7&

txtcolor=0xffffff&volume=70&previewimage=images/butterfly.jpg&autoload=on'),

</script>

<noscript>

 <object width='320' height='265' id='flvPlayer'>

  <param name='allowFullScreen' value='true'>

  <param name='movie' value='OSplayer.swf?movie=video/butterfly-movie.flv&btncolor=0x333333&

accentcolor=0x20b3f7&txtcolor=0xffffff&volume=70&previewimage=previewimageurl&autoload=on'>

  <embed src='OSplayer.swf?movie=video/butterfly-movie.flv&btncolor=0x333333&accent

  color=0x20b3f7&txtcolor=0xffffff&volume=70&previewimage=previewimageurl&autoload=on'

  width='320' height='265' allowFullScreen='true' type='application/x-shockwave-flash'>

  </embed>

 </object>

</noscript>

</video>

</div>

</body>

</html>
Using Listing 6-7b in an HTML5 page, the video will play in all the major browsers, including Internet Explorer 7 and 8. Opera 11 had a bug that prevents the controls from working, but this has been fixed in version 11.5. It will also play on iPhones and iPads. Users of Mozilla Firefox, Chrome, and Safari no longer need to have Flash installed. Eventually, when users have stopped using IE 7 and IE 8, we can dispense with the fallback element (Oh, happy day!).
![]() Tip There are several other free players that are available, including Kaltura (
Tip There are several other free players that are available, including Kaltura (http://www.kaltura.org) JWPlayer (http://www.longtailvideo.com/players/jw-flv-player/), and SWFObject.JS (http://hubpages.com/hub/-MP4-Flash-Video).
Testing Your Video and MIME Types
When testing your video, ensure that your Flash Player and QuickTime player are functioning properly and that the appropriate MIME types are set on your server.
MIME types? It means Multipurpose Internet Mail Extension. Aren’t you glad you asked?
Although it started as a mailing item, MIME types have developed into a method for transferring non-HTML formatted files across the internet. They are used by browsers to determine media content types. Videos won’t play unless the correct MIME type is set in the server.
Every computer manual I have read emphasized the importance of MIME types, but they omit to tell the reader how to apply MIME types. Do MIME types go into the page markup? Or are they added to the server somehow? Or is it both? After a great deal of searching, I discovered that the answer varies. It depends on the category of the MIME type.
![]() Caution When providing HTML5 video for a web site, be sure to contact your host server and request that the MIME types are set for
Caution When providing HTML5 video for a web site, be sure to contact your host server and request that the MIME types are set for .ogv, .mp4, .flv, and .webm videos files. Your videos won’t play in some browsers if you neglect to do this. Some enlightened hosts allow the web designer to add MIME type permissions to a server. For more information on MIME types, see the Appendix.
The following notes were extracted from a treasure trove of .htaccess and MIME data (see http://tomraftery.com/2005/01/15/creating-an-htaccess-file/).
The MIME type is a snippet of code that most hosts use to set the MIME types on their server. It lives in a file called .htaccess, which can contain some or all of the following AddTypes:
AddType video/ogg .ogv

AddType video/mp4 .mp4

AddType video/webm .webm

AddType video/x-flv .flv

AddType application/x-shockwave-flash swf
Editing a Client’s Video
What should you do if the client’s video needs editing? For instance, it might be too long and needs to be shortened. It might include clips that must be removed because you would not wish to see them on one of your web sites. Some of the clips might need removing because they are poor quality, such as blurred or shaky. The client may want sound added or removed. The client may even pass the video camera to you and ask you to download and edit the contents. The client might want you to add a still with an overlaid title, or to add a rolling list of credits to close the video.
If you have edited a video before, you will be able to accept the client’s video clips and edit them. Of course, you would provide an estimate of the cost and explain what you need to do to make the video acceptable.
If you have never edited a video before, you have the following choices:
- Ask the client to have the video edited by someone else.
- Explain that you have not edited a video before, but you are willing to give it a try.
The latter requires that you get a video editor and become reasonably proficient at using it. You will need plenty of space on your hard disk (or you could attach an external hard drive). The free Windows Live Movie Maker (WLMM) is excellent and the Help files are not too obscure. WLMM came installed with Windows XP and Vista in the root start-up menu. It must be downloaded for Windows 7 (http://www.microsoft.com/downloads). However, be warned that any video-editing program is not like any other piece of software and it takes some learning—but it is creative and great fun. WLMM is naturally based on the real life movie editing process where you have a collection of film clips that must be trimmed, assembled in the correct order, and then combined. Some of the clips need to be blended into the next clip using fades and dissolves.
Adding sound and titles is not too difficult, and rolling credits can be added at the end of a video. Beware of using loud sound. In particular, do not use background sound if someone is speaking. This irritating gimmick beloved of advertisers and documentary films, will ruin your video. Presenters often have their commentaries made inaudible by a cacophony of inappropriate background “music”.
In Windows Live Movie Maker, a video loaded into the program appears as a series of clips or short pieces laid out in the main pane. Each clip can be previewed (played) in the preview pane and paused to allow you to trim the clip. The two main features are the time line and the story board. You can rearrange the order of the clips in either, but use the time line to trim clips or to add/remove sound. The Help button is a white question mark in a blue circle located on the top right. You must be online to see the Help files.
Because this book is about web design, I will spend no more time on video editing. Try reading Getting Started with Windows Live Movie Maker by James Floyd Kelly (Friends of ED, 2010).
Create a Slide Show
Slide shows are sometimes more informative than videos because the user is in total control of what they see. A slide show can be paused to enable a particular slide to be examined for as long as the user wishes. This section gives four methods for creating slide shows that can be embedded in web pages.
This section describes the following four popular methods for creating web embedded slide shows:
- Using a snippet of JavaScript from BarelyFitz Designs (see Figure 6-8).
- Using the Animoto online slide show creator (see Figure 6-9).
- Converting a PowerPoint slide show into a video.
- Using Windows Live Movie Maker.
The BarelyFitz Designs Slide Show
Patrick Fitzgerald of BarelyFitz Designs produced an excellent piece of free, open-source JavaScript for slide shows. He also provides a very useful tutorial on his web site :
http://www.barelyfitz.com/projects/slideshow/
Figure 6-8 shows a screenshot of a slide show created using the BarelyFitz technique.
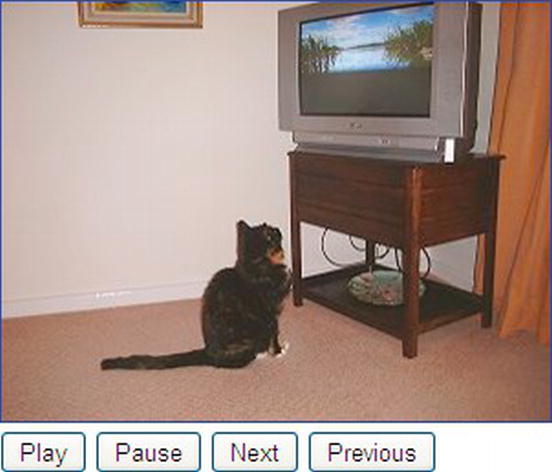
Figure 6-8. A slide show with controls
In the next section, you’ll learn how to create the slide show depicted in Figure 6-8.
Creating a BarelyFitz Slide Show
This technique is easy to understand and implement. No knowledge of JavaScript is required; just amend the listing to insert your own slides.
- Access the BarelyFitz web site (http://
www.barelyfitz.com), click the Download & Examples tab, and download the JavaScript scriptslideshow.js. Place the script file in the folder containing the web page, and upload a copy to the server folder where the page will be hosted. - Prepare a blank web page and place it in the same folder as the JavaScript code.
- Collect the pictures for your slide show and place them in a subfolder within the folder containing your web page. For the easiest solution, make your slides all the same size. If you want to use different sizes, remove any mention of width and height from the markup; but be warned, you will have a slide show that jumps around to accommodate the various sizes. To minimize the jumping, make the pictures the same height.
- The markup for Figure 6-8 is adequate for most purposes. Adapt it to support your own slides. Replace the items in bold italics with your own pictures; add any number of pictures. Then upload the page to your server. This example assumes that the slides are in a folder called
slides.
Using the HTML5 code in Listing 6-8, the slide show works in all browsers, including IE 7 and IE 8.
Listing 6-8. (slide-show.html)
<!doctype html>

<html lang=en>

<head>

<title>Slide show for Figure 6-8 based on BarelyFitz Designs</title>

<meta charset=utf-8>

<script type="text/javascript" src="slideshow.js">

</script>

<script type="text/javascript">

SLIDES = new slideshow("SLIDES");

s = new slide();

s.src = "slides/Mitzi1.jpg";

s.text = "Open link in same window";

SLIDES.add_slide(s);


s = new slide();

s.src = "slides/Mitzi2.jpg";

s.text = "Open link in same window";

SLIDES.add_slide(s);


s = new slide();

s.src = "slides/Mitzi3.jpg";

s.text = "Open link in same window";

SLIDES.add_slide(s);


s = new slide();

s.src = "slides/Mitzi4.jpg";

s.text = "Open link in same window";

SLIDES.add_slide(s);


</script>

</head>

<body onLoad="SLIDES.pause()">

<a href="javascript:SLIDES.hotlink()">

<img name="SLIDESIMG" src="slides/Mitzi1.jpg"

 width="300" height="229" border="1" title=”Mitzi” alt="Mitzi">

</a>

<!--The control buttons can be arranged in a different order by changing the É
order of the items in the form-->

        <form>

        <input type=button value="Next" onClick="SLIDES.next()">

        <input type=button value="Previous" onClick="SLIDES.previous()">
        <input type=button value="Play" onClick="SLIDES.play()">

        <input type=button value="Pause" onClick="SLIDES.pause()">

        </form>

<script type="text/javascript">

if (document.images)

{

  SLIDES.set_image(document.images.SLIDESIMG);

  SLIDES.update();

  SLIDES.play(); //optional

}

        </script>

</body>

</html>
To alter this interval between continuously playing slides, open the JavaScript file slideshow.js with Notepad and find the “timeout” section. You will see that the default is 3,000 milliseconds (3 seconds). Change the figure to speed up or slow down the interval between slides.
Explore the BarelyFitz web site and then select the Tutorial tab for more detail on embedding and configuring the code in a web page. The web site has several worked examples; from these you could discover how to add additional features, such as descriptive text that alters with each slide change, or a drop-down list of slides, or different button controls.
The Animoto Slide Show Creator
The Animoto Lite version is only suitable for testing because it has limited facilities and cannot be used for commercial purposes. If after trying it you wish to buy it, the Pro versions have few restrictions and various levels of licensing are available depending on your needs. It also offers an iPhone app. You will find Animoto at http://animoto.com.
The program offers a wide range of opening screens and music, but it forces you to choose some music. Unfortunately, the one choice of music that is missing is “none.” You must choose a theme, some music, and bits of text or it won’t move on to the next step. Most of the music is not at all pleasant, but I did find some good items in the classical section. When you have uploaded your slides and selected the themes and music, click the Create Video button. Eventually you will receive an email telling you the video of the slide show is available for viewing. You can view it and download its code for embedding in a web page.
An Animoto slide show is shown in Figure 6-9.
Figure 6-9. An Animoto slide show
The Animoto downloaded code snippet uses Shockwave Flash and looks like the following:
<object id="vp13vUA9" width="432" height="240" classid=

"clsid:d27cdb6e-ae6d-11cf-96b8-444553540000">

<param name="movie" value="http://static.animoto.com/swf/w.swf?w=swf/vp1&e=1323028467

&f=3vUA9wXxd8zgGDF87fQJqw&d=28&m=b&r=240p&volume=100&start_res=240p&i=m&options=">

</param>

<param name="allowFullScreen" value="true">

</param>

<param name="allowscriptaccess" value="always">

</param>

<embed id="vp13vUA9" src="http://static.animoto.com/swf/w.swf?w=swf/vp1&

e=1323028467&f=3vUA9wXxd8zgGDF87fQJqw&d=28&m=b&r=240p&volume=100&

start_res=240p&i=m&options=" type="application/x-shockwave-flash"

allowscriptaccess="always" allowfullscreen="true" width="432" height="240">

</embed>

</object>
Convert a PowerPoint Slide Show into a Video
This is an effective way of creating a slide show and it is very versatile. It will import many types of input, even animated .gifs. The free version will convert the video to MP4, WMV, and AVI video with no watermark. If you convert to any other file types, the slide show will have a watermark in the top-left corner.
Download the freeware version of the E.M. PowerPoint converter from http://www.effectmatrix.com/PowerPoint-Video-Converter/Free-PowerPoint-Video-Converter.htm
The web site banner is Etinysoft, so don’t think you have arrived at the wrong source.
Using Windows Live Movie Maker to Create a Slide Show
Pictures can be imported into Windows Live Movie Maker and then arranged in the required sequence. The slide show will then be saved as a .wmv file. The procedure for using Windows Live Movie Maker to create a slide show as a video is as follows:
- Put the slides into a folder so that you can locate them easily.
- Open Windows Live Movie Maker and click Add Videos and Photos. Navigate to the folder containing the slides.
- Open each slide until they are all shown in the right-hand pane.
- Click Edit on the menu and adjust the time interval between slides to, let’s say, 3 seconds.
- Options are available for various transitions and fades.
- Click Home on the menu and click the Save Movie button on the toolbar.
- Select For Computer and then give the file a name. Click Save.
The resulting .wmv file can be viewed in any player, such as the Windows Media Player or QuickTime. To add it to a web page, the created file could then be uploaded to YouTube so that you can embed the downloadable code. The resulting video can be viewed in any browser. Figure 6-10 shows the YouTube version of the slide show.
Figure 6-10. The slide show as created in Windows Live Movie Maker and then stored on YouTube. Note that the appearance of the YouTube frame has recently changed a little.
Listing 6-10 shows how the downloadable YouTube version of the .wmv file is embedded in an HTML5 web page. The markup is extremely simple, but if your client does not want to use YouTube, then the .wmv file could be converted to other formats for use in one of the previously described methods of embedding a video.
Listing 6-10. Embed a YouTube Video of a Windows Live Movie Maker File (slides-video-YT.html)
<!doctype html>

<html lang=en>

<head>

<title>Embedded YouTube video of an .wmv slide show </title>

<meta charset=utf-8>

<meta details go here>

</head>

<body>

<iframe width="420" height="315" src="http://www.youtube.com/embed/xxxxxxxxxxx?rel=0"

frameborder="0" allowfullscreen></iframe>

</body>

</html>
Summary
In this chapter, you learned that the new HTML5 <audio> and <video> tags allow AV to play without plug-ins, but the <audio> and <video> tags will not work in IE 7 and IE 8. The good news is that IE 9 promises to support the <audio> and <video> tags. However, IE 9 will only work on computers using Vista or Windows 7.
You were alerted to the fact that you would need some file converters, and several tried and tested converters were recommended. You were shown several fallback methods for solving the problem of displaying videos in IE 7 and IE 8. Alternative video solutions were provided, such as YouTube and Vimeo. Then you learned how to use two, simple JavaScript solutions to ensure that videos would be seen in any browser. The chapter ended describing four ways of creating and embedding slide shows into a web page.
In the next chapter, you will discover how to give rounded corners to boxes, web pages, and tab menus. The new CSS3 method of rounding corners is described with many, fully worked projects.