
C H A P T E R 10
Add PayPal
The PayPal system of payment for goods and services is extremely popular, very secure, and trusted by most users. Since PayPal added the ability to use credit/debit cards, the service has boomed and it is now one of the most accepted methods of sending and receiving payments, subscriptions, or donations.
The PayPal payment system can be easily integrated into web pages so that people can pay for goods and services offered on commercial web sites. At first you may feel nervous about setting up a PayPal account because you are dealing with money, and in particular you may be dealing with your client’s money. However, PayPal has made the process such that you can easily backtrack or even cancel and start again. Almost everything you enter into the PayPal forms can be changed later.
How Does PayPal Work?
Is PayPal a bank? Although PayPal is not a traditional bank, it is an internet bank. In fact, it is a bank that only operates online; it has no branches. Having no branch premises or branch staff, PayPal can offer a very economical cash-handling service to web site owners and web site users. PayPal even handles currency conversion, which can be very helpful when dealing with international commerce. Also, with PayPal, a merchant can accept many forms of payment, including all the major credit cards.
PayPal makes a small charge for every transaction. This applies only to the web owner, not to customers. A typical charge at the time of writing was $0.32 (£0.20 in the United Kingdom), plus 3 percent of the transaction cost. For instance, if you sell something for $16 (£10), the total charge might be $0.80 (£0.50). These costs may be out-of-date now, but they do indicate that PayPal’s fees are very affordable. Also, fees vary depending on the country, the type of account, and the transaction; in the United States, this ranges from 1.9 percent to 2.9 percent of the total, plus $0.30.
A fee is charged for currency conversion. It ranges from 3.4 percent of the monthly sales for a small amount to 1.4 percent for amounts over $93,000 (£55,000).
PayPal deducts a very small fee for transferring money from your PayPal account to your personal bank account.
OK, PayPal is virtually free, so how does it survive? Two hundred and twenty million PayPal account owners have money deposited in PayPal accounts. The money is mostly deposited there by paying customers. This money earns interest for PayPal. Also, advertisers pay PayPal to send you an occasional advertisement.
To transfer money from your PayPal account into your personal bank account, you must access your PayPal account and instruct PayPal the amount of money to transfer (see the section “Managing a PayPal Account” near the end of this chapter).
![]() Caution PayPal is very safe, but beware of emails purporting to come from PayPal. When PayPal sends you an email it states your full name and it will never ask for your PayPal personal details. Bogus PayPal e-mails are addressed to “Dear member” or “Dear PayPal member” and they are phishing for your account details. Forward bogus emails to
Caution PayPal is very safe, but beware of emails purporting to come from PayPal. When PayPal sends you an email it states your full name and it will never ask for your PayPal personal details. Bogus PayPal e-mails are addressed to “Dear member” or “Dear PayPal member” and they are phishing for your account details. Forward bogus emails to [email protected] to help track down these criminals.
Setting up a PayPal Account
![]() Note Because the interface and the set-up procedure can vary a little from country to country, this chapter only gives hints on what to look for and what to do on the PayPal sign-up forms. A little common sense will guide you safely through the sign-up and configuration steps once you know what to look for. Also, PayPal has a Help Center web site at
Note Because the interface and the set-up procedure can vary a little from country to country, this chapter only gives hints on what to look for and what to do on the PayPal sign-up forms. A little common sense will guide you safely through the sign-up and configuration steps once you know what to look for. Also, PayPal has a Help Center web site at https://www.paypal.com/help. The steps for setting up a business account and downloading payment buttons are described briefly at https://www.paypal.com/webapps/mpp/merchant. There you will find the five types of payment buttons available for download. The best starting point for UK readers is probably a PDF document at https://www.paypal-business.co.uk/pdf/website-payments-standard.pdf.
The procedure assumes that your client requires a business account. Make a careful note of all the details you enter, including the Merchant Account ID. File the details carefully so that you can always find them quickly and easily. The initial step consists of setting up a PayPal account for the web site owner. This section will guide you through this process.
- US readers should go to
https://www.paypal.com/webapps/mpp/merchant. - UK readers should access
www.paypal.co.uk/ukand click the Sign Up button. On the home page choose PayPal for Your Business and click the Get Started button. - US readers should then click the Get Started button. On the next screen you are offered upgrades; either select an upgrade or click the No Thanks button.
- On the next screen, US readers see an explanation of the next three steps. Click the Create New Account button.
- On the next screen, both US and UK readers can sign up for a business account. Click the Get Started button.
- After clicking the appropriate Get Started button in the sign-up screen, you come to another sign-up screen, that shows the three steps once more. Here you choose the country and the language from the drop-down menu, and then click the Create New Account button. Use the drop-down list to select a Business Type. During the next three steps, you add your client’s preliminary information for setting up an account and confirm your client’s email address. PayPal will send your client an email containing simple instructions.
- On the next screen you will find a drop-down menu where you must choose a Payment Solution. No advice is provided by PayPal, but the choices are explained at the HomeBusinessWiz.com web site at
http://www.homebusinesswiz.com/2010/04/paypal-business-accounts-standard-or-pro.htmlThe web site recommends that you choose Website Payments Standard. With this type of Payment Solution, customers can pay by PayPal or debit/credit card. When customers pay, they come to the PayPal-hosted payment page. The Standard payment scheme is free but the Pro scheme has a monthly fee. After choosing your payment solution, click Continue.
- Fill out the next form and click Continue. Provide the next items of required information to complete the sign up. You will receive an email giving final instructions. You will then have a PayPal account.
- To link to your bank account, access your PayPal account and set up your personal banking information. As a method of account verification, PayPal will place a small amount of money into your bank account, and then ask you to verify that the money was deposited.
Now that the account is set up, the next step is to log in to the account and tweak your client’s PayPal profile to reflect the client’s preferences.
Adjust Your Client’s Account Details Using Profile
Profile is where you fine-tune the client’s personal and payment details. The PayPal account has a default profile set up. You will probably need to tweak this. For instance, you may wish to add VAT/sales tax details. To amend your profile, access the PayPal home page and log in to your account or your client’s account.
- Just below the row of blue tabs, find Profile and click it.
- With US accounts, click Profile and then find Sales Tax and click the Update link on the far right of the screen. The sales tax options allow you to create sales taxes by state as well as for international transactions by country. Click Add New Sales Tax, select the territory, and enter the percentage for the sales tax. Use the International Sales tax option for the United States, and enter the zip code and select the state. If the postage is also subject to sales tax, tick the box labeled Apply Rate to Postage Amount.
- In the UK, look for VAT, and click the Update link on the far right of the screen. In the next screen, enter the percentage for the VAT. If the postage is also subject to VAT, tick the box labeled Apply Rate to Postage Amount.
- Click the yellow Continue button and log out.
Now that you have an account and set the client’s Profile preferences, you can select and download secure payment buttons.
Download Encrypted PayPal Buttons
At one time, rogue buyers could hack into the PayPal payment button code and enter reduced prices. PayPal provided an encryption method, but it was very complex and impossible to edit. Now PayPal has an encrypting process for buttons that is very straightforward and easily edited by the account holder. The code for buttons is now hosted safely on the PayPal site instead of on the web page. The prices are no longer accessible to hackers. If your web site has the old, vulnerable buttons, they will need to be re-created.
PayPal provides two methods of downloading hosted secure buttons:
Step 1: Accessing the PayPal Button Factory
To access the PayPal Button Factory, follow these steps:
- Access
http://www.paypal.co.uk(in the United Kingdom) orwww.paypal.com(in the United States). - Log in to your PayPal account.
- Click Profile in UK accounts. For USA accounts go to Merchant Services tab and My Saved Buttons.
- Look for PayPal Buttons
 Manage My Payment Buttons. Click the relevant Update link on the far right.
 - On the next screen, click Create New Button in the Related Items box on the right.
- On the next screen, choose a button type from the drop-down menu. As you choose a button, the image will appear in the box titled Your Customer’s View. The buttons list includes Buy Now, Shopping Cart, Gift Vouchers, Donations, Subscription, Automatic Billing, and Installment Plan. If you click the item Which Button Shall I Choose, you will see an illustration of each one with an explanation of its purpose. Be sure to select Use My Secure Merchant Account ID under the heading Merchant Account IDs. This masks your client’s email address to prevent spammers from finding it.
- In the box labeled Customize Button, you will be able to modify the button or even add your own image.
- Fill out the remaining details. When you are satisfied, click Create Button, and then you will be able to copy and paste the code into your web page.
If you are satisfied with the button, you can generate the HTML code for it by clicking Create Button at the bottom of the page.
Step 2: Tracking and Inventory, Profit, and Loss (Optional)
You will find this optional item near the bottom of the screen. It provides tracking and inventory options for a button. To use this feature, tick the box labeled Track Inventory, Profit and Loss.
- You now choose whether to track the stock level By Item or By Option. In both cases, you must enter the item ID that you entered previously.
- For Qty in Stock, enter the number of the items that you currently have in stock. If you select the option for a stock level under Alert Quantity, it will trigger an email from PayPal to inform you that your stock in that item is low.
You will be asked to specify whether or not to allow customers to purchase something that is out of stock. If you choose Yes, customers can purchase the out-of-stock item as usual. If you select No, they cannot purchase the item. You have the option to redirect customers to a web page that informs them that the item is out of stock; this occurs when a user clicks Continue Shopping.
On this screen, PayPal also offers a reporting system for tracking the profits and losses.
Step 3: Customize Advanced Features of the Button
In this step you can do the following:
- Allow your customers to add a message with the order.
- Allow you to acquire the customer’s postal address.
- Set a web page for your customer to return to after completing or canceling the checkout procedure.
- Experienced designers can add other advanced variables to the button. The advanced variables offer many features that could be useful for more complex ordering processes, including passing information back to your web site if you wish to have a special post-sales page.
Copy and Save the Buttons
Once you have completed the previous steps, you can click Create Button at the bottom of the page.
The code appears in the next window. Click the Select Code button. Then use Ctrl+C to copy the code to memory. Alternatively, click the Go Back to Edit This Button link if you wish to make some changes.
![]() Caution Paste the code for each button into a text editor such as NotePad. Save with easily recognizable names. This is a safety precaution in case you mess up the web page and have to start again. You won’t want the hassle of downloading all the buttons again from scratch.
Caution Paste the code for each button into a text editor such as NotePad. Save with easily recognizable names. This is a safety precaution in case you mess up the web page and have to start again. You won’t want the hassle of downloading all the buttons again from scratch.
Embedding the PayPal Buttons in a Page
![]() Tip I recommend that you first practice using the default buttons. Experiment with the more complex buttons as you become familiar with the PayPal interface. Remember that you can practice by creating buttons, embedding them, and then deleting them.
Tip I recommend that you first practice using the default buttons. Experiment with the more complex buttons as you become familiar with the PayPal interface. Remember that you can practice by creating buttons, embedding them, and then deleting them.
Embedding the PayPal buttons is just a matter of downloading the generated code from the PayPal web site and pasting it into your page.
- Design your PayPal order page and save it. This will be a page based on the style of the other pages on your web site. Leave blank areas where you will eventually paste the PayPal buttons when you have downloaded them.
- Load the page into your web design program in code view. Then copy and paste the button codes into the page code.
- If you have Add to Cart buttons, you also need to download a View Cart button. Select its code and copy it to the web page HTML. You can do this after adding the first button on a page and it will work for all subsequently added buttons on that page. You only need one View Cart button on a page. The View Cart button may not be very obvious on the interface for your country; it may not be available from the main menu. In this case, to create a View Cart button, you go to the code page after clicking Create Button for the Shopping Cart button. You are offered the option to create a View Cart button (the second item below the code window).
![]() Note The screenshot in Figure 10-1 was created offline; therefore, the PayPal buttons are not yet visible.
Note The screenshot in Figure 10-1 was created offline; therefore, the PayPal buttons are not yet visible.
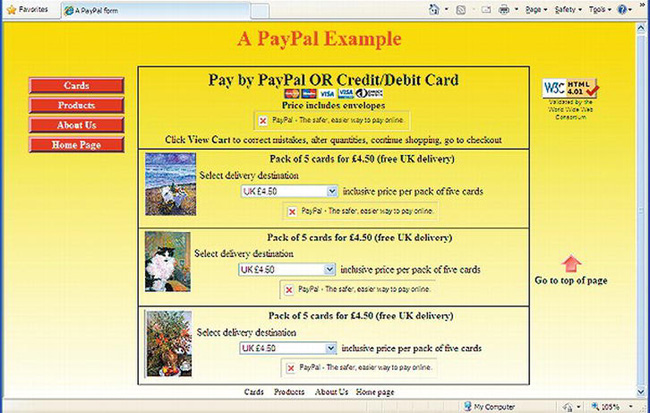
Figure 10-1. A page not connected to the internet
The PayPal buttons are not visible in Figure10-1 because these are loaded dynamically by PayPal. In a WYSIWYG program running offline, your page will appear like Figure 10-1. When you go online, the buttons appear, as shown in Figure 10-2.
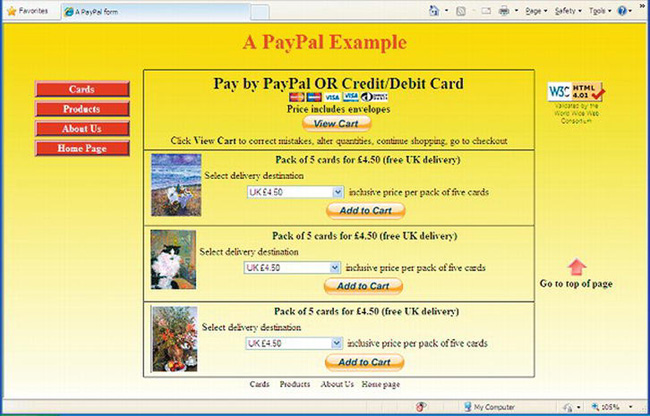
Figure 10-2. The page when connected to the internet. The buttons have been dynamically inserted by PayPal.
I am most grateful to the artist Ann Roe Jones for giving permission to use the pictures shown in Figures 10-1 and 10-2. The page can be seen on the web site that I designed and produced for her
(http://www.annroejones-artist.co.uk).
![]() Note The blocks of PayPal code in this example were deliberately altered for security reasons. The downloaded PayPal code is shown in bold font.
Note The blocks of PayPal code in this example were deliberately altered for security reasons. The downloaded PayPal code is shown in bold font.
Listing 10-1a creates the pages shown in Figures 10-1 and 10-2. This listing shows four PayPal buttons pasted into the page. They are indicated by bold type. The first button is the View Cart button and the next three are the Add to Cart buttons.
Listing 10-1a. Creating a Web Page with Encrypted PayPal Buttons (pay-cards.html)
<!doctype html>

<html lang=en>

<head>

<title>A PayPal payment page</title>

<meta charset=utf-8>
<link rel="stylesheet" type="text/css" href="pay-cards-html5.css">
<!--conditional Javascript added for IE 7 and 8 users-->
<!--[if lte IE 8]>
<script src="html5.js">
</script>
<![endif]-->
</head>
<body>
<div id="container">
<a id="top"></a>
<h1>A PayPal Example</h1>
<nav><!--side menu column starts-->
<ul>
<li><a href="#" title="Greetings Cards">Cards</a></li>
<li><a href="#" title="Products">Products</a></li>
<li><a href="#" title="About Us">About Us</a></li>
<li><a href="#" title="Return to Home Page">Home Page</a></li>
</ul>
</nav><!--end of side menu column-->
<div id="rightcol"><!--Start of far right column-->
<p class="cntr"><br><img alt="" src="images/valid-html401.png" width="88" 
height="31"><br><span class="tiny">Validated by the<br>World Wide Web<br>
Consortium</span></p>
<p class="cntr redarrow"><a href="#top"><img title="Go to top of page"
src="images/upred.gif" alt="Go to top of page" width="33" height="30"></a><br>
<b>Go to top of page</b></p>
</div><!--end of right column-->
<div class="box"><!--CREATE FIRST BOX-->
<h2 class="cntr">Pay by PayPal OR Credit/Debit Card</h2>
<img src="images/debitcards.gif" alt="Cards" title="Cards" width="149" height="16"><br>
<h2>Price includes envelopes</h2>
<!--Embed the view cart button code-->
<form target="paypal" action="https://www.paypal.com/cgi-bin/webscr" method="post">
<input type="hidden" name="cmd0" value="_s-xclick" />
<input type="hidden" name="encrypted0" value="-----BEGIN PKCS7-----
The downloaded View Cart button has an enormous amount of code, a large chunk
has been left out here to save space.
PZVCt3PZQ5JXw1vUx5L0CiOTFThe5bZV9/drVWjIpZDFBsq5fVzaZURC3m6xpgA==-----END PKCS7-----">
<input type="image" src="https://www.paypal.com/en_GB/i/btn/btn_viewcart_LG.gif" name="submit0" alt="PayPal - The safer, easier way to pay online.">
<img alt="" src="https://www.paypal.com/en_GB/i/scr/pixel.gif" width="1" height="1">
<br>Click <b>View Cart</b> to correct mistakes, alter quantities, continue
shopping, go to checkout
</form>
</div>
<div class="box"><!--CREATE SECOND BOX-->
<img title="Beach" alt="Beach" height="95" src="images/beach2thumb.jpg" style="float: left;
margin-left: 5px; margin-right: 5px" width="77"><b>Pack of 5 cards for £4.50
(free UK delivery)</b>
<form target="paypal" action="https://www.paypal.com/cgi-bin/webscr" method="post">
<input type="hidden" name="cmd" value="_s-xclick">
<input type="hidden" name="hosted_button_id" value="10350939">
<p><input type="hidden" name="on0" value="Delivery Destination"></p>
<p class="lft">Select delivery destination</p>
<p><select name="os0">
<option value="UK">UK £4.50</option>
<option value="Europe">Europe £6.20</option>
<option value="Outside Europe">Outside Europe £7.20</option>
</select> inclusive price per pack of five cards</p>
<input type="hidden" name="currency_code" value="GBP">
<input type="image" src="https://www.paypal.com/en_GB/i/btn/btn_cart_LG.gif"
name="submit" alt="PayPal - The safer, easier way to pay online.">
<img alt="" src="https://www.paypal.com/en_GB/i/scr/pixel.gif" width="1" height="1">
</form>
</div>
<div class="box"><!--THIRD BOX-->
<img title="Sir Patrick Moore's cat" alt="Sir Patrick Moore's cat" height="91"
src="images/catthumb.jpg" style="float: left; margin-left: 5px; margin-right: 5px"
width="69" /><b>Pack of 5 cards for £4.50 (free UK delivery)</b>
<form target="paypal" action="https://www.paypal.com/cgi-bin/webscr" method="post">
<input type="hidden" name="cmd" value="_s-xclick">
<input type="hidden" name="hosted_button_id" value="10350961">
<p><input type="hidden" name="on0" value="Delivery Destination"></p>
<p class="lft">Select delivery destination</p><p>
<select name="os0">
<option value="UK">UK £4.50</option>
<option value="Europe">Europe £6.20</option>
<option value="Outside Europe">Outside Europe £7.20</option>
</select> inclusive price per pack of five cards</p>
<input type="hidden" name="currency_code" value="GBP">
<input type="image" src="https://www.paypal.com/en_GB/i/btn/btn_cart_LG.gif"
name="submit" alt="PayPal - The safer, easier way to pay online.">
<img alt="" src="https://www.paypal.com/en_GB/i/scr/pixel.gif" width="1" height="1">
</form>
</div>
<div class="box-bottom"><!--FOURTH BOX-->
<img title="Ferns and Flowers" alt="Ferns and Flowers" height="103"
src="images/fernsthumb.jpg" style="float: left; margin-left: 5px; margin-right: 5px"
width="73">
<b>Pack of 5 cards for £4.50 (free UK delivery)</b>
<form target="paypal" action="https://www.paypal.com/cgi-bin/webscr" method="post">
<input type="hidden" name="cmd" value="_s-xclick">
<input type="hidden" name="hosted_button_id" value="10351323">
<p class="lft"><input type="hidden" name="on0" value="Delivery Destination"></p>
<p class="lft">Select delivery destination</p>
<p><select name="os0">
<option value="UK">UK £4.50</option>
<option value="Europe">Europe £6.20</option>
<option value="Outside Europe">Outside Europe £7.20</option>
</select> inclusive price per pack of five cards</p>
<input type="hidden" name="currency_code" value="GBP" />
<input type="image" src="https://www.paypal.com/en_GB/i/btn/btn_cart_LG.gif"

name="submit" alt="PayPal - The safer, easier way to pay online.">

<img alt="" src="https://www.paypal.com/en_GB/i/scr/pixel.gif" width="1" height="1">

</form>

</div>

</div>

<footer><p class="cntr">Footer goes here</p></footer>

</body>

</html>
![]() Note The PayPal code for each button usually contains the attribute
Note The PayPal code for each button usually contains the attribute border="0". This border is best removed by CSS markup; therefore, delete border attributes from the listing so that your page will validate.
This Listing 10-1b is the CSS style sheet for Listing 10-1a. It creates boxes for the images and the PayPal buttons without using deprecated tables.
Listing 10-1b. The CSS Style Sheet For Listing 10-1a (pay-cards.css)
/*add display attributes for the semantic tags*/

header, footer, section, article, nav { display:block;

}

body {font-family:"times new roman"; font-size:medium; color:black;

background:white url('images/yellowgradient2.gif') repeat-x;

}

#container {min-width:960px;  max-width:1100px; padding:0; margin:auto;

}

header {width:100%; margin:auto; height:60px; text-align:center;

}

nav { float:left; margin:0; width :125px; display:block; padding:0; border:0 zoom:1;

}

#rightcol {float:right; width:120px; text-align: left; display:inline; margin:0; border:0

}

/* set general side button styles */

nav ul { margin-left:30px; padding-left:0;width:120px; list-style-type:none;

}

nav ul li { margin-bottom: 4px; text-align: center;

}

/* set general anchor styles */

nav li a { display: block; color: white; background:#D20B0D; font-weight: bold;

text-align:center;

}

/* specify state styles. */

/* mouseout (default) */

nav li a { background: #D20B0D;  border: 4px outset #FFAAAA; text-decoration: none;

}

/* mouseover */

nav li a:hover { background: maroon; border: 4px outset maroon;
}
/* onmousedown */

nav li a:active { background:#AECBFF; border: 4px inset #AECBFF

}

p.redarrow {text-align:center; padding-top: 250px;

}

.box { margin:0 150px 0 190px; padding:5px; text-align:center; border:1px solid black;

border-bottom:0;

}

.box-bottom { margin:0 150px 0 190px; padding:5px; text-align:center; border:1px solid black;

}

img { border:0;

}

footer {clear:both; text-align:center;

}

h1 {font-size:xx-large; color:red; margin-top:10px; margin-bottom:5px; text-align:center;

}

h2 {font-size:x-large; font-weight bold; margin-top:5px; margin-bottom:5px;

font-weight:bold;

}

span.tiny {text-align: center; font-family: Arial; font-size: xx-small; color: #000;

}

p {margin-top:5px; margin-bottom:5px;

}

p.cntr {text-align:center;

}

p.lft {text-align:left;

}
Add a Donation Button
A donation button allows users to contribute to your organization. In this case, the users specify the amount they wish to donate. The button code is downloaded from the PayPal web site; and like the Buy Now button, it is enciphered and completely secure. Use the instructions given earlier under the heading To Access the PayPal Button Factory. Follow Those Steps, but select the Donations button. Fill out the form and make sure that the box is ticked next to Save Button at PayPal (this will protect the button from fraudulent changes). Click Create Button.
The PayPal Donations button code will appear; copy and paste it into your text editor and save it with a memorable name. Then paste the code into your web page where you want the button to appear.
![]() Tip Using the same process, a Subscription button can be downloaded and various options set, such as the amount and the renewal date.
Tip Using the same process, a Subscription button can be downloaded and various options set, such as the amount and the renewal date.
A secure donation button is shown in Figure 10-3.
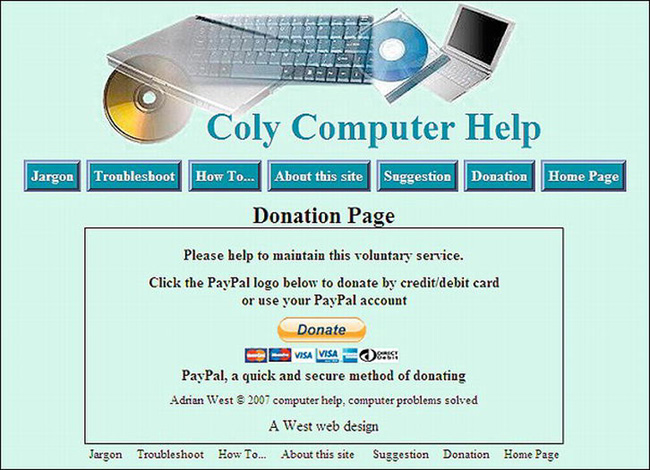
Figure 10-3. The donation page on my free, computer-help web site. The PayPal Donation button is encrypted to prevent tampering by hackers.
For Figure 10-3, the PayPal code was downloaded and inserted in the HTML code. When the page is viewed online, it dynamically loads a yellow button and also the debit/credit card logos.
The downloaded code for the button looks something like the following (the value has been changed to 1234567ABC for security):
<form action="https://www.paypal.com/cgi-bin/webscr" method="post">

<input type="hidden" name="cmd" value="_s-xclick">

<input type="hidden" name="hosted_button_id" value="1234567ABC ">

<input type="image" src="https://www.paypal.com/en_US/GB/i/btn/btn_donateCC_LG.gif"

border="0" name="submit" alt="PayPal - The safer, easier way to pay online.">

<img alt="" border="0" src="https://www.paypal.com/en_GB/i/scr/pixel.gif" width="1"

height="1">

</form>
The Please Pay Button
The donation button can be adapted to use when the customer needs to obtain a quotation on goods before proceeding with an order. If the quotation is acceptable, the customer can then send payment via the donation button. The donation button can be customized using your own image and text.
The Please Pay button shown in Figure 10-4 was customized using a graphics program; the code was downloaded from PayPal.

Figure 10-4. Paying for an amount that matches a quotation
Design a customized button as follows:
- Design a Please Pay button in
.gifformat in a graphics program and place it in the images folder on your web site’s root folder. Make a note of the URL for the button image. - Log in to the client’s account and for UK, click My Selling Preferences in the Profile. For USA accounts go to My Selling Tools, then PayPal buttons update. Or more easily, try the Merchant Services tab.
- Click Create a New Button and select the Donations button from the drop-down list.
- Fill in the fields.
- Under the heading Customize Button, click Use Your Own Button Image.
- Enter the URL for the button that you designed.
- Click Create Button, then copy and paste the code into your web page.
When the customer agrees to the vendor’s quotation, the customer enters the amount after clicking the Please Pay button. In Listing 10-4, the code for the customized downloaded payment button is shown in bold text (for security the PayPal reference number has been changed to 12345ABC).
(A downloadable file is not available for this listing)
Listing 10-4. Adding a Customized PayPal Button to a Web Page
<!doctype html>

<html lang=en>

<head>

<title>Please Pay</title>

<meta charset=utf-8>

<style type="text/css">

body {font-size:medium; text-align:center;

}
#container { width:400px; padding-top:10px; border:1px black solid;
}
h1 { font-size:120%;
}
</style>
</head>
<body>
<div id="container">
<h1>Thank you for accepting our quotation</h1>
You can pay by one of two methods:-
<p>1. Click <b><a href="#check">CHECK</a></b>. A form will appear. Please
<br>fill it out and mail it with your check</p>
<p>OR</p>
2. By PayPal or Debit/Credit card, <br>click the <b>Please Pay</b> button
<form action="https://www.paypal.com/cgi-bin/webscr" method="post">
<input type="hidden" name="cmd" value="_s-xclick">
<input type="hidden" name="hosted_button_id" value="12345ABC">
<input type="image" src="please-pay.gif" border="0" name="submit" alt="PayPal — The safer, easier way to pay online.">
<img alt="" border="0" src="pixel.gif" width="1" height="1">
</form>
</div>
</body>
</html>
Test Your PayPal Buttons
Once the downloaded code has been added to your web site, some of the payment process can be tested. However, the full payment flow cannot be tested with a single account because PayPal does not allow members to make a payment to themselves.
![]() Note Members are permitted to have both a Personal account and a Business/Premier account. For testing purposes, a member may want to open a separate Personal PayPal account.
Note Members are permitted to have both a Personal account and a Business/Premier account. For testing purposes, a member may want to open a separate Personal PayPal account.
Go to your web site and locate the PayPal payment button page that you wish to test.
- Click on the button.
- If the button is functioning correctly, you are taken to a PayPal Payment page. Your computer will have cookies enabled, so you see your own PayPal username. However, when your buyer clicks Buy Now, they see their own PayPal username if they have a PayPal Account.
- If the customer is not a PayPal member, they can click on the Click Here button where it says If You Do Not Have a PayPal Account, Click Here.
Customers Can Use PayPal or a Debit/Credit Card
If customers have no PayPal account, they use the alternative payment link to enter their name and delivery address. They will then be prompted for details such as payment amount, debit/credit card type and number, email address, and phone number. They can choose to save the information by creating a PayPal account to simplify future transactions.
Customers are fully protected by PayPal’s fraud prevention feature. Premier and business account holders can turn the feature on or off by logging in to PayPal, going to Profile, clicking Website Payment Preferences under the Selling Preferences column, and ticking the yes/no box under PayPal Account Options.
Managing a PayPal Account
To access the account so that the owner can manage it, go to http://www.paypal.co.uk (in the United Kingdom) or www.paypal.com (in the United States). Then follow these steps:
- Log in using the button on the left.
- Your email address is shown. Enter your password and click the Login button.
- Click History for an overview of what has happened in your account.
- When you have finished, click Logout.
- To transfer money from your PayPal account into your personal bank account, you must access your PayPal account and then instruct PayPal the amount to transfer.
- Access your PayPal account and click Withdraw.
- Click Withdraw funds to your bank account.
- Enter the amount to be transferred.
- Below the Amount field, ensure that your personal bank account is shown.
- Click Continue.
- On the next page, confirm that the details are correct and click the Submit button.
- The transaction will take about three days to complete.
- Request Money allows you to receive or request money from anyone with an email address in 190 countries and regions that accept PayPal. To request money for an auctioned item, request payment from a customer, or send a personal payment request by entering the recipient’s email address and the amount you are requesting.
![]() Tip PayPal offers a full API for even further control of your shopping cart and other buttons. Try experimenting with the useful Website Payments Standard Overview page at
Tip PayPal offers a full API for even further control of your shopping cart and other buttons. Try experimenting with the useful Website Payments Standard Overview page at https://cms.paypal.com/us/cgi-bin/?cmd=_render-content&content_ID=developer/. It goes through many of the advanced features that developers can use to work with PayPal, including a reference to all of the PayPal variables. PayPal also has a shipping calculator that may prove useful to you.
Summary
This chapter has shown you that the step-by-step process of adding PayPal to a web site is not mysterious, but relatively simple and logical. You have learned how to embed the downloaded code for various PayPal buttons and you have been reassured about security. You have also learned how the web site owner can transfer money and view a PayPal account’s balance.
In the next chapter, you will learn more about security and how it affects email addresses and feedback forms. Safe solutions will be provided and although a little JavaScript is used and a PHP form filter is described, no knowledge of either script language is needed.