
C H A P T E R 17
Printing, Counting, and Redirecting
As the title suggests, this chapter provides practical methods for implementing the following four utilities:
- Page printing
- A do-it-yourself (DIY) visitor counter
- A Google Analytics visitor counter
- Redirecting
I’ll start by examining how the pitfalls of printing from the browser toolbar can be avoided and how a user can save ink and paper. Then you’ll see how to create a visitor counter. Finally, I’ll describe ways of redirecting to another page, or to another location on the same page, or to another web site.
Page Printing
A page can be printed from a web site page without a special style sheet by using either the printer button on the browser toolbar, or a page printer button inserted near the top of the page.
Unfortunately, both methods will print unwanted items such as background color, banner headings, menu buttons, footers, and advertisements. These items consume paper and ink unnecessarily. Also, the printer has to be set to landscape format to prevent cutting off the right side of the page. Features such as menu buttons and Go to Top arrows are quite useless on a printed document. In addition, a lengthy document may page-break at inconvenient points. The next section will demonstrate how these problems can be avoided by looking into the following topics:
- Creating a Print This Page button
- Preventing unwanted items from printing
- Simplifying the printout to save ink and paper
- Page breaks
- Printing URLs (web addresses)
- Printing check boxes
- Search engines and printable pages
- Testing CSS printable pages
Create a “Print This Page” Button
A page can be printed using the browser toolbar button, but most users appreciate a prominent Print This Page button, especially beginners. A page printer button can be inserted near the top of the page, as shown in Figure 17-1.

Figure 17-1. Two types of page printer button
For a standard Windows button (like the upper button in Figure 17-1), place this markup on the page where you want the button to appear. Only part of Listing 17-1 is given next, but the full listing is available to download from the book’s page at http://www.apress.com
Listing 17-1. Partial Listing for Two Types of Page Print Button (button-types.html)
<div id="button">

        <input type="button" value="Print this page" onclick="window.print()"

        title="Print this page">

        </div>
The value (shown bold in the markup) provides the text on the button.
The CSS for the Windows style button is:
#button { text-align:center; }
For the customized lower button in Figure 17-1, use the following markup:
        <div id=button>

        <input id="printbtn" type="button" value="Print this page"

        onclick="window.print()" title="Print this page">

        </div>
The CSS for the customized button is
        #button { text-align:center;

        }

        #printbtn { margin-bottom:10px; padding:5px; font-weight:bold;

        background:aqua; color:black;

        }
Prevent Unwanted Items from Printing
To strip out unwanted items when printing a page, an additional “print” style sheet must be created. This will print a page in a more convenient portrait format, in black and white, and with all the unwanted items removed.
The print style sheet comes into play only when the Print This Page button (or the browser’s Print button) is clicked.
In the <head>…</head> section of the HTML page, place the print style sheet link after the screen style sheet link, as follows:
        <link rel="stylesheet" href="mainstyle.css" type="text/css" media="screen">

        <link rel="stylesheet" href="print.css" type="text/css" media="print">
Simplifying the Printout to Save Ink and Paper
Figures 17-2, 17-3, and 17-4 show that a printout can have all the unnecessary items removed.
Figure 17-2. The screen display (top half of page only)
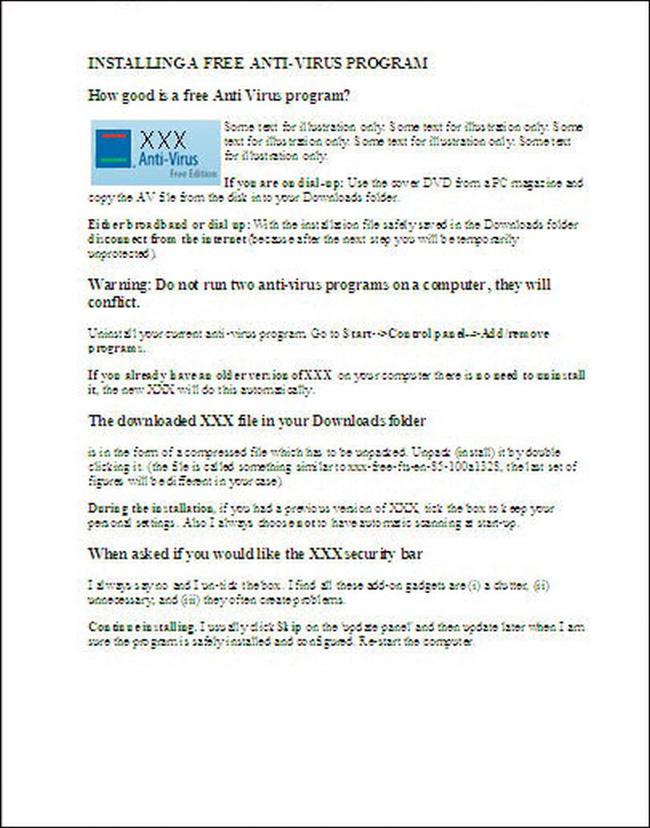
Figure 17-3. First printed page
Figure 17-4. Second printed page
In Figures 17-2, 17-3, and 17-4, I chose to omit the following items from the printout:
- The background color (to save colored ink).
- The header (it contains no useful information). This saves paper and ink.
- The Print This Page button, because it will not work on a printout.
- The menu buttons because they will not work on a printout.
- Headings (
h1toh6) on the screen display have large line spacing. I chose to reduce the text size and line height in the printout to economize on the user’s paper.- The Go to Top of Page “Up” arrow because it will not work on a printout.
- The footer because it is a set of links that will not work on a printout.
I also decided to split the columns. The screen page in this project has two columns; each column contains a different topic. Therefore, I set the printout so that it produces a different page for each column/topic. This prevents the page breaking in an inappropriate place. I achieved this by placing a page break at the top of column two.
I retained the instructional images in the printout because they would be useful to the user.
Listings 17-2a, 17-2b, and 17-2c provide the content for a two-column page and the two style sheets. The menu in this case is a horizontal menu bar with rollover buttons. It is included within the header <div>. No semantic tags are used so that the point of the exercise can be clearly understood without the clutter of a JavaScript hack for IE. In Listing 17-2a, most of the textual content has been omitted in order to save space and to clearly show the items targeted by the print CSS. The full page with its two style sheets can be downloaded from the Apress companion web site. The screen and print styles are shown in bold type. The <div>s to be ignored by the printer are also shown in bold type.
![]() Note The printed page has a minor drawback: a multicolumn page prints each column so that it spans the whole width of the page, as seen in Figures 17-3 and 17-4.
Note The printed page has a minor drawback: a multicolumn page prints each column so that it spans the whole width of the page, as seen in Figures 17-3 and 17-4.
Listing 17-2a. A Two-Column Page to Demonstrate Page Printing (twocol-printer.html)
<!doctype html>
<html lang=en>
<head>
<title>Two column page for printer</title>
<meta charset=utf-8>
meta details go here
<link rel="stylesheet" type="text/css" href="twocol.css" media="screen">
<link rel="stylesheet" type="text/css" href="twocol-print.css" media="print">
</head>
<body>
<a id="top"></a>
<div id="container">
<div id="hdr"><!--the CSS removes the header from the print-out-->
<h1>Coly Computer Help</h1></div>
<ul id="hmenu"><!--the CSS removes the menu from the print-out-->
<li class="hbtnew">
<a title="Computer Jargon explained" href="glossary.php">Jargon</a></li>
The rest of the code for the horizontal menu bar goes here
</ul>
<br>
<div id="button"><!--the CSS removes the print button from the print-out-->
<input type="button" value="Print this page" onclick="window.print()" title="Print this page">
</div><br><!--End of page printer button-->
<h3>INSTALLING & CONFIGURING A FREE ANTI-VIRUS PROGRAM</h3>
<div id="leftcol">
<h3>How good is a free Anti Virus program?</h3>
<img title="XXX free" src="images/xxx-crop.jpg" alt="XXX free" width="158" height="81">
The content of the first column goes
</div></div>
<!--LEFT COLUMN BEGINS ON A SEPARATE PAGE-->
<div id="rightcol" style="page-break-before:always;">

 <h3>Configuring a free anti-virus program</h3>

        The content of the second column goes here

</div>

</div>

<div id="ftr"><!--the CSS removes the footer from the print-out-->

<b>THIS IS THE FOOTER THAT YOU DO NOT WANT TO PRINT</b>

</div></div>

</body>

</html>
Some versions of Mozilla Firefox will sometimes insert a blank page due to an in-built quirk. To avoid any browser quirks, start the style sheet with a re-set, as shown in Listing 17-2b.
Listing 17-2b. The CSS Style Sheet for the Printer (twocol-print.css)
/*PRINT.CSS: re-set style for printing only*/

/*re-set basic styles to avoid browser compatibility quirks*/

html, h1, h2, h3, h4, h5, p { padding:0; margin:0; font-size:100%; font-weight:normal;

}

/*TO SAVE INK, set the text to black with white background*/

body { width:100%; padding:0; margin:0; float:none; color:black; background-color:white;

}

/*TO SAVE PAPER, remove the large line space beneath a heading. Set headings to 14 point*/

h1, h2, h3, h4, h5, h6 { margin-top:0; margin-bottom:0; font-weight:bold;

font-size:14pt; !important

}

/*SELECT UNWANTED PRINT-OUT ITEMS, i.e., header, menu, print-button, footer and uparrow*/

#hdr, #hmenu, #button, #ftr, .uparrow { display:none;

}

/*REVEAL OUTGOING URL links on printed page. See item on Printing URLs*/

a[href^="http://":after {content: "(" attr(href)")";

}

/*SET PAGE BREAK class so that the printed pages do not break in undesirable places*/

.break-before { page-break-before: always;

}
![]() Note The
Note The print.css style sheet does not include any commands already covered by the main (screen) style sheet. When the page is printed, the print style sheet overrides some of the main style sheet commands.
More on Page Breaks
The previous style sheet, twocol-print.css/Listing 17-2b, contained a command to cause the page to break at the top of column two. The page can also break at the end of column one with the following CSS class:
        .break-after { page-break-after:always;

        }
To complete the project, the main-style listing, twocol.css, is shown in Listing 17-2c.
Listing 17-2c. Creating the Main Style for the Screen Version of the Page (twocol.css)
body { background-color:#D7FFEB; font-family: "Times New Roman"; font-size: medium;

color: #000000;

}

#container {text-align:center; margin: auto; width:960px;

}

img { border:0;

}

#leftcol { float: left; width: 48%; padding:2px; text-align:left;

}

#leftcol img { float:left; margin-right:5px;

}

#rightcol { float: right; width: 48%; padding:2px; text-align:left;

}

#ftr { clear: both;}/* ensure footer stays at the bottom */

#hdr { background-position:35% 20%; background-image:url('images/compbkgcrop.jpg'),

background-repeat:no-repeat; width:960px; height:170px;

}

#button {margin:auto;
}

h1 { position:absolute; top:90px; left:300px; width:450px; font-family:"Times New Roman";

font-size: 300%; color: #0080a0; font-weight:bold; margin-bottom:5px;

}

.uparrow { text-align:center;

}

#hmenu { width:790px; text-align:center; margin:5px 0 10px 100px;

}

li.hbtnew {display:block; margin:auto; float:left; text-align:center; padding:3px;

list-style-type:none; list-style-position:inherit;

}

li.hbtnew a {display:block; text-decoration:none; color:white; background-color:#0080a0;

font-weight:bold; padding:4px;

}

li.hbtnew a { background: #0080a0; border: 4px outset #AABAFF;

}

li.hbtnew a:hover { background: #0060a0; color:yellow; border: 4px outset #8ABAFF;

}

li.hbtnew a:active { background:#ABCBFF; border: 4px inset #ABCBFF;

}

h3, h4, h5, h6 { margin-top:0; margin-bottom:0;

}

span.tiny {font-size: x-small;

}

.cntr { text-align:center; margin:auto;

}

.lft {text-align:left;

}

.right {text-align:right;

}
Printing URLs (Web Addresses)
If the web page has internal links to other pages or anchors on the same page, there is no point in printing them because they do nothing on a printed page. The next bit of CSS markup will print the URL of a web site that will be useful to the user. The printed URL will omit the underline because this can sometimes obscure an underscore in the URL. The code works in all browsers.
/*reveal links on printed page*/

a[href^="http://":after {content: "("attr(href)")"; }
Note that the four brackets in the middle (between the curly brackets) are ordinary curved brackets. Assuming that the following lines appear in the HTML…
<p>

        Click for <a title="Click for free computer help"

        href="http://www.colycomputerhelp.co.uk">Free computer help </a>

</p>
…the screen appearance of the URL would be as follows:
Click for Free computer help
The corresponding printout would be:
Click for Free computer help (
http://www.colycomputerhelp.co.uk).
Printing Check Boxes
On printable pages such as an order form, square check boxes (also known as tick boxes) using Wingdings or Webdings do not work in Mozilla Firefox. However, practically every computer has the Lucida Sans Unicode symbols. The Lucida Sans Unicode check box □ displays correctly in all popular browsers. You will need to use a larger font for the box than for the text.
Figure 17-5. This is how the box displays and prints in all popular browsers.
Listing 17-5 provides a tick box that prints correctly and also displays correctly in all browsers.
Listing 17-5. A Tick Box Suitable for Printing in all Browsers (tickbox-printer.html)
<!doctype html>
<html lang=en>
<head>
<title>This is box styled with Unicode Lucida font</title>
<meta charset=utf-8>
<style type="text/css">
.stylebox { font:xx-large bold; font-family:"Lucida Sans Unicode"; margin-left:50px;}
</style>
</head>
<body>
<p>The tick box shown below is styled with Unicode Lucida and it is
formatted as xx-large and bold </p>
<p class="stylebox">□</p>
</body>

</html>
Search Engines and Printable Pages
Some web designers create a printer-friendly page that is a duplicate of the main textual content. Search engines frown on the use of duplicate pages. The following is what Google says about using duplicate pages instead of CSS printable versions of a page: “Don't create multiple copies of a page under different URLs. Many sites offer text-only or printer-friendly versions of pages that contain the same content as the corresponding graphic-rich pages. To ensure that your preferred page is included in our search results, you'll need to block duplicates from our spiders using a robots.txt file. For information about using a robots.txt file, please visit our information on blocking Googlebot.”
For information on robots_text, visit:
http://code.google.com/web/controlcrawlindex/docs/robots_txt.html.
![]() Note The page printer described in this chapter does not upset search engines. Using a CSS page printer as shown in this chapter avoids this problem.
Note The page printer described in this chapter does not upset search engines. Using a CSS page printer as shown in this chapter avoids this problem.
Test CSS Printable Pages
There is no need to waste paper and ink, even though the testing requires a reasonable amount of trial and error. Load the page into a browser and click File ![]() Print Preview to see what the printable page will look like. If the printable page includes a page break, click the right-arrow at the bottom of the print preview screen to see subsequent pages.
Print Preview to see what the printable page will look like. If the printable page includes a page break, click the right-arrow at the bottom of the print preview screen to see subsequent pages.
Press the Esc key to switch out of the Print Preview mode.
A DIY Visitor Counter
Many clients ask for a visitor counter. Having paid for the web site and its hosting, they will be anxious to know if people are visiting it. You have to choose between a third-party counter, relying on the host’s counter, or putting your own DIY counter on the site.
A third-party counter means adding some code to a page. That code then links to a URL that manages the counting for you. I have found that third-party counters are sometimes subject to denial of service attacks (DOS) that put the counter out of action for a while. A site owner once told me that the site’s count no longer made sense. As a result, I use the DIY counter because it is under the total control of the webmaster and not reliant on vulnerable hosts.
Most hosts provide visitor statistics, but owners are reluctant to delve into their web site’s control panel. This means that the DIY counter is probably the best option. In the following sections, I will show you how to create one. It does involve the simple application of a small piece of PHP script, but this is fully explained. The main topics will be presented as follows:
- Why bother with a counter?
- Interpreting the visitor counts
- How a counter works
- Step 1: Create a free PHP visitor counter
- Step 2: Create the
"count"files- Step 3: Use a text editor to create three, tiny, identical text files
- Step 4: Make the menus match the three, main PHP pages
- Step 5: Upload the counter to the host
- Step 6: Ensure that browsers access the new
*.phppages instead of the old*.htmlpages- Step 7: Test the counter
Why Bother With A Counter?
Some web designers discourage their clients from having a visitor counter. They say that counters are old-fashioned, amateurish, and pointless. These excuses usually disguise a designer’s inability to optimize for search engines. They don’t want their inability exposed by a low visitor count.
A visitor counter that is limited to the home page may not provide enough information for the site owner. The home page may have many hits, but if the home page is garish, messy, or obscure, users will not explore the rest of the site. The counter is only telling the site owner how many people have visited the home page, which is not very useful. The owner needs to know whether visitors were tempted to explore the other pages. Visitor counters should, therefore, be placed on other key pages, that is, the pages the owner hopes will be visited. This will tell the owner whether the home page has persuaded users to delve deeper.
Interpreting the Visitor Counts
What can we learn by looking at the visitor counts and how many pages should have counters?
Let’s say the visitor counter on the home page reads 10,000. All 10,000 visitors could have taken one look at your home page and then skipped to another web site. Or they may have looked at several pages. The owner will never know whether visitors were tempted to delve deeper into the web site.
Clearly having a counter only on the home page will not be very informative. We could learn much more if counters were also placed on three other key pages. Let’s call the key pages a Walker’s page, a Camper’s page, and an About Us page. How might we interpret the following visitor counts?
- Home page: 10,000 visitors
- Walker’s page: 5,800 visitors
- Camper’s page: 8,700 visitors
- About Us page: 2,300 visitors
This information shows that
- The home page is not turning away visitors because the other pages had visitors.
- The visitors are more interested in camping gear than walking equipment.
- The sum of the hits on the other pages is greater than the number of home page hits; therefore, the home page is tempting visitors to look at more than one other page.
How a Counter Works
This counter is not only free, but it is thoroughly reliable. The counter requires some PHP code, but you need no knowledge of PHP to implement it. Just insert your own file names and count numbers into the simple listing that are included in this section. The count can start at any number of the owner’s choosing; in this example I chose 1000. The method is very simple and consists of a snippet of PHP code inserted into a page. When a user accesses the web page, this code triggers a small PHP file that adds 1 to the number stored in a text file. The new number (now 1001) is passed back to the web page and displayed. The process is illustrated in Figure 17-6.
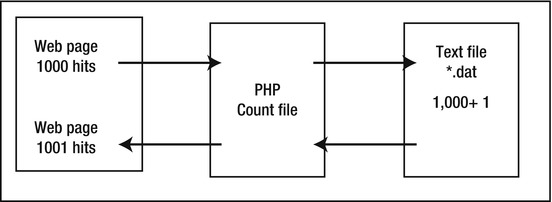
Figure 17-6. How the visitor number is increased by one when a page is visited
A dummy home page? Some designers create a duplicate home page named something like index-dummy.html so that all pages link to the dummy home page rather than to the real home page. This method means that, if after exploring the other pages on a web site, the visitors click back to the home page, they are sent to the dummy home page. The counter on the genuine home page does not record another unique visitor. Although this gives a more accurate visitor count, it does mean that the web site contravenes one of the search engine rules: “do not create duplicate pages.” So, this technique is not recommended.
Step 1: Create a Free PHP Visitor Counter
The visitor counter featured in this chapter was devised by James Crooke of CJ Website Designs. His web site is http://www.cj-design.com.
The counter is free to use on condition that you credit him next to the visitor count. The code for doing this is listed in Step 2 of the three count*.php files.
This worked example assumes that the key pages are index.html, walk.html, and camp.html. (In this example, we will assume the owner does not want a counter on the About Us page).
![]() Note Only the three pages listed will have a
Note Only the three pages listed will have a DOCTYPE. The supporting files (*.dat and count*.php) must not have a DOCTYPE.
- Using a text editor (e.g., Notepad or Notepad++), insert the
includecode (shown in bold) type immediately above the closing body tag of the home page (index.html), or you could put it in the footer.- Save the modified index page with the name
index.php, as shown in Listing 17-6.Listing 17-6. A Home Page That Includes a Visitor Counter (index.php)
<!doctype html>

<html lang=en>

<head>

<title>index page with counter</title>

<meta charset= windows-1252>

        meta details go here

<link to style sheet goes here…

</head>

<body>

        the home page content goes here

    <p>

    <?php

    include("counthome.php");

    ?>

    </p>

</body>

</html>
Caution Because the page contains some PHP, the
charsetin this case must bewindows-1252; otherwise, the page will not validate.- Repeat the process in the
camp.html page, as follows :<p>
<?php include("countcamp.php");
?>
</p>- Save the file as
camp.php.- Repeat the process in the
walk.htmlpage.<p>
<?php include("countwalk.php"); ?>
</p>- Save the file as
walk.php. You now have three new.phpfiles:index.php,camp.php, andwalk.php.
Step 2: Create the Count Files
Use a text editor to create three "count" files from scratch and save them as .php files. These files are identical except for the item shown in bold type.
- Create the first
"count"file for the home page, as follows:<?php
$COUNT_FILE = "counthome.dat";
if (file_exists($COUNT_FILE)) {
$fp = fopen("$COUNT_FILE", "r+");
flock($fp, 1);
$count = fgets($fp, 4096);
$count += 1;
fseek($fp,0);
fputs($fp, $count);
flock($fp, 3);
fclose($fp);
} else {
echo "Can't find file, check '$file'<br>";
}
?>
<font color="#000000" size="x-small" face="Arial">
<?php echo $count;
?>
<a href=”http://www.cj-design.com>©CJ Counter</a>
</font>- Save the file as
counthome.php.- Create the second
"count"file for the camping page, as follows:<?php
$COUNT_FILE = "countcamp.dat";
if (file_exists($COUNT_FILE)) {
$fp = fopen("$COUNT_FILE", "r+");
flock($fp, 1);
$count = fgets($fp, 4096);
$count += 1;
fseek($fp,0);
fputs($fp, $count);
flock($fp, 3);
fclose($fp);
} else {
echo "Can't find file, check '$file'<br>";
}
?>
<font color="#000000" size="x-small" face="Arial">
<?php echo $count;
?>
<a href=”http://www.cj-design.com>©CJ Counter</a>
</font>- Save the file as
countcamp.php.- Create the third
"count"file for the walking page, as follows:<?php
$COUNT_FILE = "countwalk.dat";
if (file_exists($COUNT_FILE)) {
$fp = fopen("$COUNT_FILE", "r+");
flock($fp, 1);
$count = fgets($fp, 4096);
$count += 1;
fseek($fp,0);
fputs($fp, $count);
flock($fp, 3);
fclose($fp);
} else {
echo "Can't find file, check '$file'<br>";
}
?>
<font color="#000000" size="x-small" face="Arial">
<?php echo $count; ?>
<a href=”http://www.cj-design.com>©CJ Counter</a>
</font>- Save the file as
countwalk.php.
Step 3: Use a Text Editor to Create Three, Tiny, Identical Text Files
- Put only the counter’s start number in each file (say 0 or 1000). Do not put anything else in these files and do not insert a comma to indicate thousands.
- Save these three files with the names
home.dat,camp.dat,andwalk.dat.
You now have three new PHP web pages, three .dat files, and three *count.php files.
Step 4: Make Menus Match the Three PHP Pages
On everypage in the web site, change the menu hyperlinks so that they link to index.php, camp.php and walk.php instead of the old *.html pages.
Step 5: Upload the Counter to the Host
- Using your FTP program, access the web site on the host server.
- Now upload to the host server the three
.datfiles, the threecount.phpfiles, and the three main PHP pages.- Using an FTP program, in the host server’s panel, right-click the new file
counthome.php. On the drop-down menu, look for Properties/CHMOD and click it. Change the 644 figure to 777.- Repeat this for
countcamp.php,countwalk.php,counthome.dat,countcamp.dat, andcountwalk.dat
![]() Note CHMOD stands for change mode; that is, it enables you to change the access permissions on the files so that the content cannot be activated by an unauthorized person on Linux servers. The main page is left as CHMOD 664, so it is safe from interference. The other pages are set to 777 to allow the files to interact with each other, and thus change the visitor count every time someone looks at the pages. On Windows servers that support PHP, this is a little more complicated. The easiest way to do this is to place the
Note CHMOD stands for change mode; that is, it enables you to change the access permissions on the files so that the content cannot be activated by an unauthorized person on Linux servers. The main page is left as CHMOD 664, so it is safe from interference. The other pages are set to 777 to allow the files to interact with each other, and thus change the visitor count every time someone looks at the pages. On Windows servers that support PHP, this is a little more complicated. The easiest way to do this is to place the .dat files in a sub-directory and set the sub-directory to 777.
Step 6: Ensure that Browsers Access the New *.php Pages Instead of the Old *.html Pages
This may very well be the most import step of all, as it prevents browsers accessing the old HTML files; because if two files have the same prefix, such as index.html and index.php, browsers will always choose the HTML version.
- In the right-hand server/host pane of the FTP program, right-click the file
index.htmland either rename it asindexold.htmlor delete it. Users will now automatically access theindex.phpfile.- Repeat this for the
camp.htmlfile and thewalk.htmlfile.
The counter should now function as follows: when a visitor accesses a page, this triggers one of the related files: countcamp.php or countwalk.php or counthome.php. These cause the number on the related *.dat file to be increased by one. The new number is then passed to the relevant page, where it is displayed. You now need to test the counter.
Step 7: Testing the Counter
Access the web site with a browser to ensure that the counter number is showing at the bottom of the page. If the counter number is present on the page, click the refresh icon on the browser. The number should increment by one. Access the other main pages to check that their counters work.
![]() Note If a PHP parsing error occurs, most likely a space has been inserted between
Note If a PHP parsing error occurs, most likely a space has been inserted between <? and php. Delete that space so that it looks like <?php.
Track Visitors with Google Analytics
Google Analytics is an alternative to the previously described DIY counter. It provides a detailed analysis of visitors for each page, and it even records the average time visitors spend looking at each page. You will be able to discover where the visitor traffic came from; for example, a search engine, a referral, or a direct URL entry. It will even tell you which countries use your web pages the most.
Google Analytics requires you to add a piece of JavaScript to the <head> section of each page on your web site. The following steps will provide you with the code and help you install it:
- To install Google Analytics, visit
http://www.google.com/analyticsand sign on. If you have a Google account, use that to sign on; otherwise, register for an account.- Fill in the form that appears, and tick the box to say you agree with the terms.
- Click the Create Account button and you are given a snippet of code to inset into the
<head>section of every page. This code is essential; Google cannot track your pages without it. Insert the snippet just before the closing</head>tag.
When you download the code, it will look similar to the following:
<script src="http://www.google-analytics.com/urchin.js" type="text/javascript">

</script>

        <script type="text/javascript">

        _uacct = "UA-67xxx9-1";

        urchinTracker();

        </script>
After 24 hours, you will be able to see the first visitor reports. As time goes by, the reports will become more meaningful. To access the analysis (called My Dashboard), open www.google.com/analytics and log in. Click on the name of your web site and the statistics are displayed.
In Google Analytics, on the left-hand menu, select Traffic Sources ![]() Keywords. This will show you a list of all the keywords people have searched in order to arrive at your site.
Keywords. This will show you a list of all the keywords people have searched in order to arrive at your site.
For help, go to http://support.google.com/googleanalytics/?hl=en.
Redirection
Redirection is a subset of links (or hyperlinks to use the full term). Links take three forms: navigation links that take the user from page to page; links within the <head> section of a page that connect the page to scripts or to CSS style sheets; and redirection links that don’t fit into either of the other two categories.
Most users are familiar with web pages that have a set of links near the top (see Figure 17-7). These links, when clicked, cause the cursor to jump to various sections on the page. The user is redirected to a specific location on a page. Users can also be redirected to a specific place on another page. They can be redirected from one web site to another web site, and an old web site can redirect users to a later version that has a different URL.
Anchors and Links
The place that the redirection points to is called an anchor. Originally the anchors on a page were defined as <a name="…"></a>. Although <a name="…"></a> is not deprecated, W3C recommended in 2002 that id should be used instead of name. The code then becomes <a id="…"></a>. The same recommendation applies to anchors on the same page or on other pages; that is, use id not name.
The component that redirects the cursor to the anchor is a link. You will be completely familiar with links that redirect you to another page. This usually takes the following form:
<b>For a desciption of the tennis courts</b> Please click

<a href="tennis.html " title="Tennis court information"><b>Tennis</b</a>.
The next six mini-projects show that a slightly different link format is required to send the cursor to an anchor that is more specific than a whole page.
Redirecting to a Specific Place on the Same Page
A list of links at the top of a page can redirect the user to various sections on that page. This is common practice for long pages of information. Figure 17-7 shows a typical menu for moving around the same page. Clicking a link takes you to the relevant section on the page. Always place an Up arrow (or a return-to-menu link) at the end of each section to allow the user to redirect back to the menu (see Figure 17-8).
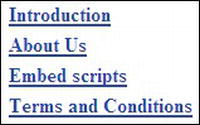
Figure 17-7. Redirection with default links

Figure 17-8. Redirection using an Up-arrow
The bold type in Listing 17-7 shows the location of the redirection links in these two figures. Clicking an item on the menu takes you to the relevant section. Clicking the Up arrow anywhere on the page redirects you to the menu. The full file can be downloaded from the Apress companion site.
Listing 17-7. Creating Two Types of Redirection on a Long Page (long-page-with-links.html)
<!doctype html>

<html lang=en>

<head>

<title>Long page with links to items on page</title>

<charset=utf-8>

        <style type="text/css">

        #menu p { margin-top:5px; margin-bottom:0;

        }

        img { border:0;

        }

        h1 { font-size:large;

        }

        </style>

</head>

<body>

<a id="top"></a>

<div id="menu">

<p><b><a href="#intro">Introduction</a></b><a href="#intro" title="Introduction"></a></p>

<p><b><a href="#about">About Us</a></b><a href="#about" title="About Us"></a></p>

<p><b><a href="#embed" title="Embed scripts">Embed scripts</a></b></p>

<p><a href="#terms" title="Terms and conditions"><b>Terms and Conditions</b> </a></p>

</div>

<h1>EMBEDDING SCRIPTS</h1>

<a id="intro"></a>

<p>Introduction</p>

        Long block of text goes here

<p><b>Return to Menu</b><a href="#top"><img title="Return to Menu"

src="images/bluearrow.gif" alt="Return to Menu"></p>

<a id="about"></a>
<p>About Us</p>

        Long block of text goes here

<p><b>Return to Menu</b><a href="#top"><img title="Return to Menu"

src="images/bluearrow.gif" alt="Return to Menu"></p>

<a id="embed"></a>

<p>Embed scripts</p>

        Long block of text goes here

<p><b>Return to Menu</b><a href="#top"><img title="Return to Menu"

src="images/bluearrow.gif" alt="Return to Menu"></p>

<a id="terms"></a>

<p>Terms and Conditions</p>

        Long block of text goes here

<p><b>Return to Menu</b><a href="#top"><img title="Return to Menu"

src="images/bluearrow.gif" alt="Return to Menu"></p>

</body>

</html>
You need to create the arrow image in a color and size to suit your page.
For a very long block of text, you may need more than one Up arrow. Create a class for the additional Up arrow and set the top margin for that class at, let’s say, 400 pixels. The Up arrows will then be spaced apart vertically, without using dozens of breaks between the Up arrows, like <br><br><br><br><br> or <p> </p><p> </p><p> </p><p> </p>, and so on.
Redirecting to a Specific Position on a Different Page in the Same Web Site
In the next example, a web page named page1.html has a link to page2.html, but the anchor is a particular place on page 2. That particular place on page2.html has a list of costs for using the tennis courts. The principle is shown in Figure 17-9.
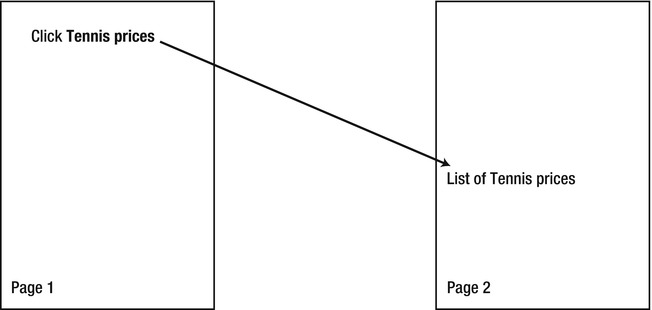
Figure 17-9. Redirecting to a particular location on another page
The redirection link in page1.html would be page2.html#tennis-prices. The complete link would be:
<b>For details of the cost of using the tennis courts</b> Please click

<a href="page2.html#tennis-prices" title="Tennis court hire prices"><b>

Tennis prices</b </a>
The href specifies the target page (page2.html) and the hash symbol specifies the precise spot on the target page (#tennis-prices). In page2.html, immediately before the list of tennis court prices, you would insert the following code:
<a id="tennis-prices"></a>
When the user clicks the link on page1.html, the browser immediately jumps to the tennis court price list section on page2.html.
Redirecting from an Old Web Site to a Newer One
An owner may wish to redirect traffic from an old web site to a new site. Figure 17-10 shows a typical page for a web site that has been replaced by a new web site. As well as displaying the page, the user will be automatically redirected to the new web site within a certain number of seconds.
Figure 17-10. A typical redirection page
We will now examine a typical example. Let’s say that the owner is a town council in the United Kingdom. The web site is http://www.brightville-council.com. The council decides that the .com domain name is not really suitable for a UK town hall. Therefore, the council commissions you to design and produce a shiny new web site called http://www.brightville-council.org.uk. What is the council to do about the 100,000 people who know the old URL? And then there is the problem posed by all that literature and those directories that quote the old URL?
Also, the search engines will have indexed some of the pages of the old web site so that entering “Brightville” or “Brightville council” will access the old site.
The neatest solution is to keep the old site running for a couple of years in parallel with the new site, but you need to ensure that you have no close duplication between the old and new sites. The search engines will not tolerate duplicate web sites.
The next step requires some detective work. Use a search engine to discover which pages the search engine chooses when the keywords are entered. The pages that appear on the first three pages of results would be sufficient. Make a note of the page names because a redirection must be added to those pages.
Download copies of those pages using the FTP details for the old site. Create new versions of those pages using the markup shown in Listing 17-10 and keep the same page name. The redirection instruction is shown in bold type.
Listing 17-10 offers a simple solution to this problem by automatically notifying users and then redirecting them to the new web site. A downloadable template is not available for this listing.
Listing 17-10. Adding a Redirection to Another Web Site
<!doctype html>

<html lang=en>

<head>

<title>Redirection page</title>

<charset=utf-8>

<meta http-equiv="refresh" content="5; URL=http://www.brightville-council.org.uk">

        no need for any other meta content

        <style type="text/css">

        body {font-weight:bold; font-size: large; color:black; font-family:arial;

        text-align:center; }

        </style>

</head>

<body>

<p>A search engine such as Google has directed you to an old version of our web site</p>

<p>Please accept our apologies</p>>

<p>You will be switched to the new version at

<a href="http://www.brightville-council.org.uk">

www.brightville-council.org.uk </a> in 5 seconds</p>

<p>If re-direction does not occur after 5 seconds, please click

<a href="http://www.brightville-council.org.uk /">Here</a></p>

</body>

</html>
Insert your own, new web site details in place of the URLs shown in bold italics. In the host where the old URL is stored, upload the revised pages to replace the old pages. The text on the redirection message could be something like the text shown in Figure 17-10. Vary the text a little on each page so that the search engines will not be upset by duplicate pages.
Creating a “Go Back” Button
A page such as a printable form may not have a navigation menu. A redirection by means of a Go Back button would be a helpful feature. The Go Back button might look like that shown in Figure 17-9.
Figure 17-11. A typical Go Back button
Normally the Go Back button is only required on a single page of the web site, so an internal style sheet is a sensible choice. However, if you have several pages in a web site needing a Go Back button, use an external style sheet. Listing 17-11 creates the Go Back button shown in Figure 17-11. A downloadable template is not available for this listing.
Listing 17-11. Inserting a Go Back Button into a Web Page
<!doctype html>

<html lang=en>

<head>

<title>A Go-back-button</title>

<charset=utf-8>
        meta details go here

        <style type="text/css">

        #button {height:22px; width:125px; margin:auto; background-color:#6aaaff;

        text-align:center;

        }

        /*set alternative hyperlink colours white medium bold*/

        a.button:link {color: white; text-decoration:none; font-size:100%; font-weight:bold;

        }

        a.button:hover {color: red;text-decoration: none; font-size:100%; font-weight:bold;

        }

        </style>

</head>

<body>

<div id="button">

        <a class="button" href="previous-page.html" title="Return to previous screen

and full menu">GO BACK</a>

</div>

</body>

</html>
Replace previous-page.html with the file name of the page you wish to return to.
Go Back to Any Page
If the user has accessed a page from any other page at random, you will need a bit of JavaScript to achieve a redirection to the unknown page. This does duplicate the function of the browser’s back button, but it might be useful, for instance, on an error-reporting page for a feedback form. The value of the button text would then be “Return to form”.
If the user has arrived at a page called page2.html from any other page, she can return to any previous page with this button (see Figure 17-12).
Figure 17-12.A button redirecting the user to the previous page
A user is returned to the previous page when the button is clicked. The button is created with Listing 17-12. (This listing is not available for downloading).
Listing 17-12. Placing a Button on a Page to Redirect the User to the Previous Page
<!doctype html>

<html lang=en>

<head>

<title>A Go-back-to previous page button</title>

<charset=utf-8>

        meta details go here

</head>

<body>

<form method="post" action=" ">

<input type="button" value="Go to previous page" onclick="history.go(-1)">

</form>

</body>

</html>
Summary
This chapter dealt with three topics: page printing, a visitor counter, and redirection. The page printer code is designed to save the user’s paper and ink and gives a clean printout devoid of unnecessary items such as background color, banner headings, menu buttons, advertisements, and footers.
The DIY visitor counter provides the user with a simple visual assessment of whether the web site is attracting visitors. The chapter explained why it was important to have a counter on more than one page. Instructions were provided for installing Google Analytics as an alternative to the DIY counter.
The redirection section listed and explained five types of redirection.
In the next chapter, you will learn why validation is important and how to interpret the reports provided by validators such as the W3C validator and html5.validator.nu.