Chapter 8. MLOps for Azure
A third reason for our family to move was that we had never had a proper home since 1933 when, in the midst of the Great Depression, we were dispossessed. It was only years later that I understood how the rural paradise I loved at age 6 disappeared. My parents could not make the payments. My mother abandoned her struggling practice and found a job as receiving physician in a state hospital that provided a few dollars and an apartment too cramped for us all, so my brother and I were sent into what we later called “The Exile.”
Dr. Joseph Bogen
Microsoft’s continuous investments in Azure for machine learning are paying off. The number of features offered today makes the platform as a whole a great offering. A few years ago, it wasn’t even clear that Azure would get such an influx of top-level engineering and a growing interest in its services.
If you haven’t tried Azure at all or haven’t seen anything related to machine learning within Microsoft’s cloud offering, I highly recommend you give it a chance. Like most cloud providers, a trial period is available with enough credits to try it out and judge for yourself.
One of the examples I usually tend to bring up is that of using Kubernetes. Installing, configuring, and deploying a Kubernetes cluster is not a straightforward task at all. It is even more complicated if you factor in associating a machine learning model and scaling its interactions with potential consumers. This is a challenging problem to solve correctly. If you get a chance to go through the deployment settings for a trained model, using a Kubernetes cluster as a target for the model, it boils down to selecting the cluster from a drop-down menu.
Aside from all the features and abstractions of complex problems like deploying models in production, it is very refreshing to see an enormous amount of detailed documentation. Although this chapter concentrates on doing operations in machine learning in Azure, it can’t possibly capture all of the exciting details. The main documentation resource is an excellent place to bookmark to dive deeper into more information not covered here.
In this chapter, I go through some of the interesting options in Azure, from training a model to deploying it in containers or a Kubernetes cluster. As they are becoming commonplace in machine learning offerings, I will dive into pipelines. Pipelines can enhance the automation further, even when the automation originates outside of the Azure cloud.
There are many ways to perform machine learning tasks within the platform: Azure ML Studio Designer, Jupyter Notebooks, and AutoML, where you can upload a CSV and start training models right away. Finally, most (if not all) features have corresponding support in the SDK (covered in the next section). That flexibility is vital because it allows you to choose the solution that works best for you. So there is no need to follow an opinionated way to operationalize models.
Finally, I will cover practical recommendations on applying some of the core principles of DevOps, such as monitoring and logging using features of Azure Machine Learning.
Note
Although this chapter is about Azure Machine Learning, it will not cover basics like creating and setting up a new account. If you haven’t tried the service yet, you can start here.
Azure CLI and Python SDK
The various examples and code snippets in this chapter assume that you have the Azure command line tool and Python SDK (Software Development Kit) installed and available in your environment. Make sure you install the latest version of the CLI, and that the machine learning extension is available after installation:
$ az extension add -n azure-cli-ml
Most of the time, you will need to authenticate from your local system back to Azure. This workflow is similar to other cloud providers. To associate your Azure account with the current environment, run the following command:
$ az login
Most of the Python examples using Azure’s Python SDK will require an account with Azure and the config.json file associated with your workspace downloaded locally. This file has all the information necessary to associate the Python code with the workspace. All interactions with the Python SDK should use this to configure the runtime:
importazureml.corefromazureml.coreimportWorkspacews=Workspace.from_config()
To retrieve the config.json file, log in to Azure’s ML studio and click the top-right menu (labeled Change Subscription). The submenu will have a link to download the config.json file (see Figure 8-1) .

Figure 8-1. Azure JSON config
If config.json is not present in the current working directory, using the SDK fails with a traceback:
In [2]: ws = Workspace.from_config()
~~~~~~~~~~~~~~~~~~~~~~~~~~~~~~~~~~~~~~~~~~~~~~~~~~~~~~~~~~~~~~~~~~~~~~~~~~~
UserErrorException                        Traceback (most recent call last)
<ipython-input-2-e469111f639c> in <module>
----> 1 ws = Workspace.from_config()

~/.python3.8/site-packages/azureml/core/workspace.py in from_config
    269
    270 if not found_path:
--> 271   raise UserErrorException(
    272    'We could not find config.json in: {} or in its parent directories.'
    273     'Please provide the full path to the config file or ensure that '
Now that I’ve covered some of the basics of using the Azure CLI and the SDK, I will get into more authentication details and some variants you can use in Azure.
Authentication
Authentication should be one of the core pieces of automation when dealing with services. Azure has a service principal for access (and access control) to resources. When automating services and workflows, people tend to overlook or even attempt to simplify authenticating in general. It is very common to hear recommendations like: “just use the root user,” or “just change file permissions so anyone can write and execute.” A seasoned engineer will know best, but only because they have experienced the pain after accepting these suggestions of lax security and deployment constraints. I very much understand the problem of trying to fix a situation like this one.
When working as a Systems Administrator in a media agency, the Engineering Lead logged directly into the production environment to make a file readable to anyone (needed by the PHP application where it ran). We eventually found out about it. The result of the change meant any HTTP request (and anyone on the internet) had read, write, and execute permissions for that file. Sometimes, a simple fix may be tempting and feel like the best way forward, but this is not always the case. Particularly with security (and authentication in this case), you have to be very skeptical of simple fixes that remove a security constraint.
Always ensure that authentication is done correctly, and do not try to skip or work around these restrictions, even when it is an option.
Service Principal
In Azure, creating a service principal involves several steps. Depending on the constraints you need for the account and resource access, it will vary from one example to another. Adapt the following to fit a specific scenario. First, after logging in with the CLI, run the following command:
$ az ad sp create-for-rbac --sdk-auth --name ml-auth
That command creates the service principal with the ml-auth name. You are free to choose any name you want, but it is always good to have some convention to remember what these names are associated with. Next, take note of the output, and check the "clientId" value, which the next steps require:
[...]
Changing "ml-auth" to a valid URI of "http://ml-auth", which is the required
format used for service principal names
Creating a role assignment under the scope of:
     "/subscriptions/xxxxxxxx-2cb7-4cc5-90b4-xxxxxxxx24c6"
  Retrying role assignment creation: 1/36
  Retrying role assignment creation: 2/36
{
[...]
  "clientId": "xxxxxxxx-3af0-4065-8e14-xxxxxxxxxxxx",
[...]
  "sqlManagementEndpointUrl": "https://management.core.windows.net:8443/",
  "galleryEndpointUrl": "https://gallery.azure.com/",
  "managementEndpointUrl": "https://management.core.windows.net/"
}
Now use the "clientId" to retrieve metadata from the newly created service
principal:
$ az ad sp show --id xxxxxxxx-3af0-4065-8e14-xxxxxxxxxxxx
{
    "accountEnabled": "True",
    "appDisplayName": "ml-auth",
    ...
    ...
    ...
    "objectId": "4386304e-3af1-4066-8e14-475091b01502",
    "objectType": "ServicePrincipal"
}
To allow the service principal access to your Azure Machine Learning workspace, you need to associate it with the workspace and resource group:
$ az ml workspace share -w example-workspace
  -g alfredodeza_rg_linux_centralus
  --user 4386304e-3af1-4066-8e14-475091b01502 --role owner
That command is the last one required to complete the process of creating a service principal and associating it with the machine learning account using the owner role. The example-workspace is the name of the workspace I used in Azure, and alfredodeza_rg_linux_centralus is the resource group within that workspace. It is rather unfortunate that there is no output from running that command after a successful call.
Once this account created, you can use it to enable automation with authentication, which prevents prompts and constant authenticating. Make sure to restrict the access and role to the least number of permissions needed.
Authenticating API Services
Other environments might not benefit from a service principal account, depending on the workflow at hand. These services can be exposed to the internet, providing interaction with deployed models via HTTP requests. In those cases, you need to decide the type of authentication to be enabled.
Before deploying a model or even configuring any settings for getting a model into production, you need to have a good idea about the different security features available to you.
Azure offers different ways to authenticate, depending on the service you need to interact with. The defaults for these services change, too, depending on the deployment type. Essentially, two types are supported: keys and tokens. Azure Kubernetes Service (AKS) and Azure Container Instances (ACI) have varying support for these authentication types.
-
AKS has key-based auth enabled by default.
-
ACI has key-based auth disabled by default (but can be enabled). No authentication is enabled by default.
-
AKS has token-based auth disabled by default.
-
ACI does not support token-based auth.
These types of clusters for deployments are significant enough to grasp before deploying the model to production. Even for test environments, always enable authentication to prevent a mismatch between development and production.
Compute Instances
Azure has a definition for compute instances that describes them as a managed cloud-based workstation for scientists. Essentially, it allows you to get started very quickly with everything you might need for performing machine learning operations in the cloud. When developing proof of concepts or trying something new from a tutorial, you can leverage the excellent support for Jupyter Notebooks with an enormous amount of dependencies preinstalled and ready to go. Although you can upload your own notebooks, I recommend starting by browsing the thorough samples that exist, as shown in Figure 8-2.
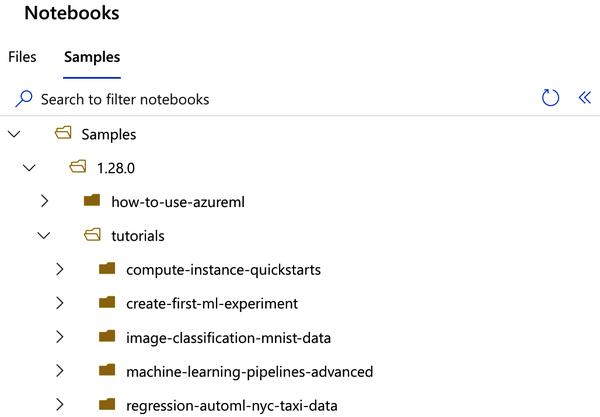
Figure 8-2. Azure notebook samples
One of the most annoying problems to solve when trying to get started running notebooks and tinkering with models is setting up an environment. By offering something ready-to-use and preconfigured specifically for ML, you are enabled to achieve your tasks quickly, moving from ideas in a notebook to production.
Once you are ready to deploy a trained model from a compute instance, you can use the compute instance as a training cluster since it supports a job queue, multiple jobs in parallel, and multi-GPU distributed training. This is a perfect combination for debugging and testing because the environment is reproducible.
Have you ever heard “But it works on my machine!” before? I surely have! Even if testing or exploring new ideas, reproducible environments are a great way to normalize development so that there are fewer surprises and collaboration between other engineers is more streamlined. Using reproducible environments is an instrumental part of DevOps that applies to ML. Consistency alongside normalization takes a lot of effort to get right, and whenever you find tools or services that are immediately available, you should take advantage of them right away.
As a Systems Administrator, I’ve put tremendous effort in normalizing production environments for development, and it is a hard problem to solve. Use Azure compute instances as much as possible!
You can create a compute instance within Azure ML Studio from the various workflows that require one, like when creating a Jupyter Notebook. It is easier to find the Compute link in the Manage section and create one there. Once it loads, multiple choices are presented (see Figure 8-3). A good rule of thumb is to pick a low-cost virtual machine to get started, which avoids higher costs down the road for something that might not be needed just to run a notebook.
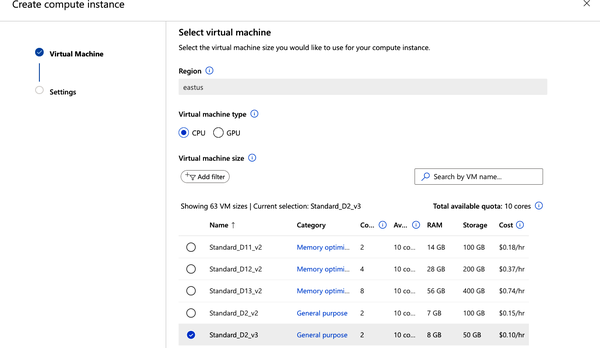
Figure 8-3. Azure Create compute instance
In this example, I’m choosing a Standard_D2_v3. Since the names of the various machines offered keep changing, the choices you get might be different.
Deploying
There are several ways of deploying in Azure to interact with a model. If you are dealing with massive amounts of data beyond what is reasonable to deal with in-memory, batch inferencing is a better fit. Azure does provide a lot of useful tooling (general availability for this service was announced in 2020), helping users deal with terabytes of both structured and unstructured data and get inferences from it.
Another way of deploying is for online (sometimes referred to as instant) inference. When dealing with smaller datasets (not in the order of terabytes!), it is useful to have a model deployed quickly, accessed over an HTTP API that Azure can create for you programmatically. An HTTP API that gets created for you automatically for a trained model is another one of these features that you should leverage.
Crafting HTTP APIs is not that much work, but offloading that work to a service means you (and your team) have more time to work on more substantial pieces like the quality of your data or the robustness of the deployment process.
Registering Models
The Azure documentation describes registration as something optional. It is indeed optional in that you don’t need it to get a model deployed. But as you get used to the process of deploying models and releasing them into production environments, it will become apparent that skimping on features and constraints like authentication (or, in this case, model registration) makes things go easier at first but can create problems later.
I highly recommend you register your models and follow a process to do so, even better if this process is fully automated. Granted, you may not need to register every single model you work with, but you most definitely should for select models that get into production. If you are familiar with Git (the version control system), then versioning models will feel like a very natural way to reason about changes and modification for production-level models.
These are a few key aspects of model versioning that makes it a compelling feature to use:
-
You can identify which model version you are using
-
You can quickly select from the various versions, with clarity from descriptions
-
You can roll back and select a different model without effort
There are a few ways to register a model. If you are training the model within Azure, then you can use the Python SDK with the result object of a Run class:
description="AutoML trained model"model=run.register_model(description=description)# A model ID is now accessible(run.model_id)
But you aren’t required to use Azure to train the model. Perhaps you already have several models trained, and you are considering moving to Azure to get them into production. The Python SDK allows you to register these models as well. Here is an example of how to do this with an ONNX model that is locally available in your system:
importosfromazureml.core.modelimportModel# assumes `models/` is a relative directory that contains uncompressed# ONNX modelsmodel=Model.register(workspace=ws,model_path="models/world_wines.onnx",model_name="world_wines",tags={"onnx":"world-wines"},description="Image classification of world-wide wine labels")
One of the refreshing things about Azure is its flexibility. The Python SDK is not the only way to register models. This is how to do it with the Azure CLI:
$ az ml model register --name world_wines --model-path mnist/model.onnx
You can iterate over several models and get them registered into Azure quickly with some modifications to the previous examples. If you have models available via HTTP, you could potentially download them programmatically and send them over. Use extra metadata to fill out the tags and descriptions; good descriptions make it easier to identify it later. The more automated the process, the better! In Figure 8-4, I’m using the Azure ML Studio to directly upload and register an ONNX model, which is also useful for handling a single model.
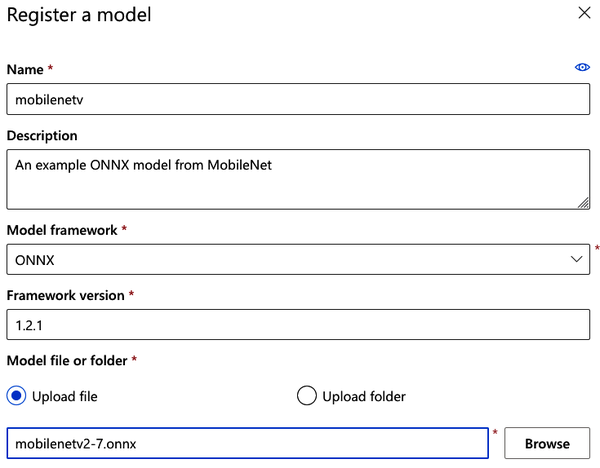
Figure 8-4. Registering a model in Azure
Versioning Datasets
Similar to registering models, the ability to version a dataset solves one of the biggest problems in ML today: enormous datasets that differ slightly are hard (and until recently, impossible) to version nicely. Version control systems like Git are not a good fit for this task, even though version control systems are supposed to help. This mismatch of version control systems that target source code changes and enormous datasets has been a thorn when producing reliable and reproducible production models.
This is another example of how cloud providers like Azure improve workflows with features like dataset versioning. Data is one of the most important pieces when crafting an ML pipeline, and since data can go through many rounds of transformations and cleaning, it is instrumental to version throughout the steps from raw to clean.
Retrieve the dataset first. In this example, the dataset is hosted over HTTP:
from azureml.core import Dataset

csv_url = ("https://automlsamplenotebookdata.blob.core.windows.net"
       "/automl-sample-notebook-data/bankmarketing_train.csv")
dataset = Dataset.Tabular.from_delimited_files(path=csv_url)
Next, register it using the dataset object:
dataset = dataset.register(
    workspace=workspace,
    name="bankmarketing_dataset",
    description="Bankmarketing training data",
    create_new_version=True)
The create_new_version will incrementally set a newer version of the data, even if there is no previous version (versions start at 1). After registering and creating a new version of the dataset, retrieve it by the name and version:
from azureml.core import Dataset

# Get a dataset by name and version number
bankmarketing_dataset = Dataset.get_by_name(
    workspace=workspace,
    name="bankmarketing_dataset",
    version=1)
Deploying Models to a Compute Cluster
In this section, you will configure and deploy a model to a compute cluster. Although there are a few steps involved, it is useful to repeat the process a few times to get used to them.
Head over to the Azure ML Studio and create a new automated ML run by clicking on “New Automated ML run” in the Automated ML section, or directly from the main (home) page by clicking the Create New box with the drop-down. For this part of the process, you will need a dataset available. If you haven’t registered a dataset, you can download one and then select From Local File to register it. Follow the steps to upload it and make it available in Azure.
Configuring a Cluster
Back on the “Automated ML run” section, select the available dataset to configure a new run. Part of configuring requires a meaningful name and description. Until this point, all you have configured and made available is the dataset and how it should be used and stored. But one of the critical components of a robust deployment strategy is to ensure that the cluster is solid enough to train the model (see Figure 8-5).

Figure 8-5. Configure an AutoML run
At this point, no cluster should be available in the account. Select “Create a new compute” from the bottom of the form. Creating a new cluster can be done while configuring a run to train a model, or it can be made directly on the Manage section under the Compute link. The end goal is to create a robust cluster to train your model.
It is worth emphasizing to use meaningful names and descriptions whenever possible throughout the many features and products in Azure ML. The addition of these informational pieces is critical to capture (and later identify) what the underlying feature is about. A useful way to solve this is thinking about these as fields, like when writing an email: the email subject should capture the general idea about what will be in the body. Descriptions are incredibly powerful when you are dealing with hundreds of models (or more!). Being organized and clear in naming conventions and descriptions goes a long way.
There are two significant cluster types: the Inference Cluster and the Compute Cluster. It is easy to feel confused until the underlying systems are known: inference clusters use Kubernetes behind the scenes and Compute Clusters uses virtual machines. Creating both in Azure ML Studio is straightforward. All you need to do is fill out a form, and you get a cluster up and running, ready to train some models. After creation, all of them (regardless of the type) are available as an option to train your model.
Although the Kubernetes cluster (Inference) can be used for testing purposes, I tend to use a Compute Cluster to try different strategies. Regardless of the chosen backend, it is crucial to match the workload to the size (and quantity) of machines doing the work. For example, in a Compute Cluster you must determine the minimum number of nodes as well as the maximum number of nodes. When parallelizing a model’s training, the number of parallel runs cannot be higher than the maximum number of nodes. Correctly determining the number of nodes, how much RAM, and how many CPU cores are adequate is more of a trial-and-error workflow. For the test run, it is best to start with less, and create clusters with more power as needed (see Figure 8-6).

Figure 8-6. Create a Compute Cluster
I choose 0 as the minimum number of nodes in this figure because it prevents getting charged for idle nodes. This will allow the system to scale down to 0 when the cluster is unused. The machine type I’ve selected is not very performant, but since I’m testing the run, it doesn’t matter that much; I can always go back and create a newer cluster.
Deploying a Model
Very much like training a model, when the time comes to deploy a model into production, you have to be aware of the cluster choices available. Although there are a few ways to get this done, there are two key ways to deploy. Depending on the type of deployment use case (production or testing), you have to choose one that fits the best. Following is an excellent way to think about these resources and where they work best:
- Azure Container Instance (ACI)
-
Best for testing and test environments in general, especially if the models are small (under 1 GB in size).
- Azure Kubernetes Service (AKS)
-
All the benefits of Kubernetes (scaling in particular) and for models that are larger than 1 GB in size.
Both of these choices are relatively straightforward to configure for a deployment. In Azure ML Studio, go to Models within the Assets section and select a previously trained model. In Figure 8-7, I chose an ONNX model that I’ve registered.
There are a couple of essential parts in the form; I chose ACS as the compute type, and enabled authentication. This is crucial because once the deployment completes, it will not be possible to interact with the container unless you use keys to authenticate the HTTP request. Enabling authentication is not required but is highly recommended to keep parity between production and testing environments.
After completing the form and submitting it, the process of deploying the model starts. In my example case, I enabled authentication and used ACS. These options don’t affect the interaction with the model much, so once the deployment completes, I can start interacting with the model over HTTP, ensuring that requests are using the keys.

Figure 8-7. Deploy a model
You can find all the details about the deployed model in the Endpoints section. The name used for the deployment is listed, which links to a dashboard of the deployment details. Three tabs are part of this dashboard: Details, Consume, and Deployment Logs. All of these are full of useful information. If the deployment completes succesfuly, then the logs will probably not be that interesting. In the Details tab, a section will show the HTTP API (displayed as “REST endpoint”). Since I enabled authentication, the page will show the value of “Key-based authentication” as true as shown in Figure 8-8.

Figure 8-8. REST endpoint
Anything that can talk to an HTTP service with authentication enabled will work. This is an example using Python (no Azure SDK needed for this); the input is using JSON (JavaScript Object Notation), and the input for this particular model follows a strict schema that will vary depending on the model you are interacting with. This example uses the Requests Python library:
importrequestsimportjson# URL for the web servicescoring_uri='http://676fac5d-5232-adc2-3032c3.eastus.azurecontainer.io/score'# If the service is authenticated, set the key or tokenkey='q8szMDoNlxCpiGI8tnqax1yDiy'# Sample data to score, strictly tied to the input of the trained modeldata={"data":[{"age":47,"campaign":3,"contact":"home","day_of_week":"fri","default":"yes","duration":95,"education":"high.school","nr.employed":4.967,"poutcome":"failure","previous":1}]}# Convert to JSONinput_data=json.dumps(data)# Set the content typeheaders={'Content-Type':'application/json'}# Authentication is enabled, so set the authorization headerheaders['Authorization']=f'Bearer {key}'# Make the request and display the responseresp=requests.post(scoring_uri,input_data,headers=headers)(resp.json())
Because the service is exposed with HTTP, it allows me to interact with the API in any way I choose (like using Python in the previous example). Interacting with an HTTP API to interact with the model is compelling because it offers excellent flexibility and gets you immediate results since it is a live inferencing service. In my case, it didn’t take long to create the deployment to get responses from the API. This means I’m leveraging the cloud infrastructure and services to quickly try a proof of concept that may end up in production. Trying out models with sample data and interacting with them in environments similar to production is key to paving the way for robust automation later.
When all goes well, a JSON response will get back with useful data from the prediction. But what happens when things break? It is useful to be aware of the different ways this can break and what they mean. In this example, I use input that is unexpected for the ONNX model:
{"error_code":500,"error_message":"ONNX Runtime Status Code: 6. Non-zero status code returnedwhile running Conv node. Name:'mobilenetv20_features_conv0_fwd'Missing Input: data Stacktrace: "}
An HTTP status code of 500 indicates that the service had an error caused by invalid input. Make sure that you use the correct keys and authentication methods. Most of the errors from Azure will be easy to grasp and fix; here are a few examples of how those look:
Missing or unknown Content-Type header field in the request-
Make sure that the right content type (e.g., JSON) is used and declared in the request.
Method Not Allowed. For HTTP method: GET and request path: /score-
You are trying to make a
GETrequest when you probably need aPOSTrequest that sends data. Authorization header is malformed. Header should be in the form: "Authorization: Bearer <token>"-
Ensure that the header is properly constructed and that it has a valid token.
Troubleshooting Deployment Issues
One of the many crucial factors for effective MLOps (of course inherited from DevOps best practices, covered in “DevOps and MLOps”) is good troubleshooting skills. Debugging or troubleshooting is not a skill that you are born with; it takes practice and perseverance. One way I explain this skill is by comparing it to walking in a new city and finding your way around. Some will say that if I find my bearings with (apparent) ease, then I must have some natural ability. But not really. Pay attention to the details, review those mental details regularly, and question everything. Never assume.
When finding my bearings, I immediately identify the sun’s position or the sea (is that East? Or West?), and take mental notes of landmarks or remarkable buildings. Then, I go from beginning to end, reviewing each step mentally: I went left at the hotel until the big church where I turned right, across the beautiful park, and now I’m at the square. Night settles in, and then there isn’t a sun position, and I can’t remember where to go. Was it left here? Or right? I ask questions, my friends all tell me left, and I don’t assume they are right. Trust but validate. “If they tell me left, that means I wouldn’t have gotten to the park, I’ll go their way, wait for a few blocks, and if there is no park, I will backtrack and turn the other way.”
Do not ever assume things. Question everything. Pay attention to details. Trust, but verify. If you practice this advice, your debugging will seem like a natural skill to your peers. In this section, I get into a few details related to containers and containerized deployment in Azure and some of the things you might see come up when they are problems. But you can apply the core concepts anywhere.
Retrieving Logs
Once you deploy a container, you have a few ways of retrieving logs. These are available in Azure ML Studio as well as the command line and the Python SDK. Using the Python SDK means only a few lines after initializing the workspace:
fromazureml.coreimportWorkspacefromazureml.core.webserviceimportWebservice# requires `config.json` in the current directoryws=Workspace.from_config()service=Webservice(ws,"mobelinetv-deploy")logs=service.get_logs()forlineinlogs.split(''):(line)
Run that example code with the name of a service you’ve previously deployed, and output gets generated with lots of information. Sometimes logs aren’t that good and are mostly repetitive. You have to see through the noise and pick up the highlights with useful information. In a successful deployment, most of the output will not mean much.
These are some of the logs from deploying an ONNX model (timestamps removed for brevity):
WARNING - Warning: Falling back to use azure cli login credentials.
Version: local_build
Commit ID: default

[info] Model path: /var/azureml-models/mobilenetv/1/mobilenetv2-7.onnx
[info][onnxruntime inference_session.cc:545 Initialize]: Initializing session.
[onnxruntime inference_session Initialize]: Session successfully initialized.
GRPC Listening at: 0.0.0.0:50051
Listening at: http://0.0.0.0:8001
Application Insights
Another aspect of retrieving logs and debugging that is valuable to explore is using observability tooling. Observability refers to the means of capturing the state of the system (or systems) at any given point in time. That sounds like a mouthful, but in short, it means that you rely on tooling like dashboards, log aggregation, graphs, and alerting mechanisms to visualize systems as a whole. Because the whole theme of observability is filled with tooling and processes, it is often complicated to get such a thing into production.
Observability is crucial because it isn’t about application logs; it is about telling a story about applications when problems arise. Sure, you found a Python traceback in a log, but that doesn’t necessarily mean that the Python code needs fixing. What if the input expected was a JSON payload from another system, but instead, the external system sent an empty file? Why would that happen? Observability brings clarity to seemingly chaotic systems. The problems get exponentially more complicated when dealing with distributed systems.
It is not uncommon to define a pipeline system for ingesting data into models that involve several different steps. Source the data, clean it, remove garbage columns, normalize it, and version this new dataset. Suppose all of these are being done with the Python SDK and leveraging triggers from Azure. For example, new data gets into the storage system, which triggers an Azure Function that executes some Python. In this chain of events, it is difficult to tell a story without tooling.
Azure offers the right tooling out-of-the-box with the simplest of calls in the SDK. It is called Application Insights, and it is packed with all the graphs and dashboards useful right after enabling it. However, it is not only logs or nice graphs that it has to offer. A whole suite of crucial data with a highly visual interface is readily available. Response times, failure rates, and exceptions—they all get aggregated, timestamped, and graphed.
This is how you enable Application Insights in a previously deployed service:
fromazureml.core.webserviceimportWebservice# requires `ws` previously created with `config.json`service=Webservice(ws,"mobelinetv-deploy")service.update(enable_app_insights=True)
When Application Insights is enabled, the API endpoint section in ML Studio will display it as shown in Figure 8-9.
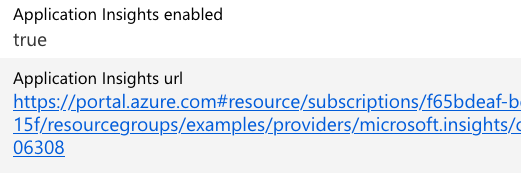
Figure 8-9. Application Insights enabled
Follow the link provided into the dashboard for the service. A plethora of various charts and informational sources are available. This image captures a small portion of the graphs available for requests made to the deployed model in a container, as shown in Figure 8-10.
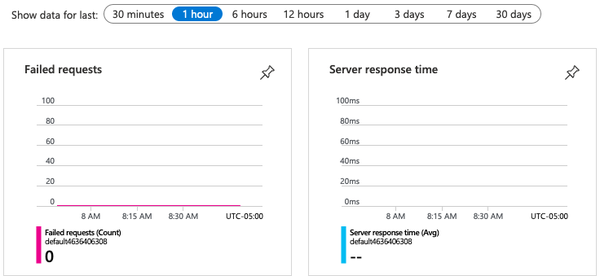
Figure 8-10. Application Insights
Debugging Locally
Following the advice of DevOps principles when debugging, you must question everything and never assume anything. One technique that is useful to debug problems is to run a production service, or in this case, a trained model, in different environments. Containerized deployments and containers in general offer that flexibility, where something that runs in production in Azure can run locally. When running a container locally, which is the same container that runs in production with problems, you can do many more things aside from looking at logs. Debugging locally (potentially on your machine) is a tremendous asset to grasp and take advantage of, while avoiding service disruptions or catastrophic service interruptions. I’ve been in several situations where the only option was to “log in to the production web server to see what is going on.” This is dangerous and highly problematic.
By being skeptical of issues and problems, it is crucial to attempt to replicate the problem. Reproducing the issue is the golden ticket to solving problems. Sometimes, to reproduce customer-facing products, I’ve reinstalled operating systems from scratch and done deployments in separate environments. Developers jokingly use the phrase “it works on my machine,” and I bet you that it almost always holds true—but in reality, it doesn’t mean anything. The advice to “question everything” can be applied here: deploy multiple times, in different environments, including locally, and try to replicate.
Although it is unreasonable to expect you have to run Azure’s Kubernetes offering locally, the Python SDK does offer facilities to expose a (local) web service where you can deploy the same production-grade model, in a container, locally. There are a few advantages to this approach that I’ve mentioned already. Still, there is another crucial one: most of the Python SDK APIs will work against this local deployment in addition to all the container tooling commands you can run to poke the container at runtime. Operations like retrieving the container logs, or getting inside the container to inspect the environment, are all possible and seamless.
Note
Since these operations are dealing with containerized deployments, it is required to have Docker installed and running in your environment.
There are a few steps required to run a service locally. First, you must register the model into the current directory:
fromazureml.core.modelimportModelmodel=Model.register(model_path="roberta-base-11.onnx",model_name="roberta-base",description="Transformer-based language model for text generation.",workspace=ws)
Next, create an environment, which installs all required dependencies for the model to operate within the container. For example, if the ONNX runtime is required, you must define it:
fromazureml.core.environmentimportEnvironmentenvironment=Environment("LocalDeploy")environment.python.conda_dependencies.add_pip_package("onnx")
A scoring file (usually named score.py) is required to deploy the model. This script is responsible for loading the model, defining the inputs for that model, and scoring data. Scoring scripts are always specific to the model, and there isn’t a generic way to write one for any model. The script does require two functions: init() and run(). Now, create an Inference Configuration, which brings together the scoring script and the environment:
fromazureml.core.modelimportInferenceConfiginference_config=InferenceConfig(entry_script="score.py",environment=environment)
Putting it all together now requires using the LocalWebservice class from the Python SDK to launch the model into a local container:
fromazureml.core.modelimportInferenceConfig,Modelfromazureml.core.webserviceimportLocalWebservice# inference with previously created environmentinference_config=InferenceConfig(entry_script="score.py",environment=myenv)# Create the config, assigning port 9000 for the HTTP APIdeployment_config=LocalWebservice.deploy_configuration(port=9000)# Deploy the serviceservice=Model.deploy(ws,"roberta-base",[model],inference_config,deployment_config)service.wait_for_deployment(True)
Launching the model will use a container behind the scenes that will run the HTTP API exposed at port 9000. Not only can you send HTTP requests directly to localhost:9000, but it is also possible to access the container at runtime. My container runtime didn’t have the container ready in my system, but running the code to deploy locally pulled everything from Azure:
Downloading model roberta-base:1 to /var/folders/pz/T/azureml5b/roberta-base/1
Generating Docker build context.
[...]
Successfully built 0e8ee154c006
Successfully tagged mymodel:latest
Container (name:determined_ardinghelli,
id:d298d569f2e06d10c7a3df505e5f30afc21710a87b39bdd6f54761) cannot be killed.
Container has been successfully cleaned up.
Image sha256:95682dcea5527a045bb283cf4de9d8b4e64deaf60120 successfully removed.
Starting Docker container...
Docker container running.
Checking container health...
Local webservice is running at http://localhost:9000
9000
Now that the deployment finished, I can verify it by running docker:
$ docker ps
CONTAINER ID        IMAGE               COMMAND
2b2176d66877        mymodel             "runsvdir /var/runit"

PORTS
8888/tcp, 127.0.0.1:9000->5001/tcp, 127.0.0.1:32770->8883/tcp
I get in the container and can verify that my score.py script is there, alongside the model:
root@2b2176d66877:/var/azureml-app# find /var/azureml-app
/var/azureml-app/
/var/azureml-app/score.py
/var/azureml-app/azureml-models
/var/azureml-app/azureml-models/roberta-base
/var/azureml-app/azureml-models/roberta-base/1
/var/azureml-app/azureml-models/roberta-base/1/roberta-base-11.onnx
/var/azureml-app/main.py
/var/azureml-app/model_config_map.json
When trying to deploy, I had some issues with the score.py script. The deployment process immediately raised errors and had some suggestions:
Encountered Exception Traceback (most recent call last):
  File "/var/azureml-server/aml_blueprint.py", line 163, in register
    main.init()
AttributeError: module 'main' has no attribute 'init'

Worker exiting (pid: 41)
Shutting down: Master
Reason: Worker failed to boot.
2020-11-19T23:58:11,811467402+00:00 - gunicorn/finish 3 0
2020-11-19T23:58:11,812968539+00:00 - Exit code 3 is not normal. Killing image.

ERROR - Error: Container has crashed. Did your init method fail?
The init() function, in this case, needs to accept one argument, and my example was not requiring it. Debugging locally and tinkering with a locally deployed container with a model is very useful and an excellent way to quickly iterate over different settings and changes to the model before trying it out in Azure itself.
Azure ML Pipelines
Pipelines are nothing more than various steps to achieve the desired goal. If you have ever worked with a continuous integration (CI) or continuous delivery (CD) platform like Jenkins, then any “pipeline” workflow will feel familiar. Azure describes its ML pipelines as a good fit for three distinct scenarios: machine learning, data preparation, and application orchestration. These have similar setups and configurations while working with different sources of information and targets for their completion.
As with most Azure offerings, you can use the Python SDK or Azure ML Studio to create pipelines. As I’ve mentioned already, pipelines are steps toward achieving an objective, and it is up to you how to order those steps for the end result. For example, a pipeline may have to deal with data; we’ve covered datasets in this chapter already, so retrieve an existing dataset so that a pipeline step can get created. In this example, the dataset becomes the input of a Python script, forming a distinct pipeline step:
fromazureml.pipeline.stepsimportPythonScriptStepfromazureml.pipeline.coreimportPipelineDatafromazureml.coreimportDatastore# bankmarketing_dataset already retrieved with `get_by_name()`# make it an input to the script stepdataset_input=bankmarketing_dataset.as_named_input("input")# set the output for the pipelineoutput=PipelineData("output",datastore=Datastore(ws,"workspaceblobstore"),output_name="output")prep_step=PythonScriptStep(script_name="prep.py",source_directory="./src",arguments=["--input",dataset_input.as_download(),"--output",output],inputs=[dataset_input],outputs=[output],allow_reuse=True)
Note
The Azure SDK can change frequently, so be sure to check out the official Microsoft AzureML documentation.
The example uses the PythonScriptStep, one of the many different steps available as a pipeline step. Remember: pipelines are all about steps working toward an objective, and Azure provides different steps for different types of work within the SDK and Azure ML Studio. This step is missing a key part, however: the compute target. But it is already packed with almost everything needed to do data preparation. First, it uses the dataset object and calls as_named_input, which the PythonScriptStep uses as an argument. The script step is a Python class, but it tries to represent a command line tool, so the arguments use dashes, and the values to those arguments get passed in as items in a list. This is how you retrieve a previously created compute target with the SDK:
fromazureml.core.computeimportComputeTarget,AmlComputefromazureml.coreimportWorkspacews=Workspace.from_config()# retrieve the compute target by its name, here a previously created target# is called "mlops-target"compute_target=ws.compute_targets["mlops-target"]
Aside from the compute target, which we’ve already covered in this chapter, you can optionally provide a runtime configuration, which allows setting environment variables to tell Azure how to manage the environment. For example, if you want to manage your dependencies instead of having Azure handle it for you, then the runtime configuration would be the way to do that. Here is a simplified way to set that particular option:
fromazureml.core.runconfigimportRunConfigurationrun_config=RunConfiguration()# a compute target should be defined already, set it in the config:run_config.target=compute_target# Disable managed dependenciesrun_config.environment.python.user_managed_dependencies=False
Publishing Pipelines
I’ve previously made the comparison of continuous integration systems like Jenkins to pipelines: many steps working in a coordinated way to accomplish an objective. But although other CI/CD systems like Jenkins have this capability, one thing that is very tricky to accomplish is to expose these jobs outside of the environment. Azure has a straightforward way to achieve this, both via Azure ML Studio and with the SDK. Essentially, what happens with the pipeline is that it becomes available over HTTP so that any system anywhere in the world can reach the pipeline and trigger it.
The possibilities then are endless. You are no longer tied to using services, pipelines, and triggers from within Azure. Still, your pipeline steps can start elsewhere, perhaps in a closed on-premise environment at your company or a public source code service like GitHub. This is an interesting flexibility because it offers more options, and the constraints of the cloud provider go away. You don’t need to create a new pipeline every time you want to publish it. You can encounter this in the documentation while trying to find out how to publish a pipeline. In this example, a previous experiment and run gets retrieved to publish the pipeline:
fromazureml.core.experimentimportExperimentfromazureml.pipeline.coreimportPipelineRunexperiment=Experiment(ws,"practical-ml-experiment-1")# run IDs are unique, this one already existsrun_id="78e729c3-4746-417f-ad9a-abe970f4966f"pipeline_run=PipelineRun(experiment,run_id)published_pipeline=pipeline_run.publish_pipeline(name="ONNX example Pipeline",description="ONNX Public pipeline",version="1.0")
Now that you know how to publish it, you can interact with it over HTTP. These API endpoints require authentication, but the SDK has everything you need to get the authentication headers needed to make requests:
fromazureml.core.authenticationimportInteractiveLoginAuthenticationimportrequestsinteractive_auth=InteractiveLoginAuthentication()auth_header=interactive_auth.get_authentication_header()rest_endpoint=published_pipeline.endpointresponse=requests.post(rest_endpoint,headers=auth_header,json={"ExperimentName":"practical-ml-experiment-1"})run_id=response.json().get('Id')(f"Pipeline run submitted with ID: {run_id}")
Azure Machine Learning Designer
For the graphically inclined, the Azure Machine Learning designer is a good choice for abstracting away the complexity of building machine learning projects on Azure. The process to train a model is as follows:
-
Sign in to Azure ML Studio.
-
Select the Designer interface as shown in Figure 8-11.
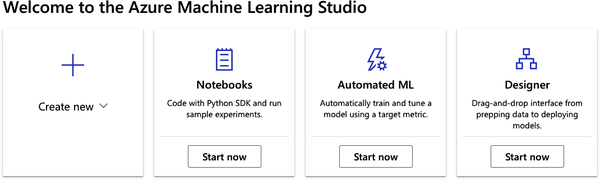
Figure 8-11. Azure ML designer
-
Select a sample project to explore, like the Automobile Regression project in Figure 8-12. Note there are many sample projects to explore, or you can build your ML project from scratch. An excellent resource to investigate ML Designer sample projects is the official Microsoft Azure Machine Learning designer documentation.
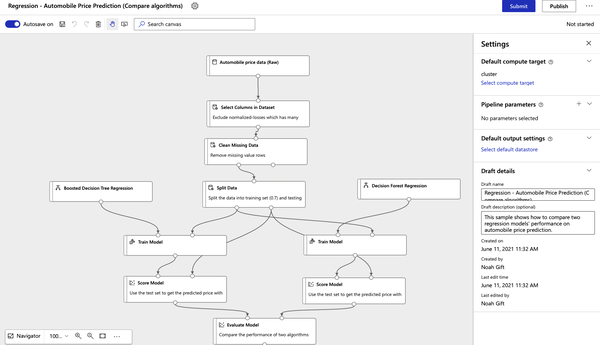
Figure 8-12. Azure ML Designer Automobile Regression project
-
To run the project, submit a pipeline job as shown in Figure 8-13.
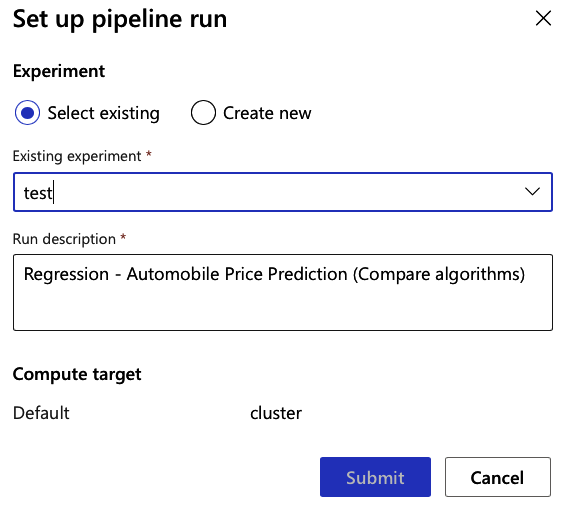
Figure 8-13. Azure ML designer submission
The Azure ML designer may seem a bit fancy, but it can play an essential role in understanding how the Azure ML Studio ecosystem works. By “kicking the tires” on a sample project, you get exposed to all of the essential aspects of Azure ML Studio, including AutoML, storage, compute clusters, and reporting. Next, let’s talk about how all of this relates to the ML lifecycle on Azure.
ML Lifecycle
In the end, all tooling and services in Azure are there to help with the model lifecycle. This methodology is not entirely particular to Azure, but it is useful to grasp how these services help you get your models into production. As Figure 8-14 shows, you start with training, which can happen in a Notebook, AutoML, or with the SDK. Then you can move on to validation with Azure Designer or Azure ML Studio itself. Production deployments can then leverage scaling with Kubernetes while keeping attention to problems with Application Insights.
Figure 8-14 tries to make it clear that this is not a linear process, and the constant feedback loop throughout the process of shipping to production can require going back to previous steps to address data issues and other common problems observed in models. However, the feedback loop and constant adjusting is essential for a healthy environment; it is not enough to click a checkbox that enables monitoring or that Kubernetes is handling scaling. Without consistent evaluation, success is impossible, regardless of the cloud provider.
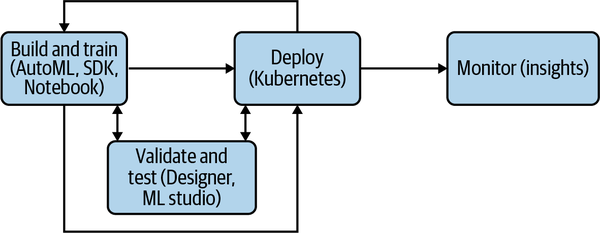
Figure 8-14. ML lifecycle
Conclusion
No doubt Azure is already solving challenging problems related to operationalizing machine learning, from registering and versioning datasets to facilitating monitoring and deploying live inferencing models on scalable clusters. It all feels relatively new, and Azure as a whole is still catching up in functionality to other cloud providers—but this shouldn’t matter. The platform of choice (even if it isn’t Azure) has to enable workflows with ease; you must leverage what is available. You will see repetition and emphasis on some ideas throughout the book about leveraging technology and avoiding solving challenges with half-baked solutions. Technology reuse will propel any venture. Remember that the most important thing to achieve as an MLOps engineer is to ship models to production, not reinvent cloud features.
The next chapter will dig into the Google Cloud Platform.
Exercises
-
Retrieve an ONNX model from a public source and register it in Azure with the Python SDK.
-
Deploy a model to ACI and create a Python script that returns the model’s response, as it comes back from the HTTP API.
-
Deploy a container locally, using Azure’s Python SDK, and produce some HTTP requests for live inferencing.
-
Publish a new pipeline, and then trigger it. The trigger should show the output of the
run_idafter a successful request. -
Train a model using Azure AutoML from the Python SDK by grabbing a dataset from Kaggle.
Critical Thinking Discussion Questions
-
There are many ways to train models on the Azure platform: Azure ML Studio Designer, Azure Python SDK, Azure Notebooks, and Azure AutoML. What are the advantages and disadvantages of each?
-
Why is it a good idea to enable authentication?
-
How can reproducible environments help deliver models?
-
Describe two aspects of good debugging techniques and why they are useful.
-
What are some benefits of versioning models?
-
Why is versioning datasets important?