
Backing up a database is arguably the most important aspect to database administration. Without backups, you cannot recover in cases of data loss or corruption. You cannot rebuild quickly without the data that you, ultimately, are responsible for. Have you ever met a DBA that is sort of mehhhh about backups? I guarantee you that is because they are either lazy or have never had to recover from a catastrophic failure. The worst part about either of those reasons is that one is by choice and one is by circumstance, but both can be remediated with a little foresight and planning.
Don’t get me wrong; sometimes, a failure is going to happen. It just will; Murphy’s law says so. But that doesn’t mean that we can’t recover from it successfully, does it? The purpose of this chapter is to explain not only the importance of regular backups, but also the proper way to structure these into a cohesive and complete maintenance plan.
The one thing I want you to take from this chapter is one simple sentence: it makes absolutely no sense at all to NOT have database backups.
As you can guess, there are multiple different facets to database backups though. Let’s look at those before I explain the actual task itself.
Recovery models: This is how your database is set up to recover lost data. This is typically set during the installation of the database engine, but can be changed at any time.
Backup types: Certain types of recovery models allow for certain types of backups. This can also be changed at any time, depending on the settings of the recovery model of the database needing to be backed up.
Recovery Models
An important note before starting this is that the recovery model for a specific database comes into play here. What is a recovery model? Simply put, it tells the database how to recover and in what way. The recovery model is set in the initial setup and configuration of the database, but can also be accessed by right-clicking the database name and choosing Properties. Choose Options from the menu choices, shown on the left in Figure 2-1, and the second option down will show the Recovery Mode.

Figure 2-1. Database Properties window
Let’s look at the differences in recovery models. Figure 2-2 shows the basic differences between the models available, so it’s really up to the database administrator to determine the actual need or requirement to properly meet the need of the customer or application.

Figure 2-2. Recovery models
Full
Using the Full Recovery model , data loss is minimal because all of the data can be restored unless there is damage to the tail of the transaction log. The Full Recovery model can be thought of as the fail-safe model solution, since everything is included in the backup. The only caveat to this is that the transaction log plays an important role because, if it’s damaged or incomplete, the full backup will fail.
Bulk Logged
The Bulk Logged Recovery model is a quick way to recover, but data can only be recovered from the last backup. This may not be a problem if the time between backups is low. For example, when using the Bulk Logged Recovery model, the last backup is the only really viable one because that is the only one that can be recovered. This means that if the backup period is set to every 6 hours, then 6 hours is the maximum amount of data that will be lost.
Simple
All data is lost from the time of the last backup until the data loss event. This option is not recommended because the likelihood of data loss is much higher with this model than the other two.
How do the recovery models work toward the Back Up Database task, though? Think about it like this: if you had a database with a Simple recovery model, but tried to enforce transaction log backups, it would fail. Why? Because the Simple recovery model doesn’t do transaction log backups. It’s sort of a sneaky way to get you to think about doing things a little bit differently; if you want transaction logs to be backed up, then you should probably have transaction logs to backup. Makes sense, right? So, what’s the difference between the backup types?
Backup Types
Figure 2-3 shows that there are three backup types in SQL Server, each of which is unique, but all sort of related. When used correctly, all three can work together to give a heightened level of data security to the users.

Figure 2-3. Backup types
Full Backups
Full backups back up everything in the database. That is the important part to remember; it will not backup the individual settings or components of SQL Server, in other words.
Differential Backups
Differential backups are related to full backups in that differential backups only have data since the last full backup. This can be a hard concept to understand. Think of full backups being the major yard lines on a football field (10, 20, 30, 40, etc.) and differential backups being the individual yard lines (11, 12, 13, 14, etc.). Can you get from the 10 yard line straight to the 30? Sure. But you can also get there going yard by yard. This is what differential backups give you— a “yard by yard” capture of the data. The beauty of differential backups is that data loss is minimized because the only loss is to the last differential backup. It is also much faster because the only data that is backed up is the data added or changed since the last full backup. The downside to differential backups is that the full backup must be restored; the differential backups are then applied to the base data. A differential backup without its parent full backup, for all intents and purposes, is useless since it cannot be used to restore anything.
Transaction Log Backups
Transaction logs are at the core of the concept of data recovery. They can be run as often as required up until the limit of a physical disk. The interval for backup is entirely up to the database administrator and can be set to backup down to the minute, although this is probably a little ridiculous because you would obviously generate 1,440 logs per day. If this is the requirement, it can certainly be achieved; however, as noted earlier, storage will be a major consideration in this case.
Keep in mind that the transaction log backup interval is basically the amount of time that has been agreed upon for maximum data loss. For some companies, this is absolute zero. For some, it may be 5 minutes, or 10, or 20. Whatever the interval agreed upon, that is what you are tasked to set up. If you get the company that says absolute zero, then the cost of additional fault tolerant storage needs to be added to the server configuration. More than likely, they will consider that they could go maybe 30 minutes with data loss, but that it should be mitigated as much as possible.
Tip
The minimum amount of time that you can have a scheduled task in SQL Server is 10 seconds. If you need tasks run more frequently than this, you may need to consider switching to decaf.
So that covers those concepts. Again, I cannot stress enough how important backups are for databases. It could be argued that it is the single most important thing that a database administrator is responsible for. To make this easier on you, your company, and your customers, always try to think two steps ahead of what is happening. A good way to help do this is to be prepared, and what better way to be prepared than to have a fresh, clean copy of the data always available for restoring in case of a catastrophic failure.
Figure 2-4 shows a closer look at how these recovery models affect the backup types.
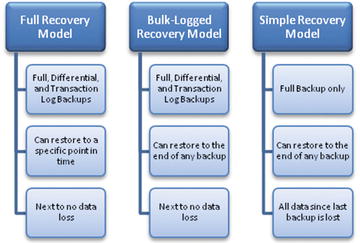
Figure 2-4. Recovery models vs. Backup types
Following the logic described in Figure 2-4, I would recommend a full backup with differential backups and transaction log backups. That way, the transaction logs would feed the differential backups, which rely on the full backups to restore correctly.
Figure 2-5 shows the ideal setting for backups, using the three types described earlier.

Figure 2-5. Ideal backup settings
Consider the backup schedule shown in Figure 2-6 using the colors and references from Figure 2-5. This is what I would call “absolutely ideal.”

Figure 2-6. Absolutely ideal backup settings
The full backup starts the backup set, with the first differential being supported by the transaction log backups. Those backups would in turn feed the differential backups, which are placed on top of the full backups. The important thing to notice in Figure 2-6 is that there are no time constraints on it. It’s totally up to you to determine what the amount of time is for all three types of backups. For example, say you wanted to have 10-minute transaction log backups supporting differential backups taken at 30-minute intervals, leading from a full backup taken nightly. The image shown in Figure 2-6 is a great way to quantify that, because all you need to do, graphically, is add more green and yellow bars (a lot more, honestly).
That sets us up with a good foundation on understanding how backups work. Hopefully, you can see the benefit to having data properly backed up in case of an emergency.
Setting Up the Maintenance Plan
I’m basically going to go screen by screen and explain this in sometimes excruciating detail, so here we go!
Full Backup Configuration
Right-click Maintenance Plans and select Maintenance Plan Wizard to get going. The first interface you see is Select Plan Properties. Enter Backup Maintenance Plan in the Name box. Next, enter a brief description. Click the “Separate schedules for each task” radio button. Leave the rest defaulted for now. Figure 2-7 should be what you see now.

Figure 2-7. Select Plan Properties
Remember when we looked at the database’s recovery model? Yours is hopefully set to Full. There are instances when you don’t need this, and that’s understandable; however, I would strongly recommend using Full.
Why did I bring this up? This information leads to the selection of backup tasks. If your database is in Full recovery model, then we can create a more stringent maintenance plan, and that is the goal of this book.
When you click Next on this screen, you will see the options we discussed earlier. Select all three backup options, as shown in Figure 2-8.

Figure 2-8. Select Maintenance Tasks
Now, click Next to set up the three parts of the backup. This is sort of a moot point, because the three parts will execute at different times and for different reasons. Recall earlier in this chapter when I said that the full backup is fed from the differential backups, which is fed from the transaction log backups. When you see the screen shown in Figure 2-9, just click Next.
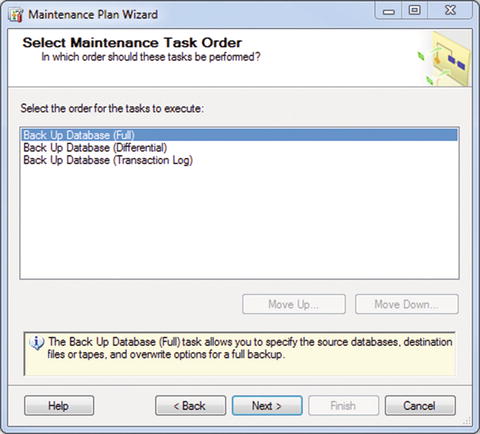
Figure 2-9. Select Maintenance Task
This is where it starts to get interesting. The first interface that comes up is the Define Back Up Database (Full) Task screen. Your completed screen (except for the Schedule) should look like Figure 2-10.
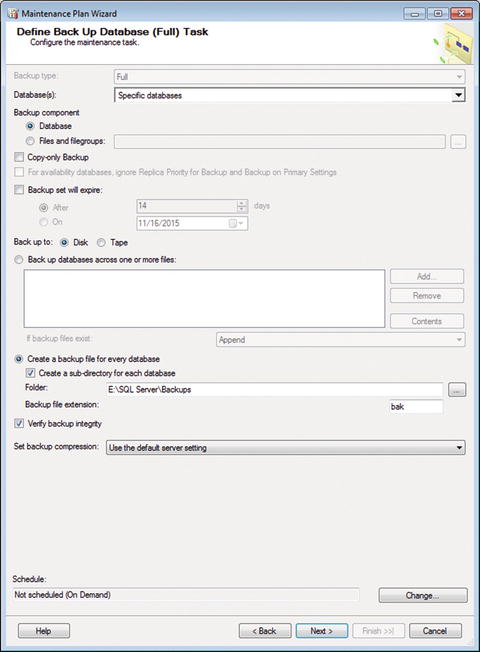
Figure 2-10. Define Back Up Database (Full) Task
Tip
This interface is slightly different in SQL Server 2014 and SQL Server 2016, but the essence of the task is the same.
Pull down the Database(s) menu and select the databases that you would like to backup. It can be any single database or group of databases that you would like to backup. My database for this book is called DEVTEST , so you can use that name if you like, or you can choose another name. Notice that the “Create a backup file for every database” radio button is selected. Since we are using this specifically for configuring the setting for a full backup of the database, click the “Create a sub-directory for each database” check box under that option. What this means is that, for every database that you choose to back up, those backups are going to be kept in a directory with the name of the database as the name of the directory. At the bottom of the screen, click the Change… button to set up the schedule for this task.
While we’re at it, let’s define what our backup schedule should look like and when it should run. Recall when we went over the backup scheduling schemes earlier in this chapter. We can use that for a good starting point. Let’s configure this for a 24-hour window, so there is minimal interruption of data. If the full backup is set for midnight, then the first differential should be set for midnight also, followed by the first transaction log backup as well. Then every 6 hours, a new differential backup will run. Inside of those, transaction log backups will run every hour. Table 2-1 shows a fairly accurate representation of the time block that I am describing.
Table 2-1. 24-Hour Backup Schedule Example
Time | Full? | Differential? | Transaction Log? |
|---|---|---|---|
12:00 AM | X | X | X |
1:00 AM | X | ||
2:00 AM | X | ||
3:00 AM | X | ||
4:00 AM | X | ||
5:00 AM | X | ||
6:00 AM | X | X | |
7:00 AM | X | ||
8:00 AM | X | ||
9:00 AM | X | ||
10:00 AM | X | ||
11:00 AM | X | ||
12:00 PM | X | X | |
1:00 PM | X | ||
2:00 PM | X | ||
3:00 PM | X | ||
4:00 PM | X | ||
5:00 PM | X | ||
6:00 PM | X | X | |
7:00 PM | X | ||
8:00 PM | X | ||
9:00 PM | X | ||
10:00 PM | X | ||
11:00 PM | X |
Using this model, we can restore to any hour in a given day, meaning that the most data we will lose is 1 hour. If this is acceptable, we can move on. If not, then we can adjust the time between backups. We will stay with this schedule for now though. Figure 2-11 shows what you should see on the screen now.

Figure 2-11. New Job Schedule
Notice that the defaults are not what we want for a full backup. All you need to do to make this available for our schedule is to pull down the Occurs menu and choose Daily. That’s it. Notice the text in the Summary field now reads Occurs every day at 12:00:00 AM. Schedule will be used starting on [DATE]. This is perfect! Click OK here to save this schedule. Notice that the same Summary we just read has been transferred to the Schedule block on the interface. This completed screen is shown in Figure 2-12.
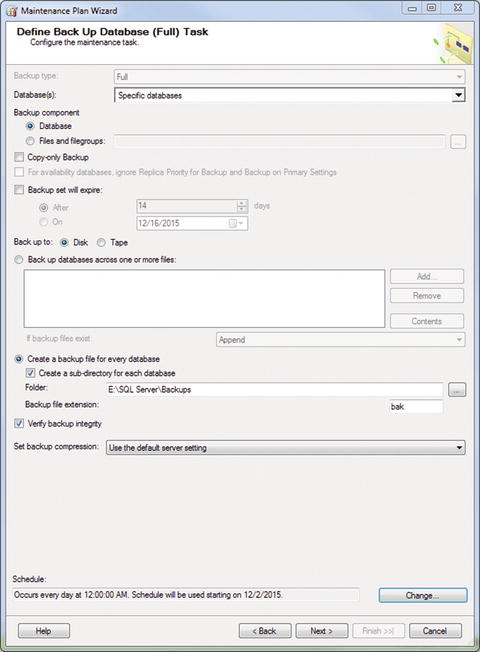
Figure 2-12. Define Back Up Database (Full) Task, completed
Click Next to continue setting up the plan.
Differential Backup Configuration
Next, the Define Back Up Database (Differential) Task interface is displayed. Same as before, choose the database from the Database(s) drop-down menu, update the folder location, and click the “Create a sub-directory for each database” check box. You can also check “Verify database integrity”, but that’s actually done in a later task as well, so it’s up to you. Again, click Change… at the bottom of the screen to set up the schedule for the task.
The defaults in this area are not correct either! Oh well, that’s why we’re here. Change the Occurs selection to Daily. Under the “Daily frequency” area, click the “Occurs every” radio button and enter 6 in the first box. Your screen should look like Figure 2-13 when you are done.

Figure 2-13. New Job Schedule
So this means that our differential backup will now run every 6 hours every day. Your completed interface for the differential backup section should look like Figure 2-14.

Figure 2-14. Define Back Up Database (Differential) Task, completed
It is interesting to note that this screen is the same as the full-backup screen, except for the Schedule portion.
Transaction Log Backup Configuration
Click OK and then click Next to continue. The next screen that opens is the Define Back Up Database (Transaction Log) Task screen. The same general settings as the two previous screens: select the database from the Database(s) menu, select the folder for the backup, which should be your E:SQL ServerLogs folder, and check the “Create a sub-directory for each database” check box. When you’re done, click the Change… button at the bottom of the interface to define this schedule. Change the Occurs value to Daily, and make sure that the “Occurs every” value is set to 1 hour(s). That’s it for this area. Your screen should now resemble Figure 2-15.

Figure 2-15. New Job Schedule
Click OK when you are done with the scheduling. You should then see what is shown in Figure 2-16.

Figure 2-16. Define Back Up Database (Transaction Log) Task, completed
When you are ready, click Next.
The screen that opens is titled Select Report Options. You should now see what is shown in Figure 2-17.

Figure 2-17. Select Report Options
Now, this is fairly self-explanatory. If you want a report written to a text file and popped into the file system, click the box. Notice that I have chosen the Backups directory, not the Logs directory. This is because I want to keep the Logs directory for my transaction logs. The Backups directory can be used to store the maintenance text files, whereas the individual folders inside of Backups store the actual .bak files in case you ever need to restore the database.
You can also get the report emailed to you, but you have to have an Operator defined (more on that later). If you have an Operator defined, select it here to receive the email. What this does is let you know, by email, when the maintenance plan runs and what the result was. For now, we will leave only the report option selected. Click Next to move on.
On the next screen, Complete the Wizard, you see a summary of what we did. Expanding the options in the interface will show the complete detail of what was done, as shown in Figure 2-18.

Figure 2-18. Complete the Wizard
Note that these options have not been saved yet. You could click Cancel right here and destroy all of the work that we’ve done thus far, but let’s not do that. Instead, review what we did, and when you’re ready, click Finish. Hopefully, you see what is shown in Figure 2-19.

Figure 2-19. Maintenance Plan Wizard Progress
Always a good sign! Click Close when you are ready. Notice that Backup Maintenance Plan now appears in the Maintenance Plans area of SSMS. It is now enabled and it will run on the schedule that we defined.
Configuring the Jobs
Notice that there are now jobs in the Jobs folder inside of SQL Server Agent. These aren’t very descriptive, are they? Which is which? Let’s fix this right now. Double-click Subplan_1. You should see what is shown in Figure 2-20.

Figure 2-20. Job Properties, General tab
See that first box up there labeled Name? Just change the tail end of it to say Full Backup instead of Backup Maintenance Plan.Subplan_1. Notice that it is also set to Database Maintenance in the Category option. This is great, because this is what we are doing. Ensure that the Enabled check box is checked—and this screen is all set.
One thing I skipped over is the Owner selection. This typically should be set to the owner of the database.
Also notice that on the left of the screen, there are menu options. You are currently on the General option. If you click the Steps option, you will see what is shown in Figure 2-21.

Figure 2-21. Job Properties, Steps tab
Notice that the menu bar does not show our new name yet. The Name in the Job step list isn’t updated either. How frustrating. Let’s fix that now.
Double-click the text Subplan_1. The Job Step Properties window opens, so change the “Step name” box to Full Backup, as shown in Figure 2-22.

Figure 2-22. Job Properties, Steps tab, General option
Don’t touch anything else on this screen just yet, except for clicking the Advanced option on the left. Adjust this screen to the settings shown in Figure 2-23.

Figure 2-23. Job Properties, Steps tab, Advanced option
Click OK when this is done and you will go back to the Job Properties screen, with the text Full Backup now replacing Subplan_1. Figure 2-24 is what you should see now.

Figure 2-24. Job Properties, Steps tab
Click the Schedules option on the left and notice that our schedule is in there, and that it is enabled, as shown in Figure 2-25.

Figure 2-25. Job Properties, Schedules tab
Click the Alerts option and you will see a blank screen. This is fine, for now.
Click the Notifications option and you will see what is shown in Figure 2-26.

Figure 2-26. Job Properties, Notifications tab
If you have an Operator set up already, select that in the Email box. For the time being, we are going to keep the “Write to the Windows Application event log” option selected, but we are going to change the drop-down to “When the job completes”; that way, we will always know what happened with our job. More on this a bit later.
Clicking the Targets option will show a blank screen as well. This is fine, since we haven’t defined any targets.
Click OK when you are through with the Targets option and have followed the directions for this area. You will then see that the Jobs folder has changed to what you see in Figure 2-27.

Figure 2-27. Updated SQL Server Agent Jobs
Now you can clearly see that this job is specifically the Full Backup job. Do the same things listed earlier for the other two and label them accordingly. Remember that we defined the full backup as the first task, the differential backup as the second task, and the transaction log as the third task. Those line up with the Subplan designations here. You should end up with what you see in Figure 2-28.

Figure 2-28. Completed SQL Server Agent Jobs
It’s okay that syspolicy_purge_history is in there too. That’s a job that SQL Server does on its own.
And that, my friend, is how you set up a database backup maintenance plan.
It’s worth noting that you can also update the Job names from the Maintenance Plan itself by double-clicking and editing the Subplan names from the Design Surface, and then saving the plan. You may find this quicker, once you get experienced in setting up the maintenance plans.
Summary
This was a big chapter, but I wanted to be sure to cover all of the important bits needed to really get into the specifics of the tasks.
To review, you learned about the following:
Full, Bulk Logged, and Simple recovery models
Full, differential, and transaction log backups
Configuration options for the backup tasks
Recall that I mentioned that database backups were arguably the most important part to database administration. I sincerely hope that you have learned exactly why this is in this chapter. Data integrity is an important topic, as is data protection, loss mitigation, and a host of other database concepts. At the core of each of these concepts is one very important piece of the puzzle that absolutely must be present: data. Protecting that data is our job as database administrators. And, properly maintained backups are integral in providing that puzzle piece.