![]()
Using Express.js 4 to Create Node.js Web Apps
It’s only logical that, by using frameworks, software engineers become more productive and can achieve results faster. Often, the results are of a better quality because the frameworks are used and maintained by many other developers and contributors. Even if developers build everything from scratch, they end up with their own framework in the end. It’s just a very customized one!
Node.js is a relatively young platform when it comes to frameworks (unlike Ruby or Java), but there’s already a leader that has become a de facto standard used in the majority of Node.js projects: Express.js.
Express.js is an amazing framework for Node.js projects, and it’s used in the majority of web apps, which is why this second chapter is dedicated to getting started with this framework.
In this chapter we cover the following topics, which serve as an introduction to Express.js:
- What Express.js is
- How Express.js works
- Express.js Installation
- Express.js scaffolding (command-line tool)
- The Blog Project overview
- Express.js 4 Hello World example
What Is Express.js?
Express.js is a web framework based on the core Node.js http module and Connect (http://www.senchalabs.org/connect/) components. The components are called middleware and they are the cornerstones of the framework philosophy configuration over convention. In other words, Express.js systems are highly configurable, which allows developers to pick freely whatever libraries they need for a particular project. For these reasons, the Express.js framework leads to flexibility and high customization in the development of web applications.
If you write serious apps using only core Node.js modules (refer to the following snippet for an example), you most likely find yourself reinventing the wheel by writing the same code continually for similar tasks, such as the following:
- Parsing of HTTP request bodies
- Parsing of cookies
- Managing sessions
- Organizing routes with a chain of if conditions based on URL paths and HTTP methods of the requests
- Determining proper response headers based on data types
To illustrate my point, here is an example of a two-route representational state transfer: http://en.wikipedia.org/wiki/Representational_state_transfer.
(REST) API server, i.e., we have only two end points and they are also called routes. In this application, we use only core Node.js modules for server functions. A single “userland”/external native MongoDB driver module is used for persistence. This example is taken from beginner-friendly Rapid Prototyping with JS (http://rpjs.co/): Agile JavaScript Development by Azat Mardan [2013]:
var http = require('http'),
var util = require('util'),
var querystring = require('querystring'),
var mongo = require('mongodb'),

var host = process.env.MONGOHQ_URL ||
  'mongodb://@127.0.0.1:27017';
//MONGOHQ_URL=mongodb://user:[email protected]/db_name
mongo.Db.connect(host, function(error, client) {
  if (error) throw error;
  var collection = new mongo.Collection(
     client,
    'test_collection'
  );
  var app = http.createServer(
    function (request, response) {
      if (
        request.method === 'GET' &&
        request.url === '/messages/list.json'
      ) {
        collection.find().toArray(function(error, results) {
          response.writeHead(
            200,
            {'Content-Type': 'text/plain'}
          );
          console.dir(results);
        response.end(JSON.stringify(results));
      });
    };
    if (
      request.method === "POST" &&
      request.url === "/messages/create.json"
    ) {
      request.on('data', function(data) {
        collection.insert(
          querystring.parse(data.toString('utf-8')),
          {safe: true},
          function(error, obj) {
            if (error) throw error;
            response.end(JSON.stringify(obj));
          }
        );
      });
    };
  });
  var port = process.env.PORT || 5000;
  app.listen(port);
})
As you can see, developers have to do a lot of manual work themselves, such as interpreting HTTP methods and URLs into routes, and parsing input and output data.
Express.js solves these and many other problems as abstraction and code organization. The framework provides a model-view-controller-like (MVC-like) structure for your web apps with a clear separation of concerns (views, routes, models).
For the models (M in MVC), we need to use Mongoose (http://mongoosejs.com/) or Sequelize (http://sequelizejs.com/) libraries in addition to Express.js— more on this later in the book in Chapter 7. In this chapter we’ll cover the basics of Express.js. Built on top this framework, Express.js applications can vary from bare-bones, back-end-only REST APIs to full-blown, highly scalable, full-stack with jade-browser (https://npmjs.org/package/jade-browser) and Socket.IO (http://socket.io/), real-time web apps. To give some analogies to developers who are familiar with Ruby—Express.js is often seen as Sinatra, which has a very different approach to the Ruby on Rails framework. Express.js and Sinatra promote the configurability while Ruby on Rails convention over configuration.
Although Express.js is the most starred library on NPM (as of May 2014), and the most mature and used Node.js framework, the playing field is still relatively level with many different frameworks, and new ones are released every month. Some of them, such as Meteor (http://meteor.com/) and DerbyJS (http://derbyjs.com/), show an interesting trend in attempts to merge front-end and back-end code bases. For a handpicked list of Node.js frameworks, refer to the Node Framework (http://nodeframework.com/) resource.
When evaluating a Node.js framework for your project, use these easy steps to guide you:
- Build a sample app which is usually provided by the creators of frameworks on GitHub or official web sites. See how the app feels in terms of styles and patterns.
- Consider the type of application you’re building: prototype, production app, minimum viable product (MVP), small scale, large scale, and so on.
- Consider the libraries already familiar to you and determine whether you can or plan to reuse them, and whether your framework plays nicely with them. Provide out-of-the-box solutions: template engines, database object-relational mapping (http://en.wikipedia.org/wiki/Object-relational_mapping) libraries (ORMs) / drivers, cascading style sheets (http://en.wikipedia.org/wiki/Cascading_Style_Sheets) (CSS) frameworks.
- Consider the nature of your application: REST API (with a separate front-end client), a traditional web app, or a traditional web app with REST API end points (such as Blog).
- Consider whether you need the support of reactive templates with WebSocket from the get-go. (the Meteor framework, anyone?)
- Evaluate the number of stars and follows on NPM and GitHub to judge the popularity of the framework. More popular typically means more blog posts, books, screencasts, tutorials, and programmers exist; less popular means this is a newer framework, a niche/custom choice, or a poor choice. With newer frameworks, there is a greater chance that contributing back to them will be valued, so pick your comfortable spot.
- Evaluate NPM, GitHub pages, and a framework’s website for the presence of good API documentation with examples or open issues/bugs. If there are more than a few hundred, depending on popularity, this may not be a good sign. Also, determine the date of the last commit on the GitHub repository. Anything older than six months is not a good sign.
How Express.js Works
Express.js usually has an entry point—aka, a main file. Most of the time, this is the file that we start with the node command; or export as a module, in some cases. And in this file, we do the following:
- Include third-party dependencies as well as our own modules, such as controllers, utilities, helpers, and models
- Configure Express.js app settings such as template engine and its file extensions
- Connect to databases such as MongoDB, Redis, or MySQL (optional)
- Define middleware such as error handlers, static files folder, cookies, and other parsers
- Define routes
- Start the app
- Export the app as a module (optional)
When the Express.js app is running, it’s listening to requests. Each incoming request is processed according to a defined chain of middleware and routes, starting from top to bottom. This aspect is important in controlling the execution flow. For example, routes/middleware that are higher in the file have precedence over the lower definitions.
Because we can have multiple middleware functions processing each HTTP request, some of the functions are in the middle (hence the name middleware). Here are some examples of middleware purposes:
- Parse cookie information and put it in req object for following middleware/routes
- Parse parameters from the URL and put it in req object for following middleware/routes
- Get the information from the database based on the value of the parameter if the user is authorized (cookie/session) and put it in req object for following middleware/routes
- Authorize users/requests, or not.
- Display the data and end the response
Express.js Installation
The Express.js package comes in two flavors:
- express-generator: a global NPM package that provides the command-line tool for rapid app creation (scaffolding)
- express: a local package module in your Node.js app’s node_modules folder
Before we proceed with installations, let’s check the Express.js versions. We’ll use an exact version 4.1.2 to avoid confusion resulting from potential future changes to the Express.js skeleton-generating mechanism and the module API.
For the Express.js Generator, which is a separate module, we’ll use version 4.0.0, which is compatible with Express.js 4.x. If you have a version other than 4.0.0 ($ express -V to check), you can uninstall it using $ sudo npm uninstall -g express-generator. Or $ sudo npm uninstall -g express for Express.js 2.x and 3.x. Before, version 4.x, Express.js Generator was a part of the Express.js module itself. After you’ve uninstalled the older versions, install the proper version with the next section’s commands.
Express.js Generator
To install the Express.js Generator as global package, run $ npm install -g [email protected] from anywhere on your computer. This downloads and links the $ express terminal command to the proper path, so that later we can access its command-line interface (CLI) for the creation of new apps.
![]() Note For Max OS X and Linux users, if there is an error installing globally, most likely your system requires root/administrator rights to write to the folder. In this case, $ sudo npm install -g [email protected] might be needed. Refer to Chapter 1 for more information on changing NPM ownership.
Note For Max OS X and Linux users, if there is an error installing globally, most likely your system requires root/administrator rights to write to the folder. In this case, $ sudo npm install -g [email protected] might be needed. Refer to Chapter 1 for more information on changing NPM ownership.
Of course, we can be more vague and tell NPM to install the latest version of express-generator: $ npm install –g express-generator. But in this case your results might be inconsistent with the book’s examples.
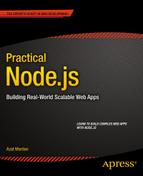
The Figure 2-1 shows us results of running the aforementioned command. Please notice the path in Figure 2-1: /usr/local/lib/node_modules/express-generator. This is where, on Max OS X / Linux systems, NPM puts global modules by default. We verify the availability of Express.js CLI by running $ express –V.
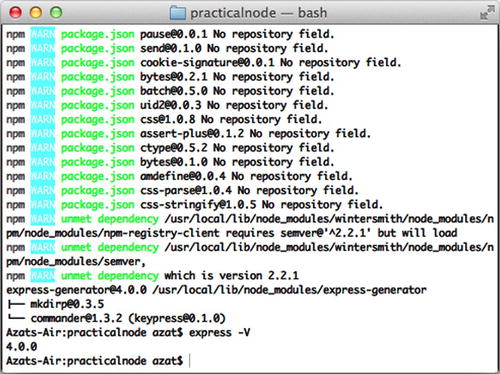
Figure 2-1. The result of running NPM with -g and $ express -V
Local Express.js
For the local Express.js 4.1.2 module installation, let’s create a new folder express-cli somewhere on your computer: $ mkdir express-cli. This will be our project folder for the chapter. Now we can open it with $ cd express-cli. When we are inside the project folder, we can create package.json manually in a text editor or with the $ npm init terminal command (Figure 2-2).
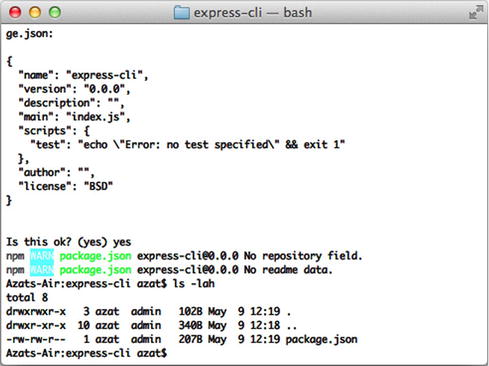
Figure 2-2. The result of running $ npm init
The following is an example of the package.json file with vanilla $ npm init options:
{
  "name": "express-cli",
  "version": "0.0.1",
  "description": "",
  "main": "index.js",
  "scripts": {
    "test": "echo "Error: no test specified" && exit 1"
  },
  "author": "",
  "license": "BSD"
}
Lastly, we install the module using NPM:
$ npm install [email protected] --save
Or, if we want to be less specific, which is not recommended for this example, use:
$ npm install express
![]() Note If you attempt to run the aforementioned $ npm install express command without the package.json file or the node_modules folder, the smart NPM will traverse up the directory tree to the folder that has either of these two things. This behavior mimics Git’s logic somewhat. For more information on the NPM installation algorithm, please refer to the official documentation at https://npmjs.org/doc/folders.html.
Note If you attempt to run the aforementioned $ npm install express command without the package.json file or the node_modules folder, the smart NPM will traverse up the directory tree to the folder that has either of these two things. This behavior mimics Git’s logic somewhat. For more information on the NPM installation algorithm, please refer to the official documentation at https://npmjs.org/doc/folders.html.
Alternatively, we can update the package.json file by specifying the dependency ("express": "4.1.2" or "express": "4.x") and run $ npm install.
The following is the package.json file with an added Express.js v4.1.2 dependency (the latest as of May 2014):
{
  "name": "expressjsguide",
  "version": "0.0.1",
  "description": "",
  "main": "index.js",
  "scripts": {
    "test": "echo "Error: no test specified" && exit 1"
  },
  "dependencies": {
    "express": "4.1.2"
  },
  "author": "",
  "license": "BSD"
}
$ npm install
In Figure 2-3, we show the result of install Express.js v4.1.2 locally, into the node_modules folder. Please notice the path after the [email protected] string in Figure 2-3 is now local and not global, as in the case of express-generator.
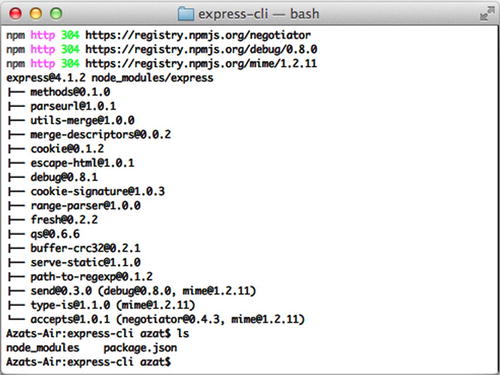
Figure 2-3. The result of running $ npm install
If you want to install Express.js to an existing project and save the dependency (smart thing to do!) into the package.json file, which is already present in that project’s folder, run $ npm install [email protected] --save.
To double-check the installation of Express.js and its dependencies, we can run the $ npm ls command, as shown in Figure 2-4.
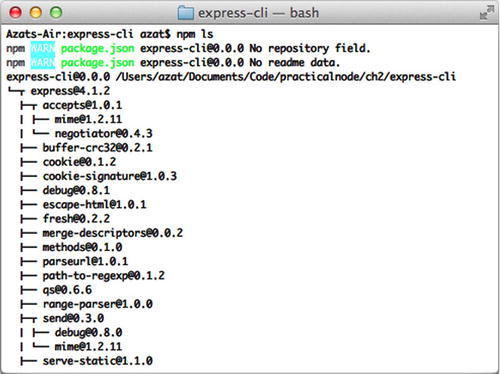
Figure 2-4. The result of running $ npm ls
Express.js Scaffolding
So far, we’ve covered Expres.js installation. When it comes to prototyping, it’s vital to be able to get started quickly with the solid app skeleton, which is why many modern frameworks provide some type of scaffolding. Now is the time to explore its rapid app creation mechanism— Express.js Generator!
Comparable with Ruby on Rails and many other web frameworks, Express.js comes with a CLI for jump-starting your development process. The CLI generates a basic foundation for the most common cases.
If you followed the global installation instructions in the installation section, you should be able to see the version number 4.0.0 if you run $ express -V from anywhere on your machine. If we type $ express -h or $ express --help, we should get the list of available options and their usage. The list of options is broken down below to serve readers as a reference.
To generate a skeleton Express.js app, we need to run a terminal command— express [options] [dir|appname]—the options for which are the following:
- -e, --ejs: add EJS (http://embeddedjs.com/) engine support (by default, Jade (http://jade-lang.com/tutorial/) is used)
- -H, --hogan: add Hogan.js engine support
- -c <engine>, --css <engine>: add stylesheet <engine> support, such as LESS (http://lesscss.org/), Stylus (http://learnboost.github.io/stylus/) or Compass (http://compass-style.org/) (by default, plain CSS is used)
- -f, --force: force app generation on a nonempty directory
If the dir/appname option is omitted, Express.js creates files using the current folder as the base for the project. Otherwise, the application is in the folder with the name provided.
Now that we’re clear with the command and its options, let’s go step by step to create an app with the scaffolding:
- Check the Express.js version, because the app-generating code is prone to changes.
- Execute the scaffolding command with options.
- Run the application locally.
- Understand the different sections, such as routes, middleware, and configuration.
- Peek into the Jade template (more on this in Chapter 3).
Express.js Command-Line Interface
Now we can use the CLI to spawn new Express.js apps. For example, to create an app with Stylus support, type the following:
$ express -c styl express-styl
Then, as the instructions in the terminal tell us (Figure 2-5), type:
$ cd express-styl && npm install
$ DEBUG=my-application ./bin/www
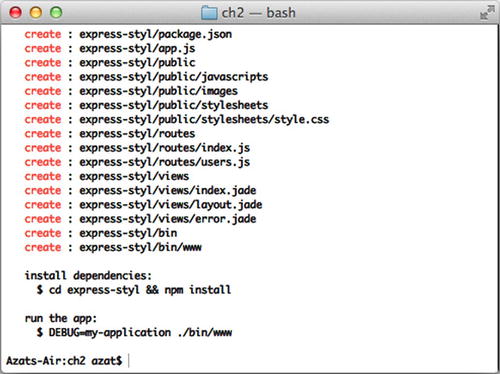
Figure 2-5. The result of using Express.js Generator
Open the browser of your choice at http://localhost:3000.
If you don’t have computer in front of your right now, here’s the full code of express-styl/app.js using Express.js Generator v4.0.0:
var express = require('express'),
var path = require('path'),
var favicon = require('static-favicon'),
var logger = require('morgan'),
var cookieParser = require('cookie-parser'),
var bodyParser = require('body-parser'),

var routes = require('./routes/index'),
var users = require('./routes/users'),

var app = express();

// view engine setup
app.set('views', path.join(__dirname, 'views'));
app.set('view engine', 'jade'),

app.use(favicon());
app.use(logger('dev'));
app.use(bodyParser.json());
app.use(bodyParser.urlencoded());
app.use(cookieParser());
app.use(express.static(path.join(__dirname, 'public')));

app.use('/', routes);
app.use('/users', users);

/// catch 404 and forwarding to error handler
app.use(function(req, res, next) {
    var err = new Error('Not Found'),
    err.status = 404;
    next(err);
});

/// error handlers

// development error handler
// will print stacktrace
if (app.get('env') === 'development') {
    app.use(function(err, req, res, next) {
        res.status(err.status || 500);
        res.render('error', {
            message: err.message,
            error: err
        });
    });
}

// production error handler
// no stacktraces leaked to user
app.use(function(err, req, res, next) {
    res.status(err.status || 500);
    res.render('error', {
        message: err.message,
        error: {}
    });
});

module.exports = app;
Routes in Express.js
When you open express-styl/app.js, you see two routes in the middle:
app.use('/', routes);
app.use('/users', users);
The first one basically takes care of all the requests to the home page, such as http://localhost:3000/. The second takes care of requests to /users, such as http://localhost:3000/users. Both of the routes process URLs in a case-insensitive manner and in a same way as with trailing slashes.
By default, Express.js doesn’t allow developers to route by query string arguments, such as the following:
GET: www.webapplog.com/?id=10233
GET: www.webapplog.com/about/?author=10239
GET: www.webapplog.com/books/?id=10&ref=201
However, it’s trivial to write your own middleware. It might look like this:
app.use(function (req, res, next) {
  if (req.query.id) {
    // process the id, then call next() when done
  else if (req.query.author) {
    // same approach as with id
  else if (req.query.id && req.query.ref) {
    // process when id and ref present
  } else {
    next();
  }
});

app.get('/about', function (req, res, next) {
    // this code is executed after the query string middleware
});
The request handler itself (index.js, in this case) is straightforward. Everything from the HTTP request is in req and it writes results to the response in res:
exports.list = function(req, res){
  res.send('respond with a resource'),
};
Middleware as the Backbone of Express.js
Each line/statement above the routes in app.js is middleware:
var favicon = require('static-favicon'),
var logger = require('morgan'),
var cookieParser = require('cookie-parser'),
var bodyParser = require('body-parser'),
//...
app.use(favicon());
app.use(logger('dev'));
app.use(bodyParser.json());
app.use(bodyParser.urlencoded());
app.use(cookieParser());
app.use(express.static(path.join(__dirname, 'public')));
The middleware includes pass-through functions that either do something useful or add something helpful to the request as it travels along each of them. For example, bodyParser() and cookieParser() add HTTP request payload (req.body) and parsed cookie data (req.cookie), respectively. And in our app.js, app.use(logger('dev')); is tirelessly printing in the terminal pretty logs for each request. In Express.js 3.x, many of these middleware were part of the Express.js module, but not in version 4.x. For this reason, the generator declared and included, and we installed additional modules like static-favicon, morgan, cookie-parser and body-parser.
Configuration of an Express.js App
Here is how we define configuration statements in a typical Express.js app (the app.js file):
app.set('views', path.join(__dirname, 'views'));
app.set('view engine', 'jade'),
And in bin/www:
app.set('port', process.env.PORT || 3000);
An ordinary setting involves a name, such as views, and a value, such as path.join(__dirname, 'views'), a path to the folder where the templates/views live.
Sometimes there is more than one way to define a certain setting. For example, app.enable('trust proxy') for Boolean flags is identical (aka, sugar-coating) to app.set('trust proxy', true). The Chapter 11 explains why we might need to trust proxy.
Jade Is Haml for Express.js/Node.js
The Jade template engine is akin to the Ruby on Rails’ Haml in the way it uses whitespace and indentation, such as layout.jade:
doctype html
html
  head
    title= title
    link(rel='stylesheet', href='/stylesheets/style.css')
  body
    block content
Other than that, it’s possible to use a full-blown JavaScript code inside of Jade templates with the - prefix. More information on Jade and Handlebars template engines is in Chapter 4.
As you’ve seen, it’s effortless to create web apps with Express.js. The framework is splendid for REST APIs as well. If you feel like the settings and other methods mentioned in this chapter just flew over your head, don’t despair! Pro Express.js 4 [2014 Apress] is dedicated solely to Express.js and its interface which can serve as a good reference. For now, the next step is to create a foundation for our project: the Blog app.
The Blog Project Overview
Our Blog app consists of five main parts from the user perspective:
- A home page with a list of articles (Figure 2-6)
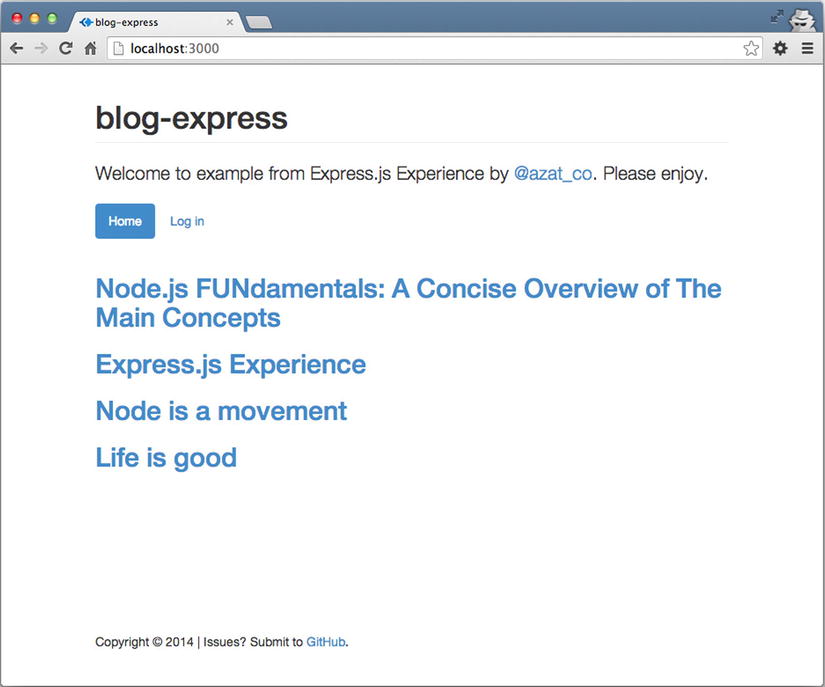
Figure 2-6. The home page of the Blog app
- An individual article page with the full-text article
- An admin page for publishing and removing content
- A login page for accessing the aforementioned admin page
- A post article page for adding new content
From a developer’s point of view, the app has the following elements:
- Main file app.js: settings, inclusions of routes, and other important logic. This is where we run when we start the server.
- Routes: all the logic related to pages and abstracted from app.js based on functional meaning, such as getting the data from the database and compiling the data into HTML
- Node.js project file package.json: dependencies and other meta data
- Dependencies in node_modules: third-party modules installed via package.json
- Database: an instance of MongoDB and some seed data
- Templates: the *.jade files
- Static files: such as *.css or browser *.js
- Configuration file config.json: security-insensitive applicationwide settings, such as app title
Although somewhat primitive, this application contains all the create, read, update, and delete (CRUD, http://en.wikipedia.org/wiki/Create,_read,_update_and_delete) elements of modern web development. In addition, we use two approaches in Blog when sending the data to the server:
- Submit data via traditional forms with full page refresh
- Submit data via REST API (AJAX HTTP requests) without page refresh
The source code for this mini-project is under ch2/hello-world folder of practicalnode GitHub repository: https://github.com/azat-co/practicalnode.
Submitting the Data
The first approach is traditional and is considered more search engine optimization friendly, but it takes longer for users (especially on mobile) and is not as smooth as the second approach (Figure 2-7).
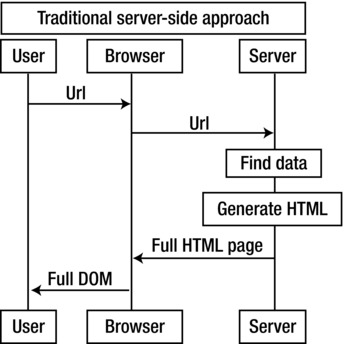
Figure 2-7. Traditional server-side approach
Sending and receiving data via REST API/HTTP requests and rendering HTML on the client side is used with front-end frameworks such as Backbone.js, Angular, Ember, and many others (http://todomvc.com/) (Figure 2-8). The use of these frameworks is becoming more and more common nowadays because it allows for more efficiency (HTML is rendered on the client side and only the data are transmitted) and better code organization.
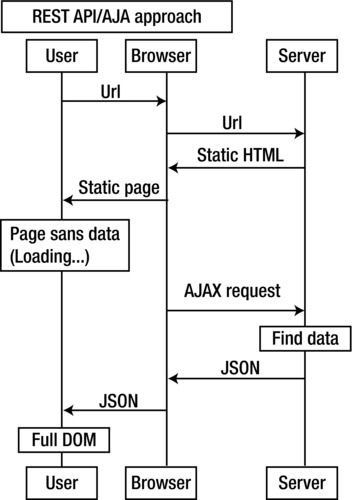
Figure 2-8. REST API approach diagram
Under the hood, virtually all front-end frameworks use jQuery’s ajax() method. So, to give you a realistic example, the admin page uses REST API end points via jQuery $.ajax() calls to manipulate the articles, including publish, unpublish, and remove (Figure 2-9).
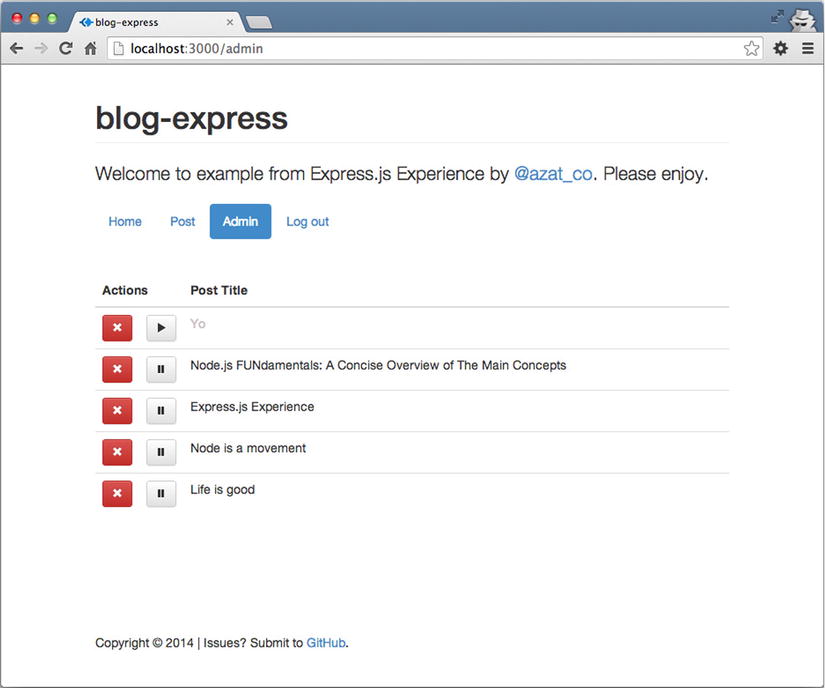
Figure 2-9. The admin page of Blog
Unlike the previous section of this chapter, which dealt with scaffolding with CLI, in this practical exercise we intentionally wanted to show how to create an Express.js app manually, because it gives us a better understanding of how things really work together in the framework.
Let’s wait no more, and start by creating our project folders.
Express.js 4 Hello World Example
This is the first and the last hello world example in this book! :-) The goal is to show readers how easy is it to create Express.js apps from scratch without generators, fancy modules and middleware. We’ll go through these sections:
- Setting up folders
- NPM init and package.json
- Dependency declaration
- The app.js file
- Meet Jade
- Running the app
Setting up Folders
Express.js is very configurable and almost all folders can be renamed. However, there are certain conventions that might help beginners to find their way through many files. Here is a list of the main folders that we use in this chapter, and their meaning:
- node_modules: dependencies (third-party modules) live here as well as Express.js and Connect libraries
- views: Jade (or any other template engine) files
That’s it for now, but if you want to create a few more folders for other examples (that we’ll cover in the later chapters), be my guest:
- routes: Node.js modules that contain request handlers
- db: seed data and scripts for MongoDB
- public: all the static (front-end) files, including HTML, CSS, JavaScript (browser), and Stylus (or any other CSS-language framework files)
Let’s choose a project folder hello-world, and create these directories with Finder or the following terminal command (Figure 2-10):
mkdir {public,public/css,public/img,public/js,db,views,views/includes,routes}
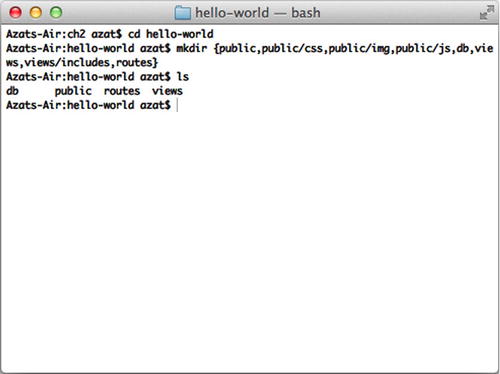
Figure 2-10. Setting up folders
Now we’re all set to add project metadata with NPM.
NPM Init and package.json
For this example we will be creating the Express.js app from scratch, i.e., without Express.js Generator. We’ll start with defining dependencies with package.json and NPM.
NPM is used not only as a registry, but also as a dependency management tool. Therefore, it’s essential to set up the project file—package.json. Although it’s possible to create the package.json file manually in a text editor, we can use the $ npm init command. Run this command in your project folder and answer all the questions (or leave them blank):
$ npm init
After the wizard has finished and the package.json file is there (don’t worry if there’s not much information there yet), we can install modules conveniently and add entries to package.json at the same time with $ npm install <package-name> --save—for example:
$ npm install express --save
The previous command uses the latest stable version (4.1.2 as of May 2014). We recommend being more specific—which is more robust in the land of the rapidly growing Node.js community—and ask for a specific version:
$ npm install [email protected] --save
For the Blog app, we need the following modules, which are the latest as of this writing:
- Express.js: 4.1.2
- Jade: 1.3.1
- Mongoskin: 0.6.1
- Stylus: 0.44.0
![]() Warning Feel free to update to newer versions. However, your results might vary, because it’s very common in the Node.js ecosystem (“userland”) to see breaking changes introduced by new versions. This usually happens unintentionally by the dependency of a dependency. For example, even if we include a specific version of Express.js such as 3.4.5, that module includes Jade with a wildcard *, and then on Jade’s breaking update, our app will suffer damage. The cure is to commit your node_modules folder along with the rest of the source code to a Git repository and use that instead of fetching modules according to package.json each time on deployment. Or use NPM's shrinkwarp feature. Read more about this issue in Chapter 12.
Warning Feel free to update to newer versions. However, your results might vary, because it’s very common in the Node.js ecosystem (“userland”) to see breaking changes introduced by new versions. This usually happens unintentionally by the dependency of a dependency. For example, even if we include a specific version of Express.js such as 3.4.5, that module includes Jade with a wildcard *, and then on Jade’s breaking update, our app will suffer damage. The cure is to commit your node_modules folder along with the rest of the source code to a Git repository and use that instead of fetching modules according to package.json each time on deployment. Or use NPM's shrinkwarp feature. Read more about this issue in Chapter 12.
Dependency Declaration: npm install
Another way to create a package.json file (without using $ npm init) is to type or copy and paste package.json and run $ npm install:
{
  "name": "hello-world",
  "version": "0.0.1",
  "private": true,
  "scripts": {
    "start": "node app.js"
  },
  "dependencies": {
    "express": "4.1.2",
    "jade": "1.3.1",
    "mongoskin": "1.4.1",
    "stylus": "0.44.0"
  }
}
In the end, the node_modules folder should be filled with the corresponding libraries.
If you noticed, one of the questions npm init asked was about the so-called entry point. In our case, it’s the app.js file, and it’s the home for most of the application’s logic. To run it, simply use one of the following commands:
- $ node app.js
- $ node app
- $ npm start
Another approach is to name the entry point index.js. In this case, we get the benefit of running the script with the $ node . command.
Let’s create the first iteration of app.js.
The App.js File
The app.js file is the main file for this example. A typical structure of the main Express.js file consists of the following areas (this may be a partial repeat from an earlier section, but this is important, so bear with me):
- Require dependencies
- Configure settings
- Connect to database (optional)
- Define middleware
- Define routes
- Start the server
- Start workers with clusters (a term spawn workers is also used for this) (optional)
The order here is important, because requests travel from top to bottom in the chain of middleware.
Let’s perform a quintessential programming exercise: writing the Hello World application. This app transitions smoothly into the Blog example project, so no effort is wasted!
Open app.js in a code editor of your choice and start writing or just copy the code from GitHub at http://github.com/azat-co/blog-express.
First, all the dependencies need to be included with require():
var express = require('express'),
var http = require('http'),
var path = require('path'),
Then, the Express.js object is instantiated (Express.js uses a functional pattern):
var app = express();
One of the ways to configure Express.js settings is to use app.set(), with the name of the setting and the value. For example:
app.set('appName', hello-world'),
Let’s define a few such configurations in app.js:
- port: a number on which our server should listen to requests
- views: absolute path to the folder with template (views in our example)
- view engine: file extension for the template files (for example, jade, html)
If we want to use the port number provided in the environmental variables (env vars), this is how to access it: process.evn.PORT.
So let’s write the code for the settings we listed earlier:
app.set('port', process.env.PORT || 3000);
app.set('views', path.join(__dirname, 'views'));
app.set('view engine', 'jade'),
Next comes the middleware section of the application. Middleware is the backbone of the Express.js framework and it comes in two flavors:
- Defined in external (third-party) modules, such as bodyParser.json from Connect/Express.js body-parser: app.use(bodyParser.json());
- Defined in the app or its modules, such as app.use(function(req, res, next){...});
Middleware is a way to organize and reuse code, and, essentially, it is nothing more than a function with three parameters: request, response, and next. We’ll use more middleware (for example, for authorization and for persistence) in Chapter 6, but for now, its use is minimal.
The next components in the app.js file are routes. Routes are processed in the order they are defined. Usually, routes are put after middleware, but some middleware may be placed following the routes. A good example of such middleware, found after a routes, is error handler.
An illustration in Figure 2-11 shows how an HTTP request is processed.
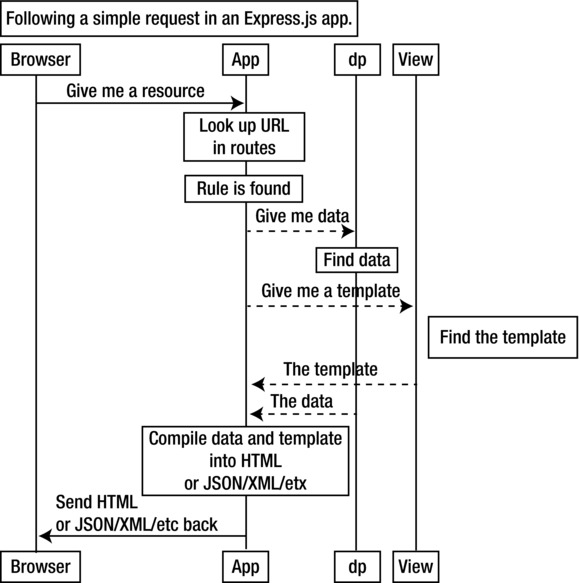
Figure 2-11. Following a simple request in an Express.js app
The next section is where we define routes themselves (the order in app.js matters). The way routes are defined in Express.js is with helpers app.VERB(url, fn1, fn2, ..., fn), where fnNs are request handlers, url is on a URL pattern in RegExp, and VERB values are as follows:
- all: catch every request (all methods)
- get: catch GET requests
- post: catch POST requests
- put: catch PUT requests
- del: catch DELETE requests
![]() Note del and delete methods are aliases, just remember that delete is a valid operator in JavaScript/ECMAScript, and therefore in Node.js. The operator removes a property from an object, e.g., delete books.nodeInAction.
Note del and delete methods are aliases, just remember that delete is a valid operator in JavaScript/ECMAScript, and therefore in Node.js. The operator removes a property from an object, e.g., delete books.nodeInAction.
Figure 2-11 shows how a trivial request might travel across the web and the Express.js app, with the dotted lines being the connection inside it.
In this Hello World example a single route is used to catch requests of all methods on all URLs (* wildcard):
app.all('*', function(req, res) {
  ...
})
Inside the request handler, a template is rendered (res.render() function) with a message msg (property of the second argument):
app.all('*', function(req, res) {
    res.render('index', {msg: 'Welcome to the Practical Node.js!'})
})
The res.render(viewName, data, callback(error, html)) where parameters mean following:
- viewName: a template name with filename extension or if view engine is set without the extension
- data: an optional object that is passed as locals; for example, to use msg in Jade, we need to have {msg: "..."}
- callback: an optional function that is called with an error and HTML when the compilation is complete
res.render() is not in the Node.js core and is purely an Express.js addition that, if invoked, calls core res.end(), which ends/completes the response. In other words, the middleware chain doesn’t proceed after res.render(). res.render is highlighted in chapter 4.
Last but not least are the instructions to start the server, which consist of the core http module and its createServer method. In this method, the system passes the Express.js app object with all the settings and routes:
http.createServer(app).listen(app.get('port'), function(){
  console.log('Express server listening on port ' + app.get('port'));
});
Here’s the full source code of the app.js file for your reference:
var express = require('express'),

var http = require('http'),
var path = require('path'),

var app = express();

app.set('port', process.env.PORT || 3000);
app.set('views', path.join(__dirname, 'views'));
app.set('view engine', 'jade'),

app.all('*', function(req, res) {
  res.render(
    'index',
     {msg: 'Welcome to the Practical Node.js!'}
  );
});

http
  .createServer(app)
  .listen(
    app.get('port'),
    function(){
      console.log(
       'Express.js server listening on port ' +
        app.get('port')
      );
    }
  );
Before we can run this server, we need to create the index.jade file.
Meet Jade: One Template to Rule Them All
Jade is an absolutely amazing template engine that allows developers to type less code and to execute powerfully almost all JavaScript functions. It also supports top-to-bottom and bottom-to-top inclusion and other useful things. Like its brother from the Ruby world, Haml, Jade uses whitespace/indentation as a part of its language. It’s a convention to use two-space indentation.
The Jade syntax and its features are covered more extensively in Chapter 4. For now, just keep in mind that the way Jade works is that the first word is used as an HTML tag (HTML element) and the text that follows (a.k.a., inner text), is put inside this element. For example,
h1 hello
p Welcome to the Practical Node.js!
Produces the following HTML code:
hello</h1>
<p>Welcome to the Practical Node.js!</p>
If we want to output a value of a variable (called locals), we use =. For example:
p= msg
For this example, create index.jade in the views folder that outputs a header and a paragraph with the value of msg variable inside that paragraph (i.e., inner text):
h1 hello
p= msg
There are more advanced examples of Jade included later in this book; but for now, everything is set for the first demo!
Running the Hello World App
When we run the $ node app command and open browsers at http://localhost:3000, we see what appears in Figure 2-12.
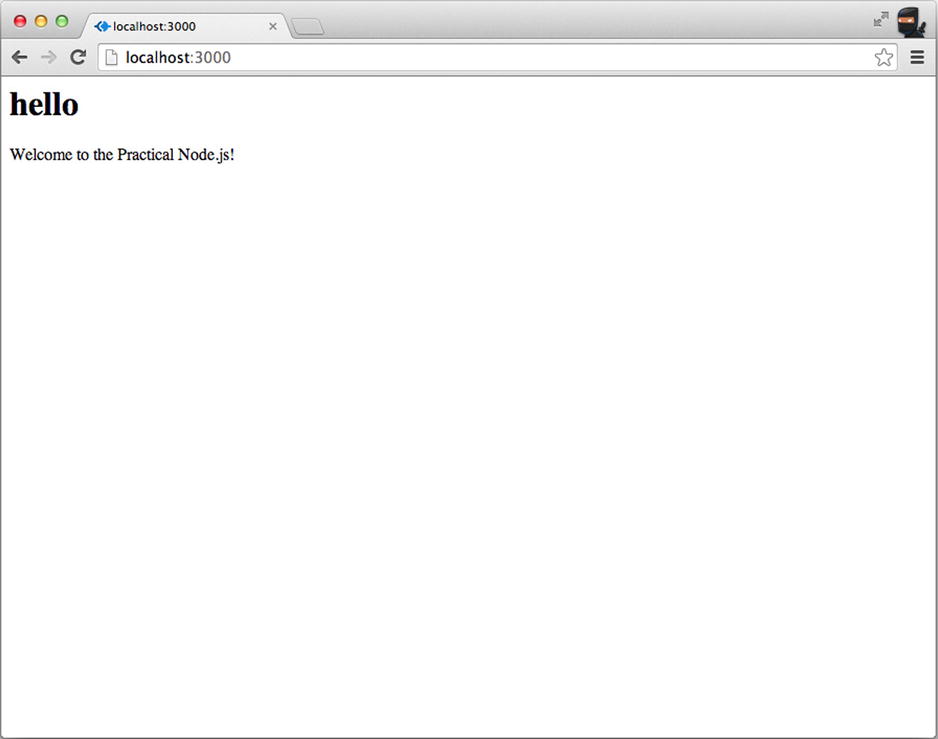
Figure 2-12. The Hello World app in action
Nothing fancy so far, but it’s worth pointing out that it took us just a few lines (the app.js file) to write a fully functional HTTP server! In the next chapter, we add more new and exciting pages using Jade instructions.
Summary
In this chapter we learned what Express.js is and how it works. We also explored different ways to install it and use its scaffolding (command-line tool) to generate apps. We went through the Blog example with a high-level overview (traditional vs. REST API approaches), and proceeded with creating the project file, folders, and the simple Hello World example, which serves as a foundation for the book’s main project: the Blog app. And then lastly, we touched on a few topics such as settings, a typical request process, routes, AJAX versus server side, Jade, templates, and middleware.