
Chapter 9: Creating a ToDo Application with Node-RED
In this chapter, we are going to create a simple ToDo application in Node-RED. This is simple and straightforward and is a good tutorial on creating an application (flow) in Node-RED. We are going to use the project feature explained in the previous chapter, so this chapter will also double as a review of that function.
Let's get started with the following four topics:
- Why you should use Node-RED for web applications
- Creating a database
- How to connect to a database
- Running the application
By the end of this chapter, you will have mastered how to make a simple web application with a database on Node-RED.
Technical requirements
To progress through this chapter, you will need the following:
- Node.js 12.x or above (https://nodejs.org/).
- CouchDB 3.x (https://couchdb.apache.org/).
- A GitHub account, available from https://github.com/.
- The code used in this chapter can be found in Chapter09 at https://github.com/PacktPublishing/-Practical-Node-RED-Programming.
Why you should use Node-RED for web applications
So far, this book has explained that Node-RED is an easy-to-use tool for the Internet of Things (IoT). There are many cases where Node-RED is used as a solution in the IoT field.
However, recently, Node-RED has been recognized as a tool for creating web applications as well as IoT.
I think one of the reasons is that the ideas of no-code and low-code have become widespread in the world. Nowadays, the number of people who know flow-based programming tools and visual programming tools is increasing, and they are being used in various fields.
It would be natural for Node-RED, which is made with Node.js, to be used for web applications.
The project function that we learned in the previous chapter, in collaboration with Git/GitHub, may also be a part of the flow of web application development culture.
In this chapter, we will create a ToDo application that is very suitable as a piece of development for tutorials.
The overall picture of the application to be created is as follows:

Figure 9.1 – An overview of the application we'll create
Figure 9.1 outlines the application's overview. The application will be accessed from a client PC browser. The user interface of this application is made with Node.js frameworks, TodoMVC and Todo-Backend. The data-handling programming is built on Node-RED by connecting CouchDB as the storage for this data.
In this application, the user interface and backend application are not built on Node-RED.
The application is implemented on your localhost directly as a Node.js application. We will cover this in a later step, where we will set it to redirect to the localhost Node.js application when accessing the localhost port where Node-RED is running.
There are two frameworks used for this application that we should be aware of before we move toward the hands-on example. We will make our ToDo application with Node-RED in this hands-on tutorial. The application is implemented via these two Node.js frameworks:
- TodoMVC: http://todomvc.com/

Figure 9.2 – TodoMVC
- Todo-Backend: https://todobackend.com/
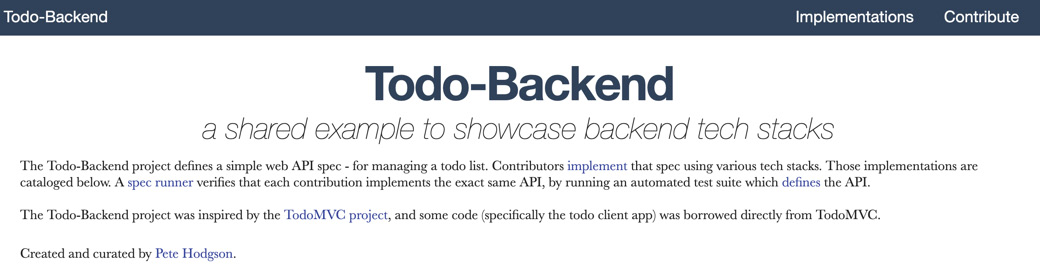
Figure 9.3 – Todo-Backend
As you can see from the fact that it is possible to create a Node-RED flow by linking web application frameworks, Node-RED works very well with the web applications implemented in Node.js and the frameworks around it. This hands-on tutorial will help you understand why Node-RED is so popular for developing web applications in a no-code/low-code fashion.
Next, we will move to the hands-on steps.
Creating a database
We introduced the big picture of the application in the previous section, but more specifically, this application uses CouchDB for the database. In this hands-on tutorial, we will create an application with Node-RED running on localhost. Therefore, you need to install CouchDB on your own local machine as well.
Let's install it by following these steps:
- Access the CouchDB website at https://couchdb.apache.org/ and then click the DOWNLOAD button:

Figure 9.4 – Click the DOWNLOAD button
- Select a file depending on the system running on local machine:

Figure 9.5 – Select file
- Expand the ZIP file you downloaded and run the application file to start CouchDB once the file has finished downloading:

Figure 9.6 – Start CouchDB
- Running the CouchDB application file launches a browser and opens the CouchDB management console. If it doesn't open automatically, you can also open it manually from the application menu:
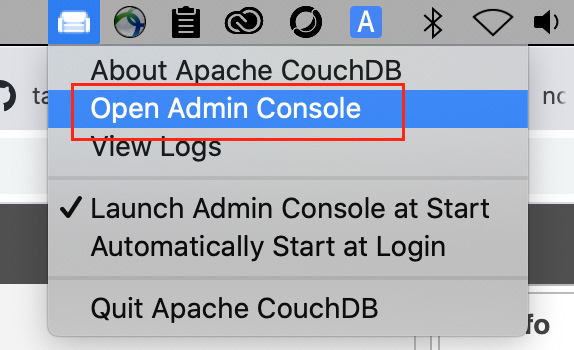
Figure 9.7 – Open the CouchDB admin console
- In the CouchDB management console, create a new database. Create it with the name todos. No partition is needed. Finally, click the Create button to complete:
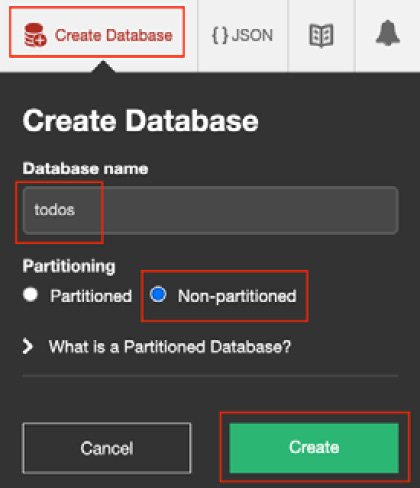
Figure 9.8 – Create a new database named "todos"
You will now be able to see the database named todos on your CouchDB admin console:

Figure 9.9 – Check the database you created
- Create an admin user to access this database from your application. To do this, access User Management from the side menu of the CouchDB Management Console, select the Create Server Admin tab, and set the user account and password.
Here, admin is set as the username and adminpass is set as the password:

Figure 9.10 – Create a server admin user account
This completes all the settings related to CouchDB. Next, let's move on to setting up our Node-RED side.
How to connect to the database
Now that the database has actually been created, we will move toward the hands-on tutorial, where we will clone the Node-RED flow from GitHub, and implement the connection to that database from the Node-RED flow. Use the project feature you learned in the previous chapter to connect to your GitHub repository, load the prepared flow definition file, and implement it on Node-RED in your local environment. Since you have already done this in the previous chapter, it is not necessary to create a new flow this time.
Configuring Node-RED
The first thing you need to do is change the localhost path (URL) of the Node-RED flow editor. Currently, you can access the flow editor at localhost:1880, but in order to change the path (URL) of the web application created by this hands-on tutorial to localhost:1880, we need to change the path of the flow editor to localhost:1880/admin.
This is because you have to move the root path of the Node-RED flow editor to access the Node.js ToDo application running on the same port on your localhost.
To configure Node-RED, follow these steps:
- Open the settings file (~/.node-red/settings.js).
- Find the httpAdminRoot setting in the settings.js file you opened.
This changes the path you access the Node-RED flow editor on. By default it uses the root path /, however, we want to use that for our application, so we can use this setting to move the editor. It is commented out by default, so uncomment it by removing the // at the start of the line:
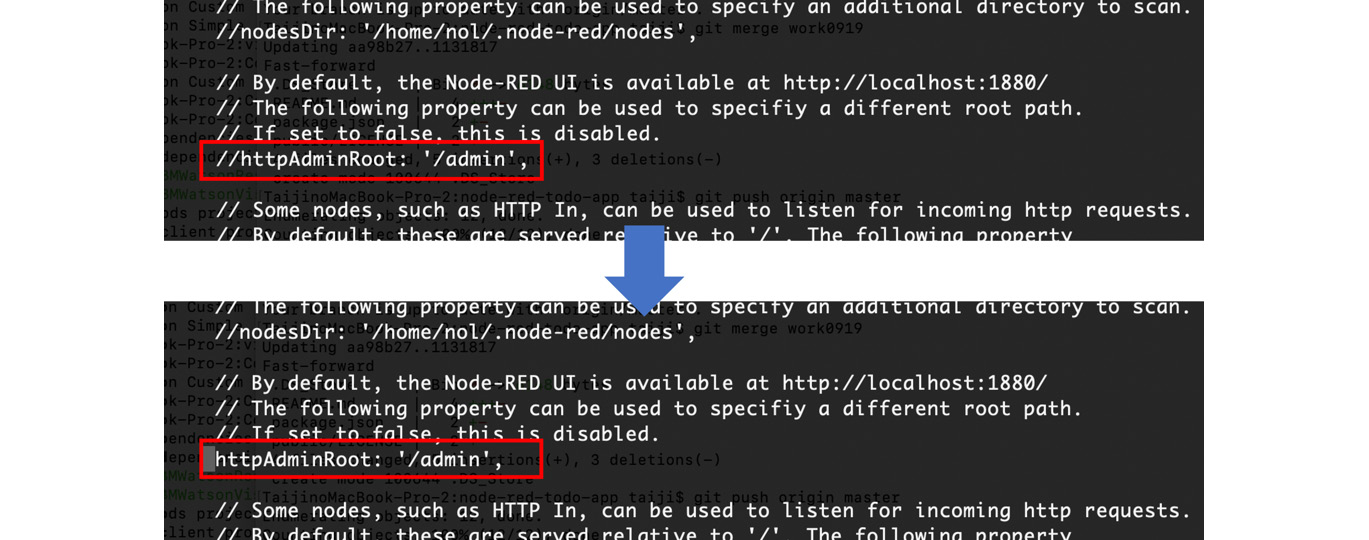
Figure 9.11 – Uncomment httpAdminRoot to enable the flow editor path
- You have now moved the flow editor to /admin. Restart Node-RED on your local machine and access the http://localhost:1880/admin URL to run your Node-RED flow editor.
Next, let's clone the project.
Cloning the Node-RED Project
This hands-on tutorial provides an example of a Node-RED project for you to use. Before cloning it into your local Node-RED instance, you should first fork the project so you have your own copy of it to use.
After forking it, you need to clone the project into your Node-RED instance.
To clone your project, follow these steps:
- Open the example project at https://github.com/taijihagino/node-red-todo-app.
- Click the fork button to create your own copy of the repository.
- Copy the URL of the repository you forked.
- Access the Node-RED editor via http://127.0.0.1:1880/admin/.
- Click the Clone Repository button in the Projects Welcome screen. If you've already closed that screen, you can reopen it with Projects | New from the main menu:

Figure 9.12 – Click New under the Projects menu to clone the repo
- On the Projects screen, provide your repository URL, your username, and password. These are used when committing changes to the project. If your local Git client is already configured, it will pick those values. It is fine to leave the Credentials encryption key field blank:
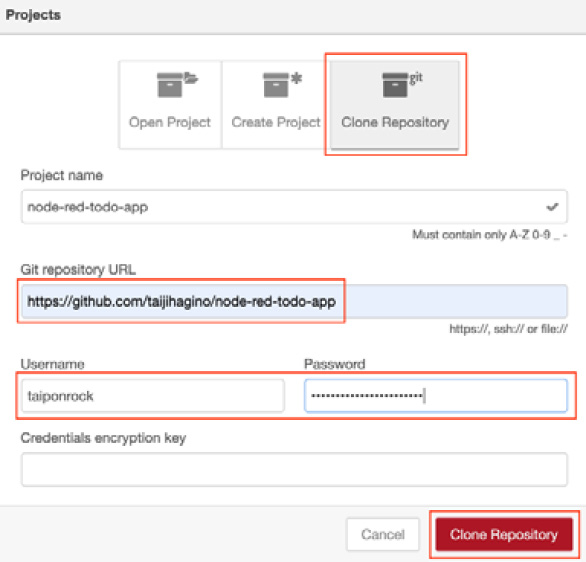
Figure 9.13 – Provide your GitHub repository information
- This will clone the repository into a new local project and start running it. In the workspace, you can see flows that implement each part of the application's REST API.
You will see some errors on all of the cloudant nodes, but the reasons for these errors come from the connection settings. These settings will be made in later steps so it is not a problem for now:
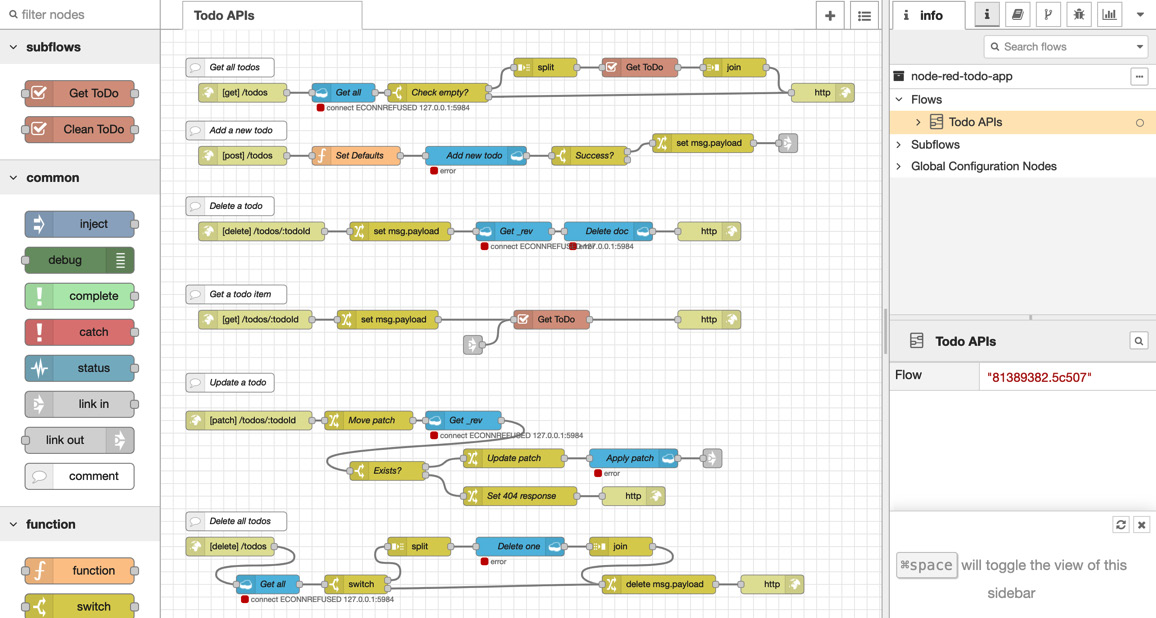
Figure 9.14 – The flow overview you cloned
- The project also includes some static resources that need to be served by the runtime. To do this, some changes to how you access this web application need to be made in your settings file.
First, you must locate your newly-cloned project on the local filesystem. It will be in <node-red root>/projects/<name-of-project>. Within that folder, you will find a folder named public. This contains the static resources for the project of this ToDo application, such as the following, for example:
/Users/taiji/.node-red/projects/node-red-todo-app
The following image is an example of this. Please use it as a reference when checking your own file path:

Figure 9.15 – The ToDo application project folder
- Edit your settings file (~/.node-red/settings.js) and find the httpStatic property in this file. Uncomment it by removing the // at the start of the line and set its value using the absolute path to the public folder. The path in the following image is just an example; please replace it with your path:

Figure 9.16 – Uncomment httpStatic and set your application project path
- Restart Node-RED.
By restarting Node-RED, the changed settings.js contents will be reloaded and applied.
Next, let's configure the Node-RED and CouchDB connection.
Configuring the Node-RED and CouchDB connection
As you know, we are using a cloudant node to connect to CouchDB, correct?
Cloudant is a JSON database based on Apache CouchDB. Cloudant has CouchDB-style replication and synchronization capabilities, so you can connect to CouchDB using the cloudant node provided by Node-RED.
As mentioned earlier, the cloudant node on Node-RED is experiencing an error. This is because the connection information to CouchDB on your local system is not set correctly when cloned from GitHub.
Here, we will correct the settings of the cloudant node on Node-RED.
Now, carry out the settings according to the following steps:
- Double-click any cloudant node to open the settings screen. If you set one of the cloudant nodes there, the settings of all cloudant nodes on the same flow will be updated, so it doesn't matter which cloudant node you choose:
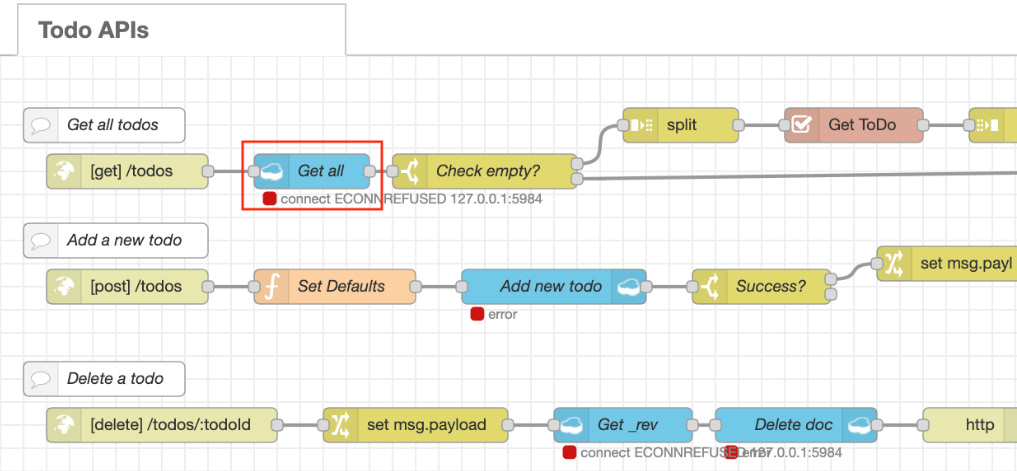
Figure 9.17 – Open the settings screen with a double-click on any cloudant node
- Click the pencil mark button on the right side of Server on the cloudant node settings screen to open the connection information settings screen for CouchDB:
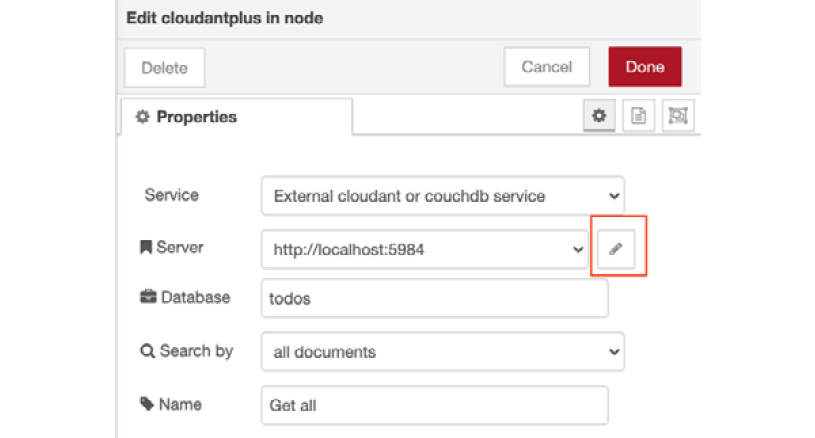
Figure 9.18 – Click the pencil mark button
- When the connection information settings screen for CouchDB opens, go to Host and set it to http://localhost:5984 (if you have CouchDB installed on a different port, replace it as appropriate) and set the Username to the server admin user of CouchDB that you set earlier. For Password, enter the server admin password.
- After entering all of this, click the Update button on the upper right to return to the previous screen:
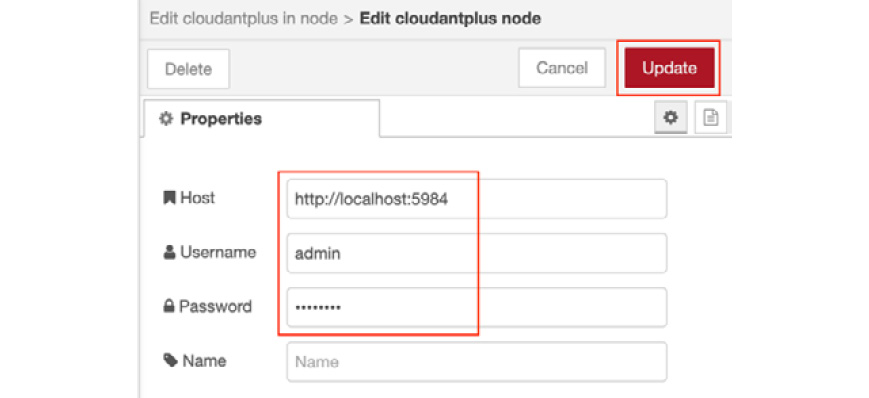
Figure 9.19 – Set your CouchDB URL and server admin user/password
- Click the Done button and return to the workspace of your Node-RED flow editor. You will see a message reading connected on all of the cloudant nodes next to a green square:
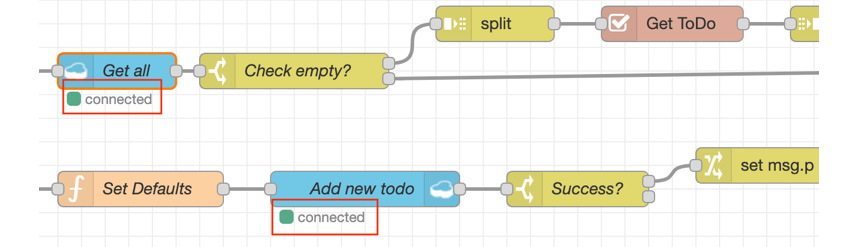
Figure 9.20 – Check that all of the cloudant nodes are error-free
Perfect, you have succeeded in configuring the settings for starting the ToDo application in Node-RED. Next, let's run this ToDo application.
Running the application
If everything is working, you should be able to open http://localhost:1880 in the browser and see the application.
Now, let's confirm that the ToDo application works by following these steps:
- Access http://localhost:1880 to open your ToDo application.
If you get the Node-RED flow editor when you open localhost:1880, the setting httpAdminRoot is not enabled, so please check your settings.js file again.
When you access this URL, the following screen should be displayed:
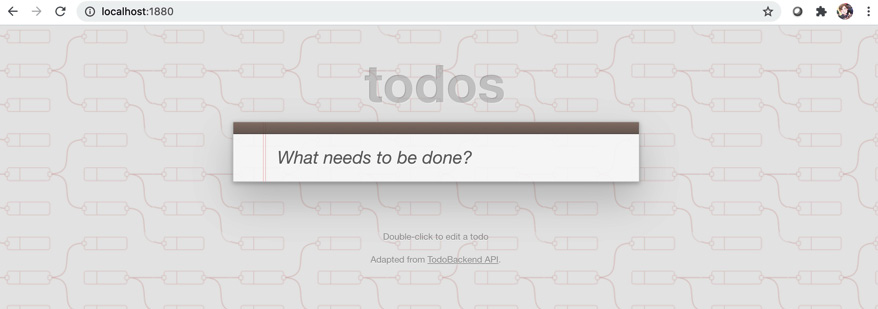
Figure 9.21 – Open your ToDo application
- Any ToDo item is fine for this test, so enter any words as a sample task. Here, I typed Report my tasks:
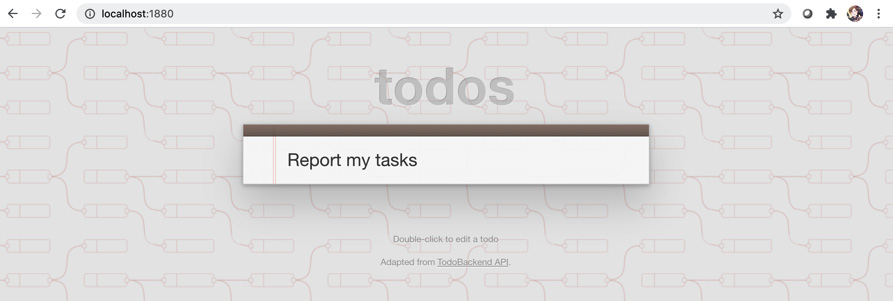
Figure 9.22 – Enter a sample ToDo item
- If you press the Enter key while entering a value in the text box, that value will be registered as a ToDo item. In the following screenshot, we can see that it looks like it has been registered in the application:
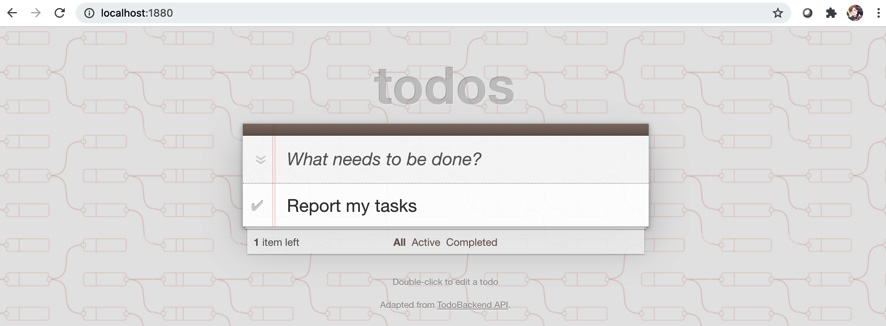
Figure 9.23 – The ToDo item you entered has been registered
Let's check if the ToDo item that showed as registered on the screen is registered in the database.
- Open the CouchDB admin console.
If you forget how to open it, you can open it with the Open Admin Console option from the CouchDB application menu. If you reopen the management console, or if the time has passed, you may be asked to log in. In that case, log in with the server admin username and password you set.
- Select Database option in the side menu, and click todos. You will see the record you registered on your ToDo application. Click the record to show more details:
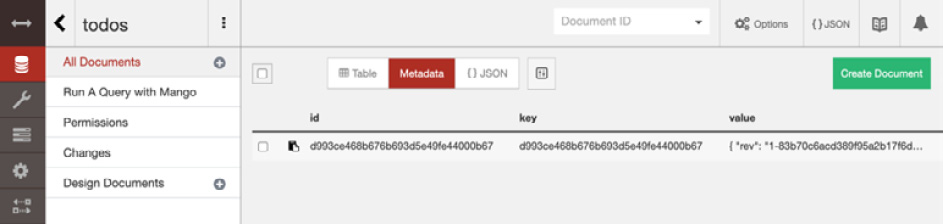
Figure 9.24 – Check the record on your todos database
- You will see the detail of the record you selected. The data is the exact item you registered via the ToDo application, that is, Report my tasks:
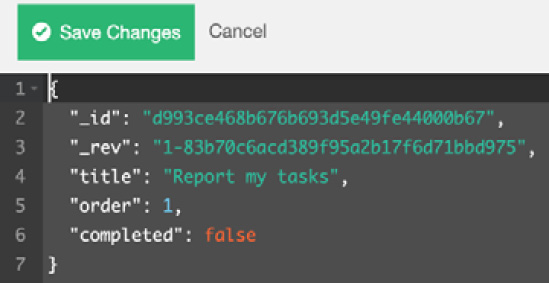
Figure 9.25 – Check the result
Congratulations! This completes the hands-on tutorial for cloning a ToDo application from GitHub and implementing it in Node-RED.
The point of this tutorial was to use the project function of Node-RED to clone and execute the application project from the GitHub repository.
This hands-on tutorial helped us learn that we don't necessarily have to implement user interfaces and server-side business logic in web applications made with Node-RED. We saw how one of the features of Node-RED is that the user interfaces and server-side business logic of the web application that we built are located outside of Node-RED, while only data handling functionalities such as accessing the database are done internally by Node-RED.
The GitHub repository we used contains two things, that is, Node-RED flow, which handles data, and the ToDo application, which runs outside Node-RED. The point here was to use the project function of Node-RED to clone and execute the application project from the GitHub repository.
Summary
In this chapter, in the form of a hands-on tutorial, we experienced how to actually run a web application on Node-RED using the project feature. Of course, this is just one way to create a web application (including a UI, using a template node, and so on) on Node-RED. However, remembering this pattern will definitely be useful for your future development tasks.
In the next chapter, we will look at a hands-on scenario where we will be sending sensor data from an edge device to the server side (cloud) with Node-RED.