
Chapter 12: Developing a Chatbot Application Using Slack and IBM Watson
In this chapter, we will create a chatbot application, using Node-RED. For the chatbot application UI, we'll use Slack, and we'll use IBM Watson AI for skills. After completing the tutorials in this chapter, you will learn how to combine Node-RED with an external API to create an application. This will help you create extensible web applications with Node-RED in the future.
Let's get started with the following topics:
- Creating a Slack workspace
- Creating a Watson Assistant API
- Enabling a connection to Slack from Node-RED
- Building a chatbot application
By the end of this chapter, you will have mastered how to make a Slack chatbot application with Node-RED.
Technical requirements
To progress in this chapter, you will need the following:
- An IBM Cloud account: https://cloud.ibm.com/.
- The code used in this chapter can be found in Chapter12 folder at https://github.com/PacktPublishing/-Practical-Node-RED-Programming .
Creating a Slack workspace
This hands-on tutorial uses Slack as the UI for your chatbot application. Node-RED is responsible for controlling the exchange of messages in the background of the chatbot application.
The overall view of this chatbot application is as follows:
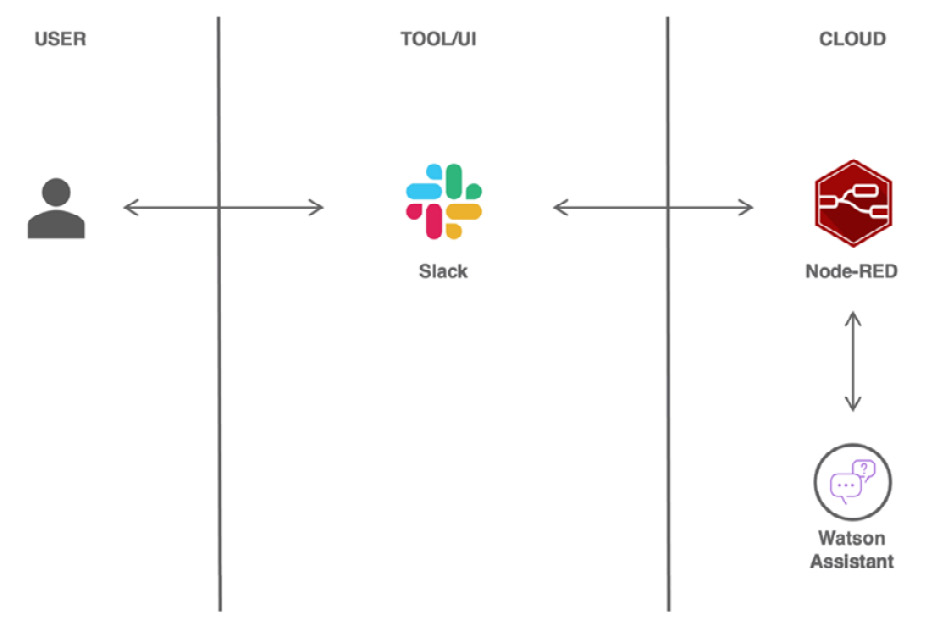
Figure 12.1 – Application overview
First of all, create a Slack workspace for use in this application with the following steps. If you already have a Slack workspace, you can use your existing one. In that case, skip the following steps and create a channel called learning-node-red in your workspace:
- Access https://slack.com/create, enter your email address, and click the Next button:
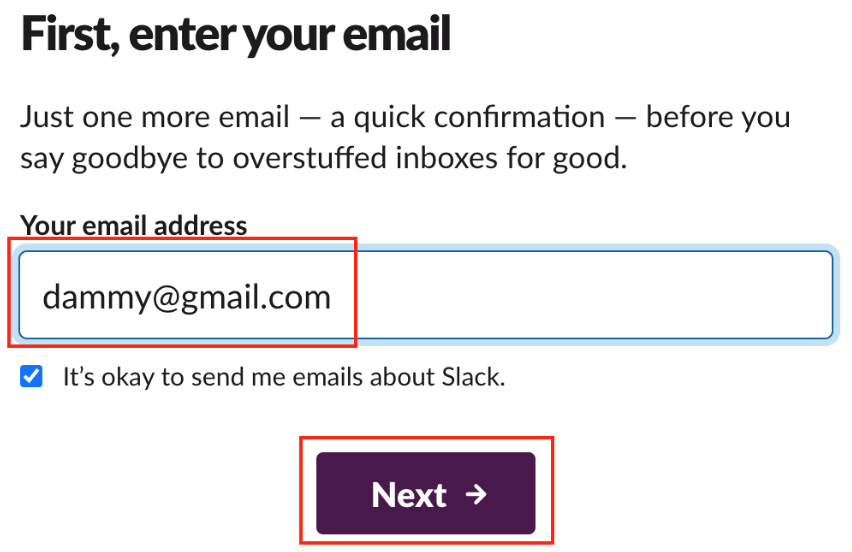
Figure 12.2 – Enter your email address
- Check the six-digit verification code from the email you received from Slack:
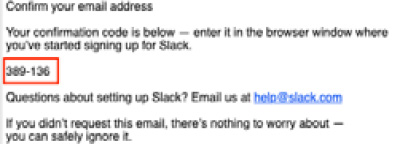
Figure 12.3 – Check the six-digit code
- Enter the verification code in the window that is displayed after you click Next with your email address. After entering your verification code, you will be redirected to the next window automatically:
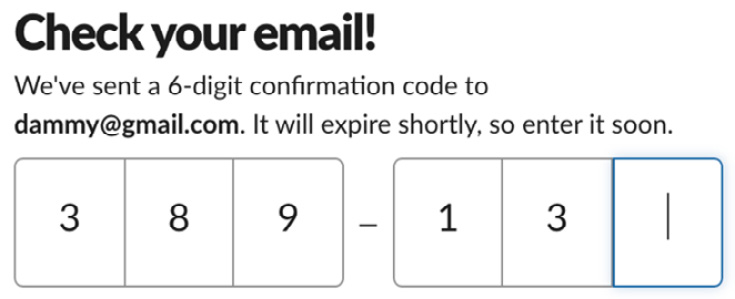
Figure 12.4 – Enter the verification code
- Give your workspace a name and click the Next button:

Figure 12.5 – Give your workspace a name
- Create a channel in your workspace. You can use the general channel as it is, but let's create a channel to implement the chatbot. Here, we will create a channel named Learning Node-RED:

Figure 12.6 – Your workspace name
- Click skip for now without adding teammates:
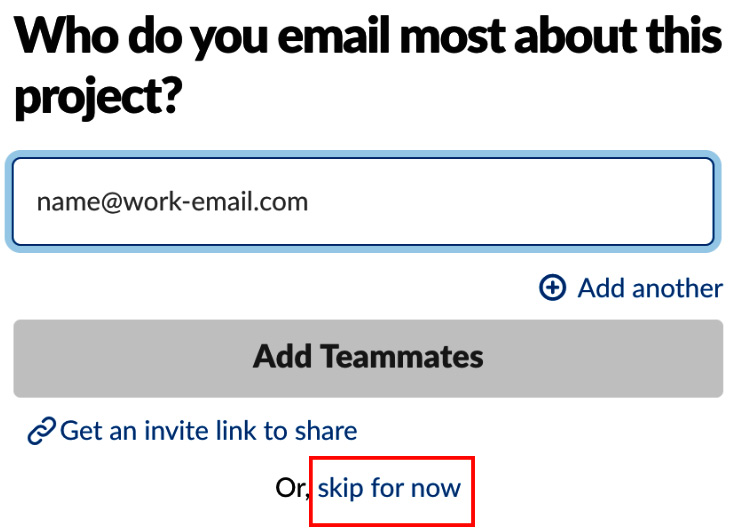
Figure 12.7 – No teammates are needed for this tutorial
- Click See Your Channel in Slack to open the workspace you created:

Figure 12.8 – Click See Your Channel in Slack
You have created the workspace for this tutorial:
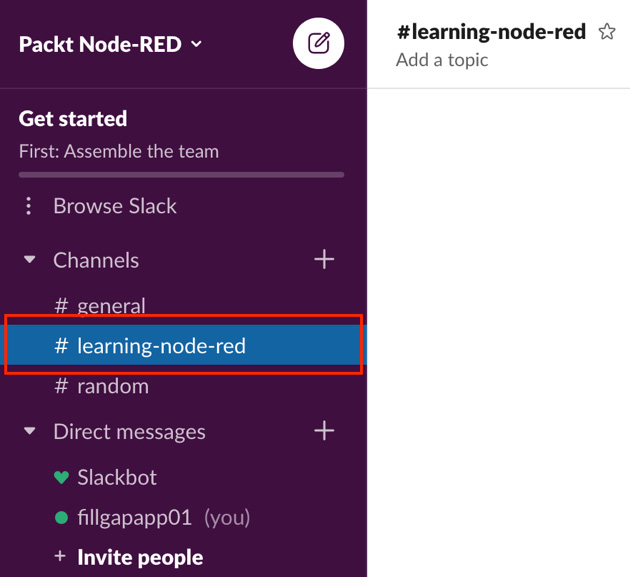
Figure 12.9 – You have created the workspace
Important note
The channel on which the chatbot resides should preferably be a channel that only you participate in unless you have a public purpose. This is because the chatbot's movement can be noisy for participants who do not like (or are not interested in) the chatbot.
At this point, you've got your workspace and channels ready to run your chatbot in Slack. Next, we will create a mechanism that will be the engine of the chatbot.
Creating a Watson Assistant API
This hands-on tutorial uses IBM's Watson Assistant API as the engine for chatbots. Watson Assistant can use natural language analysis to interpret the intent and purpose of natural conversation and return an appropriate answer.
Details about Watson Assistant can be found at the following URL: https://www.ibm.com/cloud/watson-assistant-2/.
To use the Watson Assistant API, you need to create an instance of the Watson Assistant API on IBM Cloud. Follow these steps to create it:
- Log in to your IBM Cloud dashboard, and search Assistant in the Catalog. Click the Assistant tile on the results of your search:
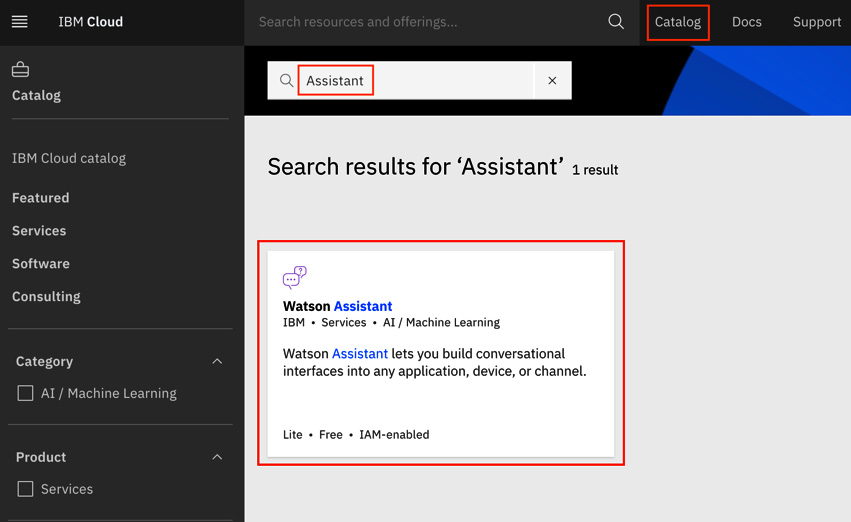
Figure 12.10 – Search for Watson Assistant
- Create a Watson Assistant API service. Select a region for the Watson Assistant service data center. Dallas is stable so here we selected Dallas.
- Select Lite for the pricing plan. Other items such as service name and resource group can be left at their default values.
- Click the Create button:

Figure 12.11 – Create a Watson Assistant service
- Launch the Watson Assistant tool. Click the Launch Watson Assistant button to open the Watson Assistant console:
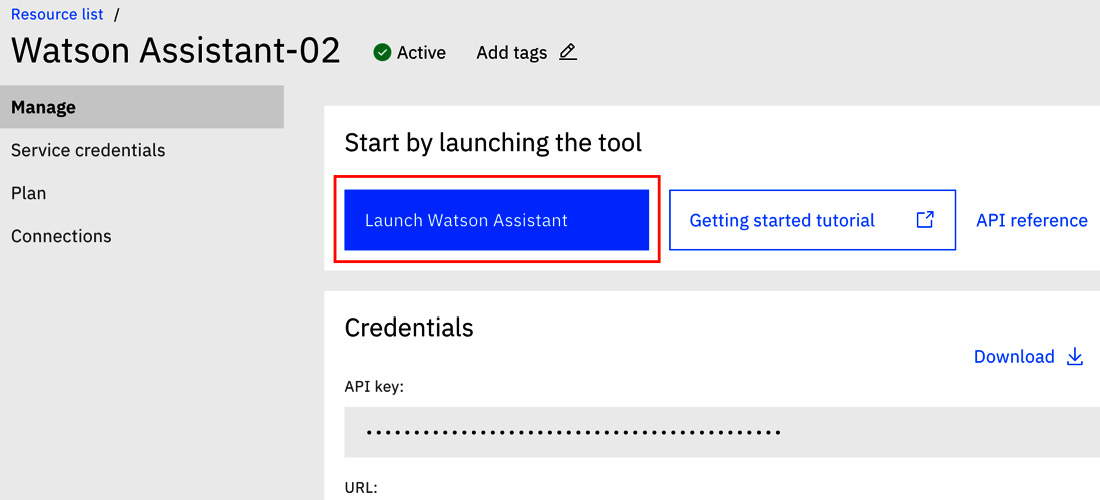
Figure 12.12 – Launch the Watson Assistant console
- Create a Skill in your Watson Assistant service.
You will be moved to the My first skill screen automatically when you open the Watson Assistant console for the first time.
Normally, you would create a Watson Assistant skill here, but this hands-on tutorial will focus on Node-RED rather than how to use Watson Assistant. Therefore, a skill in Watson Assistant is created by importing the definition file prepared in advance.
If you want to create your own skill, that's fine. In that case, the official Watson Assistant documentation will help: https://cloud.ibm.com/apidocs/assistant/assistant-v2.
- Click Assistants on the side menu of the Watson Assistant console, and click the Create assistant button:

Figure 12.13 – Create Assistant menu
This time, I prepared a skill that will randomly return a joke phrase when told tell me a joke.
- Create an assistant for this frame, set the assistant's name to Respond Joke Phrase, and click the Create assistant button:

Figure 12.14 – Create assistant
- Import Dialog. When your assistant is created, the settings screen of the created assistant is displayed. In the Dialog area on that settings screen, click the Add dialog skill button:

Figure 12.15 – Add dialog skill
- Select the Import skill tab and select the JSON file for the skill you want to import. Download this JSON file at https://github.com/PacktPublishing/-Practical-Node-RED-Programming/blob/master/Chapter12/skill-Respond-Joke-Phrase.json.
- Click the Import button when the JSON file is selected:
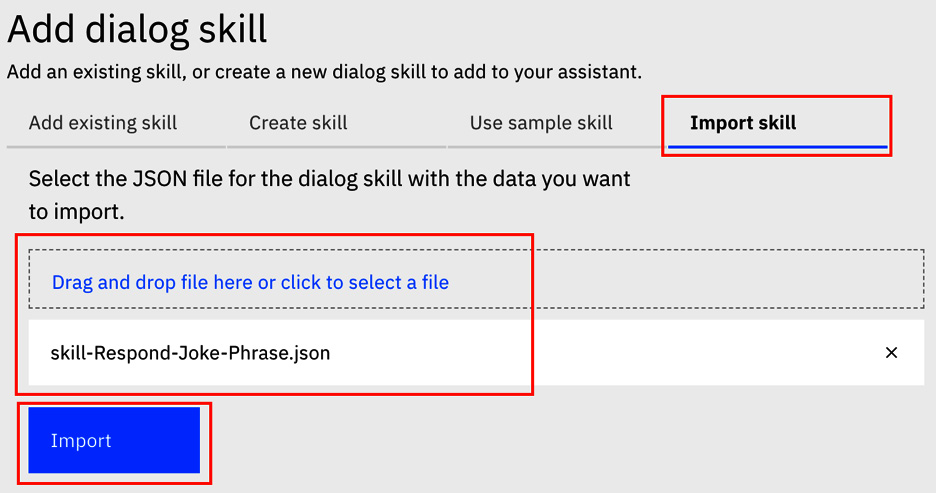
Figure 12.16 – Import the dialog skill file
You will see Respond Joke Phrase in the Dialog area:

Figure 12.17 – Dialog skill imported
- This completes the skill import. You can return simple greetings and joke phrases, so try out the conversation with the Try it feature provided in the Watson Assistant console:
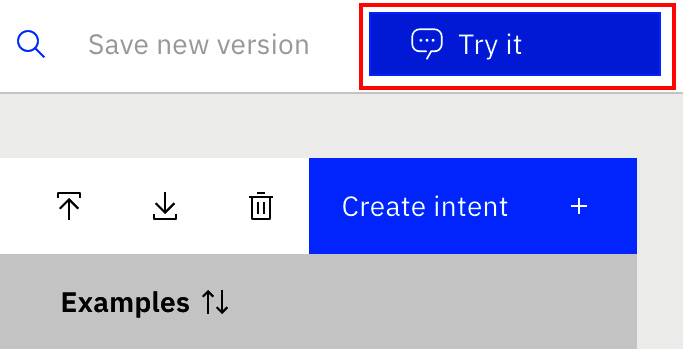
Figure 12.18 – Try it
The chat window will be opened when you click the Try it button. Try typing the conversation that follows in the chat window:
"Hello"; "Hi"; "Tell me jokes"; "Do you know any jokes?"; and so on…
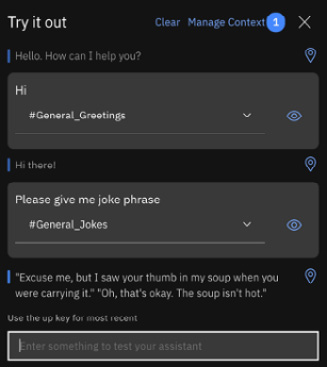
Figure 12.19 – Test conversation
If you don't get a good answer, try another phrase. Watson Natural Language Understanding divides conversations spoken in Watson Assistant's Try it out window into classes of intents or entities. If a conversation is not divided into the desired classes, you can train the Assistant API in the Try it out window.
Now that you've created an auto-answer conversation using Watson Assistant, there's one more thing to do, that is, confirmation of the Skill ID. This is the ID you will need later to operate Watson Assistant as an API from Node-RED.
Check the Skill ID from the Skills screen by following these steps:
- Click View API Details under the Skills menu at the top right of the Skill tile you created:
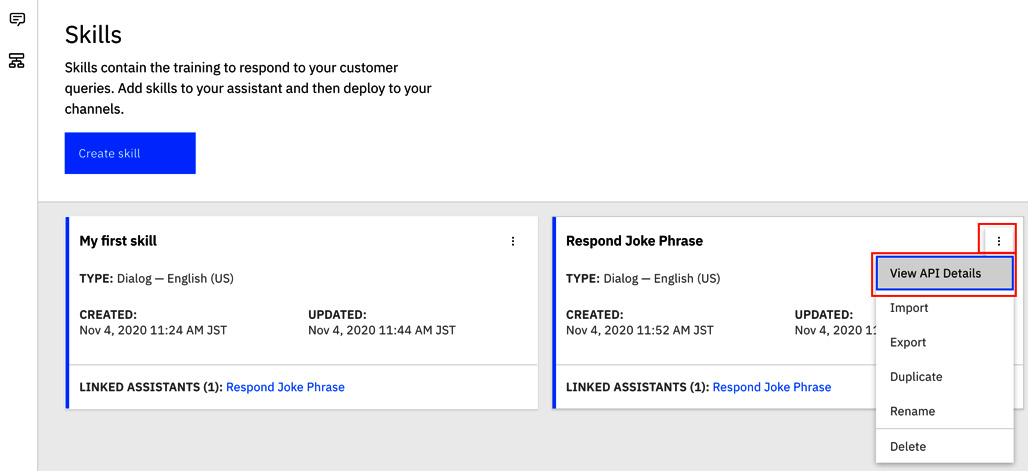
Figure 12.20 – Access the View API Details menu
- Make a note of the Skill ID displayed:
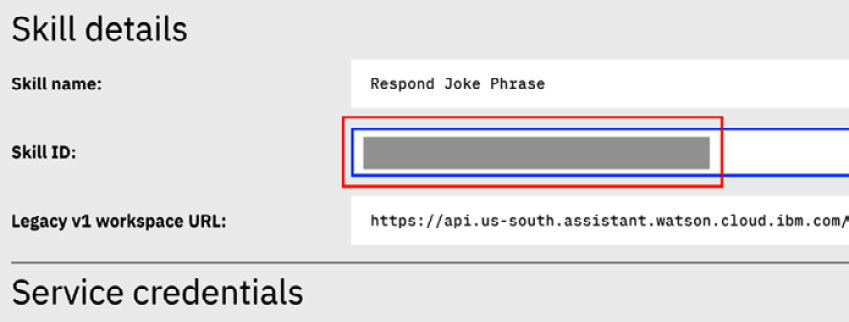
Figure 12.21 – Check and note the Skill ID
We have now created a chatbot service that automatically responds to chats. Next, let's integrate this with the Slack user interface.
Enabling the connection to Slack from Node-RED
Next, let's move on to the preparation of a Slack node on your Node-RED environment. Launch the Node-RED flow editor created on IBM Cloud.
What you do in this step is to install a node to connect to Slack in your Node-RED environment. The method is easy. All you have to do is find and install the node from the Manage palette window, which you've done several times in other chapters.
Follow these steps to proceed:
Important note
I believe that the Node-RED flow editor on your IBM Cloud has already been created as a service (as a Node.js application), but if you haven't done so already, refer to Chapter 6, Implementing Node-RED in the Cloud, to create a Node-RED service on IBM Cloud, before proceeding with this chapter.
- You need to install the node-red-contrib-slack node to use Slack from Node-RED, so click Manage palette:
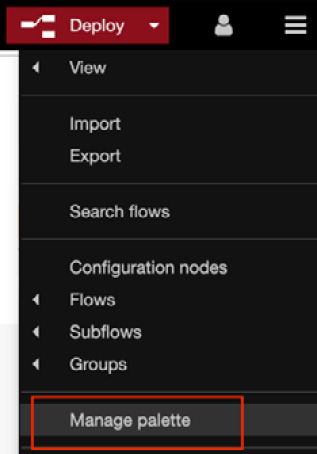
Figure 12.22 – Open the Manage palette window
- Search the node-red-contrib-slack node and click the Install button:
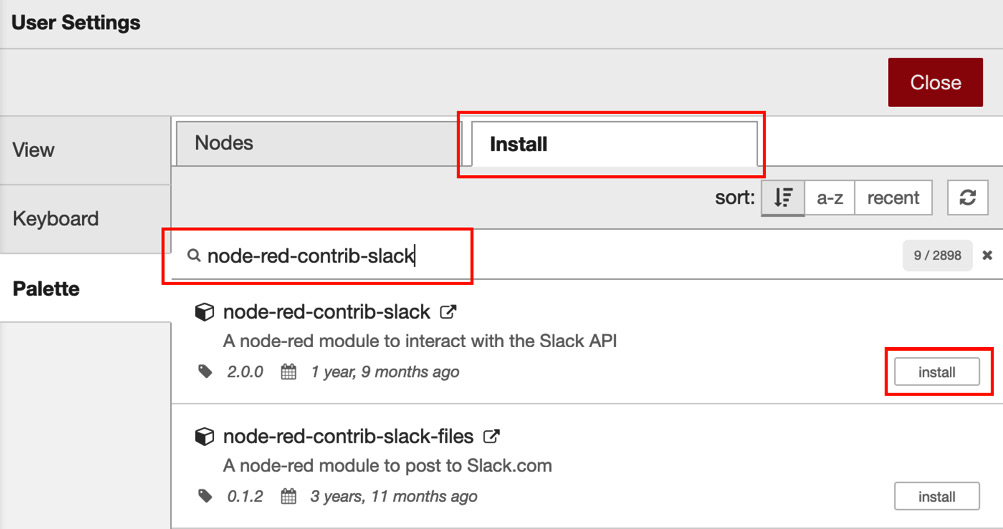
Figure 12.23 – Install the node-red-contrib-slack node
- You will see four nodes that belong to node-red-contrib-slack on your palette. You have to prepare Slack nodes for building this sample application:
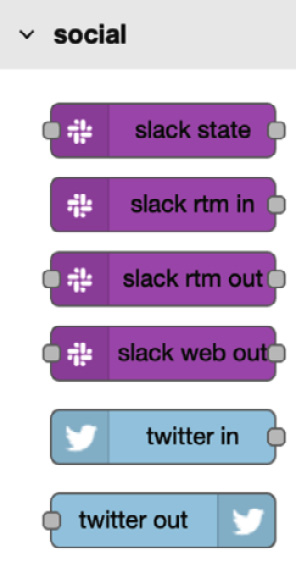
Figure 12.24 – Slack nodes will appear on your palette
- Make a bot in your Slack workspace by accessing the Slack App Directory via Settings & administration | Manage apps on your Slack application (desktop or web):
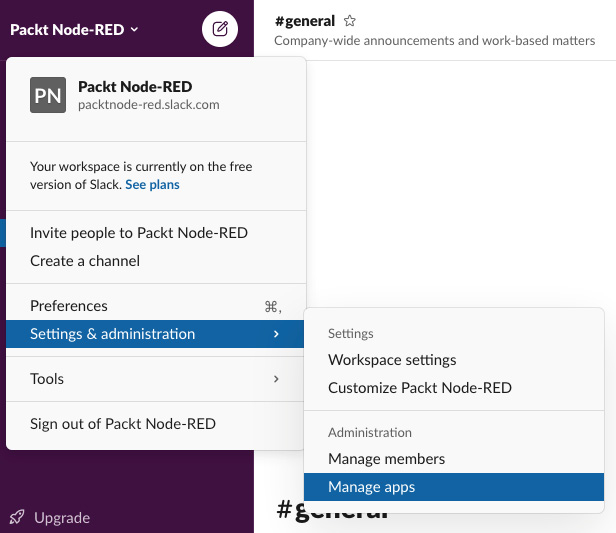
Figure 12.25 – Select Manage apps
- After moving to the Slack App Directory website, click the slack app directory logo at the top left of the website to access the Slack App Directory main page:
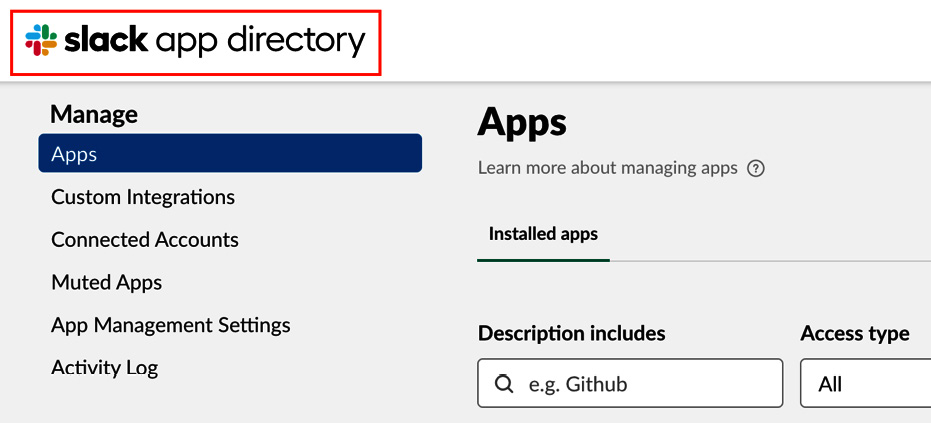
Figure 12.26 – Access the Slack App Directory
You can also access the Slack App Directory top page with the following URL: https://<your workspace>.slack.com/apps.
The following URL is just an example: https://packtnode-red.slack.com/apps.
This URL is generated automatically depending on each workspace name on Slack.
- Click the Get Essential Apps button to move to the application search window:
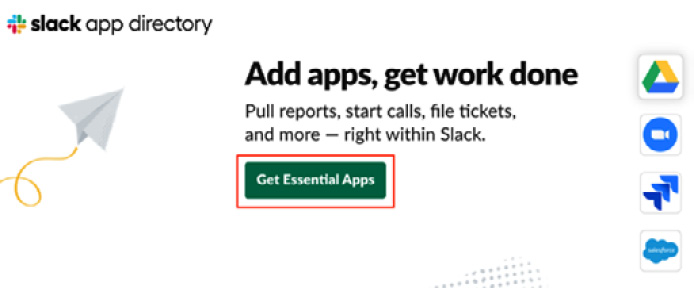
Figure 12.27 – Click the Get Essential Apps button
- Search the word bots and click Bots on the results:
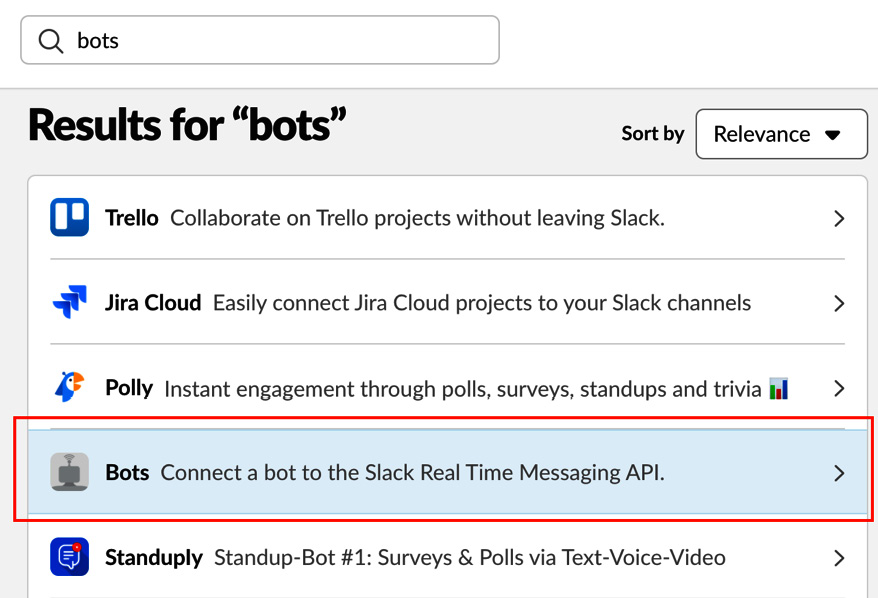
Figure 12.28 – Search for Bots and select it
- Click the Add to Slack button on the Bots app screen:
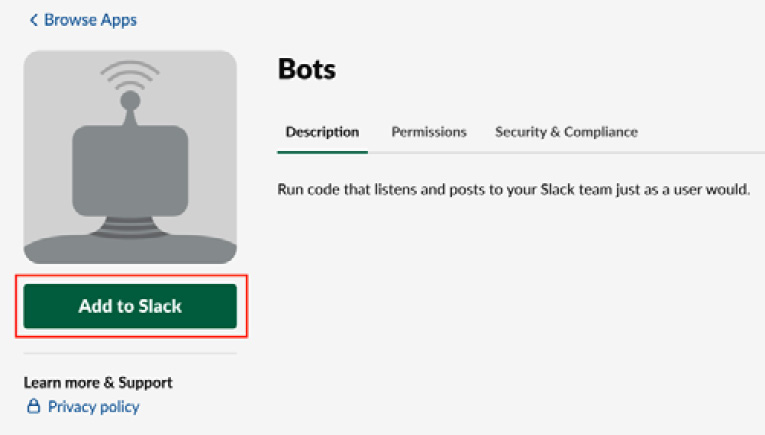
Figure 12.29 – Add the Bots app to your workspace
- Set the Username of this bot application using any name you like. In this example, we named it packt-bot.
- Click the Add bot integration button:
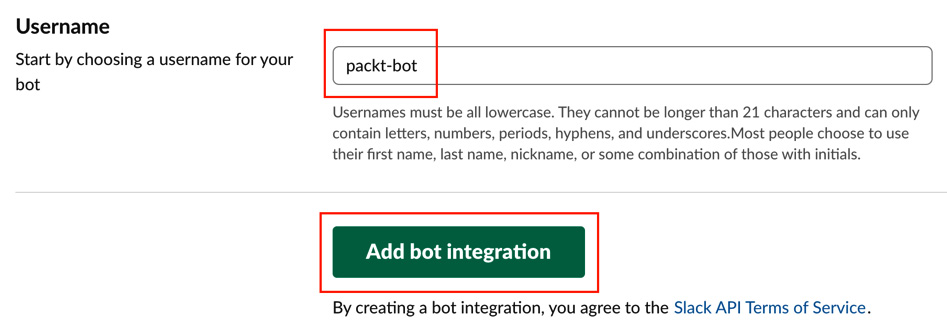
Figure 12.30 – Set your bot name
- On the next screen, the API token for using the bot will be generated and displayed. Make a note of this so that you do not forget it. This API token is used when creating a flow with Node-RED:
Important note
Be careful when sharing bot user tokens with applications. Do not publish bot user tokens in public code repositories. This is because anyone can access the bot with this API token.

Figure 12.31 – Confirm your API token
- Click the Save Integration button to finish the bot app integration:
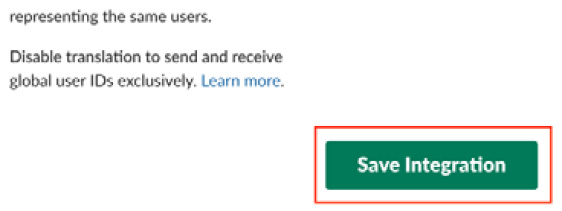
Figure 12.32 – Bot app integration is finished
Now you are ready. Let's move on to the flow creation procedure.
Building a chatbot application
So far, you've created a chatbot engine in Watson Assistant, created a Slack workspace, and integrated the Bot app, which you can use in that Slack workspace.
Here, we will combine these services with Node-RED and create a mechanism with Node-RED so that the bot will answer when talking in Slack's workspace.
Follow these steps to create a flow:
- Connect Watson Assistant to Node-RED. Access your Node-RED service dashboard via Resource list on IBM Cloud. Select the Connections tab and click the Create connection button:
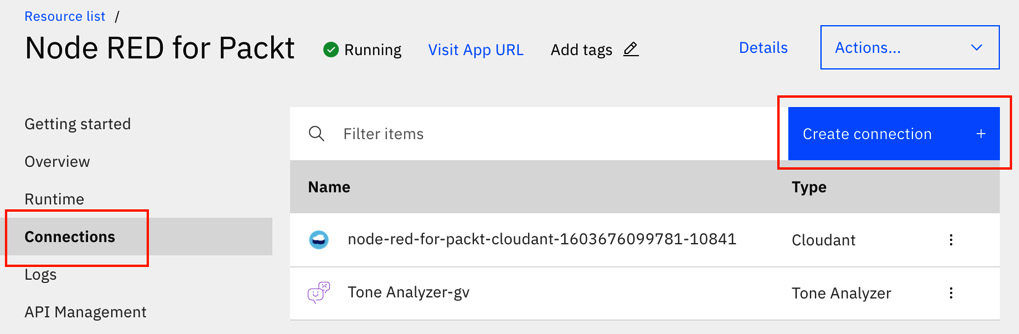
Figure 12.33 – Create a new connection on Node-RED
- Select the Watson Assistant service you created and click the Next button:
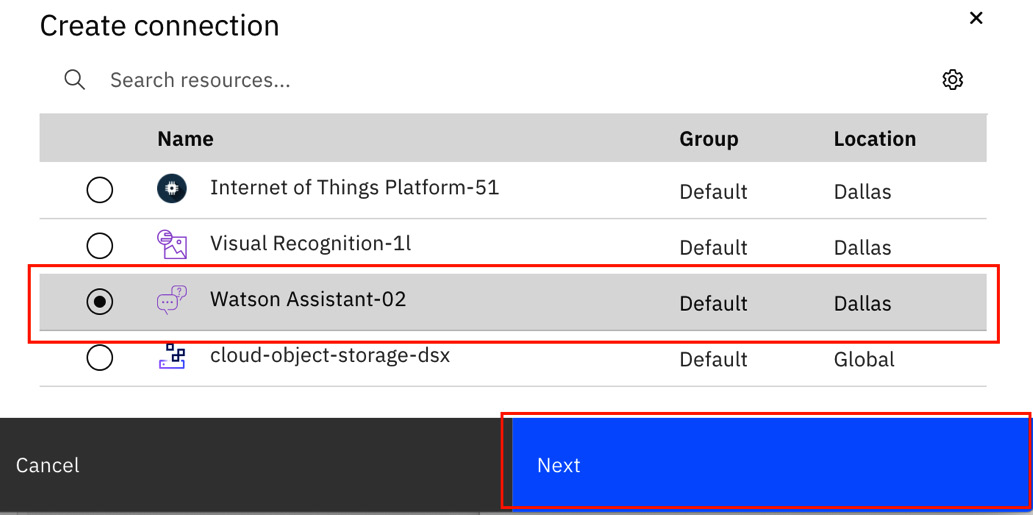
Figure 12.34 – Create a new connection on Node-RED
- Click the Connect button with the default options to finish the connection setup. Doing this operation will restart the Node-RED application, which will take a few minutes to complete:

Figure 12.35 – Finish creating the new connection on Node-RED
- Make the flow to handle conversations on Slack.
You already have Slack nodes and Watson nodes that are available to use for this hands-on tutorial.
- Place a slack-rtm-in node, two function nodes, an assistant node, slack-rtm-out, and a debug node. After placing them, wire them sequentially as in the following figure:
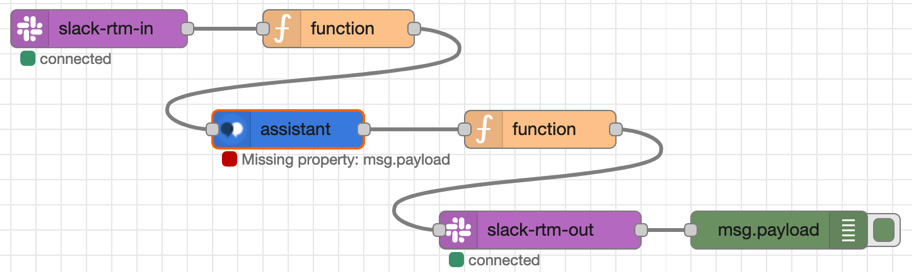
Figure 12.36 – Place the nodes and wire them
- Set the parameters for each node.
Follow this procedure to set the parameters on each node. For the nodes that need to be coded, code them as follows:
- The slack-rtm-in node:
a) Click the edit button (pencil icon) to open the Properties panel:
- The slack-rtm-in node:
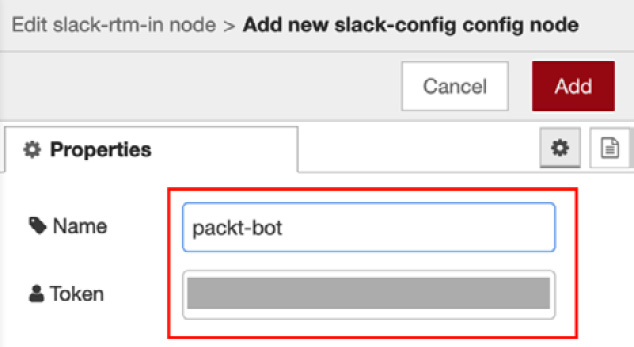
Figure 12.37 – Open the Properties panel
b) Enter the Token value you generated on your Slack Bots app. You can set any name for this configuration. In the example here, it's named packt-bot:
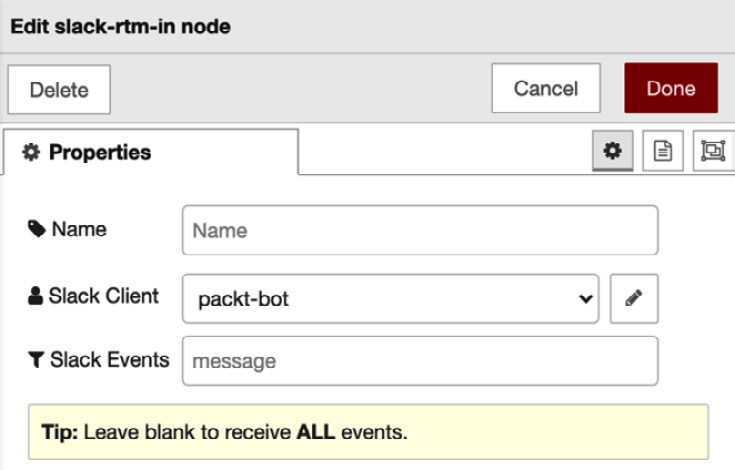
Figure 12.38 – Set the properties of the configuration to connect the Slack app
When you go back to the main panel of this node, you will see the configuration has been set in the Slack Client property.
c) Click the Done button to close this setting:

Figure 12.39 – Finish setting the properties of the slack-rtm-in node
- The function node (first one):
a) In the first function node, enter the following:
global.set("channel",msg.payload.channel);
msg.topic = "message";
msg.payload = msg.payload.text;
return msg
You can also refer to the following figure:

Figure 12.40 – First function node coding
In this function node, the message that is posted on Slack is taken out from the JSON data sent from Slack and put in msg.payload again.
Another important process is to store the channel information sent from Slack in the Global variable in Node-RED. The channel information stored here will be used later when sending a response message back to Slack.
- The assistant node:
In the previous step, you connected Watson Assistant to Node-RED. This means that you can call the Assistant API from Node-RED without using an API key or secret.
When I double-click the assistant node to open the settings panel, I don't see any properties such as API keys. If you see them in your settings panel, it means that the Watson Assistant and Node-RED connection process is failing. In that case, perform the connection process again.
There is only one property to set here. Set the Watson Assistant Skill ID you wrote down earlier as the Workspace ID property in the assistant node's settings panel:

Figure 12.41 – Set the Skill ID as the Workspace ID
This completes the settings for the assistant node. Save your settings and close the settings panel.
- The function node (the second one):
In the first function node, enter the following code:
var g_channel=global.get("channel");
msg.topic = "message";
msg.payload = {
channel: g_channel,
text: msg.payload.output.text[0]
}
return msg
You can also refer to the following figure:

Figure 12.42 – Second function node coding
The second function node stores the autoresponder message returned from Watson Assistant in msg.payload.text, and gets the Slack channel information saved in the first function node and stores it in msg.payload.channel.
- The slack-rtm-out node:
Next is the slack-rtm-out node, which is easy to set up:
a) Double-click on the slack-rtm-out node to open the settings panel.
b) You will see that the configuration named packt-bot you created is already placed in this node property. If it is not set yet, please select it from the drop-down list manually. Once you click on Done, the settings will be complete:

Figure 12.43 – Check the property settings of the slack-rtm-out node
- The debug node:
The debug node here simply outputs the log. No settings are required.
- Check the bot application on Slack.
An auto-answer chatbot has been created using Slack. Let's try the conversation.
- On the channel you created in your Slack workspace, add the bot app you integrated and click the Add an app link on the channel:
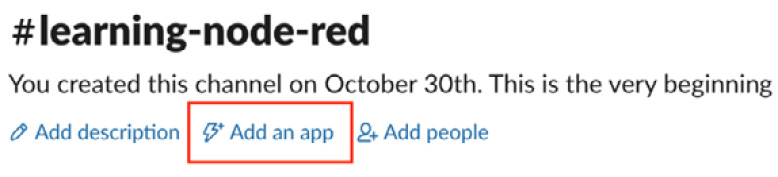
Figure 12.44 – Click the Add an app link
- Click the Add button to add the bot app to your channel:

Figure 12.45 – Add the bot app you created
Now, let's actually have a conversation. Mention and talk to your bot (packt-bot in the example) on the channel where you added this bot app. Since the only conversations we are learning with Watson Assistant this time are greetings and listening to jokes, we will send a message from Slack that seems to be related to either of these.
First, let's say Hello. You will see a greeting kind of response:
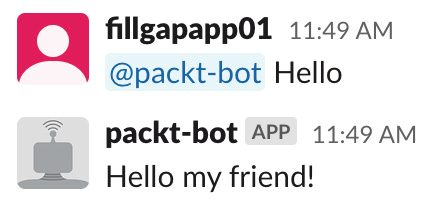
Figure 12.46 – Exchanging greetings with the chatbot
Then send a message like Please tell me a joke. It randomly responds with a bot-selected joke as a reply:

Figure 12.47 – The chatbot answers some jokes
Great work! You finally made the chatbot application with Node-RED.
If you want the flow configuration file to make this flow in your Node-RED environment, you can get it here: https://github.com/PacktPublishing/-Practical-Node-RED-Programming/blob/master/Chapter12/slack-watson-chatbot-flows.json.
Summary
In this chapter, we experienced how to make a chatbot application with Slack, Watson, and Node-RED. This time, we used Slack as a chat platform, but you can use any chat platforms that have APIs, such as LINE, Microsoft Teams, and so on, instead of Slack.
This chapter is also very helpful for creating any applications that are not IoT-based. Node-RED can develop various applications by linking with any Web API.
In the next chapter, let's develop our own node. Of course, it can be used in any environment. Developing your own node with Node-RED means developing a new node that cannot be done with the existing nodes. This is surely the first step for advanced users of Node-RED.