
![]()
Getting Node.js Apps Production Ready
Getting Node.js apps to a production-ready state is probably the most under covered and skipped topic in the Node.js literature, but it’s one of the most important in my humble opinion.
Yes, the apps differ in structures, frameworks they use, and goals they try to achieve; however, there are a few commonalities worth knowing about, for example, environmental variables, multithreading, logging and error handling. So, in this chapter we cover the following topics:
- Environment variables
- Express.js in production
- Socket.IO in production
- Error handling
- Node.js domains for error handling
- Multithreading with Cluster
- Multithreading with Cluster2
- Event logging and monitoring
- Building tasks with Grunt
- Git for version control and deployments
- Running tests in Cloud with TravisCI
Environment Variables
Before deployment to the production environment, it’s good to prepare our app’s code. Let’s start with information that needs to be private and can’t be shared in a version control system. Sensitive information such as API keys, passwords, and database URIs are best stored in environment variables (http://en.wikipedia.org/wiki/environment_variable), not in the source code itself. Node.js makes it fairly easy to access these variables:
console.log (process.env.NODE_ENV,
  process.env.API_KEY,
  process.env.DB_PASSWORD)
Then, before the application is started, set these variables:
$ NODE_ENV=test API_KEY=XYZ DB_PASSWORD=ABC node envvar.js
![]() Note There’s no space between NAME and value (NAME=VALUE).
Note There’s no space between NAME and value (NAME=VALUE).
Typically, the environment variable setting is a part of the deployment or operations setup. In the next chapter, we deal with putting these variables on the server.
Express.js in Production
In Express.js 4.x, use if/else statements to check for NODE_ENV values:
var errorHandler = require('errorhandler'),
if (process.env.NODE_ENV === 'development') {
  app.use(errorHandler({
    dumpExceptions: true,
    showStack: true
  }));
} else if (process.env.NODE_ENV === 'production') {
  app.use(errorHandler());
}
Express.js 3.x provides app.configure(), the so-called sugarcoating methods for different modes: development, test, stage, production, and so on.
app.configure('development', function(){
  app.use(express.errorHandler({
    dumpExceptions: true,
    showStack: true
  }));
});

app.configure('production', function(){
  app.use(express.errorHandler());
});
Each app.configure pattern is equivalent to a series of if/else statements:
if (process.env.NODE_ENV === 'development') {
  app.use(express.errorHandler({
    dumpExceptions: true,
    showStack: true
  }));
} else if (process.env.NODE_ENV === 'production') {
  app.use(express.errorHandler());
}
To run the server in a specific mode, just set an environment variable. For example,
$ NODE_ENV=production node app.js
or:
$ export NODE_ENV=production
$ node app.js
![]() Note By default, Express.js falls back to development mode as we see in the source code (http://bit.ly/117UEi6).
Note By default, Express.js falls back to development mode as we see in the source code (http://bit.ly/117UEi6).
When using in-memory session store (the default choice), the data can’t be shared across different processes/servers (which we want in production mode). Conveniently, Express.js and Connect notify us about this as we see in this source code (http://bit.ly/1nnvvhf) with this message:
Warning: connect.session() MemoryStore is not
designed for a production environment, as it will leak
memory, and will not scale past a single process.
This problem is solved easily by using a shared Redis instance as a session store. For example, for Express.js 4, execute the following:
var session = require('express-session'),
  RedisStore = require('connect-redis')(session);

app.use(session({
  store: new RedisStore(options),
  secret: 'keyboard cat'
}));
The more advanced example with session options is as follows:
var SessionStore = require('connect-redis'),
var session = require('express-session'),

app.use(session({
  key: '92A7-9AC',
  secret: '33D203B7-443B',
  store: new SessionStore({
    cookie: { domain: '.webapplog.com' },
    db: 1, // Redis DB
    host: 'webapplog.com'
}));
For Express.js 3.x application use this middleware configuration:
var SessionStore = require('connect-redis'),

app.configure(function(){
  this.use(express.session({
    key: '92A7-9AC',
    secret: '33D203B7-443B',
    store: new SessionStore({
      cookie: { domain: '.webapplog.com' },
      db: 1, // Redis DB
      host: 'webapplog.com'
    })
  }));
});
Options for connect-redis are client, host, port, ttl, db, pass, prefix, and url. For more information, please refer to the official connect-redis documentation (https://github.com/visionmedia/connect-redis).
Akin to Express.js 3.x, the Socket.IO library has configure() method that can be used to define different rules for different environments:
var io = require('socket.io').listen(80);

io.configure('production', function(){
  io.enable('browser client etag'),
  io.set('log level', 1);
  io.set('transports', [
    'websocket',
    'flashsocket',
    'htmlfile',
    'xhr-polling',
    'jsonp-polling'
  ]);
});

io.configure('development', function(){
  io.set('transports', ['websocket']);
});
Often, WebSockets data are stored in a high-performance database such as Redis. In this example, you can use environment variables for values of port and hostname:
var sio = require('socket.io'),
  RedisStore = sio.RedisStore,
  io = sio.listen();

io.configure(function () {
  io.set('store', new RedisStore({ host: 'http://webapplog.com' }));
});

var redis = require('redis'),
  redisClient = redis.createClient(port, hostname),
  redisSub = redis.createClient(port, hostname);

redisClient.on('error', function (err) {
  console.error(err);
});

redisSub.on('error', function (err) {
  console.error(err);
});

io.configure(function () {
  io.set('store', new RedisStore({
    nodeId: function () { return nodeId; },
    redisPub: redisPub,
    redisSub: redisSub,
    redisClient: redisClient
  }));
});
As a rule of thumb, listen to all error events from http.Server and https.Server (i.e., always have onerror event listeners doing something):
server.on('error', function (err) {
  console.error(err);
  ...
})
Then, have a catchall event listener (uncaughtException) for unforeseen cases. These cases won’t make it to the onerror handlers:
process.on('uncaughtException', function (err) {
  console.error('uncaughtException: ', err.message);
  console.error(err.stack);
  process.exit(1);
});
Alternatively, you can use the addListener method:
process.addListener('uncaughtException', function (err) {
  console.error('uncaughtException: ', err.message);
  console.error(err.stack);
  process.exit(1);
});
The following snippet is devised to catch uncaught exceptions, log them, notify development and operations (DevOps) via e-mail/text messages, and then exit:
process.addListener('uncaughtException', function (e) {
  server.statsd.increment('errors.uncaughtexception'),
  log.sub('uncaughtException').error(e.stack || e.message);
  if(server.sendgrid && server.set('env') === 'production') {
    server.notify.error(e);
  }
  exit();
});
You might wonder what to do in the event of these uncaught exceptions (the server.notify.error() method). It depends. Typically, at a minimum, we want them to be recorded, most likely in the logs. For this purpose, later we’ll cover a more advanced alternative to console.log—the Winston library (https://github.com/flatiron/winston). At a maximum, you can implement text message alerts effortlessly using the Twilio API (http://www.twilio.com). The following is an example in which helpers can send HipChat (https://www.hipchat.com) messages via their REST API and send an e-mail containing an error stack:
var sendHipChatMessage = function(message, callback) {
  var fromhost = server
    .set('hostname')
    .replace('-','')
    .substr(0, 15); //truncate the string
  try {
    message = JSON.stringify(message);
  } catch(e) {}
  var data = {
    'format': 'json',
    auth_token: server.config.keys.hipchat.servers,
    room_id: server.config.keys.hipchat.serversRoomId,
    from: fromhost,
    message: 'v'
      + server.set('version')
      + '
message: '
      + message
  };
  request({
    url:'http://api.hipchat.com/v1/rooms/message',
    method:'POST',
    qs: data}, function (e, r, body) {
      if (e) console.error(e);
      if (callback) return callback();
  });
};

server.notify = {};
server.notify.error = function(e) {
  var message = e.stack || e.message || e.name || e;
  sendHipChatMessage(message);
  console.error(message);
  server.sendgrid.email({
    to: '[email protected]',
    from: server.set('hostname') + '@webapplog.com',
    subject: 'Webapp '
      + server.set('version')
      + ' error: "'
      + e.name
      + '"',
    category: 'webapp-error',
    text: e.stack || e.message
  }, exit);
  return;
}
Node.js Domains for Error Handling
Because Node.js allows developers to write asynchronous code, and that’s what we usually do, and because state changes during different async parts of code, sometimes it’s harder to trace errors and have a meaningful state and context in which the application was during that exception. To mitigate this, we have domains in Node.js.
Contrary to its more popular homonym (domain as in webapplog.com or google.com), domain is a core Node.js module (http://nodejs.org/api/domain.html). It aids developers in tracking and isolating errors that could be a juggernaut task. Think of domains as a smarter version of try/catch statements (https://developer.mozilla.org/en-US/docs/web/javaScript/reference/statements/try...catch).
When it comes to Express.js (and other frameworks), we can apply domains in error-prone routes. A route can become error prone if it has pretty much any nontrivial code (i.e., any route can be prone to error), but usually developers can just analyze logs and determine which URL and path are causing the crashes. Typically, these routes rely on third-party modules, some communication, or file system/database input/output.
Before defining the routes, we need to define custom handlers to catch errors from domains. In Express.js 4.x we do the following:
var express = require('express'),
var domain = require('domain'),
var defaultHandler = require('errorhandler'),
In Express.js 3.x, we execute:
var express = require('express'),
var domain = require('domain'),
var defaultHandler = express.errorHandler();
Then, for Express.js 4.x and 3.x, we add middleware:
app.use(function (error, req, res, next) {
  if (domain.active) {
    console.info('caught with domain'),
    domain.active.emit("error", error);
  } else {
    console.info('no domain'),
    defaultHandler(error, req, res, next);
  }
});
Here is a “crashy route” in which the error-prone code goes inside the d.run callback:
app.get('/e', function (req, res, next) {
  var d = domain.create();
  d.on('error', function (error) {
    console.error(error.stack);
    res.send(500, {'error': error.message});
  });
  d.run(function () {
    // Error-prone code goes here
    throw new Error('Database is down.'),
  });
});
On the other hand, we can call next with an error object (e.g., when an error variable comes from other nested calls):
app.get('/e', function (req, res, next) {
  var d = domain.create();
  d.on('error', function (error) {
    console.error(error.stack);
    res.send(500, {'error': error.message});
  });
  d.run(function () {
    // Error-prone code goes here
    next(new Error('Database is down.'));
  });
});
After you launch this example with $ node app, go to the /e URL. You should see the following information in your logs:
caught with domain { domain: null,
  _events: { error: [Function] },
  _maxListeners: 10,
  members: [] }
Error: Database is down.
    at /Users/azat/Documents/Code/practicalnode/ch10/domains/app.js:29:10
    at b (domain.js:183:18)
    at Domain.run (domain.js:123:23)
The stack trace information (lines after Error: Database is down.) might be very handy in debugging async code. And the browser should output a nice JSON error message:
{"error":"Database is down."}
The working (or should we write crashing) example of Express.js 4.1.2 and domains in routes is in the ch10/domains folder on GitHub (https://github.com/azat-co/practicalnode/tree/master/ch10/domains). The package.json for this example looks like this:
{
  "name": "express-domains",
  "version": "0.0.1",
  "private": true,
  "scripts": {
    "start": "node app.js"
  },
  "dependencies": {
    "express": "4.1.2",
    "jade": "1.3.1",
    "errorhandler": "1.0.1"
  }
}
For your convenience, here’s the full content of practicalnode/ch10/domains/app.js:
var express = require('express'),
var routes = require('./routes'),
var http = require('http'),
var path = require('path'),
var errorHandler = require('errorhandler'),

var app = express();

app.set('port', process.env.PORT || 3000);
app.set('views', __dirname + '/views'),
app.set('view engine', 'jade'),
app.use(express.static(path.join(__dirname, 'public')));

var domain = require('domain'),
var defaultHandler = errorHandler();
app.get('/', routes.index);

app.get('/e', function (req, res, next) {
  var d = domain.create();
  d.on('error', function (error) {
    console.error(error.stack);
    res.send(500, {'error': error.message});
  });
  d.run(function () {
    // Error-prone code goes here
    throw new Error('Database is down.'),
    // next(new Error('Database is down.'));
  });
});

app.use(function (error, req, res, next) {
  if (domain.active) {
    console.info('caught with domain', domain.active);
    domain.active.emit('error', error);
  } else {
    console.info('no domain'),
    defaultHandler(error, req, res, next);
  }
});

http.createServer(app).listen(app.get('port'), function () {
  console.log('Express server listening on port '
    + app.get('port'));
});
For more ways to apply domains with Express.js, take a look at the Node.js domains your friends and neighbors by Forrest L Norvell (http://twitter.com/othiym23) & Domenic Denicola (http://domenicdenicola.com/) presentation from NodeConf 2013 slide 4-1( http://othiym23.github.io/nodeconf2013-domains/#/4/1).
![]() Warning The domain module is in the experimental stage, which means that it’s likely that methods and behavior will change. Therefore, stay updated and use exact versions in the package.json file.
Warning The domain module is in the experimental stage, which means that it’s likely that methods and behavior will change. Therefore, stay updated and use exact versions in the package.json file.
There are a lot of opinions out there against Node.js that are rooted in the myth that Node.js-based systems have to be single threaded. Although a single Node.js process is single threaded, nothing can be further from the truth about the systems. And with the core cluster module (http://nodejs.org/api/cluster.html), we can spawn many Node.js processes effortlessly to handle the system’s load. These individual processes use the same source code and they can listen to the same port. Typically, each process uses one machine’s CPU. There’s a master process that spawns all other processes and, in a way, controls them (can kill, restart, and so on).
Here is a working example of an Express.js (version 4.x or 3.x) app that runs on four processes. At the beginning of the file, we import dependencies:
var cluster = require('cluster'),
var http = require('http'),
var numCPUs = require('os').cpus().length;
var express = require('express'),
The cluster module has a property that tells us whether the process is master or child (master controls children). We use it to spawn four workers (the default workers use the same file, but this can be overwritten with setupMaster (http://nodejs.org/docs/v0.9.0/api/cluster.html#cluster_cluster_setupmaster_settings)). In addition, we can attach event listeners and receive messages from workers (e.g., kill).
if (cluster.isMaster) {
  console.log (' Fork %s worker(s) from master', numCPUs)
  for (var i = 0; i < numCPUs; i++) {
    cluster.fork();
  };
  cluster.on('online', function(worker) {
    console.log ('worker is running on %s pid', worker.process.pid)
  });
  cluster.on('exit', function(worker, code, signal) {
    console.log('worker with %s is closed', worker.process.pid);
  });
}
The worker code is just an Express.js app with a twist. Let’s get the process ID:
} else if (cluster.isWorker) {
  var port = 3000;
  console.log('worker (%s) is now listening to http://localhost:%s',
    cluster.worker.process.pid, port);
  var app = express();
  app.get('*', function(req, res) {
    res.send(200, 'cluser '
      + cluster.worker.process.pid
      + ' responded
'),
  })
  app.listen(port);
}
The full source code of practicalnode/ch10/cluster.js is as follows:
var cluster = require('cluster'),
var numCPUs = require('os').cpus().length;
var express = require('express'),

if (cluster.isMaster) {
  console.log (' Fork %s worker(s) from master', numCPUs);
  for (var i = 0; i < numCPUs; i++) {
    cluster.fork();
  }
  cluster.on('online', function(worker) {
    console.log ('worker is running on %s pid', worker.process.pid);
  });
  cluster.on('exit', function(worker, code, signal) {
    console.log('worker with %s is closed', worker.process.pid);
  });
} else if (cluster.isWorker) {
  var port = 3000;
  console.log('worker (%s) is now listening tohttp://localhost:%s',
    cluster.worker.process.pid, port);
  var app = express();
  app.get('*', function(req, res) {
    res.send(200, 'cluser '
      + cluster.worker.process.pid
      + ' responded
'),
  });
  app.listen(port);
}
As usual, to start an app, run $ node cluster. There should be four (or two, depending on your machine’s architecture) processes, as shown in Figure 10-1.
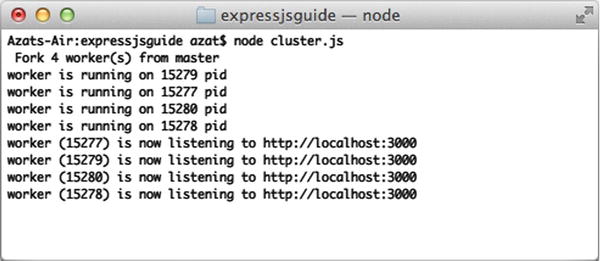
Figure 10-1. Starting four processes with Cluster
When we CURL with $ curl http://localhost:3000, there are different processes that listen to the same port and respond to us (Figure 10-2).
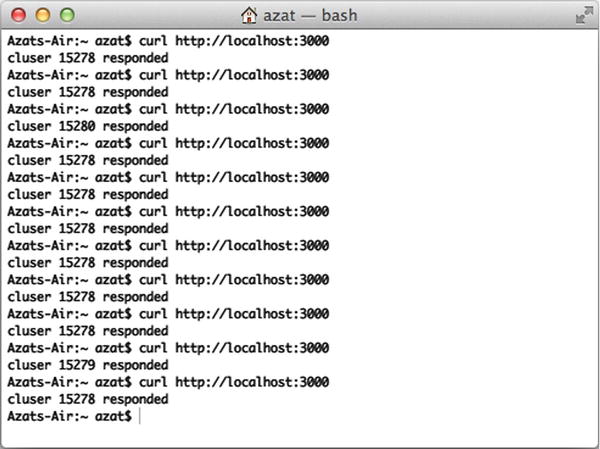
Figure 10-2. Server response is rendered by different processes
Multithreading with Cluster2
If you prefer ready solutions to low-level libraries (such as cluster), check out the real-world production library created and used by eBay: cluster2 (GitHub ( https://github.com/cubejs/cluster2 ) ,NPM ( https://www.npmjs.org/package/cluster2 )) which is a wrapper for the core cluster module. Cluster2 provides handy utility functions and is battle-tested on a large-scale production deployment.
$ npm install cluster2
To use Cluster2 with Express.js, use listen() on an instance of the cluster object:
var Cluster2 = require('cluster2'),
    express = require('express'),

var app = express.createServer();
// Other Express.js configurations and routes
app.get('/', function(req, res) {
  res.send('hello'),
});

var cluster2 = new Cluster2({
  port: 3000
  // Other Cluster2 options
});
cluster2.listen(function(callback) {
  callback(app);
});
Event Logging and Monitoring
When things go south (e.g., overloads, crashes), there are two things software engineers can do:
- Monitor via dashboard and health statuses (monitoring and REPL).
- Analyze postmortems after the events have happened (Winston and Papertrail).
Monitoring
When going to production, software and development operations engineers need a way to get current status quickly. Having a dashboard or just an end point that spits out JSON-formatted properties is a good idea, including properties such as the following:
- memoryUsage: memory usage information
- uptime: number of seconds the Node.js process is running
- pid: process ID
- connections: number of connections
- loadavg: load average
- sha: Secure Hash Algorithm (SHA) of the Git commit deploy and /or version tag of the deploy
Here’s an example of the Express.js route /status:
app.get('/status', function(req, res){
  res.send({
    pid: process.pid,
    memory: process.memoryUsage(),
    uptime: process.uptime()
  })
})
A more informative example with connections and other information is as follows:
var os = require('os'),
  exec = require('child_process').exec,
  async = require('async'),
  started_at = new Date();

module.exports = function(req, res, next) {
  var server = req.app;
  if(req.param('info')) {
    var connections = {},
      swap;

    async.parallel([
      function(done) {
        exec('netstat -an | grep :80 | wc -l',
        function(e, res) {
          connections['80'] = parseInt(res,10);
          done();
        });
      },
      function(done) {
        exec(
          'netstat -an | grep :'
            + server.set('port')
            + ' | wc -l',
          function(e, res) {
            connections[server.set('port')] = parseInt(res,10);
            done();
          }
        );
      },
      function(done) {
        exec('vmstat -SM -s | grep "used swap" | sed -E "s/[^0-9]*([0-9]{1,8}).*/1/"',
        function(e, res) {
          swap = res;
          done();
        });
      }], function(e) {
        res.send({
          status: 'up',
          version: server.get('version'),
          sha: server.et('git sha'),
          started_at: started_at,
          node: {
            version: process.version,
            memoryUsage: Math.round(process.memoryUsage().rss / 1024 / 1024)+"M",
            uptime: process.uptime()
          },
          system: {
            loadavg: os.loadavg(),
            freeMemory: Math.round(os.freemem()/1024/1024)+"M"
          },
          env: process.env.NODE_ENV,
          hostname: os.hostname(),
          connections: connections,
          swap: swap
        });
    });
  }
  else {
    res.send({status: 'up'});
  }
}
REPL in Production
What can be better than poking around a live process and its context using the REPL tool? We can do this easily with production apps if we set up REPL as a server:
var net = require('net'),
  options = {name: 'azat'};

net.createServer(function(socket) {
  repl.start(options.name + "> ", socket).context.app = app;
}).listen("/tmp/repl-app-" + options.name);
Then, connect to the remote machine by using Secure Shell (SSH). Once on the remote machine, run:
$ telnet /tmp/repl-app-azat
You should be prompted with a standard >, which means you’re in the REPL.
Or, if you want to connect to the remote server right away, i.e., by-passing the SSH step, you can modify the code to this:
var repl = require('repl'),
var net = require('net'),
  options = { name: 'azat' };

app = {a: 1};
net.createServer(function(socket) {
  repl.start(options.name + "> ", socket).context.app = app;
}).listen(3000);
Please use iptable to restrict the Internet protocol addresses (IPs) when using this approach. Then, straight from your local machine (where the hostname is the IP of the remote box), execute:
$ telnet hostname 3000
Winston provides a way to have one interface for logging events while defining multiple transports, e.g., e-mail, database, file, console, Software as a Service (SaaS), and so on. The list of transports supported by Winston include the following:
- Console
- File
- Loggly (http://www.loggly.com/)
- Riak
- MongoDB
- SimpleDB
- Amazon SNS
- Graylog2
- Papertrail
- Cassandra
It’s easy to get started with Winston:
$ npm install winston
In the code, execute the following:
var winston = require('winston'),
winston.log('info', 'Hello distributed log files!'),
winston.info('Hello again distributed logs'),
To add and remove transporters, use the winston.add() and winston.remove() functions. To add, use:
winston.add(winston.transports.File, {filename: 'webapp.log'});
To remove, use:
winston.remove(winston.transports.Console);
For more information, go to the official documentation (https://github.com/flatiron/winston#working-with-transports).
Papertrail (https://papertrailapp.com) is a SaaS that provides centralized storage and a web GUI to search and analyze logs. To use Papertrail with the Node.js app, do the following:
- Write logs to a file and remote_sync (https://github.com/papertrail/remote_syslog) them to Papertrail.
- Send logs with winston (https://github.com/flatiron/winston#working-with-transports), which is described earlier, and winston-papertrail (https://github.com/kenperkins/winston-papertrail) directly to the service.
Building Tasks with Grunt
Grunt is a Node.js-based task runner. It performs compilations, minifications, linting, unit testing, and other important tasks for automation.
Install Grunt globally with NPM:
$ npm install -g grunt-cli
Grunt uses Gruntfile.js to store its tasks. For example,
module.exports = function(grunt) {

  // Project configuration
  grunt.initConfig({
    pkg: grunt.file.readJSON('package.json'),
    uglify: {
      options: {
        banner: '/*! <%= pkg.name %> <%= grunt.template.today("yyyy-mm-dd") %> */
'
      },
      build: {
        src: 'src/<%= pkg.name %>.js',
        dest: 'build/<%= pkg.name %>.min.js'
      }
    }
  });

  // Load the plugin that provides the "uglify" task
  grunt.loadNpmTasks('grunt-contrib-uglify'),

  // Default task
  grunt.registerTask('default', ['uglify']);

};
package.json should have plugins required by the grunt.loadNpmTasks() method. For example,
{
  "name": "grunt-example",
  "version": "0.0.1",
  "devDependencies": {
    "grunt": "~0.4.2",
    "grunt-contrib-jshint": "~0.6.3",
    "grunt-contrib-uglify": "~0.2.2",
    "grunt-contrib-coffee": "~0.10.1",
    "grunt-contrib-concat": "~0.3.0"
  }
}
Let’s move to the more complex example in which we use jshint, uglify, coffee, and concat plugins in the default task in Gruntfile.js.
Start by defining package.json:
module.exports = function(grunt) {

  grunt.initConfig({
    pkg: grunt.file.readJSON('package.json'),
And then the coffee task:
    coffee: {
      compile: {
        files: {
The first parameter is the destination and the second is source:
          'source/<%= pkg.name %>.js': ['source/**/*.coffee']
          // Compile and concatenate into single file
        }
      }
    },
concat merges multiple files into one to reduce the number of HTTP requests:
    concat: {
      options: {
        separator: ';'
      },
This time, our target is in the build folder:
      dist: {
        src: ['source/**/*.js'],
        dest: 'build/<%= pkg.name %>.js'
      }
    },
The uglify method minifies our *.js file:
    uglify: {
      options: {
        banner: '/*! <%= pkg.name %> <%= grunt.template.today("dd-mm-yyyy") %> */
'
      },
      dist: {
        files: {
Again, the first value is the destination; the second dynamic name is from the concat task:
          'build/<%= pkg.name %>.min.js': ['<%= concat.dist.dest %>']
        }
      }
    },
jshint is a linter and shows errors if the code is not compliant:
    jshint: {
      files: ['Gruntfile.js', 'source/**/*.js'],
      options: {
        // options here to override JSHint defaults
        globals: {
          jQuery: true,
          console: true,
          module: true,
          document: true
        }
      }
    }
  });
Load the modules to make them accessible for Grunt:
  grunt.loadNpmTasks('grunt-contrib-uglify'),
  grunt.loadNpmTasks('grunt-contrib-jshint'),
  grunt.loadNpmTasks('grunt-contrib-concat'),
  grunt.loadNpmTasks('grunt-contrib-coffee'),
Last, define the default task as sequence of subtasks:
  grunt.registerTask('default', [ 'jshint', 'coffee','concat', 'uglify']);
};
To run the task, simply execute $ grunt or $ grunt default.
Gruntfile.js is as follows:
module.exports = function(grunt) {

  grunt.initConfig({
    pkg: grunt.file.readJSON('package.json'),
    coffee: {
      compile: {
        files: {
          'source/<%= pkg.name %>.js': ['source/**/*.coffee'] // compile and concat into single file
        }
      }
    },
    concat: {
      options: {
        separator: ';'
      },
      dist: {
        src: ['source/**/*.js'],
        dest: 'build/<%= pkg.name %>.js'
      }
    },
    uglify: {
      options: {
        banner: '/*! <%= pkg.name %> <%= grunt.template.today("dd-mm-yyyy") %> */
'
      },
      dist: {
        files: {
          'build/<%= pkg.name %>.min.js': ['<%= concat.dist.dest %>']
        }
      }
    },

    jshint: {
      files: ['Gruntfile.js', 'source/**/*.js'],
      options: {
        // options here to override JSHint defaults
        globals: {
          jQuery: true,
          console: true,
          module: true,
          document: true
        }
      }
    }
  });

  grunt.loadNpmTasks('grunt-contrib-uglify'),
  grunt.loadNpmTasks('grunt-contrib-jshint'),
  grunt.loadNpmTasks('grunt-contrib-concat'),
  grunt.loadNpmTasks('grunt-contrib-coffee'),

  grunt.registerTask('default', [ 'jshint', 'coffee','concat', 'uglify']);

};
The results of running $ grunt are shown in Figure 10-3.
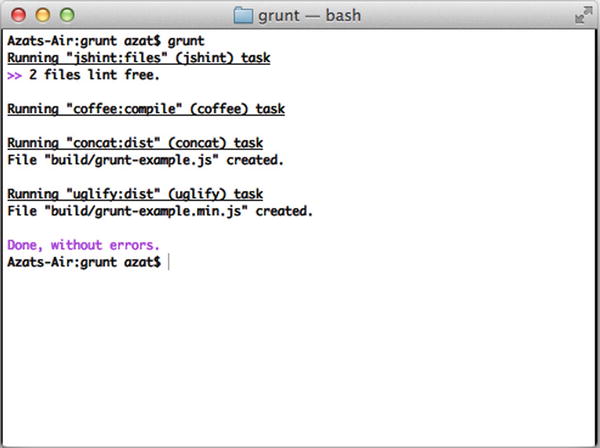
Figure 10-3. The results of the Grunt default task
Git for Version Control and Deployments
Git has become not only a standard version control system, but also—because of its distributed nature—Git has become the default transport mechanism of deployment (i.e., enables you to send source code).
Platform as a service (PaaS) solutions often leverage Git for deploys, because it’s already a part of many development flows. Instead of “pushing” your code to GitHub or BitBucket, the destination becomes a PaaS-like Heroku, Azure, or Nodejitsu. Git is also used for continuous deployment and continuous integration (e.g., TravisCI, CircleCI).
Even when IaaS solutions are used, systems such as Chef (http://docs.opscode.com) can be used.
Installing Git
To install Git for your OS, download a package from the official website (http://git-scm.com/downloads). Then, follow these steps:
- In your terminal, type these commands, substituting "John Doe" and [email protected] with your name and e-mail address:
$ git config --global user.name "John Doe"
$ git config --global user.email [email protected] - To check the installation, run:
$ git version - You should see something like the following in your terminal window, as shown in Figure 10-4 (your version might vary; in our case it’s 1.8.3.2):
git version 1.8.3.2
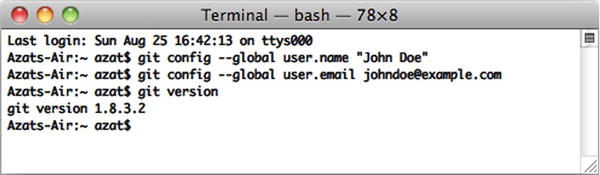
Figure 10-4. Configuring and testing the Git installation
Generating SSH Keys
SSH keys provide a secure connection without the need to enter username and password every time. For GitHub repositories, the latter approach is used with HTTPS URLs (e.g., https://github.com/azat-co/rpjs.git) and the former with SSH URLs (e.g., [email protected]:azat-co/rpjs.git).
To generate SSH keys for GitHub on Mac OS X/Unix machines, do the following:
- Check for existing SSH keys:
$ cd ~/.ssh
$ ls -lah - If you see some files like id_rsa (please refer to Figure 10-5 for an example), you can delete them or back them up into a separate folder by using the following commands:
$ mkdir key_backup
$ cp id_rsa* key_backup
$ rm id_rsa*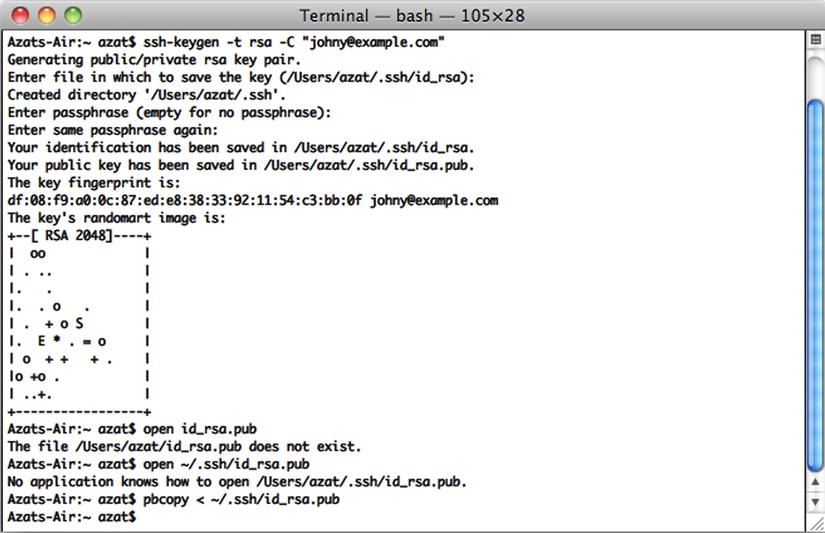
Figure 10-5. Generating an RSA (Ron Rivest, ( http://en.wikipedia.org/wiki/ron_rivest ), Adi Shamir (http://en.wikipedia.org/wiki/adi_shamir) and Leonard Adleman (http://en.wikipedia.org/wiki/leonard_adleman )) key pair for SSH and copying the public RSA key to a clipboard
- Now we can generate a new SSH key pair using the ssh-keygen command, assuming we are in the ~/.ssh folder:
$ ssh-keygen -t rsa -C "[email protected]" - Next, answer the questions. It’s better to keep the default name id_rsa. Then, copy the content of the id_rsa.pub file to your clipboard:
$ pbcopy < ~/.ssh/id_rsa.pubAlternatively, you can open the id_rsa.pub file in the default editor:
$ open id_rsa.pubor in TextMate:
$ mate id_rsa.pub
![]() Tip SSH connections are also used to connect to IaaS remote machines.
Tip SSH connections are also used to connect to IaaS remote machines.
After you have copied the public key, go to github.com (http://github.com), log in, go to your account settings, select “SSH key,” and add the new SSH key. Assign a name (e.g., the name of your computer) and paste the value of your public key.
To check whether you have an SSH connection to GitHub, type and execute the following command in your terminal:
$ ssh -T [email protected]
If you see something such as,
Hi your-GitHub-username! You've successfully authenticated,
but GitHub does not provide shell access.
then everything is set up.
While connecting to GitHub for the first time, you may receive the warning “authenticity of host . . . can’t be established.” Please don’t be confused with this message; just proceed by answering yes, as shown in Figure 10-6.
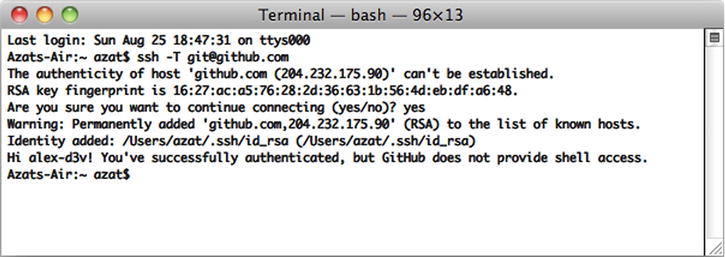
Figure 10-6. Testing the SSH connection to GitHub for the very first time
If, for some reason, you have a different message, please repeat steps 3 and 4 from the previous section on SSH Keys and/or reupload the content of your *.pub file to GitHub.
![]() Warning Keep your id_rsa file private. Don’t share it with anybody!
Warning Keep your id_rsa file private. Don’t share it with anybody!
More instructions are available at GitHub: Generating SSH Keys (https://help.github.com/articles/generating-ssh-keys). Windows users might find useful the SSH key generator feature in PuTTY (http://www.putty.org).
In case you’ve never used Git and/or GitHub, or you’ve forgotten how to commit code, the next section provides a short tutorial.
Creating a Local Git Repository
To create a GitHub repository, go to github.com (http://github.com/), log in, and create a new repository. There will be an SSH address; copy it. In your terminal window, navigate to the project folder to which you would like to push GitHub. Then, do the following:
- Create a local Git and .git folder in the root of the project folder:
$ git init - Add all the files to the repository and start tracking them:
$ git add - Make the first commit:
$ git commit -m "initial commit"
Pushing the Local Repository to GitHub
You can create a new repository in github.com via a web interface. Then, copy your newly created repo’s to the Git SSH URI, which looks something like [email protected]:username/reponame.
- Add the GitHub remote destination:
$ git remote add your-github-repo-ssh-urlIt might look something like this:
$ git remote add origin [email protected]:azat-co/simple-message-board.git - Now everything should be set to push your local Git repository to the remote destination on GitHub with the following command:
$ git push origin master - You should be able to see your files at github.com (http://github.com/) under your account and repository.
Later, when you make changes to the file, there is no need to repeat all these steps. Just execute:
$ git add
$ git commit -am "some message"
$ git push origin master
If there are no new untracked files that you want to start tracking, type the following:
$ git commit -am "some message"
$ git push origin master
To include changes from individual files, run the following:
$ git commit filename -m "some message"
$ git push origin master
To remove a file from the Git repository, execute:
$ git rm filenameFor more Git commands, go to:
$ git --help
![]() Note We advise against committing the node_modules folder to the repository for a project intended to be used in other applications, i.e., for a module. On the other hand, it’s a good practice to commit that folder along with all the dependencies for a standalone application, because future updates might break something unintentionally.
Note We advise against committing the node_modules folder to the repository for a project intended to be used in other applications, i.e., for a module. On the other hand, it’s a good practice to commit that folder along with all the dependencies for a standalone application, because future updates might break something unintentionally.
Running Tests in Cloud with TravisCI
TravisCI is an SaaS continuous integration system that allows you to automate testing on each GitHub push (e.g., $ git push origin master). Alternative services include Codeship (https://www.codeship.io), CircleCI (https://circleci.com), and many others www.quora.com (http://bit.ly/1ipdxxt).
TravisCI is more common among open-source projects and has a similar configuration to other systems, i.e., a YAML file. In case of Node.js programs, it can look like this:
language: node_js
node_js:
  - "0.11"
  - "0.10"
In this configuration, 0.11 and 0.10 are versions of Node.js to use for testing. These multiple Node.js versions are tested on a separate set of virtual machines (VMs). The following configuration file can be copied and used (it’s recommended by TravisCI):
language: node_js
node_js:
  - "0.11"
  - "0.10"
  - "0.8"
  - "0.6"
NPM’s package.json has a property scripts.test that is a string to execute scripts, so we can put the mocha command in it:
echo '{"scripts": {"test": "mocha test-expect.js"}}' > package.json
The previous line yields the following package.json file:
{"scripts": {"test": "mocha test-expect.js"}}
Then, we can run $ npm test successfully.
On the other hand, we can use any other command that invokes the execution of the test, such as the Makefile command $ make test:
echo '{"scripts": {"test": "make test"}}' > package.json
TravisCI uses this NPM instruction to run the tests.
After all the preparation is done in the form of the YAML file and the package.json property, the next step is to sign up for TravisCI (free for open-source project/public repositories on GitHub) and select the repository from the web interface on travis-ci.org (http://travis-ci.org).
For more information on the TravisCI configuration, follow the project in this chapter or see Building a Node.js project (http://about.travis-ci.org/docs/user/languages/javascript-with-nodejs/) (http://docs.travis-ci.com/user/languages/javascript-with-nodejs).
TravisCI Configuration
There’s no database in our application yet, but it’s good to prepare the TravisCI configuration right now. To add a database to the TravisCI testing instance, use:
services:
  - mongodb
By default, TravisCI starts the MongoDB instance for us on the local host, port 27017:
language: node_js
node_js:
  - "0.11"
  - "0.10"
  - "0.8"
  - "0.6"
services:
  - mongodb
That’s it! The test build will be synched on each push to GitHub.
If your tests fail even locally right now, don’t despair, because that’s the whole point of TDD. In the next chapter, we hook up the database and write more tests for fun.
Because of the GitHub hooks to TravisCI, the test build should start automatically. On their completion, contributors can get e-mail / Internet Relay Chat (IRC) notifications.
Summary
In this chapter, we briefly touched on environment variables, went through the basics of Git, and generated SSH keys. We used Grunt for predeploy tasks such as concatenation, minification, and compilation; implemented clusters, monitoring, error handling, and logging; and configured TravisCI to run tests.
In the next chapter, we’ll proceed to cover the deployment of the app to PaaS (Heroku) and IaaS (Amazon Web Services). We’ll also show basic examples of Nginx, Varnish Cache and Upstart configurations.