APPENDIX B
SAMPLE PRACTICE ACTIVITIES
Here we include three sample practice activities that we use when training teachers and school leaders on using and practicing the techniques from Teach Like a Champion. We hope that these practice activities will provide additional context for how they are discussed in the book as well as concrete examples of how the rules of practice are applied in discrete practice activities.
No Opt Out Iterative Practice
Background.
Champion teachers are quick to establish the expectation that even when students don’t know an answer (yet!), they still have the responsibility to participate in the learning process. One of the ways to accomplish this is through No Opt Out, a technique that ensures that a student who is unable to answer a question will answer it as often as possible.
Objective of the Practice.
Our objective with this activity was to get teachers to use No Opt Out immediately after it had been introduced. In order to do that, we simplified the activity in order to (1) give participants enough iterations so that they started to feel natural with it (Rule 3: Let the Mind Follow the Body), and (2) have them practice simplified versions of different situations they might face so that they weren’t worried about what could go wrong (Rule 10: Isolate the Skill). In short, we wanted them to practice being successful (Rule 1: Encode Success).
Task.
In this practice session there are three roles: Teacher, Student A, and Student Z. The Teacher will pose a question to Student A, who will not respond with the correct answer. The Teacher will use No Opt Out to enable Student A to respond with the correct answer. Your goal is to practice getting comfortable using No Opt Out in relatively simple and predictable settings. Listen for how your tone and body language change, so you can find the versions of each that are natural to you.
No Opt Out Iterative Practice (Facilitator Directions)
Step 1 (5 minutes): Allow teachers to read through the four different variations on the Teacher Copy and plan how they would respond in each scenario.
Step 2 (2 minutes): Ask teachers to get into groups of three with three rotating roles:
Step 3 (20 minutes; 5 minutes per round): For each round, the basic exchange will remain consistent:
- The Teacher asks Student A a simple question: “What’s 3 plus 5?”
- Student A is unable to answer, but in a different way (and with a different tone) each time, as indicated by each variation. Teacher asks Student Z to provide a correct answer, then uses No Opt Out to return to Student A.
Once all teachers have completed the round, reflect briefly on the reflection question before the group moves on to the following variation. The purpose of this practice is not to practice using feedback but rather for teachers to get comfortable using the No Opt Out technique in a variety of realistic situations.
No Opt Out Iterative Practice (Teacher Copy)
Variation 1: Student A should get the answer wrong but in a tone suggesting genuine effort. Student Z should answer directly and correctly. Plan how you would respond.
Reflection: Were you and your partners able to normalize error, that is, make Student A feel like getting the question wrong and then getting it right was a normal part of school? If so, what helped?
Variation 2: Student A should say “I don’t know” in a sarcastic tone. Student Z should answer the question directly and correctly. Plan how you would respond.
Reflection: How did your response change when Student A was negative, challenging, and sarcastic? What were the two most effective things that members of the group did?
Variation 3: Student A should again answer incorrectly but in a tone suggesting genuine effort. Student Z should say “I don’t know” when asked the follow-up question. Plan how you would respond.
Reflection: What actions or phrases were effective in this situation?
Variation 4: The fourth and final time through the exercise, Student A should get the answer wrong but in a tone suggesting genuine effort. Student Z should answer directly and correctly. The Teacher should be ready with a more demanding question to push for greater rigor. Plan how you would respond.
Reflection: What actions or phrases were effective in this situation?
STRONG VOICE LAY-UP DRILL
Background.
Strong Voice (Economy of Language, Do Not Talk Over, Do Not Engage, Square Up/Stand Still, and Quiet Power) can have a powerful impact on students, often diffusing potentially explosive situations before they escalate beyond control. There are several reasons this activity is so powerful in practicing elements of Strong Voice:
- It allows all staff members/participants to play all roles and is a great way to create norms around role-playing because no one person is “on stage” (Rule 34: Everybody Does It).
- It normalizes the feedback process and challenges participants to provide honest feedback (Rule 23: Practice Using Feedback).
- It makes subtechniques more concrete by using these terms in feedback (Rule 40: Keep Talking).
Objective of the Practice.
Our objective with this activity was to give teachers repeated practice using the Strong Voice technique in the classroom. When using this activity, we usually choose three to four of the variations and eventually end with the final variation when we stop giving and getting feedback. At this point, the technique is becoming automatic to teachers, built into muscle memory (Rule 3: Let the Mind Follow the Body).
Task.
Participants will do a role play to practice using the Strong Voice technique in a common teacher–student interaction: asking a student who is slouching to sit up.
Strong Voice Lay-Up Drill (Facilitator Directions)
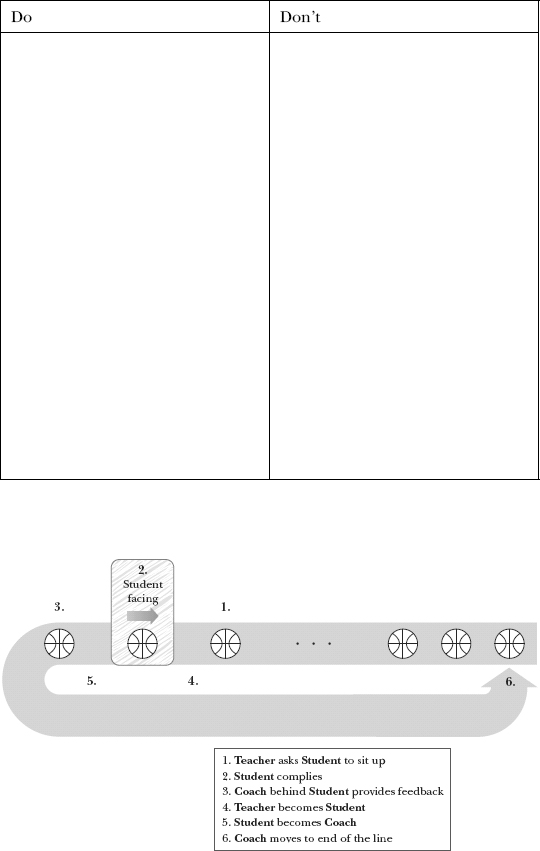
Step 1 (5 minutes): Participants complete the table on the Lay-Up Drill by planning the Dos and Don’ts of implementing Strong Voice with students.
Step 2 (10 minutes): Participants line up according to the diagram at the bottom of the Strong Voice Lay-Up Drill.
Variation 1.0:
Directions:
- Each participant will rotate through the role play playing the Student, then becoming the Teacher, then becoming the Coach, who gives feedback, and then going to the back of the line to be the Student again.
Roles:
- Student: Slouch in your seat. Immediately comply with the Teacher’s request to sit up.
- Teacher: Use the principles of Strong Voice to get the Student to sit up. For Variation 1.0, simply state “I need you to sit up.” Do not vary the language.
- Coach: When providing feedback, include one thing that the Teacher did well and one thing that the Teacher could try differently. You may encourage the Coach to always use the following sentence starters:
- “You did a good job of . . .”
- “Next time, try . . .”
For example: “You did a good job of squaring up with the student. Next time, try to implement a nonverbal signal to support your direction.”
Step 3 (20 minutes): Continue the Strong Voice drill, choosing several of the next different variations (3–5 minutes per variation).
Variations:
Strong Voice Lay-Up Drill (Teacher Copy)
You will be role-playing a scenario in which you ask a student to sit up. The purpose of this practice activity is to get as many opportunities as possible to practice using your Strong Voice. In the following table, list the Dos and Don’ts of using Strong Voice with students when delivering the direction “I need you to sit up.”
USING NONVERBAL INTERVENTIONS ROLE PLAY
Background.
Nonverbal interventions are a critical part of “100%” classroom management. Done correctly, they can allow you to manage behavior while you continue teaching, keeping your lesson “on the rails.” This allows you to avoid the “death spiral”—interrupting the learning for students who remain attentive—and to remain positive in dealing with those who are off task.
Objective of the Practice.
The purpose of this activity is to give participants the opportunity to use and improve their use of nonverbal interventions to reinforce high behavioral expectations via the least invasive means, while teaching. We use a simple lesson here (teaching the Pledge of Allegiance) in order to isolate the skill of effectively using nonverbal interventions.
Task.
Teachers will practice the effective use of nonverbal gestures (in the 100% technique) by participating in a role play in which they redirect off-task behavior nonverbally.
Using Nonverbal Interventions Role Play (Facilitator Directions)
Step 1 (10 minutes): Ask participants to complete the Teacher Copy of the role play by describing a nonverbal intervention they could use to address each behavior if the behavior happened while they were teaching. Remind participants that the goal is to address behavior without stopping the lesson and that the best interventions are
- Simple: You want to use them fast
- Unambiguous: Reliability of interpretation is critical
- Positive: Call attention to the solution rather than the problem
You may wish to have all participants try the first example and then report back their answers before having them complete the rest of the worksheet.
Step 2 (5 minutes): Choose a few of the behaviors on the worksheet and ask participants to demonstrate a nonverbal intervention they might use. When possible, ask for several examples for each behavior (that is, from multiple participants) and ask participants to discuss the similarities and differences.
Step 3 (10 minutes):
Scenario: Announce that you will now offer participants the chance to put these and similar interventions into practice via a role play where a teacher will be required to correct behaviors while teaching. The objective for the lesson is to have the class learn and memorize the Pledge of Allegiance. Assign the following roles to participants:
Roles:
- “One thing you did well was . . .”
- “One thing you can try differently next time is . . .”
The purpose is to force the Teachers to use effective gestures and nonverbal interventions while teaching. Thus, the Confederates should correct their behavior in a compliant manner if they feel that a simple, unambiguous, and relatively positive nonverbal intervention has been made.
Step 4 (5 minutes): Ask the teacher to repeat a small portion of the practice, integrating the feedback from his or her coach. After the initial teacher has practiced, you can switch roles, allowing for more teachers to practice.
Step 5 (10 minutes):
Discussion: Starting with the role-players, participants should be asked to reflect on the experience.
Questions for the “Teacher(s)”:
- What was most difficult about the activity?
- What were your most effective interventions? Why?
- What helped you to manage the situation effectively?
Questions for the “Students”:
- What did you notice about the teacher’s interactions with you or your peers?
- As a student who was doing what was asked, did you feel engaged in, and important to, the lesson? Were you able to focus on it?
Step 6 (5 minutes): The previous activity revealed that there are more and less effective ways to intervene nonverbally. As a group make a list on the board of practical takeaways that are important to think about in making effective nonverbal interventions (for example, the importance of moving into a student’s line of sight for a gesture).
Using Nonverbal Interventions Role Play (Teacher Copy)
Listed here you’ll find various types of student behavior that might require a nonverbal intervention. For each one, describe an effective nonverbal intervention you might use. The best interventions are
- Simple: You want to use them quickly while you are teaching
- Unambiguous: Reliability of interpretation is critical
- Positive: Call attention to the solution rather than the problem
The first example is done for you. Please continue with the behaviors and interventions that follow.
| Behavior One: Student slouching in his chair |
| Intervention One: Make “hands folded” gesture (hands folded in front of me with elbows bent 90° and fingers intertwined) to signal to sit up. |
| Behavior Two: Student with her head down on her desk (eyes up) |
| Intervention Two: |
| Behavior Three: Student with her head down on her desk (eyes hidden) |
| Intervention Three: |
| Behavior Four: Student sending the bathroom signal at critical time during lesson |
| Intervention Four: |
| Behavior Five: Frequent struggler doing well and working hard today |
| Intervention Five: |
| Behavior Six: Student persistently raising hand (for reasons unrelated to your questions) |
| Intervention Six: |
| Behavior Seven: Student engaged in sustained looking under desk for “something” |
| Intervention Seven: |
| Behavior Eight: Student gazing out window |
| Intervention Eight: |