
PrimeFaces CSV is easy to configure. It works with AJAX and non-AJAX requests. It supports partial processing and updating on the client side. There is almost no effort for the users if they plan to add a CSV support to their web applications.
In this recipe, we will see how to configure and use PrimeFaces Client Side Validation Framework. We will develop input components with attached standard validators and converters and see how client-side validation works in action. We will also learn how the text for validation messages can be customized in JavaScript to be used with PrimeFaces CSV.
CSV is disabled by default. To enable the CSV Framework, a configuration parameter in web.xml is required:
<context-param>
  <param-name>
    primefaces.CLIENT_SIDE_VALIDATION
  </param-name>
  <param-value>true</param-value>
</context-param>
Now, you are able to use CSV by setting the validateClient attribute to true for command components such as p:commandButton or p:commandLink. After that, a click on a button or link validates the form fields on the client side and displays validation errors in message components.
For demonstration purposes, we will create a bean with seven properties, which have various data types:
@Named
@ViewScoped
public class BasicCsvBean implements Serializable {

  private String string1;
  private String string2;
  private String string3;
  private Integer int1;
  private Double double1;
  private Double double2;
  private Date date1;

  // getters / setters
  ...
}
The bean's properties are bound to the values of input components. Furthermore, a few standard JSF validators and converters are attached to the input components. The following code shows this:
<p:messages id="messages"/>
<h:panelGrid id="grid" columns="2" cellpadding="3"
style="margin-bottom:10px;">
<p:outputLabel for="text1" value="Text1"/>
<p:inputText id="text1" value="#{basicCsvBean.string1}"
required="true" label="Text1"/>
<p:outputLabel for="text2" value="Text2"/>
<p:inputText id="text2" value="#{basicCsvBean.string2}"
label="Text2">
<f:validateLength minimum="5" maximum="8"/>
</p:inputText>
<p:outputLabel for="text3" value="Text3"/>
<p:inputText id="text3" value="#{basicCsvBean.string3}"
label="Text3">
<f:validateRegex pattern="^[d]+$"/>
</p:inputText>
<p:outputLabel for="int1" value="Integer1"/>
<p:inputText id="int1" value="#{basicCsvBean.int1}"
label="Integer1">
<f:convertNumber integerOnly="true"/>
</p:inputText>
<p:outputLabel for="double1" value="Double1"/>
<p:inputText id="double1" value="#{basicCsvBean.double1}"
label="Double1">
<f:validateDoubleRange minimum="5.5" maximum="8.5"/>
</p:inputText>
<p:outputLabel for="double2" value="Double2"/>
<p:inputText id="double2" value="#{basicCsvBean.double2}"
label="Double2">
<f:convertNumber type="currency" currencySymbol="$"/>
</p:inputText>
<p:outputLabel for="date1" value="Date1"/>
<p:inputText id="date1" value="#{basicCsvBean.date1}"
label="Date1">
<f:convertDateTime pattern="dd.MM.yyyy"/>
</p:inputText>
</h:panelGrid>
<p:commandButton validateClient="true"
value="Submit (Non-Ajax)" ajax="false"
style="margin-right:5px"
onclick="PF('inputValuesWdgt').hide()"/>
<p:commandButton validateClient="true"
value="Submit (Ajax)"
process="grid" update="grid messages inputValues"
onclick="PF('inputValuesWdgt').hide()"
oncomplete="PF('inputValuesWdgt').show()"/>
<p:dialog header="Input values" closeOnEscape="true"
visible="#{facesContext.postback and
!facesContext.validationFailed}"
widgetVar="inputValuesWdgt">
<h:panelGrid id="inputValues" columns="1" cellpadding="3">
<h:outputText value="#{basicCsvBean.string1}"/>
<h:outputText value="#{basicCsvBean.string2}"/>
<h:outputText value="#{basicCsvBean.string3}"/>
<h:outputText value="#{basicCsvBean.int1}"/>
<h:outputText value="#{basicCsvBean.double1}"/>
<h:outputText value="#{basicCsvBean.double2}">
<f:convertNumber type="currency" currencySymbol="$"/>
</h:outputText>
<h:outputText value="#{basicCsvBean.date1}">
<f:convertDateTime pattern="dd.MM.yyyy"/>
</h:outputText>
</h:panelGrid>
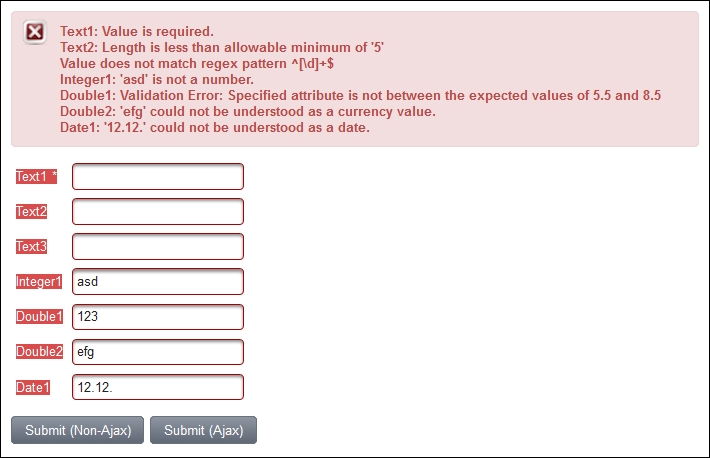
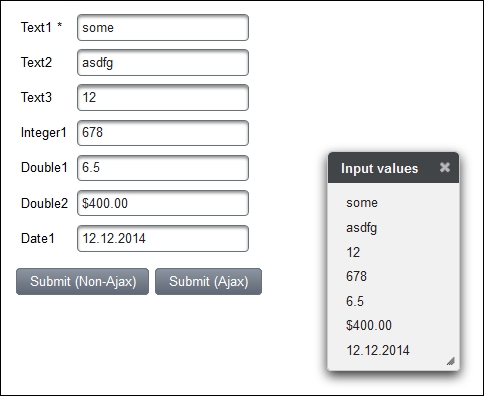
</p:dialog>Two command buttons process the input components in non-AJAX and AJAX cases, respectively. In the AJAX case, the inputs, the messages component, and the content of a dialog are updated. The p:messages tag displays errors if validation fails and p:dialog displays the submitted values if everything is OK. A failed validation is shown here:
The dialog looks like this:
In the example, the input components are validated on the client side because p:commandButton has validateClient="true". In non-AJAX cases, all visible and editable components in the form (h:form) get validated without the need to send a non-AJAX request. The message components must be placed inside the form too.
In AJAX cases, the whole processing happens on the client side. If the process attribute is enabled, the components that would be processed on the server side get validated on the client side. If the update attribute is defined, the components that would be updated on the server side get updated on the client side.
PrimeFaces message components have client-side renderers for CSV support; these are p:message, p:messages, and p:growl. Lots of options for these components, such as showSummary, showDetail, globalOnly, and redisplay, are supported on the client side as well.
The text for validation messages is retrieved from client-side bundles. PrimeFaces only provides bundles in the English language. The default text is located in the validation.js and beanvalidation.js files that are included by PrimeFaces automatically.
Tip
For more languages, please follow the instructions for PrimeFaces Locales http://code.google.com/p/primefaces/wiki/PrimeFacesLocales.
Default text can be easily customized. The next JavaScript snippet overwrites the PrimeFaces' default text for missing values in the required fields and the f:validateLength and f:validateRegex validators. This text is displayed in the first picture showed earlier. Here's the JavaScript snippet that is being discussed:
PrimeFaces.locales['en'] = {
  messages: PrimeFaces.locales['en_US'].messages
};

$.extend(PrimeFaces.locales['en'].messages, {
  'javax.faces.component.UIInput.REQUIRED':
    '{0}: Value is required.',
  'javax.faces.validator.LengthValidator.MINIMUM':
    '{1}: Length is less than allowable minimum of '{0}'',
  'javax.faces.validator.LengthValidator.MAXIMUM':
    '{1}: Length is greater than allowable maximum of '{0}'',
  'javax.faces.validator.RegexValidator.NOT_MATCHED':
    'Value does not match regex pattern {0}'
});
The JavaScript snippet can be placed in the lang_en.js file in the resources/js folder and included on a page via h:outputScript. This is shown in the following code:
<h:outputScript library="js"
  name="lang_#{facesContext.viewRoot.locale.language}.js"/>
The same approach can be applied to all other languages in a multilanguage web application.
Consider the use of p:clientValidator if you would like to validate user' inputs instantly. This use case is described in the next recipe, Instant validation with p:clientValidator.
This recipe is available in the demo web application on GitHub (https://github.com/ova2/primefaces-cookbook/tree/second-edition). Clone the project if you have not done it yet, explore the project structure, and build and deploy the WAR file on application servers compatible with Servlet 3.x, such as JBoss WildFly and Apache TomEE.
The showcase for the recipe is available at http://localhost:8080/pf-cookbook/views/chapter10/basicCsv.jsf.