Chapter 12
Wireless Security and Mobile Devices
Lab Exercises
12.01 Wireless Network and Device Detection
12.02 Monitor Mode Sniffing
12.03 Cracking WPA2 Passwords and Deauthenticating Clients with Wifite
Lab Analysis
Key Term Quiz
When you walk down the street or hallway, do you hear other people talking? Do you try to listen in to any of those conversations? Do those people know you are listening to them? Is that illegal?
I’ve personally heard people in hallways actually shouting on a cell phone, “Well, you need to sign in first. You can use my account. My username is x and my password is y” (where x and y are the actual credentials). I’ve even heard people, very loudly, say their Social Security numbers on cell phone calls. I am continually floored each time I hear people almost yelling their sensitive information into their phones—within earshot of others!
Similar questions about legality have been tossed around for many years regarding Wi-Fi traffic. The latest news to come out regarding that goes all the way back to 2010, 2012, and 2014.
• This 5/17/10 article explains how Google admits that its Street View cars collected actual data from unencrypted Wi-Fi networks by accident, instead of just collecting intended network names and router MAC addresses:
https://www.infosecurity-magazine.com/news/google-says-street-view-cars-collected-wifi-data-9499/
• This 7/1/11 article explains how a federal judge denied Google’s request to dismiss the class-action lawsuit against them, claiming they violated the Federal Wiretap Act by collecting unencrypted Wi-Fi data:
https://www.infosecurity-magazine.com/news/federal-judge-rejects-googles-motion-to-dismiss/
• In this 7/1/11 article, “Ms. Smith” explains more about the decision to allow a lawsuit against Google to continue:
https://www.csoonline.com/article/2220115/sniffing-open-wifi-may-be-wiretapping-judge-tells-google.html
• In this 4/16/12 article, David Goldman explains that Google was fined $25,000 for obstructing a federal regulator’s investigation into the interception of unencrypted Wi-Fi traffic:
https://money.cnn.com/2012/04/16/technology/google-fcc/index.htm
• In this 4/27/12 article, David Kravets explains that the Justice Department cleared Google of claims that it illegally intercepted unencrypted Wi-Fi traffic:
https://www.wired.com/2012/04/doj-google-streetview/
• In this 9/7/12 article, Timothy B. Lee explains how a federal judge handed down a ruling that if you intercept unencrypted Wi-Fi traffic, that does not constitute a violation of wiretapping. Innovatio IP Ventures wanted a preliminary ruling to allow them to intercept Wi-Fi traffic to prove that certain businesses offering public Wi-Fi infringed on its patents. The ruling is the opposite of a 2011 pronouncement against Google, related to Google’s Street View cars capturing of Wi-Fi traffic from all around the United States.
https://arstechnica.com/tech-policy/2012/09/sniffing-open-wifi-networks-is-not-wiretapping-judge-says/
• In this 9/17/12 article related to the same case, Kent Lawson explains that there is no expectation of privacy or legal claims for anyone not encrypting any form of network communications:
https://blog.privatewifi.com/federal-judge-rules-that-wifi-sniffing-is-perfectly-legal/
• In this 4/1/14 article, David Kravets explains how Google is trying to get the Supreme Court to reverse their decision, claiming that intercepting unencrypted Wi-Fi traffic is legal:
https://arstechnica.com/tech-policy/2014/04/google-tells-supreme-court-its-legal-to-packet-sniff-open-wi-fi-networks/
• In this 6/30/14 article, Lawrence Hurley explains how the Supreme Court rejected Google’s appeal:
https://www.reuters.com/article/us-usa-court-privacy/u-s-top-court-rejects-google-bid-to-drop-street-view-privacy-case-idUSKBN0F51E520140630
• In this PDF version of a PowerPoint presentation that explores the legalities of public Wi-Fi sniffing for security researchers and educators, Simson L. Garfinkel and Michael McCarrin advise on Slide #53, “Don’t tell students to sniff in the wild!” and on Slide #59, “For now—try to avoid sniffing in the 9th Circuit”:
https://citeseerx.ist.psu.edu/viewdoc/download?doi=10.1.1.663.1549&rep=rep1&type=pdf
![]() 30 MINUTES
30 MINUTES
Lab Exercise 12.01: Wireless Network and Device Detection
For the networks and devices under your control, understanding as much as you can about the wireless network traffic and devices sending and receiving packets has never been in question. You need to be fully aware of all traffic on networks you control to know what might be lurking or attacking. That’s perfectly legal!
On your home network, it’s important to be aware of all the devices sending and receiving wireless traffic. If you’re an administrator or engineer at a company, the same applies. Network monitoring is mandatory for cybersecurity.
Learning Objectives
In this lab exercise, you’ll explore wireless network signals. At the end of this lab exercise, you’ll be able to
• Understand how easily wireless networks can be detected
• Understand how much information about wireless networks can easily be detected
• Understand how easily wireless devices can be detected
• Understand how much information about wireless devices can easily be detected
Lab Materials and Setup
The materials you need for this lab are
• The Principles of Computer Security: CompTIA Security+ and Beyond textbook
• A Windows 10 host machine with an Internet connection
• A wireless network interface card (NIC) connected to a Wi-Fi network
• A wireless access point (WAP), also known as just an access point (AP)
Let’s Do This!
You’re about to download and install two programs. Make sure you’re connected to a Wi-Fi network before continuing.
![]() 1b, 1c. Feel free to crop or redact any portion of the screenshots for privacy.
1b, 1c. Feel free to crop or redact any portion of the screenshots for privacy.
![]() 1d
1d
Step 1 On your Windows 10 machine, download and install NetSpot. The following description is from www.netspotapp.com:
NetSpot is the only professional app for wireless site surveys, Wi-Fi analysis, and troubleshooting on Mac OS X and Windows. It’s a FREE Wi-Fi analyzer. No need to be a network expert to improve your home or office Wi-Fi today! All you need is your MacBook running Mac OS X 10.10+ or any laptop with Windows 7/8/10 on board and NetSpot which works over any 802.11 network.
a. Go to www.netspotapp.com.
Click the Get NetSpot button.
In the NetSpot FREE edition section, click the Download Now button.
The executable will download to your Downloads folder. Click it to run the executable and install NetSpot.
Click the blue Install Now button to begin the installation.
Click the Launch button when the installation is complete.
Click the Continue button on the bottom left to keep using the free version.
b. While the operating system can give you basic and limited information about wireless networks you’re in range of, with the Discover tab selected, you’ll see information in the following categories: SSID, BSSID, Graph, Signal, %, Min, Max, Average, Level, Band, Channel, Width, Vendor, Security, Mode, and Last Seen. Figure 12-1 shows NetSpot in action.
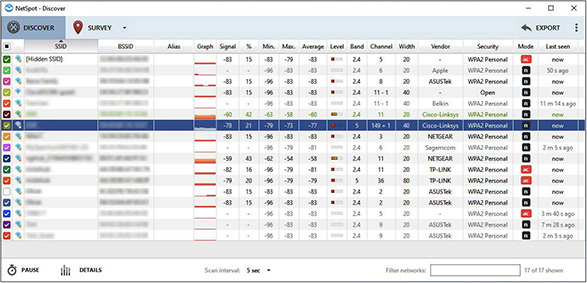
FIGURE 12-1 NetSpot detecting wireless signals
SSID (service set identifier) is the name of the network. BSSID (basic service set identifier) is the AP’s MAC address.
NetSpot provides a great page at www.netspotapp.com/help/terms-definitions/ that contains “All the clever words used in NetSpot and Wi-Fi related science explained.” Check it out.
c. If you put a check in the color-coded checkbox in the first column for some or all rows, you can get information comparing those SSIDs to the others by clicking Details on the bottom bar (or by simply double-clicking a row without putting a check in any box). As shown in Figure 12-2, you’ll see a new window with the following tabs: Signal (5 min, 30 min, 60 min), Tabular Data, Channels 2.4 GHz, and Channels 5 GHz. The Signal, Channels 2.4 GHz, and Channels 5 GHz tabs will show aggregate information for the SSIDs selected. You can add and remove checks to dynamically change the color-coded output.
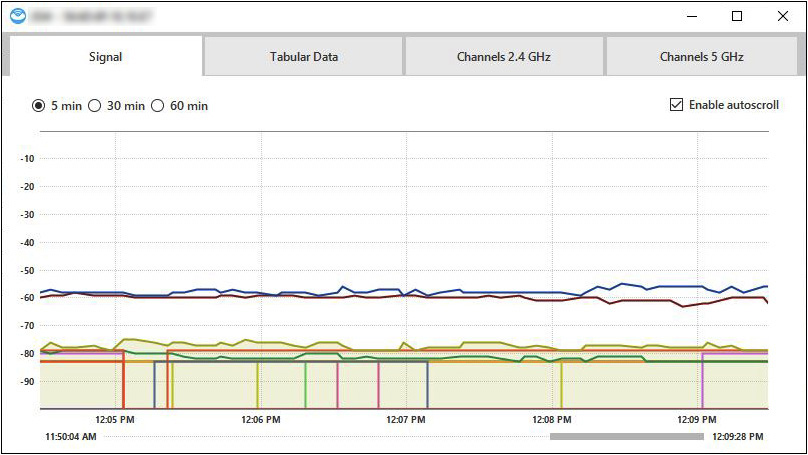
FIGURE 12-2 Comparing SSIDs in NetSpot
d. How many SSIDs did you discover? Did you have an idea of how many SSIDs you were in range of? How many different vendors were detected? What were the security settings detected for the wireless networks? Was there any information you found extremely interesting?
e. There are more features offered by NetSpot, including a site survey, but they aren’t free. We’re not going to explore these features, but you’re more than welcome to pay for them and go even further.
![]() 2c. Feel free to crop or redact any portion of the screenshot for privacy.
2c. Feel free to crop or redact any portion of the screenshot for privacy.
![]() 2d
2d
Step 2 Download and install Advanced IP Scanner. The following is from www.advanced-ip-scanner.com:
Reliable and free network scanner to analyse LAN. The program shows all network devices, gives you access to shared folders, provides remote control of computers (via RDP and Radmin), and can even remotely switch computers off. It is easy to use and runs as a portable edition. It should be the first choice for every network admin.
a. Go to www.advanced-ip-scanner.com.
Click the Free Download button.
Run the .exe from Downloads.
Keep English (English) as the default language and click the OK button.
Either keep the radio button for Install selected or click the Run radio button and then click Next.
Click the radio button next to I Accept the Agreement.
Click the Install button.
Click the Finish button.
b. On the IP Address Range bar, just include your subnet range (for example, 192.168.1.1-254) and delete anything else that appears there by default.
c. Click the Scan button.
![]() Cross-Reference
Cross-Reference
Port scanning is going on behind the scenes, and you’ll learn about how that works in great detail, along with some great lab exercises, in Chapter 16.
Wireless devices, as well as wired devices, will be revealed along with metadata, including status, name, IP, manufacturer, MAC address, and comments.
There will be even more information about certain devices. If you see an arrow in the Status column, click it to expand the selection to include services discovered.
d. How many devices were detected? What were some of the manufacturers listed? What services were detected on certain devices? Is there anything extremely interesting that caught your eye?
![]() 60 MINUTES
60 MINUTES
Lab Exercise 12.02: Monitor Mode Sniffing
When a frame enters a NIC, if the destination MAC address is not the NIC’s unicast MAC address, a multicast, or a broadcast, the NIC will drop the frame. Promiscuous mode is a mode for a wired or wireless NIC that causes the NIC to pass all traffic it receives up the networking stack on a machine. With promiscuous mode enabled, the NIC will accept and read frames that have unicast addresses other than the NIC’s MAC address.
Of course, on a switched network, promiscuous mode is not useful, since a switch will only send frames to ports associated with destination MAC addresses listed in the switch’s source address table (SAT), as you saw in Chapter 9. The one exception is an unknown unicast, when a switch doesn’t know which port a destination MAC address is associated with. In this case, the switch will flood the frame out of all ports except the port on which the frame originated. Normally, this won’t be a problem because every data exchange should be preceded by an ARP request and an ARP reply, which makes the communicating stations known to the switch, before any data is transferred.
On Wi-Fi networks with encryption using WPA2 (Wi-Fi Protected Access 2), by default, packets to or from other hosts will not be able to be decrypted by the NIC and will not be captured. Therefore, promiscuous mode works the same as non-promiscuous mode. On Wi-Fi networks without encryption, promiscuous mode works as it does on wired networks, allowing NICs to read traffic with unicast addresses other than the NIC’s MAC address.
Monitor mode, like promiscuous mode, allows a device with a wireless NIC to monitor all traffic received from a wireless network. The difference between monitor mode and promiscuous mode is that monitor mode allows packets to be captured without having to associate with an AP first. Monitor mode only applies to wireless networks (as wired networks don’t have an association process with an AP), while promiscuous mode applies to both wired and wireless networks.
Promiscuous mode on a wireless network is like sitting down with a bunch of people at a table in a restaurant. You can hear conversations between other people at the same table because you’re all sharing a meal together. Monitor mode is like listening to people’s conversations when you walk down the street or a hallway. You have no connection to them, and they have no connection to you.
By default, monitor mode can’t run inside any virtual machine (VM) on any guest operating system. VMs see the virtual NICs as Ethernet adapters and not Wi-Fi adapters. However, monitor mode sniffing on a VM is possible with an external NIC that allows for promiscuous mode and monitor mode, which you’ll be doing in this chapter.
If you have a VM running in bridged mode with its own virtual NIC and MAC address, the hypervisor will inject itself through a device driver and force a wired physical NIC to accept the frame with a VM’s MAC address so it can be sent to the VM. Therefore, even though the destination MAC address belongs to the virtual NIC on the VM and not the physical NIC, the physical NIC is able to accept the frame. The virtual bridge will send the traffic to the VM with the corresponding destination MAC address on its virtual NIC.
Hypervisors need to tweak that behavior for wireless traffic, since many wireless adapters don’t support promiscuous mode and will automatically drop traffic if the destination MAC address is not the MAC address of the physical wireless NIC. All traffic has to use the MAC address of the host’s wireless NIC. The hypervisor needs to replace the VM’s source MAC address of an outgoing frame with the host’s MAC address to make sure the reply will be sent back to the host MAC address and not the guest MAC address.
When the hypervisor sees an incoming packet with a destination IP address that belongs to one of the VM’s virtual NICs, it replaces the destination MAC address of the host NIC in the frame with the VM’s MAC address and then sends the traffic to the VM. Since a Layer 2 ARP frame doesn’t have a Layer 3 IP header, the Target IP Address field is parsed by the hypervisor to know which virtual NIC should get the ARP reply. Hypervisors examine ARP and DHCP traffic so they can learn the IP addresses of VMs.
From a cybersecurity perspective, using monitor mode to capture packets from APs can be very helpful in determining if there are rogue APs set up to fool clients into connecting to them, leading to a man-in-the-middle attack. Using the Wireshark packet analyzer, information sent and received by these rogue APs can be analyzed in greater depth, compared to the tools in the previous lab exercise.
Learning Objectives
In this lab exercise, you’ll capture packets without even being connected to a Wi-Fi network. At the end of this lab exercise, you’ll be able to
• Understand how monitor mode sniffing works
• Understand the dangers of leaving Wi-Fi networks unprotected
Lab Materials and Setup
The materials you need for this lab are
• The Principles of Computer Security: CompTIA Security+ and Beyond textbook
• A web browser with an Internet connection
• The Kali Linux VM you installed in Chapter 1
• A wireless NIC connected to a Wi-Fi network
• An AP in range, whether it’s yours or someone else’s
• An external wireless USB NIC that supports monitor mode and packet injection
I bought the following external wireless USB NIC, which is rated by many as the best one for packet injection (which we’ll be doing in the next lab exercise):
www.amazon.com/Alfa-Long-Range-Dual-Band-Wireless-External/dp/B00VEEBOPG
However, I’ve actually had more consistent success with packet injection using an older 802.11n external wireless USB NIC from the same company (Alfa):
www.amazon.com/gp/product/B004Y6MIXS
The newer 802.11ac external wireless USB NIC sometimes refuses to work properly. Welcome to the world of Linux drivers, and welcome to the world of wireless sniffing.
Let’s Do This!
Plug your external wireless USB NIC into a USB port and then boot into your Kali Linux VM.
From the VMware Workstation Player menu, click Player, mouse over Removable Devices, mouse over Qualcomm Atheros UB91C, and then click Connect (Disconnect from Host), as shown in Figure 12-3. Click the OK button in the dialog box that pops up.

FIGURE 12-3 Connecting the external wireless USB NIC to the Kali Linux VM
![]() Note
Note
The screenshots for this chapter were made while using Bash (Bourne-again shell) through Kali Linux 2020.2. As discussed in Chapter 2, Kali Linux 2020.4 switched from Bash to Zsh (Z shell). Therefore, your terminal will have a different look, but the commands and output will work the same.
![]() 1e, 1f
1e, 1f
Step 1 Install the device drivers for the external USB wireless NIC.
a. The external USB wireless NIC can’t yet communicate with Kali Linux. The tricky part in any Linux distribution is installing the device drivers (that is, the software that enables hardware to communicate with the OS and programs). Enter the following to install the driver software for the wireless USB NIC:
sudo apt install realtek-rtl88xxau-dkms
Enter your password when prompted, and throughout the rest of the chapter.
Type Y at the prompt and press ENTER to follow through with the installation. If you execute the command again, you should see, along with other output, something similar to the following, depending on the current version when you’re performing this lab exercise:
realtek-rtl88xxau-dkms is already the newest version (5.6.4.2~git20210118-0kali1).
b. Shut down the Kali Linux VM and remove the external USB Wi-Fi NIC. Turn on the Kali Linux VM and then log in.
c. Run the following two commands (entering Y to the prompts and pressing ENTER) to update the apt package manager and upgrade packages on the system:
sudo apt update
sudo apt upgrade
d. Plug the wireless USB NIC in, select the radio button Connect To A Virtual Machine, put a check in the Remember My Choice and Do Not Ask Again box, and click the OK button. To undo this, a “Forget Connection Rule” selection appears now in the Removable Devices menu item for the NIC.
e. Run the following command to list the USB devices connected to Kali Linux:
lsusb
The output should include a line referencing the NIC, as shown in Figure 12-4.

FIGURE 12-4 The NIC is recognized.
f. Type in the following command to see IP addressing information:
ip a
In the output, notice an entry for a new wlan0 interface.
![]() 2a–2c
2a–2c
Step 2 Put your NIC in monitor mode. By default, it’s in managed mode. Steps 2a, 2b, and 2c can be seen in Figure 12-5.

FIGURE 12-5 Changing managed mode to monitor mode
a. Enter the following command to see that the type of the wlan0 interface is managed, as shown in the top of Figure 12-5:
iw dev
b. Enter the following commands to shut down the interface, set the type to monitor mode, and then bring the interface back up, as shown in the middle of Figure 12-5:
sudo ip link set wlan0 down
sudo iw wlan0 set monitor control
sudo ip link set wlan0 up
c. Enter the following command to check the new type of the wlan0 interface, as shown in the bottom of Figure 12-5:
iw dev
Now the interface is in monitor mode.
d. For reference, the following commands can be used to return the wlan0 interface to managed mode and verify that the mode is back to managed (the last command verifies that the mode is managed after the previous three commands). Do not enter these commands now, as the next step requires monitor mode.
sudo ip link set wlan0 down
sudo iw wlan0 set type managed
sudo ip link set wlan0 up
iw dev
![]() 3c. Feel free to crop or redact any portion of the screenshot for privacy.
3c. Feel free to crop or redact any portion of the screenshot for privacy.
Step 3 Start sniffing with Wireshark, the world-renowned packet sniffer. Wireshark and packet sniffing in general will be explained more in future chapters.
a. From the terminal, enter the following command:
sudo wireshark
b. Double-click the wlan0 interface to start sniffing in monitor mode.
c. You’ll notice lots of broadcast wireless beacon frames coming from APs. Notice the SSIDs listed in the Info column. If you are in range of any unencrypted networks, you’ll actually see all packets, including data packets to and from clients, from those networks. You should also see broadcast probe requests from clients and unicast probe responses from APs.
You’re likely to also capture other multicast and unicast traffic, depending on what’s in range.
d. Click the red square (the second icon from the left on the main toolbar) to stop capturing packets.
e. Select rows in the Packet List pane (the top one) to see the field names and values in the Packet Details pane (the middle one). Expand each section by clicking the triangles. When you click anything in the Packet Details pane, the corresponding hex dump on the left and ASCII/Unicode on the right (if applicable; otherwise, you’ll see a dot) are selected in the Packet Bytes pane (the bottom pane).
f. To filter by SSID, in the display filter bar at the top (where it says “Apply a display filter…
<Ctrl-/>”), type
wlan.ssid == CSCPROF
where CSCPROF is the SSID (substitute the one you’re filtering by), and then press ENTER. The bar will turn green for filters with proper syntax and red for filters with improper syntax.
To remove the display filter, click the X at the right of the filter bar.
g. To filter by beacon frames (APs advertising SSIDs, data rates, encryption types, and other capabilities through broadcasts in regular intervals without solicitation), use the following filter:
wlan.fc.type_subtype == 8
h. To filter by probe requests (clients requesting information from a specific AP by SSID or all APs in range through broadcasts), use the following filter:
wlan.fc.type_subtype == 4
i. To filter by probe responses (APs advertising SSIDs, data rates, encryption types, and other capabilities through unicasts if the data rates are compatible between client and AP), use the following filter:
wlan.fc.type_subtype == 5
j. A great list of Wireshark 802.11 filters can be found here:
www.semfionetworks.com/uploads/2/9/8/3/29831147/wireshark_802.11_filters_-_reference_sheet.pdf
Technically, you can now take your laptop with your wireless NIC and drive around town, performing war driving, sniffing packets right out of the air. You can sniff at the airport, coffee shops, the mall, hotels, and any other locations where the public Wi-Fi is not encrypted. On unencrypted networks, you’ll be able to see all packets. However, remember the articles from the beginning of the chapter and decide whether you consider those actions to be legal or illegal, ethical or unethical, and moral or immoral. The author and publisher are not liable for any actions related from sniffing on networks that are not under your control.
![]() 90 MINUTES
90 MINUTES
Lab Exercise 12.03: Cracking WPA2 Passwords and Deauthenticating Clients with Wifite
WEP (Wired Equivalency Privacy), established as the first encryption standard for 802.11 wireless networks and ratified in 1997, was a poor attempt at preventing attackers from sniffing wireless traffic sent between wireless clients and APs. It was in no way equivalent to the privacy wired (Ethernet) networks have with cables.
WPA (Wi-Fi Protected Access) debuted in 2003 as an intermediate step between WEP and WPA2 (Wi-Fi Protected Access 2), which debuted itself in 2004. There were so many problems with WEP that a temporary upgrade (WPA) was immediately needed, until a better long-term solution (WPA2) could be designed.
WPA2 has had its share of problems and vulnerabilities, but has been the only choice for wireless security since 2004. It is now slowly being phased out in favor of WPA3, which was introduced in 2018. WPA3 prevents dictionary attacks and replay attacks, which are possible with WPA2. In fact, in this lab exercise, you’re going to crack a WPA2 password and decrypt packets, both of which are simply not possible with WPA3!
WPA2 (all of the following applies to WPA as well) has two modes: personal mode, also known as pre-shared key (PSK), and enterprise mode. Personal mode simply uses a pre-shared key in the form of a password, while enterprise mode uses a username/password pair, which is used with 802.1X (port-based authentication) and a RADIUS (Remote Authentication Dial-In User Service) server (in most cases, also using an Active Directory database). Cracking enterprise mode is significantly harder than cracking personal mode.
Each client on a WPA2-PSK infrastructure has its own handshake. Therefore, by default, you won’t be able to monitor any traffic except your own on an encrypted network. However, if you know the pre-shared key and capture the handshakes of other clients with the AP, you can decrypt their entire sessions, as you’ll be doing in this lab exercise.
In order for Wireshark to decrypt WPA2 traffic, it must capture an EAPoL (Extensible Authentication Protocol over LAN) 802.1X handshake, which is a four-way handshake that contains values used by WPA2 to set up keys used for encrypting traffic between the client and the AP. This happens each time a client connects to an AP, and the values and keys are different for each session.
Using packet injector tools, you can type a simple command to send a deauthentication frame (only if 802.11w-2009, discussed shortly, is not enabled) to clients associated with the AP, causing them to immediately reauthenticate. This is more effective when sent to the unicast addresses of the clients, as opposed to the broadcast address. Wireshark can then capture the EAPoL four-way handshake. Once this is done, and you’ve cracked the WPA2 password, you can put the password in Wireshark with the SSID, which will allow you to decrypt packets. You’ll be able to see every packet sent to and received by each client whose EAPoL handshake you captured. Cracking the pre-shared key and forcing the victims to reconnect is all that’s needed!
The latest standard, WPA3, limits active attacks, where unlimited password attempts are flooded to the AP in a dictionary attack or brute force attack, through a new key exchange protocol called Simultaneous Authentication of Equals (SAE), which replaces WPA2’s pre-shared key (PSK). WPA3 also eliminates passive attacks, preventing users from sniffing traffic from other devices, even with the Wi-Fi password and a successful connection. WPA3 also prevents the passive capturing of an exchange to determine session keys and the decrypting of data captured earlier (perfect forward secrecy). WPA3 actually eliminates the problem of open networks not using encryption, like the ones found in coffee shops, hotels, and the like. However, it leaves them unauthenticated through unauthenticated encryption with Opportunistic Wireless Encryption (OWE), which encrypts the messages and creates a MAC for each message using a key that the client and AP generate under OWE. The keys used are unique and individualized for each client, so other devices can’t decrypt this traffic.
Laptops and phones that support WPA3 will fall back to WPA2, if that’s the highest level of security offered by the AP. Upgrading a home router can be a swift action, but for organizations as well as public Wi-Fi hotspots, the changeover could take a much longer time. Therefore, expect to still see WPA2, and the vulnerabilities introduced in this chapter, for quite some time.
IEEE 802.11w-2009, which was introduced in 2009 but hasn’t been supported in client device chipsets until recently, added wireless security features. While frames can’t be protected before the four-way handshake, management frames sent after the key establishment can be protected. These frames include deauthentication frames, which, based on this standard, will be encrypted between the client and the AP. If a client gets an unencrypted deauthentication frame, it will not be accepted. 802.11w-2009 is not enabled on most wireless networks and client devices, though.
WPA3 requires 802.11w-2009, but as of this writing, most home routers don’t yet ship with WPA3, and most NICs on client devices don’t support it.
Wi-Fi 5 (802.11ac) operates just in the 5GHz range. The newest standard, Wi-Fi 6 (802.11ax), operates in both the 5GHz and 2.4GHz ranges, as did Wi-Fi 4 (802.11n), and will eventually replace Wi-Fi 5 (802.11ac) in stadiums, conference halls, and many other high-demand public locations. Change doesn’t come quickly, so public Wi-Fi networks could still be using Wi-Fi 5 (802.11ac) and WPA2 for many years to come, making the lab exercise you’re about to perform very scary.
Learning Objectives
In this lab exercise, you’ll see firsthand why it’s time to upgrade to Wi-Fi 6 (802.11ax) and WPA3. At the end of this lab exercise, you’ll be able to
• Crack WPA2 encryption
• Deauthenticate clients and capture their handshake when they reauthenticate
• Use Wireshark to view decrypted packets from the clients whose reauthentication was captured
Lab Materials and Setup
The materials you need for this lab are
• The Principles of Computer Security: CompTIA Security+ and Beyond textbook
• A web browser with an Internet connection
• The Kali Linux VM you installed in Chapter 1
• A wireless NIC connected to a Wi-Fi network
• An AP running WPA2
• Multiple clients connected to the AP
• The external USB wireless NIC you used in the previous lab exercise
Let’s Do This!
Make sure your NIC is in monitor mode, as described in the previous lab exercise, before starting this lab exercise. You are not advised to attack any devices that aren’t under your control, and the author and publisher are not liable if you choose to do so. To make sure the device driver has been installed correctly and that your NIC is capable of packet injection, enter the following command:
sudo aireplay-ng -9 wlan0
You should see an “Injection is working!” message. If you don’t see that message, troubleshoot with the earlier instructions for setting up the NIC. You can also try the commands to “down” and “up” the NIC as well to try and make it work.
![]() 1b
1b
Step 1 Using Wireshark, you’re going to decrypt packets after cracking the WPA2 password with Wifite version 2. Wifite essentially combines famous pentesting tools, including airmon-ng, aircrack-ng, reaver, and more.
a. Start sniffing using Wireshark on the wlan0 interface. In order to decrypt packets, this capture session must have the four-way handshake for each client you’d like to decrypt. Without it, Wireshark won’t be able to derive the necessary keys to decrypt.
b. In the current directory, create a text file with your SSID’s WPA2 password in it. This is to
simplify the process and focus on the new concepts in this chapter, as opposed to password
cracking in general, which was covered in Chapter 11. Otherwise, Wifite will use a default file,
/usr/share/dict/wordlist-probable.txt.
You can examine the default wordlist with cat -n (-n prints the line numbers) and grep (to search for a string), like this:
cat -n /usr/share/dict/wordlist-probable.txt | grep weissman
In this case, there are two entries in the wordlist-probable.txt file that contain the string weissman (weissman on line 21682 and weissmann on line 78719). Substitute another string for weissman to search the file for other words. You can view the entire file with the less utility by typing the following:
cat -n /usr/share/dict/wordlist-probable.txt | less
Advance page by page with the spacebar, or line by line with the up- and down-arrow keys (which can be held down for fast scrolling) or the ENTER key. Press q to quit.
Alternatively, you can open the file in a text editor like vim by typing the following:
vim /usr/share/dict/wordlist-probable.txt
Advance with the arrow keys. Press ESC, :, q, and ENTER to quit.
Alternatively, you can use rockyou.txt, which comes with Kali Linux, as you did to crack passwords in Chapter 11.
c. To see Wifite help, execute the following command:
wifite –help
In the WPA section, notice the following items related to handshakes (hs) and dictionary (dict) files:
• --new-hs Captures new handshakes and ignores existing handshakes in hs (off by default)
• --dict [file] File containing passwords for cracking (the default is /usr/share/dict/wordlist-probable.txt)
![]() 2b, 2d. Feel free to crop or redact any portion of the screenshots for privacy.
2b, 2d. Feel free to crop or redact any portion of the screenshots for privacy.
Step 2 Discover targets and clients with Wifite and then launch an attack to capture the WPA2 password.
a. Start Wifite with the command
sudo wifite --new-hs --dict ./crack-it
where crack-it is the name of the text file in the current directory containing the WPA2 password of your SSID.
Wifite will start scanning, as shown in Figure 12-6.
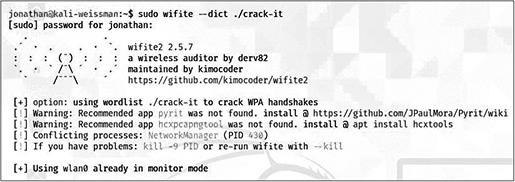
FIGURE 12-6 Wifite starting
Wifite will find targets (APs) and clients. Give it a few minutes to collect information and many clients. You’ll see a list of targets and the number of clients shortly thereafter, as shown in Figure 12-7.

FIGURE 12-7 Cracking WPA2 with Wifite
b. Press ESC to stop (as shown in Figure 12-7) when a few clients have been found for your AP. At the prompt, type the number representing your access point for the target (also shown in Figure 12-7). You’ll notice attacks starting. Press ESC to skip the first attack, WPS Pixie dust, and then press c or ENTER to continue, as shown in Figure 12-8.
c. Skip the next two attacks, WPS NULL PIN and WPS PIN Attack, in the same fashion (as shown in Figure 12-8).

FIGURE 12-8 Cracking WPA2 with Wifite
d. Ignore the “Skipping PMKID attack, missing required tools: hcxdumptool, hcxpcapngtool” message. The next attack, WPA Handshake capture (WPA in all instances in the output refers to WPA2), is going to be a success! Notice the password after “Cracked WPA Handshake PSK:” (also shown in Figure 12-8). If you have a hard time capturing this for whatever reason (including a wireless USB NIC that doesn’t perform packet injection), simply disconnect a client from Wi-Fi and reconnect, which will easily allow you to capture the four-way handshake.
e. The output will contain the name of the handshake file with EAPoL. You don’t need that because you’re already capturing in Wireshark.
![]() 3b–3e. Feel free to crop or redact any portion of the screenshots for privacy.
3b–3e. Feel free to crop or redact any portion of the screenshots for privacy.
Step 3 With Wireshark, decrypt packets from clients that were deauthenticated and whose subsequent reauthenticating handshakes were captured.
a. Go back to the running Wireshark and click the 802.11 Preferences button at the top right (if you don’t see the Wireless Toolbar, from the menu bar click View | Wireless) or click Edit | Preferences | Protocol | IEEE 802.11.
Put a check in the Enable Decryption checkbox. Click the Edit button next to Decryption Keys, click the plus sign, and set Key-type to wpa-pwd. Enter the password using the format password:SSID and then click the OK button to close the WEP and WPA Decryption Keys window. Click the OK button to click the Preferences window.
Alternatively, the key can be entered in the form of 64 hex digits, which can be calculated at the following sites:
https://www.wireshark.org/tools/wpa-psk.html
https://www.yeahhub.com/analyzing-deauthentication-packets-wireshark/
In Wireshark, filter by eapol, and you’ll see multiple EAPoL handshakes. To see the deauthentication frames, filter by wlan.fc.type_subtype == 12. Use || or the or keyword between multiple filters to filter by at least one of them (logical OR).
With the EAPoL in the current capture, Wireshark will be able to decrypt packets from each client that was deauthenticated and reauthenticated. Do not stop the capture; otherwise, you’ll have to deauthenticate the clients again to view decrypted new traffic. You’ll still be able to view decrypted traffic to that point, though, if you stop the capture.
b. In Wireshark, filter by ip.addr == 192.168.1.0/24 (use your network ID and subnet mask) to see all the decrypted packets now. Notice the source IP addresses.
c. Send pings to those IP addresses and filter by icmp in Wireshark. You’ll be able to sniff ICMP (Internet Control Message Protocol) in plaintext (from clients that reauthenticated) in Wireshark now.
d. Send pings from the clients that reauthenticated to fully qualified domain names (FQDNs) like www.google.com. You’ll be able to sniff the DNS and ICMP in plaintext (from clients that reauthenticated) in Wireshark now.
e. Open up a browser on the clients that reauthenticated and go to various websites. You’ll notice in Wireshark that TLS still encrypts to and from websites that use encryption, though, as seen in Chapter 7.
Lab Analysis
1. Should capturing wireless traffic on any network be allowed?
![]()
2. Why is capturing wireless traffic on networks under your control a form of cybersecurity?
![]()
Key Term Quiz
Use the terms from the list to complete the sentences that follow.
deauthentication
monitor mode
promiscuous mode
WEP
WPA
WPA2
WPA3
1. A NIC can capture all packets of a network, provided it is connected to a network, while operating in ____________.
2. A NIC can capture all packets while not connected to any network, while operating in ____________.
3. A ____________ attack, which injects packets, will work on networks that don’t have 802.11w-2009 enabled.
4. The very weak ____________ was temporarily replaced by ____________.
5. The newest Wi-Fi security standard, ____________, is starting to replace ____________ on wireless networks.