
![]()
Tracing, Logging, and API Documentation
When an application is being developed, there are two things everyone expects it to provide, but almost nobody likes doing the work that providing them entails. We’re speaking of the implementation of tracing and logging features and the documentation of the application. Tracing and logging give the ability to write status or error logs or monitor the application state at runtime. Documentation of an application is mandatory, as the user needs guidance on how to work with an application. All these requirements exist independently of the type of application being developed. Documentation in the particular case of a public HTTP API is important, as nobody wants to explore the API by trial and error. This chapter will first focus on the tracing and logging features in ASP.NET Web API. The chapter’s second part is dedicated to the API documentation features of ASP.NET Web API.
Tracing and Logging
There are several scenarios in developing a Web API that involve the need to trace and log information about the Web API at runtime. In one such scenario you might charge your Web API users per request, and so every request from your registered user needs to be logged to a database so you can bill him based on the use data. In another scenario your API misbehaves at runtime, and you want to inspect variable values at runtime without having to attach a debugger. ASP.NET Web API, which has been developed with such scenarios in mind, provides extensibility points for tracing and logging, so you don’t have to do them on your own. The next three sections will explore how and where tracing in ASP.NET Web API works out of the box, how to make use of it in general, and how to use it with NLog. NLog is a popular logging framework for .NET, which was explained in Chapter 1.
The Tracing Mechanisms in ASP.NET Web API
In this section you’ll see how ASP.NET Web API tracing works under the hood and how it allows you to trace the state of internals of the ASP.NET Web API framework. To set some context for tracing and logging with ASP.NET Web API, let’s look up front at logging in general.
By default, tracing in ASP.NET Web API allows you to trace the state of the main services of ASP.NET Web API. As has been indicated everywhere in this book, these services are registered in the Services property of the HttpConfiguration class. If you don’t explicitly activate tracing in ASP.NET, nothing gets logged. So if you don’t activate it, no code being executed in ASP.NET Web API is even aware of tracing. First, let’s take look at the code in Listing 18-1 which is the sort of logging code you might have seen already in some variations.
Listing 18-1. Typical Logging Source Code in .NET
internal class Program {
    private static string[] _args;

    private static void Main(string[] args) {
        _args = args;
        Trace.Listeners.Add(new ConsoleTraceListener());

        if (tracingEnabled()) {
            Trace.Write("Application started.
");
        }

        Console.WriteLine("Press any key to exit.");
        Console.ReadLine();

        if (tracingEnabled()) {
            Trace.Write("Application stopped
");
        }
    }

    private static bool tracingEnabled() {
        return _args.ToList().Contains("trace");
    }
}
First, the code in Listing 18-1 checks whether somebody enabled tracing. In our sample here, this check is done by providing the command line parameter "trace" when starting the sample program. Independent of that setting, a ConsoleTraceListener instance is added to the list of listeners to be used by the Trace class. The ConsoleTraceListener writes its output to the console window. If tracing is enabled, the Trace.Write method hands over the tracing information, which then is written by all registered trace listeners.
One of the first things that is apparent when reading the sample code is that the logging code creates a lot of overhead compared with the productive source code. Even though this is a constructed sample, there are many real-world scenarios where the source code looks pretty much the same. Besides the fact that the code is cluttered by the checks for enabled logging, thus making it hard to read, these checks slow down the code at runtime even if logging is not enabled.
Another drawback of the logging code shown in Listing 18-1 is that it is tied to a specific logging framework, which in that sample is the tracing from the System.Diagnostics namespace. If you need to replace the tracing framework being used, you have to touch each class containing your logging mechanism. This process can take a lot of effort and tends to be error-prone.
Furthermore, if you need tracing information from ASP.NET Web API itself, the logging framework being used for ASP.NET Web API logging might differ from the framework you want in your user code. Thus, you might end up with different kinds of event logs in different places.
To work around all of the above-named issues, the ASP.NET Web API team has chosen a different approach to support logging in. As was said before, if you don’t enable tracing in the ASP.NET Web API configuration, there’s no code being executed in ASP.NET Web API that is even aware of tracing. How could that be done? The ASP.NET Web API team solved this problem by creating wrapper classes for the main ASP.NET Web API services being registered in the Services collection property of the HttpConfiguration for your Web API application. These wrapper classes, being aware of tracing, can trace the beginning and the end of the service. Between the tracing events, they invoke the original service, which is wrapped in a try/catch block, so exceptions thrown inside the service can also be traced—indeed, that’s why tracing’s being done at all.
Most of the work in the ASP.NET Web API tracing mechanism, as described above, happens in a single class—TraceManager, in the System.Web.Http.Tracing namespace. TraceManager itself is registered as a service in the HttpConfiguration, as it implements the ITraceManager interface, which allows you to replace the instance being used inside the HttpConfiguration. The ITraceManager interface is pretty simple, as Listing 18-2 shows.
Listing 18-2. The ITraceManager Interface
public interface ITraceManager {
    void Initialize(HttpConfiguration configuration);
}
The only member that ITraceManager forces its derived types to implement is the Initialize method, which expects an HttpConfiguration instance as its parameter. The TraceManager instance, being registered as the default ITraceManager implementation for ASP.NET Web API, is initialized at the end of the static DefaultInitializer method of the HttpConfiguration class. The DefaultInitializer method creates the instance of the HttpConfiguration used in your ASP.NET Web API application.
With the TraceManager instance created and initialized, now is the perfect time to see what TraceManager itself actually does. Let’s start with the Initialize method (see Listing 18-3).
Listing 18-3. Initialize Method of the TraceManager Class
public void Initialize(HttpConfiguration configuration) {
    ITraceWriter traceWriter = ServicesExtensions.GetTraceWriter(configuration.Services);
    if (traceWriter == null)
        return;
    TraceManager.CreateAllTracers(configuration, traceWriter);
}
First, the TraceManager requests an ITraceWriter instance from the list of registered services in the HttpConfiguration instance (what ITraceWriter is and how to use it will be covered a bit later in this chapter). If that instance is null, the Initialize method is exited, and no further code from the TraceManager class gets executed during the Web API application runtime. Otherwise, the CreateAllTracers method of the TraceManager class is executed with the current Web API application configuration and the recently read ITraceWriter instance as its parameters.
The logic being executed inside the just-described Initialize method actually is the single point where ASP.NET Web API decides whether tracing is enabled or not.
Having just whetted our appetite for tracing in ASP.NET Web API, let’s assume that the returned ITraceWriter instance has not been null; thus, TraceManager.CreateAllTracers will be called (see Listing 18-4).
Listing 18-4. TraceManager.CreateAllTracers Method Implentation
private static void CreateAllTracers(HttpConfiguration configuration, ITraceWriter traceWriter) {
    TraceManager.CreateActionInvokerTracer(configuration, traceWriter);
    TraceManager.CreateActionSelectorTracer(configuration, traceWriter);
    TraceManager.CreateActionValueBinderTracer(configuration, traceWriter);
    TraceManager.CreateContentNegotiatorTracer(configuration, traceWriter);
    TraceManager.CreateControllerActivatorTracer(configuration, traceWriter);
    TraceManager.CreateControllerSelectorTracer(configuration, traceWriter);
    TraceManager.CreateMessageHandlerTracers(configuration, traceWriter);
    TraceManager.CreateMediaTypeFormatterTracers(configuration, traceWriter);
}
The CreateAllTracers method in Listing 18-4 contains no logic besides executing eight methods, all of whose names start with Create and end with Tracer or Tracers.
At the start of the introduction to the ASP.NET Web API tracing mechanism, we said that ASP.NET Web API creates wrapper classes around the service classes being registered in the Web API configuration if tracing is enabled. The tracers referenced in the names of the methods in Listings 18-3 and 18-4 are in fact these wrapper classes. Put simply, every method in Listing 18-4 creates one wrapper class around a particular service being registered in the configuration and replaces the original service with the corresponding wrapper.
As the implementations of the eight methods are very similar, only one of them needs explaining—namely, CreateActionInvokerTracer (see Listing 18-5), the first one invoked by the CreateAllTracers method.
Listing 18-5. CreateActionInvokerTracer Method
private static void CreateActionInvokerTracer(HttpConfiguration configuration, ITraceWriter traceWriter) {
    IHttpActionInvoker service = TraceManager.GetService<IHttpActionInvoker>(configuration.Services);
    if (service == null || service is HttpActionInvokerTracer)
        return;
    HttpActionInvokerTracer actionInvokerTracer = new HttpActionInvokerTracer(service, traceWriter);
    configuration.Services.Replace(typeof (IHttpActionInvoker), (object) actionInvokerTracer);
}
First, the CreateActionInvokerTracer method reads the IHttpActionInvoker instance from the configuration’s list of registered services. If that instance is not null or is not already of the type HttpActionInvokerTracer, a new instance of HttpActionInvokerTracer is created, with the original IHttpActionInvoker service instance and the ITraceWriter instance parameter as constructor parameters. The original IHttpActionInvoker instance is then replaced by the HttpActionInvokerTracer in the configuration’s services collection.
Listing 18-6 shows the signature of the HttpActionInvokerTracer class whose instance was created in Listing 18-5.
Listing 18-6. ActionInvokerTracer Class Signature
internal class HttpActionInvokerTracer : IHttpActionInvoker {

    public HttpActionInvokerTracer(
        IHttpActionInvoker innerInvoker,
        ITraceWriter traceWriter) {}

    Task<HttpResponseMessage> IHttpActionInvoker.InvokeActionAsync(
        HttpActionContext actionContext,
                CancellationToken cancellationToken) {
    }
}
The HttpActionInvokerTracer class implements the IHttpActionInvoker interface. It’s necessary to do so to be able to replace the original HttpActionInvoker service (shown in Listing 18-5) that also implements this interface. Listing 18-6 also shows the signature of the constructor that expected the original HttpActionInvoker and the ITraceWriter implementation from the Web API application configuration. The InvokeActionAsync method is the implementation of the InvokeActionAsync method of the IHttpActionInvoker interface that is implemented by the HttpActionInvokerTracer class.
The constructor of the HttpActionInvokerTracer class passes its parameters only to private fields, so we won’t explain that action in a dedicated listing.
The important part of the HttpActionInvokerTracer class happens in the InvokeActionAsync method, as Listing 18-7 shows.
Listing 18-7. InvokeActionAsync Method of the HttpActionInvokerTracer Class
Task<HttpResponseMessage> IHttpActionInvoker.InvokeActionAsync(HttpActionContext actionContext, CancellationToken cancellationToken) {
    if (actionContext == null) {
        throw new ArgumentNullException("actionContext");
    }

    return _traceWriter.TraceBeginEndAsync<HttpResponseMessage>(
        actionContext.ControllerContext.Request,
        TraceCategories.ActionCategory,
        TraceLevel.Info,
        _innerInvoker.GetType().Name,
        InvokeActionAsyncMethodName,
        beginTrace: (tr) => {
            tr.Message = Error.Format(
                SRResources.TraceActionInvokeMessage,
                .FormattingUtilities
                    .ActionInvokeToString(actionContext));
        },
        execute:
            () => (Task<HttpResponseMessage>)
                _innerInvoker.InvokeActionAsync(actionContext,
                cancellationToken),
        endTrace: (tr, result) => {
            HttpResponseMessage response = result;
            if (response != null) {
                tr.Status = response.StatusCode;
            }
        },
        errorTrace: null);
}
The InvokeActionAsync method in Listing 18-7 consists of five steps that exist in similar form in each of the tracer wrapper instances created in Listing 18-4.
- First, a call to the TraceBeginEndAsync<HttpResponseMessage> method is made. The following steps create the parameters for that method call itself.
- The second step is to create the beginTrace Action delegate. This contains a TraceRecord instance, with its message set to the name of the controller’s action and its parameters.
- As a third step, the execute Func delegate is created. This gets assigned the InvokeActionAsync method of the original HttpActionInvoker instance that has been passed in as a parameter to the HttpActionInvokerTracer constructor.
- The fourth step is similar to the second, but it creates the endTrace Action delegate. It gets assigned the StatusCode of the HttpResponseMessage returned from the controller’s action.
- The last step is pretty simple: it creates the errorTrace Action delegate, which is null. In another implementation, this delegate could contain the action to invoke if an error was encountered performing the operation.
The TraceBeginEndAsync<HttpResponseMessage> method from the first step is an extension of the ITraceWriterExtensions class. It is responsible for injecting the properties into the TraceRecord instances at runtime and invoking the concrete logger implementation with those instances. Furthermore, it wraps the execute Func delegate in a try/catch block and executes it.
As the method itself is a bit lengthy, we’ll split it in sections to explain it, starting with the part that handles the beginTrace Action delegate being passed in as a parameter (see Listing 18-8).
Listing 18-8. Handling of the beginTrace Action Delegate in TraceBeginEndAsync Method
if (traceWriter == null)
    throw Error.ArgumentNull("traceWriter");

if (execute == null)
    throw Error.ArgumentNull("execute");

traceWriter.Trace(
    request,
    category,
    level,
    (TraceRecord traceRecord) => {
        traceRecord.Kind = TraceKind.Begin;
        traceRecord.Operator = operatorName;
        traceRecord.Operation = operationName;
        if (beginTrace != null) {
            beginTrace(traceRecord);
        }
    }
);
After checking the passed-in traceWriter and execute Func delegate against null, the method calls the trace writer’s Trace method (to be covered in detail in the next section), injects the properties to the TraceRecord instance, and invokes the beginTrace method, with that instance as a parameter. This writes the begin-trace information to the selected trace log destination.
After writing the begin-trace information to the log, next is the execution of the execute Func delegate. As already explained, the delegate is wrapped in a try/catch block not only to log the begin- and end-trace information but also to log exceptions occurring during the execute operation.
First, let’s look at the try block of the try/catch section (see Listing 18-9).
Listing 18-9. try Block of the TraceBeginEndAsync Method
Task<TResult> task =execute();
if (task == null) {
    return task;
}

return task
    .Then<TResult, TResult>((result) => {
        traceWriter.Trace(
            request,
            category,
            level,
            (TraceRecord traceRecord) => {
                traceRecord.Kind = TraceKind.End;
                traceRecord.Operator = operatorName;
                traceRecord.Operation = operationName;
                if (endTrace != null) {
                    endTrace(traceRecord, result);
                }
            });

        return result;
    })

    .Catch<TResult>((info) => {
        traceWriter.Trace(
            request,
            category,
            TraceLevel.Error,
            (TraceRecord traceRecord) => {
                traceRecord.Kind = TraceKind.End;
                traceRecord.Exception = info.Exception.GetBaseException();
                traceRecord.Operator = operatorName;
                traceRecord.Operation = operationName;
                if (errorTrace != null) {
                    errorTrace(traceRecord);
                }
            });

        return info.Throw();
    })

    .Finally(() => {
        if (task.IsCanceled) {
            traceWriter.Trace(
                request,
                category,
                TraceLevel.Warn,
                (TraceRecord traceRecord) => {
                    traceRecord.Kind = TraceKind.End;
                    traceRecord.Operator = operatorName;
                    traceRecord.Operation = operationName;
                    traceRecord.Message = SRResources.TraceCancelledMessage;
                    if (errorTrace != null) {
                        errorTrace(traceRecord);
                    }
                });
        }
    });
At the beginning of the try block, the execute Action delegate is invoked, and its returning Task object is then checked against null. If the Task instance is null, the tracing code is stopped, and everything behaves as if tracing were not enabled. If the Task instance is not null, it is returned with three continuations defined thus: Then, Catch, and Finally. Each invokes a call to the trace writer’s Trace method, with the TraceRecord instance being created with the appropriate parameters. When the task is executed, the way the trace writer then writes the trace log depends on the result of the task operation.
Example: Microsoft.AspNet.WebApi.Tracing
Now that the theory of ASP.NET Web API tracing has been gone into and you know how it works under the hood, you might be interested to see it in action. By default, ASP.NET Web API doesn’t provide trace writers, but the ASP.NET Web API Team has created a NuGet package named Microsoft.AspNet.WebApi.Tracing. You can install it by running Install-Package Microsoft.AspNet.WebApi.Tracing on the NuGet Package Manager Console.
![]() Note At the time of writing, this NuGet package was in prerelease. If it is still in prerelease as you read this, you will need to use the –pre switch with the Install-Package command Microsoft.AspNet.WebApi.Tracing -pre.
Note At the time of writing, this NuGet package was in prerelease. If it is still in prerelease as you read this, you will need to use the –pre switch with the Install-Package command Microsoft.AspNet.WebApi.Tracing -pre.
After installing the package, you will see that a file named TraceConfig.cs has been added in your App_Start folder. Its content is shown in Listing 18-10.
Listing 18-10. TraceConfig.cs of the Microsoft.AspNet.WebApi.Tracing
public static class TraceConfig {
    public static void Register(HttpConfiguration configuration) {
        if (configuration == null) {
            throw new ArgumentNullException("configuration");
        }

        var traceWriter =
            new SystemDiagnosticsTraceWriter() {
                MinimumLevel = TraceLevel.Info,
                IsVerbose = false
            };

        configuration.Services.Replace(typeof (ITraceWriter), traceWriter);
    }
}
As Listing 18-10 shows, the created SystemDiagnosticsTraceWriter instance replaces the registered ITraceWriter instance (which is null at that moment) in the Services collection of the Web API configuration. Remember, that’s the point that indicates to the TraceManager whether to enable tracing or not.
In order to get the tracing up and running, the TraceConfig.Register method needs to be invoked from the applications configuration (see Listing 18-11).
Listing 18-11. Registering the TraceConfig
public static class WebApiConfig {
    public static void Register(HttpConfiguration config) {
        RouteConfig.Register(config);
        TraceConfig.Register(config);
    }
}
If you hit F5 in Visual Studio now and point your browser to the URI http://localhost:11850/api/values/5, you’ll get the output in the Output Window in Visual Studio.
iisexpress.exe Information: 0 : Request, Method=GET, Url= http://localhost:11850/api/values/5 , Message=' http://localhost:11850/api/values/5 '
iisexpress.exe Information: 0 : Message='Values', Operation=DefaultHttpControllerSelector.SelectController
iisexpress.exe Information: 0 : Message='WebApiTracing.Controllers.ValuesController', Operation=DefaultHttpControllerActivator.Create
iisexpress.exe Information: 0 : Message='WebApiTracing.Controllers.ValuesController', Operation=HttpControllerDescriptor.CreateController
iisexpress.exe Information: 0 : Message='Selected action 'Get(Int32 id)'', Operation=ApiControllerActionSelector.SelectAction
iisexpress.exe Information: 0 : Message='Parameter 'id' bound to the value '5'', Operation=ModelBinderParameterBinding.ExecuteBindingAsync
iisexpress.exe Information: 0 : Message='Model state is valid. Values: id=5', Operation=HttpActionBinding.ExecuteBindingAsync
iisexpress.exe Information: 0 : Message='Action returned 'value'', Operation=ReflectedHttpActionDescriptor.ExecuteAsync
iisexpress.exe Information: 0 : Message='Will use same 'XmlMediaTypeFormatter' formatter', Operation=XmlMediaTypeFormatter.GetPerRequestFormatterInstance
iisexpress.exe Information: 0 : Message='Selected formatter='XmlMediaTypeFormatter', content-type='application/xml; charset=utf-8'', Operation=DefaultContentNegotiator.Negotiate
iisexpress.exe Information: 0 :Operation=ApiControllerActionInvoker.InvokeActionAsync, Status=200 (OK)
iisexpress.exe Information: 0 : Operation=ValuesController.ExecuteAsync, Status=200 (OK)
iisexpress.exe Information: 0 : Response, Status=200 (OK), Method=GET, Url= http://localhost:11850/api/values/5 , Message='Content-type='application/xml; charset=utf-8', content-length=unknown'
iisexpress.exe Information: 0 : Operation=XmlMediaTypeFormatter.WriteToStreamAsync
iisexpress.exe Information: 0 : Operation=ValuesController.Dispose
The log shows the output of all registered tracers. The output set in boldface shows the trace information being crafted in the HttpControllerActionInvokerTracer, which was dissected earlier in this chapter.
In this section, about the tracing mechanism in ASP.NET Web API, you have learned how the mechanism works under the hood and how it differs from classic tracing approaches—and you have seen it in action. One thing ignored until now—but already seen in a few places—is the piece of code that actually does the logging to a specific location, be it a log file or another form of event log. Let’s head over to the ITraceWriter interface and change that.
ITraceWriter
In the last few paragraphs you have seen that you can get tracing up and running in an ASP.NET Web API application without knowing how it works or even implementing a trace writer when using the Microsoft.AspNet.WebApi.Tracing NuGet package. This is OK for fast results but not for most real-world scenarios, as you might want to log to other targets (like files or databases) as well, and that requires having more details about ASP.NET Web API tracing. We’ll now create a trace writer that allows logging the trace output being created inside the already seen tracer wrapper class to the Windows console.
The core of each trace writer implementation is the ITraceWriter interface (see Listing 18-12), which has to be implemented by our trace writer.
Listing 18-12. The ITraceWriter Interface
public interface ITraceWriter {
    void Trace(HttpRequestMessage request, string category, TraceLevel level, Action<TraceRecord> traceAction);
}
The interface defines only one method: Trace, which you’ve already seen in use (for example, in Listing 18-9). This method expects four parameters, of which the first is the current request made from the client. The category and the level parameters allow you to categorize the trace record and define its severity. The last parameter, traceAction delegate, allows you to pass in code that configures the TraceRecord being written to the trace log.
The TraceRecord has several properties you can use to create a comprehensive trace log. The implementation of TraceRecord is shown in Listing 18-13.
Listing 18-13. TraceRecord Implementation
public class TraceRecord {
    private Lazy<Dictionary<object, object>> _properties = new Lazy<Dictionary<object, object>>(
        () => new Dictionary<object, object>());

    public TraceRecord(HttpRequestMessage request, string category, TraceLevel level) {
        Timestamp = DateTime.UtcNow;
        Request = request;
        RequestId = request != null ? request.GetCorrelationId() : Guid.Empty;
        Category = category;
        Level = level;
    }

    public string Category { get; set; }
    public Exception Exception { get; set; }
    public TraceKind Kind { get; set; }
    public TraceLevel Level { get; set; }
    public string Message { get; set; }
    public string Operation { get; set; }
    public string Operator { get; set; }
    public Dictionary<object, object> Properties {
        get { return _properties.Value; }
    }
    public HttpRequestMessage Request { get; private set; }
    public Guid RequestId { get; private set; }
    public HttpStatusCode Status { get; set; }
    public DateTime Timestamp { get; private set; }
}
As you can see, some of the mandatory properties are created inside the constructor of TraceRecord. Properties are not available until after the instantiation of TraceRecord, like the Message or the Operation, are set from within the code that makes the call to the ITraceWriter instance later on.
Now there is a good foundation upon which to implement our console window trace writer. Listing 18-14 shows the implementation of the ConsoleTraceWriter class.
Listing 18-14. ConsoleTraceWriter Implementation
public class ConsoleTraceWriter : ITraceWriter {
    public void Trace(HttpRequestMessage request, string category,
                        TraceLevel level, Action<TraceRecord> traceAction) {
        var traceRecord = new TraceRecord(request, category, level);
        traceAction(traceRecord);
        traceToConsole(traceRecord);
    }

    private void traceToConsole(TraceRecord traceRecord) {
        Console.WriteLine(
            "{0} {1}: Category={2}, Level={3} {4} {5} {6} {7}",
            traceRecord.Request.Method,
            traceRecord.Request.RequestUri,
            traceRecord.Category,
            traceRecord.Level,
            traceRecord.Kind,
            traceRecord.Operator,
            traceRecord.Operation,
            traceRecord.Exception != null
                ? traceRecord.Exception.GetBaseException().Message
                : !string.IsNullOrEmpty(traceRecord.Message)
                        ? traceRecord.Message
                        : string.Empty
            );
    }
}
The Trace method implementation first creates a new TraceRecord instance and hands it over to the traceAction callback method. After that, it logs all available TraceRecord properties to the Windows console window.
As hosting in IIS does not allow showing a console window, let’s instead create a self-host environment to see the ConsoleTraceWriter in action. The required code is shown in Listing 18-15.
Listing 18-15. A Console Application to Host ASP.NET Web API Using ConsoleTraceWriter
internal class Program {
    private static void Main(string[] args) {
        var config = new HttpSelfHostConfiguration("http://localhost:8080");

        config.Routes.MapHttpRoute(
            name: "DefaultApi",
            routeTemplate: "api/{controller}/{id}",
            defaults: new {id = RouteParameter.Optional}
            );

        var traceWriter = new ConsoleTraceWriter();
        config.Services.Replace(typeof (ITraceWriter), traceWriter);

        using (var server = new HttpSelfHostServer(config)) {
            server.OpenAsync().Wait();
            Console.WriteLine("Press Enter to quit.");
            Console.ReadLine();
        }
    }
}
After creating a new self-hosting configuration and assigning the default Web API route definition to it, the ConsoleTraceWriter is also added to the configuration. Running the self-host Web API server and pointing the browser tohttp://localhost:8080/api/values/ gives the output shown in Figure 18-1.
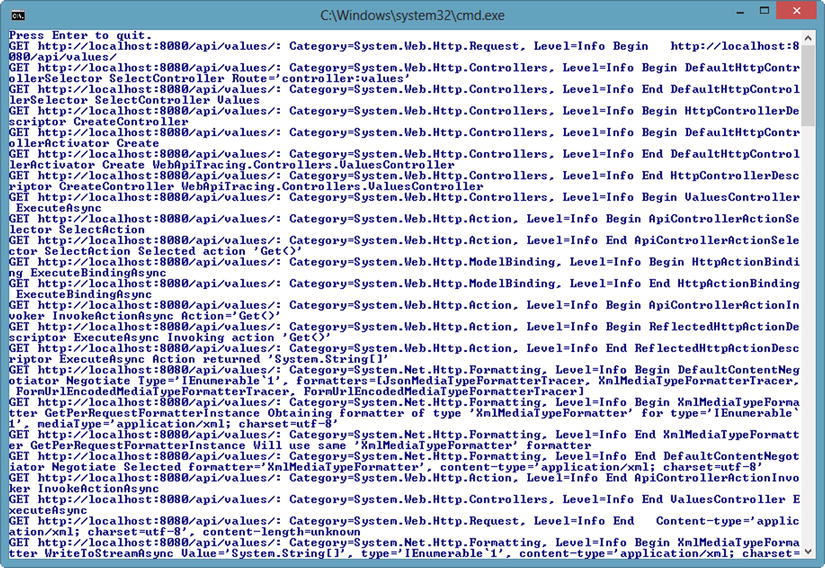
Figure 18-1. Trace output in a self-host environment using ConsoleTraceWriter
The output looks pretty much the same as that from the Microsoft.AspNet.WebApi.Tracing package despite its being shown inside a Windows console window instead of the Visual Studio output window.
Besides the Visual Studio output window and the Windows console window, there are many more options to which you might want to write your trace output. One drawback of the approaches taken in the last two samples is that, depending on the output target, the configuration of our Web API application had to be changed. To solve that problem, a generic ITraceWriter could be implemented. It would allow logging on to any arbitrary tracing target you might want to write the trace output to. That would imply writing implementations for each output target—quite an effort! To get rid of that complexity, let’s consider taking another approach: reusing an existing tracing framework and wrapping it in an ITraceWriter implementation. Indeed, that’s what the next section is about.
ITraceWrite Implementation Using NLog
Depending on the output target and the hosting environment chosen for your ASP.NET Web API application, the ITraceWriter implementation might vary. To have instead a generic implementation for all types of hosting scenarios and output targets, you’ll need to wrap an existing tracing framework in an ITraceWriter implementation. The framework chosen here, NLog, is a popular open-source logging framework for the .NET platform. NLog allows you to write its output to the following targets:
- files
- event log
- database
- network
- Windows command window
Furthermore, you can add more output providers to write to other targets not listed here. NLog allows writing to custom targets by implementing a class that derives from the NLog.TargetWithLayout class and overrides its Write method. That custom target then has to be referenced as an extension inside the NLog configuration section in your application configuration file (web.config or app.config).
To use NLog for our ITraceWriter implementation, it has to be added to the current project using the NuGet command line: Install-Package NLog. Now let’s head over to the implementation of our NLogTraceWriter class and explore it in sections, starting with the Trace method (see Listing 18-16).
Listing 18-16. The Trace Method of the NLogTraceWriter Class
public class NLogTraceWriter : ITraceWriter {
    public void Trace(
        HttpRequestMessage request,
        string category,
        TraceLevel level,
        Action<TraceRecord> traceAction) {
            if (level == TraceLevel.Off) return;
            var record = new TraceRecord(request, category, level);
            traceAction(record);
            logToNLog(record);
    }
}
The Trace method of the NLogTraceWriter implementation looks quite similar to the ones seen before. The main difference is the call to the logToNLog method, which is shown in Listing 18-17.
Listing 18-17. The logToNLog Method of the NLogTraceWriter Class
private void logToNLog(TraceRecord traceRecord) {
    var messageBuilder = new StringBuilder();

    if (traceRecord.Request != null) {
        if (traceRecord.Request.Method != null) {
            messageBuilder.Append(" " + traceRecord.Request.Method);
        }

        if (traceRecord.Request.RequestUri != null) {
            messageBuilder.Append(" " + traceRecord.Request.RequestUri);
        }
    }

    if (!string.IsNullOrWhiteSpace(traceRecord.Category)) {
        messageBuilder.Append(" " + traceRecord.Category);
    }

    if (!string.IsNullOrWhiteSpace(traceRecord.Operator)) {
        messageBuilder.Append(" " + traceRecord.Operator + " " + traceRecord.Operation);
    }

    if (!string.IsNullOrWhiteSpace(traceRecord.Message)) {
        messageBuilder.Append(" " + traceRecord.Message);
    }

    if (traceRecord.Exception != null) {
        messageBuilder.Append(traceRecord.Exception.GetBaseException().Message);
    }

    currentLogger[traceRecord.Level](messageBuilder.ToString());
}
The logToNLog method mainly joins all traceRecord properties into a single message string, which then gets handed over to the currentLogger method, which writes to the event log. The currentLogger method is a Dictionary<TraceLevel, Action<string>> that selects the method—Info(), Error(), or the like—to call on the current NLog logger instance based on the TraceRecord instance’s Level property. The implementation is shown in Listing 18-18.
Listing 18-18. Mapping of TraceRecord Levels to NLog Logger Methods
private static readonly Lazy<Dictionary<TraceLevel, Action<string>>> Loggers =
    new Lazy<Dictionary<TraceLevel, Action<string>>>(() =>
        new Dictionary<TraceLevel, Action<string>> {
            { TraceLevel.Debug, LogManager.GetCurrentClassLogger().Debug },
            { TraceLevel.Error, LogManager.GetCurrentClassLogger().Error },
            { TraceLevel.Fatal, LogManager.GetCurrentClassLogger().Fatal },
            { TraceLevel.Info, LogManager.GetCurrentClassLogger().Info },
            { TraceLevel.Warn, LogManager.GetCurrentClassLogger().Warn }
        });

private Dictionary<TraceLevel, Action<string>> currentLogger {
    get { return Loggers.Value; }
}
The Loggers property, which is of the type Lazy<Dictionary<TraceLevel, Action<string>>>, maps the enumeration elements of the TraceLevel enum to the matching method of the Logger instance being returned from the LogManager.GetCurrentClassLogger() method. The currentLogger property then selects the appropriate value based on the TraceLevel being provided as key.
The registration of the NLogTraceWriter is very similar to others already seen. Listing 18-19 shows the registration inside the TraceConfig class.
Listing 18-19. Registering the NLogTraceWriter Using the TraceConfig Class
public static class TraceConfig {
    public static void Register(HttpConfiguration configuration) {
        if (configuration == null) {
            throw new ArgumentNullException("configuration");
        }

        var traceWriter =
            new NLogTraceWriter();

        configuration.Services.Replace(typeof (ITraceWriter), traceWriter);
    }
}
At the beginning of this section, it was noted that NLog allows logging against different log targets. You might wonder where to tell NLog which one to use for our sample application. NLog uses the application configuration to store that information. So before being able to log anything, you need to update web.config (or app.config if you’re self-hosting) accordingly. NLog expects the application configuration file to have a section of the type NLog.Config.ConfigSectionHandler providing information about the targets to use and the rules being applied to the loggers. Listing 18-20 shows the relevant web.config fragments (they could also be used in an app.config file).
Listing 18-20. Configuration of the Logging Targets and Rules for NLog in web.config
<configuration>
  <configSections>
    <section name="nlog" type="NLog.Config.ConfigSectionHandler, NLog"/>
  </configSections>
  <nlog xmlns:xsi="http://www.w3.org/2001/XMLSchema-instance">
    <targets>
      <target name="logfile"
                xsi:type="File"
                fileName="${basedir}/${date:format=yyyy-MM-dd}.WebApiNLogTracing.log" />
      <target name="eventlog"
                xsi:type="EventLog"
                layout="${message}" log="Application" source="WebApiNLogTracing Application" />
    </targets>
    <rules>
      <logger name="*" minlevel="Trace" writeTo="logfile" />
      <logger name="*" minlevel="Trace" writeTo="eventlog" />
    </rules>
  </nlog>
</configuration>
First, the required NLog configuration section is created. Inside that section, two targets, logfile and eventlog, are created. The former logs to a file, and the latter logs to the Windows event log. The logfile is configured to name the file with the current date followed by the name of the application. The eventlog is configured to write, as is, the Message of the Logger to the Application section inside the Windows event log. The source of the event log entry identifies our application.
The Rules section of the NLog configuration applies two rules to all Logger instances and both targets and sets the minimum trace level in order to trace which one causes NLog to create a verbose log file or event log.
Since the logfile was defined to be written in the root of our applications directory, writing to that file works without any issues, as the user context is the same as that for the application. When trying to write to the event log using the credentials of your application, you might encounter the problem that no event log entry is created. This might occur because your application needs to be registered as an event source, and your credentials might not allow you to do that. Explaining how to create an event source would extend the scope of this book, but Microsoft provides a support document that describes how to write to an event log by creating an event source: http://support.microsoft.com/kb/307024/en-us. A quick workaround is to start Visual Studio as an administrator and run the application from within Visual Studio. Doing so creates the log file containing ASP.NET Web API trace messages, as well as the Windows event log entries. Figure 18-2 shows the log file in the root folder of the application, and Figure 18-3 shows the event log entries being created during the same requests.
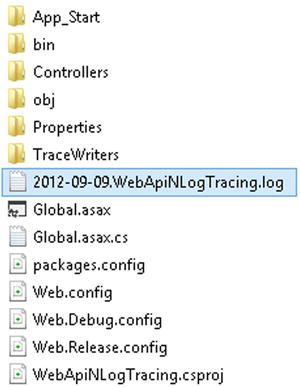
Figure 18-2. Trace log file created by the NLogTraceWriter
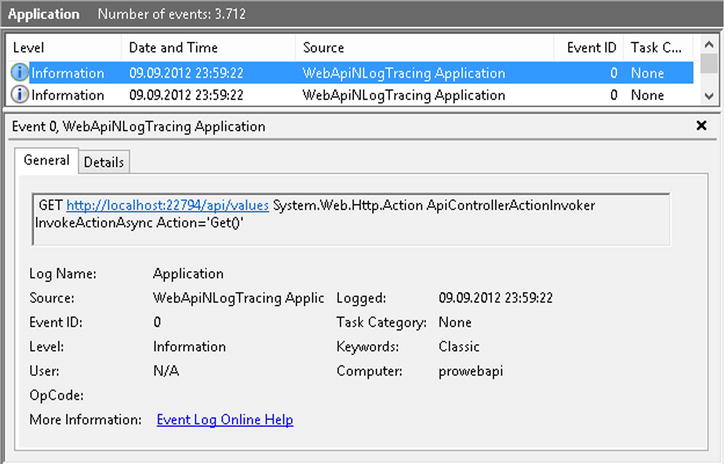
Figure 18-3. Event log entry created by the NLogTraceWriter
The NLogTraceWriter implementation in this section gives a way of tracing information to different targets (a way agnostic to a logging target) by registering the ITraceWriter implementation only once. Relevant changes can be made to the web.config or app.config without the need to change our code and recompile the application just for the purpose of changing the type of logging.
The last three sections have shown how to trace and log information from within the default services of ASP.NET Web API. Of course, the ITraceWriter implementation inside our own application code can also be used. How to do so will be the focus of the next section.
Using ITraceWriter in User Code
ASP.NET Web API traces information about the “infrastructure” of an ASP.NET Web API application when tracing is enabled. Many details can be read from that information but at times you may want to log even more details, especially about code specific to your own application.
Due to the way tracing works in ASP.NET Web API, you can also use the configured trace writer inside your own code. Listing 18-21 shows how to do so inside a controller action.
Listing 18-21. Using the ITraceWriter Instance Inside a Controllers Action
public IEnumerable<string> Get() {
    var traceWriter = Configuration.Services.GetTraceWriter();
    if(null != traceWriter) {
        traceWriter.Trace(Request, "WebApiNLogTracing.Controllers",
            TraceLevel.Info,
            (traceRecord) => {
                    traceRecord.Message = "Read all values.";
                });
    }
    return new string[] {"value1", "value2"};
}
After getting the ITraceWriter instance from the application configuration (when tracing is enabled, that is), a TraceRecord is wired up and written to the configured target. Listing 18-22 shows the log file entry being created by a request to the controller action from Listing 18-21.
Listing 18-22. Log File Entry Being Created Inside a Controllers Action
2012-09-10 00:29:21.8747|INFO|WebApiNLogTracing.TraceWriters.NLogTraceWriter| GET http://localhost:22794/api/valuesWebApiNLogTracing.Controllers Read all values.
As it’s cumbersome to constantly write traceWriter.Trace and then provide the TraceLevel parameter, the ASP.NET Web API team created the ITraceWriterExtensions class, which provides a few shorter methods with which to use the ITraceWriter. One example that uses the .Debug extension method is shown in Listing 18-23.
Listing 18-23. Using the .Debug Extension Method for ITraceWriter in a Controllers Action
public string Get(int id) {
    var traceWriter = Configuration.Services.GetTraceWriter();
    if (traceWriter != null) {
        traceWriter.Debug(Request, "WebApiNLogTracing.Controllers",
                        string.Format("Read value {0}", id));
    }
    return "value";
}
When pointing your browser to the URI http://localhost:22794/api/values/5, you find the corresponding entry in your log file. As said, the ITraceWriterExtensions class provides some more useful methods, which you can easily explorer using Visual Studio IntelliSense.
You have already seen that ASP.NET Web API provides a well-thought-out, unobtrusive, and extensible way to add tracing to your ASP.NET Web API application. If tracing is not enabled, the impact on performance is close to zero, as no code aware of tracing is executed after application configuration initialization. Furthermore, the tracing framework provided is reusable in the code inside your Web API application, and it can be used in conjunction with your preferred logging framework.
Now, as promised, let’s continue with the documentation of ASP.NET Web API applications.
Documenting Your Web API
When creating a public HTTP API using ASP.NET Web API, in the end you are creating web services. People with backgrounds in classic .NET web services technologies like ASP.NET Web Services (ASMX) and Windows Communication Foundation (WCF) are used to having their public web services API-documented automatically by implementing those services. ASMX and WCF create a web page for each service, where the web service description language (WSDL) file is wrapped visually in an HTML page to provide information about the web service and its methods and parameters. The WSDL file is also available, and so the client proxy code can be created from that definition as well.
Due to the different approach in HTTP applications, wherein the server and client can evolve independently, it is not mandatory to provide a file on the server that describes methods and parameters for the client. Of course, the developer implementing the client needs that information anyway. A common practice here is to provide some static HTML pages describing the HTTP methods, URI templates, media types, and parameters supported by the API. Often these files are created by hand, a cumbersome and error-prone method.
When ASP.NET Web API first became publicly available in beta state, people who had an ASMX and WCF web services background started complaining about the additional work. The ASP.NET Web API team, which lent a sympathetic ear to the community from the framework’s earliest days, came up with a solution for ASP.NET Web API, one that allows you to create documentation for your Web API in a simple and easy-to-modify way.
Before digging deeper into API documentation, let’s first create a small API that allows creation, updating, and deletion of cars, one that’s also able to get a specific car or a list of all cars. Then let’s create the documentation for that API based on the mechanism ASP.NET Web API provides to do just that.
The API providing the typical CRUD functionality is pretty simple, as has earlier been stressed several times. The Car class in Listing 18-24 is the same one encountered in previous samples.
Listing 18-24. A Car Class Implementation
public class Car {
    public int Id { get; set; }
    public string Make { get; set; }
    public string Model { get; set; }
    public int Year { get; set; }
    public float Price { get; set; }
}
Listing 18-25 shows the CarsController implementation for which the documentation is to be created.
Listing 18-25. A Controller Handling Some Operations Using the Car Class
public class CarsController {
    private readonly List<Car> _cars;

    public CarsController() {
        _cars = new List<Car>() {
            new Car() {
                Id = 17,
                Make = "VW",
                Model = "Golf",
                Year = 1999,
                Price = 1500f
            },
            new Car() {
                Id = 30,
                Make = "Mercedes",
                Model = "A-Class",
                Year = 2007,
                Price = 10000f
            }
        };
    }

    public List<Car> Get() {
        return _cars;
    }

    public Car Post(Car car) {
        car.Id = _cars.Max(c => c.Id) + 1;
        _cars.Add(car);
        return car;
    }

    public Car Get(int id) {
        return _cars.FirstOrDefault(c => c.Id == id);
    }

    public Car Put([FromUri] int id, Car car) {
        _cars[_cars.FindIndex(c => c.Id == id)] = car;
        return car;
    }

    public HttpResponseMessage Delete(int id) {
        _cars.RemoveAt(_cars.FindIndex(c => c.Id == id));
        return new HttpResponseMessage(HttpStatusCode.NoContent);
    }
}
The implementation in Listing 18-25 is straightforward but, alas, not really useful in a real-world scenario. But it fits well and shows the “automatic” generation of API documentation in ASP.NET Web API as it implements several actions that provide return values and expect parameters to be passed in. Before generating an API documentation automatically, let’s create it by hand to show what the ASP.NET Web API documentation mechanism is expected to create.
Documenting an HTTP API by Hand
It’s common for a lot of developers of public HTTP applications to create the documentation by hand. As it’s desirable to have some sort of a template for our automatically created documentation in this chapter’s next section, let’s first do documentation by hand for our CarsController and its operations. The requirements are to show
- the name of the resource being handled in the operations (here it’s Car);
- the HTTP methods being supported and the URI templates for those operations;
- the URI and body parameters for those operations;
- a sample response for the supported media types;
- a plain-text description for each operation and its parameters.
The documentation shown in Listing 18-26 fulfills all these requirements.
Listing 18-26. A Complete, Handcrafted Documentation for the cars API
Cars
GET api/Cars
application/json Sample response body
[{"Id":17,"Make":"VW","Model":"Golf","Year":1999,"Price":1500.0},{"Id":24,"Make":"Porsche","Model":"911","Year":2011,"Price":100000.0}]

text/xml Sample response body
<ArrayOfCar xmlns:i="http://www.w3.org/2001/XMLSchema-instance" xmlns="http://schemas.datacontract.org/2004/07/WebApiDocumentation.Entities"><Car><Id>17</Id><Make>VW</Make><Model>Golf</Model><Price>1500</Price><Year>1999</Year></Car><Car><Id>24</Id><Make>Porsche</Make><Model>911</Model><Price>100000</Price><Year>2011</Year></Car></ArrayOfCar>

GET api/Cars/{id}
Gets a car by its ID.

Parameter: id (FromUri): The ID of the car.

application/json Sample response body
{"Id":17,"Make":"VW","Model":"Golf","Year":1999,"Price":1500.0}

text/xml Sample response body
<Car xmlns:i="http://www.w3.org/2001/XMLSchema-instance" xmlns="http://schemas.datacontract.org/2004/07/WebApiDocumentation.Entities"><Id>17</Id><Make>VW</Make><Model>Golf</Model><Price>1500</Price><Year>1999</Year></Car>

POST api/Cars
Parameter: car (FromBody):

application/json Sample response body
{"Id":17,"Make":"VW","Model":"Golf","Year":1999,"Price":1500.0}

text/xml Sample response body
<Car xmlns:i="http://www.w3.org/2001/XMLSchema-instance" xmlns="http://schemas.datacontract.org/2004/07/WebApiDocumentation.Entities"><Id>17</Id><Make>VW</Make><Model>Golf</Model><Price>1500</Price><Year>1999</Year></Car>

PUT api/Cars/{id}
Parameter: id (FromUri):

Parameter: car (FromBody):

application/json Sample response body
{"Id":17,"Make":"VW","Model":"Golf","Year":1999,"Price":1500.0}

text/xml Sample response body
<Car xmlns:i="http://www.w3.org/2001/XMLSchema-instance" xmlns="http://schemas.datacontract.org/2004/07/WebApiDocumentation.Entities"><Id>17</Id><Make>VW</Make><Model>Golf</Model><Price>1500</Price><Year>1999</Year></Car>

DELETE api/Cars/{id}
Parameter: id (FromUri):
Even though the operations and implementation of the controller are pretty simple, crafting and keeping its documentation can become a hard job—and might be error-prone as well. So let’s get this job automated and keep our heads free for the implementations of APIs in the future.
Documenting an HTTP API Using ApiExplorer
Having created an API documentation by hand, let’s see what ASP.NET Web API can do. The core of the ASP.NET Web API documentation mechanism is the ApiExplorer class, which implements the IApiExplorer interface. This interface, as Listing 18-27 shows, has only one property that has to be implemented by a derived type: the generic ApiDescriptions collection.
Listing 18-27. The IApiExplorer Interface
public interface IApiExplorer {
    Collection<ApiDescription> ApiDescriptions { get; }
}
The ApiDescription class itself contains the description for an API being defined by a relative URI and an HTTP method. The primary goal of an IApiExplorer implementation is to provide a collection of all API descriptions being implemented in an HTTP API application. The ApiExplorer class shipped with ASP.NET Web API is registered as the default IApiExplorer service in the application configuration. As with the other default services, ApiExplorer can be replaced by your own implementation. In order to provide the ApiDescription collection, the ApiExplorer, when instantiated, creates that collection and fills it with instances of ApiDescription. The ApiDescription instances are created by querying the ASP.NET Web API configuration and its default services. Some of the services and classes queried for the required information are
- HttpConfiguration.Routes
- HttpControllerSelector
- HttpControllerDescriptor
- HttpActionDescriptor
- HttpParameterDescriptor
- HttpActionBinding
As you might expect, this process is a lengthy one. Describing it in full detail would be beyond the scope of this book. Instead, let’s focus on the results that ApiExplorer has created. At the end of this service-querying process inside its constructor, ApiExplorer has all ApiDescription instances available for use in documenting our API.
Although ASP.NET Web API is hosting layer agnostic, it is a part of the ASP.NET framework stack. So, we can use ASP.NET MVC and ASP.NET Web API inside the same project without any problems. This is pretty handy, as some web application framework that is able to render the output of our ApiExplorer to HTML code is needed. Of course, we choose ASP.NET MVC 4 for that. To create the HTML code, it’s first necessary to create a model class that gets instantiated and assigned to the appropriate view in our ASP.NET MVC controllers action method. The model implementation, contained in the class ApiModel, is shown in Listing 18-28.
Listing 18-28. The ApiModel Class
public class ApiModel {
    private IApiExplorer _explorer;

    public ApiModel(IApiExplorer explorer) {
        if (explorer == null) {
            throw new ArgumentNullException("explorer");
        }
        _explorer = explorer;
    }

    public ILookup<string, ApiDescription> GetApis() {
        return _explorer.ApiDescriptions.ToLookup(
            api => api.ActionDescriptor.ControllerDescriptor.ControllerName);
    }
}
The ApiModel class expects an IApiExplorer instance in its constructor, an instance that is assigned to a private field that is accessed in the GetApis method to return its ApiDescriptions collection items as ILookup<string, ApiDescription>. That collection is created using the ToLookup method, an extension method for IEnumerable<T> that resides in the System.Linq.Enumerable class. The ILookup interface itself defines the properties Count and Item and the method Contains, which can be applied to an IEnumerable<T>. The Item property gets the IEnumerable<T> sequence of values indexed by a specified key. So the ToLookup method applies an index on the ApiDescriptions property of the ApiExplorer instance. This allows use of the ControllerName string property of the ControllerDescriptor class as a key for that indexed collection. Thus, ApiDescriptions can now be accessed in a grouped manner based on the controller name. This may be a bit hard to grasp in theory, so let’s take a look at the Index view for our HomeController (see Listing 18-29). The HomeController is an ASP.NET MVC 4 controller, a type we’ll inspect soon.
Listing 18-29. The Index View for the ASP.NET MVC HomeController
@model WebApiDocumentation.Models.ApiModel

@{
    ViewBag.Title = "API Help";
}

@section Scripts
{
    @Scripts.Render("∼/bundles/jqueryui")
    <script type="text/javascript">
        $(function() { $(".accordion").accordion(); });
    </script>
}

<div id="body" class="content-wrapper">
    <h2>API Help</h2>

    @foreach (varapiDescriptionGroupinModel.GetApis()) {
        <h3>@apiDescriptionGroup.Key</h3>

        <div class="accordion">
            @foreach (varapiinapiDescriptionGroup) {
                <h4><a href="#">@api.HttpMethod @api.RelativePath</a></h4>
                <div>
                    @foreach (varparaminapi.ParameterDescriptions) {
                        <p>Parameter: <em>@param.Name</em> (@param.Source)</p>
                    }
                </div>
            }
        </div>
    }
</div>
The ApiModel class is referenced in the first line of the view using the @model directive, which allows access to its members inside the view. The model can be accessed using the view’s Model property. Previously, when handcrafting our API documentation, we wanted to show the name of the resource as the title for the group of operations possible on the resource. Below the resource name, the list of operations appeared as URI templates, including their parameters and their source.
Look again at Listing 18-28. You’ll see that the ILookup<string, ApiDescription> being returned from the Get Apis method of the ApiModel is used to iterate the groups of API descriptions. As you saw in Listing 18-29, the grouping key of that Lookup is the controller name, and so that name can be written to the HTML output stream using @apiDescriptionGroup.Key. Since the apiDescriptionGroup contains all ApiDescription instances for a particular controller, you can iterate over that collection to get the details for the operations of the controller, whose name was just used as the group title. To create an output similar to the handcrafted version, write out the HttpMethod and the relative URI for each operation. Each ApiDescription contains a list of parameters for each operation. So, iterating again, this time over the ParameterDescriptions collection, allows almost complete documentation for the cars API.
To get the code inside the view working, wire it up with the ApiModel instance inside our HomeController class (see Listing 18-30).
Listing 18-30. Wiring Up ApiModel and the Index View
public class HomeController : Controller {
    public ActionResult Index() {
        var config = GlobalConfiguration.Configuration;
        var explorer = config.Services.GetApiExplorer();
        return View(new ApiModel(explorer));
    }
}
The Index method on the HomeController, which derives from the System.Web.Mvc.Controller base class, gains access to the application configuration first. After querying the registered Services for the ApiExplorer instance, assign that result as the parameter to the ApiModel class, which is itself a parameter for the view to be rendered later on.
Pointing our browser to http://localhost:31438/ gives the API documentation created by the classes described previously. The result can be seen in Figure 18-4.
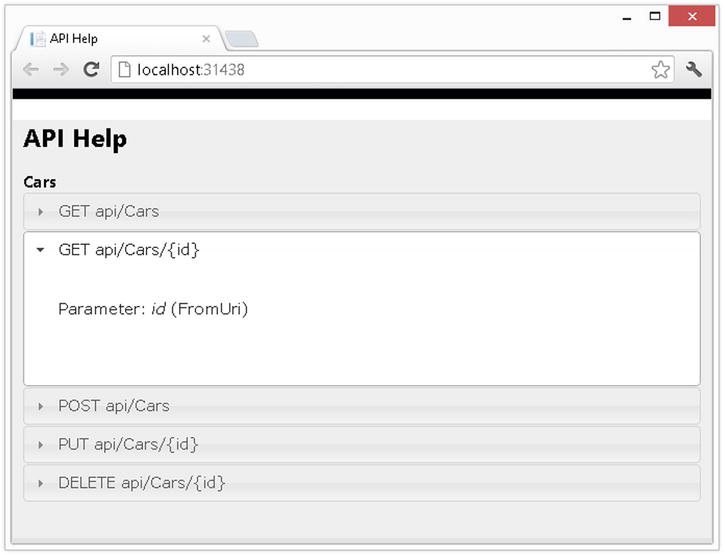
Figure 18-4. Output of the API documentation created by ApiExplorer
Again, when the result in Figure 18-4 is compared with our documentation created by hand, it still lacks two things: the description of the operation and its parameters, as well as the sample response bodies. Let’s start with the latter. The ApiExplorer doesn’t provide any help here, but as ASP.NET Web API already provides everything to create it by ourselves, that’s no problem. One or more sample instances of our resource and its representation, like XML or JSON, are all that are needed. As a MediaTypeFormatter can be used anywhere, simply create the sample response output from the resource class instances in our ApiModel. That’s what Listing 18-31 shows.
Listing 18-31. Creating the Sample Response Data
private static readonly List<Car>_cars= new List<Car>() {
    new Car() {
                Id = 17,
                Make = "VW",
                Model = "Golf",
                Year = 1999,
                Price = 1500f
            },
    new Car() {
                Id = 24,
                Make = "Porsche",
                Model = "911",
                Year = 2011,
                Price = 100000f
            }
};

private Dictionary<Type, object>_sampleData=
    new Dictionary<Type, object>() {
    {typeof (Car), _cars[0]},
    {typeof (List<Car>), _cars}
};

public stringGetSampleResponseBody(ApiDescription api, string mediaType) {
    string body = null;
    Type returnType = GetResponseType(api.ActionDescriptor);

    object o;
    if (returnType != null && _sampleData.TryGetValue(returnType, out o)) {
        var formatters = api.SupportedResponseFormatters;

        MediaTypeFormatter formatter = formatters.FirstOrDefault(
            f => f.SupportedMediaTypes.Any(m => m.MediaType == mediaType));

        if (formatter != null) {
            var content = new ObjectContent(returnType, o, formatter);
            body = content.ReadAsStringAsync().Result;
        }
    }
    return body;
}

private Type GetResponseType(HttpActionDescriptor action) {
    return action.ReturnType;
}
Listing 18-31 consists of three parts: creating a List<Car> named _cars, which contains the sample car resources. The _sampleData Dictionary maps the _cars list to the type of response the CarsController can be: List<Car> or Car. The work of creating the sample is done by the GetSampleResponseBody method, which first tries to find a matching response type for the currently selected operation (that is, the controllers action). If the return type can be determined from the API description and there is a match in the sample data dictionary, the ApiModel tries to find a matching MediaTypeFormatter for that particular return type. If this succeeds also, the MediaTypeFormatter is invoked to deserialize the return type to the requested media type—for example, application/json. To visualize that additional data, let’s update our Index view now and add the code shown in Listing 18-32.
Listing 18-32. Visualizing the Sample Response Bodies
@{
    string jsonResponse = @Model.GetSampleResponseBody(api, "application/json");
    string xmlResponse = @Model.GetSampleResponseBody(api, "text/xml");
}

@if (jsonResponse != null) {
    <h5>application/json Sample response body</h5>
    <p><code>@jsonResponse</code></p>
}

@if (xmlResponse != null) {
    <h5>text/xml Sample response body</h5>
    <p><code>@xmlResponse</code></p>
}
Our reference documentation contained sample response bodies for application/json as well as text/xml media types, so our automatically created documentation should be able to do the same. The code in Listing 18-33 is pretty straightforward in doing that by calling the GetSampleResponseBody method of the ApiModel twice—once for each media type. The results, if available, then are rendered to the HTML output stream.
The updated output of the Index view can be examined in Figure 18-5.
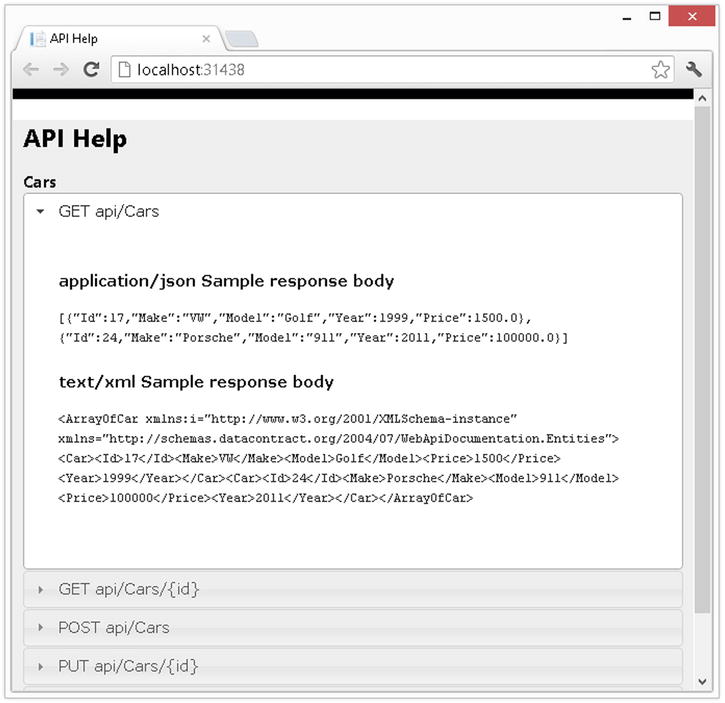
Figure 18-5. Sample response body for application/json and text/xml media types
Although the code shown in the previous listings works fine, there’s one drawback: If the return type of the controllers Action were of type HttpResponseMessage, no sample response output would be shown. But thanks to the ApiDescription class, there’s a simple workaround for that problem. Listing 18-33 shows another mapping and updates our GetResponseType method introduced in Listing 18-31.
Listing 18-33. Improving the Sample Response Output Generation
private static readonly Dictionary<string, Type> _typeMappings =
    new Dictionary<string, Type>() {
        { @"GETapi/Cars/{id}", typeof (Car) }
};

private Type GetResponseType(ApiDescription api) {
    Type t;
    return _typeMappings.TryGetValue(api.ID, out t)
        ? t : api.ActionDescriptor.ReturnType;
}
The dictionary _typeMappings contains a list of elements for which the key is the ID of an API. That ID is available as a property on each ApiDescription instance and is a concatenation of the HTTP method and the relative URI path for that particular API. In our listing, that is GET api/Cars/{id}. The value for the key inside the _typeMappings dictionary is the returned HttpResponseMessage’s value type, which in our sample is Car. The GetResponseType method now tries to get the sample response type from the mapping dictionary. If that fails, it falls back to its already known implementation. If you now change the implementation of the Get(int id) method of the CarsController class, as in Listing 18-34, the documentation will still be created including the sample response bodies already shown in Figure 18-5.
Listing 18-34. Returning an HttpResponseMessage Instead of a Car Instance
public HttpResponseMessage Get(int id) {
    return Request.CreateResponse(HttpStatusCode.OK,
        _cars.FirstOrDefault(c => c.Id == id));
}
Now there is only one thing missing from our API documentation: a text description of each operation and its parameters. As ASP.NET Web API is a sophisticated framework, there’s also a solution available for that. Besides the others already used, the ApiDescription and the ApiParameterDescription classes provide a property named Documentation. These classes are designated to provide the plain-text description for an API or its parameter. This is perfect for our needs, but one question remains: how to populate that information with the description of the API or its parameters, especially since documentations haven’t been defined until now? This problem is solvable with two classes and one interface. The classes are two attributes named ApiDocumentationAttribute and ApiParameterDocumentationAttribute. Both are shown in Listing 18-35.
Listing 18-35. ParameterDocAttribute and ApiParameterDocAttribute
[AttributeUsage(AttributeTargets.Method, AllowMultiple = false)]
public sealed class ApiDocumentationAttribute : Attribute {
    public ApiDocumentationAttribute(string description) {
        Description = description;
    }

    public string Description { get; private set; }
}

[AttributeUsage(AttributeTargets.Method, AllowMultiple = true)]
public sealed class ApiParameterDocumentationAttribute : Attribute {
    public ApiParameterDocumentationAttribute(string parameterName, string description) {
        ParameterName = parameterName;
        Description = description;
    }

    public string ParameterName { get; private set; }

    public string Description { get; private set; }
}
The ApiDocumentationAttribute contains only one property, Description, which is of type string. The ApiParameterDocumentationAttribute instead contains two properties: ParameterName and Description, both also of type string. The ParameterName property has to be provided, as an operation can have multiple parameters and the attribute then has to be applied multiple times to the method, once for each parameter.
The interface provided by ASP.NET Web API for API and parameter documentation purposes is the IDocumentationProvider interface. Its signature is shown in Listing 18-36.
Listing 18-36. The IDocumentationProvider Interface
public interface IDocumentationProvider {
    string GetDocumentation(HttpActionDescriptor actionDescriptor);
    string GetDocumentation(HttpParameterDescriptor parameterDescriptor);
}
The IDocumentationProvider interface defines two methods named GetDocumentation and expects a parameter of type HttpActionDescriptor or HttpParameterDescriptor. This makes sense, as providing documentation strings for APIs (which are the actions in this context) or their parameters is the goal. An implementation of IDocumentationProvider is the AttributeDocumentationProvider class, which can be seen in Listing 18-37.
Listing 18-37. The AttributeDocumentationProvider Implementation
public class AttributeDocumentationProvider : IDocumentationProvider {
    public stringGetDocumentation(HttpActionDescriptor actionDescriptor) {
        var apiDocumentation =
            actionDescriptor
                .GetCustomAttributes<ApiDocumentationAttribute>()
                    .FirstOrDefault();
        if (apiDocumentation != null) {
            return apiDocumentation.Description;
        }

        return string.Empty;
    }

    public stringGetDocumentation(HttpParameterDescriptor paramDescriptor) {
        var parameterDocumentation =
            paramDescriptor
                .ActionDescriptor
                    .GetCustomAttributes<ApiParameterDocumentationAttribute>().
                        FirstOrDefault(
                            param =>
                                param.ParameterName ==
                                    paramDescriptor.ParameterName);
        if (parameterDocumentation != null) {
            return parameterDocumentation.Description;
        }

        return string.Empty;
    }
}
The implementation of both GetDocumentation methods is pretty simple, although they are a bit lengthy and hard to read. The API’s GetDocumentation method queries the HttpActionDescriptor for that particular action (the API) for each applied ApiDocumentationAttribute instance. If it succeeds, it returns the Description property string value from that attribute. The GetDocumentation implementation for the parameters is almost the same: it also queries the HttpActionDescriptor but, of course, for ApiParameterDocumentationAttribute instances. For each instance that matches the parameter’s name—which we defined in the attribute definition on our controllers action method—the string value of the parameter’s Description property is returned.
Although there is now an IDocumentationProvider implementation, our API documentation won’t contain its output for two reasons: the AttributeDocumentationProvider is not registered in the Web API configuration, and the Index view doesn’t use the Documentation properties of the ApiDescription and ApiParameterDescription classes. First, let’s update the Index view, as shown in Listing 18-38.
Listing 18-38. Adding Api and Parameter Documentation to the Index View
<div>
    <p>@api.Documentation</p>
    @foreach (var param in api.ParameterDescriptions) {
        <p>Parameter: <em>@param.Name</em> (@param.Source): @param.Documentation</p>
    }

    @{
        string jsonResponse = @Model.GetSampleResponseBody(api, "application/json");
        string xmlResponse = @Model.GetSampleResponseBody(api, "text/xml");
    }

    @if (jsonResponse != null) {
        <h5>application/json Sample response body</h5>
        <p><code>@jsonResponse</code></p>
    }

    @if (xmlResponse != null) {
        <h5>text/xml Sample response body</h5>
        <p><code>@xmlResponse</code></p>
    }
</div>
As the changes are self-explanatory and have already been discussed in detail, let’s give our documentation the final touch by registering the AttributeDocumentationProvider as an IDocumentationProvider instance in the Web API configuration shown in Listing 18-39.
Listing 18-39. Registration of the AttributeDocumentationProvider
public static class WebApiConfig {
    public static void Register(HttpConfiguration config) {
        config.Routes.MapHttpRoute(
            name: "DefaultApi",
            routeTemplate: "api/{controller}/{id}",
            defaults: new {id = RouteParameter.Optional}
            );

        config.Services.Replace(
            typeof(IDocumentationProvider),
            new AttributeDocumentationProvider());
    }
}
Reloading our API documentation in the browser for the last time, you see full-blown documentation according to the requirements set by the handcrafted version. Figure 18-6 shows the complete version.
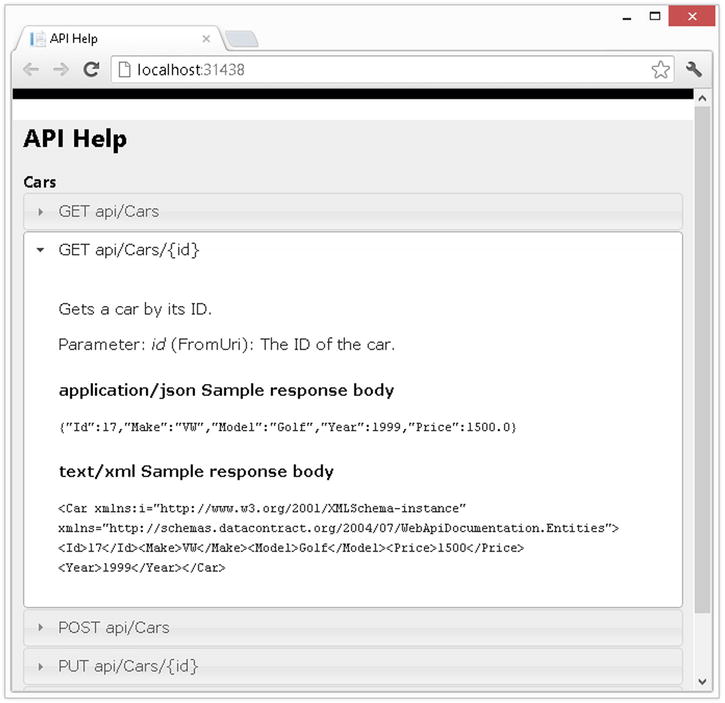
Figure 18-6. A complete API documentation for ASP.NET Web API
Now that all requirements for complete API documentation, once by hand and once automated, by use of ASP.NET Web API’s mechanism have been fulfilled, you have a reusable solution for a tedious task in Web API development. Of course, you can modify the output to suit your needs, as you’ve seen, so that in the end everything sent to the browser is plain HTML. Even more, you can enrich your documentation with more information if it’s required. An example would be minimum and maximum measurements if the return type is an image file.
Summary
As you saw in both the tracing and the documentation sections, ASP.NET Web API again proves to be a well-thought-out and sophisticated framework for Web API development. Even though it’s in its first version, it provides mechanisms for tracing and logging and supports state-of-the-art software development by embracing concepts like dependency injection and easing test-driven development.