
Selecting Images Using the Built-In Gallery Application
As we know, using an intent is often the quickest way to harness a capability that already exists in a pre-installed Android application. For the purposes of the examples in this chapter, let's look at how we can harness the built-in Gallery application to select an image that we might want to work with.
The intent that we'll want to use is a generic Intent.ACTION_PICK that signals to Android that we want to select a piece of data. We also supply a URI for the data that we want to pick from. In this case, we are using android.provier.MediaStore.Images.Media.EXTERNAL_CONTENT_URI, which means that we'll be selecting images that are stored using the MediaStore on the SD card.
Intent choosePictureIntent = new Intent(Intent.ACTION_PICK,

 android.provider.MediaStore.Images.Media.EXTERNAL_CONTENT_URI);
When this intent is triggered, it launches the Gallery application in a mode where the user is able to select an image.
As is usual with the return from an intent, after the user has selected the image, our onActivityResult method is triggered. The selected image's URI is returned in the data of the returned intent.
onActivityResult(int requestCode, int resultCode, Intent intent) {

    super.onActivityResult(requestCode, resultCode, intent);


    if (resultCode == RESULT_OK) {

        Uri imageFileUri = intent.getData();

    }

}
Here is a full example:
package com.apress.proandroidmedia.ch3.choosepicture;


import java.io.FileNotFoundException;

import android.app.Activity;

import android.content.Intent;

import android.graphics.Bitmap;

import android.graphics.BitmapFactory;

import android.net.Uri;

import android.os.Bundle;

import android.util.Log;

import android.view.Display;

import android.view.View;

import android.view.View.OnClickListener;

import android.widget.Button;

import android.widget.ImageView;
Our activity will be responding to click events fired by a button; we'll therefore implement OnClickListener. In the onCreate method, we use the normal findViewById method to access the necessary UI elements that are defined in the Layout XML.
public class ChoosePicture extends Activity implements OnClickListener {


    ImageView chosenImageView;

    Button choosePicture;


    @Override

    public void onCreate(Bundle savedInstanceState) {

        super.onCreate(savedInstanceState);

        setContentView(R.layout.main);


        chosenImageView = (ImageView) this.findViewById(R.id.ChosenImageView);

        choosePicture = (Button) this.findViewById(R.id.ChoosePictureButton);


        choosePicture.setOnClickListener(this);

    }

Figure 3–1. The choosePicture button, displayed when the app first launches
What follows is the onClick method, which will respond to the pressing of the choosePicture button which is displayed when the app starts as illustrated in Figure 3–1. In this method, we create the intent that will trigger the Gallery application to launch in a mode that allows the user to select a picture as shown in Figure 3–2.
    public void onClick(View v) {

        Intent choosePictureIntent = new Intent(Intent.ACTION_PICK,

 android.provider.MediaStore.Images.Media.EXTERNAL_CONTENT_URI);

        startActivityForResult(choosePictureIntent, 0);

    }
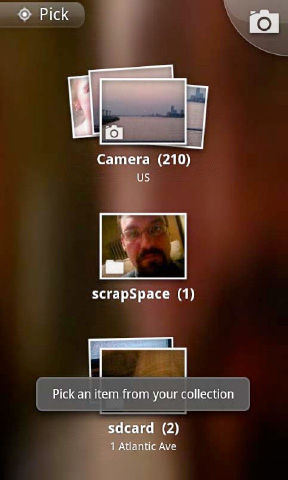
Figure 3–2. The view of the Gallery application when triggered by the ACTION_PICK intent prompting the user to choose an image; the UI of the Gallery application may vary per device.
When the Gallery application returns after the user has selected an image, our onActivityResult method is called. We get the URI to the selected image in the passed-in intent's data.
        protected void onActivityResult(int requestCode, int resultCode,  Intent intent) {

        super.onActivityResult(requestCode, resultCode, intent);


        if (resultCode == RESULT_OK) {

            Uri imageFileUri = intent.getData();
Since the returned image is likely too big to load completely in memory, we'll use the technique we went over in Chapter 1 to resize it as it is loaded. The dw int and the dh int will be the maximum width and height respectively. The maximum height will be less than half the screen height, as we will eventually be displaying two images, aligned vertically.
            Display currentDisplay = getWindowManager().getDefaultDisplay();

            int dw = currentDisplay.getWidth();

            int dh = currentDisplay.getHeight()/2 - 100;


            try {

                // Load up the image's dimensions not the image itself

                BitmapFactory.Options bmpFactoryOptions = new BitmapFactory.Options();

                bmpFactoryOptions.inJustDecodeBounds = true;
                Bitmap bmp = BitmapFactory.decodeStream(getContentResolver().

openInputStream(imageFileUri), null, bmpFactoryOptions);


                int heightRatio = (int)Math.ceil(bmpFactoryOptions.outHeight/(float)dh);

                int widthRatio = (int)Math.ceil(bmpFactoryOptions.outWidth/(float)dw);


                if (heightRatio > 1 && widthRatio > 1)

                {

                    if (heightRatio > widthRatio) {

                        bmpFactoryOptions.inSampleSize = heightRatio;

                    }

                    else {

                        bmpFactoryOptions.inSampleSize = widthRatio;

                    }

                }


                bmpFactoryOptions.inJustDecodeBounds = false;

                bmp = BitmapFactory.decodeStream(getContentResolver().

openInputStream(imageFileUri), null, bmpFactoryOptions);


                choosenImageView.setImageBitmap(bmp);


            } catch (FileNotFoundException e) {

                Log.v("ERROR",e.toString());

            }

        }

    }

}
It requires the following in the project's layout/main.xml file:
<?xml version="1.0" encoding="utf-8"?>

<LinearLayout xmlns:android="http://schemas.android.com/apk/res/android"

    android:orientation="vertical"

    android:layout_width="fill_parent"

    android:layout_height="fill_parent"

    >

    <Button

        android:layout_width="fill_parent"

        android:layout_height="wrap_content"

        android:text="Choose Picture" android:id="@+id/ChoosePictureButton"/>

    <ImageView android:layout_width="wrap_content" android:layout_height=

    "wrap_content" android:id="@+id/ChosenImageView"></ImageView>

</LinearLayout>

Figure 3–3. The application after the user has chosen a picture
That's it; we now have a user-chosen image as a Bitmap object displayed to the user as illustrated in Figure 3–3. Let's look at how we can use this Bitmap as a starting point for other operations.