
The main purpose of a content management system (CMS) is to manage content. That's true, but what exactly is content? And what does it mean to manage it?
In a modern, web-based CMS, content is generally thought of as the words that are displayed on the screen for people to read. This includes such elements as front-page stories on a newspaper web site, blog entries on a political pundit's site, or forum posts.
For each of these examples, the content differs slightly. For example, a newspaper article might have a piece of text called a headline, plus information such as a dateline, a byline, and possibly an abstract. After that might be a combination of paragraphs, quotes, illustrations, and links to other content. A blog post usually has a similar format, except the name of the person who wrote it is usually indicated by author or blogger instead of byline. And a forum post typically has some indication of its relation to the parent forum and its place in the current thread.
Drupal formalizes the differences between these and calls them content types. A content type is a classification of a particular kind of information, and defines different fields based on the purpose of the content. And since each piece of information on a site adheres to one particular content type, it can be treated in a way that is appropriate to that content type.
Drupal comes with a number of predefined content types:
Blog entry: A single post to an online journal. For blog sites, this is the principal content type used by authors on the site who want to share their ideas with others. Blog entries are generally promoted to the top of the front page as they are written so the most current information is at the top. A Blog entry can be just a sentence or two, or it can be much longer; there is really no particular size limit.
Book Page: A book is a collection of related information that has a predefined flow. A Book Page is a single page in that flow. Drupal displays Book Pages as a table of contents. When a Book Page is accessed, Drupal provides links to move to the next or previous pages. This provides a simple navigation system for organizing and reviewing structured content.
Forum topic: A forum can be created where users can post a topic and others can reply, creating a thread of posts. The Forum topic is the basic content type for creating a forum.
Basic Page: A Basic Page content type provides a simple method for creating and displaying information that rarely changes. Consider a common page on many web sites, the "About us" page. This changes rarely and is probably not something you'd want to show your user when he or she first comes to your site. The Page content type usually provides this type of static content.
Poll: Drupal has a simple polling ability where an author can ask a question and provide a list of possible answers. Answers are collected and users can see the results once they've answered the question.
Article: Am Article is similar to a blog entry in that several can be listed on a single page, with the most recent usually appearing at the top. Articles and blog entries can actually appear together on the same page, usually sorted by the date each was created with the most current showing on the top.
Each of these content types has fields that are required in order to work correctly. The default installation of the Drupal core only enables the Article and Basic Page content types. To get the others, you just need to enable them on the Modules page.
Note
Even though these content types are predefined with the core installation of Drupal, their purpose is only suggested. You can, for example, have a site with blog-type content, article-type content, and other content for a particular purpose, and use only the Article content type.
All content is stored in the database in a normalized manner that allows for efficient access and for keeping many different revisions of a piece of content as it goes through its editorial lifecycle.
Creating content of a particular type is just a matter of navigating to the appropriate place in the administrative section. Let's start with an About Us page.
From the front page, click on "Add new content". You'll get a list of all of the content types that are currently available on your system. (See Figure 6-1.)
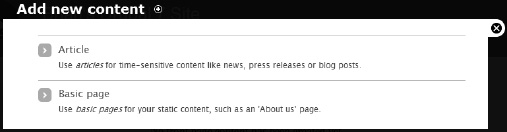
This page will contain all of the content types that are currently installed and enabled on your system.
Tip
To enable more content types, Click "Modules" from the administration menu and enable the content types you desire.
Clicking "Basic page" presents the screen shown in Figure 6-2, where you'll see two fields, "Title" and "Body."
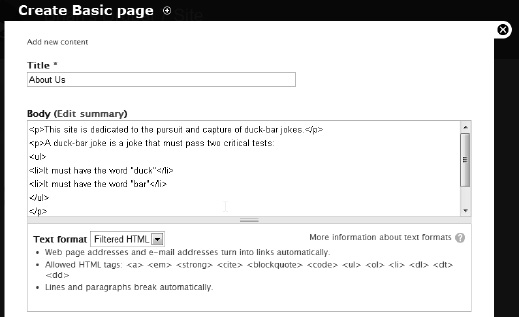
The Title and Body fields are standard Drupal features for most content types. Notice the orange asterisk next to the Title field. This indicates that the field is required to contain content.
Notice as well the small number of HTML tags that can be placed inline. These will be interpreted according to the input filters listed just below the body field.
Drupal comes with two filters: Filtered HTML and Full HTML. You can create more filters if you like, and some contributed modules create their own filters for specific purposes.
Tip
Filtered HTML, by default, is very restricted and therefore pretty safe. But your users might not find what they need. For example, Filtered HTML does not even allow the HTML image tag.
Full HTML, on the other hand, is probably way too enabling. If you enable Full HTML on your site and accidentally make it available to anonymous users, you'll probably be hacked in short order. You should use this option only with completely trusted users.
I usually create my own filter that looks a lot like Filtered HTML but adds the image tag and perhaps one or two more tags, depending on what I'm doing.
To understand why filters are necessary, you need to think about the different types of content you create. For example, if your module is designed to send e-mail to your subscribers, you might want a filter that only allows HTML tags that are e-mail-friendly, or one that allows no HTML tags at all for text-only messages.
At the bottom of the page, you'll see some buttons, Save and Preview. Clicking the Preview button lets you see the content before actually publishing it. This is a good idea, particularly as you are learning how the system works, because posting something—especially if you are hand-coding your HTML tags—could result in exposing information publicly before you can check for errors.
Because previewing is so important, it is possible to define content types such that the user will not be able to see the Save button until the post has been previewed first. (See Figure 6-3.)
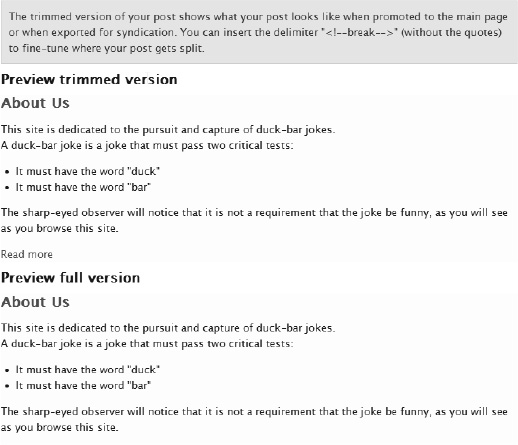
Notice that the HTML tags have been interpreted to format the text. That is, the title has turned into an HTML header and the <ul> and <li> tags have been turned into a list. Notice, also, that there are two versions, "trimmed" and "full." Drupal saves both versions and uses each where appropriate. For example, if a number of articles are to appear on the front page of a site, the trimmed version will be shown. This is also called a teaser. Whenever a teaser is shown, there is usually a "Read more..." button to get to the entire entry.
Drupal makes a guess at where you want the teaser separated from the rest of the content, but if you'd like to indicate, for example, just the first couple paragraphs, you can insert an XML processing instruction, <!--break-->, at the point where you'd like to separate the teaser from the body of the content.
If you'd rather have different text displayed as the teaser, you can click the "Edit summary" link, which will give you another box for entering this text.
Notice the area near the bottom of the page that lists a number of settings you can add for this particular page. The menu settings allow you to add the page to a particular menu hierarchy. In this case, let's add it to our primary links menu so we can display it on every page. (See Figure 6-4.)
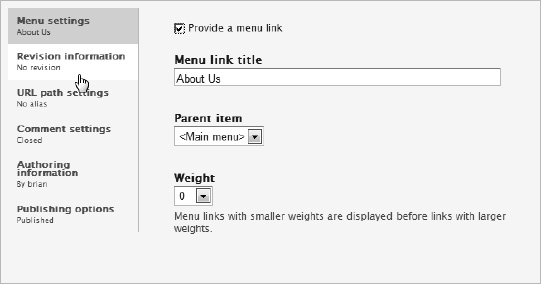
The revision information area indicates whether you want to keep revisions for this page. Since this is a new page, the only version is the original. In other words, no revision. But if you were to come back and modify this page and click the "Create new revision" box, the original version of the page would be saved, as well as a new revision. If you need to revert back to the original, it thus becomes trivial.
By default, a page is accessed by its node number. If we were to save this page right now, we would access it with the URL http://mysite.com/node/1. While that might be sufficient for accessing forum topic number 60,456, we would like to see something more appropriate for a page used as often as the "About us" page. That's where the URL path settings page comes in. Clicking that link displays a text box where you can type an alias for the path that's more appropriate for the content. (See Figure 6-5)
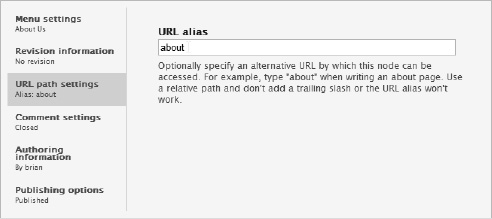
The text is what your user will type after http://mysite.com/. The text can also have paths, so if you set the URL alias field to content/about/marketing, you could publish the URL as http://mysite.com/content/about/marketing.
Drupal's comment framework provides a way for users to post comments on virtually any piece of content on the site. Commenting is turned off by default for pages, but can be turned on for any page.
The role-based permissions engine allows you to specify which types of users have the ability to create, delete, edit, or even view comments. For example, anonymous users might be given the ability to read comments that have been posted, but only authenticated users who have created an account can add new comments. And only administrators or authors are able modify or delete comments. I'll cover the permissions framework later.
The authoring information block allows you to specify the person who created the content. By default, this is the currently logged-in user.
Given the proper permissions, you can change this to any user on the site. You can also indicate when the post was authored. Leaving it blank specifies the current time, but you can change this if you'd like.
Finally, the Publishing options block will allow you to specify how the content is to be treated when you save it.
By default, pages are not promoted to the front page, but stories and blog entries have that box checked by default. Publishing content allows it to be read by your users (based on permissions).
Note
Promoting to the front page is applicable only when the default front page is used. You can set whatever page you want to be the front page. If it is not the default (/node), though, then the "promoted to the front page" checkbox will not promote the content to that new front page.
Unchecking the Published box lets you save the content, but it will be marked as a draft and users won't be able to see it. This is handy, for example, if you are working on a post but you are not ready to give it to users.
Making a post sticky causes it to appear at the top of any list of content where it would otherwise appear in reverse chronological order. This is useful when you have content that all users should see, like site policies or frequently asked questions.
Pressing the Save button publishes the page and it will appear in the browser, as shown in Figure 6-6.
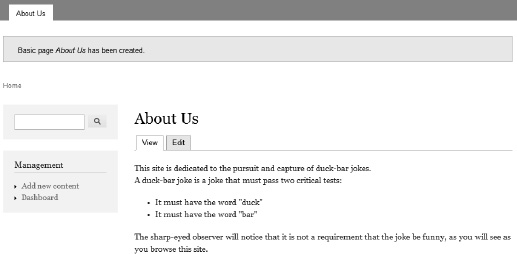
Notice at the very top of the page that the "About Us" link appears in the upper left. That's because we added the page to our Main menu. This is a quick way to create several important pages that your users will probably expect to see on your site. Plus, you can access the page with the URL, http://mysite.com/about directly.
We just created a page using Drupal's default editing environment, which is just a simple HTML <textarea> element. For any but the most rudimentary pages, you'll probably want a more robust editor that allows for the creation of rich content without the need for hand-coding HTML tags.
There are a number of WYSIWYG editors available for Drupal. The selection of an editor can be a contentious issue, since some people are advocates for one editor or another. My favorite is CKEditor because it is simple to install and provides enough flexibility for most users.
CKEditor wasn't written specifically for Drupal. It's a general purpose JavaScript-powered tool that runs in the user's browser. There is a contributed module that provides an integration bridge between Drupal and the CKEditor code. To integrate it with Drupal, we need to add this module to our site, and then add the CKEditor bits.
First, we'll load a Drupal contributed module that provides an administrative interface for the editor. This module, titled "Wysiwyg," provides an interface for a number of different JavaScript-powered editors.
To add a new module to our site, we can use our site's administration modules page. Click "Modules" on the administrative menu, then click "Install new module". You'll see the page shown in Figure 6-7.
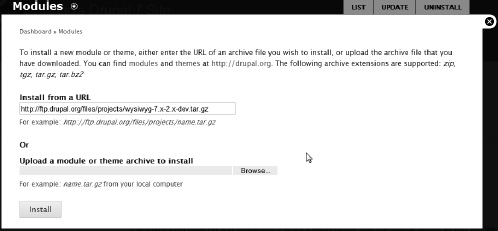
Enter the URL for the WYSIWYG project. At the time of this writing, the most current version is 7.x-2.x-dev. The version will probably be more advanced by the time you read this, so enter the URL that reflects the current version. You can also upload a module archive from your local machine.
Tip
To find the URL for a module you want, go to the Drupal site that tracks all contributed modules, http://drupal.org/project/modules. From here, you can search the database. Once you find the module, grab the link to the one that interests you and paste it into the install module screen.
That process will write the module to the modules directory on your site. If you go to the Modules page from the administration menu, you'll see the new module. Enable it and save the configuration. (See Figure 6-8)

Now it's time to set up some profiles. Click Configuration and then Wysiwyg profiles in the Content Authoring block (see Figure 6-9).

Whoops! The resulting screen, shown in Figure 6-10, indicates that something is missing.
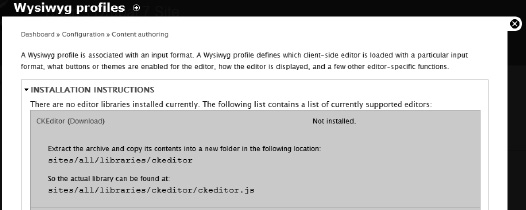
You'll see on that page that the Wysiwyg module supports many different editors and supplies information on how to install each one.
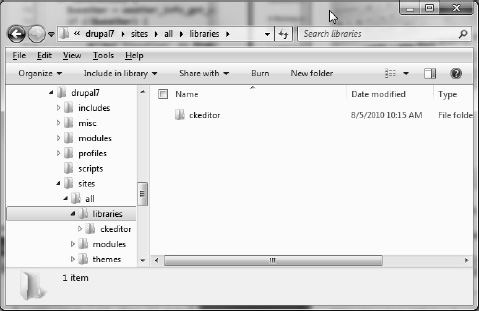
So let's download the JavaScript code for CKEditor and make it available to Drupal. The JavaScript bits for CKEditor are available at http://ckeditor.com/download. Get the .zip archive and unzip it into a new directory, libraries, which will be a sibling of your modules and themes directories. (See Figure 6-11.)
Now go back to the Wysiwyg profiles page and refresh it. You should see the happy path screen indicating that it found the CKEditor bits. (See Figure 6-12.)
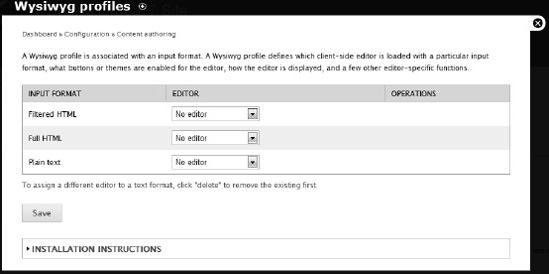
This screen shows us the various filters that are available on our site, and gives us a chance to specify a different editor for each one. For example, we might want to use our fancy new CKEditor to do full-blown HTML editing, but for plain text we might just want to use a standard text box. Or we might have a special content type that requires a graphical XML editor. There are a lot of editors available that provide functionality for various tasks.
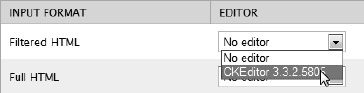
The Wysiwyg profiles screen is where we can create different configurations for each input format. For now, let's just create one for Filtered HTML. (See Figure 6-13.)
Once you've saved this, you'll notice "Edit" and "Delete" links to the right. Click "Edit" to specify the types of tools exposed to the user (see Figure 6-14). If you don't indicate any tools, your user will see them all, which might expose a security risk.

Check the appropriate boxes and save the configuration. You can always come back later and add or remove features.
Note
If you are using the Filtered HTML input format, you might confuse your users: CKeditor will correctly format all tags it recognizes, but when the user saves the document, the filter will remove all elements not allowed by the filter. Here are the tags CKEditor supports:
<a><p><span><div><h1><h2><h3><h4><h5><h6><img><map><area><hr><br><br /><ul>
<ol><li><dl><dt><dd><table><tr><td><em><b><u><i><strong><del><ins><sub><sup>
<quote><blockquote><pre><address><code><cite><embed><object><param><strike><caption>
<tbody>
There are modules available (ckeditor, wysiwyg_filter, htmlpurifier, htmLawed) that will help you to configure your Wysiwyg editor to work effectively with input formats. The issue of configuration is both confusing and important. If you will be relying heavily on your users creating content with a Wysiwyg editor, you owe it to yourself to master the care and feeding of input formats.
Now let's take it for a spin! Add content like you did before when we created a page, except this time create an article. You'll see the Create Article page with the new editor where the old text box was, as shown in Figure 6-15.
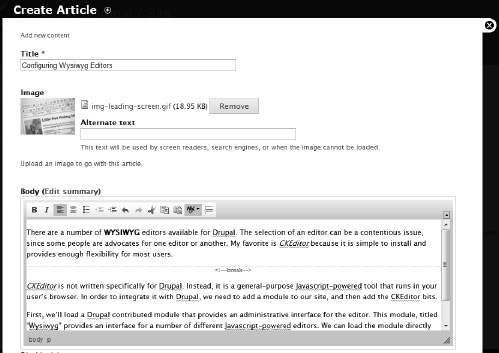
You can play with the editor now—enter some text. Notice that I've turned on spell-checking and put a teaser break after the first paragraph. I've also added an image. This particular image is not part of the Wysiwyg editor, but is an artifact of the Article content type.
Now save the article and go to the front page of the site. (See Figure 6-16.)

This is the default action for the Drupal content type, Article. Notice that it has it has been published to the front page, and only the first paragraph is shown, with a "Read more" link. That's because of the content break we put after the first paragraph.
If there were more articles, the first few would appear on this page in their trimmed version. As you'd expect, clicking "Read more" takes you to a page that displays the entire article.
Now that you've seen the basics of content creation, you might be wondering if it's possible to create content types beyond what's shipped with Drupal. The answer to that is yes! You can create custom content types using Drupal's Field framework.
Note
The Field UI is just one way to add new fields to existing content types or to create entirely new content types. You can do both of these tasks by writing modules, and you'll want to do this as part of an install script, for example, if your module requires a new content type or new fields added to one of the core content types.
Field, and the companion module, Field UI, are enabled by default.
Note
In researching Drupal, you might have heard about the module called "Content Construction Kit," or CCK. This was originally a module contributed and maintained by the Drupal community. In versions of Drupal prior to version 7, it was a separate download. CCK turned out to be so stable and popular that it was included as part of the Drupal 7 core and renamed "Field." CCK still exists as a contributed module, containing some features that were not ported to the Drupal core, but the most commonly used parts of CCK have been moved into the core.
Let's create a new content type called "Joke". This will have some special fields that don't exist in any other content type.
From the "Structure" menu, select "Content types," and then "Add content type." Enter information for the new content type. (See Figure 6-17)
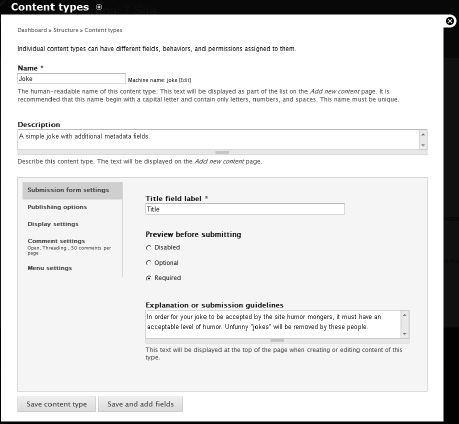
Every Drupal content type has two fields, Title and Body. If you don't like those names, you can change them, but Drupal still calls them Title and Body internally. In this case, we're happy with Title, so we leave the default.
We want to let users preview their jokes before printing, so we click the appropriate setting. This will display only the "Preview" button when they author their documents. Only after they've seen the preview will the "Save" button be displayed.
There is also a place you can communicate submission guidelines for this type of content. Various parts of the Drupal core and contributed modules use this when the content type is made available to users for creating their content.
Now press "Save and add fields" and we'll add some new fields to our content type. You'll see a screen where you can start adding fields, as shown in Figure 6-18.
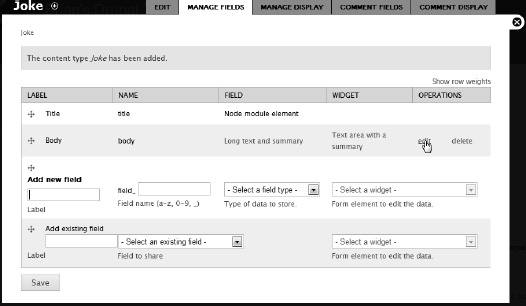
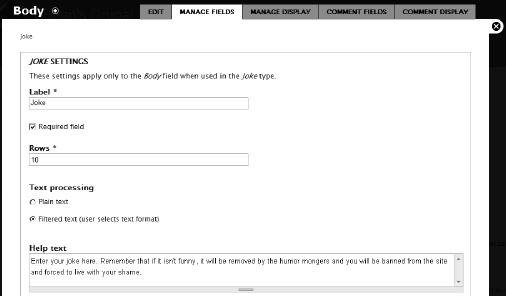
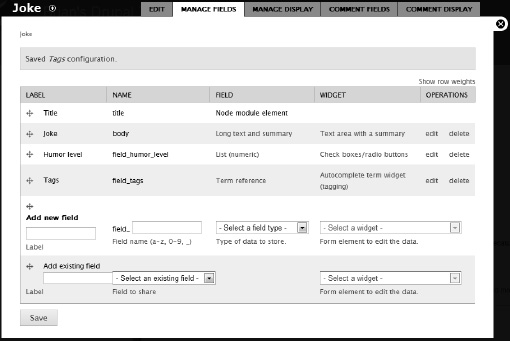
Notice the two standard fields that were created automatically, Title and Body. I like Title, but I'd rather name the Body field "Joke," so click "edit." Here you can rename the field and give some guidelines for entering the values. (See Figure 6-19)
When you save this, you will go back to the "Manage fields" screen (see Figure 6-20).

Notice that, even though you have indicated that you wanted this field to be called "Joke," Drupal's internal name is still "body." This is something that you need to be aware of as you access information in your program.
Tip
Sometimes, it is useful to reuse the body field, but sometimes, because of how themers treat the body, it is better just to disable it and create your own field. The theme template for the body typically includes information, such as author, date created, and comments. If you repurpose the body field, you may have to make changes to the body template. Theming is covered in Chapter 7.
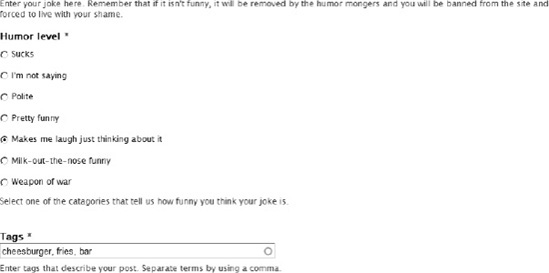
We'll add two more fields, one to allow the author to indicate how funny she thinks her joke is, and anotherto hold a list of keywords (tags) that categorize the joke (see Figure 6-21).
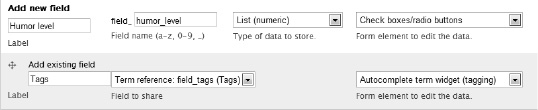
The first field to define is the field_humor_level. It is specified as a fixed list of numeric values, so we must provide that list. (See Figure 6-22)
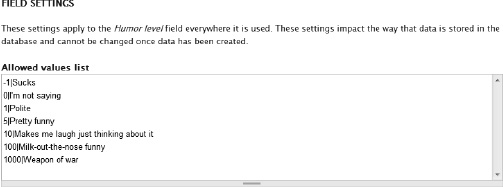
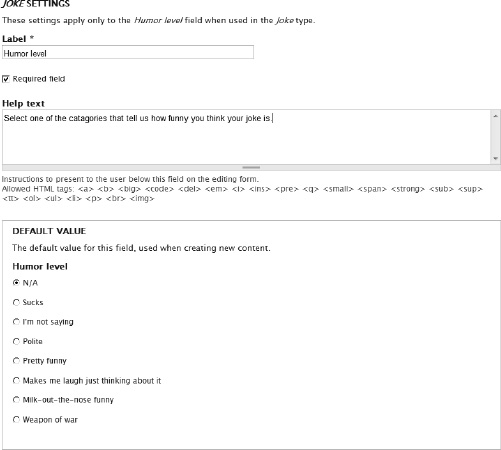
You can enter just numbers here (one per line), or pairs in the form of key|label. The label will appear in the select list, but the key is the value that will be stored in the database. I've chosen the latter for this field type. Saving this screen takes you to another screen where you can establish the default value and provide help text. (See Figure 6-23.)
On the next screen, you can enter settings for the next field, Tags. You'll want to make it a required field and set "Number of values" to "Unlimited". Saving this will bring you back to the main screen for this content type. (See Figure 6-24.)
From here you can add more fields, but let's stop and create some content. From the main menu, click on Content

This brings up the content creation page, where we can see the two fields we just defined (see Figure 6-26).
Farther down on the screen, we can see the two extra fields we created, as shown in Figure 6-27.
Notice the Preview button on the bottom. There is no Save button because we indicated earlier that users must preview their submissions before saving them. This could prevent a posting from going out with unrecognized errors. Clicking Preview will show the trimmed and full versions of the post, and also expose the Save button for committing to the database.
Note
Drupal has the ability to create database tables using the Schema contributed module. If you need to create content types that are not managed by Drupal's content management system, this could be a good alternative. However, if you want all of the goodness that Drupal provides for managed content (comments, revisions, theming, etc.), then custom content types make a lot of sense. I cover the Schema API in Chapter 10.
We'll be using this example later when we do theming. For now, you might want to enter a few more jokes so you have some content to work with. As a start, you can swipe some jokes from my site, DuckBarJokes.com.
Drupal has a rich role-based permissions framework. We've already seen some of it as we made some aspects of contributed modules available to certain users. Let's talk more about the permissions framework and how it works.
Each module can specify its own custom permissions to be displayed on the Permissions page. A module programmer can use those custom permissions, or any other permissions, to guide the display, editing, or deletion of various parts of the site.
You can even set permissions on particular nodes based on practically any criteria you'd like. If you want to restrict access to certain users if a piece of content contains the word "McNugget," but only on Fridays when everyone knows you should be eating the Filet-O-Fish, you can write code that will achieve that silly goal.
Working hand-in-hand with the permissions framework is the concept of user roles. Every user who accesses your site will have one or more roles. Each user has a unique user id, or uid, which is an integer that increments with each new user.
There are two special uids on your site, 0 and 1. When you first configured your site, you entered the username and password of the administrator, who automatically became uid 1. The administrator has access to every single aspect of your site, and does not require any permissions to be set.
At the other end of the spectrum is a user when he first comes to the site. This user is considered "anonymous" and will have a uid of zero.
All other users are considered "authenticated" once they create an account and, optionally, depending on how you configure your site, authenticate that they have a valid e-mail address. Users can create an account by clicking the "Create new account" link under the Log in button.
This will take them to the registration screen, which will only ask for a username and a e-mail address by default. This is shown in Figure 6-28.
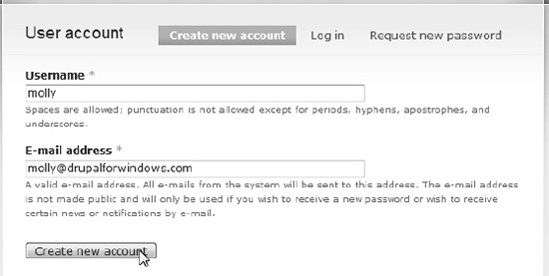
By default, only a username and e-mail address are required, but you can add more required fields, as we will shortly. By default, the system will send an e-mail to the user requesting her to click on a link. This will verify that the person has entered a valid e-mail address and that the user has access to that e-mail address. This helps to avoid spambots from creating bogus accounts.
Note
if you want more protection against bots, there are a number of bot-fighting modules you can employ, such as CAPTCHA, as shown below:

The CAPTCHA module is quick to install in your Drupal enviroment and provides instant discouragement to bots.
The user will see a confirmation that the account was created (see Figure 6-29).

As an administrator, you can specify more information that is required on the form at Configuration
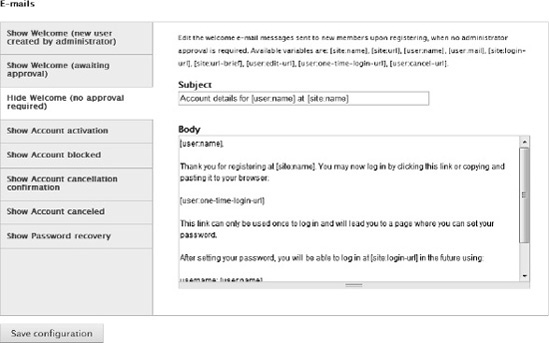
You can, for example, require that the user respond to an e-mail in order to be authenticated, or that all users be approved by an administrator before being granted access to the system.
On this page, you can also craft e-mail templates for various user management functions:
Welcome message for a new user created by administrator
Welcome message for a new user where no approval is required
Welcome message for a new user who is awaiting administrator approval
E-mail sent once an administrator approves the account
E-mail sent when a user asks for password recovery
E-mail sent to inform a user that his or her account has been blocked
E-mail sent to inform a user that his or her account has been deleted
These messages have variables available so you can personalize the message to the user. Once a user registers, he or she will get assigned the next available uid. An example e-mail message is shown in Figure 6-31.
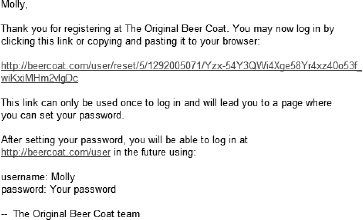
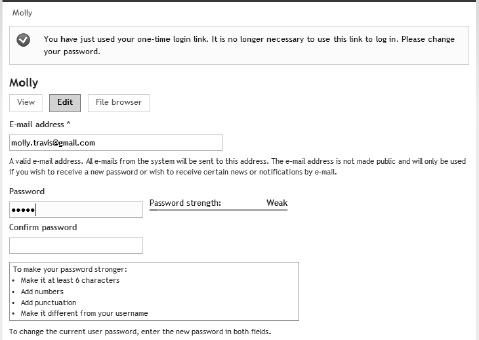
In the case of the site allowing visitors to create their own accounts, the e-mail sent will have the standard link to verify that the e-mail address is correct. It also gives the new user the ability to set a password, as shown in Figure 6-32.
Once authenticated, either by administrative approval or e-mail verification (or immediately if user authentication is turned off), the user can access the system.
The site administrator can also manually authenticate a user by changing Status from Blocked to Active.
Your site can have as many different roles as necessary. Let's create a new role for authenticated users on our site whom we have chosen to write blog entries. Let's call the role "blogger." Before doing this, make sure the Blog module is enabled (from the Modules menu).
Access the roles page by navigating to People
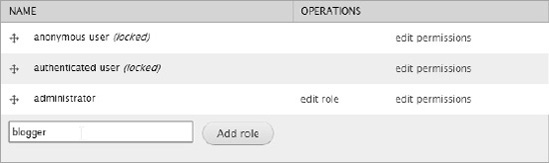
Type "blogger" and click "Add role". Once the screen comes back, click "edit permissions" to get to the permissions page shown in Figure 6-34.
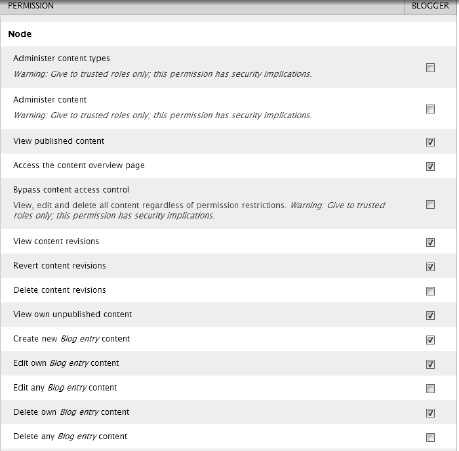
When you go to the user permissions page you'll see the new role with nothing checked. Check the appropriate permissions and click "Save permissions".
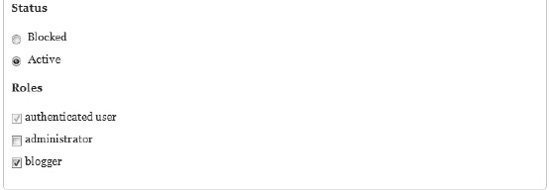
Finally, we'll need to assign a role to a user. When a user creates an account, she is granted the default role, "Authenticated user." If we want to create a user, let's say a "blogger," we can add a new user, or just have that user create her own account, and then promote her afterwards. That's usually the easiest first step for creating a user with different roles. Once the user account is present, you add it to other roles by accessing the account under the People tab on the administration menu. (See Figure 6-35.)
The user now has the combined permissions of anyone who is an authenticated user or a blogger. Now that the permissions are in place and the user has been assigned a role, how can we take advantage of them in our modules? You've probably guessed that one of the answers has to be hooks.
To create entries on the permissions page, you need to write a hook function in your module. For this exercise, I'll be using the weather block module we developed in Chapter 5.
Let's say we have three different settings we want to control:
Administer the weather information. This will allow us to set the default location, units, and language for the weather module.
View the default weather information, that is, the location, units, and language we established on a site-wide basis with the weather administration function we wrote in Chapter 5.
Get weather for any location. This will display the weather location in put box and "Get weather" button on our weather information block.
First we need to create these permissions so they will appear on the permissions form. We can do this with the permission hook shown in Listing 6-1.
Example 6.1. The Permissions Hook
function weather_info_permission() {
  return array(
    'administer weather info' =>  array(
      'title' => t('Administer weather information'),
      'description' => t('Set global site information for language, units, and location.'),
    ),
    'view weather info' =>  array(
      'title' => t('View weather information'),
      'description' => t('View the site-wide weather information on pages.'),
    ),
    'change weather location' =>  array(
'title' => t('Change weather location'),
'description' => t('Change the current location for weather information.'),
),
);
}Once we've created this in our code, we will immediately see it when we go to the permissions page, as Figure 6-36 shows.
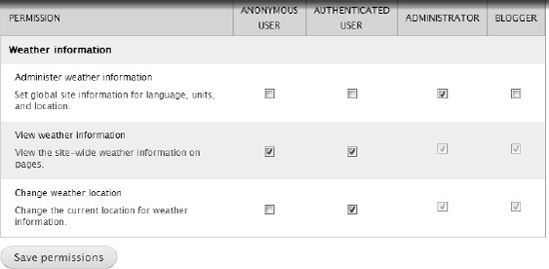
Notice that the entries on the page were generated by the contents of the array in the hook function we just wrote. Also, see that the block title is the same as our module name. And you can see the new role, Blogger, that we just created, as well as the three that were already defined.
In determining who gets access to what, you can see that only the administrator gets the permission to change the site-wide settings, but everyone, even anonymous users, can see the weather for that site-wide location. And authenticated users can change the location, but they can't change the language or units settings.
Also notice that the page knows that the administrator and blogger roles are also authenticated users, so when I check the authenticated user box, the administrator and blogger boxes automatically get set, and they become grayed so I can't uncheck them.
Set the permissions as you see fit and click "Save permissions". Of course, just having those permissions there does absolutely nothing. In order for them to work, we need to incorporate the permissions engine into our module.
Creating roles and assigning permissions doesn't change anything in our module. The task now is to tell our module how to handle access to the information based on roles and permissions. This is done with the access hook.
The user_access() function checks to see if the currently logged-on user has the checkbox set for a particular permission. So at the top of our Weather information module code, we'll want to see if the user has the ability to even display the block at all. Listing 6-2 checks to see if a user has that permission.
Example 6.2. Checking User Access
function weather_info_block_view($delta='') {
  if (!user_access('view weather info')) {
    return null;
  }
  ...
This might seem unnecessary, since we've already said that everyone, including anonymous visitors, can view the site-wide weather information. However, we might want to change that policy at a later date. If we don't have this check in our code, we won't have the flexibility to make that change.
Note
the user_access function requires a string that indicates the permission setting. This string must be the key of the array declaring the permission, not the title or description.
Then, as we move down the code, we'll want to see if the user has permission to get the weather for any location. If so, we will want to place the textbox and submit button. Otherwise, we'll just print the current conditions and forecast if we can find it. This is shown in Listing 6-3.
Example 6.3. Checking Whether a User can Change a Location
if (user_access('change weather location')) {
    $temp = drupal_get_form('weather_location_form'),
    $block_content .= drupal_render($temp);
  }
This simple change allows users who don't have the "change weather location" permission to still see the current weather defaults, but the weather location form will not appear on their screens.
Finally, we have our administrative permission. Back in Chapter 5 we created the menu function for the administrative settings. One of the lines was
'access arguments' => array('administer weather info'),The access arguments parameter uses the same string as the user_access function.
Tip
You can set permissions for any level of granularity you desire, but be careful not to overburden the permissions page. Note that there is a checkbox for every role and for every permission. You should plan your roles to cover your needs, but don't create a whole new role when a simple permission will do. Don't create a new permission when an existing one will do. Your administrator users will thank you.
Of course, if you create a permission string for every little aspect of your module, the administration could become unwieldy. On the other hand, if you set permissions too broadly, you might not be able to restrict current or future users to the level you desire. As with many aspects of programming, the happy place is found in the middle.
Now that we know how to assign a user a role and set permissions for that role, let's work on making the user's experience more personalized. To do this, we can set up a separate profile for each user.
Earlier in this chapter, we created a content type, Joke, that took advantage of the concept of fields. Because it's a content type, it has all of the goodies that content types have. For example, Drupal will keep multiple revisions of the content and make available comments if you desire. It will also display the content in summary form on a page or in full form, depending on how you set things up.
We created a new content type by attaching fields to Drupal's "node" type. The concept of "attached fields" is new to Drupal 7, and is baked into the core code. Accessing the goodness of fields is done with the new Field API. And with the Field API comes some terms:
Field: A field defines a particular type of data that can be attached to a fieldable entity type.
Fieldable entity type: An object you can attach fields to. There are four fieldable objects in the Drupal core: node, taxonomy term, comment, and user. The Field CRUD API is used to create, query, update, and delete fields from the fieldable entities.
Bundle: A set of fields that are treated as a group by the Field Attach API. In the Joke structure we created earlier in this chapter, the Humor level and Tags objects are field instances that were attached to the bundle called Joke. Earlier, I called "Joke" a content type, but "bundle" is the term that is used in the Field API jargon. When the node system uses the Field Attach API to load all fields for a Joke node, it passes the node's entity type (which is "node") and content type (which is "joke") as the node's bundle. The
field_attach_load()function then loads thefield_humor_levelandfield_tagsfields because they are both attached to the "node" bundle "joke".Widget: A field type has an inherent structure and can be represented in the UI depending on that structure. For example, a list of options can be represented as a pull-down list or a set of checkboxes. A text field can be presented as a text field or a text area. An image might be represented as an upload object with a thumbnail showing the current image. A widget is the thing that is used to present your field to the user. When you create a field type, you also provide a list of widgets that are appropriate for that field type.
Field storage: The storage of attached fields is managed by the Field Storage API. The default storage for fields is the database, but you can write your own storage backend to store your bundles. This is an incredibly powerful concept that is new to Drupal 7. Say, for example, you have a field type that is a PDF document. Storing that in the MySQL database would be cumbersome, so you can create a hook that will put these field types in the file system, or even in a PDF-friendly engine, such as Documentum, PaperVision, or SharePoint. Or you might want to set up a set of web services to store and retrieve certain entity types. The Field Storage API allows you to do this.
If this new vocabulary seems confusing, don't worry; it will become clearer as we move through an example. Let's go back to the weather information code we were working on earlier and make it so each user can set up his or her own location. We will be taking an existing fieldable entity type, user, and attach some new fields to it, creating a bundle that can be managed.
There are two basic ways to create our bundle. We can do it programmatically with the Field API, or we can take advantage of the Administrative UI we used earlier in the chapter. For now, let's use the UI and later, in Chapter 10, we'll use the Field API when we create our installation program.
To attach fields to the user entity type, go to Configuration
This brings up the familiar Field UI we saw earlier (see Figure 6-38). The difference is that now we see the existing fields for the user entity type, instead of the node type.
We create the fields the same way as with the Joke content type above, first supplying a label and a field name, and then picking the field type and widget. See Figure 6-39.
The rest of the screens are pretty self-explanatory. You'll want to set the maximum length of the location field to 20, as shown in Figure 6-40.
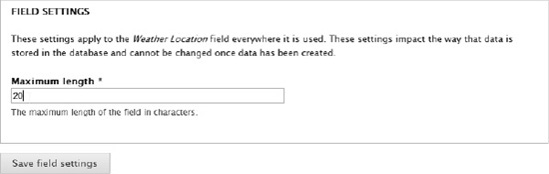
And there are more settings. Notice the "Size of textfield" field in the next screen, shown in Figure 6-41.
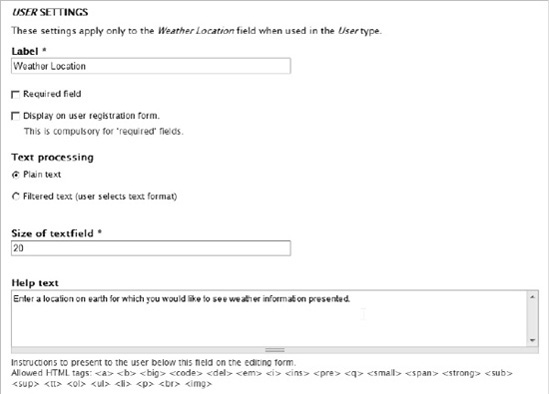
Compare this with the previous screen and the field labeled "Maximum length". The maximum length of the field determines how much space is allocated in the database for the string. "Size of textfield" indicates the size of the field widget that will be presented to the user when the value of the field is required. You may, for example, want to reserve 255 characters for the field in the database, but only have a 25-character text box to present to the user.
This screen also has a place for Help text to prompt the user for what to enter as the value. Clicking the Save settings button will bring you back to the field list.
The next field will be a text list containing all of the supported language codes. (See Figure 6-42).
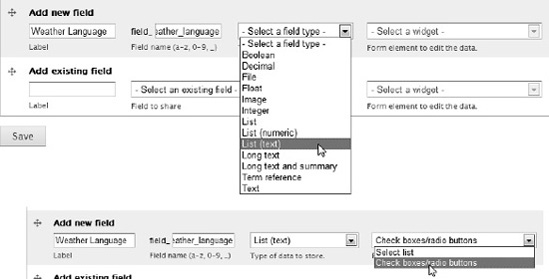
There are two options for the widget this time—a select-style pulldown list and a series of checkboxes. Either one will work, and can be changed later.
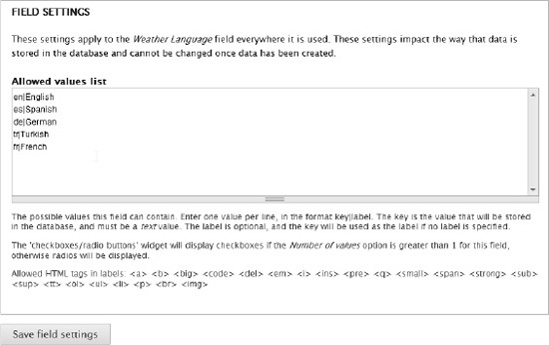
Like in the joke example, the options are listed in a set of key|value pairs (See Figure 6-43.)
The next screen lets you indicate the help text and default value from the list. After that, we can create a text list for unit and see the results on our field list screen (see Figure 6-44).
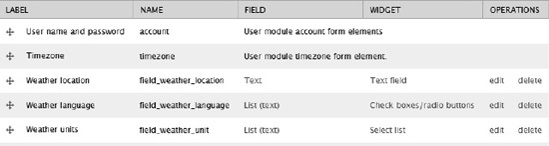
These three fields must be created before our weather information module can work properly. In Chapter 10 we'll write an installation program that creates these fields programmatically so our users don't have to deal with the details of the Field UI.
Now we'll enter some values and customize our weather display for each logged-in user. Under the People tab, find a user and click "Edit". (See Figure 6-45.)
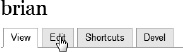
That takes us to the user's profile screen. At the bottom, we can see the three fields we created and attached to the user entity type (see Figure 6-46).
Notice the two different types of widgets. The weather language field uses the check boxes/radio button widget, and the units field uses the select list widget. You'd probably want to make these consistent; I show them here just so you can see how each is presented to the user.
We've just created three fields and attached them to the user entity type. This is a powerful concept in Drupal, and one that will be getting a lot of attention as people learn about this feature. The Field API has calls that let you create your own custom field types, along with widgets and validators that are invoked when a user creates an instance of the field. For example, you might want to create a field that represents a color. This field would save the three values for red, green, and blue and might have a color picker as its widget. And perhaps a validator would determine if the particular color chosen was renderable in a basic CSS color profile.
Creating a custom field is the first step, and then you can attach it to certain entity types, which can then be managed as bundles.
The weather location can be a valid location, or it could be something that is not acceptable to the weather service we are using. If we have a bad value in that field, it doesn't make sense to load it into the database, as the user would get an error the next time she refreshed the page.
We can use the validate hook to verify that the location is correct before submitting the form. We did this back in Chapter 5, but there's a difference with how we deal with the fields we attached to the user entity. When we hooked into the validate function, we owned the form and named the validate function in a way that the form processor was expecting.
With the way we are adding our fields to the standard user profile screen, however, we don't own the form, Drupal does. With a little investigation, I found that the name of the function that creates the form is user_profile_form(). According to the naming conventions for hooks, we would expect that we just need to create a function called user_profile_form_validate() to be called by the form submission logic, right?
But it's not quite that easy. You see, the user_profile_form() function belongs to the User module, which already has a function called user_profile_form_validate(). If we created a function with that same name, we'd get a PHP error.
So how can we hook into the validate functionality of the user_profile_form() function without violating PHP's rules? We can do this by altering the form before it is displayed, and creating our own validation function.
Let's first create a function that validates the field (see Listing 6-4).
Example 6.4. Element Validation Function
function weather_info_profile_weather_location_validate($element, &$form_state) {
  $location = $form_state['values']['field_weather_location']['und'][0]['value'];
  if (variable_get('default_location') != $location) {
    $weather = weather_info_get_weather($location, 'en'),
    if (!$weather) {
      form_set_error('field_weather_location[und][0][value]',
        t('Cannot get weather for %location.',
        array('%location' => $location)));
    }
  }
}
This function takes an element, which is a single field on the form, and the same form state structure that is passed to any validation hook. The code grabs the location submitted on the form, and then checks to see if it is different from the one already in our variable store. There's no reason to check for validity if the value is already there.
So how do I know that the name of the field we are interested in is field_weather_location[und][0][value]? The most straightforward way is to have the page render in the browser and then view the source. You'll see something like this:
<input name="field_weather_location[und][0][value]" type="text" .../>
You can also use a browser debugging tool to highlight the field and check out its properties.
Note
Notice the und array key. This is reserved for language. It is conceivable that you have a multilingual site that has a collection of different translations for a particular field. This array key is where each language will be specified. The value und means "undetermined".
This function gets the location from the form and then calls the weather service to see if it will return a valid report. If there's a problem, it sets the form error, which will keep the submit hook from firing.
Now that we have this function, we need to tell the form, which is owned by someone else, that we want our validation function added to the list of functions to be called when the form is submitted. We do this by writing a function that hooks into Drupal's form-alter mechanism.
Our form-alter function will be called after the form that's being altered has been built, but just before it is to be rendered. That way, all of the fields and settings of the form are available to our function, and we can add, delete, or change whatever we want.
The trick in creating a function to alter an existing form is in properly naming the hook function. The format is:
{your module name}_form_{the id of the form you are altering}_alterOur module name is weather_info. The name of the form we are altering is user_profile_form. So we need to create a function with a mouthful of a name: weather_info_form_user_profile_form_alter(). The function is shown in Listing 6-5.
Example 6.5. The Form-Alter Function
function weather_info_form_user_profile_form_alter(&$form, &$form_state) {
  $form['profile_weather_location']['#element_validate'][] =
    'weather_info_profile_weather_location_validate';
}
This just adds the name of our validation function to the list of functions the form will have to call before it can be considered valid.
So now that we have the field name, we can set the #element_validate property to the validation function we just created. The #element_validate property is an array of all of the validation functions that are to operate on the element. The field is usually null, since the form validation logic will probably do the validation of all fields on the form as necessary.
Now, after the form function is called, Drupal will look around for functions that alter it. Our alter hook function will be hit, which will add the name of our validate function to the list of functions that must all give their nod that a field is valid before the form will be accepted as validated. Then, when the user enters information and submits the form, our function will be called.
Try it. Enter a bad location into the form and click Save. (See Figure 6-47.)
If you are running in Visual Studio and have the debugger running, you can set breakpoints to see exactly what is happening when.
When we get to the validation function, the weather service will return a null object, which will set the form error and prevent us from saving the information. It will also put our error text at the top of the screen and highlight the offending field. (See Figure 6-48)
The form_alter() hook is a very powerful tool to have, as it allows you to customize any form in the system, whether it is part of the Drupal core or a contributed module.
Once the attached field information has been entered for your user, it is accessible as part of the $user object. The code in Listing 6-6 shows how to get the profile information for the user, and then how to get the values.
Example 6.6. Accessing Field Information for the Current User
global $user;
$user_profile = user_load($user->uid);
if (isset($user_profile->field_weather_unit['und'][0]['value'])
  && ($user_profile->field_weather_unit['und'][0]['value'] != '')) {
    $unit = substr($user_profile->field_weather_unit['und'][0]['value'], 0, 1);
  }
  else {
    $unit = variable_get('default_units', 'F'),
  }
The global $user variable does not always contain the attached fields information, so to make sure you get it, just call the user_load() function and load all of the user information, including attached fields, into the new variable. From there, you can access the attached fields.
Note
There seems to be an anomaly when loading user information this way. You can read more about it at http://drupal.org/node/57287. One way to deal with it is shown at http://drupal.org/node/361471. I use a more local technique here.
In this case, we will use the values in the profile information to set the location, language, and units for our weather block if they exist. If they are not in the profile, we will use the site defaults.
Listing 6-7 shows the full version of the weather information block view hook.
Example 6.7. The Weather Information Block View Function
function weather_info_block_view($delta='') {
  if (!user_access('view weather info')) {
    return null;
  }

  $block = null;
  $block_content = null;

  global $user;

  $user_profile = user_load($user->uid);
  if (isset($user_profile->field_weather_unit['und'][0]['value'])
    && ($user_profile->field_weather_unit['und'][0]['value'] != '')) {
      $unit = substr($user_profile->field_weather_unit['und'][0]['value'], 0, 1);
    }
    else {
      $unit = variable_get('default_units', 'F'),
    }

    if (isset($user_profile->field_weather_language['und'][0]['value'])
      && ($user_profile->field_weather_language['und'][0]['value'] != '')) {
$language = substr($user_profile->field_weather_language['und'][0]['value'], 0, 2);
}
else {
$language = variable_get('default_language', 'en'),
}
if (isset($user_profile->field_weather_location['und'][0]['value'])
&& ($user_profile->field_weather_location['und'][0]['value'] != '')) {
$location = $user_profile->field_weather_location['und'][0]['value'];
}
else {
$location = variable_get('default_location', null);
}
if ($location) {
$weather = weather_info_get_weather($location, $language);
if ($weather) {
$unit_system = $weather->weather->forecast_information->unit_system['data'];
$current = $weather->weather->current_conditions;
$block_content .= theme('current',
array(
'img' => $current->icon['data'],
'condition' => $current->condition['data'],
'temp' => $current->temp_f['data'],
'unit' => $unit,
'wind' => $current->wind_condition['data'],
'humidity' => $current->humidity['data'],
)
);
foreach($weather->weather->forecast_conditions as $new) {
$block_content .= theme('forecast',
array(
'day' => $new->day_of_week['data'],
'img' => $new->icon['data'],
'high' => weather_info_temp($new->high['data'], $unit, $unit_system),
'low' => weather_info_temp($new->low['data'], $unit, $unit_system),
)
);
}
$block['subject'] = $weather->weather->forecast_information->city['data'];
}
else {
form_set_error('weather_location',
t('Location @loc not found.', array('@loc' => $location)));
variable_set('current_location', null);
$block['subject'] = t('Get Weather'),
}
}
if (user_access('change weather location')) {
$temp = drupal_get_form('weather_location_form'),
$block_content .= drupal_render($temp);
}
$block['content'] = $block_content;
return $block;
}Attached field information is integrated into the Drupal core, making it easy to write functions that require such information.
There's one more topic to cover, and that's the updating of attached field information in the database. As we've seen, the Drupal $user variable contains basic information about the user as defined by the core. But we extended the user by attaching fields to the entity type, which caused Drupal to create some database tables, and entries in some other tables, to hold our field information, and metadata to allow the Field API to access everything.
If we want to update the user information, there's a save_user() function that's pretty straightforward. However, updating the values of attached fields requires a different function.
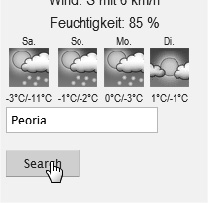
In the scenario detailed above, the user set the three variables, location, language, and unit, by changing them on the account page. But now, suppose the user is on the move and wants to check the weather for another location. This is done by entering a location on the weather information form (see Figure 6-49), which we placed in the second sidebar region of our page.
Let's make the assumption that, if a user enters a new location on the weather information block, the new location becomes the user's preferred location. I know this is a stretch, as it might just be a temporary query, but making that assumption makes it easier to explain what I want to do here.
Currently, when we enter a new location on the weather information form, the data is validated using the weather_location_form_validate() function, and then processed using the weather_location_form_submit() function. The latter is shown in Listing 6-8.
Example 6.8. The Location Submit Function as It Is Currently Written
function weather_location_form_submit($form, $form_state) {
  $location = trim($form_state['values']['weather_location']);
  variable_set('current_location', $location);
}
This code not only fails to take into account each user's individual location, but it also sets the global variable to what the user entered. Any user who changes the location will change it for everyone who is currently logged on—not really what we want.
We need to change that logic to update the profile of the current user instead of updating the current location variable for all users. In order to change the user's profile, we use the field_attach_update() function, which is part of the Field Attach API. The code to do that is shown in Listing 6-9.
Example 6.9. Refactoring the Submit Form to Handle Updating a User's Profile
function weather_location_form_submit($form, $form_state) {
  $location = trim($form_state['values']['weather_location']);
  global $user;
  $user_profile = user_load($user->uid);
  $user_profile->field_weather_location['und'][0]['value'] = $location;
  field_attach_update('user', $user_profile);
}
The field_attach_update() function requires an array containing a list of the attached fields. In order to give this, we grab the user information and convert it into an array. Once we change the weather location, we can pass it to the function and update our fields.
As you can see, it's possible to programmatically change just about any aspect of the system, even if we don't own the data or the code. For this reason, it becomes important to be sure that your code does not adversely affect other modules and has the effect on the system that you intend. A lot of this can be assured by adopting a test-driven development mindset and running tests on your module and the entire system whenever you change something.
Chapter 8 covers test-driven development and Drupal's Simpletest unit and system test environment.
In this chapter, we have covered Drupal's role functionality and looked at how roles can be used to allow or restrict access to any level of granularity the programmer wishes to accommodate. We also saw how to build custom content types and customize core content types, as well as add and programmatically access profile information to a special content type, users.
In Chapter 7, we will learn about how to make our system generate HTML to get just the right look and feel to our pages. This is done through the theming process.