
If you create custom modules or themes, you'll need to provide enough information for yourself or others to deploy the module to the Drupal core. The installer uses two files, one required and one optional, to prepare the system for accepting your module.
If your module is self-contained and does not make any changes to the system, you can use a simple .info file. (The file is pronounced"dot info.")
The .info file stores metadata about your module or theme. For a module, the .info file tells Drupal the following:
That the module exists and what it is called.
How to control the activation and deactivation of the module.
How to render the module's information on the Drupal administration pages.
How to deal with the module in other administrative contexts.
In Chapter 5, you saw a simple .info file for Drupal 7. The code in Listing 10-1 shows that .info file.
Example 10.1. A Basic .info File
; $Id$
name = Weather information
description = A block that shows current weather for a particular location.
package = Cool stuff from Brian
core = 7.x
files[] = weather_info.module
files[] = weather_info.inc
files[] = tests/weather_info.test
dependencies[] = block
configure = admin/config/weather_info/settings
version = 7.x-1.x
The .info file must have the same base name as the .module file and be in the same directory in your module hierarchy. In this case, our module is weather_info.module, so our .info file must be weather_info.info. The same goes for the .info file for themes.
Note
A Note on Names: The Drupal community has developed a set of naming conventions you should follow in order to be compatible with the community. You'll find a full description at http://drupal.org/coding-standards#naming.
Let's cover each of the fields here, and add a few as we go.
; $Id$:All Drupal files should begin with this line so the version control system can replace it with the appropriate metadata.name:This is the name of the module, which will appear on the administration page and other places. Choose the name carefully as you'll be seeing a lot of it. Drupal conventions state that the name should be descriptive but short, with the first word capitalized and the rest in lowercase. The string does not need to be quoted. The name should not end with a period.description:The description is limited to 255 characters. It should follow the Drupal capitalization conventions and end with a period. The line should be descriptive enough to tell the user what the module or theme is or does. The description can also have simple HTML markup to, for example, insert a link to online documentation or the author's site:description = The <a href="http://drupal.org/project/omega">Omega Theme</a> is a kitchen sink full of features from many of the popular base themes available on Drupal.org thrown into an end-all theme for maximum flexibility.
package:This is an optional field meant for integrating a link to your module into the administration page. If the package field is not present, your module will be listed in the "Other" section of the module administration page. This is meant for multi-module packages; if you have a single module that does not relate to any of the common items, leave this out to keep from cluttering the administration page. The following are common items for the package field:Administration
CCK
Commerce
Development
Media
User interface
Video
Views
Voting
core:This required field indicates which version of the Drupal core is needed to run your program. Modules can only specify the version of the core, not the branch of that version. For example, 7.x is correct, but 7.1 is not.files[]:This is an array that indicates all of the files your module depends on. You would want to add any include files or testing files if they exist. Note that this is a new requirement for Drupal 7; it was created as a speed optimization feature not present in Drupal 6. Drupal will scan all dependent files every time the module is installed to keep its hook registry up to date.dependencies[]:This array indicates the other modules that are required for your module to run. The value of the dependencies array is the machine name of the module:that is,weather_info, not Weather information. Following the name of the dependent module, you can optionally indicate which version of the module is required. Examples:dependencies[] = comment:indicates that any version of the comment module is required.dependencies[] = votingapi (1.x):indicates that any branch of version 1 of the Voting API is required.dependencies[] = wysiwyg (2.1):indicates that only the 2.1 branch of the Wysiwyg module will satisfy the dependency requirement.dependencies[] = token (>=7.1-1.2):indicates that only the 1.2 branch of the Token module is required, and Drupal core 7.1 or greater is required. (Standard evaluation symbols may be used:=or==equals,>greater than,<lesser than,>=greater than or equal to,<=lesser than or equal to,!=not equal to)dependencies[] = simplenews (>1.1, <=2.3, !=2.0):evaluators can be combined.
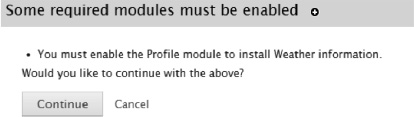
If the dependent files are not enabled and can be enabled, the installer engine will ask if you want to have them installed automatically, as Figure 10-1 shows.
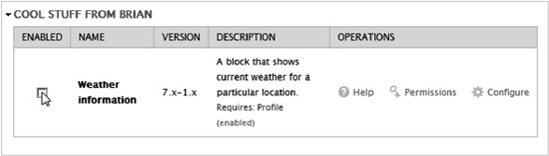
php:This optional field indicates the minimum version of PHP required by the module.version:The version of the module that you'd like to indicate. This field is discouraged as it is added bydrupal.orgwhen your module is released and a tarball is packaged. However, if you'll be hosting your module elsewhere or it's not for public use, you'll need to populate this field yourself.configure:This optional field indicates the path to the module's configuration page. It is the page that will display when the "Configure" link is clicked on the modules overview page (see Figure 10-2).Be careful not to insert a leading slash in the path:
configure = admin/config/weather_info/settings
required:This optional field indicates that this module is absolutely required to the functioning of the system and should never be disabled. Ifrequired = TRUE, the module will be enabled automatically and the enabled checkmark will be disabled. Be careful with this one, as it was designed for core modules. Your module better be pretty critical to rise to this level for all people who install it.hidden:This optional field indicates that the module should be hidden from users. When you sethidden = TRUE, the module will not appear on the modules page. This is usually used for testing modules, which the end user should not have access to.
Themes also require a .info file. A typical .info file for a theme is shown in Listing 10-2.
Example 10.2. Typical .info File for a Theme
; $Id: bartik.info,v 1.5 2010/11/07 00:27:20 dries Exp $

name = Bartik
description = A flexible, recolorable theme with many regions.
package = Core
version = VERSION
core = 7.x

stylesheets[all][] = css/layout.css
stylesheets[all][] = css/style.css
stylesheets[all][] = css/colors.css
stylesheets[print][] = css/print.css
regions[header] = Header
regions[help] = Help
regions[page_top] = Page top
regions[page_bottom] = Page bottom
regions[highlighted] = Highlighted

regions[featured] = Featured
regions[content] = Content
regions[sidebar_first] = Sidebar first
regions[sidebar_second] = Sidebar second

regions[triptych_first] = Triptych first
regions[triptych_middle] = Triptych middle
regions[triptych_last] = Triptych last

regions[footer_firstcolumn] = Footer first column
regions[footer_secondcolumn] = Footer second column
regions[footer_thirdcolumn] = Footer third column
regions[footer_fourthcolumn] = Footer fourth column
regions[footer] = Footer

settings[shortcut_module_link] = 0

; Information added by drupal.org packaging script on 2010-11-14
version = "7.0-beta3"
project = "drupal"
datestamp = "1289694732"
Note
The last four lines were created by the packaging script that was run on the theme before including it on the drupal.org site. If you are going to make your module or theme available on drupal.org, these fields should not be specified so they can be added by the packaging script.
The fields that are specific to themes are:
regions[]:All regions defined by your theme must be declared in the.infofile for the theme if you want to be able to access them with the blocks administrator. If you have a subtheme and are using only the same regions as the base theme, you still need to specify them here.stylesheets[media][]:All stylesheets used by your theme must be declared here or they will not be applied. The first dimension of the array must indicate the stylesheet's "media property." Recognized media properties are:all:Suitable for all devices.braille:Intended for braille tactile feedback devices.embossed:Intended for paged braille printers.handheld:Intended for handheld devices (typically small screen, limited bandwidth).print:Intended for paged material and for documents viewed on screen in print preview mode.projection:Intended for projected presentations, for example projectors.screen:Intended primarily for color computer screens.speech:Intended for speech synthesizers.tty:Intended for media using a fixed-pitch character grid (such as teletypes, terminals, or portable devices with limited display capabilities). Authors should not use pixel units with the "tty" media type.tv:Intended for television-type devices (low resolution, color, limited-scrollability screens, sound available).
Tip
If you want to override a particular stylesheet, just declare that filename in your stylesheet area but don't include it in your module directory. This essentially replaces the existing stylesheet file with nothing.
base theme:If your theme is a subtheme, this is where you put the name of the theme it is derived from. Note that this is the machine-readable name of the theme, not the human-readable name:base theme = pixture_reloaded.scripts[]:If your theme includes Javascript files, this is where you specify them. In versions of Drupal before 7, the filescript.jsis included automatically. In Drupal 7, it is only included if you specify it in thescripts[]parameter.features[]:Various elements output by the theme can be turned on and off from the theme's configuration page. Thefeatures[]array in the.infofile controls which of these check boxes display on the configuration page. If you want to suppress the display of a check box, omit the entry for it in the.infofile. Realize, though, that if no features are defined, all check boxes will display due to the assumed defaults. The following features are available:settings[]:This optional keyed array is intended to communicate information to the theme. If you are familiar with the .NET application configuration framework, you can think of this:<add key="mykey" value="myvalue" />
in
app.config or web.config.The settings are available to the theme module using thetheme_get_setting()function. The equivalent in your.infofile would be:settings[mykey] = myvalue
engine:This required field indicates the theme engine your theme uses. If none is provided, the theme is assumed to be stand-alone, i.e., implemented with a ".theme" file. Most themes should usephptemplateas the default engine. Omit this entry only if you know what you're doing.screenshot:This optional field indicates to the Drupal theme-page engine where it can find a thumbnail image for the theme. If this key is omitted from your.infofile, Drupal uses thescreenshot.pngfile in the theme's directory.
The lines in your .info file can appear in any order (except for the $Id$ line), but most users put the name and description first to make it easy on the human reader or updater.
Note
The contents of the .info file are cached in the database soDrupal won't notice any alteration. To clear it, do one of the following: Click the "Clear all caches" button located at Configuration
By creating the required .info file in your module, you give others an instant starting point to learn about your module, as well as providing the information Drupal needs to manage your module and integrate it into the site.
During the deployment process, it is possible to do other things with the systemusing a special Drupal module called the .install file (is pronounced "dot install"). This file has the same name as your module with an extensionof .install.
If your module requires new content types, custom databases, or otherwise makes changes to the environment, such as creating directory structures, you'll want to include a .install file with your package that the installer can use to prepare the system for accepting your module. You'll also want a .install file if you are upgrading your module from one version to another.
The philosophy of an install program is the same in Drupal as it is in Windows or any other platform. That is, you should create everything the user needs in order to use your module, and leave no trace if the user wants to uninstall the module. The .install file allows you to do both of those things; the Drupal engine hooks into your .install file to set things up and tear them down.
Tip
The .install file is a PHP code file, and uses the same coding conventions as any other PHP file. If you are using Visual Studio, you should add .install as a valid extension for PHP files so you will get all of the coloring and IntelliSense goodness you expect.
In Chapter 5, we enabled a module using the Modules administration page. When a module is enabled, Drupal goes through the module file, as well as any included files, and makes a list of artifacts it might need later. It stores this information in the database and refers to it when the hook mechanism is executed.
The module-enabling process, then, is really a code-deployment process. During this process, you might need to do other things to the environment so your module has the requisite information it needs to function and so the Drupal installation has everything it needs to make use of your module.
The .install file works with Drupal's hook system just like any other Drupal program file. Probably the most common reason for creating a .install file is to create a database table or two, which you do using the schema hook. Like all hooks, your function will have the name of your module, followed by an underscore and the hook name, in this case, schema.
Thinking back to the weather information module we created in the second part of this book, recall that it allows the user to specify a custom location, language, and display units for the weatherlocation. We used the user profile module to assure that each user could specify his own information.
But now suppose we'd like to keep track of the locations, languages, and display units of anyone who has entered weather location information. We can access the user profile tables to get information about what our users have specified right now, but that's lost if they make a change. I want to keep track of all information ever entered. For that, we'll need a special table that we can create, manage, and drop if necessary.
The first thing we need to do in our .install file is to create a hook function for the schema. That function is called weather_info_schema() and appears in Listing 10-3.
Example 10.3. A Schema Hook Function forCreating a Table in the Drupal Database
function weather_info_schema() {
  $schema['weather_info'] = array(
    'description' => 'Weather information history.',
    'fields' => array(
        'hid' => array(
          'type' => 'serial',
          'unsigned' => TRUE,
          'not null' => TRUE,
          'description' => 'Primary Key: Unique history entry ID.',
          ),
        'location' => array(
          'type' => 'varchar',
          'length' => 255,
          'not null' => TRUE,
          'default' => '',
          'description' => 'Weather location.',
          ),
'units' => array(
'type' => 'text',
'length' => 50,
'not null' => TRUE,
'description' => 'Weather unit system.',
),
'language' => array(
'type' => 'text',
'length' => 50,
'not null' => TRUE,
'description' => 'Language in which weather is displayed.',
),
'uid' => array(
'type' => 'int',
'not null' => TRUE,
'default' => '0',
'description' => 'The uid of the user making the entry.',
),
'timestamp' => array(
'type' => 'int',
'not null' => TRUE,
'default' => '0',
'description' => 'A unix timestamp indicating the time the entry was made.',
),
),
'primary key' => array('hid'),
'indexes' => array(
'list' => array('location'),
),
);
return $schema;
}First, the fields are created and then, optionally, the keys and indexes. The term in the first dimension of the array is the name of the table to be created, in this case weather_info. You can create as many tables as you want in a single schema array by adding first-dimension array items keyed by the name of the table. The definition of the table's fields, keys, and indexes is in an array contained therein.
As with most things Drupal, a description is required, which is the first array item. Then the fields are defined with their own arrays—each item is a table column containing an array of parameters.
Keys and indexes fill out the array. In addition to the items shown in the example in Listing 10-3, you can specify unique keys, foreign keys, and other artifacts. A list of available schema API keys is reprinted in Appendix III.
Notice that the schema is returned from the schema hook function. There is no need to explicitly create the database tables, as the Drupal module installation function will take care of that. In fact, it's best to let Drupal deal with the database because it needs to know about your schemas in case it needs to remove them later.
In Drupal, a module can be enabled, installed, disabled, or uninstalled. Modules are enabled on the module administration page (Modules from the admin menu, or /admin/modules from the URL). Remember that in order for a module to appear on that page, it must appear in the sites directory hierarchy. For more information on this, see Chapter 5.
When the administrator checks the box next to your module and clicks the "Save configuration" button, the installer looks for certain hooks in your .install file. First, it deals with the schema hook and creates your database tables. And then, if the module has not yet been installed (or has been uninstalled), the installer engine will look for the install hook and execute it if it is present. After that, the enable hook is executed. (See Figure 10-3)

It is in these hooks that you should do everything necessary to make sure your module has what it needs in the environment to function.
Listing 10-4 shows the install hook for our weather information module.
Example 10.4. Install Hook That Seeds a Custom Table
function weather_info_install() {
  global $user;
  // Insert a default weather_info category.
  db_insert('weather_info')
    ->fields(array(
        'location' => 'Manchester, NH',
        'units' => 'F',
        'language' => 'en',
        'uid' => $user->uid,
        'timestamp' => REQUEST_TIME,
        ))
    ->execute();
  drupal_set_message(st('Weather information table has been created.'));
}
Tip
Notice the st() function in this module. In your regular Drupal module, you should use the t() function to provide translatable strings. This is a best practice and will be enforced by community standards. However, during the installation process, the database, theme, or localization subsystems might not be available. The st() function is a functional equivalent to t() for use only in installation programs.
First, an initial record in the database is inserted using the database API function, db_insert(). Recall that the schema array is read first by the installer program, so the table or tables should exist by the time the installer gets to the install hook. This means we are safe to insert our record. If this fails, it usually means there was a problem creating the tables from the schema. If that was the case, however, the error handler would probably prevent us from getting to this point.
The fact that we've gotten this far should mean that everything is good so far.
Next, we need to create the fields that our program depends on. The weather information module depends on certain fields that will be managed as part of the user's profile information. Back in Chapter 6, we created those fields manually. But we don't want to burden our users with this,
The Fields API has a number of functions that allow us to create, retrieve, update, and delete fields. Like any good API, the Fields CRUD API isolates us from the details of the underlying implementation and allows us to get our job done without worrying about how the tables actually look.
Listing 10-5 shows the API call for the first field, field_weather_location.
Example 10.5. Creating a Field and an Instance with field_create_field()
// *
// * Weather location field
// *

$field = array(
  'field_name' => 'field_weather_location',
  'type' => 'text',
  'translatable' => TRUE,
  );
$instance = array(
'field_name' => 'field_weather_location',
  'entity_type' => 'user',
  'bundle' => 'user',
  'label' => 'Weather location',
  'widget' => array(
      'type' => 'text_textfield',
      'weight' => '15',
      ),
    'description' => st('Enter a location on earth for which you would like '
      . 'to see weather information presented.'),
    );

// Create the field and instance.
field_create_field($field);
field_create_instance($instance);
We use two arrays. The first, $field, provides the name of the field we are creating and its type. This is the field itself, which can be used in many different places. The second, $instance, is one instantiation of a field, which has particulars concerning the actual instance. This seems redundant for this simple field, but you could have a custom field that contains many different facets of atype of information, such as a color with red, green, and blue components, or an address made up of street, city, state, postal code, etc. Defining this field once and instantiating it for particular purposes is more efficient.
Listing 10-6 shows the remaining two fields we need to create.
Example 10.6. Creating Two More Fields and Instances
// *
// * Weather language field
// *

$field = array(
  'field_name' => 'field_weather_language',
  'type' => 'list_text',
  'translatable' => TRUE,
  'settings' => array(
      'allowed_values' => "en|English
es|Spanish
de|German
tr|Turkish
fr|French
",
      'allowed_values_function' => '',
      ),
    );
$instance = array(
  'field_name' => 'field_weather_language',
  'entity_type' => 'user',
  'bundle' => 'user',
  'label' => 'Weather language',
  'widget' => array(
      'type' => 'options_select',
      'weight' => '16',
      ),
    'description' => st('Enter the language in which you would like to see '
      . 'weather information presented.'),
    'default_value' => array(
      array(
        'value' => 'en',
        ),
),
);
field_create_field($field);
field_create_instance($instance);
// *
// * Weather units field
// *
$field = array(
'field_name' => 'field_weather_unit',
'type' => 'list_text',
'translatable' => TRUE,
'settings' => array(
'allowed_values' => "F|Fahrenheit
C|Celsius
K|Kelvin
R|Rankine",
'allowed_values_function' => '',
),
);
$instance = array(
'field_name' => 'field_weather_unit',
'entity_type' => 'user',
'bundle' => 'user',
'label' => 'Weather units',
'widget' => array(
'type' => 'options_select',
'weight' => '17',
),
'description' => st('Enter the measurement unit with which you would like '
. 'to see weather information presented.'),
'default_value' => array(
array(
'value' => 'F',
),
),
);
field_create_field($field);
field_create_instance($instance);Notice the allowed_values property for the language and unit fields. Since these are list_text field types, the allowed_values field provides a list that will appear in a drop-down select widget or a radio button list. The newline characters (
) denote the individual values, and the vertical bar (|) separates the value that will be placed in the database from the text that will be shown to the user.
The enable hook is shown in Listing 10-7.
Example 10.7. The Enable Hook Sets Up System Variables
function weather_info_enable() {
  variable_set('default_location', 'Manchester, NH'),
  variable_set('default_units', 'F'),
  variable_set('default_language', 'en'),
variable_set('current_location', variable_get('default_location'));
drupal_set_message(st('Weather information default variables have been set.'));
}The only task of the enable hook, in our case, is to set up the four system variables the module depends on. Recall that this hook is called after the install hook, so if there are any tasks you need to do that depend on tables that were created or modified, it's safe to do them in this hook.
That wraps up the tasks necessary for setting up our installer to be ready for our weather information module. Here are some other common tasks you might want to take care of in your install hook:
Create custom content types. The schema hook creates tables that your module alone will manage, but if you need to create a content type that is managed by Drupal's node framework, you can do this using the
node_type_save()function.Set the values of persistent system variables. Drupal's variable table holds values that are available to all users. Your module will probably need to set some of these for access later.
Populate your tables with sample data or required parameters. Your module might contain a few records of reference data or a few thousand. The install hook is where you can populate those tables.
Create records in tables maintained by other modules. This might be necessary if your module has dependencies on other modules and you need to tell the other modules about your newly installed module. You can also modify the system table, giving your module more weight than others, for example. Be careful with this, though, as you might step on other modules' wishes.
Create directory structures for storage of temporary or legacy files.For example, the image module creates a directory structure for temporary storage of thumbnail images and other graphics. You might also need to create such structures and set the permissions appropriately.
Establish a connection to an enterprise database source for populating managed tables. You might need to access information from back-end systems using web services or direct database connections.
Grant permissions to certain roles. The roles are created in your module, but you might want to add permissions to the standard roles,
DRUPAL_ANONYMOUS_RIDandDRUPAL_AUTHENTICATED_RID.
Of course, there are myriad other things you might want to do to set the system up for your module.
Now that we've created the weather information history table, we'll want to add some functionality to our module that takes advantage of the new table. To start, we will insert a record every time a user changes his profile information inhis user profile. The function to insert the record is shown in Listing 10-8.
Example 10.8. Inserting a Record into the History Table
function weather_info_insert_history($location, $language, $unit, $weather) {
  global $user;
    $fields = array(
'location' => $location,
'language' => substr($language, 0, 2),
'units' => substr($unit, 0, 1),
'uid' => $user->uid,
'timestamp' => REQUEST_TIME,
);
$options = array('return' => Database::RETURN_STATEMENT);
$returned = db_insert('weather_info', $options)
->fields($fields)
->execute();
}We will call this function from the validate function of the form where the user enters information on the profile page. The code is shown in Listing 10-9.
Example 10.9. Calling the Insert History Function
function weather_info_profile_weather_location_validate($element, &$form_state) {
  $location = $form_state['values']['field_weather_location']['und'][0]['value'];
  $language = $form_state['values']['field_weather_language']['und'][0]['value'];
  $unit = $form_state['values']['field_weather_unit']['und'][0]['value'];
  if (variable_get('default_location') != $location) {
    $weather = weather_info_get_weather($location, 'en'),
    if ($weather) {
      weather_info_insert_history($location, $language, $unit, $weather);
    }
    else {
      form_set_error('field_weather_location[und][0][value]', t('Cannot get weather for %location.',
        array('%location' => $location)));
    }
  }
}
This stores the appropriate information into the history table whenever the user makes a change.
The disable and uninstall hooks are used to back out of certain environmental changes you made with the enable and install hooks. They can also be used (particularly the uninstall hook) to remove any information generated in the normal use of your module.
The reason for this two-part process is simple. A user might enable and disable a module several times for any number of reasons. If your module creates and maintains its own database tables or file structures, the user might have entered information that goes in these areas.
Another example is that you, as a developer, might want to try out some new things with a module without harming existing data. Or you might want to just temporarily disable a module during a quick test.
If you were to drop the tables and wipe the directories every time the user disabled your module, the data would be gone the next time it was enabled.
The disable hook is executed when a module is unchecked on the Modules page and the page is submitted, as shown in Figure 10-4.
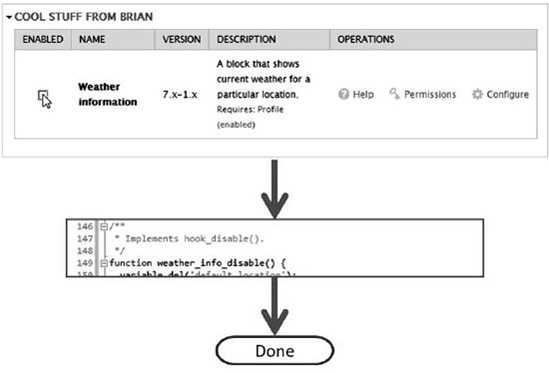
The disable hook, then, should be used only to put the system in a state where other functions are not affected by its presence. Listing 10-10 shows the weather information disable hook.
Example 10.10. Disable Hook Function
function weather_info_disable() {
  variable_del('default_location'),
  variable_del('default_units'),
  variable_del('default_language'),
  variable_del('current_location'),
}
This function merely deletes the system variables from the variables table. This is probably not necessary because it's unlikely that any other module will be using them, but it is good manners to clean up after yourself. Remember that the disable hook is optional. If you don't include it, your module will still be removed from the list of enabled modules, and its functionality will be unavailable.
The uninstall hook is executed when the module is checked on the uninstall page and the page is submitted, as shown in Figure 10-5.
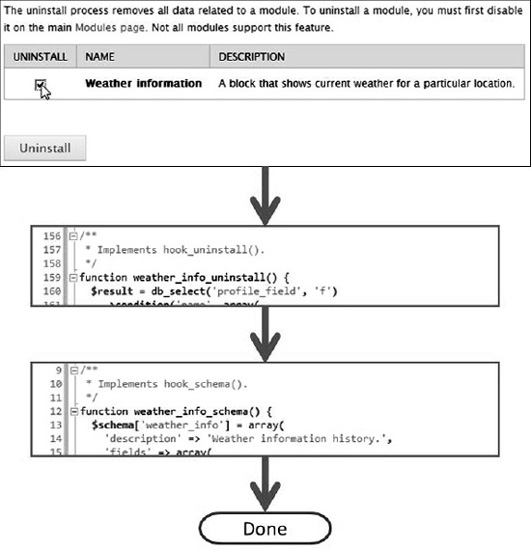
The uninstall hook is where you really clean up all traces of your module—any directories you've created on the site-managed store, or any configuration changes made to the system table, or any number of things you may have done to prepare the system for your module. Listing 10-11 shows the weather information uninstall hook.
Example 10.11. The Uninstall Hook
function weather_info_uninstall() {
  field_delete_field('field_weather_location'),
  field_delete_field('field_weather_language'),
field_delete_field('field_weather_unit'),
// Flush the cache to get rid of the user profile page entry
drupal_flush_all_caches();
}During the install phase, we created three attached fields that entered information into the database tables that the Field module managed. When we uninstall the module, our uninstall hook function needs to delete all traces of our activities. This is done by deleting the fields, which removes all of the information from the system.
Note
If you have created tables using the schema hook, you need not remove those tables as the uninstall engine will take care of it for you.
There's one last taskto perform before we deliver our module. We need to add the .install file to our .info file so Drupal knows about it. Listing 10-12 shows the new .info file.
Example 10.12. A .info File Showing the .install File as Part of the Package
; $Id$
name = Weather information
description = A block that shows current weather for a particular location.
package = Cool stuff from Brian
core = 7.x
files[] = weather_info.module
files[] = weather_info.inc
files[] = weather_info.install
files[] = tests/weather_info.test
dependencies[] = blocks
configure = /admin/config/weather_info/settings
version = 7.x-1.x
That covers the installing and uninstalling of modules. Now, what happens if you need to make changes to existing modules and you don't want to require your users to rebuild everything? You can give them the tools to perform an update.
As development of your module proceeds, you will certainly want to make improvements to it. Drupal has an update manager that periodically checks the Drupal community site, drupal.org, for updates released for all modules loaded on a particular system. If your module is hosted at drupal.org and you release a new version, the update manager on all systems where your module is enabled will inform the administrator that a new version is ready.
This is why you need to think about how the functionality of your module has changed and make it easy for the administrator to update the system.
If you add or remove functionality to your module that affects only the module, then all you need to do is put the new module file in your project directory. It will be distributed to the community and everyone will send you love, respect, and PayPal contributions.
On the other hand, if you add functionality that affects another part of the system, you'll want to include an update hook so the installer engine will know what to do with your new code.
You might need to update the system if you add functionality that captures more information with new database fields. Or you might need to fix a database table that was incorrectly specified in the first place. There could be new directories required to store certain information, or some role permissions might need to be changed. The update hook is where to perform these tasks.
Drupal's update engine is quite ingenious. Not only does it have to understand which update is currently installed, it needs to be able to graciously apply new updates without affecting existing updates or the base installation of the module. It does this by reading through the .install file looking for updates that it needs to apply. Drupal keeps track of each module that has been installed and what the current update version is. When an update for a currently installed module comes along, the Drupal installer will look in the .install file for update hooks with a carefully crafted name indicating the updated version of the module.
Warning
Note that you must never use the same update number twice. Once you publically issue code with update 7103, for example, then the next update—even if you removed update 7103 as faulty, buggy code—must be 7104. Otherwise, none of your users with the old 7103 installed will see it as a new update to run.
The project for this book, the weather information block, saves location, language, and unit information in the database table we created with the .install script. As a new revision, I'd like to also save the XML stream that's returned whenever a user selects a new location. Plus, I'd like to make the name of the database table more descriptive.
Changing the name of a table in the database will break all kinds of things that depend on it. In our case, we have encapsulated the access to that table ina single function, so we don't need to make many changes. Listing 10-13 shows the modified function to write to the table and insert the new information.
Example 10.13. New Function for Writing to the Database
function weather_info_insert_history($location, $language, $unit, $weather) {
  global $user;
  $fields = array(
    'location' => $location,
    'language' => substr($language, 0, 2),
    'units' => substr($unit, 0, 1),
    'uid' => $user->uid,
    'timestamp' => REQUEST_TIME,
    'xml' => $weather->asXML(),
    );
  db_insert('weather_info _history')
    ->fields($fields)
    ->execute();
}
Notice the asXML() method on the weather object. This is a way to serialize the XML weather object so it can be stored as a text field. We have also changed the name of the table on the db_insert() function to reflect our new table name.
This code works on our system, because we have manually changed the name of the table in our database and added the field. But we don't want our users to have to go through that effort. Plus, we want to take all of the existing data and populate the new field with the XML for the previously stored locations.
Listing 10-14 shows the update function that will do all of that.
Example 10.14. An Update Hook
/**
 * Rename {weather_info} table to {weather_info_history} and add a field to capture
 * raw XML data from the weather service.
 */
function weather_info_update_7100() {
  ... update logic goes here.
}
First, notice the Doxygen-style comment before the function declaration. We'll see that a bit later when the module is updated.
Next, see the carefully crafted function name, weather_info_update_7100(). This is a hook that will be found and executed by the update program. It is the name of our module, followed by _update_, followed by a number that indicates information about the particular update. That number is created according to the following rules:
1 digit for Drupal core compatibility
1 digit for your module's major release version (e.g., is this the 7.x-1.* (1) or 7.x-2.* (2) series of your module?)
2 digits for sequential counting starting with 00
Note
The second digit should be 0 for the initial porting of your module to a new Drupal core API.
The following are examples of update hook names:
weather_info_update_7100():This is the first update to get the database ready to runweather_infoversion 7.x-1.*.weather_info_update_7000():Assuming I had a version of the module running under Drupal 6, this is a required update to bring it up to compatibility with Drupal core API 7.x.weather_info_update_7200():This is the first update to get the database ready to runweather_infoversion 7.x-2.*.weather_info_update_7201():This is the second update to get the database ready to runweather_infoversion 7.x-2.*.
Listing 10-15 shows the complete function that will be updating our module.
Example 10.15. A Complete Update Function
/**
 * Rename {weather_info} table to {weather_info_history} and add a field to capture
 * raw XML data from the weather service.
 */
function weather_info_update_7100() {
  db_rename_table('weather_info', 'weather_info_history'),
  db_add_field('weather_info_history', 'xml',
    array(
      'type' => 'text',
      'size' => 'normal',
      'description' => 'Raw weather XML returned.',
    )
  );

  // update all existing records
  $result = db_select('weather_info_history', 'h')
    ->fields('h', array('hid', 'location', 'language'))
    ->execute();
  foreach ($result as $record) {
    $weather = weather_info_get_weather($record->location, $record->language);
    if ($weather) {
      db_update('weather_info_history')
        ->fields(array(
            'xml' => $weather->asXML())
            )
        ->condition('hid', $record->hid, '=')
        ->execute();
    }
  }
}
The first two functions rename the table and add a new field. Then, the rest of the code reads the existing records and updates each record with the XML generated by a call to the weather service.
Now that the .install file is ready, let's deliver our package to the users. We just need to modify the .info file first. Since we have a new version of our program, we should update the version number. In this case, the new version number will be 7.x-1.0. Our new .info file is shown in Listing 10-16.
Example 10.16. A .info File That Updates the Version Number
; $Id$
name = Weather information
description = A block that shows current weather for a particular location.
package = Cool stuff from Brian
core = 7.x
files[] = weather_info.module
files[] = weather_info.inc
files[] = weather_info.install
files[] = tests/weather_info.test
dependencies[] = profile
configure = /admin/config/weather_info/settings
version = 7.x-1.0
After we place the new module files in our directory and go to the Configuration page, we'll see the error shown in Figure 10-6.
The error message is displayed by the update manager, which noticed that there is at least one new version of an installed module. Clicking on "status report" provides more information, as shown in Figure 10-7.

Clicking on "database update script" launches the update program, which starts the wizard shown in Figure 10-8.
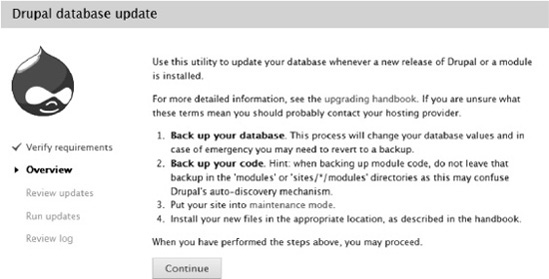
Clicking "Continue" shows all of the updates that are available. (See Figure 10-9.)

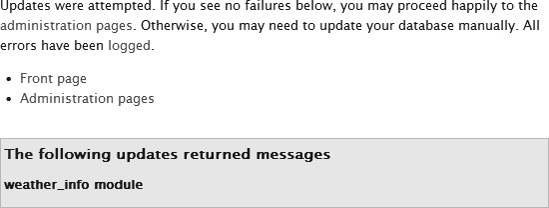
You'll notice that the information in our .install file is shown here. You can see the information contained in the comment that was entered just before the update function definition. Also, you can see the number of the update, 7100. Clicking "Apply pending updates" causes the updater to run all of the update functions available (in this case, just one). The throbberdisplays while the process is executing. (See Figure 10-10.)

Finally, the update happy screen is shown in Figure 10-11.
There are some important things to keep in mind about the .install file and updates:
When you update your module's schema, the changes should be reflected in the schema hook. Even though your update functions will make changes to the schema, if you have new users who come in after you've made a couple of updates, the functions will load the most current schema and then apply updates from that point.
Keep all of your updates in your
.installfile. You may have some users who have used your module from the beginning and have applied the updates as they came along. However, other users might have installed your module after you have made a couple of updates and they'll need to start from that point. Also, some users might be a couple updates behind and need to execute them in order.Never renumber your update functions. The number at the end of your update function is an incremental value. The highest applied update for your module is stored in the database. If you renumber an update after it has been applied, bad things could happen. Just stick to the numbering conventions and you shouldn't have any problems.
Warning
Your install code must be current with your module code and vice versa. In this example, we changed the module to update the table name and add a field. If a user installed that new module and tried to run it before running the update script, the module would fail. It is up to the user to run the update script whenever a new module is loaded, and it is up to the programmer to make sure everything is in sync.
Test, test, test. It is even more important that the update function work flawlessly than the initial installation. Having an update means your users are using your module, and they probably have data that depends on it. If your update program fails, it renders the module useless. Worse, it could orphan your users' data.
Now that you have your module described and instructions for installation, let's talk about the process of delivering your module to your users.
By creating the .info and .install modules, you have described your module to the Drupal core in enough detail for it to do the installation. But there is still more you need to do to help your user understand the module and how to use it.
The Drupal site, drupal.org, provides a service that hosts your module for anyone to access. You've already used this site if you've installed any contributed modules. The site includes a search function that lets users look for modules that contain the features they want, and it gives them a way to download the most recent versions.
The site is available to users and developers for free, but if you want your module listed on the site, you must agree to the site's guidelines, which basically means you must be involved in the maintenance of the module and allow others to join your project to make it better. Just uploading code and forgetting about it will not be tolerated by the community.
Note
Even if you don't want your module hosted on drupal.org, you should use these guidelines to help you maintain your module. For a list of compelling reasons why you should list your module on drupal.org, see http://drupal.org/node/648898.
Getting involved in the Drupal community can take several forms. The book page for the site that explains the different ways to be involved starts at http://drupal.org/node/281873.
But regardless of whether you decide to maintain your module on the community site, you should develop certain files while the information is still fresh in your mind.
Good documentation is vital for your module to be accepted widely. It will also help your users work with the module's functionality and get the most out of it. This, in turn, improves the chance that your module will be referred, picking up new users. And community recognition is most likely why you are spending all of your valuable time creating something to give a way for free, isn't it?
Here are some guidelines to use when coding modules that will be available in the Drupal contributions repository. These guidelines are a good place to start even if your module will only be used by you or your company.
Have a useful README file: All but the most trivial modules should have a README.txt file in the project directory. This should provide a basic overview of the module and how a potential user might benefit from installing it. The README.txt file from the Services module is about as brief as you'd want to go:
// $Id:$

Goals
==============
- Provide weather information for a geographical location on Earth.
- Provide a block that can be placed in any region.
- Allow users to define their own location, language, and display
  units that will be displayed when they log on.

This module uses the profile module and creates new profile fields
so each user can specify his or her own location for weather.

Documentation
==============
http://drupalforwidows.com/docs/weather_info
Use
hook_help(): All but the most trivial modules should implement the help hook to provide information about the module to the administrator and/or users of your module. The embedded documentation style guide (http://drupal.org/node/24566) is a resource for creating effective documentation for your module. At the very least, you should create a help hook that simply displays the README file using a function like:/** * Implements hook_help(). */
function weather_info_help($section) {
  switch ($section) {
    case 'admin/help#weather_info':
      // Return a line-break version of the module README
        return _filter_autop(
          file_get_contents( dirname(__FILE__) . "/README.txt"));
  }
}
Tell the user what the module does: The README and help files should give the user an idea of what the module does, what the menu paths are for administration, what file directories created or accessed, and what might impact other modules or the Drupal core. In short, the information should help the user get the most out of your module and let him know what to expect from its interaction with others.
Don't name your package unless it is justified: Remember the
packageparameter in the.infofile? Most modules should not create their ownpackages as this tends to clutter up the module administration page. Chances are your package does something similar to what other modules are doing and should therefore be placed in a well-known package name. If it is a unique, stand-alone module, just leave the package name out and it will be listed under "Other" on the module administration page.Document your functions properly: The Drupal community has embraced the Doxygen documentation conventions as a standard way to generate documentation from inline comments. Using Doxygen-style comments allows various scripts to rollup your comments into a standardized form that others in the community are comfortable with. For more information on Doxygen formatting conventions, see
http://drupal.org/node/1354.Write and deliver tests: I can't overemphasize the importance of developing test suites for your module. Chapter 8 goes into depth on creating test suites and executing them against your module and your site.
Consider an installation profile: If you have several modules to install, or if your module requires other modules that might not be installed on potential user sites, you can create a supercharged profile that performs a batch installation of a set of modules and even of the Drupal core itself. You can create an installation profile that contains the core (for systems that don't yet have Drupal installed), or a profile that includes only the modules that makes your profile unique. For more information on creating installation profiles, see
http://drupal.org/node/159730.
These should be considered a minimum set of requirements for developing your modules. They will help other users understand your code. Remember, that other user could be you in three years when you have to fix the code!
Installing and deploying a Drupal module is as critical a task as installing any other program. You need to create an environment that is favorable for your application, and then you need to provide the means to uninstall gracefully and be a good neighbor should your user not want to use your module any more.