
![]()
Git in Other Environments
If you read through the whole book, you’ve learned a lot about how to use Git at the command line. You can work with local files, connect your repository to others over a network, and work effectively with others. But the story doesn’t end there; Git is usually used as part of a larger ecosystem, and the terminal isn’t always the best way to work with it. Now we’ll take a look at some of the other kinds of environments where Git can be useful, and how other applications (including yours) work alongside Git.
Graphical Interfaces
Git’s native environment is in the terminal. New features show up there first, and only at the command line is the full power of Git completely at your disposal. But plain text isn’t the best choice for all tasks; sometimes a visual representation is what you need, and some users are much more comfortable with a point-and-click interface.
It’s important to note that different interfaces are tailored for different workflows. Some clients only expose a carefully curated subset of Git functionality, in order to support a specific way of working that the author considers effective. When viewed in this light, none of these tools can be called “better” than any of the others; they’re simply more fit for their intended purpose. Also note that there’s nothing these graphical clients can do that the command-line client can’t; the command-line is still where you’ll have the most power and control when working with your repositories.
gitk and git-gui
When you install Git, you also get its visual tools, gitk and git-gui.
gitk is a graphical history viewer. Think of it like a powerful GUI shell over git log and git grep. This is the tool to use when you’re trying to find something that happened in the past, or visualize your project’s history.
Gitk is easiest to invoke from the command-line. Just cd into a Git repository, and type:
$ gitk [git log options]
Gitk accepts many command-line options, most of which are passed through to the underlying git log action. Probably one of the most useful is the --all flag, which tells gitk to show commits reachable from any ref, not just HEAD. gitk's interface looks like this:
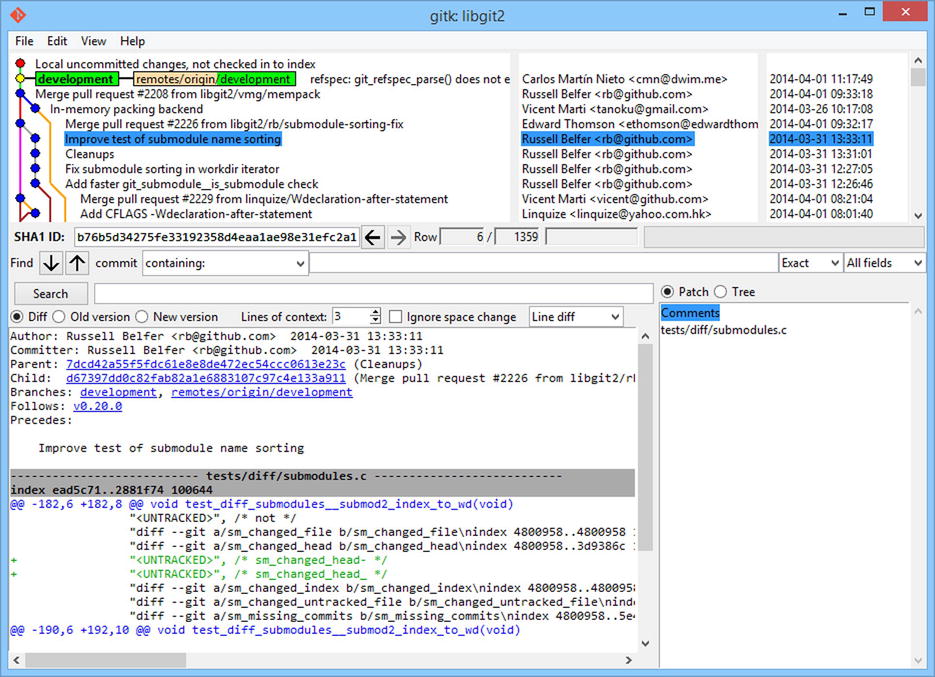
Figure A-1. The gitk history viewer
On the top is something that looks a bit like the output of git log --graph; each dot represents a commit, the lines represent parent relationships, and refs are shown as colored boxes. The yellow dot represents HEAD, and the red dot represents changes that are yet to become a commit. At the bottom is a view of the selected commit; the comments and patch on the left, and a summary view on the right. In between is a collection of controls used for searching history.
git-gui, on the other hand, is primarily a tool for crafting commits. It, too, is easiest to invoke from the command line:
$ git gui
And it looks something like this:
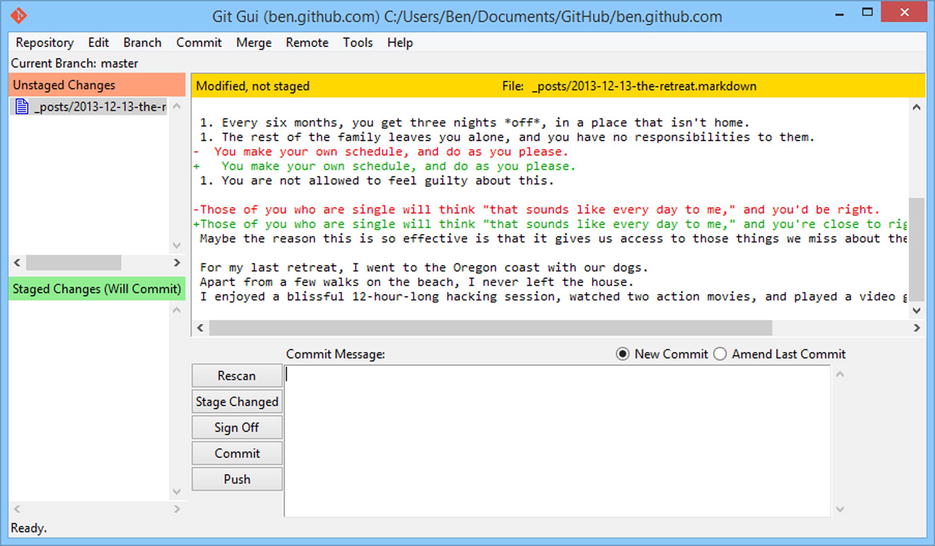
Figure A-2. The git-gui commit tool
On the left is the index; unstaged changes are on top, staged changes on the bottom. You can move entire files between the two states by clicking on their icons, or you can select a file for viewing by clicking on its name.
At top right is the diff view, which shows the changes for the currently-selected file. You can stage individual hunks (or individual lines) by right-clicking in this area.
At the bottom right is the message and action area. Type your message into the text box and click “Commit” to do something similar to git commit. You can also choose to amend the last commit by choosing the “Amend” radio button, which updates the “Staged Changes” area with the contents of the last commit. Then you can simply stage or unstage some changes, alter the commit message, and click “Commit” again to replace the old commit with a new one.
gitk and git-gui are examples of task-oriented tools. Each of them is tailored for a specific purpose (viewing history and creating commits, respectively), and omit the features not necessary for that task.
GitHub for Mac and Windows
GitHub has created two workflow-oriented Git clients: one for Windows and one for Mac. These clients are a good example of workflow-oriented tools—rather than expose all of Git’s functionality, they instead focus on a curated set of commonly used features that work well together. They look like this:
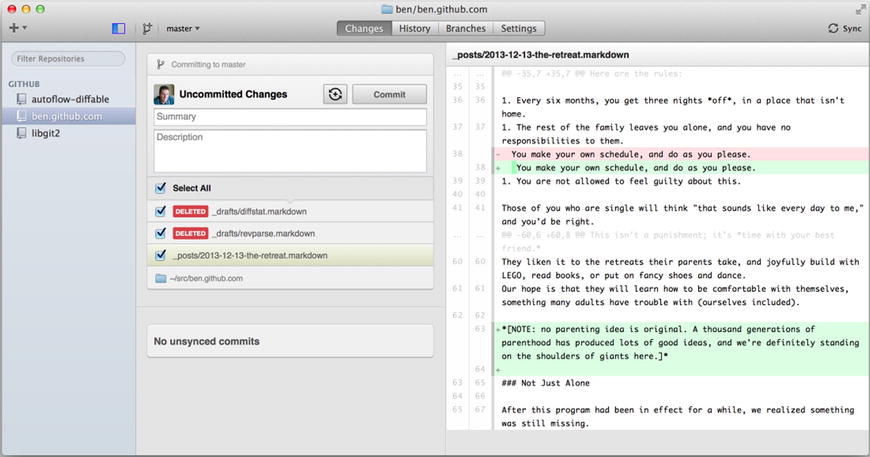
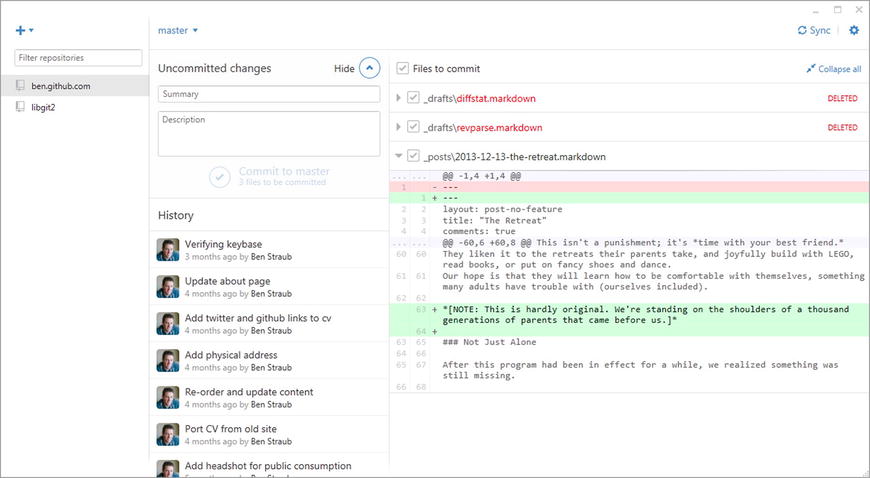
They are designed to look and work very much alike, so we’ll treat them like a single product in this chapter. We won’t be doing a detailed rundown of these tools (they have their own documentation), but a quick tour of the “changes” view (which is where you’ll spend most of your time) is in order.
On the left is the list of repositories the client is tracking; you can add a repository (either by cloning or attaching locally) by clicking the “+” icon at the top of this area.
In the center is a commit-input area, which lets you input a commit message, and select which files should be included. (On Windows, the commit history is displayed directly below this; on Mac, it’s on a separate tab.)
On the right is a diff view, which shows what’s changed in your working directory, or which changes were included in the selected commit.
The last thing to notice is the “Sync” button at the top-right, which is the primary way you interact over the network.
![]() Note You don’t need a GitHub account to use these tools. While they’re designed to highlight GitHub’s service and recommended workflow, they will happily work with any repository, and do network operations with any Git host.
Note You don’t need a GitHub account to use these tools. While they’re designed to highlight GitHub’s service and recommended workflow, they will happily work with any repository, and do network operations with any Git host.
Installation
GitHub for Windows can be downloaded from https://windows.github.com, and GitHub for Mac from https://mac.github.com. When the applications are first run, they walk you through all the first-time Git setup, such as configuring your name and email address, and both set up sane defaults for many common configuration options, such as credential caches and CRLF behavior.
Both are “evergreen”—updates are downloaded and installed in the background while the applications are open. This helpfully includes a bundled version of Git, which means you probably won’t have to worry about manually updating it again. On Windows, the client includes a shortcut to launch Powershell with Posh-Git, which we’ll talk more about later in this appendix.
The next step is to give the tool some repositories to work with. The client shows you a list of the repositories you have access to on GitHub, and can clone them in one step. If you already have a local repository, just drag its directory from the Finder or Windows Explorer into the GitHub client window, and it will be included in the list of repositories on the left.
Recommended Workflow
Once it’s installed and configured, you can use the GitHub client for many common Git tasks. The intended workflow for this tool is sometimes called the “GitHub Flow.” We cover this in more detail in “The GitHub Flow” (Chapter 6), but the general gist is that (a) you’ll be committing to a branch, and (b) you’ll be syncing up with a remote repository fairly regularly.
Branch management is one of the areas where the two tools diverge. On Mac, there’s a button at the top of the window for creating a new branch:

Figure A-5. “Create Branch” button on Mac
On Windows, this is done by typing the new branch’s name in the branch-switching widget:
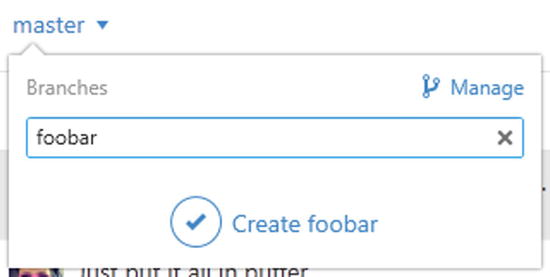
Figure A-6. Creating a branch on Windows
Once your branch is created, making new commits is fairly straightforward. Make some changes in your working directory, and when you switch to the GitHub client window, it shows you which files changed. Enter a commit message, select the files you’d like to include, and click the “Commit” button (Ctrl-enter or ⌘-enter).
The main way you interact with other repositories over the network is through the “Sync” feature. Git internally has separate operations for pushing, fetching, merging, and rebasing, but the GitHub clients collapse all these into one multi-step feature. Here’s what happens when you click the Sync button:
- git pull --rebase. If this fails because of a merge conflict, fall back to git pull --no-rebase.
- git push.
This is the most common sequence of network commands when working in this style, so squashing them into one command saves a lot of time.
Summary
These tools are very well-suited for the workflow they’re designed for. Developers and non-developers alike can be collaborating on a project within minutes, and many of the best practices for this kind of workflow are baked into the tools. However, if your workflow is different, or you want more control over how and when network operations are done, we recommend you use another client or the command line.
Other GUIs
There are a number of other graphical Git clients, and they run the gamut from specialized, single-purpose tools all the way to apps that try to expose everything Git can do. The official Git website has a curated list of the most popular clients at http://git-scm.com/downloads/guis. A more comprehensive list is available on the Git wiki site, at https://git.wiki.kernel.org/index.php/Interfaces,_frontends,_and_tools#Graphical_Interfaces.
Starting with Visual Studio 2013 Update 1, Visual Studio users have a Git client built directly into their IDE. Visual Studio has had source-control integration features for quite some time, but they were oriented toward centralized, file-locking systems, and Git was not a good match for this workflow. Visual Studio 2013’s Git support has been separated from this older feature, and the result is a much better fit between Studio and Git.
To locate the feature, open a project that’s controlled by Git (or just git init an existing project), and select View ![]() Team Explorer from the menu. You’ll see the “Connect” view, which looks a bit like this:
Team Explorer from the menu. You’ll see the “Connect” view, which looks a bit like this:
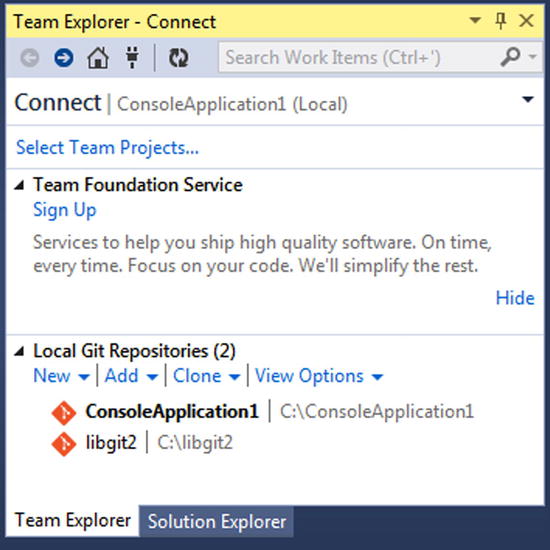
Figure A-7. Connecting to a Git repository from Team Explorer
Visual Studio remembers all the projects you’ve opened that are Git-controlled, and they’re available in the list at the bottom. If you don’t see the one you want there, click the "Add" link and type in the path to the working directory. Double-clicking one of the local Git repositories leads you to the Home view, which looks like Figure A-8. This is a hub for performing Git actions; when you’re writing code, you’ll probably spend most of your time in the Changes view, but when it comes time to pull down changes made by your teammates, you’ll use the Unsynced Commits and Branches views.
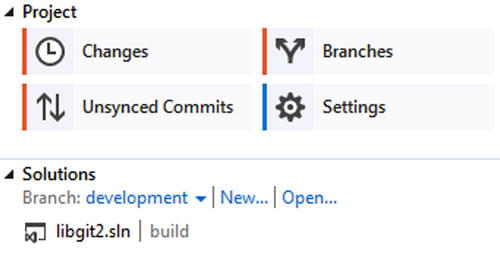
Figure A-8. The Home view for a Git repository in Visual Studio
Visual Studio now has a powerful task-focused UI for Git. It includes a linear history view, a diff viewer, remote commands, and many other capabilities. For complete documentation of this feature (which doesn’t fit here), go to http://msdn.microsoft.com/en-us/library/hh850437.aspx.
Git in Eclipse
Eclipse ships with a plugin called Egit, which provides a fairly-complete interface to Git operations. It’s accessed by switching to the Git Perspective (Window ![]() Open Perspective
Open Perspective ![]() Other…, and select Git).
Other…, and select Git).
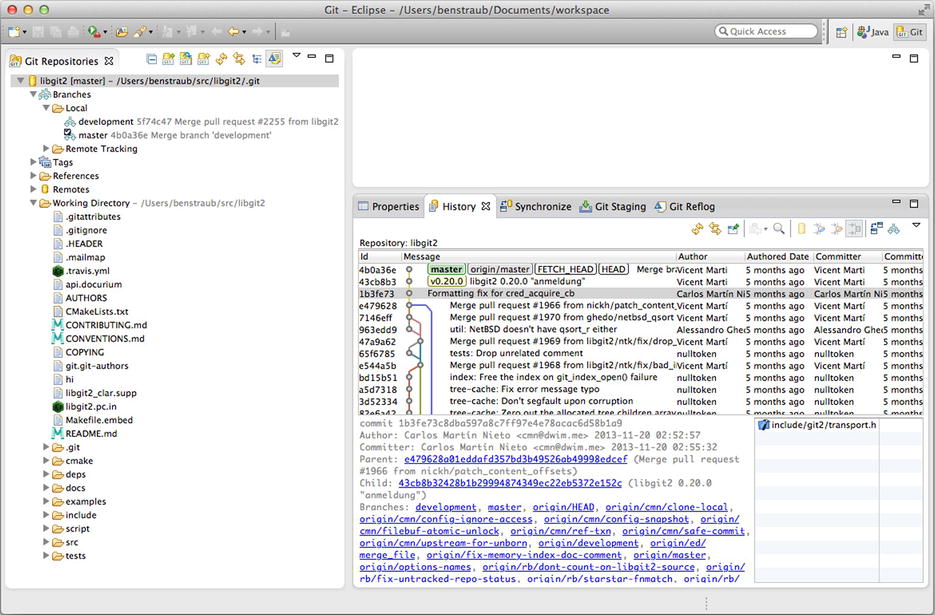
Figure A-9. Eclipse’s EGit environment
EGit comes with plenty of great documentation, which you can find by going to Help ![]() Help Contents, and choosing the EGit Documentation node from the contents listing.
Help Contents, and choosing the EGit Documentation node from the contents listing.
Git in Bash
If you’re a Bash user, you can tap into some of your shell’s features to make your experience with Git a lot friendlier. Git actually ships with plugins for several shells, but it’s not turned on by default.
First, you need to get a copy of the contrib/completion/git-completion.bash file out of the Git source code. Copy it somewhere handy, like your home directory, and add this to your .bashrc:
. ~/git-completion.bash
Once that’s done, change your directory to a git repository, and type:
$ git chec<tab>
…and Bash will auto-complete to git checkout. This works with all of Git’s subcommands, command-line parameters, and remotes and ref names where appropriate.
It’s also useful to customize your prompt to show information about the current directory’s Git repository. This can be as simple or complex as you want, but there are generally a few key pieces of information that most people want, like the current branch and the status of the working directory. To add these to your prompt, just copy the contrib/completion/git-prompt.sh file from Git’s source repository to your home directory, add something like this to your .bashrc:
. ~/git-prompt.sh
export GIT_PS1_SHOWDIRTYSTATE=1
export PS1='w$(__git_ps1 " (%s)")$ '
The w means print the current working directory, the $ prints the $ part of the prompt, and __git_ps1 " (%s)" calls the function provided by git-prompt.sh with a formatting argument. Now your bash prompt will look like this when you’re anywhere inside a Git-controlled project
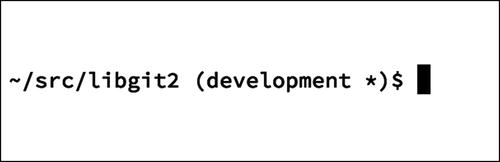
Figure A-10. Customized bash prompt
Both of these scripts come with helpful documentation; take a look at the contents of git-completion.bash and git-prompt.sh for more information.
Git also ships with a tab-completion library for Zsh. Just copy contrib/completion/git-completion.zsh to your home directory and source it from your .zshrc. Zsh’s interface is a bit more powerful than Bash’s:
$ git che<tab>
check-attr        -- display gitattributes information
check-ref-format  -- ensure that a reference name is well formed
checkout          -- checkout branch or paths to working tree
checkout-index    -- copy files from index to working directory
cherry            -- find commits not merged upstream
cherry-pick       -- apply changes introduced by some existing commits
Ambiguous tab-completions aren’t just listed; they have helpful descriptions, and you can graphically navigate the list by repeatedly hitting Tab. This works with Git commands, their arguments, and names of things inside the repository (like refs and remotes), as well filenames and all the other things Zsh knows how to tab-complete.
Zsh happens to be fairly compatible with Bash when it comes to prompt customization, but it allows you to have a right-side prompt as well. To include the branch name on the right side, add these lines to your ~/.zshrc file:
setopt prompt_subst
. ~/git-prompt.sh
export RPROMPT=$'$(__git_ps1 "%s")'
This results in a display of the current branch on the right-hand side of the terminal window, whenever your shell is inside a Git repository. It looks a bit like this:
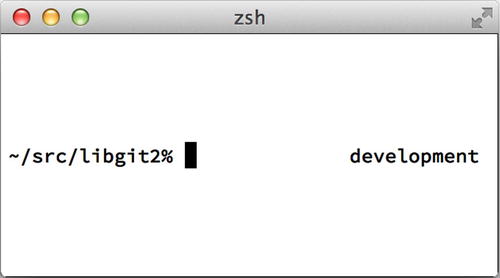
Figure A-11. Customized zsh prompt
Zsh is powerful enough that there are entire frameworks dedicated to making it better. One of them is called “oh-my-zsh”, and it can be found at https://github.com/robbyrussell/oh-my-zsh. oh-my-zsh’s plugin system comes with powerful git tab-completion, and it has a variety of prompt themes, many of which display version-control data. Figure A-12 is just one example of what can be done with this system.
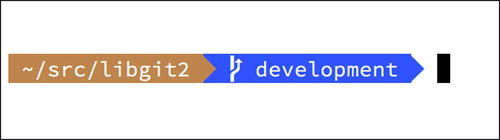
Figure A-12. An example of an oh-my-zsh theme
Git in Powershell
The standard command-line terminal on Windows (cmd.exe) isn’t really capable of a customized Git experience, but if you’re using Powershell, you’re in luck. A package called Posh-Git (https://github.com/dahlbyk/posh-git) provides powerful tab-completion facilities, as well as an enhanced prompt to help you stay on top of your repository status. It looks like this:
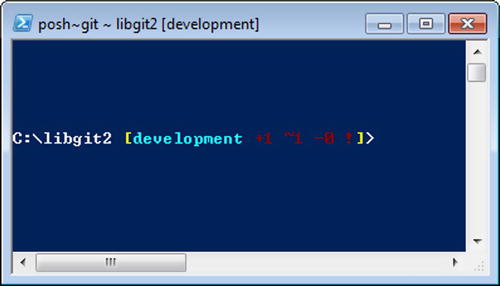
Figure A-13. Powershell with Posh-Git
If you’ve installed GitHub for Windows, Posh-Git is included by default, and all you have to do is add these lines to your profile.ps1 (which is usually located in C:Users<username>DocumentsWindowsPowerShell):
. (Resolve-Path "$env:LOCALAPPDATAGitHubshell.ps1")
. $env:github_posh_gitprofile.example.ps1
If you’re not a GitHub for Windows user, just download a Posh-Git release from (https://github.com/dahlbyk/posh-git), and uncompress it to the WindowsPowershell directory. Then open a Powershell prompt as the administrator, and do this:
> Set-ExecutionPolicy RemoteSigned -Scope CurrentUser -Confirm
> cd ~DocumentsWindowsPowerShellposh-git
> .install.ps1
This adds the proper line to your profile.ps1 file, and Posh-Git will be active the next time you open your prompt.
Summary
You’ve learned how to harness Git’s power from inside the tools that you use during your everyday work, and also how to access Git repositories from your own programs.