
In this chapter, we will be installing tools, customizing and setting our development workarea on a Mac for developing applications on all devices. We will be installing tools such as integrated development environment (IDE), Git, node.js, npm, Grunt, Gulp, Bower, and Xcode.
These tools are not only necessary so we can hit the ground running in the following chapters, but having access to node.js, Grunt, Gulp, Bower, and Git will also give us access to millions of free open source libraries. Keep in mind that each tool we will discuss in this chapter has many features and can be used in many different ways—in fact, there are entire books covering each tool. Once you become equipped with basic knowelege, feel free to explore and broaden your personal knowledge on each individual tool. Even if you are already familiar with the some or all of the tools covered in this chapter, we encourage you to take a look at this chapter anyway, since there will be additional configuration and customization that will help make using these tools easier.
Git Version Control
We’ll start off by installing Git. What is Git? It is a free open source distributed version control system. If you have previously been using other version control systems such as SVN or CVS, we would still encourage you to install Git. Git is great tool to have, considering many open source libraries are only available on Git. In fact, there are millions of open source Git libraries, so this is a cruicial piece of software to have in your arsenal of tools. It gives you access to free software you can use rather than rushing to develop a solution on your own.
The easiest way to install Git is to simply download and install the latest version from the following link :
http://git-scm.com/download/mac
Before you begin downloading and installing using their installer, we recommend installing an additional package manager that can be used to install other Unix tools and open source software on a Mac. This will come handy when you begin to need additional tools. There are very few package managers on the market for Mac—Homebrew, Fink, and Macports are the most popular ones. Homebrew is the newest and most well liked package manager of these three.
To install Homebrew , open Terminal by typing “terminal” in the Spotlight search box (right top corner) (see Figure 1-1).

Figure 1-1. Terminal search in Spotlight
Before rushing to install Homebrew and Git, check to ensure you don’t already have them installed on your machine. Once Terminal opens, up type in:
$ git$ brew
Typing “git” in Terminal will give you a printout example of usage and commands. Similarly, Brew will print out example usage, troubleshooting, and commands. If they are already installed, feel free to skip this step.
Type in the following command, as shown in Figure 1-2:

Figure 1-2. Install Homebrew using terminal
$ ruby -e "$(curl -fsSL https://raw.githubusercontent.com/Homebrew/install/master/install)" (See Figure 1-2).The default Terminal color scheme is “basic”— a white background with black text color—but you can easily change it by typing “command” + “,” when the Terminal window is focused, under the “Profiles” ➤ “Text” options. I selected the “Homebrew” color scheme.
After Brew installation is completed, you can start using Brew and use it to install Git. In Terminal, type:
$ brew install git bash-completionThat’s it! Once you’re done, confirm Git has been installed by typing in Terminal:
$ gitTyping “git” in Terminal will give you a printout example of usage and commands.
Customize Git
We recommend bookmarking this URL: https://git-scm.com/ . It is a great source to use if you need to find documents, the latest available version of Git, and much more.
Next, we want to configure and customize Git. We will start with entering your personal information. To do so, type in Terminal:
$ git config --global user.name "Your Name"$ git config --global user.email "[email protected]"$ git config --global apply.whitespace nowarn
Git Customization and Configuration
The following site is a great resource for Git customization and configuration:
https://git-scm.com/book/en/v2/Customizing-Git-Git-Configuration
In terms of customization, we recommend customizing colors for Git so it will appear more “readable” once you begin to work in a command line. The default Git settings will color output your list of files when you are in Terminal. However, we will customize it a bit more and select the appropriate colors for the type of repositories (repos) that we will be using. To do so, type into Terminal:
$ vim ∼/.gitconfigThis will open the Git configuration file in a text editor and allow you to make changes. If you have previously used different text editors such vi, feel free to do so here.
Paste the following into a Git config file, below the existing settings:
[color]branch = autodiff = autostatus = auto[color "branch"]current = yellow reverselocal = yellowremote = green[color "diff"]meta = yellow boldfrag = magenta boldold = red boldnew = green bold[color "status"]added = yellowchanged = greenuntracked = cyan
If you are not familiar with vim, or maybe just a bit rusty, use the following instructions to edit and save the Git config file:
To open the file, type: “vim ∼/.gitconfig”.
Next, insert content; type “i” on your keyboard.
Continue by pasting code using “command + v”, just like in any other text editor.
Lastly, to save, press the escape key on your keyboard and type “:wq” and press enter. Note: if you are unhappy with the changes and you want to just quit, type “:q!”, which will revert the changes and quit.
You can confirm that your changes have been made by typing:
$ cat ∼/.gitconfigAdding gitexcludes
Now let’s add the “gitexcludes ” file. This file will instruct Git to ignore specific files. For now, let’s just tell Git to ignore Mac famouse “DS_Store” file:
$ vim ∼/.gitexcludesThen, type in a list of files you would like to ignore:
.DS_StoreThis file can be very useful. Let’s say you work on a large team, and each developer wants to keep their own IDE settings. You can use this file to ignore an entire folder.
Adding the Repo Branch
Next on the list is branches. Branches are a staging environment. When you don’t want to make changes in the working directory, you can request a copy from Git and make changes on that branch, then integrate the branch into the working environment when you are ready to commit the changes. Git records these commits and they show as a fork of the project. Git allows you to add, delete, and rename these branches, so it’s helpful know what branch you’re working are on without having to ask Git to tell you.
We’ll add some magic to your Bash prompt so that it will include your branch information. Doing this will add the repo branch. Figure 1-3 shows the folder name along with the branch name in brackets “(master)”.

Figure 1-3. Command line showing branch name
This setting will be very useful when you switch between branches following the Gitflow process (discussed later in this chapter).
Configurate bash_profile
To configure these options, we will be editing the Bash profile file. Bash profile is used to set PATH and other shell environmental variables. There are two type of bash profile files : .bash_profile and .bashrc. bash_profile excutes login shell commands, while bashrc excutes non-login shell commands. In our case, we want the changes to be reflected in all directories and all users, so we will be using bash_profile.
To edit, open the bash_profile file in a vim editor by typing in Terminal:
$ vim ∼/.bash_profileThen add the following code to your Bash file:
parse_git_branch() {git branch 2> /dev/null | sed -e '/^[^*]/d' -e 's/* (.*)/ (1)/'}source /usr/local/etc/bash_completion.d/git-completion.bashGIT_PS1_SHOWDIRTYSTATE=trueexport PS1="u@h W[�33[32m]$(parse_git_branch)[�33[00m] $ "
Lastly, remember to run the Bash profile file to allow these changes to take effect:
$ . ∼/.bash_profileFigure 1-4 shows the command line with the repo branch name and colors:

Figure 1-4. Command line with adjusted colors and branch name prompt
By the way, in Figure 1-4, we are using a “git status” command, which shows you the changes in your Git directory in comparison to the remote server. In your directory, this command won’t work until you set an actual Git project and will create a “fatal” error message if you type “git status”, but we wanted to show you what it looks like on a working Git direcctory.
Additionally, you can add extra commands to a Bash profile to ajust your working environment to your liking. For instance, the code below sets custom colors for list view, shortcuts to edit Bash profile, change directory to locations and reload Bash profile automatically with one command: “bash”. See below:
alias ls='ls -ltra'export CLICOLOR=1export LSCOLORS=ExFxCxDxBxegedabagacadexport ANDROID_HOME=/usr/local/opt/android-sdkalias vimb='vim ∼/.bash_profile'alias runb='. ∼/.bash_profile'alias cdr='cd /Applications/XAMPP/xamppfiles/htdocs/'alias bash='. ∼/.bash_profile'
Download Git Libraries
There are millions of open source Git repos, and now that you have installed Git, you can start taking advantage of these libraries . As an example, we will be downloading the following repository:
https://github.com/pilwon/ultimate-seedFirst, we want to create a directory and change it into the newly created directory:
$ mkdir ultimate-seed && cd $_Then you can clone the repository from the hosting server:
$ git clone https://github.com/pilwon/ultimate-seedGit “Hello World”
Now you are ready to set up your first project, and since we are starting from scratch, we will be creating your Git-hosted project.
First, create a directory where your project will reside. To do so, type into the terminal:
$ mkdir [/path/to/your/project] && cd $_This will create the directory and change the current working directory into the newly created directory. Then, initiate Git by typing in the following command line:
$ git initHere are the complete commands to create a “test” folder and init git on your desktop:
$ cd ∼/Desktop$ mkdir test && cd $_$ git init$ git status
That’s it! You’ve created your project and intiated a Git.
Now, you can create a repo on GitHub, Bitbucket, AWS CodeCommit, or your favorite hosting solution and upload your code.
Need help deciding which hosting solution you should be using? we believe that it boils down to factors such as how many members are on your team, the repo size, the number of repo you need, and your budget. To make it easy to select your version control remote hosting solution, we have created a quick comparison between GitHub, Bitbucket, and AWS CodeCommit (Table 1-1).
Table 1-1. Git showdown
GitHub | Bitbucket | AWS CodeCommit | |
|---|---|---|---|
Filesize limit | 1GB | 1GB | 10GB |
Free Repo | Free Unlimited users | Free for unlimited users | Free for up to 5 active users |
Private Repo | Starts at $7/month | Free for up to 5 users | Free for up to 5 active users |
Web Visual | GitHub Flow | Not available | Not available |
3rd Party Integration | Integration with many 3rd party tools. | Integrate via Plugins | Integrates well with AWS services. |
Pricing | Private repo $7/month | Free for up to 5 users | $1 per active user per month |
Visit the following link, which will provide more information on these three types of hosted Git solutions: http://stackshare.io/stackups/github-vs-bitbucket-vs-aws-codecommit
As you can see from Table 1-1, GitHub is great for publishing free open source libraries and would be our primary choice. It’s great for open source projects and provides easy-to-use UI and integration with many tools, however it does not offer free private repos. That feature alone makes Bitbucket and AWS CodeCommit good tools to add to your arsenal. Not having to pay an additional fee for source control adds great value in my opinion, especially when it’s your personal repo.
To upload a repo to Bitbucket, start by creating a free account by going to https://bitbucket.org and signing up. Then, create a new repository by selecting “Create a repository” or going to “Create” ➤ “Create Repository” in your dashboard (Figure 1-5).

Figure 1-5. Creating a new repository on BitBucket
Next, select the repository owner, name, description, and other settings. Notice that you have an option to set the access level as private (Figure 1-6).

Figure 1-6. Create a new repository settings window on Bitbucket
Next, change the directory (cd) to where your project resides, in case you are not there, and add a file. For instance you can just add a markdown readme file (we’ll talk more about markdown in later chapters):
$ vim readme.mdInside of “vim”, press “i" to insert any text and “:wq” to save and quit. Now we can commit our changes:$ git add .$ git commit -m 'first commit'
Now we are ready to commit our project. To add a remote origin location, change to your username and repo name and then type the following into the command line:
$ git remote add origin ssh://[email protected]/[username]/[repo-name].gitHere’s an example of what the code should look like:
$ git remote add origin https://[email protected]/elinewyorkcity/test.git Lastly, push up the changes to Git:
$ git push -u origin –allThis will push the changes to the “master” branch. You can confirm you are on the “master” branch in terminal. My terminal shows me that I am in the “test” folder—using the “master” branch looks like this:
eli@Elis-MBP-6 test (master) $This will commit and upload your changes. Now, you can log in to Bitbucket and you will be able to see your files.
In case you don’t have SSH set up yet, follow the instructions here:
https://confluence.atlassian.com/bitbucket/set-up-ssh-for-git-728138079.html
This simple setup works great for a project with a small team, but when you’re working with larger team it can become a challenge if you don’t have a well-organized framework in place.
Gitflow
So far we’ve created and uploaded a repo and downloaded a repo. Since we did not set a branch, we were working with the “master” branch. This type of simple workflow is called “Feature Branch Workflow ,” since we are using only one feature branch (master).
As things get more complicated, especially when you are working in a large team, there is a need for standard practices that all developers can follow, such as scheduling releases, fixing bugs, and other general development tasks. The most common solution for these tasks is Gitflow Workflow.
Gitflow is a strict branching model designed around the project release. While somewhat more complicated than the Feature Branch Workflow, it provides a robust framework for managing larger projects and has been proven to work well on projects with many members.
You can read more about it here, from a Vincent Driessen article:
http://nvie.com/posts/a-successful-git-branching-model/
We will not be explaining the entire Gitflow model since it’s beyond the scope of this book, but we would like to point out a couple of tools that will make using Gitflow much easier and reduce the boilerplate code needed to follow the Gitflow practice.
Take a look at the following repository:
https://github.com/nvie/gitflow
As we mentioned earlier, to download this tool, all you have to do is type into the command line:
$ git clone https://github.com/nvie/gitflowInstalling Gitflow is simple with Brew:
$ brew install git-flowNext, to initialize a new repository with the basic Gitflow branch structure, use the following command:
$ git flow init [-d]Using the “-d” flag will accept all default settings. Then you can implement operations such as list, start, finish, and publish a branch.
Gitflow on GitHub
As you become more comfortable with Git, and specifically if you are using GitHub as your Git remote server provider, you will find GitHub to be a friendly environment. In fact, it has a built-in user interface (UI) to make pull requests, merge branches, and perform all Gitflow and other structure operations.
Nevertheless, for programmers, using a UI can take longer than a command line operation. Luckily, there is an open source tool called “node-gh” that allow us to perform the commands via Terminal instead of GitHub UI. Check it out here: https://github.com/node-gh/gh
In addition to this, I have forked and cloned gh repository and added commands to match Gitflow so you can also make a pull request in the command line, in addition to following Gitflow methodology:
git clone https://github.com/eladelrom/node-ghNode.js
Node.js is a fast, lightweight JavaScript runtime built on Chrome’s V8 JavaScript engine, and uses an event-driven, non-blocking I/O model. It includes the npm package ecosystem, with access to hundreds of thousands of packages.
You can install node via Brew:
$ brew install nodeHowever, for Mac, the safest way is to install Node.js is using the installer available here: http://nodejs.org . See Figure 1-7:

Figure 1-7. Node.js Mac installer
To check that the installation was successful, type into the command line terminal:
$ nodeTyping “node.” will kick off the interactive shell (AKA “REPL”). Next, type:
> console.log('Hello World');Node.js replies with “Hello World”. See Figure 1-8.

Figure 1-8. Node.js Hello World example
This interactive shell is great for testing one-liners. To exit out of it, press Ctrl + C twice.
Do you want to know more about Git commands? You can visit the following page to download a Git cheat sheet:
https://training.github.com/kit/downloads/github-git-cheat-sheet.pdf
npm
npm is the Node.js package manager . It’s mainly used to install Node.js packages. When used in development, it allows you to easily link dependencies to your project for quick installation and updates.
npm comes with Node.js right out of the box, so you don’t need to do anything additional to install it. You can now install any package for your project. See the list of available packages here: https://www.npmjs.com/
Although npm does comes with Node.js, it’s a good idea to know how to update npm, since it needs to be updated more often than Node.js.
To update, open Terminal and ensure node.js is at least v0.10.32. Check it by typing:
$ node -vTo check the npm version, type:
$ npm –vThe version should be higher than 2.1.8.
To update npm, type the following:
$ [sudo] npm install npm -gSee Figure 1-9 for the complete commands.

Figure 1-9. Installing npm and checking Node.js and npm versions
Grunt
Next on our list is Grunt . Grunt is a JS-based task runner. It provides easy automation using JavaScript, with access to thousands of plugins to choose from to automate just about anything you can think of. Additionally, publishing your own Grunt plugin to npm is easy to do.
Note
A task runner is automation. We developers are known to be “lazy” and prefer to create an automated task when doing repetitive work.
Now that we have Node.js and npm, you can install Grunt. Install Grunt by using command line interface (CLI) globally:
$ [sudo] npm install -g grunt-cliIf you want to install Grunt on a local project, the npm init command will create a basic package.json file and add Grunt to the “devDependencies” section, using a tilde version range. Type the following:
$ npm install grunt --save-devThere are thousands of plugins available for Grunt. These plugins are what really make Grunt great. They give you access to community open-source projects that will help you to easily automate your tasks. You can see a list here: http://gruntjs.com/plugins . Anytime you need anything that Grunt doesn’t offer out of the box, you can simply search the Grunt plugin directory and see if there is a plugin available.
Installing a Grunt plugin is just like installing any of the other node modules. For example, to install the grunt-nglue plugin, type this:
$ npm install grunt-nglue --save-devSee more details here: http://gruntjs.com/getting-started
Gulp
Another JS-based task runner is Gulp. Gulp emerged after Grunt and was quickly adopted by a large portion of the JS community. Gulp is a streaming build system. When you think of Gulp, imagine Grunt, but faster and less work for your config boilerplate code.
In a nutshell, Grunt focuses on configuration, while Gulp focuses on gluing community-developed micro-tasks to one another.
Each Gulp module is a streaming node, which has nothing to do with Gulp except for the module name. Gulp runs on its own, while Grunt plugins only work inside of Grunt.
Many consider Gulp to be better. Most developers choose one or the other, but they can be used together for different tasks.
To install, in Terminal, type:
$ [sudo] npm install --g gulpTo install Gulp on a local project, the npm init command will create a basic package.json file (if you don’t already have one) and will add Gulp to the devDependencies section. Using a tilde version range, type the following;
$ npm install --save-dev gulpNow you can browse through the Gulp plugin list, located here: http://gulpjs.com/plugins/
To create your first Gulp file, check the GitHub project here:
https://github.com/gulpjs/gulp/blob/master/docs/getting-started.md
Bower
Last but not least is the Bower package manager . Bower helps keep track of your project’s packages as well as making sure they are up to date. See: http://bower.io/
You can install Bower easily with npm:
$ [sudo] npm install -g bowerTo install locally, use the following command:
$ npm install --save-dev bowerNow you can search for packages here: http://bower.io/search/
To install a package, simply type into the Terminal:
$ bower install some-packageBower is used together with many other tools and can be integrated with all sorts of setups and workflows to your liking.
Check the Bower tools page, which includes tons of links to many tools you can integrate:
Having Node.js, npm, Grunt, Gulp, and Bower will give you instant access to about half a million free open source community projects, and I personally believe that they’re essential to have before starting any JavaScript project.
Integrated Development Environment
The first thing we will do with an integrated development environment (IDE) is set our developer environment. WebStorm ( https://www.jetbrains.com/webstorm/ ) by Jetbrains would be our first pick for the best type of app/site we will be building. It combines the entire “MEAN” stack development into one easy-to-use IDE.
You will be able to easily develop MongoDB, Express.js, AngularJS, and Node.js using WebStorm. It also includes integration with everything else that we will be using in this book. The only caveat is that their pricing model has changed, and they are now charging a yearly subscription, which can be a big turnoff for large businesses. At the time of this writing, the cost is $649 per year for a business license. However, for individual customers, the price is as low as $59 for the first year and free for students and and open source contributors.
Of course, there are many other free alternatives to WebStorm, especially if you are comfortable with command line. For instance, Sublime Text ( https://www.sublimetext.com/ ), Notepad++ ( https://notepad-plus-plus.org/ ) and brackets.io ( http://brackets.io/ ) can be great alternatives.
Keep in mind that this is based entirely on personal preference, and you will have no problem working with whatever IDE you prefer, whether your main choice is listed here or not.
Now, let’s install and configurate the WebStorm IDE. Go to the download page and begin downloading:
https://www.jetbrains.com/webstorm/download/
At the time of writing, the current version of WebStorm is Version 2016.1.3. Once the download is completed, start WebStorm. The first message will request the type of license. If you don’t have a license, you can use the “evaluate for free for 30 days” option. See Figure 1-10:

Figure 1-10. WebStorm license activation window
In the initial WebStorm configuration window, the Keymap scheme has plenty of options in case you are used to other IDEs, such as Visual Studio or Eclipse. For color scheme, “Darcula” is the default, but feel free to select a different one. You can view a preview of the theme (see Figure 1-11).

Figure 1-11. WebStorm initial configuration window
Once you click “OK,” WebStorm 11 restarts and gives you the option to create a new project, open, or check out from Version Control, as shown in Figure 1-12. Select “Create New Project.”

Figure 1-12. WebStorm welcome window
We will be creating two projects: an AngularJS project and a Node.js project.
Let’s start with the AngularJS app. Select “Create New Project,” select “AngularJS,” and then “Create.” See Figure 1-13.

Figure 1-13. WebStorm welcome window .
As you can see, WebStorm automatically downloads the AngularJS seed project, so you can get started right away. See Figure 1-14.

Figure 1-14. AngularJS hello world app
All you have to do now is double click “index.html” (see Figure 1-15). Once you hover over the page, the browsers’ icons will show up.

Figure 1-15. Index.html browser icons
Select the browser of your choice and the “Hello World” app will open up in your browser (see Figure 1-16).

Figure 1-16. Angular seed app running in the browser
The same process will work for the Node.js app. Select “Create New Project,” then select “Node.js Express App” and finally “Create” (see Figure 1-17).
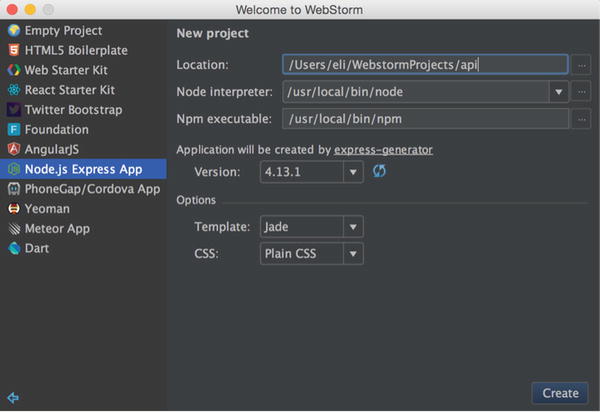
Figure 1-17. Creating a Node.js express app in WebStorm
Next, your work environment will open up and you can begin working on your Node.js project right away. See Figure 1-18.

Figure 1-18. Node.js workspace in WebStorm
Installing a Free Open Source IDE
Installing and setting WebStorm was a breeze, but it’s not completely necessary, and you can perform your entire development using free, open source tools. Sublime Text can be used to view files in any development language; in fact, you can create your entire development directory on your own and simply view and edit the contents of your files with the Sublime Text editor. Download Sublime Text here:
Now all you have to do is add a folder (Figure 1-19). To do so, follow these steps:
Select top menu, then: “Project” ➤ “Add Folder to Project…”
Browse to the folder where your files are located and select that folder.

Figure 1-19. Sublime Text select a project folder menu
You can now select and edit files (Figure 1-20).

Figure 1-20. Edit an HTML file in Sublime Text
Installing Xcode
Lastly, another great set of tools that we would recommend installing would be Apple “Xcode” (see Figure 1-21). This includes an IDE for developing iOS apps, a compiler, instruments, a simulator and SDKs. We will need these once we start to develop apps that will be deployed for iOS.

Figure 1-21. Xcode welcome screen
Visit the following link to download:
Summary
In this chapter, we covered installing, customizing, and configuating tools such as integrated development environments (IDEs), and we installed Brew, Git, Node.js, npm, Grunt, Gulp, Bower, WebStorm, Sublime Text and Xcode. These tools will come handy in the following chapters as we start to develop and deploy applications. Keep in mind that there are entire books and much more information online for each of the tools we discussed. We have only scratched the surface in this regard, but feel free to acquire more information on your own; the more you know about these tools, the easier it will be to develop your applications quickly and efficiently in the future. In the next chapter, we will be rolling out servers, customizing them, and configuring them so we can deploy our code and see it work.