
In this chapter, we will be learning about Cordova, PhoneGap and Ionic. Cordova enables us to write our code only once and deploy our app on just about any platform out there while still using the same code base. We will learn how to create projects, preview them in the platform we selected, and easily deploy our apps. We will also cover how to install plugins and learn about the distribution process.
Apache Cordova
Cordova is an open-source mobile development framework . It allows the use of HTML5, CSS3, and JavaScript for cross-platform development. Because of the technology stack of Cordova, using it will allow us to easily create and integrate MEAN stack apps.
Why Apache? Cordova is licensed under the Apache License, Version 2.0 , which allows the royalty-free distribution of your app, making it free of charge worldwide. See the complete license here: http://www.apache.org/licenses/LICENSE-2.0
Cordova’s applications execute within wrappers , which are targeted to each platform you select and thus rely on plugins to access each device's own specific capabilities. Some examples include camera, push notifications, and device status. In fact, you can view all of the plugin options Cordova offers and filter by device here:
https://cordova.apache.org/plugins/
By using the Cordova platform, we can deploy the same code base across the most popular platforms and stores , such as Android, iOS, and Web, without having to re-implement with each platform's specific language and tool set. Additionally, we can create a WebView (special browser window) that is able to access device-level APIs.
Note
The main advantage of Cordova is that it is budget-friendly and can cross-platform, removing the need to write specific platform native code.
Writing native code for each platform has its own advantages. , and many large Fortune 500 companies have specific teams dedicated to each platform. But the ability to re-use your code and deploy it on multiple devices and stores can reduce the development effort and resources for a project. This will allow startups and smaller-sized companies to gain a presence in all popular stores and platforms, just like the “big boys,” while utilizing a single development team.
Cordova is supported by all major platforms , including iOS mobile and desktop, Android, Bada, BlackBerry, Windows mobile and desktop, Amazon Fire OS, and much more. Visit Cordova to see the list of supported platforms:
https://cordova.apache.org/contribute/
Cordova “Hello World”
You actually already have all of the tools you will need to get started. You will be utilizing Node.js and npm, which we have covered extensively in previous chapters. Let’s begin.
The most common way to install Cordova and plugins and maintain a Cordova project is to use the Command Line Interface (CLI ) utility, such as Mac OSX’s Terminal application. Open Terminal.
To install Cordova, you will need to install the code globally using npm:
$ sudo npm install -g cordovaNote
Notice we use the “g” flag to ensure that the code will be available to us locally, for our specific Hello World project, but also globally for future projects. As a rule of thumb, any package that provides command-line tools that you will need to use on multiple projects should be installed globally.
Notice that we have installed Cordova as a “sudo” in order to allow npm to make any changes it needs in our environment. If you encounter any errors, simply try to run the same command again or follow the instructions that the error has given you.
Next, create your first Cordova app:
$ cordova create HelloCordovaNow we can navigate into the folder and add a platform:
$ cd HelloCordova$ cordova platform add browser
Once these commands are run in the Terminal, you should be able to see the same or similar output in your Terminal. See Figure 4-1.

Figure 4-1. Terminal output installing Apache Cordova
Running Your App in Cordova
Lastly, run the project in the platform. In the Terminal, run the following command:
$ cordova run browser This command will execute and open up the app we just created in your browser. See Figure 4-2.

Figure 4-2. Apache Cordova deployed in the browser
At any time, you can terminate the app by typing ctrl+c in Terminal. The project’s files just created are shown in Figure 4-3 and described in the following list.

Figure 4-3. HelloCordova project list of files
config.xml: This file provides information about the app and specifies parameters affecting how it will work, such as whether it responds to orientation shifts or not.
www: This folder holds the actual web app HTML, CSS, and JS files.
Plugins: The plugins folder contains the plugins your app will be using. The plugins are an interface for Cordova and native components to communicate with each other, as well as bindings to standard device APIs. These enable you to invoke native code from JavaScript.
Platforms: This folder contains the platforms you will be using, such as Android, BlackBerry, iOS, and Windows Mobile.
Hooks: The hooks folder holds special scripts, which can be added by applications, plugin developers, or even by your own build system, to customize Cordova commands.
Figure 4-4 (from https://cordova.apache.org/docs/en/latest/guide/overview/index.html ) provides a high-level architectural overview of the Cordova platform. The “Web App” is your “www” folder and “config.xml” file, and the HTML rendering targets specific platforms and allows added plugins to interact with specific native code from JavaScript.
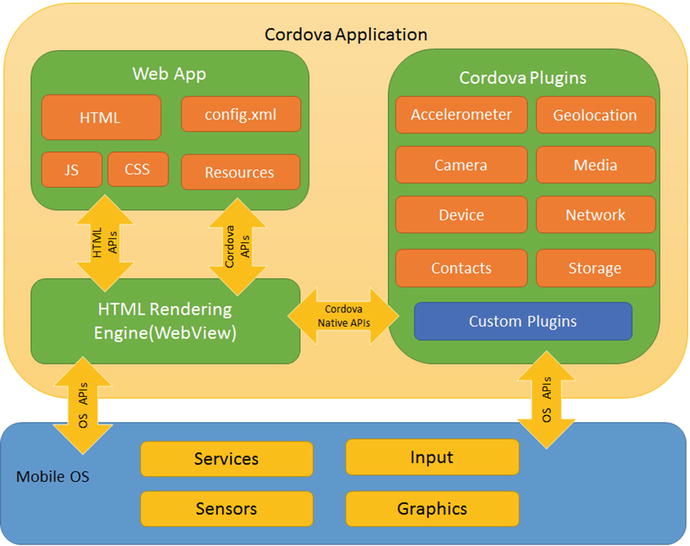
Figure 4-4. Cordova app architecture
Cordova Platform Deployment
So far, we have deployed a simple “Hello World” Cordova app on a web browser. Now let’s say we want to add a platform, such as iOS. In the Terminal of the project, type ctrl+c to stop the app, and then:
$ cordova platform add iosNext, navigate to the project files. In the Terminal, type:
$ cd platforms/ios/Lastly, we can now open the project in Xcode, which we already installed back in Chapter 1. In the Terminal, type:
$ open HelloCordova.xcodeprojThe project will open in Xcode if the SDK was properly. See Figure 4-5.

Figure 4-5. Opening Cordova app iOS platform in Xcode
The deployment of each platform is different. For iOS, the process consists of the following steps:
Deploy App to Emulator: Test the app in the iOS Simulator.
Deploy to an Actual Device: Follow the same iOS developer steps as if you were to deploy a native iOS app.
To see the app running in the emulator, all you have to do is select the type of device you want your app to run under in Xcode. Click the “HelloCordova” icon on the top menu, then select “HelloCordova” and select one of the iOS Simulators from the available list. We chose the iPhone 6 (See Figure 4-6):

Figure 4-6. Select iOS device in Xcode
Now that you have selected a device, hit the play icon on the top menu to begin the simulator and the stop icon to close it. See Figure 4-7 to watch our app running in the simulator.

Figure 4-7. Cordova Hello World app running in iOS Simulator for iPhone 6
Next, navigate back to the platform folder:
$ cd ..To remove the iOS or any other platform, all you have to do is type the following command:
$ cordova platform remove iosOf course you would need to replace the platform name, depending on whichever platform you want to remove.
You can also add a specific version of a platform. For example, to add the iOS platform version 4.0.0:
$ cordova platform add [email protected]Deployment to the iOS store using the Apple iOS Developer Program will be covered later on in this book (see “Platform Deployment”). You can jump to that section of the book and have the app installed and tested on your actual device if you are anxious to do so.
Notice we used “browser” and now “iOS” as our platform name, but you can use any platform available from the list we previously mentioned. They can be viewed here:
https://cordova.apache.org/contribute/
A few helpful Cordova commands:
“cordova –v”: Displays the cordova version
“cordova –h”: Provides a list of commands and options
“cordova platform update [email protected]”: Updates a platform to a specific version
“cordova platform update ios”: Updates a platform to the latest version. At the time of writing, iOS latest version is 4.1.1.
Cordova Plugins
The Apache Cordova project maintains a set of plugins known as the core plugins, which are available on most platforms. These core plugins allow your application to access device capabilities such as battery, camera, and contacts.
In addition to the core plugins Cordova maintains, there are also many third-party plugins, which provide additional features not necessarily available on all platforms.
You can search for Cordova plugins using the command line search or directly on npm. You are also able to develop your own plugins, as described in the Plugin Development Guide on the Cordova website. Some plugins may be necessary, for example, to communicate between Cordova and custom native components.
To find a plugin, visit the plugin page, where you can sort by platform and/or quality: http://cordova.apache.org/plugins/
The command line can be used to search for features. For example, let’s say we want to find a push notifications feature for our platform. In the command line, type:
$ cordova plugin search notificationsThis opens up your default browser with the following URL:
http://cordova.apache.org/plugins/?q=notifications
See Figure 4-8 below.

Figure 4-8. Searching plugins result page
To install a plugin, type the name of the plugin you would like to add. The following command would not be successful:
$ cordova plugin add phonegap-plugin-pushIf you try to install using the command above, it will spit out an error message in the Terminal because it’s expecting a sender ID (see Figure 4-9), and you will see the following error message:

Figure 4-9. Terminal output for installing phonegap-plugin-push
Error: Variable(s) missing (use: --variable SENDER_ID=value).Since this is a third-party plugin, it was configured to require a parameter. Clicking on the plugin in the Cordova search results page we opened earlier will result in the Cordova page opening up the npm project URL, located here: https://www.npmjs.com/package/phonegap-plugin-push
Follow the Installation link and read the author notes to see what the installation requires. In our case, it will need the store ID for Android. Since we will not be installing this plugin for the Android platform, we can install it with the default ID of “XXXXXXX.” Let’s try again:
$ cordova plugin add phonegap-plugin-push --variable SENDER_ID="XXXXXXX"This time it successfully installed the plugin. Additionally, there are other core plugins that are worth mentioning:
Basic Device Information (Device API): cordova-plugin-device
Network Connection Events: cordova-plugin-network-info
Battery Events: cordova plugin add cordova-plugin-battery-status
Accelerometer: cordova plugin add cordova-plugin-device-motion
Compass: cordova plugin add cordova-plugin-device-orientation
Geolocation: cordova plugin add cordova-plugin-geolocation
Camera: cordova plugin add cordova-plugin-camera
Media Capture: cordova plugin add cordova-plugin-media-capture
Media Playback: cordova plugin add cordova-plugin-media
Access Files: cordova plugin add cordova-plugin-file
Network File Access: cordova plugin add cordova-plugin-file-transfer
Notification via Dialog Box: cordova plugin add cordova-plugin-dialogs
Notification via Vibration: cordova plugin add cordova-plugin-vibration
Contacts: cordova plugin add cordova-plugin-contacts
Globalization: cordova plugin add cordova-plugin-globalization
Splashscreen: cordova plugin add cordova-plugin-splashscreen
Open New Browser Windows (InAppBrowser): cordova plugin add cordova-plugin-inappbrowser
Debug Console: cordova plugin add cordova-plugin-console
To install these plugins, we can use the same syntax that we used to install the “phonegap-plugin-push” plugin:
$ cordova plugin add [plugin name]Also notice that some plugins rely on other plugins. For example, “cordova-plugin-media-capture” relies on “cordova-plugin-file.” The plugin will be automatically installed on all platforms we add—in our case, iOS and browser.
To see the plugin list, type the following command:
$ cordova plugin listIn the back stage, you can see that the “config.xml” added configuration for these plugins automatically. For example, for the push notification, there is an entry:
<feature name="PushNotification"><param name="ios-package" value="PushPlugin" /></feature>
Visit the plugins folder inside the “www” folder and you will see the plugin was added correctly. See Figure 4-10:

Figure 4-10. Plugin folder shows installed plugins
Cordova Plugman
In addition to installing plugins manually, as we have done, Cordova utilizes a tool called “Plugman” to help you manage plugins.
To install the manager, run this command:
$ sudo npm install -g plugmanTo see a help printout and a version, just as we’ve done in Cordova, use the “-h” and “-v” flags:
$ plugman –h$ plugman –v
The Plugman tool implements the plugin on all device APIs and disables them by default—you decide when to enable the plugin. It also supports two different ways of adding and removing plugins, depending on your choice of workflow, discussed in the Overview:
If you use a cross-platform workflow, you will need to use the Cordova CLI utility to add plugins, as described in the Command-Line Interface, which is what we showed you earlier in the chapter. As you have seen, CLI sets the plugin for all of the platforms at once.
If you want to use a platform-centered workflow, you will need to use a lower-level Plugman CLI, separately, for each targeted platform.
Here’s an example of using Plugman for a specific platform. Type the following commands:
$ cd ∼/desktop$ cordova create TestPlugMan$ cd TestPlugMan/$ cordova platform add android$ plugman install --platform android --project platforms/android --plugin cordova-plugin-console
In this example, we navigated to our desktop directory, created a new project called “TestPlugMan,” added the Android platform and installed a console plugin to that specific platform.
Additionally, Plugman comes handy when you want to create a plugin on your own and it’s not published yet.
Cordova Distributions
Apache Cordova is the engine that powers the distribution solutions . Distributions contain additional tools to help the developer deploy and develop apps, which is why they differ in command from Cordova, but technically they do the same thing.
Each tool can provide command line tools, JavaScript frameworks, and cloud services that extend beyond Cordova.
There are many distributions to choose from: Adobe PhoneGap, Ionic, Monaca, Onsen UI, Visual Studio, TACO, Telerik, GapDebug, App Builder, Intel XDK, Cocoon, and Framework7.
You can read more about these here: https://cordova.apache.org/ or visit the sites of each distribution directly.
PhoneGap, the most popular distribution, offers easy cloud deployment, while Ionic is built from CSS with superpowers (“Sass”) and optimized for AngularJS, so both are great options for MEAN stack types of apps. Recently, Ionic changed their pricing model, and it’s now free for developers up to using limited resources and monthly charges based on resources used. See more information here: https://ionic.io/pricing
PhoneGap Distribution
We have chosen Adobe PhoneGap as our example of a Cordova distribution. The reason we chose PhoneGap is that it’s an open source distribution and the original and most popular of Apache Cordova distributions available.
The benefit of using PhoneGap over Cordova directly is that it has a built-in feature that enables developers to deploy their app in the cloud. This means that you may not need to open the app in Xcode or any other native development SDK in order to publish your app, and you can use additional tools and commands offered by the distribution.
In the section below, we will install PhoneGap, start coding, and show you how to preview the PhoneGap App.
Installing PhoneGap
For installing PhoneGap, Adobe offers either a CLI installation or a desktop app.
If you prefer the desktop app, simply download it here:
https://github.com/phonegap/phonegap-app-desktop/releases/download/0.2.3/PhoneGapDesktop.dmg
To install the CLI, type in the Terminal:
$ sudo npm install -g phonegap@latestYou can confirm that the installation was successful by typing “phonegap” in the Terminal command line.
In the future, when new versions of PhoneGap are released, you can upgrade your PhoneGap installation by using the following command:
$ sudo npm update -g phonegapInstall PhoneGap Mobile App
Phonegap offers developers distribution for mobile apps on devices and allows tests and previews of PhoneGap mobile apps across platforms without additional platform SDK setup, which brings tremendous value. It provides access to the PhoneGap core APIs providing access to the native device features without having to install plugins or compile locally first.
Google Play: https://play.google.com/store/apps/details?id=com.adobe.phonegap.app
Windows Phone Store: http://www.windowsphone.com/en-us/store/app/phonegap-developer/5c6a2d1e-4fad-4bf8-aaf7-71380cc84fe3
Additionally, you can find the app directly on a device’s store using the “PhoneGap Developer” keyword. See the app installed on an iPhone, Figure 4-11.

Figure 4-11. PhoneGap Developer app install on an iPhone
Start Coding
We have already installed PhoneGap and the PhoneGap Developer app, and now we can create our first PhoneGap app. To get started, we will utilize PhoneGap to create the basic scaffolding for our app. In the Terminal, type the following command:
$ phonegap create helloPhoneGapThis command created a folder for us named “helloPhoneGap,” which holds everything we will need to get started.
Navigate into that folder and see what was created.
$ cd helloPhoneGap/As you can see, it created a similar structure as Cordova with a “www,” platforms, plugins, hooks folders, and a config.xml and package.json file.
Preview Your PhoneGap App
To preview the application that was created, all there is left to do is type one command into the Terminal:
$ phonegap serveThis command will start up the app server and advise us of the IP address it is listening in on. In our case, it’s listening in on 192.168.1.65:3000. See Figure 4-12.

Figure 4-12. Starting PhoneGap app server and moving files to device
Now, open your device, such as iPhone or Android, and in the PhoneGap Developer app we installed, select the IP address the app server is listening in on (192.168.1.65:3000 in our case, but it will be different for you).
PhoneGap will build and transfer the files via Socket.IO to the device automatically. See Figure 4-13 for a preview of the app. Figure 4-12 shows in the Terminal that the files were moved successfully.
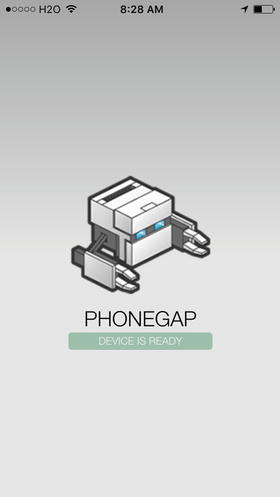
Figure 4-13. PhoneGap Developer app preview on iPhone
You can see the value of using PhoneGap over Cordova; we didn’t have to install Xcode or follow the tedious process of Apple in order to run the app on our device. In fact, the PhoneGap Developer app gives us access to the device API, so that we can also easily access our device hardware.
PhoneGap Development
Now that we have PhoneGap installed and we know how to install and preview our app on our devices, we can go ahead and make changes in our app and start the actual development process.
We will be using WebStorm to import our project. However, feel free to use any Integrated Development Environment (IDE ) you would like.
In WebStorm, select “Open” on the Welcome page (see Figure 4-14). If you have any projects open, close them and the Welcome page will appear.

Figure 4-14. WebStorm Welcome window
Next, it will open up the “Open File or Project” window. Then, WebStorm asks us to define the project root directory. Navigate to where you placed the “helloPhoneGap” project and click on “Project Root” (see Figure 4-15.)

Figure 4-15. Selecting project root in WebStorm
Click “Finish” and that’s all there is to it. WebStorm will open up with the project configured (see Figure 4-16).

Figure 4-16. WebStorm with helloPhoneGap project configured
Navigate into the “www” folder and open the index.html file in WebStorm—see Figure 4-16 and Listing 4-1.
Listing 4-1. Index.js content
<body><div class="app"><h1>PhoneGap</h1><div id="deviceready" class="blink"><p class="event listening">Connecting to Device</p><p class="event received">Device is Ready</p></div></div><script type="text/javascript" src="cordova.js"></script><script type="text/javascript" src="js/index.js"></script><script type="text/javascript">app.initialize();</script></body>
The code is straightforward; it shows a title called “PhoneGap” and has a div with text that will change according to the device. Then, it loads the Cordova.js and js/index.js scripts and initializes the app.
Change the heading tag from “Hello”:
<h1>PhoneGap</h1>To “Hello PhoneGap”:
<h1>Hello PhoneGap</h1>Now, to see this change on the actual device, all you have to do is run the server command again in the Terminal:
$ phonegap serveAs you recall, WebStorm has a “Terminal” window, so you don’t need to open up the Mac Terminal—simply use the built-in Terminal. To stop the local server created by PhoneGap, click ctrl-c.
You should be able to see the change we have made on your actual device—see Figure 4-17.

Figure 4-17. “Hello PhoneGap” is showing on device
Ionic
A second Cordova distribution we would like to point out and cover is Ionic. Ionic distribution is geared toward the AngularJS framework .
Similar to PhoneGap, Ionic has built-in features that enable developers to develop and deploy their app easily. Additionally, it will automatically set your project with structure, libraries, and settings according to AngularJS best practices.
In this section, we will install Ionic, add plugins, preview the app we will be creating, preview the app in an iOS simulator, and review the Ionic resources.
To get started, install Ionic using the following command in the Terminal:
$ sudo npm install -g ionicThat command will install the Ionic CLI: https://www.npmjs.com/package/ionic . It is a Cordova decorator, meaning all Cordova commands will work plus additional commands added be ionic.
Once Ionic is installed, you can start a new project. We’ll call the project “helloionic”:
$ ionic start helloionicIonic adds the iOS application by default and uses the “tabs” template project. The command is the same as writing tabs at the end:
$ ionic start helloionic tabsSee the Terminal output in Figure 4-18:

Figure 4-18. Ionic “helloionic” project output
Ionic offers currently three template starters: tabs (default), sidemenu, and blank.
Next, let’s start a new project in WebStorm so we can explore the project easily. Similar to how we imported the “helloPhoneGap” project into WebStorm, we’ll do the same with “helloionic”(see Figure 4-19). As you recall:
Select “Open.”
Next, select “Source files are in a local directory, no Web server is yet configured.”
Now, browse and set the project root, “helloionic,” and click “OK”

Figure 4-19. “helloionic” configured in WebStorm
Ionic automatically created our project and included the same files and folder we have seen before in Cordova and PhoneGap, such as index.html, hooks, platforms, plugins, config.xml, bower.json, and package.json.
Additionally, Ionic includes all the basic AngularJS structures and templates to get you started as soon as possible. For instance:
www/js/app.js: App file is a global place for creating, registering, and retrieving AngularJS modules.
www/js/controllers.js: AngularJS controller is the glue that holds the model and view together.
www/js/services.js: AngularJS services are substitutable objects that are wired together using dependency injection (DI) .
www/templates: The view representation includes the following: chat-detail.html, tab-account.html, tab-chats.html, tab-dash.html, tabs.html.
www/lib: Includes the following libraries: CSS, SCSS, fonts, and the js folder, which includes Angular libraries and Ionic libraries.
www/lib/ionic/scss/ionic.scss: SCSS is described on http://sass-lang.com/ as “CSS with superpowers.” Sass is a preprocessor for generating CSS that adds power and elegance to the basic language.
In the next chapter, we will be diving deep into AngularJS, folder structure, and framework, and we don’t want to get sidetracked from the chapter objective. Go over the code and you will get an idea, or review this project again after you’ve completed Chapter 5.
Ionic Front-end
Ionic excels when it comes to front-end, offering pre-made UI components ready to use across different platfroms. To see the available UIs, check the Ionic component page:
http://ionicframework.com/docs/components/
Additionally, Ionic follows OS-specific guidelines for following styles, behaviors, and transitions to fit the platform you choose. For example, the menu toggle button is on the left in iOS but on the right in Android.
Ionic also put lots of effort into performance. For instance, for handling lists, Ionic introduced a “collection-repeat” directive to replace ng-repeat and its only showing list that are displaying instead of rendering all the items in a collection.
Add Plugins in Ionic
Adding plugins or re-installing in Ionic is the same as Cordova and PhoneGap:
$ ionic plugin add [plugin name]That command will register the plugin inside the “package.json,” just as we’ve seen in Cordova and PhoneGap.
Preview Your App
To run the project, in the Terminal either inside of WebStorm or directly in Terminal, after changing the directory to the Ionic library (“cd helloionic”), type:
$ ionic serveThe “serve” command deploys the project in the browser. See Figure 4-20:

Figure 4-20. “helloionic” deployed in the browser
Use the lab flag to see your app in different platforms (see Figure 4-21).

Figure 4-21. Ionic serve with lab flag
$ ionic serve –labAlso worth mentioning:
livereload flag: Watch for changes and update your app automatically.
c flag: Print the console logs to the Terminal.
Let’s put it all together:
ionic serve --c --lab --livereloadiOS Simulator
To deploy the same project on iOS, you need to install the “ios-sim” project using the following command:
$ sudo npm install -g ios-simThen you can run the project in the simulator using the following command (see output in Figure 4-22):

Figure 4-22. “helloionic” deployed on iPhone 6
$ ionic run iosYou can also open the Ionic project in Xcode by typing this command in the Terminal:
$ open platforms/ios/HelloCordova.xcodeprojIn Xcode, build and run the current scheme, the play icon, just as we did in Chapter 1. Ionic supports the Crosswalk Project ( https://crosswalk-project.org/ ). Crosswalk is an HTML application runtime originally sponsored by Intel and built on open source foundations. It extends the web platform and adds new capabilities, ensuring they are available on your build. Benefits include:
Improved performance and visuals using HTML5, CSS3, and JavaScript
Access to latest recommended and emerging web standards
Ability to try experimental APIs not supported by mainstream web browsers
Control over the update cycle of your app by distributing it with its own runtime.
Debug easily using Chrome DevTools
To install Crosswalk, run the following commands:
$ npm install -g ios-deploy$ ionic browser add crosswalk
After installing Crosswalk, you can provide a rich experience on all Android 4.x devices. Ionic will automatically embed Crosswalk for your Android build, ensuring everything is working correctly.
You can use the browser list command to see the different versions of Crosswalk you can install:
$ ionic browser listIonic Resources
Next, when you are ready to deploy, you’ll need icons and a splashscreen for your app on each platform you deploy. This can add a lot of work, since you need to follow each platform’s guidelines. Ionic handles that gracefully. All you have to do is follow these templates for icons and splashscreens:
Splashscreens: http://code.ionicframework.com/resources/splash.psd
Place the icon and splash file template in the Ionic resource folder (“helloionic/resources”) and run this command:
$ ionic resourcesAlternatively, you can run “ionic resources” first and, once the directory and files are created, add PSD and run the command again.
Running the command will generate all the files and take care of parameters such as image dimension, OS Device, and landscape/portrait. That command will also upload the files to Ionic’s servers and create the correct platform folders and edit the “config.xml” file for you automatically.
Summary
In this chapter, we learned about Apache Cordova, created a Cordova “Hello World” sample app, and learned how to run this app. We studied the different platform deployments that Cordova supports and also the different Cordova plugins available and where to locate them. We covered several of the Cordova distributions, such as PhoneGap and Ionic. We installed PhoneGap and the PhoneGap Mobile App and created a PhoneGap Hello World sample project. We began coding and previewed our PhoneGap app on our specific device. Lastly, we configured WebStorm IDE with the PhoneGap project we had created. We then created and configured an Ionic project, previewed some of the features and commands that can help you use Ionic to its fullest potential, and deployed your app in the browser and on iPhone 6.
In the next chapter, we will learn about AngularJS and how to create apps in AngularJS, which can be deployed using Cordova, PhoneGap, and Ionic on most popular devices. This will allow us to leverage and use the same codebase to deploy our app without having to write native code for each specific device.