Let's say there is a manufacturer that produces TV sets. Each TV set has a remote control that allows the user to change channels and whatnot. A remote control is an interface to control a TV. If every TV model needs a unique remote control, then there will be an explosion of designs just for remote controls. Every remote control has some features that are common among different models of TVs, though, such as channel changing, volume, and power on/off. And each TV should be able to respond to these commands sent from a remote control with primitive command interfaces. We can separate remote control logic from actual TV models. So changes in TV models should not have any impact on the design of the remote controls. The same design of a remote control can be reused and extended without affecting other TV models either.
There is a similar situation in object-oriented software design. For example, let's say you wanted to design interfaces for displaying the same types of windows in different operating systems. Most of the time, a basic window is constructed of lines and rectangles. Operating system A draws lines and rectangles differently from operating system B. If we put each specific implementation for each type of window, the size of proliferating class hierarchy will be staggering. A solution for this problem is to separate the abstractions for different window types from each implementation for different operating systems. A design pattern that helps fix that design issue is called a Bridge pattern.
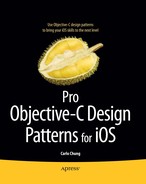
The goal of using the Bridge pattern is to separate an abstraction hierarchy from its implementation, so they can vary independently. An abstraction defines a high-level abstraction interface that will be used by clients. An implementation hierarchy defines a lower-level interface that will be used by the abstraction hierarchy. The bridge is formed when a reference of implementing class is encapsulated in an instance of abstraction, as illustrated in Figure 9-1.
Abstraction is the parent interface that defines the high-level abstraction interface used by clients. It has a reference to an instance of Implementor, which defines the interface for implementation classes. This interface doesn't need to correspond to Abstraction's interface; in fact, they can be quite different. The Implementor's interface provides primitive operations, and Abstraction's higher-level operations are based on these primitives. When a client sends an operation message to an instance of Abstraction, the method sends an operationImp message to imp. An actual underlying ConcreteImplementator (A or B) will respond to that and pick up the task.
So if you want to add new ConcreteImplementators to the system, all you need to do is to create a new implementing class for Implementor that responds to the operationImp message and perform any specific operations there. That won't affect anything on the Abstraction side, though. Likewise, if you want to make changes to the interface of Abstraction or create more refined Abstraction classes, you can do so without affecting the other side of the bridge as well.
Note
THE BRIDGE PATTERN: Decouples an abstraction from its implementation so that the two can vary independently.[7]
You'd naturally think about using it in the following situations.
You don't want a permanent binding between an abstraction and its implementation (so an implementation can be switched at runtime).
Both the abstractions and their implementations should be extensible by subclassing independently.
Changes in the implementation of an abstraction should have no impact on clients' code.
If an extra subclass is needed for each implementation in order to refine the abstractions, then it indicates there is a need for splitting them into two parts.
You want to share an implementation among multiple objects with different abstraction interfaces.
In the following sections, we are going to use an example of developing an emulator that can run different handheld game consoles from the 80s and 90s and illustrate how to use the Bridge pattern to solve some related design problems.
Back in the days when Game Boy and Game Gear were so popular, it was very common to see a lot of kids holding one in their hands and playing their favorite games. Those kids have grown up, and Game Boy and Game Gear became nostalgia for them. There are a lot of people who have made different emulators that run the original Game Boy and Game Gear games on a desktop computer, as well as iOS devices with totally different hardware architectures in order to bring their long lost childhood memory back.
Without getting into details, we are going to discuss how to use the Bridge pattern to build an emulator that can support multiple portable gaming platforms like Game Boy and Game Gear (or possibly others).
There are two major components in each platform, the operating system and the control panel as a means of input from the user. Both Game Boy and Game Gear have up, down, left, and right buttons on the left-hand side of the control panel, as well as buttons A and B as action buttons on the right-hand side and a Start button in the middle. However, Game Boy has a Select button that is right next to the Start button, and Game Gear doesn't have that button at all. Despite the slight differences in the button layout and the number of buttons, the structure and the functionality of the control panel are pretty much common across different platforms.
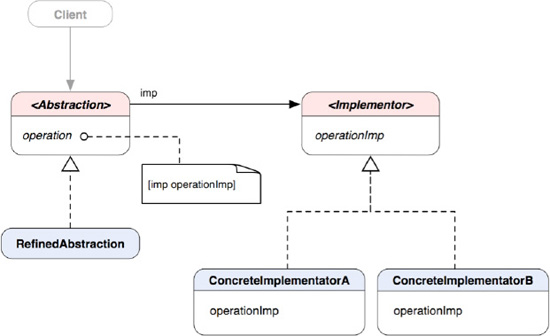
When we design the emulator, besides the actual emulator (the OS that runs games for its platform), we also need to think about a virtual controller as the user input device for it. That virtual controller can most probably be simulated on the iOS with some sort of UI elements for the platform. If we create a specific controller for each concrete emulator, then there would be a lot of redundancy and a possible explosion of subclasses of virtual controllers. What's more, it may require different subclasses for different types of virtual input methods. For example, instead of using arrow buttons to simulate up, down, left, and right instructions, the virtual controller can get input from the accelerometer with changes in acceleration in different directions. The problem is we need to separate both a virtual controller and an emulator so they can vary independently without affecting each other's code. In other words, a group of emulators will have their own class hierarchy, while a group of virtual controllers will have their own separately. Both hierarchies have different interfaces, but they are connected with a "bridge" formed between the high-level abstract classes in both hierarchies with an object composition relationship. A static structure of the design is illustrated in Figure 9-2.
ConsoleController and ConsoleEmulator are abstract classes for virtual controllers and emulators respectively. Both classes have different interfaces. The only way to connect them is by encapsulating a reference to an instance of ConsoleEmulator in ConsoleController. So an instance of ConsoleController can use an instance of ConsoleEmulator at an abstract level. This forms a bridge between two different classes, ConsoleController and ConsoleEmulator. ConsoleEmulator has defined interfaces for any of its subclasses to handle low-level instructions for a particular console's OS. ConsoleController has a relatively low-level method to send basic command types across the bridge. The setCommand:command method of the ConsoleController takes a parameter of a predefined command type and passes it with a message, loadInstructionsForCommand:command, to an embedded ConsoleEmulator reference. And finally it sends an executeInstructions message to the same reference to execute any loaded instructions in the emulator. A visual representation of connecting two different class hierarchies is shown in Figure 9-3.
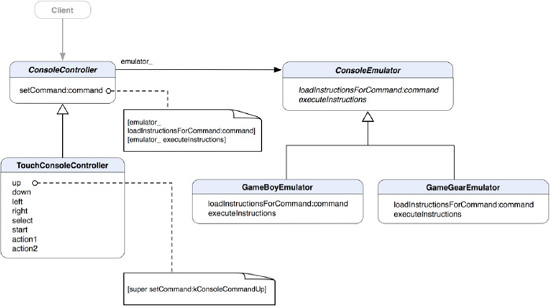
Figure 9-3. The abstraction class hierarchy will not be affected by changes in the implementation class hierarchy or vice versa.
The ConsoleController class hierarchy is representing a form of "abstraction" to any "implementation" in the ConsoleEmulator class hierarchy. The Abstraction class hierarchy provides a layer of abstraction to form a virtual controller layer over any compatible ConsoleEmulator. A concrete ConsoleController can talk only to an emulator on the other side of the bridge through the low-level setCommand: method defined in the parent ConsoleController class. The method is not meant to be overridden by subclasses in this configuration, as this is an interface that allows any communication between the parent and refined controllers to take place. If there are changes on the emulator side, nothing will affect any controller on the left and vice versa.
Sounds very interesting, huh? Let's see some code. First off, we need to define some commands that should be supported by any emulator, as in Listing 9-1.
Example 9-1. ConsoleCommands.h
typedef enum
{
  kConsoleCommandUp,
  kConsoleCommandDown,
  kConsoleCommandLeft,
  kConsoleCommandRight,
  kConsoleCommandSelect,
  kConsoleCommandStart,
  kConsoleCommandAction1,
  kConsoleCommandAction2
} ConsoleCommand;
We have up, down, left, right, select, start, action 1, and action 2 as our generic commands defined as a group of enum. If we want to expand the command list in the future to support more sophisticated emulators, we can do so without breaking any design on both sides. Let's look at the definition of abstract ConsoleEmulator in Listing 9-2.
Example 9-2. ConsoleEmulator.h
#import "ConsoleCommands.h"

@interface ConsoleEmulator : NSObject
{

}

- (void) loadInstructionsForCommand:(ConsoleCommand) command;
- (void) executeInstructions;

// other behaviors and properties.

@end
Our abstract ConsoleEmulator has two basic methods that we have briefly discussed previously, loadInstructionsForCommand: and executeInstructions. loadInstructionsForCommand: should load any specific OS instructions in an internal data structure based on the command type that we have defined in Listing 9-1. executeInstructions will execute any loaded instructions in the data structure. OS instructions and how to execute them are platform-specific, so concrete emulators should override these methods as in Listings 9-3 and 9-4.
Example 9-3. GameBoyEmulator.h
#import "ConsoleEmulator.h"

@interface GameBoyEmulator : ConsoleEmulator
{

}

// overridden behaviors from the abstract class
- (void) loadInstructionsForCommand:(ConsoleCommand) command;
- (void) executeInstructions;

// other behaviors and properties.

@end
Both GameBoyEmulator and GameGearEmulator are subclasses of ConsoleEmulator. They override the abstract methods to provide specific behaviors for their platforms.
Example 9-4. GameGearEmulator.h
#import "ConsoleEmulator.h"

@interface GameGearEmulator : ConsoleEmulator
{

}

// overridden behaviors from the abstract class
- (void) loadInstructionsForCommand:(ConsoleCommand) command;
- (void) executeInstructions;

// other behaviors and properties.

@end
Now we have the emulator hierarchy defined completely. On the virtual controller side of the design, ConsoleController is our starting point for the whole virtual controller class hierarchy. It keeps an internal reference to an instance of ConsoleEmulator as emulator_. It also defines a setCommand:command method that will be used by its subclasses to input a command with a predefined command type. We will get to its details in just a little bit. Its class declaration is shown in Listing 9-5.
Example 9-5. ConsoleController.h
#import "ConsoleEmulator.h"
#import "ConsoleCommands.h"

@interface ConsoleController : NSObject
{
  @private
  ConsoleEmulator *emulator_;
}

@property (nonatomic, retain) ConsoleEmulator *emulator;

- (void) setCommand:(ConsoleCommand) command;

// other behaviors and properties

@end
setCommand: just simply sends loadInstructionsForCommand:command and executeInstructions messages to the emulator_ reference to finish the instruction execution process, as in Listing 9-6.
Example 9-6. ConsoleController.m
#import "ConsoleController.h"


@implementation ConsoleController

@synthesize emulator=emulator_;

- (void) setCommand:(ConsoleCommand) command
{
  [emulator_ loadInstructionsForCommand:command];
  [emulator_ executeInstructions];
}

@end
The basic bridge for both the virtual controller and emulator is complete. Now we are ready to get our first virtual controller, called TouchConsoleController, to form an interface between the multi-touch screen and a concrete emulator hidden from the view. It's got some basic method declarations that reflect our predefined command types in Listing 9-1. Its class declaration is shown in Listing 9-7.
Example 9-7. TouchConsoleController.h
#import "ConsoleController.h"

@interface TouchConsoleController : ConsoleController
{

}

- (void) up;
- (void) down;
- (void) left;
- (void) right;
- (void) select;
- (void) start;
- (void) action1;
- (void) action2;

@end
The methods of the TouchConsoleController are self-explanatory. Each of them simply sends a [super setCommand:ConsoleCommand] message to super with an appropriate ConsoleCommand value, as in Listing 9-8.
Example 9-8. TouchConsoleController.m
#import "TouchConsoleController.h"
#import "ConsoleEmulator.h"


@implementation TouchConsoleController

- (void) up
{
  [super setCommand:ConsoleCommandUp];
}

- (void) down
{
  [super setCommand:kConsoleCommandDown];
}

- (void) left
{
  [super setCommand:kConsoleCommandLeft];
}

- (void) right
{
  [super setCommand:kConsoleCommandRight];
}

- (void) select
{
  [super setCommand:kConsoleCommandSelect];
}

- (void) start
{
[super setCommand:kConsoleCommandStart];
}
- (void) action1
{
[super setCommand:kConsoleCommandAction1];
}
- (void) action2
{
[super setCommand:kConsoleCommandAction2];
}
@endWe want all the methods to use the same setCommand: implementation defined in the parent class by sending the message to super instead of self to avoid confusion. self and super are symbolically the same here, as the subclass doesn't override the setCommand: method to provide its own bridge. We still use super to emphasize the architecture, though. Then a forwarded ConsoleCommand value will be used for loading appropriate OS instructions and executing them in a concrete emulator across the bridge.
With the Bridge pattern, we can see the power of object composition. The bridge we have implemented for the ConsoleEmulator cannot possibly be done with straight inheritance. This is also one of the reasons we favor object composition over inheritance.
We have discussed how to use the Bridge pattern to implement an emulator app that runs on iOS. Without delving into the bells and whistles of making a truly working emulator, we focused on some design issues that the Bridge pattern can help with. So next time, when you are facing a dilemma of "how to separate abstraction from implementation yet they are still connected," you would intuitively think of the Bridge pattern. Then you can look through the sample code again and see how it can fit to yours.
The Bridge pattern is a way to adapt an interface to a different one. In the next chapter, we are going to see a different pattern that can be used not just to put different interfaces together, but also to simplify them as a single access point, like the façade of a building.
[7] The original definition appeared in Design Patterns, by the "Gang of Four" (Addison-Wesley, 1994).