Just like the next top-paid app in the app store, we need some good ideas to start with. The good idea we are going to use for this book example is a drawing app. We call it TouchPainter. It is simple yet comprehensive enough to showcase many design patterns and best practices.
We will go through several design phases, and during each process we will come up with some requirements, use cases, and problems related to our design. Along the road, we will explore different design patterns that can solve the design problems to satisfy the requirements.
There are three main milestones in our design process:
Conceptualizing the ideas
Designing the look-and-feel
Architectural design
From conceptualizing the ideas, we will collect some basic requirements and use cases about our TouchPainter app, such as somehow the user should be able to use the app, and the user's experience when using it.
Once we have a pretty good idea about what we are going to put in the app, we will move forward to have a basic look-and-feel laid out. The look-and-feel design process gives a developer a chance to explore what UI elements can be grouped together in a logical way. Not only can the process provide a developer a big picture of what looks good or bad in the first place, it can also possibly eliminate unnecessary UI elements so it simplifies and enhances the user experience. This is an iterative process, so the design should be open for changes easily. Many developers use pencils and paper to sketch what different views can be put together. Once the sketches look satisfying, developers/UI designers can start using some software to put together wireframes with more realistic-looking widgets to refine the design. If things don't look as expected, you may want to go back to the paper design or make some changes onscreen with the widgets. We are going to explore this process when we put some wireframes for the look-and-feel and requirements together in that section.
When the look-and-feel is ready, it'll be time to define some technical problem domains that can affect the architecture of the application. A problem domain can go like, "How can the user open a scribble?"
Ready? Let's go!
Any type of software development needs some sorts of requirements, and this one is no exception. But we don't need to define every detail at the beginning. All we need is the most basic one to start with. What should be our first requirement?
A drawing pad allows scribbling with the user's finger.
I don't think any user of our app will be satisfied with just a black and white drawing experience. It would be nice to have some options for setting different colors and stroke sizes. Then we have another requirement:
It allows the user to change stroke colors and sizes.
But just allowing the user to scribble is not enough; we should also allow the user to save it. So we have another requirement for that:
It allows the user to save a scribble.
It wouldn't make sense if the user couldn't open a saved scribble again and modify it. So here we go:
It allows the user to open a saved scribble.
What if the user doesn't like his or her masterpiece, and wants to get rid of it and start over?
It allows the user to delete the current scribble.
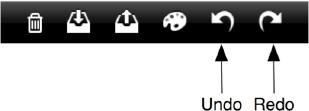
It would be nice to allow the user undo and redo what he or she has drawn. So here comes another requirement:
It allows the user to undo and redo scribbling.
The list can go on and on, but for now we have some basic requirements to kick-start our design with. But before we dive into a design phase, we should make sure we have the look-and-feel of it so we can get a pretty good idea about what the app should look like. Let's summarize our first-ever requirements for our wonderful drawing app:
Do you remember the last time you were asked or you decided to make last-minute changes on the user interface and/or user experience for your app? Moments like that aren't fun. So a better practice, at least in iOS development here, is to design the entire look-and-feel as well as user experiences that are close to the final product as early as possible. I call it Look-and-Feel–driven design. We have heard about data-driven design, event-driven design, and test-driven design. But they all deal only with technical details. However, Look-and-Feel–driven design can let us focus on the user experience at a very early stage. Not only can it save us some crunch time before it's released, but it also makes sure stakeholders and developers are on the same page down the road. Even in development, with the look-and-feel of the application and UI design ready, developers who are busy cutting their code will have some good visual clues about what exactly they are working on. It can increase productivity, as many possible hard-to-find bugs or design flaws can be found at an early stage.
Let's move on to the look-and-feel of our drawing app. How should we get started? A pen and a piece of paper or, if you prefer, graphical stencils drawn on a computer should be a good start. Here is the first look of our app in Figure 2-1.
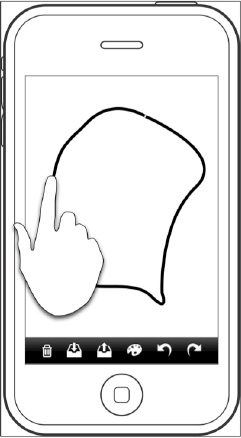
In our first draft of the look-and-feel, it shows that the user can use his or her finger to scribble lines (or whatever shape the user wants) on the screen. So that should fulfill our first requirement: a drawing pad allows scribbling with the user's finger. We feel OK about this part.
At the bottom of the view, there is a toolbar that contains six buttons—from left to right, deleting, saving, opening a saved scribble, selecting different stroke colors and sizes, and undoing/redoing what's drawn onscreen.
The wireframe just looks like a typical iPhone app that does allow the user to draw something with a finger. It also allows the user to change other settings that are related to the session. We are happy with the look for now. Let's move on to the next wireframe for our other requirements in Figure 2-2.
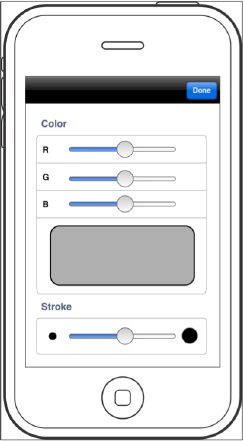
In this wireframe, the user can adjust the stroke color and size by varying various color component sliders. The grayish box in the middle of the page will show the current stroke color based on the selected RGB values. Adjusting the slider at the bottom section of the page can set the stroke size. This wireframe fulfills our second requirement: it allows the user to change stroke colors and sizes. Tapping the Done button will take us back to the main canvas view, as shown in Figure 2-1.
Up to this point, we are pretty confident that the wireframes we've got so far can fulfill four out of five requirements, except the fourth one, which allows the user to open a saved scribble. Our first question about that requirement is, how does the user know what scribble to open in the first place? So definitely we need some sort of browser so the user can browse through a whole bunch of them and pick the one he or she wants. We can picture it as a thumbnail view.
Our rough wireframe for a thumbnail view is shown in Figure 2-3.
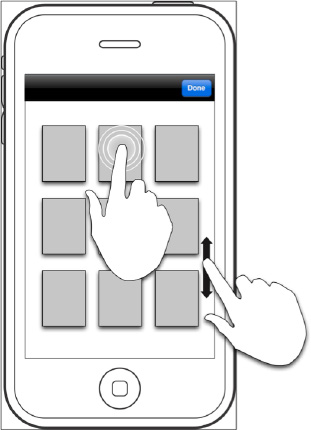
Once the user hits the palette button on the main canvas view, it will bring up the thumbnail view as shown in Figure 2-3. The user can scroll through a list of scribble thumbnails by swiping the page upward and downward. The user can also tap any one of them to open it on the canvas view, so the user can continue to work on it. Otherwise, the user can go back to the main canvas view by hitting the Done button.
We can refine the design later if needed, but we are pretty happy with the look-and-feel of the wireframes. Let's move on to the next stop—architectural design.
As we know, this book is about design patterns in Objective-C and iOS development, so I guess a lot of you can't wait to ask yourself this question: what patterns should I use for this app? Well, I believe a lot of people have a habit of finding patterns first and then spending a lot of time trying to "fit" them in a project so it looks "professional," although the patterns may not resolve the problems correctly.
Before we think about resolving solutions, we need to have problems first. In the last section, we've already come up with some basic requirements for the app from some primitive use cases. A use case describes "who" can do "what" with an app. We can elaborate some design problems out of those requirements (or use cases), so we can find some possible ways to solve them later.
We are going to lay out and examine some problem domains elaborated from the original requirements. Each of them has some refined, specific features or sub-problems related to the principle domain. We come up with four major domains and their specific features as follows:
View Management
Transition from one view to another
Using a mediator to coordinate view transitions
Scribble representation
"What" can be drawn onscreen
Representing marks with a composite structure
Drawing a scribble
Representation of a saved scribble
Capturing the state of a scribble
Restoring the state of a scribble
User operations
Browsing a list of scribble thumbnails
Undo/redo scribbling
Changing stroke colors and sizes
Deleting the current scribble on the screen
The Model-View-Controller pattern is discussed in Chapter 1. A model represents the data that is presented by a view. A controller stands between a view and a model to coordinate them. So each controller "owns" a view and a model. In iOS development, that kind of controller is referred to as a view controller. From the wireframes we have in the previous section, we have an idea of what the TouchPainter app should have. There are three views, and each of them should be maintained by a corresponding controller. So we have three controllers based on our initial UI design:
CanvasViewControllerPaletteViewControllerThumbnailViewController
CanvasViewController contains our main canvas view on which the user can scribble with a finger, as illustrated in Figure 2-1. PaletteViewController maintains a bunch of user control elements so the user can adjust the color and size of a stroke, as in Figure 2-2. Any new settings will be forwarded to the model of the CanvasViewController. The ThumbnailViewController showcases all previously stored scribbles as thumbnails, so the user can browse through all of them until he or she taps one to open it, as illustrated in Figure 2-3. All necessary information about that scribble will be forwarded to the CanvasViewController to display the scribble on the canvas view.
There are some interactions between different view controllers. They are tightly dependent on each other. Things can become chaotic, especially if we want to add more view controllers to the application later.
When the user taps the palette button on the CanvasViewController, the view will be replaced by the PaletteViewController's view. Likewise, a hit on the button that opens a thumbnail view on the CanvasViewController will bring up the view of the ThumbnailViewController. When the user taps the Done button on the navigation bar to finish his or her business, it will take the user back to the view of the CanvasViewController. Figure 2-4 illustrates their possible interactions.
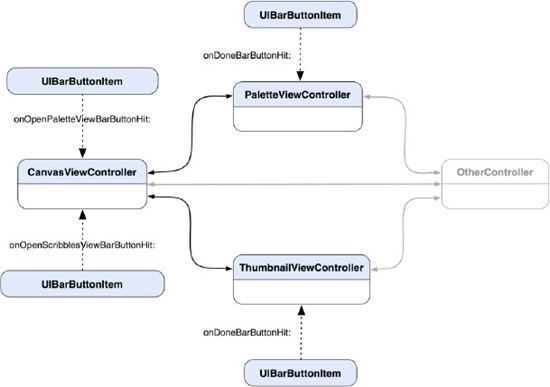
Figure 2-4. A diagram shows dependencies among CanvasViewController, PaletteViewController, and ThumbnailViewController in a typical iOS application design.
When you look at the diagram Figure 2-4 and you think, "There is nothing wrong with it. I have been doing it and it works all the time," then you may want to know why it may not be a good design in most applications. In a typical iOS application, view transitions like the one shown in Figure 2-4 don't look very complex, even though there are certain dependencies among those controllers. The application can't scale well if views and their controllers are dependent on each other. Also, if we modify the way the views change, code changes in each of them are almost unavoidable. In fact, the dependencies are not just among the view controllers but the buttons as well. Those buttons are indirectly related to particular view controllers. If the app grows larger and more complex, the dependencies could be out of control, and a bunch of hard-to-understand view transition logics will follow. We need a mechanism to reduce interactions between different view controllers and buttons, so it will make the whole structure less coupled but more reusable and extensible. A kind of coordinating controller just like a view controller should help, but its role is not to coordinate a view and a model; it needs to coordinate different view controllers for proper view transitions.
The Mediator pattern (Chapter 11) suggests an object that encapsulates the logic of how a set of objects interacts. A mediator promotes loose coupling among different objects by keeping them from referring to each other explicitly. So their interactions can be varied in a centralized place, and their dependencies can be reduced. A structure for their new interaction patterns is illustrated in Figure 2-5.
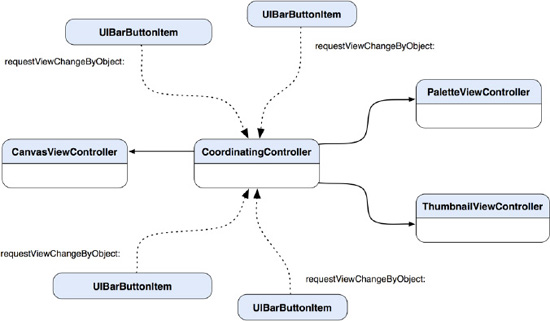
Figure 2-5. A diagram shows fewer dependencies among the view controllers and their buttons with the introduction of CoordinatingController as a mediator.
With the introduction of our new member, CoordinatingController, to our architecture, any further changes to the architecture later will be a lot easier. The CoordinatingController encapsulates logic that coordinates the traffic of view-changing requests fired off from different controllers and buttons alike. Interactions are not just limited to view transitions, but they could be information forwarding and operation invocation. Should those interactions need to be modified later, the only place that we need to go to is in CoordinatingController, not any other view controllers. With this structure, the CoordinatingController knows everyone on the interaction map. A button tap will trigger a call to CoordinatingController to request a view transition. Based on the information stored in the button, such as a tag, CoordinatingController can tell what view the button desires to open. If we want to reuse any of those view controllers, we don't need to worry about how they should be connected in the first place.
Now the CanvasViewController, PaletteViewController, ThumbnailViewController, and their buttons perform just like different musicians in an orchestra. They don't depend on each other to perform a piece but just follow what a conductor tells them about when and what to do. Can you imagine an orchestra without a conductor?
When the user touches the canvas view, touch information will be collected, such as the location of the touch. We need to have some sort of data structure to organize touches onscreen, so that all touches can be conglomerated and managed as a single entity. Especially when we need to parse the data later (e.g., draw it on the screen), the data structure needs to be highly organized and predictable.
Before we think of any possible data structure that can be used to hold the touch data, let's take a look at how we should define a stroke.
If the user first touches the screen and then moves his or her finger, it creates a stroke. However, if the finger doesn't move but finishes the touch at the same location where it started, that should be considered a dot. These are illustrated in Figure 2-6.
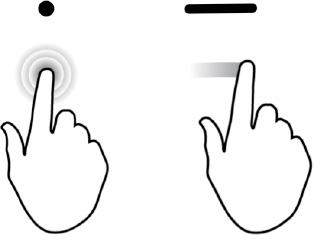
It's intuitive to think of a dot as just a single location, while a stroke has multiple locations along the path. A stroke is an entity by itself that contains a series of touch locations. The challenge here is how to manage both types of entities as if they were a single type. Can we think of a stroke that has multiple dots? If a stroke has an array to hold all the dots, then can we just use a stroke structure to represent both the dot and stroke? But then for the case of a dot, we will waste memory for having an array that is just a dot in a stroke. The best case is we can have a design pattern to let us have our cake and eat it too.
Before we examine how we can make use of a data structure to represent strokes and dots, let's think about how we can draw a point and line on the screen. The Cocoa Touch framework has a framework called Quartz 2D, which provides an API to draw 2D glyphs on a UIView, including lines and different polygons.
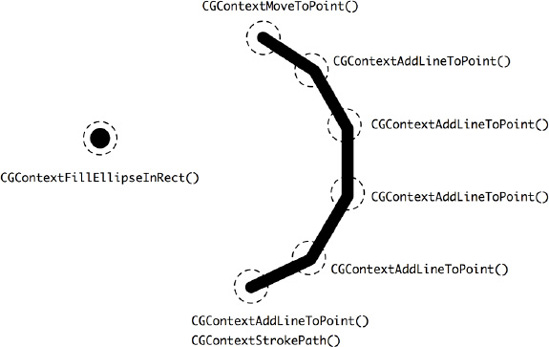
To draw anything on a UIView, we need to get ahold of a drawing context provided by the runtime. For instance, if we want to draw a dot, then we pass in the drawing context and the size of the dot as a CGRect that contains the width and height as well as the location information to a Quartz 2D function, CGContextFillEllipseInRect(). For drawing a line, we need to first let the context move to the first point with a function call, CGContextMoveToPoint(). After the first point is set to the context, we will add the rest of the points that are supposed to be part of a line to a series of function calls to CGContextAddLineToPoint(). When the last point is added, we will close the line by calling CGContextStrokePath(). Then the points are connected as a line and drawn on a UIView. A visual representation of the process is illustrated in Figure 2-7.
We can, of course, use whatever primitive data structures we know of for storing strokes, dots, and whatnot. However, if we use, let's say, a multi-dimensional array to store everything, we need a lot of type-checking to use and parse, plus it would take a lot of debugging to make the structure robust and consistent. One object-oriented way of thinking about a kind of structure that can keep independent dots as well as strokes that have other dots (vertices) as children is a tree. A representation of a tree allows complex object relationships like our strokes and dots scenario to be organized and localized in one place. A design pattern that solves this kind of structural problem is called the Composite pattern (Chapter 13).
With the Composite pattern, we can compose our strokes and dots into a tree structure so that we can treat each of the nodes uniformly. A visualized structure of strokes, dots, and vertices is illustrated in Figure 2-8.
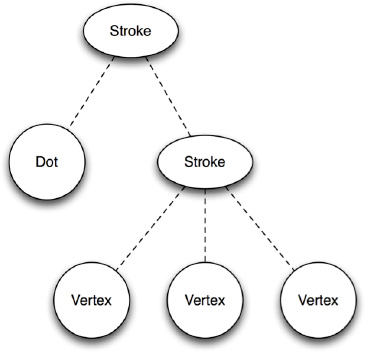
A dot is a leaf node, which is fine on its own. A stroke is a composite that can contain other dots as vertices; at the same time, it can also contain other composites as strokes. They are quite different entities. If we want each of them to represent the same type, then we need to generalize them into a common interface. Therefore, no matter what concrete type each component actually is, the generic type is still the same. With that scheme, we can treat each of them uniformly when we use them.
If the component is just a single dot, then it will be rendered as a filled circle to represent a "dot" onscreen. But if it's a series of dots (vertices) with which they are supposed to be connected together as a group of entities, then they will be plotted as a connected line (stroke). That is the distinction between them.
Either a stroke or a dot is, in fact, a kind of "mark" on a medium, which is the screen in our caseso we add a Mark as a parent type for Vertex, Dot, and Stroke. Their relationships are illustrated as a class diagram in Figure 2-9.
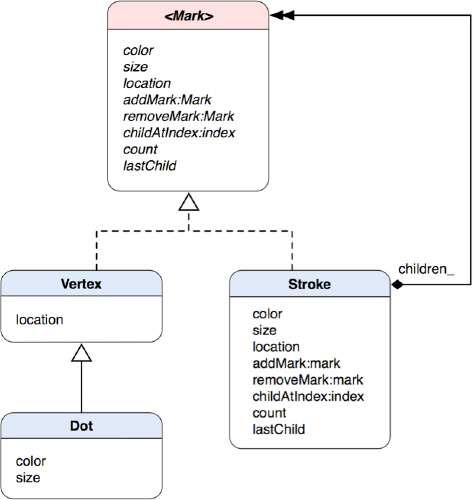
Figure 2-9. A class diagram for the Mark model as a composite structure with Dot and Stroke as concrete classes
The parent type Mark is a protocol. A protocol is an Objective-C feature that defines a contract of behavior without implementation. Concrete classes implement the interface a Mark protocol declares. Vertex, Dot, and Stroke are all concrete classes of Mark. Both Vertex and Dot need location information, but Dot also needs color and size as extra attributes, so Dot inherits Vertex as its subclass.
Mark defines attributes as well as methods for all the concrete classes. So any of them can be treated uniformly when the clients operate each of them based on the interface. There are methods for a Mark object to add other Mark objects as children and behave like a composite. Stroke implements the method for adding other Mark objects as its children. There are some other operations related to child management defined in the Mark protocol, such as removing children, returning a particular child based on an index, and returning the number of children as well as the last child in a children list.
Now we have a data structure set up that allows the app to manage points created by the user's touches in a logical way. The location information of touches plays a vital role when we present it onscreen. But the composite structure that we have examined in the last section doesn't have an algorithm to draw itself on the screen.
We know the only way to put any custom drawing on a UIView is to override its drawRect: instance method. That method will be called upon when an update on the view is requested. For example, we can send a message of setNeedsDisplay to a UIView, and then it will invoke the drawRect: method that defines any custom drawing code. We can then use a current graphics context as CGContextRef to draw whatever we want within the same method call. Let's look at how we can use the mechanism to draw a composite structure.
We can add a drawing operation like drawWithContext:(CGContextRef)context to the Mark protocol so every node can draw itself according to its specific purpose. We can pass a graphics context obtained in the drawRect: method to the drawWithContext: method, so a Mark object can draw in it. A possible implementation of the drawWithContext: method for Dot would go like the one in Listing 2-1.
Example 2-1. drawWithContext: Implementation in Dot
- (void) drawWithContext:(CGContextRef)context
{
  CGFloat x = self.location.x;
  CGFloat y = self.location.y;
  CGFloat frameSize = self.size;
  CGRect frame = CGRectMake(x - frameSize / 2.0,
                            y - frameSize / 2.0,
                            frameSize,
                            frameSize);

  CGContextSetFillColorWithColor (context,[self.color CGColor]);
  CGContextFillEllipseInRect(context, frame);
}
With an active context, an ellipse (a dot) can be drawn in the context with location, color, and size.
As for a vertex, it provides only a particular location in a stroke. So a Vertex object will add a point to a line only in the context (well, in terms of Quartz 2D, we add a line to a point) with its own location (coordinates), as shown in Listing 2-2.
Example 2-2. drawWithContext: Implementation in Vertex
- (void) drawWithContext:(CGContextRef)context
{
  CGFloat x = self.location.x;
  CGFloat y = self.location.y;

  CGContextAddLineToPoint(context, x, y);
}
For a Stroke object, it needs to move the context to the first point, pass the same drawWithContext: message and graphics context to each child, and set its stroke color. Then it wraps up the whole line drawing operation with the Quartz 2D functions CGContextSetStrokeColorWithColor and CGContextStrokePath, as shown in Listing 2-3.
Example 2-3. drawWithContext: Implementation in Stroke
- (void) drawWithContext:(CGContextRef)context
{
  CGContextMoveToPoint(context, self.location.x, self.location.y);

  for (id <Mark> mark in children_)
  {
    [mark drawWithContext:context];
  }

  CGContextSetLineWidth(context, self.size);
  CGContextSetLineCap(context, kCGLineCapRound);
  CGContextSetStrokeColorWithColor(context,[self.color CGColor]);
  CGContextStrokePath(context);
}
The primary challenge when designing the Mark protocol is to come up with a minimal set of operations to provide open-ended functionality. Performing surgery on the Mark protocol and its subclasses for adding new functionality is both invasive and error-prone. Eventually, the classes get harder to understand, extend, and reuse. So the key is to focus on a sufficient set of primitives for a simple and coherent interface.
Another way to extend the behavior of a composite structure like Mark, we can use another design pattern called the Visitor pattern. The Visitor pattern (Chapter 15) allows us to define any external behavior that can be applied to a composite structure as a "visitor." Visitors "visit" each node in a complex structure to perform particular operations based on the actual type of a visited node.
The representation of a scribble in memory is a single composite object that has a recursive structure of dots and strokes. But how can we save the representation in the file system? Representations in both places should be compatible, which means each of the representations can convert to the other without any problem.
Without using any structured and elegant mechanism to save our objects, the code could end up in complete chaos, especially if it's hard-coded in a single place. We can break down a general object-saving process into multiple steps:
Serializing an object structure into a structured file blob
Constructing a path in the file system where the blob will be saved
Saving the blob just like a regular file
As for loading the same blob from the file system and resurrecting it back to its original object structure, it should take similar steps to perform but in a somewhat reversed order:
Reconstructing the path where the blob was saved in the file system
Loading the blob from the file system just like a regular file
Deserializing it and restoring its original object structure
If we put all these steps into a giant function to handle all those chores, it will be very difficult to manage and reuse. Also, sometimes we are interested in saving not only the whole object structure but also a portion of it (e.g., only the last changes). We definitely need some sort of encapsulated operations to handle the different types of anomalies of saving the state of a scribble.
Let's not be concerned about constructing paths and such, but focus on capturing the state of a complex object in memory and turning it into an encapsulated representation, so that we can save it in the file system and restore it later.
We can use a design pattern called Memento to solve this kind of problem. Memento allows an object to save its own state however (or as complex as) it wants as an object, which is called a memento object, according to the pattern. Then some other object, such as a caretaker object, safeguards the memento object somewhere, often in the file system or memory. The caretaker object doesn't know the format of any details about the memento object. Sometime later, when it is requested, the caretaker object passes the memento object back to the original object to let it restore its state based on the saved information in the memento. Figure 2-10 illustrates their interactions in sequence.
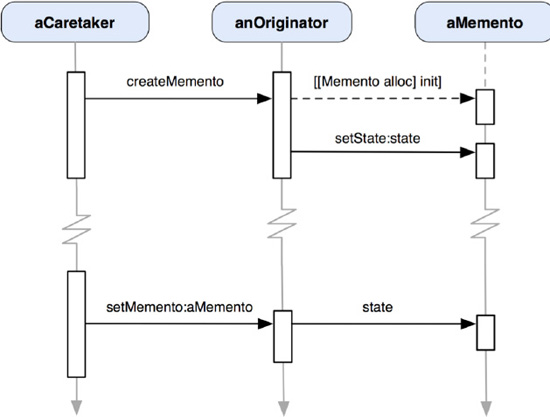
Figure 2-10. A sequence of how anOriginator object is instructed by aCaretaker to capture its own state as aMemento—aCaretaker manages aMemento and passes it back to anOriginator sometime later to let anOriginator restore its state.
Based on our problem, we need to separate the original object structure from its own captured state. But before we dive into any details, we need to figure out what we need to archive and unarchive later. In Figure 2-3, we drafted a user interface that allows the user to browse through all thumbnails of previously saved scribbles. Beyond the fact that we need to save Mark objects, we also need to save the corresponding snapshot image of the canvas view during the saving process.
Also, we may decide to archive more elements, such as a canvas and some other attributes that could be applicable to a drawing. Things can evolve when we keep releasing new versions of the app later. For the sake of flexibility, we decide to create another class that manages all these bells and whistles. We call the new class Scribble. A Scribble object encapsulates an instance of Mark composite object as its internal state. Scribble acts like a model in the Model-View-Controller paradigm, as explained in Chapter 1. In this problem domain, we need a Scribble object to be part of the capturing and restoring process with its Mark composite state instead of using Mark directly. Mark is very difficult to use directly, as it provides only primitive operations on a composite structure.
Besides Scribble being the model in the system, we also need a caretaker to save the state of a Scribble object. Let's add another class to play that role and call it ScribbleManager. An actual process of saving a scribble could be very complicated and involve a lot of other objects and such, so we will discuss only saving the internal state of a Scribble object in the rest of the section.
As illustrated in Figure 2-11, CanvasViewController initiates a call to ScribbleManager to save a scribble. ScribbleManager then asks the Scribble object that was passed in to create a memento. The Scribble object in turn creates an instance of ScribbleMemento and saves its internal Mark reference to it. At this stage, ScribbleManager can either keep the returned memento object in the memory or save it in the file system. In this "saving a scribble" process, we want the ScribbleManager to save the memento object in the file systems so the ScribbleMemento object needs to encode itself into a form of data, which is an instance of NSData. The ScribbleManager doesn't know anything about the data but just stores it in the file system with a path that only ScribbleManager has knowledge about. The overall process is like passing a black box of memento objects around, in that only the originating object can wrap and unwrap it. Everything starts from a simple message call of saveScribble:scribble from CanvasViewController to ScribbleManager.
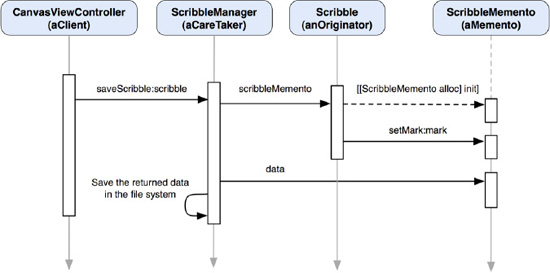
Figure 2-11. A sequence diagram shows how the state of a Scribble can be saved as a ScribbleMemento object.
There are at least two benefits when we use the Memento pattern as our object-archiving solution:
The details of the internal structure of a
ScribbleMementoobject are not exposed to the outside world. If later we decide to change what and how aScribbleobject needs to save about its state, we don't need to change other classes in the app.The
ScribbleManagerdoesn't know how to access the internal representation of aScribbleMementoobject (as well as its encodedNSDataobject). Instead, it just passes the object along in its own internally defined operations to store it in either the memory or file system. Any changes in the way to save a memento don't affect other classes.
OK, now we know how to save the state of a Scribble object as a memento object. Then how can we resurrect a Scribble object with the same mechanism? The loading part is pretty much like the saving process in reverse gear. A client (in this case, it may not be the original CanvasViewController, though) tells an instance of ScribbleManager what particular Scribble to load, which could be identified by an index. Then the ScribbleManager object reconstructs the path that was used for saving the old ScribbleMemento object and loads it from the file system as an instance of NSData. The ScribbleMemento class decodes the data and regenerates an instance of ScribbleMemento. The ScribbleManager passes the memento to the Scribble class. The Scribble class uses the memento to resurrect the original instance of Scribble with the Mark reference stored in the memento. The resurrected Scribble object that was previously archived will be returned to the client. The cycle is then complete, as illustrated in Figure 2-12.
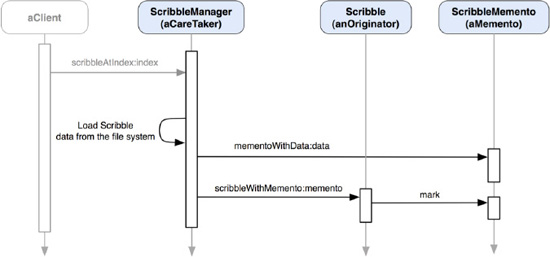
Figure 2-12. A sequence diagram shows how a Scribble object can be restored with a ScribbleMemento object.
At this point, we probably have a question about the loading process. How does the client know what scribble to open in the first place? So our next step is to set up a view so that the user can browse through all thumbnails of previously saved scribbles. When the user taps, one of them will open it back on the CanvasView through its controller, CanvasViewController, with a corresponding index of the thumbnail to tell ScribbleManager what scribble to open.
We have discussed some foundational or architectural problem domains in the previous sections. There are some other problem domains related to the user's experience or expectations of the application—things like how to browse a list of scribble thumbnails, undoing/redoing any scribbles, changing stroke colors and sizes, and deleting the current scribble on the screen. The following subsections will go through each of the domains.
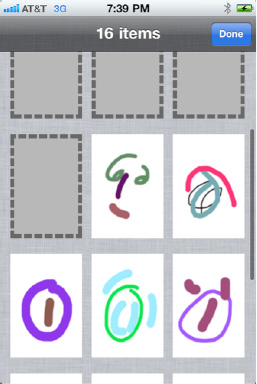
We know now how to save scribbles and their thumbnails. How can we browse through all of them so we can open any one of them? Let's flash back to the UI wireframe of a thumbnail view in Figure 2-3; the thumbnail view populates all saved scribbles as individual thumbnails for browsing. When there are a lot of thumbnails fighting each other to display on the view as fast as possible, it makes us think that they could bog down the main thread of the application. It could then slow down the responsiveness for any user actions.
Instead of taking the chance of letting the main thread handle tons of image loading operations one after the other, we should take the better approach of letting each individual thumbnail load its real image in a background thread. That can improve responsiveness while a bunch of thumbnails are busy doing their business independently. But here is a question, though—what would happen to some thumbnails with their own threads waiting in line for the others to finish? When should the user expect to see them? We need some kind of placeholder image for each of them to display while it's waiting for a chance to load the actual image. When the real images are completely loaded, they will show in place of the placeholder images. It makes for a consistent and predictable user experience. Figure 2-13 illustrates the thumbnail view in action, in which it is partially filled with loaded scribble images.
How can we design a class to do that? Well, in fact, there is a design pattern called the Proxy pattern (Chapter 22). A proxy is a placeholder or a surrogate of a real resource or object. One aspect of the Proxy pattern is to have a virtual proxy to help lazy-load heavy-weighted resources when it's requested to do so.
We need to create a thumbnail proxy class that returns a default placeholder image while it's doing some sort of lazy-loading for an actual image in the background. A typical example application on iOS is Mail. Every attachment in an e-mail is shown as a rectangular placeholder image. Until you tap it, it will load the actual attachment in the background. Instead of taking extra time to load potentially bulky email messages due to the size of the attachments, it displays a placeholder image for each attachment so the user can read the content immediately without waiting for the whole thing to be downloaded. Figure 2-14 illustrates the concept of the design.
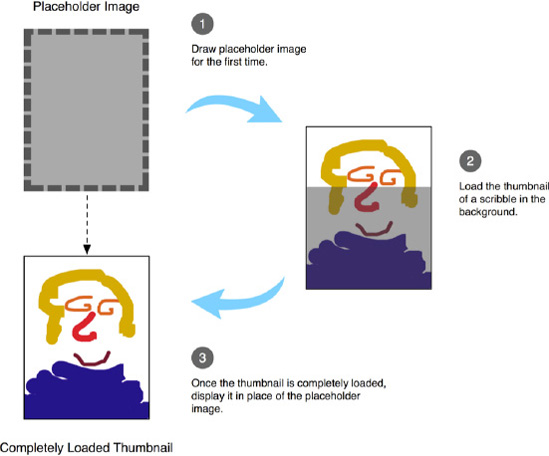
Figure 2-14. A thumbnail proxy for a scribble is first showing a placeholder image and then loading a real thumbnail in the background. When the loading process is completed, the proxy shows the real image in place of the placeholder image.
We can create a proxy class called ScribbleThumbnailProxy. Since it knows how to draw something on a view, ScribbleThumbnailProxy should be a subclass of UIView. A ScribbleThumbnailProxy object represents a thumbnail image. Each of the thumbnails does the following things when it is first loaded on the thumbnail view:
Since there is no real image available, it draws a default placeholder image in its
drawRect:rectmethod.It spawns a new thread that will load the real thumbnail image with a provided location in the file system.
When the real image is loaded, the thread will ask itself to redraw itself and the
drawRect:rectwill be invoked again.At this time, a real image is available, so it draws the real image instead.
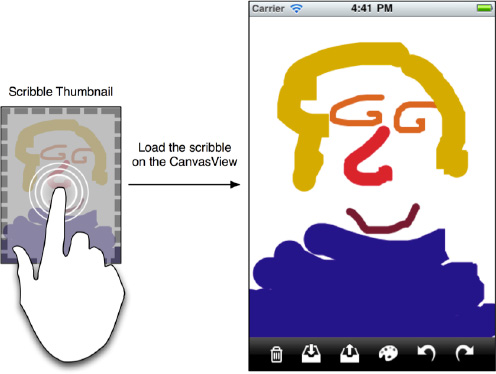
The user can browse through the whole thumbnail view to select which one to open. By tapping one of them, the real scribble represented by the thumbnail will be opened on the canvas view again, as shown in Figure 2-15.
One of our requirements is to allow the user to undo or redo what is drawn on the screen so each stroke or dot can be undone, or if it's necessary, redone. We've already put two buttons for these purposes in the original wireframe in Figure 2-1. The left-turning button is for undoing and the right-turning one is for redoing, as illustrated in Figure 2-16.
In order to achieve the undo capability, we need to somehow keep track of what has been drawn so we can remove it from the view, one at a time. At the same time, what has been removed from the view can also be replayed onscreen. For these reasons, it would be very difficult, if not impossible, to put any drawing mechanism in instance methods or functions. There is almost no way to reuse those functions and methods for keeping a history of drawing commands effectively. We need to put a drawing command into an object, so it can be kept in a history, as shown in Figure 2-17.
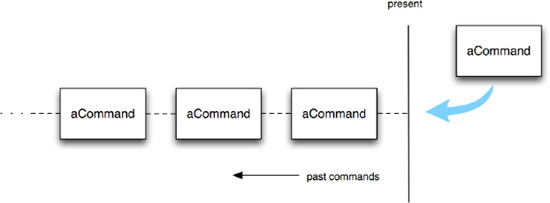
Figure 2-17. Each command object is added to a list of command history. By iterating through the list, one can undo/redo particular commands.
Each command has methods to "execute" an operation and "undo" to reverse the action. By enumerating the list, we can ask any one of the commands to undo/redo its operations. We can use an index to keep track of the current command. Moving the index in the direction toward the commands invoked in the past, we can undo each command one at a time. Likewise, moving the index forward up to the present command allows us to redo each of them. A design pattern that can help solve this kind of design problem is called the Command pattern (Chapter 20).
There are a few framework classes available in the Cocoa Touch framework for you to implement the Command pattern—for example, an object of NSInvocation encapsulates a command in the form of a target-selector entity. An NSUndoManager instance maintains a list of NSInvocation objects in its undo and redo stacks. Once an NSInvocation object is pushed in the NSUndoManager's undo stack, it can be popped and invoke its registered undo operation. Any popped NSInvocation object from the undo stack will be pushed to a redo stack. Then the undo/redo cycles can continue. The details of implementing the Command pattern are explained in Chapter 20.
The Command pattern (Chapter 20) is not only for implementing an undo/redo infrastructure but can also be used for implementing any deferred-command mechanism. In the sense of traditional desktop applications, each menu item of the main menu encapsulates a command object. When the user activates the menu item, the embedded command will be invoked. The command is first assigned to each menu item when the application is loaded, but an invocation of the command is deferred until the menu item is activated later. One of the benefits of using the Command pattern in a menu design is that the commands used in menu items can be reused in other areas, such as keyboard shortcuts or some other user interface elements for the same commands.
Based on our requirements for our PaletteViewController, the user can change stroke sizes and colors that will be used for the next stroke/dot creation in CanvasViewController. We need some commands to change stroke colors and sizes for that reason and purpose. PaletteViewController has three sliders to let the user adjust the color of a stroke by setting each color component—red, green, and blue—individually. Instead of creating separate commands that operate on individual color components, we rather create one single command that deals with the overall color change.
Let's say we create a SetStrokeColorCommand class just for that. According to the wireframe in Figure 2-2, there are three sliders and each of them is for adjusting one particular color component. After we hook them up with a SetStrokeColorCommand object, it will do its job in its execute operation to update the color of the next stroke and the color palette view located right below the sliders. The color palette reflects the current stroke color based on the values from the RGB sliders. The SetStrokeColorCommand object becomes a liaison for them. The SetStrokeColorCommand object notifies other observing components of any color changes made by moving the RGB sliders. For some reason, we need to have more than one component to monitor color changes; we can let SetStrokeColorCommand maintain a list of multiple observers. SetStrokeColorCommand can notify its observers when color changes occur, so they can perform appropriate operations. The observe-notify or publish-subscribe model is known as the Observer pattern (Chapter 12). Making a command object notify observers is an example of using compound design patterns for solving design problems. Likewise, we can create a similar class, SetStrokeSizeCommand, for updating the size of the next stroke created on the canvas view.
Figure 2-18 illustrates how SetStrokeColorCommand and SetStrokeSizeCommand objects interact with various UISlider controls as well as the small color palette view on the PaletteViewController and CanvasViewController.
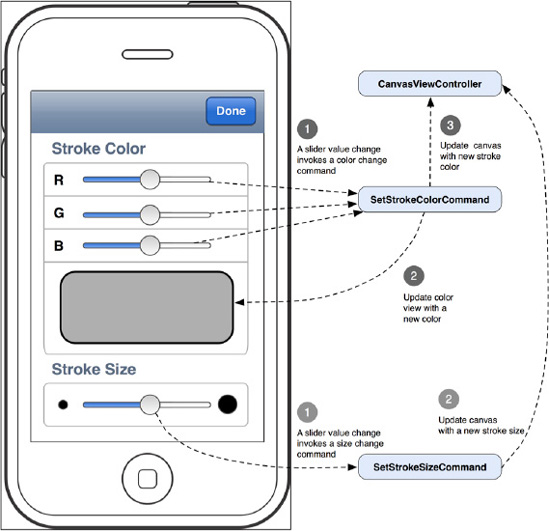
Figure 2-18. An interactive flow diagram shows how the controls on the PaletteViewController interact with various command objects and their targets (i.e., PaletteViewController and CanvasViewController).
Should we need to change the UI elements to present a different way to change stroke colors and sizes, we can still reuse what's in SetStrokeColorCommand and SetStrokeSizeCommand objects. We can, for example, use a circular color selection wheel instead of separate RGB sliders to change the stroke color with the same SetStrokeColorCommand object.
We can use the same idea to create another command class and use its object to delete the current scribble onscreen. A toolbar button is bound to the delete command. When the button is tapped, the command will be executed and the embedded instructions to delete the current scribble data will be carried out. When the canvas view is refreshed by the command, the original scribble will be gone, and the user can start drawing a new one again.
It's a very hefty chapter. You should give yourself a pat on the back for making it this far! We've explored various design patterns through our design process for our TouchPainter app. Some of them were used as stand-alone solutions while others were consolidated as a group of compound patterns. A lot of times, we don't even recognize them when we use them in our projects. Here, I've compiled a list of design patterns that I have used or mentioned in the chapter so far. Let's see how many of them you can recognize; otherwise feel free to thumb back to the previous pages and rediscover them:
Mediator
Composite
Visitor
Proxy
Memento
Command
Observer
We went over some warm-ups, and now you should feel pumped to move to the next chapters to explore deeper into design patterns so you can use them for your next top-selling or award-winning iOS projects.
In the rest of the book, we will explore the details of each of the 21 design patterns. We will elaborate examples that we have used in this chapter as well as new examples for some other patterns that have yet to be explored. We will also discuss how the Cocoa Touch framework has adapted some of the design patterns, so we can reuse them for free rather than reinventing the wheel.