
![]()
Introducing Office 365 for Developers
Office 365 provides lots of opportunities for developers to build custom applications. In this book, we’ve selected some of the most useful development technologies such as Visual Studio, SharePoint Designer, and Access. We’ve also chosen some of the more common customization scenarios including workflows, SharePoint lists, Exchange and Lync integration, and web databases. Each chapter then pairs these together to demonstrate how to build a working application. Our goal is to present a fairly broad spectrum of both tool sets and applications so you’ll have a good sense of what you can accomplish in an Office 365 environment.
Before you dive into developing some nifty applications on Office 365, we want to first explain what Office 365 is and how it works.
Office 365 Architecture
Office 365 is an interesting collection of both server and client applications that allows you to experience a fully integrated Office solution. This is provided as a hosted solution, which requires little or no IT infrastructure.
Traditional Office Server Environment
To fully explain Office 365, I need to start by describing the traditional on-premise Office server environment. If you had an unlimited budget and installed all of the Office server products, your network might look something like Figure 1-1.
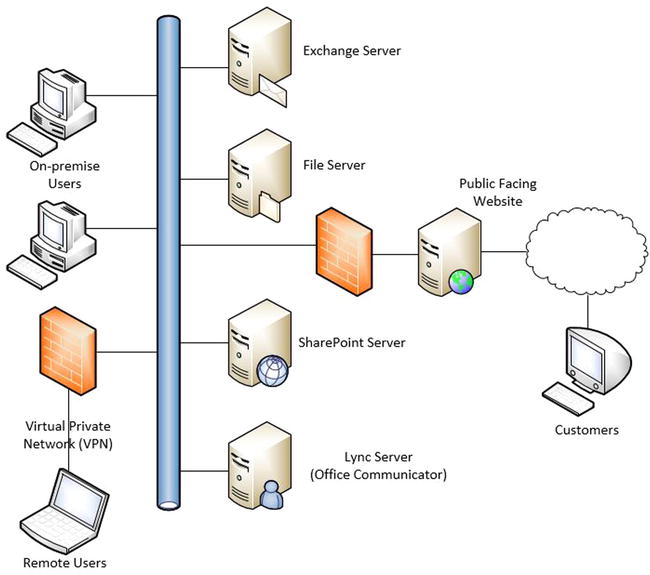
Figure 1-1. The traditional Office server environment
You would have
- An Exchange server to handle incoming and outgoing e-mails.
- One or more file servers for storing documents.
- A SharePoint server for collaboration features such as shared documents and task lists.
- A Lync server to support instant messaging and online meetings.
For larger organizations you would likely cluster these servers to provide redundancy as well as increased capacity. So instead of a single Exchange server, for example, you might have two or more. You may also need to support geographically distributed scenarios. You can see that the number of servers you would need could become extensive.
You would also have a public-facing web site for your online presence. This would provide basic content for your customers such as details provided on the Contact Us page; your company’s mission statement, core values, products, or services offered; company history; and so on.
On each of the client workstations you would install the Office client applications such as Outlook, Word, Excel, and One Note. To support remote users, you would need to provide a virtual private network (VPN), which would allow them to connect into your network and work just like the local users. You would also need to allow for the growing use of mobile devices.
The Office 365 Environment
All of the functionality described in Figure 1-1 can be easily provisioned on Office 365. The same feature set implemented on Office 365 would look like Figure 1-2.
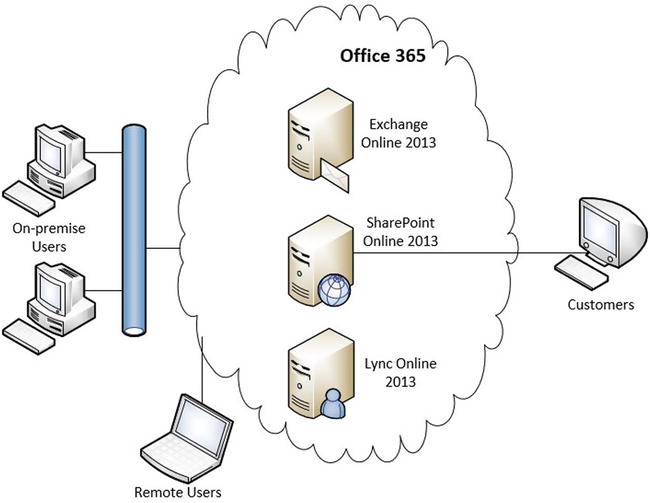
Figure 1-2. The Office 365 solution
The most obvious change in this environment is that the servers have been moved to a hosted environment. Instead of an on-site server running Exchange Server 2013, for example, you’ll use Exchange Online 2013, which is hosted on a remote server farm. These online versions of the Office server products are implemented with the same code base as their on-site counterparts. When you set up an Outlook client, you must specify the location of the Exchange server. In an Office 365 environment, you provide the URL that was specified when your Office 365 account was created. The fact that the server is now hosted off-site is essentially transparent. You can send and receive e-mails, check the calendars of team members, and schedule meetings just like you would in a traditional on-site Exchange solution.
The file servers are removed from this diagram because the SharePoint server is used for this purpose. The document libraries in SharePoint are a great place to store most of your files for both on-premise and browser-based users.
![]() Note There are some limitations regarding the size of files you can store on Office 365. For more details, see the article at http://office.microsoft.com/en-us/sharepoint-online-enterprise-help/sharepoint-online-software-boundaries-and-limits-HA102694293.aspx.
Note There are some limitations regarding the size of files you can store on Office 365. For more details, see the article at http://office.microsoft.com/en-us/sharepoint-online-enterprise-help/sharepoint-online-software-boundaries-and-limits-HA102694293.aspx.
There are a couple of really nice benefits that are inherent in a cloud-based solution: support for remote users and role-based access. Notice that there is no VPN support in Figure 1-2 because it is not needed. Clients access the Office 365 servers (Exchange Online 2013, SharePoint Online 2013, and Lync Online 2013) through an Internet connection. Office 365 doesn’t care whether you are connecting from work, your home, the public library, or your favorite coffee shop.
![]() Note You will need to be authenticated in order to access these servers, which is typically done through a login and password. If you are on an Active Directory domain, you can synchronize your AD users with Office 365, which will enable a single sign-on to your domain. Once authenticated in AD, you can access Office 365 without supplying your credentials.
Note You will need to be authenticated in order to access these servers, which is typically done through a login and password. If you are on an Active Directory domain, you can synchronize your AD users with Office 365, which will enable a single sign-on to your domain. Once authenticated in AD, you can access Office 365 without supplying your credentials.
Providing access to remote users in Office 365 is really easy. There’s no need for VPN software or firewalls. Best of all, there’s no threat of a remote user infecting your network with viruses or malware because they are not connected to your network.
The other inherent benefit is a little more subtle. In the network described in Figure 1-1, a public-facing web site was implemented using a dedicated web server that is separated from your internal network with a firewall. This is a standard practice that provides protection from someone hacking into the web server and accessing the internal network. In Office 365, the public-facing web site is implemented as a SharePoint site hosted on the same SharePoint Online server that is hosting your internal sites.
In a hosted environment, a SharePoint farm will contain potentially hundreds of sites. This is referred to as a multi-tenant environment. So how does [email protected] have access to their site while [email protected] does not? Providing separation of customer data is a core competency of hosting services. It is accomplished through advanced technology, including Active Directory, state-of-the-art anti-virus solutions, and continual monitoring and auditing.
As a result, you can create a public-facing SharePoint site that non-authenticated users can access while your internal sites are kept safely hidden. You can create multiple sites and configure each user’s access using role-based security.
Office 365 Client Applications
In addition to hosting the server components you can also use the web-based Office applications. Your e-mails, for example, are stored in the Exchange Online server and you can access them either through the Outlook client application or the Outlook Web App that is available in the Office 365 environment. You can configure this differently for each user. You can also use both. A typical configuration would use the Outlook application from an on-site PC while using the web app from a remote laptop or mobile device, as demonstrated in Figure 1-3.
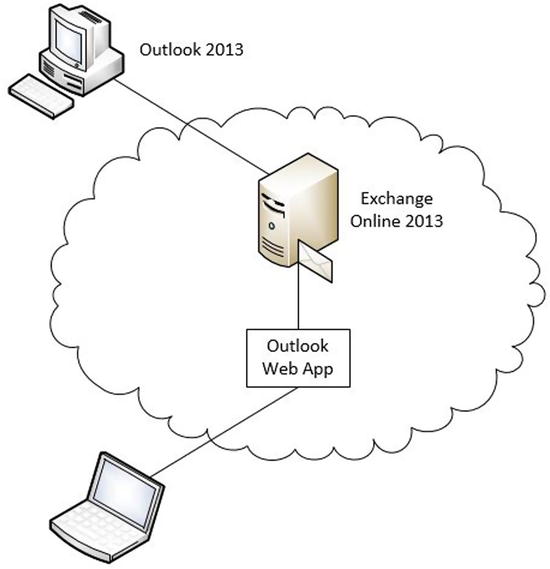
Figure 1-3. Accessing Exchange Online
The key point to remember here is that the data is stored in the cloud. Whichever application you use, it is accessing the same data.
![]() Tip In Chapter 6, we will show you how to build your own custom e-mail client. While the user experience will be different, the data resides on the server and can still be accessed through the other e-mail client applications.
Tip In Chapter 6, we will show you how to build your own custom e-mail client. While the user experience will be different, the data resides on the server and can still be accessed through the other e-mail client applications.
Office 365 also provides a lightweight web-based version of Word, Excel, OneNote, and PowerPoint, called Office Web apps. These have a limited feature set compared to their client-based counterparts but read and write files in the same format. This allows you to create, view, and edit a file using the web app and then open it with the client application to perform advanced editing capabilities. Other users can then view the modified documents.
Storing Documents in SharePoint
Office 365 is designed to support browser-only clients. In this configuration there are no local applications; the client is simply a web browser. The benefit of this approach from an IT perspective is that there is no software to install or maintain and no data that needs to be backed up. From an application perspective, this means that all your documents must be stored in the cloud.
Office uses SharePoint Online as the document repository. When you create documents using the web apps, Office 365 automatically stores them in a document library on the SharePoint site. You can set up multiple document libraries configuring different levels of access to each. Libraries can also contain a hierarchy of subfolders so you can keep your documents organized. You can use this structure to control what documents are shared and with whom. Document libraries on SharePoint also provide advanced collaboration features such as checking out files and version tracking.
Storing documents on SharePoint is pretty much a necessity when using the web apps. It is also the recommended approach with full-featured client applications. These applications can be configured to access the document libraries directly, much like the web apps. This provides file sharing, data backup, and a consistent experience across both client and web applications.
Office 365 and Windows Azure
Both Office 365 and Azure are cloud-based offerings from Microsoft, and you might be wondering how they relate to each other. Can they be used together? Well, they were designed to solve two different needs. Azure is a platform that is primarily targeted towards mission-critical solutions. It provides an operating system, relational databases, and file storage. You must supply the application(s) that use these resources. In contrast, Office 365 provides a full-featured application suite that offers the features needed by most organizations. You can implement your own customizations, as we will demonstrate throughout this book.
Happily, the two platforms can be used together with each one serving the needs it was designed to address. A fully cloud-based infrastructure might look like Figure 1-4.

Figure 1-4. Using Office 365 and Azure
The Office 365 platform provides the office automation and team collaboration tools that you’ll use to manage your business. Your mission-critical applications, including custom solutions, can be deployed on the Windows Azure platform. Users can then connect to both to perform their daily tasks.
Office 365 Online Servers
The server products (Exchange Online 2013, Lync Online 2013, and SharePoint Online 2013) form the core of the Office 365 platform. As a developer, you will be using and extending the features provided by the servers to implement custom applications. These products are very similar to their on-premise counterparts. The differences stem primarily from the fact that they are running in a multi-tenant environment. It’s a little bit like living in a large apartment building; having close neighbors places some restrictions on what you’re allowed to do.
We will get into this in more detail in the rest of this book but I wanted to give you an overview of these products. This will help you see what you’re up against as you begin developing on the Office 365 platform.
SharePoint Online 2013
SharePoint is the workhorse of an Office-based collaborative solution. It’s a great place to store and share documents, but it’s also an effective platform for gathering and analyzing data. And workflows in SharePoint can automate processes and keep data flowing through your organization.
Using Custom Applications
In addition to the typical lists and document libraries that are synonymous with SharePoint, there are a large and growing set of custom applications that you can include in your SharePoint site. In SharePoint 2013 these are referred to as Apps. These apps can be added to a SharePoint site from the Site Contents page. You will be creating your own custom apps in subsequent chapters of this book. For now, to give a quick glimpse of how apps are used, you’ll download, install, and configure one from the SharePoint store.
Go to the Team Site that was setup when you provisioned an Office 365 account. Click the Settings button in the ribbon and then select the Add an app link. You should see a page similar to Figure 1-5.
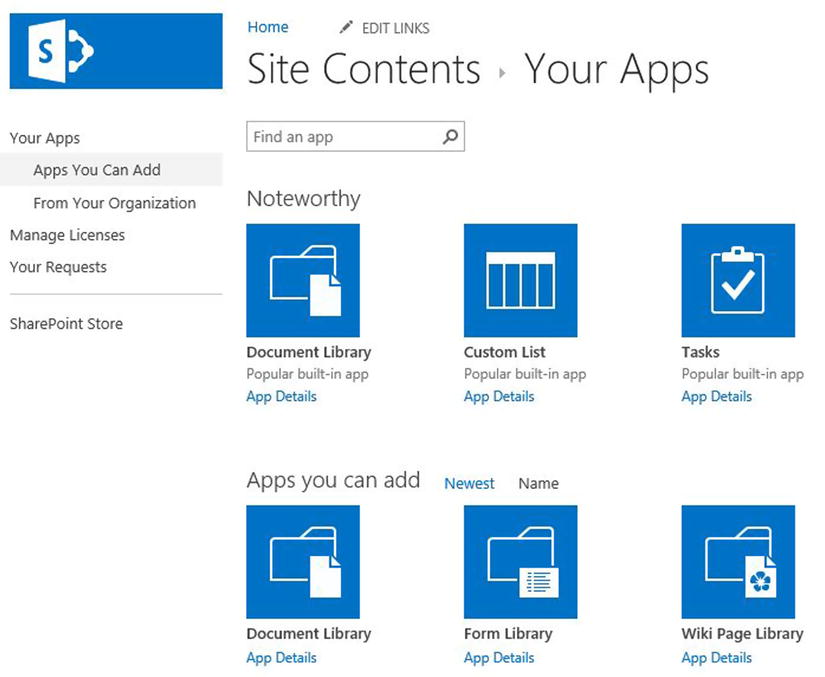
Figure 1-5. The Your Apps page, showing the apps that can be added to your site
![]() Note In SharePoint there are often multiple ways to get to the same place and depending on how you navigate to a page, the contents may be filtered based on where you came from. Also, SharePoint Online 2013 is available in many different configurations with differing features sets and licensing options. Throughout this book, we will focus on development techniques that are applicable in most of these environments. Be aware however, that all of the options shown in the screenshots may not match what are available to you.
Note In SharePoint there are often multiple ways to get to the same place and depending on how you navigate to a page, the contents may be filtered based on where you came from. Also, SharePoint Online 2013 is available in many different configurations with differing features sets and licensing options. Throughout this book, we will focus on development techniques that are applicable in most of these environments. Be aware however, that all of the options shown in the screenshots may not match what are available to you.
The “Noteworthy” section includes the most common apps which include the basic Document Library and Custom List that you are undoubtedly familiar with. The “Apps you can add” section contains more specialized lists and libraries such as a Picture Library, Calendar, Contacts, and Announcements.
You can also download additional apps from the SharePoint store. Click the SharePoint Store link on the left side of the page. You will see a collection of custom applications that are available for download. The “Featured Apps” are shown first as shown in Figure 1-6 but the page allows you to filter and search for an appropriate app.
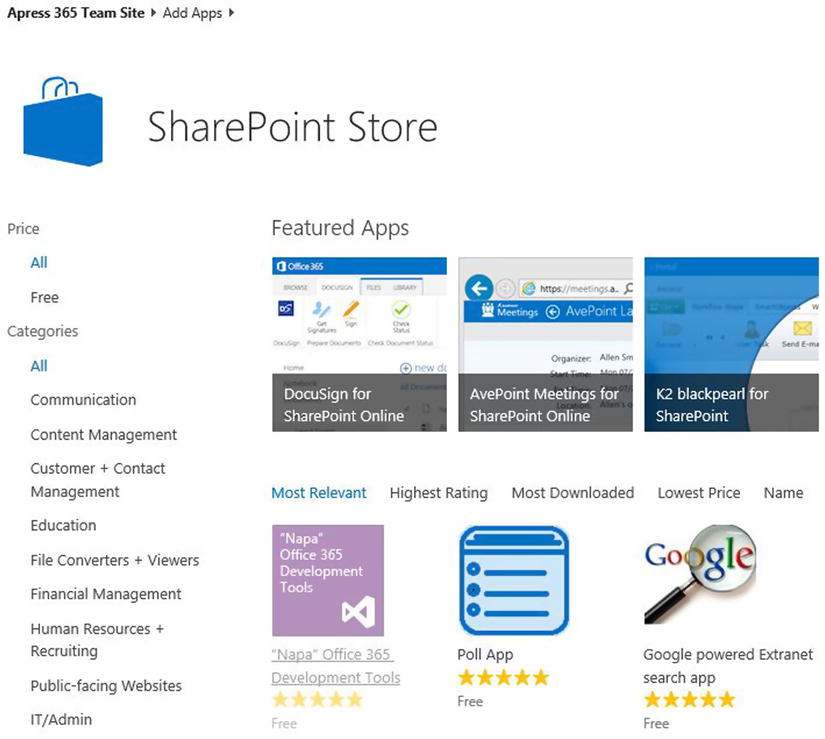
Figure 1-6. The apps available in the SharePoint store
If you find an app that looks useful just click on it and a page similar to the one shown in Figure 1-7 will be displayed with details about the app.
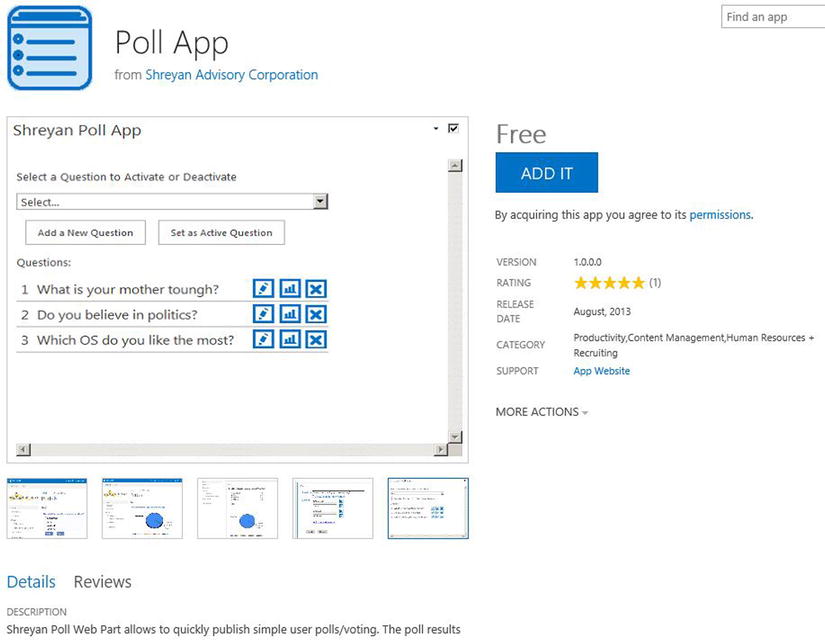
Figure 1-7. Reviewing the details of the Poll App
Select the Poll App and to install the app, click the ADD IT button. You will be presented with a confirmation page before the app is installed.
![]() Note Depending on the SharePoint configuration that you are using and your access rights, some apps may not be allowed. In this case, you’ll see a note explaining this and the ADD IT button will be disabled.
Note Depending on the SharePoint configuration that you are using and your access rights, some apps may not be allowed. In this case, you’ll see a note explaining this and the ADD IT button will be disabled.
Installing the app makes it available to be included in your site. After it is installed you’ll see a page like the one shown in Figure 1-8. To add this to your Team Site, make sure the check box is checked before clicking the Return to site button.
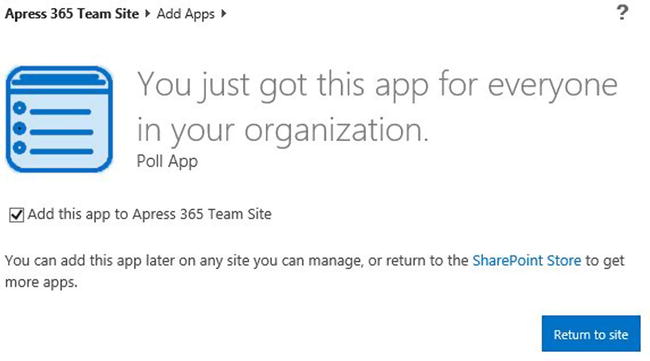
Figure 1-8. Confirming the installation
Go to the Team Site and select the Site Content link. You should see that this app has been added to your site.
Adding an App Part
There are three different types of SharePoint 2013 apps that are categorized by their shape. This is arguably a rather poor name as the differences are not really related to shape but rather their footprint on the SharePoint UI. The defined shapes are:
- Immersive (full-page): the app uses the entire area within the SharePoint page. The standard lists and document libraries are examples of full-page apps.
- App part: The app resides in an IFrame as part of a SharePoint page. From the users’ perspective, app parts resemble the earlier web parts although they are functionally different.
- Extension app: These are not really applications, just custom actions that are provided as extensions to the ribbon or menu. These actions can call into your custom apps.
To use a full-page app, you can simply select it from the Site Content (or provide a link to it). However, the Poll App that you just installed, uses the App part shape, so in order to use it, you need to include it on another page. As we’ll show you, this is a fairly simple task. You’ll add it to the Home page of your Team Site.
- Go to your Team Site and look just below the title bar. You should notice the Browse and Page links as shown in Figure 1-9.
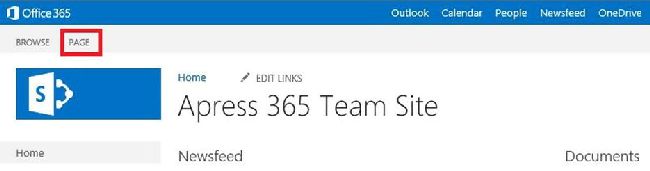
Figure 1-9. The Browse and Page links
- Click the Page link and you’ll see a ribbon bar appear like the one shown in Figure 1-10. This contains an assortment of commands for modifying the page.

Figure 1-10. The Page ribbon
- Click the Edit button in the ribbon and a couple more ribbon tabs will appear. Select the Insert tab and click the App Part button as shown in Figure 1-11.
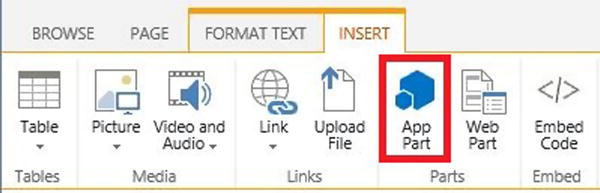
Figure 1-11. Inserting an app part
- A list of available app parts will then appear. Select the Poll App from the list as shown in Figure 1-12 and then click the Add button.
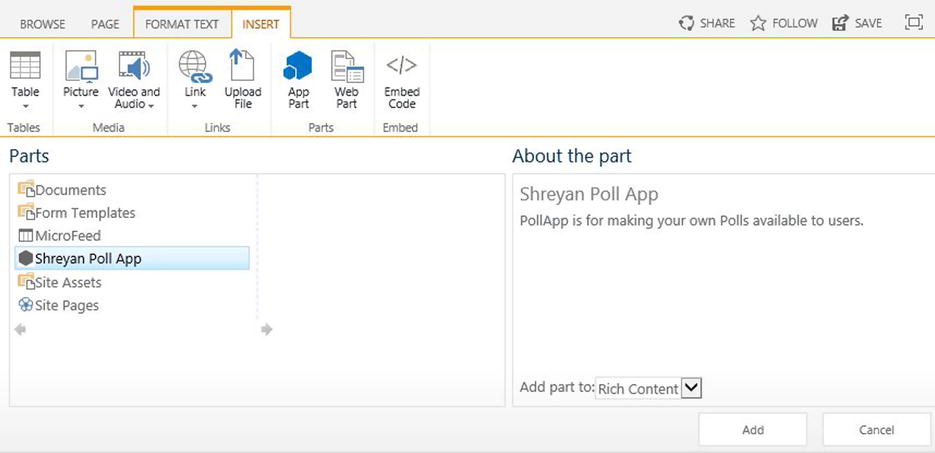
Figure 1-12. Selecting the App Poll app part
- The app part is now included on the page and displays some instructions for configuring it. Like most app parts, there are some configuration options that allow you to define how it looks on the page and how it functions. In this case, you’ll also need to enter the poll question and the allowed answers. There is a small triangle to the right of the app part. Click this to access a menu of options and then click the Edit Web Part link as shown in Figure 1-13.
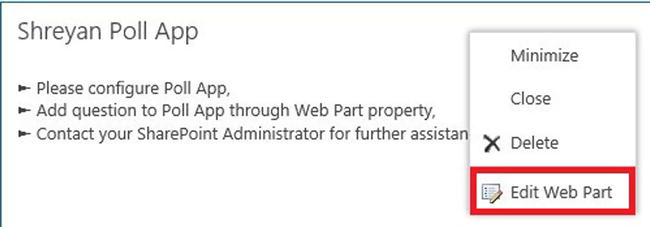
Figure 1-13. Using the app part context menu
 Tip The terms App Part and Web Part seem to be used interchangeably. App Part is the new term that has been adopted but there are still vestiges of the old terminology. In Visual Studio 2013 they are still called Web Parts. Whichever term is used, just know that they are not the same thing as the old Web Parts from SharePoint 2010.
 - The App Part property page will appear, which is shown in Figure 1-14. The left side of this page is part of the app implementation. The right side contains the standard SharePoint App Part menu that allows you to configure some of the appearance and layout options.
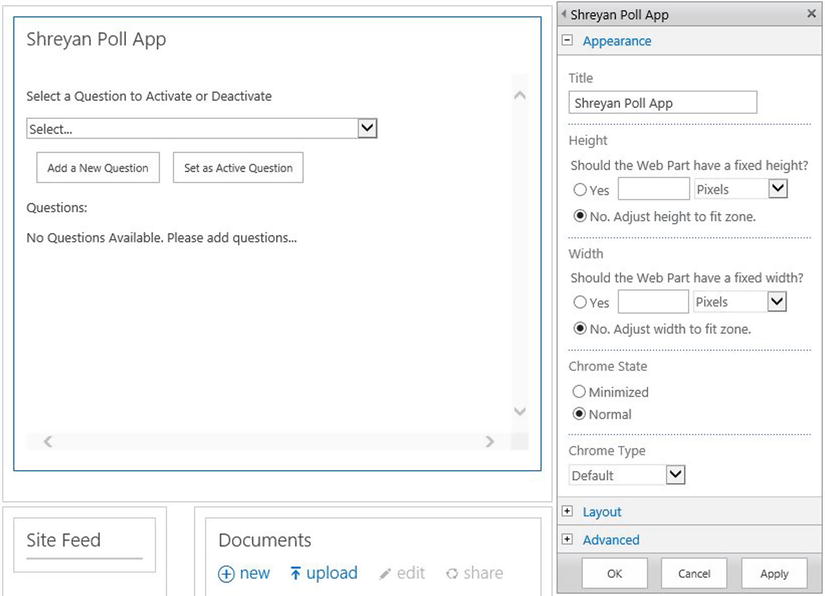
Figure 1-14. Configuring the App Part
- Follow the instructions to add a question and define a set of responses. After setting up the questions, make sure you select the question in the drop down and click the Set as Active Question button. You don’t need to change anything on the right-hand side but you might want to change title. We chose to call it Apress 365 Daily Poll. When you’re done, click the Save button in the ribbon. You should now see the poll question displayed at the top of your page similar to Figure 1-15.
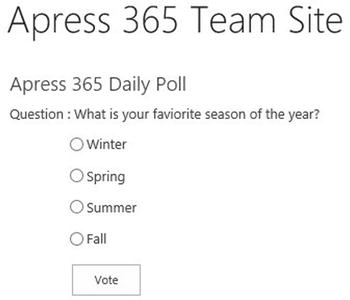
Figure 1-15. The completed app part with the configured poll question
- Once a user has responded to the poll, the question is not presented to them again. You can configure the app so that the results are displayed once the question has been answered.
Developing Solutions in Visual Studio 2013
Visual Studio 2013 has made some significant improvements that will really help you create your own custom apps. To whet your appetite, we’ll mention two of them now:
- One of the biggest changes is that you can build a SharePoint app and deploy to O365 without needing SharePoint installed on your development machine. This is a huge benefit (thank you Microsoft!). They’ve also improved the list designer in VS 2103 so creating a custom list in VS is now an attractive option that we will demonstrate in Chapter 3.
- There are also some major improvements in creating workflows in VS, which we’ll explain in Chapter 4. Workflows are a powerful component of any office automation solution. However, in previous versions they were also very difficult to achieve, especially in SharePoint Online, due to the limitations of Sandboxed solutions.
When creating a SharePoint app in VS, you have essentially two available hosting options. They can either be hosted within SharePoint or somewhere else, such as Azure. SharePoint hosted apps are essentially client-side applications that can use familiar web development techniques such as MVC, HTML, JavaScript, and CSS. They have very little server-side code, except for declarative access to the SharePoint resources. However, this is ideal for many applications which do not need resources outside of the SharePoint environment.
Non-hosted applications run on a separate web server and can have full access to non-SharePoint resources such as databases and file systems. However, accessing SharePoint resources such as lists, will require authentication, which we’ll cover in Chapter 9. Once you have setup a channel between your SharePoint site and your web application, your can read (and update) data in SharePoint.
Customization Scenarios
SharePoint Online provides a variety of ways to develop custom solutions. We will explain each of these in detail throughout this book with practical examples that you can follow. Some of the techniques we’ll cover include:
- SharePoint Designer: This is a powerful tool for editing SharePoint sites. SharePoint Designer allows you to create and edit SharePoint objects such as lists, fields, and content types.
- Visual Studio: You can develop SharePoint solutions using Visual Studio 2013. This allows you to access the SharePoint object model using familiar C# syntax. Visual Studio 2013 provides project items for creating content types, lists, and Web Parts. These can be verified using standard F5 debugging and easily deployed to your O365 site.
- Workflows: You can use Visio and SharePoint Designer 2013 to build workflow solutions in O365.
- Access Web Databases: You can create a web database in Access 2013, including tables, forms, queries, and reports, and then export the database to SharePoint Online. This is a great way to quickly implement a sophisticated web application.
This is not an exhaustive list, but represents a broad coverage of the most common development scenarios.
Exchange Online 2013
Exchange Online 2013 exposes its features to client applications through a set of web services known as Exchange Web Services (EWS). You can use these web services by adding a service reference to the EWS. Visual Studio will then generate a set of proxy classes that you’ll use to communicate with the web service. However, Exchange Online also provides a managed API that provides an easier and more intuitive way to use EWS. So your application can either call the web service directly or use the managed API, as shown in Figure 1-16.
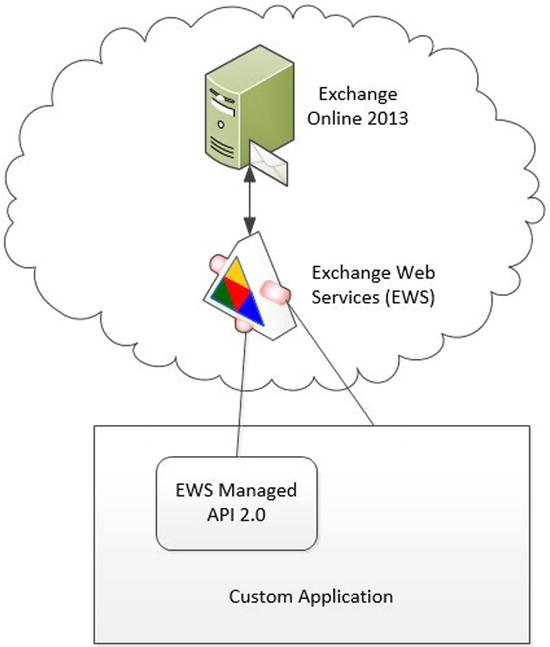
Figure 1-16. Using the Exchange Web Services (EWS)
Customization Scenarios
Exchange Online 2013 exposes many features through EWS to client applications such as Outlook and Outlook Web App. Your custom application can use these as well. Some of the more common ways you can integrate Exchange functionality in your application include:
- Accessing the mailbox items stored in Exchange. Think of Exchange as a specialized database containing objects such as e-mails, appointments, tasks, and contacts, which are organized in a hierarchy of folders. You can view, modify, and create these objects programmatically through EWS or the managed API.
- Availability is another Exchange feature that allows you to see when someone (or a group of people) will be available based on their calendars. You can also use this feature to suggest windows when the specified group of people and resources will be available.
- Exchange provides notifications when certain events occur, such as the arrival of a new message. Your custom application can receive these notifications and take appropriate actions.
Using Autodiscover
To optimize availability and capacity, especially in a cloud-based solution, the specific URL of the appropriate EWS can be dynamic. For this reason you should never hard-code this URL. Instead, when connecting to Exchange, you’ll use a process called autodiscover. In this process, the managed API performs some handshaking with the Exchange Online servers to determine the optimum path to the appropriate server, as illustrated in Figure 1-17.
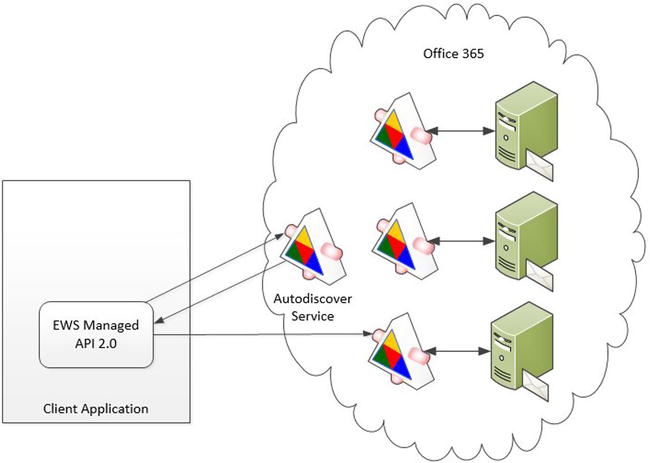
Figure 1-17. The autodiscover process
The managed API makes a request to the autodiscover service on Office 365. Through a series of callbacks, the URL to the appropriate web service is returned. The API then connects to the specified web server.
Lync Online 2013
Lync provides the ability for various types of conversations between two or more individuals. A conversation can include one or more of the following types (referred to as modality):
- Instant Message
- Audio
- Video
- Online meeting
- Desktop sharing
- File transfer
Lync Online 2013 provides the server component and is hosted by the Office 365 platform. The Lync 2013 Client must be installed on each device that will participate in a conversation. The overall architecture is shown in Figure 1-18.
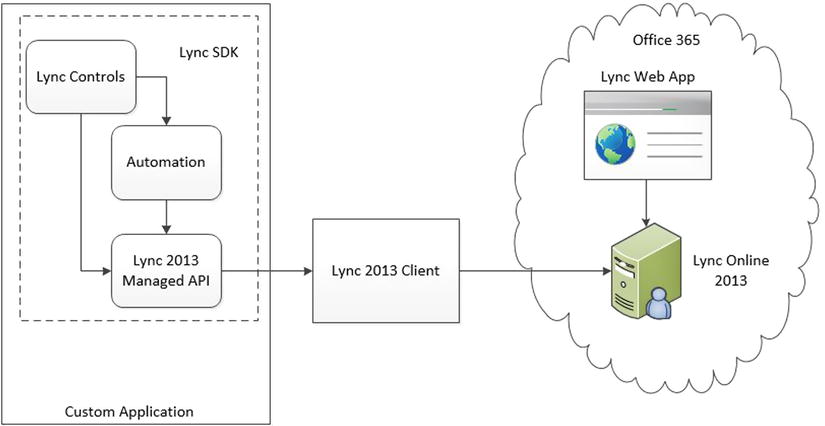
Figure 1-18. Lync architecture
The Lync 2013 client application controls the connection to the Lync Online 2013 server. It first provides the user’s credentials to the server and establishes the connection. In many cases, it uses the current user’s login credentials if this has been configured or cached credentials are enabled. In this case, this application performs its role in the background. If credentials are needed, it will display a window and prompt the user for a login and password.
Lync SDK
The Lync SDK provides some useful tools for developing custom applications that use Lync. The SDK consists of three components.
- Lync 2013 Managed API: A powerful yet easy-to-use API that allows your custom application to use the features provided by the Lync 2013 client application.
- Automation library: Provides the ability to launch and manage a conversation.
- Lync controls: A set of controls that can be dropped directly on your application, much like you would a TextBox or ComboBox control. The available controls include:
- Presence indicator
- Contact search results
- Contact list
- Custom contact list
- Contact information
- Start IM or Audio Call controls
The Lync controls also support contextual conversations. This allows data from your applications to be passed into the conversation.
Automation
The Automation library, which is part of the Lync SDK, provides an easy way to embed Lync functionality in your custom application. You use the API to instruct the Lync 2013 client application to start a particular type of conversation. This will launch a new window that displays and manages that conversation. This is depicted in Figure 1-19.
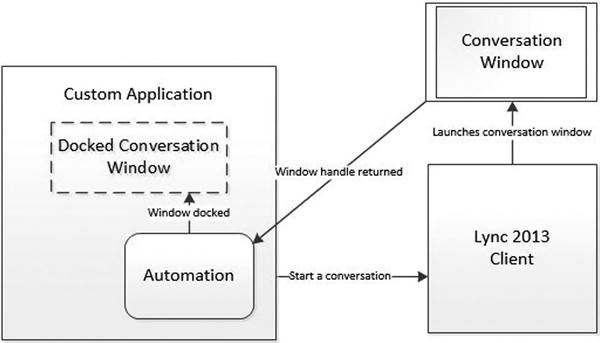
Figure 1-19. Using Lync automation
A handle to the new window is returned to your custom application so you can control the conversation in your code. You can also dock the new window inside your application’s window so the UI will be completely contained by your application.
Contextual Conversations
Lync allows you to embed information into a conversation to help the participants better understand the context of your question. For example, if you wanted to ask a colleague about a particular product, the initial message can contain details of that product. There are two ways to do this.
- Launch Link allows you to include a link to launch an application from the conversation window. In this example, the link could load an inventory application and pre-load the specific product.
- Conversation Window Extension (CWE) allows you to host Silverlight application code inside the conversation window. In this case, this application could display details of the product in question.
You can use both of these techniques in the same conversation. You can include the details directly in the conversation window with a link to launch the application. The recipient can then view the details already provided but also have the option to use the application to browse for more information.
This requires that both the Silverlight application and the launched applications be configured with Lync using the Windows Registry. This is needed to prevent executing untrusted applications.
Unsupported Features
There are a couple of features in Lync Server 2013 that are not currently available in Lync Online 2013. These include:
- UCMA (Unified Communications Managed API)
- PSTN calls to an external number
These are server-side features that are locked down primarily due to the multi-tenancy of the Lync Online platform.
Summary
The Office 365 platform is a fully integrated Office solution that provides an enormous amount of functionality right out of the box. It provides the following cloud-based services:
- SharePoint Online
- Exchange Online
- Lync Online
Each of these services was designed to expose its features to custom applications. By utilizing this functionality, you can quickly implement some very useful custom applications. Throughout the remainder of this book I will be demonstrating ways to create custom Office 365 solutions.