
![]()
Creating a Web Database with Access 2013
In this chapter you’ll create a web database using Access 2013, which will be published to SharePoint Online in your Office 365 platform. This database implements a simple job tracking application that allows you to create, estimate, and track customer jobs. Publishing a special type of Access database, called a web database, is probably the easiest way to create a form-based SharePoint site. In this chapter you will create a fully working website with numerous tables and forms (views).
Out of necessity, I will cover this briefly without explaining every detail as much of it is fairly repetitive. You can also download the complete Access database from www.apress.com and then follow along as you read this chapter.
You will implement this application using the typical approach of designing the tables first. Then you’ll add a few queries that will simplify some of the form development. You’ll also create a fairly complex data macro that will compute the estimated job total by adding up the products and services included. You will then customize the forms for each of these tables. Finally, you’ll implement a custom form for displaying a summary of all of the jobs.
Designing the Tables
Start Access 2013 and create a new database using the Custom web app template. When using this template, Access will create new objects such as tables and forms that are compatible with SharePoint. You’ll be prompted to enter a name for your app as well as the web location where this will be deployed. Enter JobTracking and the address to your Team Site as shown in Figure 5-1.
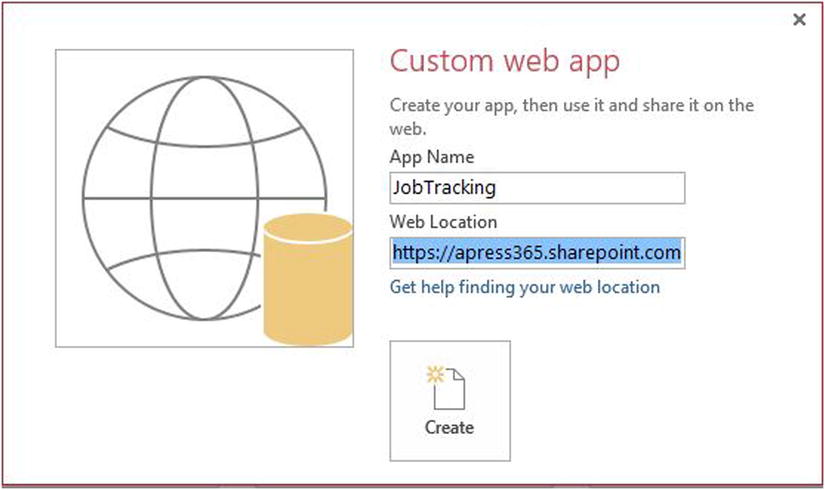
Figure 5-1. Setting up the Access app
Access will then connect to your SharePoint site and setup your new app. This includes provisioning a SQL Server database on Azure and may take several seconds to complete. The initial, empty, database will look like Figure 5-2.
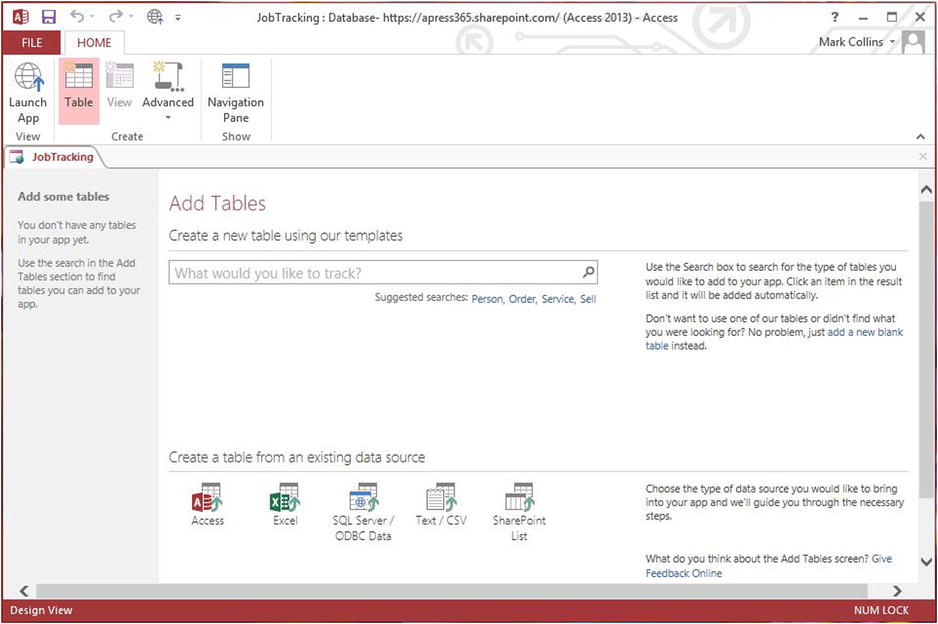
Figure 5-2. The initial Access app
Access 2013 provides several ways to get started building your database. You can search through the available table templates or you can import a data structure from an existing source such as previous versions of Access, a SQL Server database, or a SharePoint list. For this exercise, you will create your own custom tables.
![]() Note You can import the table definition from Access 2010 into Access 2013, but the forms cannot be imported; you will need to recreate them in Access 2013.
Note You can import the table definition from Access 2010 into Access 2013, but the forms cannot be imported; you will need to recreate them in Access 2013.
Data Model Overview
The logical starting place for creating a web database is to design the tables. You will need the following tables to support the job tracking application. Figure 5-3 shows how these tables are related.
- Customer – contains current or potential customers
- Phone – stores customer phone numbers
- Address – stores customer and job addresses
- Product – defines products that may be included in a job
- Service – defines services offered
- Job – contains job or proposal summaries
- JobProduct – specifies products included in a job
- JobService – specifies services included in a job
- Contact – records incoming or outgoing contacts (phone calls, e-mails, etc.)
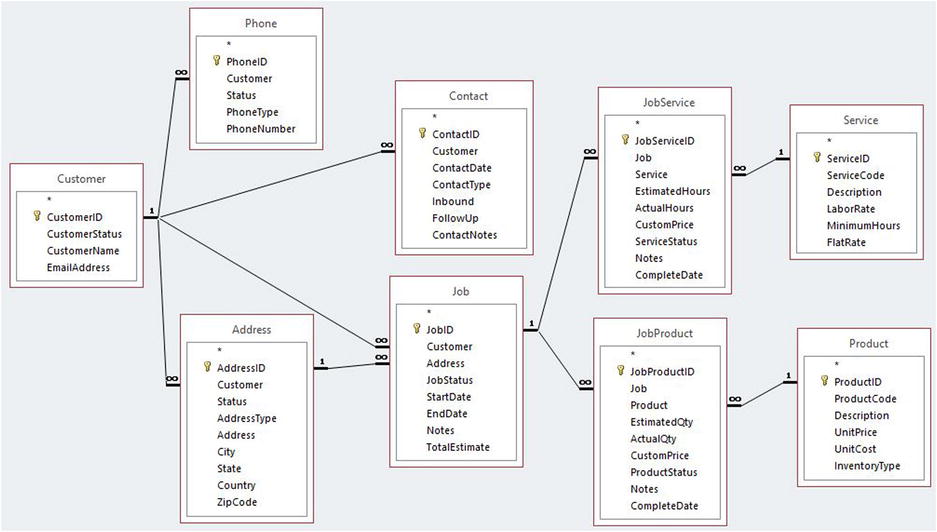
Figure 5-3. Data model diagram
Addresses and phone numbers are stored in separate tables, Address and Phone, which allows each customer to have more than one. The Job table also references the Address table to indicate the location of a particular job. The Contact table records correspondence with a customer.
A job is a collection of products and services. The Product and Service tables provide static information about each product or service such as description and price. The JobProduct and JobService tables are used to indicate when these are included in a specific job and provide job-specific details as well.
Creating the Customer Table
You’ll start by creating the Customer table. Click the Add a new blank table link in the initial Table page, shown previously in Figure 5-2. This will create a blank table as shown in Figure 5-4.
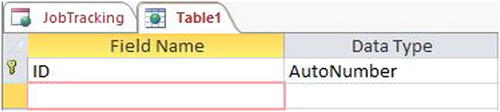
Figure 5-4. Starting with a blank table
![]() Note In Access, the terms column and field can be used interchangeably. You will see field being used most often so we will follow that convention and refer to both columns in a table and fields on a form as fields.
Note In Access, the terms column and field can be used interchangeably. You will see field being used most often so we will follow that convention and refer to both columns in a table and fields on a form as fields.
Click the ID field and change the field name to CustomerID. The next field will indicate the current status of this customer, such as Prospect or Active. To add another field, click in the first empty cell and enter the field name, CustomerStatus. In the Data Type field, select the Lookup link as shown in Figure 5-5.
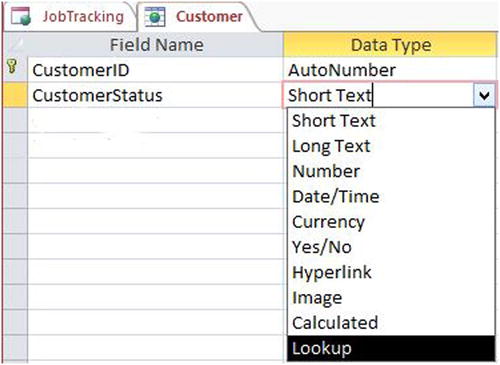
Figure 5-5. Adding a Lookup field
Defining Static Lookup Values
The Lookup Wizard will then appear and it has two options for providing values for a lookup field. The first is to get the values from another table. This will create a foreign key relationship between the tables. The second option is to specify a static list of allowed values. For this field, you will use the second option; select this in the dialog box.
Then, enter the following values as illustrated in Figure 5-6:
- Prospect
- Active
- Inactive
- Removed
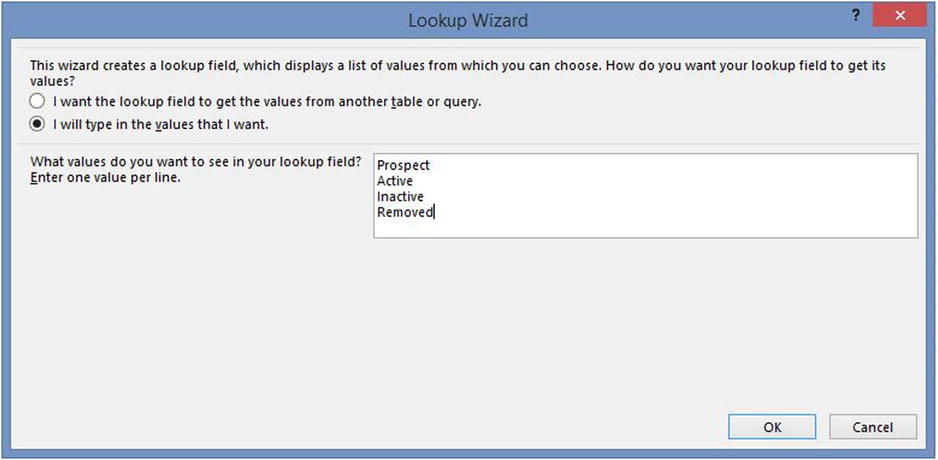
Figure 5-6. Specifying the CustomerStatus values
![]() Tip If you need to later adjust this list of values, you can display the Lookup Wizard again by clicking the Modify Lookups button in the DESIGN tab of the ribbon.
Tip If you need to later adjust this list of values, you can display the Lookup Wizard again by clicking the Modify Lookups button in the DESIGN tab of the ribbon.
Add the following additional fields to the Customer table:
- CustomerName – Text
- EmailAddress – Text
Click the Save button in the title bar to save the table design. Enter the table name Customer when prompted. The completed table should look like Figure 5-7.
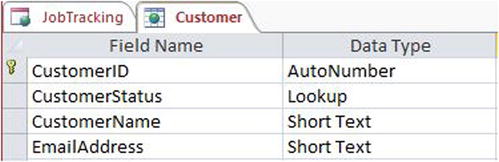
Figure 5-7. The completed Customer table
Creating the Phone Table
The Phone table contains customer phone numbers. By placing these in a separate table, each customer can have more than one. The Phone table will have the following fields:
- PhoneID – primary key
- Customer – a lookup field using the Customer table as its source
- Status – a lookup field with a static list
- PhoneType – a lookup field indicating the type of phone (cell, home, fax, etc.)
- PhoneNumber – the actual phone number
To add a new table, go to the HOME tab of the ribbon and click the Table button. This will take you to the initial page that was displayed when you first created the Access database. Click the add a new blank table link again to create a new blank table just like you did for the Customer table and rename the ID field to PhoneID.
Creating a Foreign Key Relationship
For the next field, enter the name Customer, and then select the Lookup data type. This time, in the Lookup Wizard, select the first option, to get the values from another table. The dialog box will then list the existing tables and views for you to select the source. The Customer table should be the only one listed; select it.
You’ll then have several other options for configuring the table relationship. First, when displaying a record from the Phone table, you need to select which field in the related Customer record should be displayed. Select the CustomerName field.
Then you need to decide how deletes are handled. The first option is to prevent a delete from a table if there are other records referencing it. The second option is to cascade the delete, which means that when a Customer record is deleted, all related Phone records are also deleted. The third option will allow these orphaned Phone records. Select the first option. The completed dialog box will look like Figure 5-8.
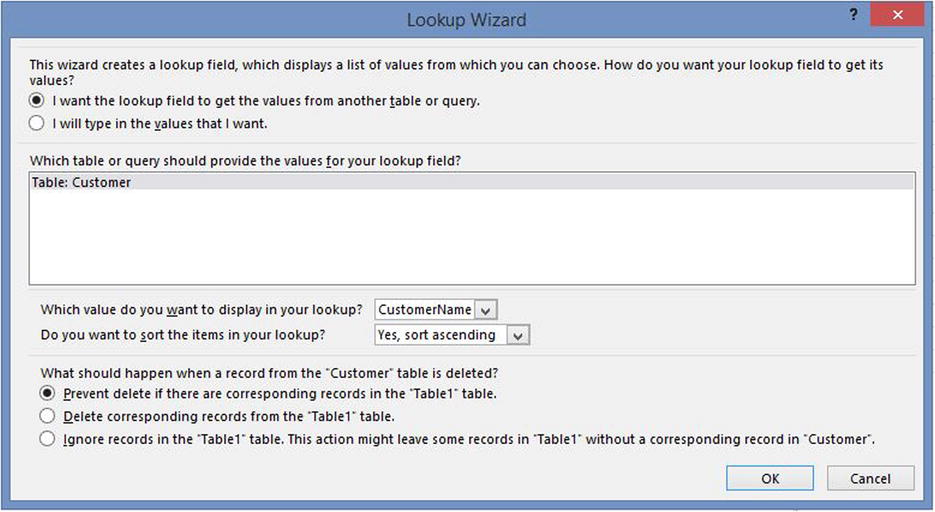
Figure 5-8. Setting up a foreign key relationship
Creating the Remaining Fields
Add a new field named Status and select the Lookup data type. Select the first option and enter the following list of values:
- Active
- Inactive
Then add a PhoneType field using the Lookup data type with the following list of values.
- Home
- Cell
- Business
- Fax
- Job
After creating the Status field, you should provide a default value. Select this field and enter “Active” in the Default Value property as shown in Figure 5-9. This will default all new records to the Active status.
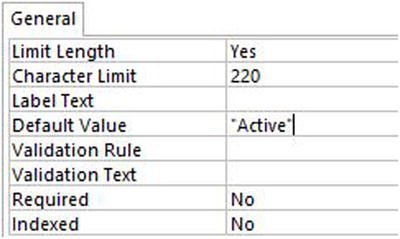
Figure 5-9. Specifying the Default Value
Finally, add the PhoneNumber field and select the Short Text data type. Click the Save button in the title bar and enter the table name Phone when prompted. The completed Phone table should look like Figure 5-10.
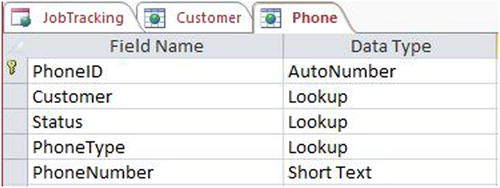
Figure 5-10. The completed Phone table
Viewing the App in SharePoint
When you created the Access database, the template automatically created the app in your Team Site. Also, a SQL Server database was provisioned in Azure. As you defined tables, these were created in SQL Server. All of this happens behind the scenes as you edit your Access database. (This is why saving may seem a little slow.)
To demonstrate the integration, let’s go to your Team Site and look at the JobTracking app. You’ll find this in your Apps in Testing list. The initial page will look like Figure 5-11.
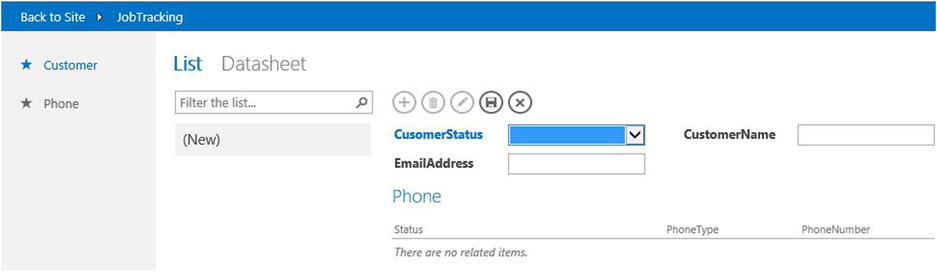
Figure 5-11. The initial app page
At this point the tables are empty so let’s insert some data. Select a CustomerStatus from the dropdown list and enter a name and e-mail address. Then click the Add Phone link, which is underneath the empty list of phones. A pop-up window, shown in Figure 5-12, will appear for you to enter the phone details.
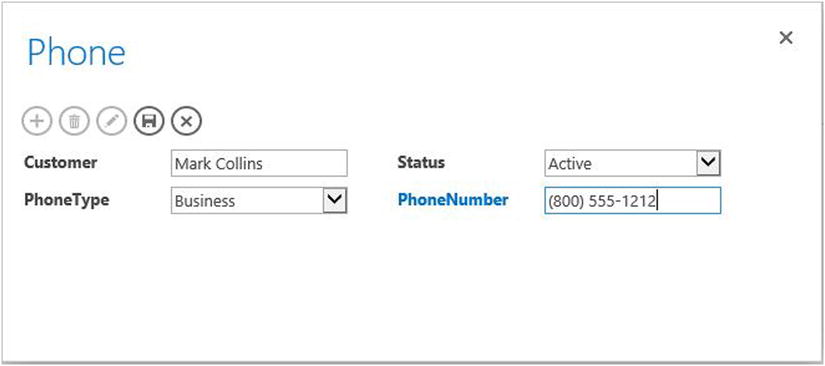
Figure 5-12. Adding a Phone record
Notice that the Customer field is already pre-filled using the CustomerName field from the Customer table and the Status was defaulted to Active. Enter some data, click the Save icon and close the dialog box. The completed Customer record will look similar to Figure 5-13.

Figure 5-13. The Customer form with Phone records
![]() Tip In previous versions of Access, even with web databases, Access was used to edit a local (.accdb, or .mdb) file. With web databases, this could be later published to a SharePoint site and also downloaded from SharePoint. With Web apps in Access 2013, there is no local file, Access is communicating directly with SharePoint and SQL Server. When you close Access and then want to later make additional changes, you’ll need to go to the SharePoint site. From the Settings menu, select the Customize in Access link. This will launch Access 2013 and open your app.
Tip In previous versions of Access, even with web databases, Access was used to edit a local (.accdb, or .mdb) file. With web databases, this could be later published to a SharePoint site and also downloaded from SharePoint. With Web apps in Access 2013, there is no local file, Access is communicating directly with SharePoint and SQL Server. When you close Access and then want to later make additional changes, you’ll need to go to the SharePoint site. From the Settings menu, select the Customize in Access link. This will launch Access 2013 and open your app.
Now you’ll define the remaining tables. To add a new table, you’ll need to go to the HOME tab on the ribbon and click the Table button.
Creating the Address Table
The Address table is similar to the Phone table with a foreign key relationship with the Customer table. Create a new table with the following fields:
- AddressID – AutoNumber, primary key
- Customer – Lookup, a lookup field using the Customer table
- Status – Lookup, a static list of values (Active and Inactive), set Active as Default
- AddressType – Lookup, a static list of values (Billing, Job, Shipping)
- Address – ShortText
- City – ShortText
- State – ShortText
- Country – ShortText
- ZipCode – ShortText
I added a default value for the Country field so the users would not have to enter this. You can choose to leave this without a default value or enter a different value as appropriate. Save the table and enter the name Address when prompted. The completed Address table should look like Figure 5-14.
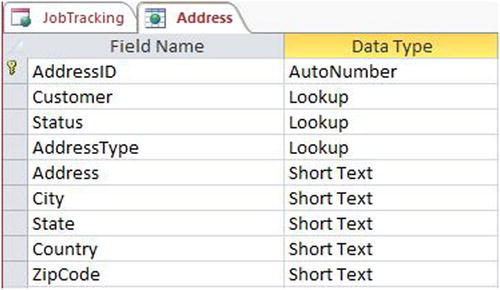
Figure 5-14. The completed Address table
Creating the Product and Service Tables
Next you’ll create the Product and Service tables that will store static information about the products and services that can be included in a job or job estimate. You’ll create these much like the previous tables.
The Product table will contain the following fields:
- ProductID – AutoNumber, the primary key
- ProductCode – ShortText, a string containing a user-recognizable identifier such as a UPC code
- Description – LongText
- UnitPrice – Currency
- UnitCost – Currency
- InventoryType – Lookup, a static list of values (Inventoried, Special Order, Custom Made) that define if/how this item is maintained in inventory.
The Service table will have the following fields:
- ServiceID – AutoNumber, primary key
- ServiceCode – ShortText, a user recognizable identifier
- Description – LongText
- LaborRate – Currency, defines the hourly rate charged for this service
- MinimumHours – Number, a numeric field indicating the minimum hours that will be charged (0 indicates that there is no minimum), for the Subtype select Whole Number.
- FlatRate – Yes/No, a Boolean field that indicates if this service is charged at a flat rate. If it is, the LaborRate field specifies the flat rate instead of an hourly rate.
![]() Tip To define a default value for a boolean Yes/No field, enter the expression as Yes or No.
Tip To define a default value for a boolean Yes/No field, enter the expression as Yes or No.
Creating the Job Table
The Job table will contain the proposed, active and completed jobs. It will generally start out as an estimate. When the job is completed, the actual values will replace the estimates and this will then be used for billing purposes.
Create the Job table as you have the previous tables. It will contain the following fields:
- JobID – AutoNumber, primary key
- Customer – Lookup, a lookup field using the Customer table
- Address – Lookup, a lookup field using the Address table (select the Address field to be displayed)
- JobStatus – Lookup, a static list of allowed values (New, Proposed, Accepted, InProgress, Complete, Cancelled) defaults to “New”
- StartDate – Date/Time, indicating the expected date the job will start (select Short Date for the display format)
- EndDate – Date/Time, indicating the expected or actual completion date (select Short Date for the display format)
- Notes – LongText
- TotalEstimate – Currency, field that will be computed by a data macro
Creating the JobProduct and JobService Tables
The JobProduct and JobService tables specify the products and services that are included in a job. The referenced tables, Product and Service, respectively, define the static properties such as price and description. The JobProduct and JobService tables supply the job-specific details such as quantity and status. These tables also allow for a custom price to be assigned that is applicable for this job only.
- Create the JobProduct table and include the following fields:
- JobProductID – AutoNumber, primary key
- Job – Lookup, a lookup field using the Job table, select JobID to be displayed
- Product – Lookup, a lookup field using the Product table, select ProductCode to be displayed
- EstimatedQty – Number, for the SubType select Whole Number
- ActualQty – Number, for the SubType select Whole Number
- CustomPrice – Currency, used to override the price for this job only
- ProductStatus – Lookup, a static list of allowed values (New, Waiting, Delivered, Cancelled), set default as “New”
- Notes – LongText
- CompleteDate – Date/Time, indicates when the product was delivered, select Short Date for the display format
- Save the table and enter JobProduct for the name when prompted.
- Create the JobService table and include the following fields:
- JobServiceID – AutoNumber, primary key
- Job – Lookup, a lookup field using the Job table, select JobID to be displayed
- Service – Lookup, a lookup field using the Service table, select ServiceCode to be displayed
- EstimatedHours – Number, for the SubType select Whole Number
- ActualHours – Number, for the SubType select Whole Number
- CustomPrice – Currency, used to override the price for this job only
- ServiceStatus – Lookup, a static list of allowed values (Planned, Waiting, Completed, Cancelled), set default as “Planned”
- Notes – LongText
- CompleteDate – Date/Time, indicates when the service was completed, select Short Date for the display format
- Save the table and enter JobService for the name when prompted.
Creating the Contact Table
The Contact table is used to record correspondence with a customer, such as e-mails or phone calls. Create the Contact table and add the following fields:
- ContactID – AutoNumber, primary key
- Customer – Lookup, a lookup field using the Customer table
- ContactDate – Date/Time, when the contact occurred, for the Subtype select Date with Time, set default as =Now()
- ContactType – Lookup, a static list of allowed values (Email, Phone, Mail, InPerson, Other)
- Inbound – Yes/No, a Boolean field indicating if the customer initiated the contact
- FollowUp – Lookup, a static list of values (None, Callback, Schedule Visit, Estimate Job), specifying an appropriate action
- ContactNotes – LongText
Save the table and enter Contact for the name, when prompted.
A select query can be used to combine the fields of two or more tables into a single view. This technique is often used to simplify form development since a form can use a query just like it would a table. The form can then be developed from the query, which combines the fields from each table.
For example, the JobProduct table provides the job-specific details but the Product table contains some important static details such as product code and description. You’ll combine these two tables into a single, de-normalized view (query). The form will use the query and can include fields from both tables.
You will create the following queries:
- qryJobProduct – combines the JobProduct and Product tables
- qryJobService – combines the JobService and Service tables
- qryJobSummary – combines the Job, Customer, and Address tables
Implementing the qryJobProduct Query
We’ll start with the qryJobProduct query that combines the JobProduct and Product tables.
- From the HOME tab of the ribbon, click the Advanced button and then select the Query link as shown in Figure 5-15.
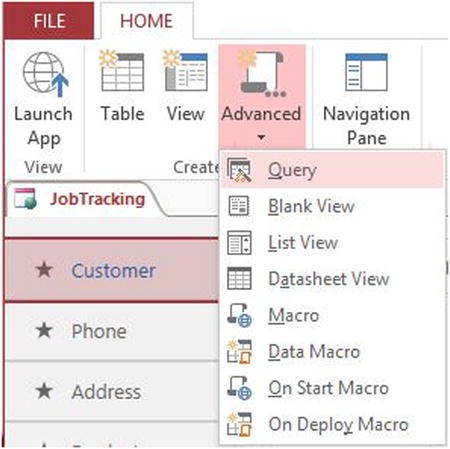
Figure 5-15. Creating a new query
- This will display the Show Table dialog box that allows you to select the tables to be included in the query. Select the JobProduct table, hold down the Ctrl key, and select the Product table as shown in Figure 5-16. Click the Add button to add these tables and then click the Close button to close the dialog box.
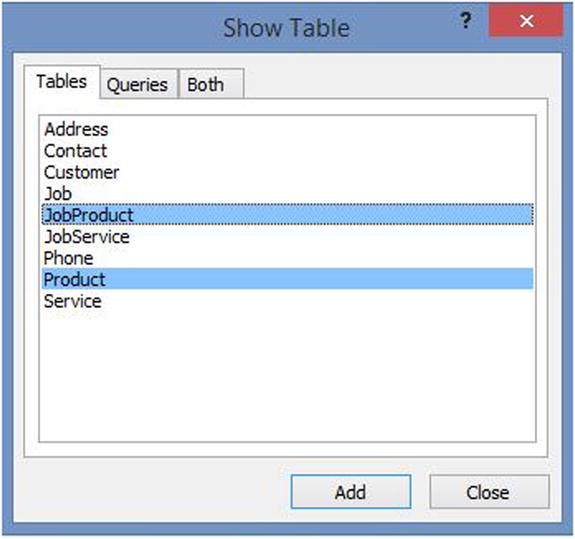
Figure 5-16. Adding the JobProduct and Product tables
- These tables will be displayed in the upper pane of the query window. Because of the foreign key relationship that exists between these two tables, there is already a join relationship shown.
 Tip You can remove or edit these joins in the query window without affecting the table relationships.
 - Double-click the following fields, one at a time, to add them to the query definition:
- JobProduct.JobProductID
- JobProduct.Job
- JobProduct.Product
- JobProduct.EstimatedQty
- JobProduct.ActualQty
- JobProduct.ProductStatus
- JobProduct.CompleteDate
- JobProduct.CustomPrice
- Product.ProductCode
- Product.Description
- Product.UnitPrice
- Product.UnitCost
- Product.InventoryType
- JobProduct.Notes
- Click the Save button in the title bar and enter the name qryJobProduct when prompted. The completed query should look like Figure 5-17.
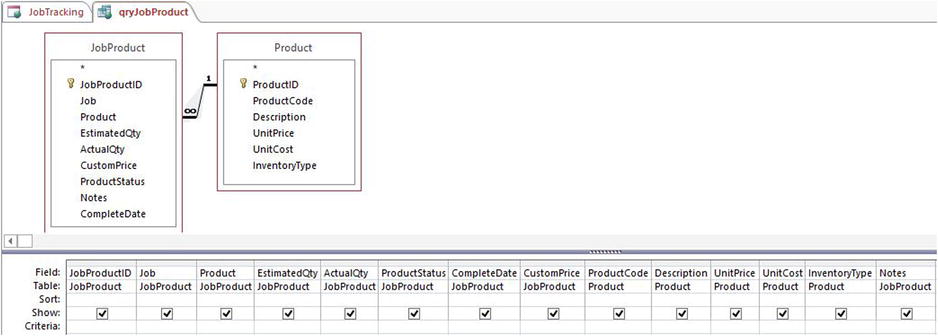
Figure 5-17. The completed qryJobProduct query
Implementing the qryJobService Query
Implement the qryJobService query the same way except use the JobService and Service tables. Include the following fields:
- JobService.JobServiceID
- JobService.Job
- JobService.Service
- JobService.EstimatedHours
- JobService.ActualHours
- JobService.ServiceStatus
- JobService.CompleteDate
- JobService.CustomPrice
- Service.ServiceCode
- Service.Description
- Service.LaborRate
- Service.MinimumHours
- Service.FlatRate
- JobService.Notes
Save the query and enter the name qryJobService when prompted. The completed query should look like Figure 5-18.
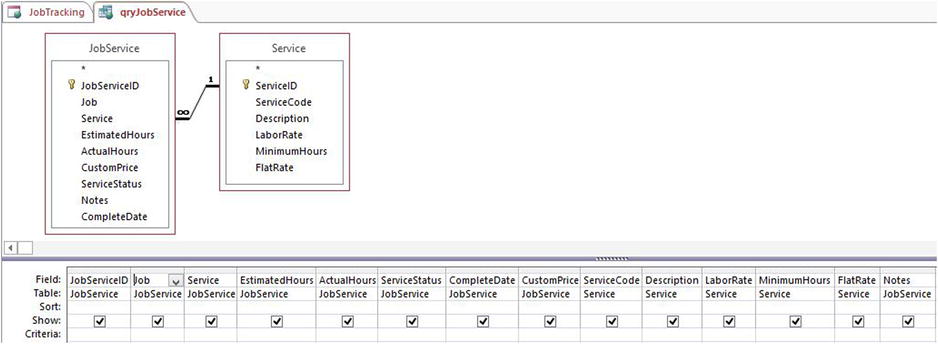
Figure 5-18. The completed qryJobService query
Creating the qryJobSummary Query
Create a new query and add the following tables:
- Customer
- Job
- Address
You may need to rearrange the tables but the initial query will look similar to Figure 5-19.

Figure 5-19. The initial query design
Notice that the Address table is linked to both the Customer and Job tables. A customer can have multiple addresses but a job can only have one address. For this query, the Job table is the main table and you’ll want to keep the join between Job and Address but remove the one between Customer and Address. Click this join and then press the Delete key to remove it. This will have no effect on the table relationships.
Double-click the following fields to add them to the query:
- Job.JobID
- Customer.CustomerID
- Customer.CustomerName
- Customer.EmailAddress
- Job.TotalEstimate
- Address.Address
- Address.City
- Address.State
- Address.ZipCode
- Address.Country
- Job.Notes
The completed query should look like Figure 5-20.
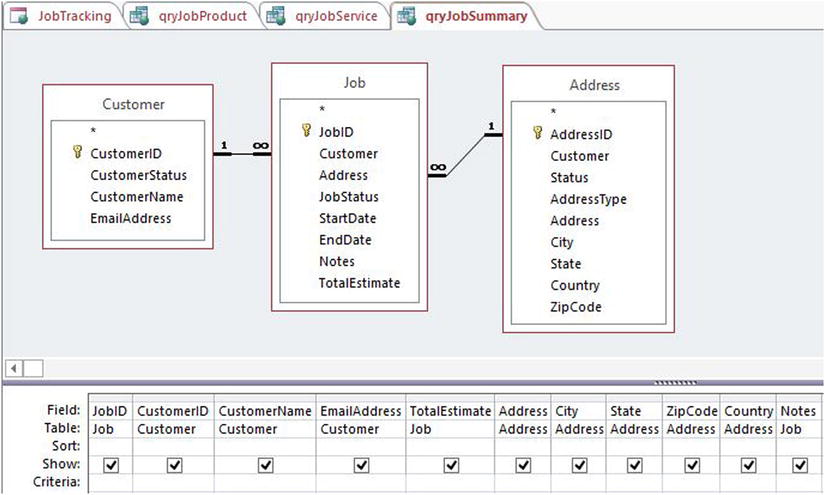
Figure 5-20. The completed qryJobSummary query
Implementing a Data Macro
Data macros are a handy place to implement data processing procedures. They can be automatically executed when certain data events occur, such as a record being added or modified. Because of this, they are particularly useful for keeping related tables in sync and enforcing business rules. A data macro can be assigned to a data event directly, or you can create a named macro that can be called by data events. Named macros can also be called manually from a form.
To add an event macro, edit the table that you want the macro to run on. Then, from the DESIGN tab of the ribbon, click either the On Insert, On Update, or On Delete button as shown in Figure 5-21, depending upon which event to want the macro to respond to.
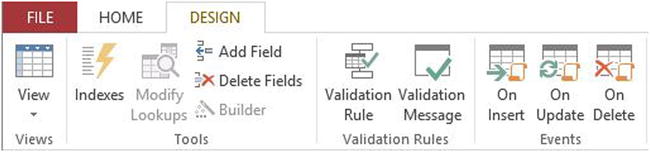
Figure 5-21. The DESIGN tab of the ribbon
Creating the Data Macro
For this application, you’ll create a named macro that calculates the total amount of the job and updates the TotalEstimate field of the Job table. You will then call this macro from all the data events that could potentially affect the total such when a record is added to the JobProduct table.
From the HOME tab of the ribbon, click the Advanced button and then select the Data Macro link as shown in Figure 5-22.

Figure 5-22. Creating a data macro
The macro will need to know which job should be updated so you’ll create a parameter that will be passed in when the macro is called. Click the Create Parameter link in the upper right-hand corner of the macro editor. Enter the name jobID, select the Number (No Decimal) type, and enter a description as shown in Figure 5-23.

Figure 5-23. Adding the jobID parameter
Using the Macro Editor
The macro editor allows you to define the logic of your data macro. Data macros will typically perform actions such as reading data from a table, and updating or inserting a record. The Action Catalog, shown in Figure 5-24, illustrates the kinds of things you can do in a macro.
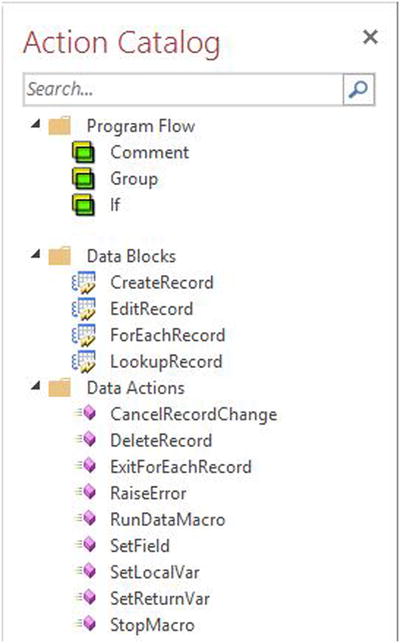
Figure 5-24. The Action Catalog
Actions are often nested inside other actions. For example, an EditRecord action specifies the record to be updated. Within this, you can add one or more SetField actions, which modify a single field within that record. Figure 5-25 shows a really simple macro that uses several of the most common actions. We will walk through this to explain how the individual actions are used.
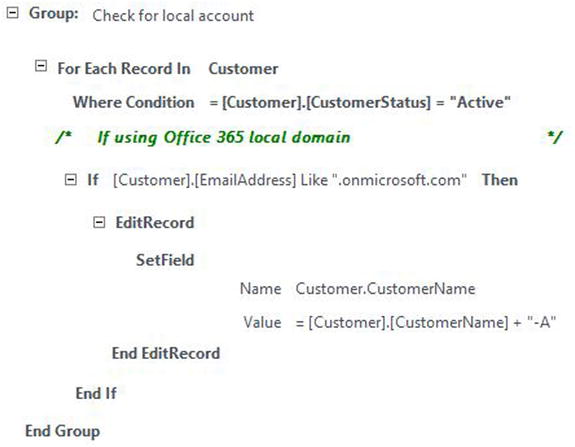
Figure 5-25. Sample macro
The Group action functions much like the #region directive in C#. You can include a set of related actions within it and collapse or expand the entire group, as necessary. For large, complex macros this will allow you to more easily follow the overall process and drill into the areas you need to focus on. A Group action can be nested inside another Group as well.
The ForEachRecord action returns data from a table or query and you can define a Where Condition to filter the rows that you want returned. In this case, we’re using the Customer table and processing only Active accounts. All the actions nested inside this action are repeated for each record. You can break out of this loop by including the ExitForEachRecord action.
For each record returned, the If action checks to see if the e-mail address includes .onmicrosoft.com. We could have included that in the Where Condition but wanted to demonstrate the If action. You can also include an Else or an Else If section to define actions to be executed when the e-mail does not include this string. An EditRecord action is inside the If action, which means it will be executed only on records where the If condition is true.
The EditRecord action operates on a single record, which must be a record already read in through one of the read actions (either the ForEachRecord or LookupRecord action). By the default, it updates the current record; the record that was last accessed. In this case this will be the Customer record currently being evaluated by the ForEachRecord action. In a complex macro, you can have multiple nested read actions. In this situation, the “current” record may not be as obvious, or you may want to update a record that is not the current one. To deal with this, you can define an Alias on each of these actions. The EditRecord action will then operate on the record returned by the read action with the matching Alias. An Alias works much like they do when defining joins in an SQL statement. You specify an alias for each table in the query and then when selecting or updating a field, it is referenced using the table alias.
As we mentioned, you include one or more SetField actions inside the EditRecord action. Each one specifies the field name and the value it is to be updated to. In this macro, we’re simply appending a -A to the CustomerName field.
![]() Tip You’ll notice that an Add New Action dropdown appears in various places in the macro. These are places where you can insert an action. The list of available actions in each location is limited based on its context. For example, you can only include a SetField action inside an EditRecord or CreateRecord action. You can also drag an action from the Action Catalog to the macro.
Tip You’ll notice that an Add New Action dropdown appears in various places in the macro. These are places where you can insert an action. The list of available actions in each location is limited based on its context. For example, you can only include a SetField action inside an EditRecord or CreateRecord action. You can also drag an action from the Action Catalog to the macro.
Computing the Job Total
Now you’ll employ some of these actions to compute the total cost of a job. The macro will compute this by adding up the products and services included in the job. The macro is fairly long so we will describe it in pieces.
![]() Tip To implement this macro, you’ll probably find it easier to just use the figures that are shown. This will indicate exactly where each action should be placed and the specific expressions that you’ll need to enter. The instructions that follow provide an overview of what the macro is doing.
Tip To implement this macro, you’ll probably find it easier to just use the figures that are shown. This will indicate exactly where each action should be placed and the specific expressions that you’ll need to enter. The instructions that follow provide an overview of what the macro is doing.
- The first macro action creates a local variable, jobTotal, and initializes it to 0. Add a SetLocalVar action with the name JobTotal and an expression of 0 as shown in Figure 5-26.
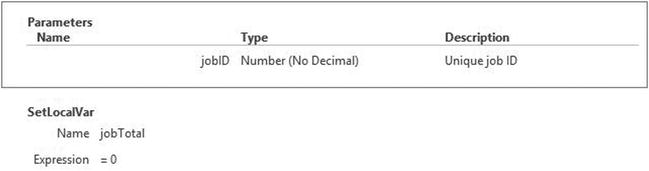
Figure 5-26. Adding a SetLocalVar action
- Then the macro iterates through all of the JobProduct records, accumulating the price multiplied by the quantity. Create a Group action named Accumulate Product Costs.
- Inside of this add a ForEachRecord action that iterates through all the JobProduct records for this job, excluding the cancelled records. For each record, either accumulate the CustomPrice field or the UnitPrice times the quantity. Use the ActualQty field, if available, or the EstimtedQty if not. The completed Group action should look like Figure 5-27.
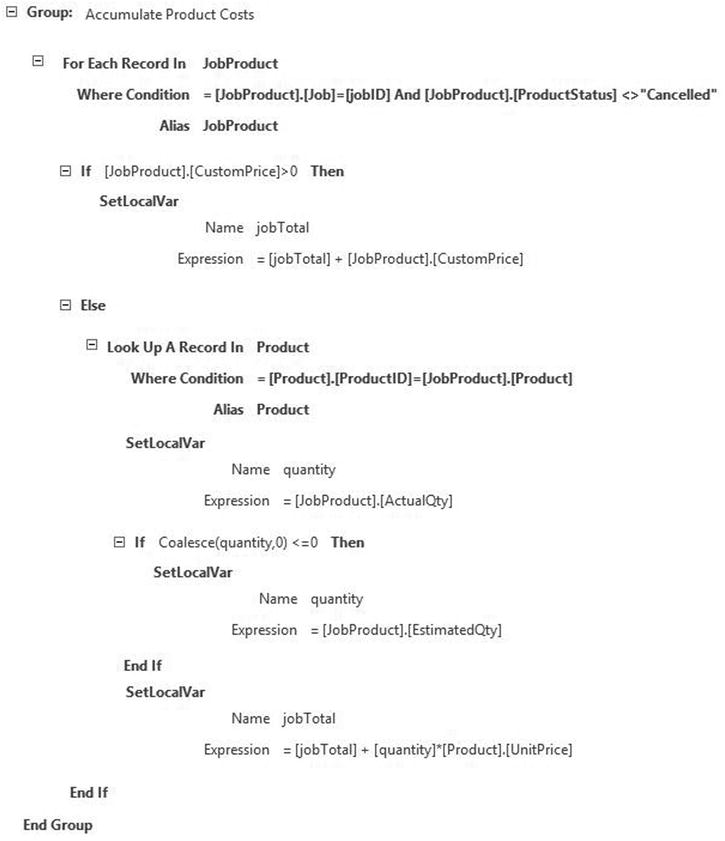
Figure 5-27. Designing the data macro – Product Costs
Note The JobProduct table contains both an EstimatedQty field as well as an ActualQty field. If the actual value is populated, the formula will use that field instead of the estimated quantity. If a price has been specified in the CustomPrice field, this value is used instead of the UnitPrice. It is also assumed that this value will be an extended amount and does not need to be multiplied by the quantity to get the total amount for this product. - The next step is to accumulate the JobService records. Add another Group action named Accumulate Service Costs, and within this, add a ForEachRecord action to iterate the JobService table.
- Just like you did for the product totals, add an If action inside the ForEachRecord to see if the CustomPrice field is populated. For the Else section, just add a Group action named Compute Service Cost. The macro should look like Figure 5-28.
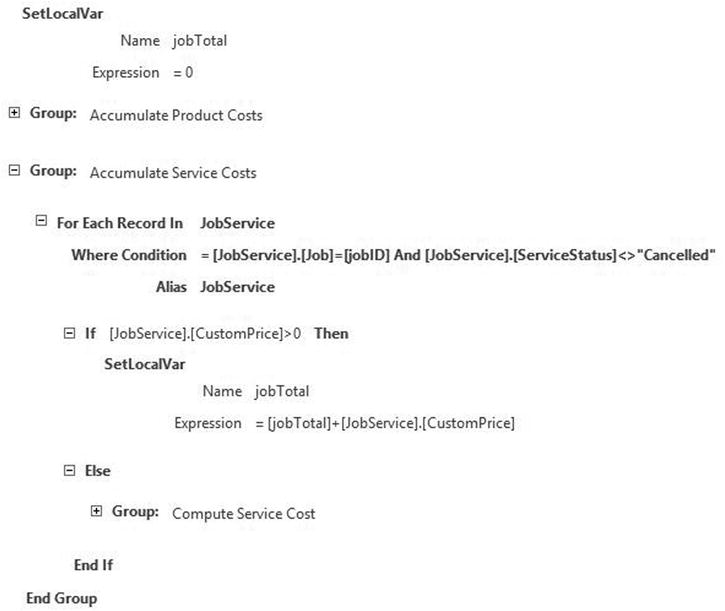
Figure 5-28. Designing the data macro – Part 2
- Now you’ll need to implement the Compute Service Cost group. Add a LookupRecord action to retrieve the Service record associated with this JobService record.
- If this is a flat rate service, the FlatRate amount from the Service record is used and the hours are ignored.
- For the Else section, you’ll add a SetLocalVar action to define the hours variable. Through a series of If actions, you’ll set this using either the ActualHours, EstimatedHours or MinimumHours fields.
- Finally, the hours variable is multiplied by the LaborRate and accumulated to the jobTotal variable. The Compute Service Cost group implementation should look like Figure 5-29.
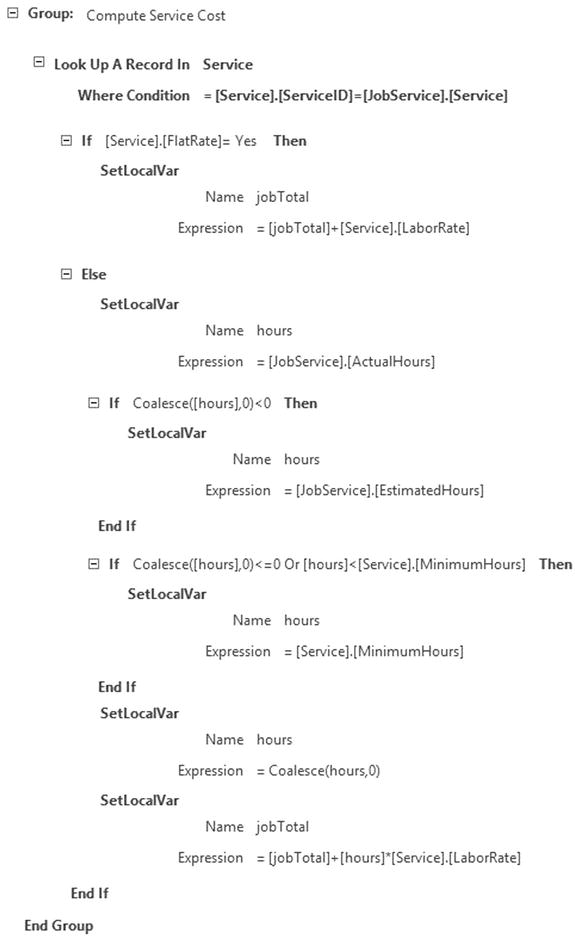
Figure 5-29. Designing the data macro – Part 3
- The last step is to update the Job table, storing the computed jobTotal variable. You must first add a LookupRecord action to get the Job record. Then add an EditRecord action with a single SetField action as shown in Figure 5-30.
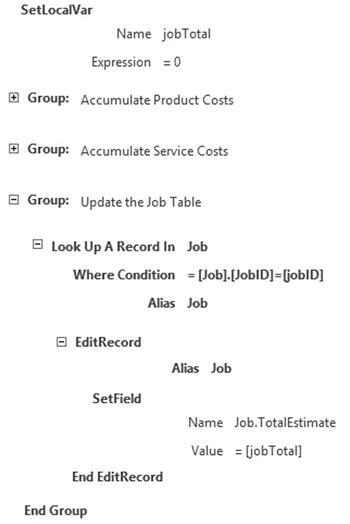
Figure 5-30. Designing the data macro – Part 4
- When you have entered all this logic, save the data macro. Enter the name CalculateJobTotal when prompted.
Entering Test Data
To test this macro, you’ll need to first enter some data. For now, you’ll just enter the data directly into the tables. To enter data, you can open a table in Datasheet View and key in the values for each field. From the Job Tracking tab, right-click the table and select the View Data link.
- Start by defining some products and services. To test the various conditions that the macro supports, you’ll need a variety of items with different values. Enter the values shown in Figures 5-31 and 5-32.

Figure 5-31. Enter data into the Product table

Figure 5-32. Entering data into the Service table
- The Job table needs an address record so you’ll create one now. You can enter whatever values you want here; our address looks like Figure 5-33.

Figure 5-33. Setting up a job address
- Next, you’ll need to create a Job record. Use the Customer record that you created earlier and select the Address record that you just created. Set the JobStatus to Proposed and leave all the other fields with their default values. The TotalEstimate should be $0.00 as shown in Figure 5-34.

Figure 5-34. Adding a Job record
- Now attach products to this job by adding JobProduct records. Enter the data shown in Figure 5-35; this will test all of the scenarios such as using a CustomPrice and overriding the EstimatedQty with the ActualQty.
l>
Figure 5-35. Adding JobProduct records
- Finally, enter records in the JobService table using the data shown in Figure 5-36.

Figure 5-36. Adding JobService records
Calling the Named Macro
The job total can change any time a record is added, changed, or deleted from either the JobProduct or JobService tables. So now you’ll add an event-triggered macro for each of these events that simply calls your named macro.
Open the JobProduct table in Design View. In the DESIGN tab of the ribbon, you’ll see a button for each of the three events as we showed earlier. Click the On Insert button, which will display the macro editor. Add a RunDataMacro action and select the CalculateJobTotal macro from the dropdown. Since this macro has a jobID parameter, the macro editor shows this and gives you a place to specify the value that should be passed in. Enter Job as shown in Figure 5-37. Click the Save button in the ribbon to save the change and then click the Close button.
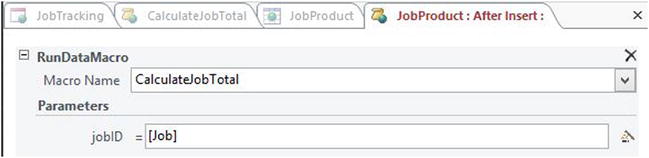
Figure 5-37. Defining an Event Macro
Repeat this process to define macros for the update and delete events. The macros will be identical to the On Insert macro. Then, create macros for all three events on the JobService table. Again, these will be identical to the On Insert macro shown in Figure 5-37.
Testing the Data Macro
Now you’re ready to test your macro. You can invoke the macro by updating one of the JobProduct or JobService records. But first, we’ll turn on the macro tracing facility. This is a really nice feature with Access 2013.
Open the CalculateJobTotal macro in the macro editor. If you don’t have it already open, you can find it in the Navigator pane. Just double-click it to open it in Design View. Select the DESIGN tab of the ribbon. You’ll see a Data Macro Tracing button as demonstrated in Figure 5-38. Click the Data Macro Tracing button to turn on tracing. This button acts like a toggle; if you click it again it will disable tracing.
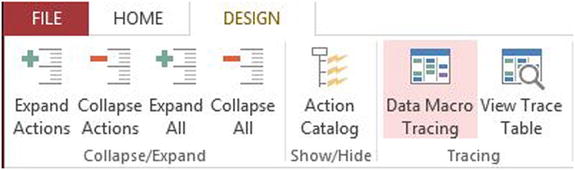
Figure 5-38. Turning on the trace mode
Now open the JobProduct table and change the ProductStatus field of one of the records. Then click off of this row to trigger the save operation, which will also invoke your macro. Go back to the CalculateJobTotal macro and click the View Trace Table button.
A portion of the trace information is shown in Figure 5-39.
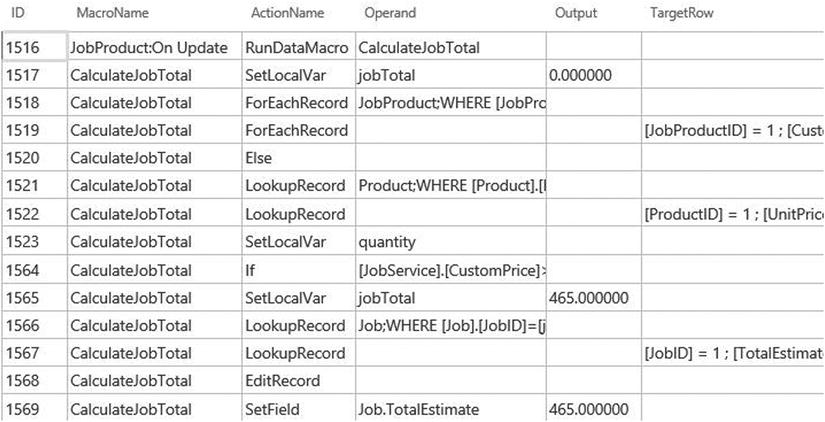
Figure 5-39. The trace log
The first entry is from the On Update event of the JobProduct table. You can see that it called the CalculateJobTotal macro. The remaining entries are from the CalculateJobTotal macro, starting with the initializing of the jobTotal variable to 0. At the end of the procedure, you can see where it looked up the Job record and set the TotalEstimate field to 465.00.
Now for a final check, open the Job table and verify the TotalEstimate field has the correct value.
Designing Forms
Now that you have the tables designed you can customize the forms that allow the users to view and edit the data contained in them. Generally, you will need a form for each table. In some cases you’ll use a query that combines the data from multiple tables. When there is a parent-child relationship such as with the Customer and Phone tables, you use a Related Items control, which we’ll demonstrate later.
There are three types of forms that you can create. If you click the Advanced button in the ribbon, you will see this listed as Blank View, List View, and Datasheet View, as demonstrated in Figure 5-40.
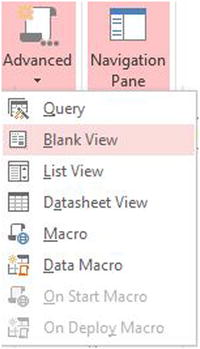
Figure 5-40. The form options
The blank view is pretty self-explanatory. Use this type if you want to setup the data binding manually. The name List View is somewhat misleading. A list view is just a form that displays a single record. In contrast, the datasheet view displays multiple records in a grid format. In Access 2010 these were called Form, and Multiple Items. Use a list view if you want to show a single record, and a datasheet view if you need to show multiple.
In Access 2013 the forms are automatically created for you. For every table, there will be a list view as well as a datasheet view. You can find these in the Navigation pane as demonstrated in Figure 5-41.
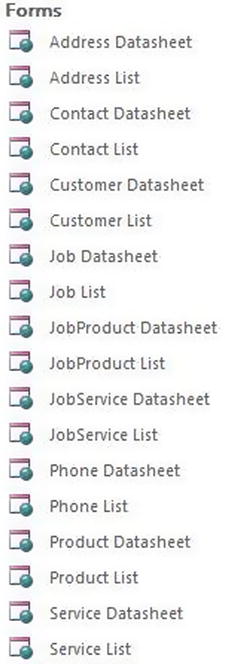
Figure 5-41. Listing the existing forms
The generated forms provide a good starting point and will save you some time. They attempt to deal with parent-child relationships by embedding a Related Items control within a form. We’ll walk you through the changes that are needed. You’ll also need to make some new forms.
![]() Caution You cannot use VBA in a web form as this is not supported with SharePoint. Instead you’ll use macros to perform advanced features such as form manipulation.
Caution You cannot use VBA in a web form as this is not supported with SharePoint. Instead you’ll use macros to perform advanced features such as form manipulation.
Exploring the Form Designer
Open the Phone Datasheet form by double-clicking it in the Navigation pane. The form will be displayed in the Layout view shown in Figure 5-42.
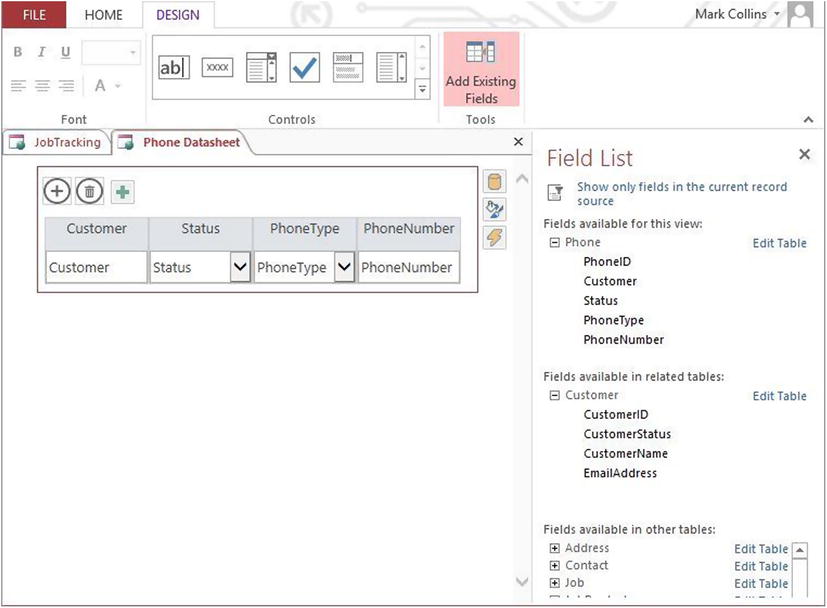
Figure 5-42. The Phone Datasheet form
The design experience in Access 2013 is very powerful and fairly intuitive. The first thing you’ll generally need to do is adjust the fields included in the form. You can resize a field and drag it around to change the order. You can also include additional fields by dragging them from the Field List pane.
Because the Phone table has a foreign key to the Customer table, you can also include any of the fields from the Customer table on the form. All the other tables are listed in the Field List pane and you can include fields from these tables as well. However, you will need to define how the record should be selected because there is no database relationship that defines that.
To the right of the grid you’ll find three small icons that are used to configure data, formatting, and action properties. One or more of these may be hidden depending on what element in the form is selected. The data properties allow you to configure the data source for the form or control. The formatting properties include defining the tooltip or caption or making the control visible or not. The actions properties allow you define custom actions for certain events such as On Click or On Load.
The action bar is shown above the grid and contains two default actions; a plus symbol for adding a new record and a trash can for deleting the selected row(s). You can also create your own custom actions, by clicking the green plus sign.
Creating the Phone and Address Forms
We’ll start with the phone and address forms. Let’s begin with the datasheet views.
Modifying the Phone Datasheet Form
The Phone Datasheet should already be displayed. If not, double-click it from the Navigation pane.
![]() Tip The value of the primary key field is auto-generated and in many cases is not meaningful to the end users. These have been removed from the generated form to save real estate. The notable exceptions to this rule are the CustomerID and JobID fields. These are often used in documents such as invoices.
Tip The value of the primary key field is auto-generated and in many cases is not meaningful to the end users. These have been removed from the generated form to save real estate. The notable exceptions to this rule are the CustomerID and JobID fields. These are often used in documents such as invoices.
Delete the Customer field from the grid. Since the Phone Datasheet form will only be used as a child form of the Customer form, displaying the customer name here would be redundant. Arrange the controls so the PhoneNumber field is before Status and PhoneType. Also use the formatting properties icon to change the captions to Phone Number and Type. The form should look like Figure 5-43.
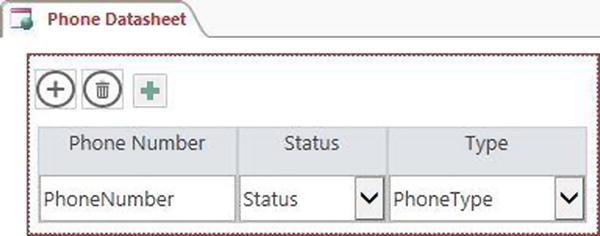
Figure 5-43. The layout of the Phone form
Modifying the Address Forms
Open the Address Datasheet form. Remove the Customer field from the grid and resize and rearrange the fields just like you did with the Phone Datasheet form. The completed form will look similar to Figure 5-44.
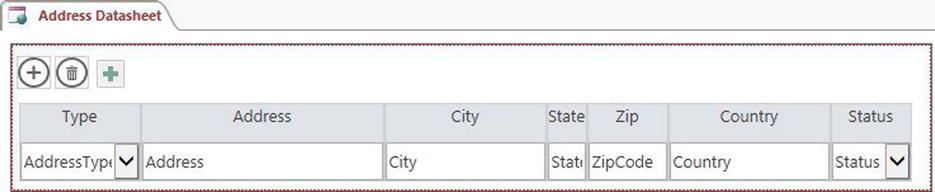
Figure 5-44. The layout of the Address Datasheet form
Now open the Address List form and remove the Customer field and caption. Re-arrange the controls to look like Figure 5-45.
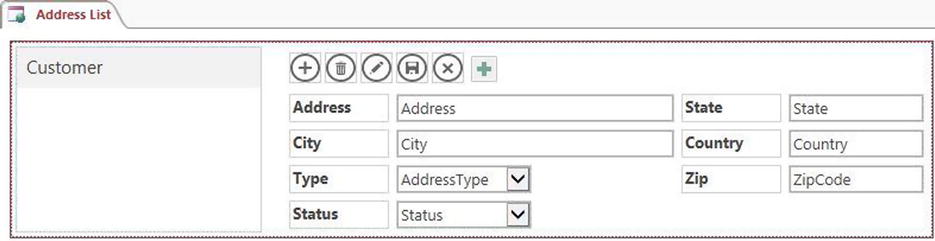
Figure 5-45. The Address List form
Creating the Product and Service Forms
Next, you’ll adjust the forms that will display the products and services that can be included in a job. First, you’ll customize the Product Datasheet and Service Datasheet forms by resizing the fields and editing the field labels. These will be similar to the Phone and Address forms. Then you’ll modify the list views to remove the related item information.
The Product Datasheet and Service Datasheet forms just need some resizing of fields and customizing the captions. Modify these so they look like Figures 5-46 and 5-47.
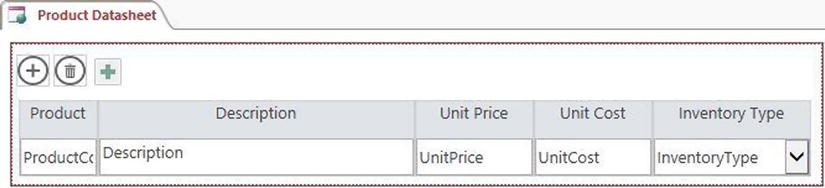
Figure 5-46. The Product Datasheet form
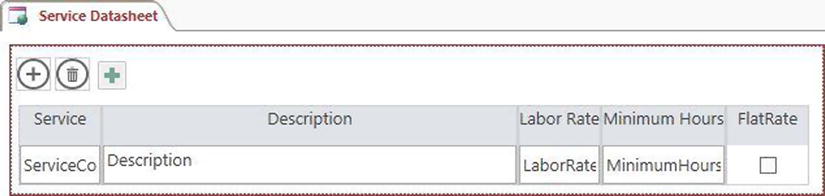
Figure 5-47. The Service Datasheet form
However, the list views have some related information that needs to be removed. For example, the Product List form, shown in Figure 5-48, includes a Related Items control to display related JobProduct records. This is here because there is a foreign key relationship defined between these tables. For this application you’ll navigate from JobProduct to Product and not the other way around.

Figure 5-48. The initial Product List form
Delete the Related Items control and adjust some of the field labels so the form looks like Figure 5-49.
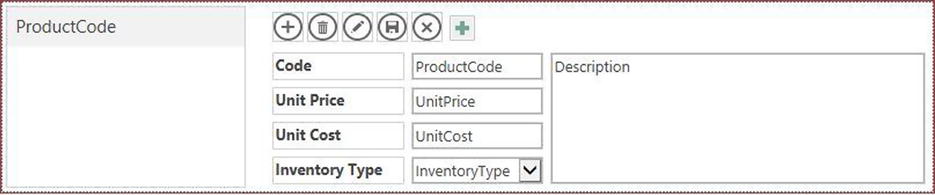
Figure 5-49. The adjusted Product List form
Save your changes. To see what this form will look like in your SharePoint site, right-click the view label in the Job Tracking tab and select the Open in Browser link as shown in Figure 5-50.
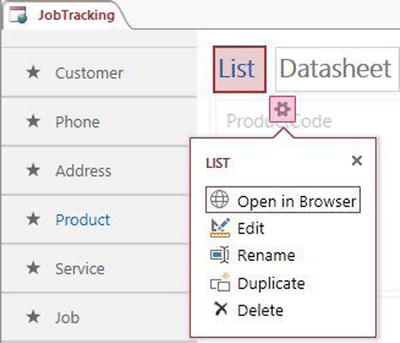
Figure 5-50. Opening a form in SharePoint
Click the edit icon and the form should look like Figure 5-51.
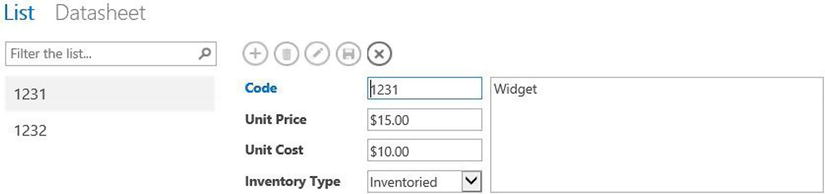
Figure 5-51. The Product List form in edit mode
![]() Tip When saving changes in the Access application, if you already have the SharePoint site open in your browser, the changes may not be immediately available. If you experience this, close all your browser windows and go back to the SharePoint site.
Tip When saving changes in the Access application, if you already have the SharePoint site open in your browser, the changes may not be immediately available. If you experience this, close all your browser windows and go back to the SharePoint site.
Make the same changes to the Service List form. The completed form should look like Figure 5-52.
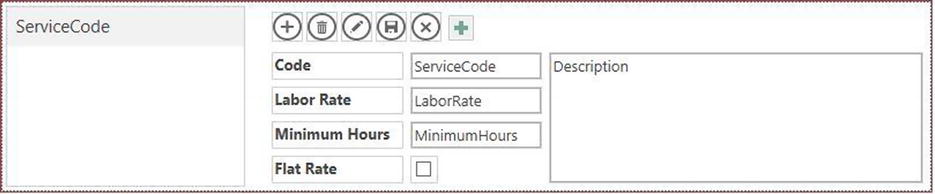
Figure 5-52. The final Service List from
Creating New JobProduct and JobService List Form
Now you’ll create new list view forms for the JobProduct and JobService tables. These tables establish the link between a job and the product and services that are included. The forms will need to display this information as well as data from the associated product or service, such as description and price. You will delete the existing JobProduct List form and create new forms from scratch. These forms will be different from the other forms you have worked on so far because:
- You will use a query instead of a table as the data source
- The controls associated with fields from the linked tables (Product or Service) will be locked to prevent editing
- Delete the JobProduct List form.
- Go to the JobTracking tab and select the JobProduct table. Notice that there is only a Datasheet view listed as demonstrated in Figure 5-53, whereas all the other tables have both a List and Datasheet view.

Figure 5-53. Displaying the JobProduct views
- Click the green plus icon to define a new view. In the Add New View dialog box, enter the name JobProduct List, select the List Details type and select qryJobProduct for the data source as shown in Figure 5-54.
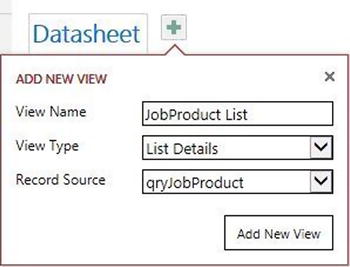
Figure 5-54. Defining the list view
- The display name in the JobTracking tab is JobProduct List. Click the settings icon, select the Rename link, and enter List.
- Since the form uses the qryJobProduct query, it will contain the fields from both the JobProduct as well as the Product table. The default form will look like Figure 5-55.
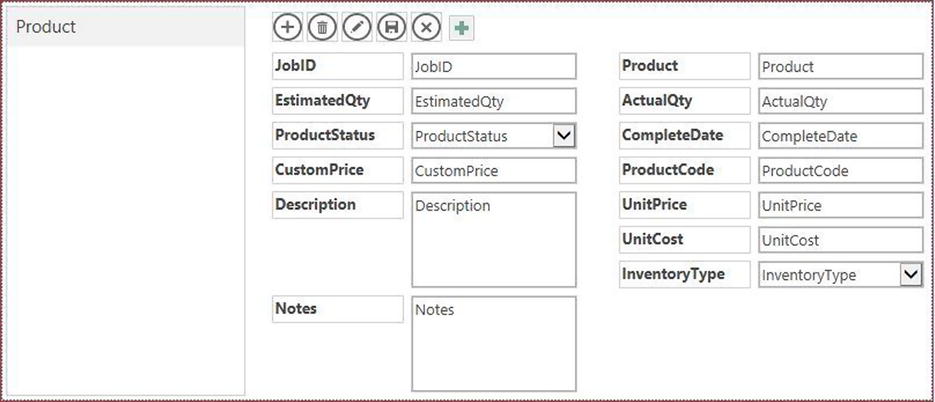
Figure 5-55. The initial list form
- Click the Edit button, to put this form in edit mode. Remove the JobID and Product fields and their associated labels. Then rearrange the fields so the Product fields are at the bottom of the form, as shown in Figure 5-56.
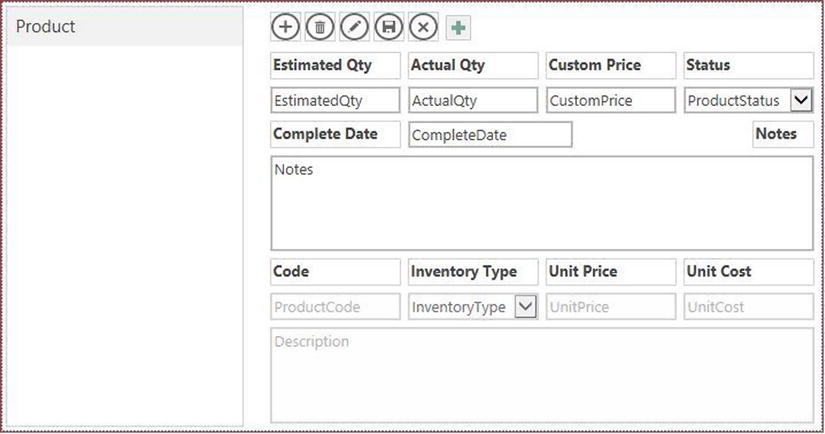
Figure 5-56. The final list form
- Select the ProductCode field and then click the formatting properties icon. Unselect the Enabled check box as shown in Figure 5-57. This will make this a read-only field.
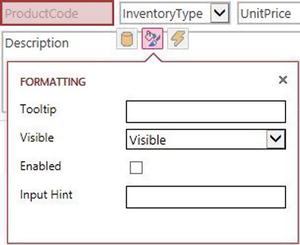
Figure 5-57. Disabling the ProductCode field
- In the same way, disable the other fields from the Product table. This includes the InventoryType, UnitPrice, UnitCost, and Description fields.
- Click the Save icon in the title bar.
- Go to your SharePoint site and select the JobTracking app. Select the Job table and then select the List view, if not already selected. The form should look similar to Figure 5-58.
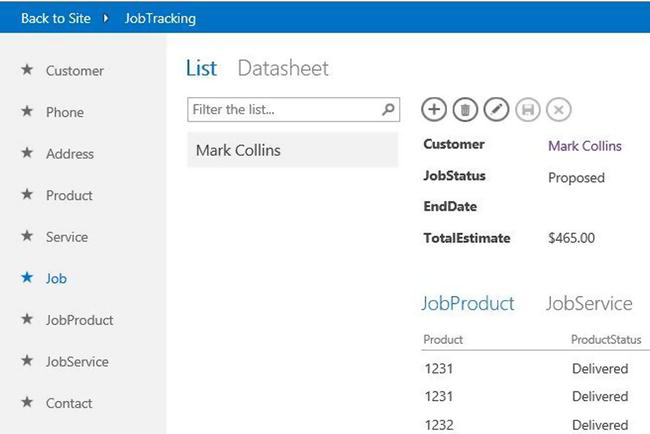
Figure 5-58. The Job List form
- Click one of the products listed in the JobProduct tab. This will display the JobProduct List form that you just created. Click the edit icon to view this in edit mode. The form will look like Figure 5-59. Notice that the Product fields are disabled and cannot be modified.
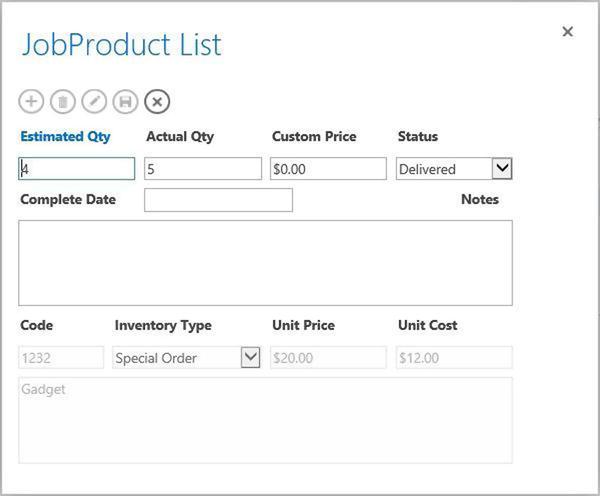
Figure 5-59. The JobProduct List form
- Repeat these steps to re-create the JobService List form. Use the qryJobService query as the data source for the form, which should look like Figure 5-60 when you’re done.
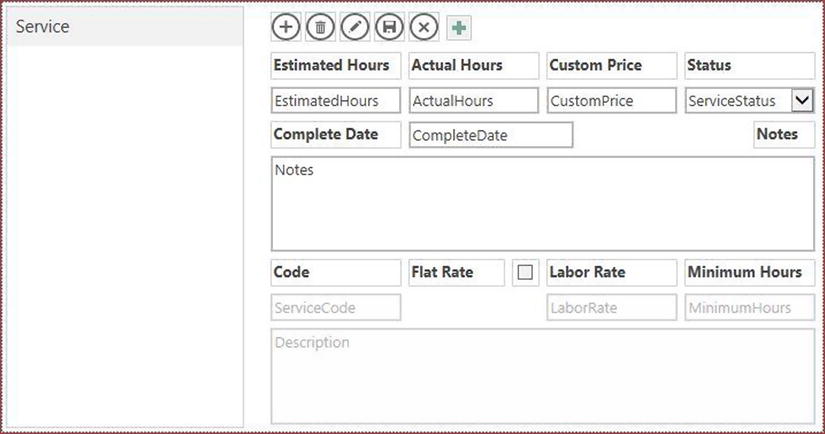
Figure 5-60. The layout of the JobService form
- Just like you did with the JobProduct List form, unselect the Enabled check box on the ServiceCode, FlatRate, LaborRate, MinimumHours, and Description controls.
Modifying the Job Form
Next you’ll customize the Job List form. First you’ll do some basic re-arranging of controls like you have done with the other forms. Then we’ll show you how to configure the Related Items control.
- Open the Job List form in the Navigation pane to open in edit mode. Arrange the controls to look like Figure 5-61.
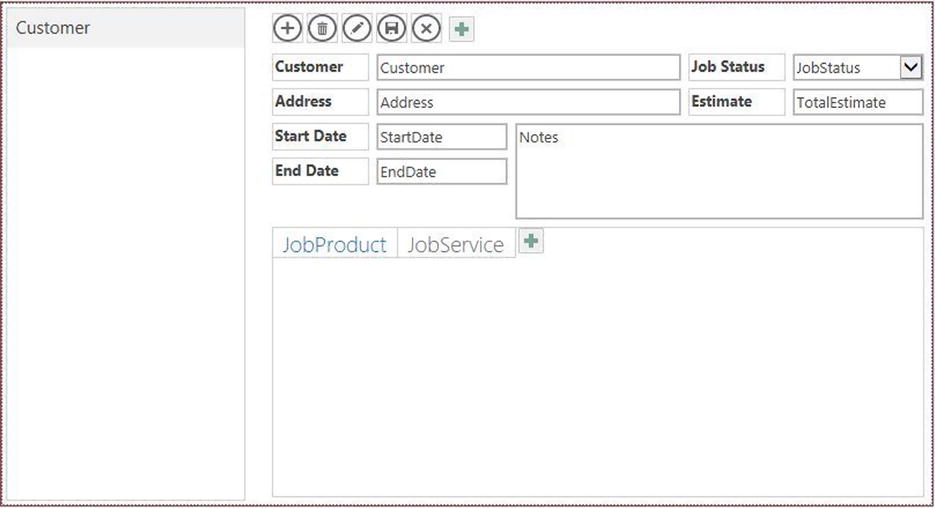
Figure 5-61. The modified Job List form
The bottom portion of this form contains a Related Items control. This is a handy way of way of displaying multiple one-to-many relationships. A job consists of products and services; the sample job that you created earlier to test the data macro had four of each. When displaying a job you’ll need to show both lists. In Access 2010 this was done by including a subform for each list. In 2013 you’ll use a Related Items control.
Each child list will be put into a different tab. Two tabs were created for you, JobProduct and JobService. As you configure each list, you can choose up to four fields of the child record that will be displayed in this control. You can also choose which form will be used as a pop-up form when one of the rows is selected. Click the JobProduct tab and then click the data properties icon.
- In the dialog that is displayed, select qryJobProduct as the data source. Recall that you created this earlier in the chapter. It contains fields from both the JobProduct table as well as the related Product table. For the Related Field property, select Job. This defines the field in the child table that is used to link a record to the parent record.
- Then you’ll see four sets of fields and captions; these specify the fields that should be displayed in this control. Select the following four fields and enter an appropriate caption:
- Product
- ProductStatus
- EstimatedQty
- ActualQty
- For the Popup View selection, choose the JobProduct List form. This is the custom form you created earlier that uses the qryJobProduct query. This form will be displayed as a pop-up dialog box when a row is selected.
- Finally, select the field that you want the rows to be sorted by. Select JobProductID so they will be displayed in the order they were created. The completed dialog box should look like Figure 5-62.
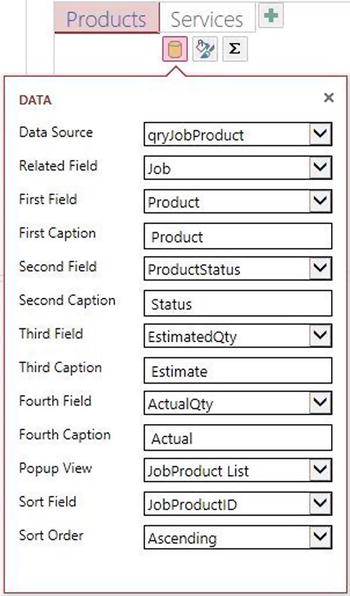
Figure 5-62. The initial layout of the Job form
- Close the data properties dialog box and click the formatting properties icon. Enter the caption Products as shown in Figure 5-63.
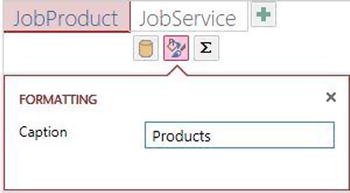
Figure 5-63. Changing the tab caption
- Then make similar changes to the JobService tab, configuring this as shown in Figure 5-64.
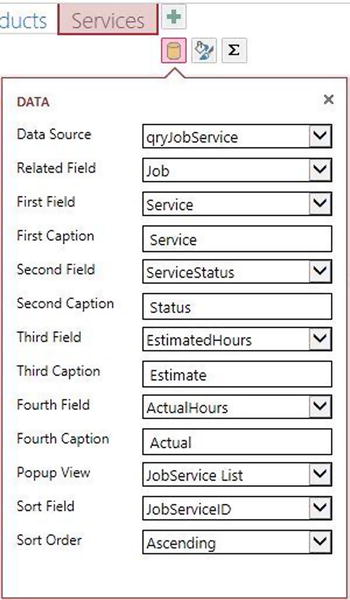
Figure 5-64. Configuring the JobService tab
- Close the data properties dialog box and click the formatting properties icon. Change the caption to Services.
- Click the Save button in the title bar to save your changes. Then go to the SharePoint site and your Job form should look similar to Figure 5-65.
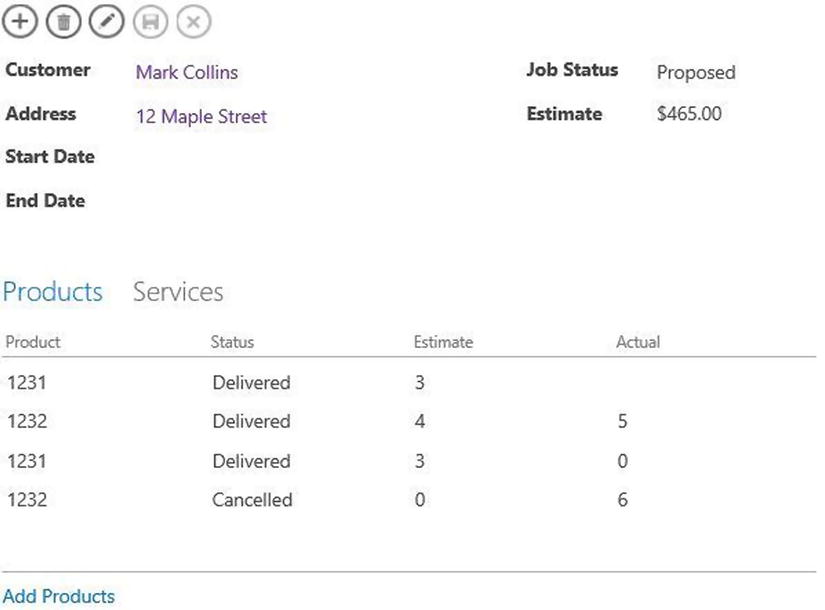
Figure 5-65. The completed Job List form
Modifying the Customer Form
The Customer form will be used to view and update customer information. This is where you’ll view and add phone numbers and addresses for a customer. This form will also allow you to add and modify customer jobs. You’ll also record correspondence (contacts) with a customer from here. This is the portal of your applications where you’ll bring all of the other forms together.
- Open the Customer List from in edit mode. There are just a few fields on this form and you just need to better arrange them.
- Add the CustomerID field to this form. As we said earlier, this is one place where this will be meaningful to the users.
- You can also re-arrange the tabs in the Related Items control. The completed form should look like Figure 5-66.
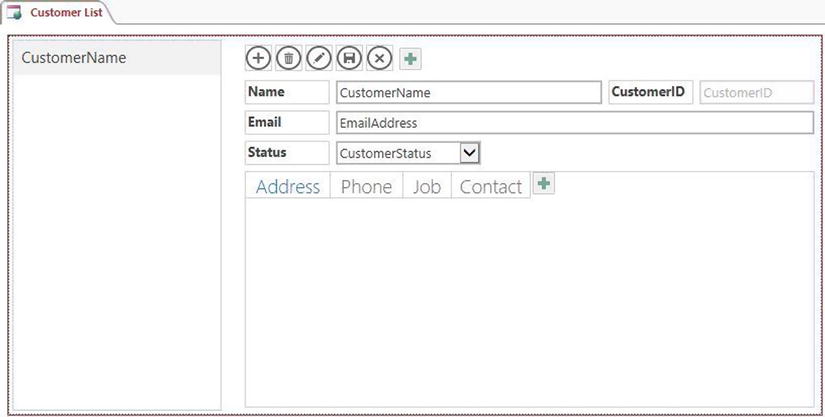
Figure 5-66. The modified Customer List form
The section on the left side of the form is used to search for a specific record. So far, we have been ignoring this. It is not used when the form is presented as a pop-up window. Most of the other forms will generally be used that way so this was not that important. However, since the Customer List form is the primary form the users will start with, we’ll need to address it.
Tip As you have seen, the users can go directly to any form. If you expect a form to be used directly, then you should consider how searching will be done.You can display up to two fields in the search box. The primary field is shown on top and the secondary, if used, is displayed on a separate line underneath. So if you use two, keep in mind that you will be able to display about half as many results. Also, be aware that the searching logic will compare the input string to any of the fields in the main table; you don’t have to display a field for it to be used in the search. You can also include an image on the search box, if the main table has a field that stores images.
- For this form, you’ll include both the CustomerName and the CustomerID fields. Select the search window and then click the data properties icon next to it. Select CustomerID as the secondary source as shown in Figure 5-67. The sort field should already be set to CustomerName; this will display the results in alphabetical order.
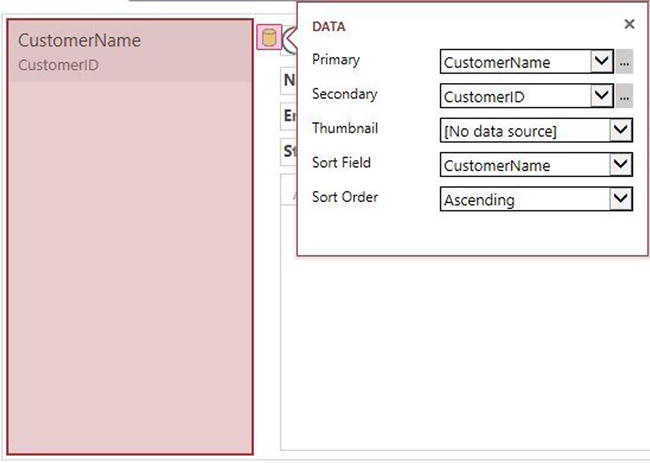
Figure 5-67. Configuring the search window
- Just like you did with the JobProduct and JobService forms, you’ll need to configure the Related Items control. You can include up to four fields in each of these tabs. Configure the Address tab as shown in Figure 5-68.
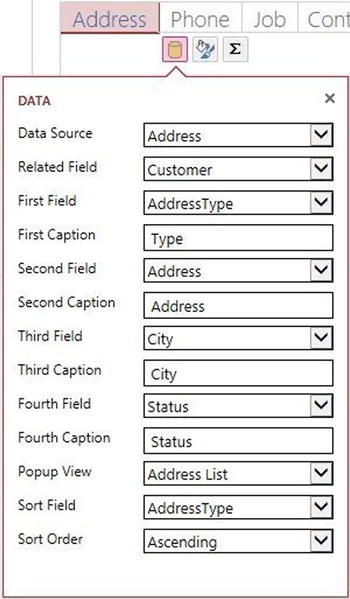
Figure 5-68. Configuring the Address tab
- Then select the Phone tab and click the data properties icon. Select the following fields and enter the corresponding label:
PhoneType - TypePhoneNumber - NumberStatus - Status - The pop-up view should be set to Phone List. Also, sort by the PhoneType field in ascending order.
- In the Job tab, select the following fields and enter the corresponding label:
JobStatus - StatusStartDate - StartEndDate - EndTotalEstimate - Total - The pop-up view should be set to the Job List. Also, sort by the StartDate field in descending order. This will show the most recent job at the top.
- In the Contact tab, select the following fields and enter the corresponding label:
ContactDate - DateContactType - TypeInbound - Inbound?FollowUp - Followup - The pop-up view should be set to the Contact List. Also, sort by the ContactDate field in descending order.
- Save your changes and go to the SharePoint site. To test out the filter you may need to add some more customers. The Customer List form with the Job tab selected, will look similar to Figure 5-69.
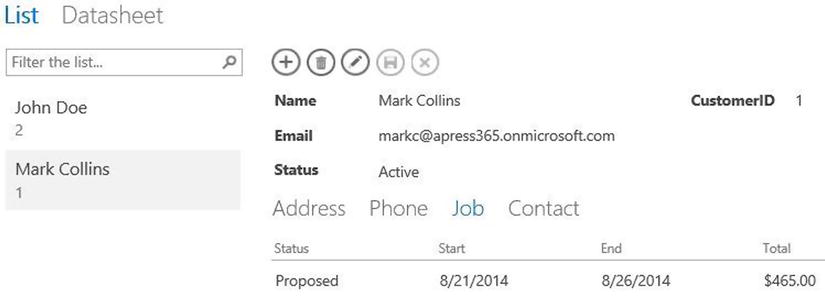
Figure 5-69. The completed Customer List view
Creating a Job Summary Form
Now you’ll create a custom view for the Job table. The Summary form will list all of the jobs in the database using a datasheet view. This will use the qryJobSummary query that you created earlier in the chapter and will include fields from both the Customer and Job tables as well as details from the Address table. You will also create a macro that will display the job detail when a record is selected.
- From the JobTracking tab, select the Job table. Buttons for the existing List and Datasheet views will be shown as well as a green plus symbol to the right of them. Click the green plus sign to define a new view. Enter the name Summary, select the Datasheet type, and select the qryJobSummary query as shown in Figure 5-70. Click the Add New View button to create the form.
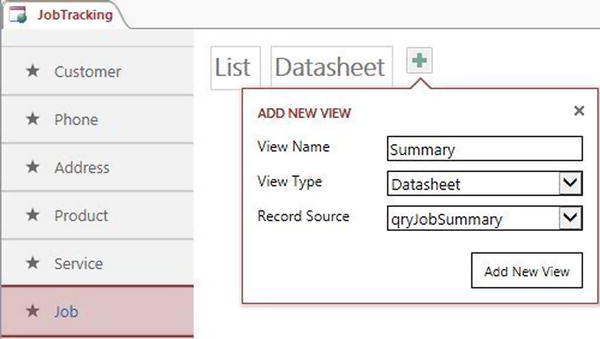
Figure 5-70. Adding a new datasheet view
- Click the Edit button open the new view in edit mode. The Field List pane, on the right-hand side, will list all of the fields in the referenced tables. To only show the fields that have been defined in this query, click the Show only fields in the current record source link. The resulting list is shown in Figure 5-71.

Figure 5-71. Listing the available fields from the query
- Drag the CustomerID and JobID fields to the grid and remove the Notes field. Re-arrange and resize the fields as shown in Figure 5-72.

Figure 5-72. Arranging the fields in the grid
- Select the entire form and click the data properties icon. In the dialog box that is shown, select the Read Only check box as shown in Figure 5-73. This will disable the form so the data cannot be modified.
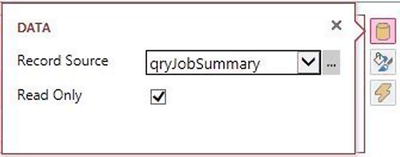
Figure 5-73. Marking this as a read-only form
- Save your changes and go to your SharePoint site. The completed form should look similar to Figure 5-74.

Figure 5-74. The completed Job Summary view
- It would be really handy to be able to select one of these jobs and display all of the details for it. You’ll accomplish that now by adding a simple macro. Edit the Summary form, select the JobID field, and click the actions icon. A dialog box will appear showing the available actions, as shown in Figure 5-75.
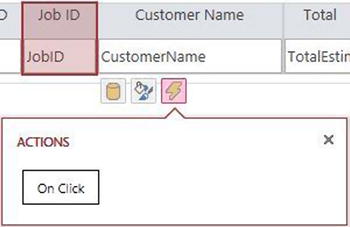
Figure 5-75. Adding an On Click action
- Click the On Click button, which will open the macro editor that you have used earlier. You will use this to define the actions to be performed when this control is clicked. Add an OpenPopup action to the macro. This action is used to open a form.
- Select the Job List view from the dropdown list. Then you’ll need to specify a where clause to select the record that should be displayed. Enter [Job].[JobID]=[JobIDTextBox] in the Where parameter as shown in Figure 5-76.

Figure 5-76. Calling the OpenPopup macro action
- Click the Save button in the ribbon to save the macro and then click the Close button to close the macro editor.
- Click the Save button in the title bar to save the form changes. Then go to your SharePoint site and open the Summary view. Click the JobID column on one of the rows and the Job List form should be displayed, showing the details of the selected job.
Summary
In this chapter, I took you on a whirlwind tour of Access web databases and you built a fairly sophisticated application, which is now hosted on your Office 365 account. The application consists of:
- Tables
- Queries
- A data macro for calculating the job total
- Web forms, including Related Items controls
- A custom view that invokes another form through a UI macro
With relative ease and essentially no coding, you have created a cloud-based web application.