
Applications usually need some type of external data source, from a Relational Database Management System (RDBMS) to the classical "quick-and-dirty" approach of using text files to store data.
Suitable mechanisms to access many of these data sources from Java have been widely documented. But some Java frameworks require special treatment, depending on the access strategy and data source being used.
Such is the case with the Java Persistence API (JPA) in the context of the Spring Framework accessing an RDBMS, which as illustrated in Chapter 2 requires the use of special weaving classes.
In Chapter 5 you also used JPA, but in the context of OSGi using the SpringSource dm Server, a product that is equipped to handle weaving and other factors needed to use JPA with OSGi. But what happens if you want to access an RDBMS in the context of OSGi and don't want to use the SpringSource dm Server?
This chapter will focus on the peculiarities of using Java's most common approach for accessing data sources in the context of Spring and OSGi without the aid of the SpringSource dm Server.
Further, and to add to your growing toolbox for Spring and OSGi projects, it will introduce you to Apache's Ivy dependency management tool and the BND tool used to inspect and modify JAR files into OSGi bundles. These two tools can aid you in the deployment of Spring and OSGi applications, especially if you don't want to rely on the SpringSource dm Server to provide out-of-the-box application dependencies or the SpringSource Enterprise Bundle Repository to obtain OSGi'fied JARs.
RDBMSs are the preferred way of storing large amounts of data in the enterprise, so learning the ins and outs of accessing this type of data store in the context of OSGi is vital.
The RDBMS itself is not the main issue for an application leveraging OSGi, but rather the strategy used to access it from Java. As explained in Chapter 2, Java has a wide range of data access strategies extending from JDBC, JDO, and Entity EJBs to Object-Relational Mappers (ORMs).
Using some of these strategies to access an RDBMS is transparent even with the presence of OSGi, but others require special measures to work properly with OSGi's more stringent class-loading approach.
In fact, in Chapter 5 you saw how the SpringSource dm Server is specially equipped to deal with some of the nuisances of using the JPA, Java's de facto ORM API, in applications using both Spring and OSGi.
What you will explore next is a detailed look at accessing an RDBMS without the need of a specialized product like the SpringSource dm Server.
JDBC was the first, and still one of the most important, building blocks for accessing RDBMS from Java. However, many of its advantages can look more like disadvantages, depending on your vantage point.
JDBC is capable of performing low-level operations against an RDBMS using Structured Query Language (SQL). Using SQL directly in Java classes, however, is where this approach shows its pros and cons.
Having the power to use SQL in Java gives a developer the flexibility to invoke any SQL operation imaginable. SQL statements ranging from simple queries to more sophisticated things like stored procedures can be declared in line with Java classes.
On the other hand, this approach can become unwieldy due to the differing nature of Java classes and relational database tables. This set of differences is often described as the object-relational impedance mismatch,[18] and this is what ORM products seek to overcome (or at least hide).
However, even though ORM products in the Java market have come a long way with initiatives like JPA, using ORM technology entails thinking more deeply about an application's design, as well as dealing with additional configuration issues. Given this fact, JDBC is unlikely to lose appeal anytime soon, and should thus continue to be used as a data access strategy even with emerging technologies like OSGi and Spring-DM.
So what do you need to employ JDBC in an application using Spring and OSGi? For someone already using JDBC with the Spring Framework, the only additional steps are incorporating OSGi headers into a JAR's MANIFEST.MF file. This applies to those JARs containing the classes with JDBC access code, as well as those corresponding to the JDBC driver provided by an RDBMS vendor.
You've already created an application accessing an RDBMS in this book, first in Chapter 2, where you used the Spring Framework, and then in Chapter 5, where you learned how to redesign the same application to run on the SpringSource dm Server. With the intent of not writing everything from scratch, I've built the JDBC design presented next on the same application.
The bundle partitioning scheme laid out in Chapter 5 took special care to separate the service interface and the service implementation (DAO) class into different bundles. This design will make it easier to incorporate a new service implementation (DAO) bundle based on JDBC.
Listing 7-1 contains the first part of the service implementation (DAO) bundle, the service class using JDBC.
Example 7-1. Service DAO Class Using JDBC
package com.apress.springosgi.ch7.servicedaojdbc;

import java.util.List;

import javax.sql.DataSource;

import com.apress.springosgi.ch7.service.HelloWorldService;
import com.apress.springosgi.ch7.model.HelloWorld;
import com.apress.springosgi.ch7.model.Person;

import org.springframework.jdbc.core.simple.SimpleJdbcTemplate;

import org.springframework.jdbc.core.simple.ParameterizedBeanPropertyRowMapper;

import org.springframework.jdbc.core.namedparam.BeanPropertySqlParameterSource;

import org.springframework.dao.EmptyResultDataAccessException;

import java.util.Date;

public class HelloWorldDAO implements HelloWorldService {

 private SimpleJdbcTemplate simpleJdbcTemplate;
public void setDataSource(DataSource dataSource) {
this.simpleJdbcTemplate = new SimpleJdbcTemplate(dataSource);
}
// JDBC-backed implementations of the methods on HelloWorld Service
public HelloWorld findById(long id) {
HelloWorld hw;
try {
hw = (HelloWorld) this.simpleJdbcTemplate.queryForObject("select *  from HelloWorld where id = ?", ParameterizedBeanPropertyRow
Mapper.newInstance(HelloWorld.class),id);
long personIdToAdd = this.simpleJdbcTemplate.queryForLong(
from HelloWorld where id = ?", ParameterizedBeanPropertyRow
Mapper.newInstance(HelloWorld.class),id);
long personIdToAdd = this.simpleJdbcTemplate.queryForLong("select
translator_id from HelloWorld where id= ?", new Object[]{new Long(id)});
hw.setTranslator(this.simpleJdbcTemplate.queryForObject("select *
from Person where id = ?", ParameterizedBeanPropertyRowMapper.new
Instance(Person.class),personIdToAdd));
} catch (EmptyResultDataAccessException ex) {
throw new EmptyResultDataAccessException("No HelloWorld by the
provided id - " + ex,0);
}
return hw;
}
public List<HelloWorld> findAll() {
return this.simpleJdbcTemplate.query("select * from HelloWorld",
ParameterizedBeanPropertyRowMapper.newInstance(HelloWorld.class));
}public HelloWorld update(HelloWorld hw) {
this.simpleJdbcTemplate.update("update HelloWorld set language=:language,
message=:message, transdate=:transdate where id=:id", new BeanProperty
SqlParameterSource(hw));
return findById(hw.getId());
}
public void save(HelloWorld hw) {
this.simpleJdbcTemplate.update("insert into Person(FNAME,LNAME,hourlyRate)
values(:firstName, :lastName, :hourlyRate)", new BeanPropertySqlParameter
Source(hw.getTranslator()));
long personIdToInsert = this.simpleJdbcTemplate.queryForLong("select id
from Person where FNAME= ? and LNAME = ?", new Object[]{new String(hw.get
Translator().getFirstName()), new String(hw.getTranslator().getLastName())});
this.simpleJdbcTemplate.update("insert into HelloWorld(language,message,
transdate,translator_id) values(?,?,?,?)", new Object[]{hw.getLanguage(),
hw.getMessage(), hw.getTransdate(), new Long(personIdToInsert)});
}
public void delete(HelloWorld hw) {
long personIdToDelete = this.simpleJdbcTemplate.queryForLong("select
translator_id from HelloWorld where id= ? ", new Object[]{new Long(hw.getId())});
this.simpleJdbcTemplate.update("delete from HelloWorld where id= ?",
new Object[]{new Long(hw.getId())});
this.simpleJdbcTemplate.update("delete from Person where id= ?", new
Object[]{new Long(personIdToDelete)});
}
public List<HelloWorldgt; findByTranslatorFirstName(String firstName) {
Person translator;try {
translator = this.simpleJdbcTemplate.queryForObject("select * from
Person where FNAME= ?",ParameterizedBeanPropertyRowMapper.new
Instance(Person.class),firstName);
} catch (EmptyResultDataAccessException ex) {
throw new EmptyResultDataAccessException("No Person by the provided
firstName - " + ex,0);
}
return this.simpleJdbcTemplate.query("select * from HelloWorld where
translator_id = ?", ParameterizedBeanPropertyRowMapper.new
Instance(HelloWorld.class),translator.getId());
}
public List<HelloWorld> findByTranslatorLastName(String lastName) {
Person translator;
try {
translator = this.simpleJdbcTemplate.queryForObject("select * from
Person where LNAME= ?",ParameterizedBeanPropertyRowMapper.new
Instance(Person.class),lastName);
} catch (EmptyResultDataAccessException ex) {
throw new EmptyResultDataAccessException("No Person by the provided
lastName - " + ex,0);
}
return this.simpleJdbcTemplate.query("select * from HelloWorld where
translator_id = ?", ParameterizedBeanPropertyRowMapper.new
Instance(HelloWorld.class),translator.getId());
}public List<HelloWorld> findByTranslatorHourlyRateOver(double hourlyRate) {
return this.simpleJdbcTemplate.query("select * from HelloWorld where
translator_id = (select id from Person where hourlyRate > ?)", Parameterized
BeanPropertyRowMapper.newInstance(HelloWorld.class),hourlyRate);
}
public List<HelloWorld> findByLanguage(String language) {
return this.simpleJdbcTemplate.query("select id, language, message,
transdate, translator_id from HelloWorld where language = ?", Parameterized
BeanPropertyRowMapper.newInstance(HelloWorld.class),language);
}
public List<HelloWorld> findByMessage(String message) {
return this.simpleJdbcTemplate.query("select id, language, message,
transdate, translator_id from HelloWorld where message = ?", Parameterized
BeanPropertyRowMapper.newInstance(HelloWorld.class),message);
}
public void deleteMessage(long id) {
long personIdToDelete = this.simpleJdbcTemplate.queryForLong("select
translator_id from HelloWorld where id= ?", new Object[]{new Long(id)});
this.simpleJdbcTemplate.update("delete from HelloWorld where id= ?",
new Object[]{new Long(id)});
this.simpleJdbcTemplate.update("delete from Person where id= ?", new
Object[]{new Long(personIdToDelete)});
}
}First of all, notice that the class inherits from the HelloWorldService interface, requiring it to use the signatures defined by the application's service interface. Next, an overall scan of the listing will show the various SQL statements interspersed throughout the class's methods, in line with the application's RDBMS table names and columns.
The in-line SQL statements represent an alternative approach to the one used earlier in the form of JPA, but notice the use of the Spring Framework's SimpleJdbcTemplate class.
This class is like the Spring JpaDaoSupport class employed to design the application's earlier service DAO class using JPA, except that in this case the Spring SimpleJdbcTemplate class reduces the amount of boilerplate code needed to perform data access using JDBC.
Next in the listing is the setDataSource() method. This method is used by the Spring Framework to inject the RDBMS data source into an instance of the DAO class. Note that upon calling this setter method, an instance of the SimpleJdbcTemplate class is associated with the data source and assigned to a class's field. It is precisely this last field that is used throughout the class's methods to fulfill the service implementation methods.
Though this JDBC service DAO implementation class might seem verbose—especially when viewed alongside its JPA counterpart in Chapter 2's Listing 2-8—it is important to keep in mind the support the Spring Framework brings to the table under these circumstances.
This class is not only shorter compared to one using stand-alone JDBC API functions, but also devoid of in-line dependencies. The dependency on the external data source is fulfilled by the Spring Framework injecting a reference, thus keeping the class a POJO.
The next step consists of creating the Spring configuration files to inject the data source into the DAO class and publish the service implementation (DAO) as an OSGi service for consumption of another application bundle.
Listing 7-2 illustrates the Spring configuration file needed to deploy a bundle using JDBC in a Spring and OSGi application.
Example 7-2. Springosgi-context.xml File for Service DAO-JDBC Bundle
<?xml version="1.0" encoding="UTF-8"?> <beans xmlns="http://www.springframework.org/schema/beans" xmlns:xsi="http://www.w3.org/2001/XMLSchema-instance" xmlns:osgi="http://www.springframework.org/schema/osgi" xsi:schemaLocation="http://www.springframework.org/schema/beanshttp://www.springframework.org/schema/beans/spring-beans.xsd http://www.springframework.org/schema/osgihttp://www.springframework.org/schema/osgi/spring-osgi.xsd"> <!-- Import the Data source service --> <osgi:reference id="dataSource" interface="javax.sql.DataSource"/> <!-- Create the helloWorldDAO bean --> <bean id="helloWorldDAO"class="com.apress.springosgi.ch7.servicedaojdbc.HelloWorldDAO"> <property name="dataSource" ref="dataSource"/> </bean>
<!-- Export helloWorldDAO as a service to OSGi via its interface --> <osgi:service ref="helloWorldDAO"interface="com.apress.springosgi.ch7.service.HelloWorldService"/> </beans>
The first thing this listing does is look up and import an OSGi service using the interface java.sql.DataSource via the Spring-DM element <reference>. In case you don't recall or skipped Chapter 5 altogether, in line with the application's design, another bundle is charged with publishing an OSGi service pointing to the application's data source, which in itself has the necessary connection parameters to the RDBMS.
Once a reference to this last service is found, it will be associated with the dataSource ID. You will then encounter the <bean> element used to instantiate the service implementation JDBC class com.apress.springosgi.ch7.servicedaojdbc.HelloWorldDAO. Note also that a reference to the dataSource is injected into the bean via the <property> element.
Finally, the service implementation (DAO) bean employing JDBC is published as an OSGi service—using the HelloWorldService interface—through the Spring-DM element <service>. Again in line with the application's design, another bundle will be charged with accessing this published OSGi service pointing to the application's service implementation (DAO) and presenting results to end users via a web interface.
To complete the contents of this bundle using JDBC, it's also necessary to create the MANIFEST.MF file that will accompany the bundle. Listing 7-3 illustrates this file.
Example 7-3. MANIFEST.MF for the Service DAO-JDBC Bundle
Bundle-Version: 1.0
Bundle-SymbolicName: com.apress.springosgi.ch7.servicejdbc
Bundle-Name: HelloWorld Spring-OSGi Service JDBC
Bundle-Vendor: Pro Spring-OSGi
Import-Package: com.apress.springosgi.ch7.model;version="1.0.0",
 com.apress.springosgi.ch7.service;version="1.0.0",

 org.springframework.jdbc.core.simple;version="2.5.4",

 org.springframework.jdbc.core.namedparam;version="2.5.4",

 org.springframework.dao;version="2.5.4",

 javax.sql
Bundle-ManifestVersion: 2
Since I have described numerous OSGi MANIFEST.MF files in the book, the meaning of this last file probably requires little explanation. The only notable point is the inclusion of Spring's JDBC package, org.springframework.jdbc.core.simple; the application's service interface, com.apress.springosgi.ch7.service; and Java's core SQL package, javax.sql.
For the moment, put these last three listings aside. The service DAO-JDBC bundle—including the entire application—will be built in the last section of the chapter. Next, you will perform one more step in order to use JDBC with OSGi: OSGi'fying a JDBC driver for an RDBMS.
Whether you are using a DAO-JDBC bundle or a DAO-JPA bundle, a JDBC driver is central to achieving connectivity to an RDBMS. Provided by an RDBMS vendor, a JDBC driver provides the necessary "hooks" to connect from a Java environment to a particular RDBMS brand.
In our OSGi application design, this driver (bundle) is used by a bundle to register a Java data source as an OSGi service that can later be used by other bundles requiring RDBMS connectivity.
In Chapter 5, Listings 5-12 and 5-13 illustrate the contents of a bundle that harness the MySQL RDBMS driver and publish a Java data source as an OSGi service. Specifically, Listing 5-12 uses various import statements to access this RDBMS's JDBC driver, a driver that you obtained from the SpringSource Enterprise Bundle Repository.[19]
This, however, raises an interesting question. What happens if the RDBMS driver you require is not available at the SpringSource Enterprise Bundle Repository? While the site has made considerable progress OSGi'fying commonly used JARs, this doesn't mean it will have every OSGi'fied JAR bundle in existence, especially something like JDBC drivers, which are plentiful given the number of RDBMS vendors and versions.
Do you ask an RDBMS vendor for an OSGi'fied version of a JDBC driver? Well, good luck with that. OSGi has only recently gained a wider audience in the Java world, and it will likely take a few more years for mainstream vendors to start distributing their JAR files with OSGi headers.
So what other choice do you have? OSGi'fying the JDBC driver JAR file yourself is one possibility. After all, it is just a matter of finding out what packages a JAR file needs and makes available to other bundles. But before you cringe at the mere thought of inspecting a JAR's code and what may well be hundreds of classes for dependencies, there is a tool that can aid you in this process: BND (http://www.aqute.biz/Code/Bnd).
So next, in order to continue with the purpose at hand, OSGi'fying a JDBC driver, I will introduce you to the BND tool.
The BND tool is a Java utility that inspects the contents of a compiled JAR and attempts to construct the MANIFEST.MF file necessary to deploy the JAR in an OSGi environment. In essence, it attempts to convert a JAR into an OSGi bundle.
BND may prove to be a far more useful tool than the following OSGi'fication process of a JDBC driver. The reason is that BND can migrate JARs to OSGi bundles without source code, which can become critical as you migrate preexisting projects to an OSGi-based architecture, in which determining a class's import/export relationship may be impossible without source code.
BND can run using a variety of tools that include Ant, Maven, and Eclipse, and there is also a command-line version. To simplify the exploration process, I will use the command-line version in this section.
Once you download BND from http://www.aqute.biz/Code/Download#bnd and a JDBC driver like PostgreSQL from http://jdbc.postgresql.org/download/postgresql-8.3-603.jdbc2.jar, you can go straight to the command line of your workstation and invoke BND's most basic operation, illustrated in Listing 7-4.
BND's command-line invocation always starts with the instruction java -jar bnd-0.0.249.jar, indicating "execute the bnd-0.0.249.jar JAR." As illustrated in Listing 7-4, BND requires at least one argument. This example argument corresponds to the JDBC driver for the PostgreSQL RDBMS postgresql-8.3-603.jdbc2.jar. Upon executing the instruction in Listing 7-4, a detailed output of a JAR's contents is generated. Listing 7-5 illustrates this information.
Example 7-5. BND JAR Inspection Results.
[MANIFEST postgresql-8.3-603.jdbc2.jar]Ant-Version Apache Ant 1.5.4 Created-By 1.2.2 (Sun Microsystems Inc.) Manifest-Version 1.0 [IMPEXP] [USES] org.postgresql java.sql org.postgresql.core org.postgresql.fastpath org.postgresql.jdbc2 org.postgresql.largeobject org.postgresql.util org.postgresql.core java.sql org.postgresql org.postgresql.core.v2 org.postgresql.core.v3 org.postgresql.jdbc2 org.postgresql.util org.postgresql.core.types java.sql org.postgresql.util
org.postgresql.core.v2            java.sql
                                             org.postgresql
                                             org.postgresql.core
                                             org.postgresql.util
org.postgresql.core.v3            java.sql
                                             org.postgresql
                                             org.postgresql.core
                                             org.postgresql.util
org.postgresql.fastpath           java.sql
                                             org.postgresql.core
                                             org.postgresql.util
org.postgresql.geometric      java.sql
                                             org.postgresql.util
org.postgresql.jdbc2             java.sql
                                             org.postgresql
                                             org.postgresql.core
                                             org.postgresql.core.types
                                             org.postgresql.fastpath
                                             org.postgresql.geometric
                                             org.postgresql.largeobject
                                             org.postgresql.util
org.postgresql.largeobject      java.sql
                                             org.postgresql
                                             org.postgresql.core
                                             org.postgresql.fastpath
                                             org.postgresql.util
org.postgresql.translation      org.postgresql.util
                                             java.sql
                                             org.postgresql

[USEDBY]
java.sql                                 org.postgresql
                                             org.postgresql.core
                                             org.postgresql.core.types
                                             org.postgresql.core.v2
                                             org.postgresql.core.v3
                                             org.postgresql.fastpath
                                             org.postgresql.geometric
                                             org.postgresql.jdbc2
                                             org.postgresql.largeobject
                                             org.postgresql.util
org.postgresql org.postgresql.core
org.postgresql.core.v2
org.postgresql.core.v3
org.postgresql.jdbc2
org.postgresql.largeobject
org.postgresql.util
org.postgresql.core org.postgresql
org.postgresql.core.v2
org.postgresql.core.v3
org.postgresql.fastpath
org.postgresql.jdbc2
org.postgresql.largeobject
org.postgresql.core.types org.postgresql.jdbc2
org.postgresql.core.v2 org.postgresql.core
org.postgresql.core.v3 org.postgresql.core
org.postgresql.fastpath org.postgresql
org.postgresql.jdbc2
org.postgresql.largeobject
org.postgresql.geometric org.postgresql.jdbc2
org.postgresql.jdbc2 org.postgresql
org.postgresql.core
org.postgresql.largeobject org.postgresql
org.postgresql.jdbc2
org.postgresql.util org.postgresql
org.postgresql.core
org.postgresql.core.types
org.postgresql.core.v2
org.postgresql.core.v3
org.postgresql.fastpath
org.postgresql.geometric
org.postgresql.jdbc2
org.postgresql.largeobject
[LIST]
META-INF
MANIFEST.MF
META-INF/services
java.sql.Driver
org
org <no contents>
org/postgresql
Driver$1.class
Driver$ConnectThread.classDriver.class PGConnection.class PGNotification.class PGRefCursorResultSet.class PGResultSetMetaData.class PGStatement.class org/postgresql/core BaseConnection.class BaseResultSet.class BaseStatement.class ConnectionFactory.class Encoding.class Field.class Logger.class Notification.class Oid.class PGBindException.class PGStream$1.class PGStream.class ParameterList.class Parser.class ProtocolConnection.class Query.class QueryExecutor.class ResultCursor.class ResultHandler.class UTF8Encoding.class Utils.class VisibleBufferedInputStream.class org/postgresql/core/types PGBigDecimal.class PGBoolean.class PGByte.class PGDouble.class PGFloat.class PGInteger.class PGLong.class PGNumber.class PGShort.class PGString.class PGType.class PGUnknown.class
org/postgresql/core/v2
  ConnectionFactoryImpl$SimpleResultHandler.class
  ConnectionFactoryImpl.class
  FastpathParameterList.class
  ProtocolConnectionImpl.class
  QueryExecutorImpl$1.class
  QueryExecutorImpl$2.class
  QueryExecutorImpl$3.class
  QueryExecutorImpl.class
  SimpleParameterList.class
  V2Query.class
org/postgresql/core/v3
  CompositeParameterList.class
  CompositeQuery.class
  ConnectionFactoryImpl$UnsupportedProtocolException.class
  ConnectionFactoryImpl.class
  Portal.class
  ProtocolConnectionImpl.class
  QueryExecutorImpl$1.class
  QueryExecutorImpl$2.class
  QueryExecutorImpl$3.class
  QueryExecutorImpl$ErrorTrackingResultHandler.class
  QueryExecutorImpl.class
  SimpleParameterList.class
  SimpleQuery.class
  V3ParameterList.class
  V3Query.class
org/postgresql/fastpath
  Fastpath.class
  FastpathArg.class
org/postgresql/geometric
  PGbox.class
  PGcircle.class
  PGline.class
  PGlseg.class
  PGpath.class
  PGpoint.class
  PGpolygon.class
org/postgresql/jdbc2
  AbstractJdbc2Array$PgArrayList.class
  AbstractJdbc2Array.class
  AbstractJdbc2Blob.class
AbstractJdbc2BlobClob$LOIterator.class
  AbstractJdbc2BlobClob.class
  AbstractJdbc2Clob.class
  AbstractJdbc2Connection$TransactionCommandHandler.class
  AbstractJdbc2Connection.class
  AbstractJdbc2DatabaseMetaData.class
  AbstractJdbc2ResultSet$CursorResultHandler.class
  AbstractJdbc2ResultSet$NullObject.class
  AbstractJdbc2ResultSet$PrimaryKey.class
  AbstractJdbc2ResultSet.class
  AbstractJdbc2ResultSetMetaData.class
  AbstractJdbc2Statement$BatchResultHandler.class
  AbstractJdbc2Statement$CallableBatchResultHandler.class
  AbstractJdbc2Statement$StatementResultHandler.class
  AbstractJdbc2Statement.class
  EscapedFunctions.class
  Jdbc2Array.class
  Jdbc2Blob.class
  Jdbc2CallableStatement.class
  Jdbc2Clob.class
  Jdbc2Connection.class
  Jdbc2DatabaseMetaData.class
  Jdbc2PreparedStatement.class
  Jdbc2ResultSet.class
  Jdbc2ResultSetMetaData.class
  Jdbc2Statement.class
  ResultWrapper.class
  TimestampUtils$ParsedTimestamp.class
  TimestampUtils.class
  TypeInfoCache.class
org/postgresql/largeobject
  BlobInputStream.class
  BlobOutputStream.class
  LargeObject.class
  LargeObjectManager.class
org/postgresql/translation
  messages_cs.class
  messages_de.class
  messages_es.class
  messages_fr.class
  messages_it.class
  messages_nl.class
messages_pl.class
  messages_pt_BR.class
  messages_ru.class
  messages_sr.class
  messages_tr.class
  messages_zh_CN.class
  messages_zh_TW.class
org/postgresql/util
  Base64.class
  GT.class
  MD5Digest.class
  PGInterval.class
  PGbytea.class
  PGmoney.class
  PGobject.class
  PGtokenizer.class
  PSQLDriverVersion.class
  PSQLException.class
  PSQLState.class
  PSQLWarning.class
  ServerErrorMessage.class
  StreamWrapper.class
  UnixCrypt.class
The first section of the output, [MANIFEST], reproduces the existing MANIFEST.MF file of a JAR. As you will note, the inspected JAR, the JDBC driver, lacks OSGi headers. Next comes the [IMPEXP] section, which is further subdivided into three more sections containing a JAR's packages in different layouts.
The [USES] section is formatted into two columns. The right side represents a series of packages that are required by the package on the left side. The section [USEDBY] is a mirror image of the [USES] section. The right side represents a series of packages that depend on the package on the left side. Finally, the [LIST] section contains the entire layout—classes, packages, and other files—for the JAR as a list.
Inspecting a JAR for its package dependency structure is a nice start toward OSGi compatibility. But the process of manually copying and pasting these results into a new JAR structure is still error prone. BND offers a simple shortcut to create an OSGi'fied JAR version on the fly. Listing 7-6 illustrates the BND wrap command to achieve this.
Example 7-6. BND wrap—On-the-Fly OSGi Bundle Creation
java -jar bnd-0.0.249.jar wrap-output postgresql-osgi-8.3.jarpostgresql-8.3-603.jdbc2.jar
This listing invokes BND with the wrap command, creating a bundle with an OSGi-compatible MANIFEST.MF file. The additional snippet -output postgresql-osgi-8.3.jar is used to indicate an explicit name for the newly created JAR (bundle). However, this newly created JAR has the side effect of being a best-guess effort at generating an OSGi-compatible MANIFEST.MF file. Listing 7-7 illustrates what this newly created bundle's MANIFEST.MF file looks like.
Example 7-7. MANIFEST.MF After Applying BND wrap
Ant-Version: Apache Ant 1.5.4 Bnd-LastModified: 1226028717542 Bundle-ManifestVersion: 2 Bundle-SymbolicName: postgresql-8.3-603.jdbc2 Bundle-Version:0 Created-By:1.5.0_16 (Sun Microsystems Inc.)Export-Package: org.postgresql.largeobject;uses:="org.postgresql.fastpath,org.postgresql.util,org.postgresql.core,org.postgresql",org.postgresql.fastpath;uses:="org.postgresql.util,org.postgresql.core",org.postgresql.geometric;uses:="org.postgresql.util",org.postgresql.util;uses:="org.postgresql",org.postgresql.core.v2;uses:="org.postgresql.util,org.postgresql.core,org.postgresql",org.postgresql.translation,org.postgresql.jdbc2;uses:="org.postgresql.fastpath,org.postgresql.geometric,org.postgresql.util,org.postgresql,org.postgresql.largeobject,org.postgresql.core.types,org.postgresql.core",org.postgresql.core.types;uses:="org.postgresql.util",org.postgresql.core;uses:="org.postgresql.util,org.postgresql.core.v2,org.postgresql.jdbc2,org.postgresql,org.postgresql.core.v3",org.postgresql;uses:="org.postgresql.largeobject,org.postgresql.fastpath,org.postgresql.util,org.postgresql.jdbc2,org.postgresql.core",org.postgresql.core.v3;uses:="org.postgresql.util,org.postgresql.core,org.postgresql"Import-Package: org.postgresql;resolution:=optional,org.postgresql.core;resolution:=optional,org.postgresql.core.types;resolution:=optional,org.postgresql.core.v2;resolution:=optional,org.postgresql.core.v3;resolution:=optional,org.postgresql.fastpath;resolution:=optional,org.postgresql.geometric;resolution:=optional,org.postgresql.jdbc2;resolution:=optional,org.postgresql.largeobject;resolution:=optional,org.postgresql.translation;resolution:=optional,org.postgresql.util;resolution:=optionalManifest-Version: 1.0 Originally-Created-By: 1.2.2 (Sun Microsystems Inc.) Tool:Bnd-0.0.249
In short, this MANIFEST.MF file makes no assumptions about what packages a bundle needs or will make available to other bundles. It simply exports (and optionally imports) every package detected by BND. It is a nice step toward OSGi compatibility, but falls short of a correct and feature-rich OSGi MANIFEST.MF file like the ones used throughout this book.
Remember that a MANIFEST.MF file used in an OSGi bundle needs to take into account everything. This can range from nonessential packages a JAR might use, like those for logging, and packages that might have gone undetected by BND, to some other artifacts, like images or text files needed by a JAR's classes that would go undetected if not explicitly declared.
You might also want to use other OSGi headers like DynamicImport-Package or assign OSGi version values, not to mention the possibility of wanting to keep preexisting MANIFEST.MF file values instead of overwriting a JAR's original MANIFEST.MF file with a BND-generated one.
For all these tasks, BND relies on a properties file. A BND properties file consists of a series of processing instructions applied to a JAR when it is transformed using BND's wrap command. Here I will show you how to create a BND properties file with the necessary Import-Package header values for the JDBC driver.
As a starting point for your first BND properties file, I will define a series of packages typically used by JDBC drivers belonging to the Java Runtime Environment (JRE), such as javax.sql and javax.xml. OSGi's more stringent class-loading approach often blocks certain JRE packages unless an OSGi environment is globally configured to import such packages.
So assuming you're using an out-of-the-box OSGi environment, it's necessary to explicitly import certain packages into a bundle using the Import-Package header. In addition, I will also add the necessary logging packages so the JDBC driver is capable of producing debugging information.
Keep in mind that even though BND is likely to automatically detect such packages if used by a JAR, under certain circumstances it might not be able to do so. For this reason, it's best to start with this type of "safety net" when OSGi'fying a JDBC driver using BND. In addition, since these packages are part of the JRE, they do not introduce any external dependency on the JDBC driver, but simply ensure the OSGi'fied JDBC driver has access to these JRE packages.
Listing 7-8 illustrates the first iteration of the BND properties file applied to the JDBC driver.
Warning
Though BND is an excellent tool for transforming JARs into OSGi bundles, be aware that this process might violate the terms of the licenses that govern certain JARs. The PostgreSQL JDBC driver is open source, so modification is not an issue, but this may not be the case for other JDBC drivers or JARs of another nature.
Example 7-8. BND Properties File for Import-Package Header
Import-Package: javax.naming,
 javax.naming.spi,
 javax.net,
 javax.net.ssl,
 javax.sql,
 javax.transaction.xa;version="[1.0.1, 2.0.0)";resolution:=optional,
 javax.xml.parsers,
 javax.xml.stream;version="[1.0.1, 2.0.0)";resolution:=optional,
 javax.xml.transform,
 javax.xml.transform.dom,
 javax.xml.transform.sax,
 javax.xml.transform.stax;resolution:=optional,
 javax.xml.transform.stream,
 org.apache.commons.logging;version="[1.1.1,2.0.0)",
 org.apache.log4j;version="[1.2.15, 2.0.0)";resolution:=optional,
 org.w3c.dom,
 org.xml.sax,
 org.xml.sax.helpers
If you place this listing in its own file— iter1.bnd —and invoke the BND command in Listing 7-9, a new JAR with these Import-Package values will be created.
Example 7-9. BND wrap On-the-Fly OSGi Bundle Creation with the Properties File
java -jar bnd-0.0.249.jar wrap -output postgresql-osgi-8.3.jar -propertiesiter1.bnd postgresql-8.3-603.jdbc2.jar
Notice the addition of the -properties flag on the wrap command pointing to a file named iter1.bnd (Listing 7-8). If you inspect the newly created bundle after executing this instruction, you will see its Import-Package values now reflect those declared in Listing 7-8.
A BND properties file might seem like a copy of a MANIFEST.MF file that is put into a new bundle, but it has more capabilities than that of a simple placeholder. A BND properties file can also contain regular expressions to ease the inclusion or exclusion of packages, as well as macros.
Let's make a second iteration of a BND properties file for the JDBC driver, this time for the Export-Package header. Listing 7-10 illustrates this second iteration using regular expressions.
Example 7-10. BND Properties File with a Export-Package Header Using Regular Expressions
<Import-Package values ommited for brevity>
Export-Package: org.postgresql.core.*
Notice the * at the end of the Export-Package value. The * is a wildcard regular expression specifying that every package should be exported under the name org.postgresql.core. As illustrated in Listing 7-6, BND's default behavior is to export every package detected in a JAR.
By using regular expressions in a BND properties file, you can control the visibility of a bundle's packages and limit some packages to private status. Listing 7-11 illustrates the MANIFEST.MF file generated by applying the BND properties file in Listing 7-10to the PostgreSQL JDBC driver.
Example 7-11. MANIFEST.MF After Applying BND wrap with a Regular Expression
Ant-Version: Apache Ant 1.5.4 Bnd-LastModified: 1226170593490 Bundle-ManifestVersion: 2 Bundle-Name: iter2 Bundle-SymbolicName: iter2 Bundle-Version: 0 Created-By: 1.5.0_16 (Sun Microsystems Inc.)Export-Package: org.postgresql.core.v2;uses:="org.postgresql.core",org.postgresql.core.types,org.postgresql.core;uses:="org.postgresql.core.v2,org.postgresql.core.v3",org.postgresql.core.v3;uses:="org.postgresql.core"Import-Package: javax.naming, javax.naming.spi, javax.net, javax.net.ssl, javax.sql, javax.transaction.xa;resolution:=optional;version="[1.0.1, 2.0.0)", javax.xml.parsers, javax.xml.stream;resolution:=optional;version="[1.0.1, 2.0.0)", javax.xml.transform, javax.xml.transform.dom, javax.xml.transform.sax, javax.xml.transform.stax;resolution:=optional, javax.xml.transform.stream, org.apache.commons.logging;version="[1.1.1,2.0.0)", org.apache.log4j;resolution:=optional;version="[1.2.15, 2.0.0)", org.w3c.dom,org.xml.sax,org.xml.sax.helpers
Manifest-Version: 1.0 Originally-Created-By: 1.2.2 (Sun Microsystems Inc.)Private-Package: org.postgresql,org.postgresql.fastpath,org.postgresql.geometric,org.postgresql.jdbc2,org.postgresql.largeobject,org.postgresql.translation,org.postgresql.utilTool:Bnd-0.0.249
Notice how the Export-Package values are now limited to the four packages under the name org.postgresql.core. Also notice how the remaining packages that were once exported by default are now assigned to the Private-Package header. If you look toward the top of this last MANIFEST.MF file, you will see the values for the headers Bundle-Name and BundleSymbolicName are assigned a value based on the BND properties file name.
These last default values can also be overridden by including the corresponding OSGi headers in a BND properties file. Listing 7-12 illustrates another iteration of the BND properties used on the PostgreSQL JDBC driver, this one using macros.
Example 7-12. BND Properties File with Bundle-Name and Bundle-SymbolicName Headers Using Macros and Comments
<Import-Package values omitted for brevity>
Export-Package: org.postgresql.core.*
# Assign version
version=8.3
# Assign name
bundle_name=com.postgres
Bundle-Name: OSGi'fied JDBC Driver - ${bundle_name} ${version}
Bundle-SymbolicName: ${bundle_name}
Bundle-Version: ${version}
The first thing this BND properties file makes use of is comments and variables. A # sign represents a comment to describe the purpose of a BND statement. Also note the declarations bundle_version and bundle_name; these represent variables that are later used in the assignment of OSGi headers. The primary characteristic of comments and variables in BND properties files is that they are only used for processing purposes; they never go on to form part of a bundle's final MANIFEST.MF file.
The remaining three statements correspond to the OSGi headers Bundle-Name, Bundle-SymbolicName, and Bundle-Version, which do go on to form part of a bundle's final MANIFEST.MF file. However, notice how the assigned values contain syntax in the form ${}.
The ${} syntax represents BND macros. Upon processing, BND will replace these macro statements with the corresponding variable values by the same name. Therefore, in this case a bundle's final MANIFEST.MF file will contain headers in the form Bundle-Version: 8.3 and Bundle-SymbolicName: com.postgres.
This concludes my introduction to how BND can aid you in migrating a JDBC driver—or any other JAR for that matter—toward OSGi compliance. Be advised there are numerous other options available in BND, including more regular expressions, macros, filters, and support for embedding resources like images or entire JARs. Consult BND's documentation for more information on these topics.
Next, I will move on to rebuilding the application using the JDBC-DAO bundle created earlier and using Apache Ivy to manage the application's dependencies.
The Hello World application you are about to start will be based on the application you created in Chapter 2, as well as the one in Chapter 5, which in itself was ported from Chapter 2 to use the SpringSource dm Server.
So what's new in this application? It will show you how to manage OSGi bundle dependencies—the staple libraries used by most applications—more easily using the Apache Ivy tool, how to deploy an OSGi bundle designed to access an RDBMS, and how to deploy everything without the aid of the SpringSource dm Server.
Figure 7-1 illustrates the bundles that will make up the application and the relationship between each one.
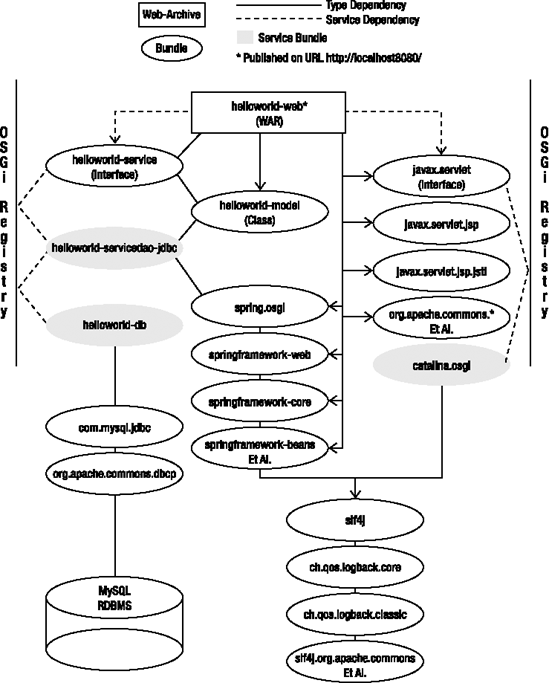
There are a few things to note with respect to the applications in Chapters 2 and 5. With respect to Chapter 2's application, the service DAO bundle is now backed by an RDBMS via an OSGi data source bundle. With respect to Chapter 5, there are no application boundaries (PARs) in addition to requiring the installation of various staple bundles that in Chapter 5 were provided by the SpringSource dm Server.
Table 7-1 lists the software you will need to download and install before embarking on this chapter's project.
Table 7-1. Revisited Spring OSGi Hello World Application Prerequisites and Downloads
Software | Function | Download Site |
|---|---|---|
Java SE 5 or higher | Java's runtime environment | http://java.sun.com/javase/downloads/ index.jsp |
Apache Ant 1.6 or higher | Popular Java build project, used for easing the compilation and creation of OSGi bundles | http://archive.apache.org/dist/ant/ binaries/apache-ant-1.7.0-bin.zip |
Apache Ivy 2.0 or higher | Dependency management project, used for easing download dependencies for OSGi bundles | http://archive.apache.org/dist/ant/ivy/ 2.0.0-rc2/apache-ivy-2.0.0-rc2-bin-with- deps.zip |
MySQL Community Server 5.0 | An open source RDBMS | http://dev.mysql.com/downloads/mysql/ 5.0.html |
Eclipse Equinox | OSGi 4.0 reference implementation developed by the Eclipse foundation | http://download.eclipse.org/equinox/drops/ S-3.5M1-200808071402/download.php?dropFile= org.eclipse.osgi_3.5.0.v20080804-1730.jar |
Spring Dynamic Modules for OSGi 1.2(Spring-DM) | Spring's central OSGi integration subproject | http://springsource.com/products/ springdynamicmodules |
If you've been following along chapter by chapter, you will already have this software installed on your workstation, with the exception of Apache Ivy.
Apache Ivy is a dependency management tool that is closely integrated with Apache Ant—the primary build tool you've used thus far. In fact, Apache Ivy is the primary reason this last prerequisite and download list is so short compared to those for other projects in the book.
Through a few simple statements, Apache Ivy can automatically download the dependencies needed by an application. If an application requires a bundle named Vowels, Apache Ivy will automatically download all dependencies required by such a bundle (e.g., Bundle A, Bundle E, Bundle I, Bundle O, and Bundle U) in order to proceed with a streamlined compilation and runtime process, without the hassles of manually tracking dependencies.
The process for installing Apache Ivy consists of the following steps:
Unzip the downloaded Apache Ivy file into a directory of your choice.
Copy Apache Ivy's JAR file,
ivy-2.0.0.jar(located in the root directory of the download), to thelibdirectory of Apache Ant.
Next, perform the following test to ensure Apache Ivy is operating correctly: create an Apache Ant build.xml file like the one in Listing 7-13.
Example 7-13. Apache Ant build.xml Test File for Apache Ivy
<?xml version="1.0"?> <projectxmlns:ivy="antlib:org.apache.ivy.ant"default="init" basedir="."> <target name="init" description="Apress - Pro Spring-OSGi"><ivy:retrieve/></target> </project>
This last listing declares the ivy namespace necessary to execute Ivy tasks in an Apache Ant project. Inside the only project target is the <ivy:retrieve> element used to trigger the retrieval of dependencies. What dependencies? Those defined in an Apache Ivy ivy.xml file like the one in Listing 7-14.
Example 7-14. Apache Ivy ivy.xml Test File
<ivy-module version="2.0">
    <info organisation="apache" module="helloworld-ivy"/>
    <dependencies>
       <dependency org="commons-lang" name="commons-lang" rev="2.4"/>
    </dependencies>
</ivy-module>
This last ivy.xml file declares one dependency on the commons-lang JAR version 2.4. If you place both these files in the same directory and invoke ant, you should see output like that in Listing 7-15.
Example 7-15. Apache Ivy Retrieval Sequence
web@localhost:/tmp$ ant Buildfile: build.xml init: No ivy:settings found for the default reference 'ivy.instance'. A defaultinstance will be used
no settings file found, using default... [ivy:retrieve] :: Ivy 2.0.0-rc2 - 20081028224207 :: http://ant.apache.org/ivy/ :: :: loading settings :: url = jar:file:/usr/local/ant/lib/ivy-2.0.0-rc2.jar!/org/apache/ivy/core/settings/ivysettings.xml [ivy:retrieve] :: resolving dependencies :: apache#helloworld-ivy;working@ubuntu [ivy:retrieve] confs: [default] [ivy:retrieve] found commons-lang#commons-lang;2.4 in public [ivy:retrieve] downloading http://repo1.maven.org/maven2/commons-lang/commons-lang/2.4/commons-lang-2.4.jar ... [ivy:retrieve] ........................... [ivy:retrieve] ................................................. (255kB) [ivy:retrieve] .. (0kB) [ivy:retrieve] [SUCCESSFUL] commons-lang#commons-lang;2.4!commons-lang.jar (6941ms) [ivy:retrieve] downloading http://repo1.maven.org/maven2/commons-lang/commons-lang/2.4/commons-lang-2.4-javadoc.jar ... [ivy:retrieve] ................ [ivy:retrieve] ........ (695kB) [ivy:retrieve] .. (0kB) [ivy:retrieve] [SUCCESSFUL] commons-lang#commons-lang;2.4!commons-lang.jar(javadoc) (33960ms) [ivy:retrieve] downloading http://repo1.maven.org/maven2/commons-lang/commons-lang/2.4/commons-lang-2.4-sources.jar ... [ivy:retrieve] ................... [ivy:retrieve] ............ (331kB) [ivy:retrieve] .. (0kB) [ivy:retrieve] [SUCCESSFUL] commons-lang#commons-lang;2.4!commons-lang.jar(source) (15081ms) [ivy:retrieve] :: resolution report :: resolve 6639ms :: artifacts dl 56024ms --------------------------------------------------------------------- | | modules || artifacts | | conf | number| search|dwnlded|evicted|| number|dwnlded| --------------------------------------------------------------------- | default | 1 | 1 | 1 | 0 || 3 | 3 | --------------------------------------------------------------------- [ivy:retrieve] :: retrieving :: apache#helloworld-ivy [ivy:retrieve] confs: [default] [ivy:retrieve] 0 artifacts copied, 3 already retrieved (0kB/5ms) BUILD SUCCESSFUL Total time: 1 minute 4 seconds
This last listing indicates Apache Ivy successfully retrieved the commons-lang JAR in its 2.4 version. In this case, the downloaded dependencies correspond to three JARs, the binary, source, and javadoc for the commons-lang JAR. If the commons-lang library relied on another JAR to operate correctly, these instructions would be enough for Apache Ivy to retrieve such dependencies automatically—though it is clear from this listing there are no other outstanding dependencies for this JAR.
The default site from which Apache Ivy attempts to retrieve JARs is http://repo1.maven.org/maven2/, and the default local directory in which downloaded files are placed is the .ivy2/cache/<jar_package_family> directory under the home directory of the user who invoked Apache Ivy. These default values will be changed in the application to accommodate the project's structure and retrieve OSGi'fied bundles from the appropriate site (a.k.a. repository).
Revisiting the Hello World "Playground" Directory Structure
It is time once again to create the proper workspace in which to maneuver, a directory structure like the one illustrated in Figure 7-2.
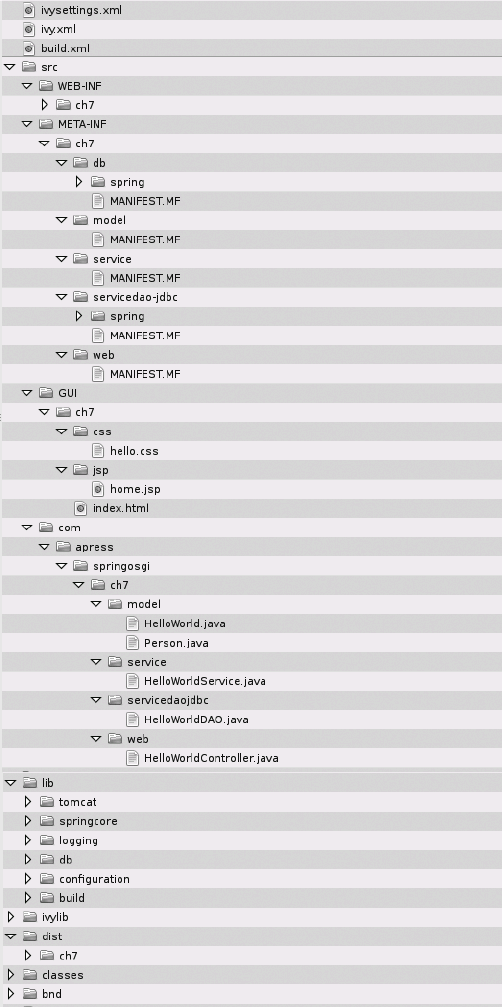
The directory structure functions as follows:
build.xml: This is the main Apache Ant configuration file containing the necessary tasks to build the application.ivy.xml: This is the main Apache Ivy configuration file containing the dependencies necessary to build and run the application.ivysettings.xml: This is the Apache Ivy settings file used to define dependency repositories and the local cache directory.bnd: BND tool and BND property files are placed in this directory.classes: All compiled Java classes are placed in this directory.dist: All built applications are placed in this directory.ivylib: All Apache Ivy dependency downloads are placed in this directory.lib & subdirectories: All JARs/bundles needed to compile Java sources and run the application are placed in this directory.src: All Java sources files composing the application are placed accordingly in subdirectories inside this directory, including application web descriptors inWEB-INF, metadata files inMETA-INF, and application user interfaces (like JSP files) in GUI.
Since you've already tackled this application in earlier chapters and should be familiar with the Hello World "playground" layout, I will only elaborate on the topics that are new to the present chapter.
Moving directly to building and deploying the application is indeed fast-forwarding. But the only thing new for the application is the JDBC-DAO bundle presented in the first section of this chapter. So it is not necessary to dwell on the application's contents, especially when you've seen them in two earlier chapters. Listing 7-16 illustrates the main Apache Ant build.xml for this chapter's version.
Example 7-16. Apache Ant build.xml
<?xml version="1.0"?><project xmlns:ivy="antlib:org.apache.ivy.ant" default="init" basedir="."><target name="init" description="Apress - Pro Spring-OSGi"> <tstamp/> <property name="projectname" value="Pro Spring-OSGi"/> <echo message="-------${projectname}------"/> <property name="debug" value="on"/> <property name="optimize" value="off"/> <property name="deprication" value="off"/> <property name="build.compiler" value="modern"/> <property name="target.vm" value="1.5"/> <property name="build.dir" value="classes"/> <property name="dist.dir" value="dist"/> <property name="src.dir" value="src"/> <property name="lib.dir" value="lib/build"/> <!-- Load JAR's onto the classpath, taken from lib subdir --> <path id="classpath"> <fileset dir="${lib.dir}"> <include name="*.jar"/> </fileset> <pathelement location="${build.dir}"/> </path> </target> <target name="compile" depends="init" description="Compile code"><ivy:retrieve pattern="lib/[conf]/[artifact]-[revision].[ext]" /><echo message="-------Compiling code for Pro-Spring OSGi------"/> <mkdir dir="${build.dir}"/> <mkdir dir="${dist.dir}"/> <javac srcdir="${src.dir}" destdir="${build.dir}" debug="${debug}" optimize="${optimize}"
deprecation="${depreaction}"
         target="${target.vm}">
     <classpath refid="classpath"/>
  </javac>

<copy todir="${build.dir}">
           <fileset dir="${src.dir}">
<!-- Some of the following statements are relevant to Ch2 -->
<!-- They are present here because the same compile task is used -->
                    <include name="**/*.properties"/>
                    <include name="**/*.xml"/>
                    <exclude name="**/*.java"/>
                    <exclude name="META-INF/**"/>
                    <exclude name="WEB-INF/**"/>
                    <exclude name="GUI/**"/>
                 </fileset>
  </copy>
  </target>

<target name="ch7" depends="compile" description="Build Chapter 7 Spring-OSGi Application">

  <echo message="------------—Building Chapter 7 Spring-OSGi Application for
 Pro Spring-OSGi ------------—"/>

     <property name="ch7.dir"          value="${dist.dir}/ch7/"/>
     <mkdir dir="${ch7.dir}"/>

     <jar destfile="${ch7.dir}/helloworld-db.jar"
   manifest="${src.dir}/META-INF/ch7/db/MANIFEST.MF">
        <metainf dir="${src.dir}/META-INF/ch7/db/"/>
     </jar>

    <jar destfile="${ch7.dir}/helloworld-model.jar"
   manifest="${src.dir}/META-INF/ch7/model/MANIFEST.MF">
         <fileset  dir="${build.dir}">
           <include name="com/apress/springosgi/ch7/model/*"/>
         </fileset>
        <metainf dir="${src.dir}/META-INF/ch7/model/"/>
   </jar>
<jar destfile="${ch7.dir}/helloworld-service.jar"
manifest="${src.dir}/META-INF/ch7/service/MANIFEST.MF">
<fileset dir="${build.dir}">
<include name="com/apress/springosgi/ch7/service/*"/>
</fileset>
<metainf dir="${src.dir}/META-INF/ch7/service/"/>
</jar>
<jar destfile="${ch7.dir}/helloworld-servicedao-jdbc.jar"
manifest="${src.dir}/META-INF/ch7/servicedao-jdbc/MANIFEST.MF">
<fileset dir="${build.dir}">
<include name="com/apress/springosgi/ch7/servicedaojdbc/*"/>
</fileset>
<metainf dir="${src.dir}/META-INF/ch7/servicedao-jdbc/"/>
</jar>
<war destfile="${ch7.dir}/helloworld-web.war"
webxml="${src.dir}/WEB-INF/ch7/web.xml" manifest=
"${src.dir}/META-INF/ch7/web/MANIFEST.MF">
<metainf dir="${src.dir}/META-INF/ch7/web/"/>
<webinf dir="${src.dir}/WEB-INF/ch7/"/>
<zipfileset dir="${src.dir}/GUI/ch7/" prefix=""/>
<classes dir="${build.dir}">
<include name="com/apress/springosgi/ch7/web/*"/>
</classes>
</war>
</target>
</project>The first thing to note about this Apache Ant project file is that it is Apache Ivy enabled. Notice the Apache Ivy namespace declared in the top-level <project> element. In addition, notice the <ivy:retrieve> element inside the compile target, which allows the build process to retrieve the application's dependencies and have them available for compilation and later for running the application.
The other marked section in this listing corresponds to the JDBC-DAO bundle named helloworld-servicedao, whose contents are Listings 7-1, 7-2, and 7-3. The remaining bundles created in this project file— helloworld-db.jar, helloworld-model.jar, helloworld-service.jar, and helloworld-web.war —are replicas of the bundles created in Chapter 5 by the same name. You can consult this chapter or the book's accompanying source code for their particular contents.
Since the Apache Ant file is already tied to Apache Ivy, the next step consists of configuring Apache Ivy to fulfill the application's dependencies.
Before I start describing Apache Ivy's configuration files, it is best to define exactly what we want to get out of Apache Ivy. What dependencies are needed by the application? The following list gives a broad classification of the application's dependencies:
build: Bundles or standard JARs needed to compile the application's classesdb: Bundles used by the application at runtime to enable RDBMS accesslogging: Bundles used by the application at runtime to enable loggingspring: Bundles used by the application at runtime to enable Spring and Spring-DM supporttomcat: Bundles used by the application at runtime to enable Tomcat (web container) support
In total you need to obtain over 40 bundles (JARs) to fulfill the application's five broad areas. The next obvious question is where to get these bundle dependencies. There are numerous places called repositories on the Internet where you can obtain bundles.
So the first step to configuring Apache Ivy is defining the repositories where you wish to obtain bundles. Listing 7-17 illustrates the ivysettings.xml file used for this purpose.
Example 7-17. Apache Ivy ivysettings.xml File
<ivysettings>

  <settings defaultResolver="chain-springosgi"/>

  <caches defaultCacheDir="${basedir}/ivylib">
  </caches>

  <resolvers>
    <chain name="chain-springosgi">
        <filesystem name="my-repository">
           <ivy pattern="${basedir}/ivylib/[organisation]/[module]/ivys/
   ivy-[revision].xml"/>
           <artifact pattern="${basedir}/ivylib/[organisation]/[module]/[type]s/
   [artifact]-[revision].[ext]"/>
           </filesystem>
<url name="spring-release-repo">
<ivy pattern="http://repository.springsource.com/ivy/bundles/
release/[organisation]/[module]/[revision]/[artifact]-[revision].[ext]" />
<artifact pattern="http://repository.springsource.com/ivy/bundles/
release/[organisation]/[module]/[revision]/[artifact]-[revision].[ext]" />
</url>
<url name="spring-external-repo">
<ivy pattern="http://repository.springsource.com/ivy/bundles/
external/[organisation]/[module]/[revision]/[artifact]-[revision].[ext]" />
<artifact pattern="http://repository.springsource.com/ivy/bundles/
external/[organisation]/[module]/[revision]/[artifact]-[revision].[ext]" />
</url>
<url name="spring-milestone-repo" m2compatible="true">
<artifact pattern="http://s3.amazonaws.com/
maven.springframework.org/milestone/[organisation]/[module]/[revision]/
[artifact]-[revision].[ext]"/>
</url>
<ibiblio name="ibiblio"/>
<url name="default-repo" m2compatible="true">
<artifact pattern="http://repo1.maven.org/maven2/[organisation]/
[module]/[revision]/[artifact]-[revision].[ext]"/>
</url>
</chain>
</resolvers>
</ivysettings>Apache Ivy repositories are configured inside the <resolvers> element of an ivysettings.xml file. For this application we will rely on Apache Ivy's concept of a chain, which is a list of repositories for locating dependencies. Notice the <chain name="chain-springosgi"> element nested inside the <resolvers> element.
Apache Ivy can define various <chain> elements. The whole purpose of a chain is to define a preference order for repositories. Under certain circumstances you might want to look up dependencies in Repository A, and then fall back on Repository B if a dependency is not found, and if a dependency is still not found, then try Repository C. For other circumstances, you might want to change the lookup order first to Repository C, and then A, and finally B. To simplify Apache Ivy's setup, however, the application will rely on a single chain.
Next, inside the <chain> element, you will find six repository definitions. The first one is a <filesystem> repository, used to look up a dependency on the file system of your workstation. On the first attempt to locate a dependency on your file system, it won't be available, of course, but it makes perfect sense thereafter to avoid pinging remote repositories to locate dependencies you've already downloaded. This is the reason why the <filesystem> repository is first.
Inside the <filesystem> element you will find both an <ivy> and <artifact> element with a pattern attribute. These last two elements along with the pattern values reflect how a repository archives dependencies. The pattern values might seem somewhat awkward, but these are conventions set forth by the early versions of Maven, a tool that pretty much sets the standard for dependency management tools.
For example, in Apache Ivy a bundle like persistence-api-1.0.jar would be archived in a directory structure of the form javax.persistence/persistence-api/jars/persistence-api-1.0.jar, with its corresponding Apache Ivy dependency file archived in a directory structure of the form javax.persistence/persistence-api/ivy-1.0.xml. The first location is the bundle (JAR) itself, and the second is the bundle's Apache Ivy file, which contains detailed information on its dependencies.
In this particular case, notice the patterns nested inside the <filesystem> element point toward the ${basedir}/ivylib directory, which is the ivylib directory of the Hello World "playground." If a pattern for a particular dependency cannot be matched in this last directory—which will always be the case on the first attempt—then Apache Ivy will fall back to the next resolver in the chain, which is an <url> element.
The <url> element is a remote site that contains bundle dependencies. Similar to the <filesystem> element, notice the nested <ivy> and <artifact> elements each with a pattern attribute. In this case the pattern values differ slightly, but this is due to how each repository owner opts to archive bundles.
Once Apache Ivy gets to a <url> element in the chain, it will attempt to download both the <ivy> and <artifact> element values from the remote site. For example, Apache Ivy will attempt to download a dependency on the persistence-api-1.0.jar bundle from a URL like http://repository.springsource.com/ivy/bundles/release/javax.persistence/persistence-api/1.0/persistence-api-1.0.jar, while looking for its corresponding Apache Ivy dependency file from a URL like http://repository.springsource.com/ivy/bundles/release/javax.persistence/persistence-api/1.0/ivy-1.0.xml. The first location is the bundle itself, and the second is the bundle's Apache Ivy file, which contains detailed information on its dependencies.
Since a <url> element represents a download, Apache Ivy doesn't just fetch dependencies, it also archives them locally for future use. This is a very important step to Apache Ivy's performance, for it would otherwise be necessary to constantly download dependencies each time Apache Ivy is invoked. So where are these dependencies archived? In the <caches> element.
Toward the top of Listing 7-17 is a statement in the form <caches defaultCacheDir="${basedir}/ivylib">. This tells Apache Ivy to archive every dependency it downloads in the ${basedir}/ivylib directory. If this value were not specified, by default all downloaded dependencies would be placed inside the .ivy2/cache/<jar_package_familiy> directory located inside the user's home directory that invoked Apache Ivy.
By overriding the default download location for dependencies, the first repository value or <filesystem> element makes more sense. Notice the <ivy> and <artifact> patterns for the <filesystem> element point toward the same directory defined in the defaultCacheDir attribute of the <caches> element. Thus if a dependency is requested on a second occasion and it was already retrieved from a remote repository, a local lookup will be sufficient to satisfy the dependency.
The second <url> element in the chain represents another repository. Here again, notice the slightly different <ivy> and <artifact> pattern values used to attempt to retrieve a dependency. It's important to note that an attempt to retrieve a dependency from this third repository will only take place if a dependency failed to be fulfilled locally (in the <filesystem> element) or be retrieved from the first <url> element.
The third <url> element is yet another repository with its own <ivy> and <artifact> patterns, serving as a fallback in case neither of the preceding repositories can fulfill a dependency.
At this point it is worth noting why these three <url> repositories were chosen first. Not only are they the primary repositories managed by the team behind the Spring Framework, but they are also the only ones that provide OSGi'fied versions of staple Java JARs. This is paramount.
By default, Apache Ivy attempts to download dependencies from http://repo1.maven.org/maven2/, so what happens if you define a dependency on a common JAR like persistence-api-1.0.jar? If you don't give precedence to a repository that has OSGi'fied JARs, Apache Ivy will likely retrieve a version that has no OSGi information, making it inoperable in an OSGi environment.
OSGi aside, and to cover the possibility of dependencies that might not be present in one of the Spring team repositories, two more repositories are defined. These are the <ibiblio> element, which is a shortcut statement representing the repository maintained by http://www.ibiblio.org/, and another <url> element pointing toward the master http://repo1.maven.org/maven2 repository.
Finally, it is worth noting the topmost element in Listing 7-17: <settings defaultResolver="chain-springosgi"/>. This indicates to use chain-springosgi as the default resolver.
Now that you've defined Apache Ivy's ivysettings.xml file, specifying where it will obtain its dependencies, you can define the dependencies themselves in Apache Ivy's ivy.xml file. Listing 7-18 illustrates the first iteration for this file.
Example 7-18. Apache Ivy ivy.xml File
<ivy-module version="2.0">

    <info organisation="apache" module="hello-ivy"/>
    <configurations>
         <conf name="build"/>
<conf name="logging"/>
<conf name="db"/>
<conf name="springcore"/>
<conf name="tomcat" />
</configurations>
<dependencies>
<!-- Download compile bundle dependencies for application build -->
<dependency org="javax.persistence" name="persistence-api"
rev="1.0" conf="build->*"/>
<dependency org="org.springframework"
name="org.springframework.web.servlet" rev="2.5.4.A" conf="build->*"/>
<dependency org="org.springframework" name="org.springframework.jdbc"
rev="2.5.4.A" conf="build->*"/>
<!-- Download runtime bundle dependencies for application logging -->
<dependency org="org.slf4j"
name="com.springsource.slf4j.org.apache.commons.logging"
rev="1.5.0" conf="logging->runtime"/>
<dependency org="org.slf4j"
name="com.springsource.slf4j.org.apache.log4j" rev="1.5.0"
conf="logging->runtime"/>
<dependency org="ch.qos.logback"
name="com.springsource.ch.qos.logback.classic" rev="0.9.9" conf="logging->runtime"/>
</dependencies>
</ivy-module>The first declaration in this listing is the <info> element. It just contains descriptive information about the Ivy module, so there is not much to elaborate on. The second declaration in the form of the <configurations> element deserves closer attention. Each of the <conf> elements nested inside the <configurations> element represent dependency areas for the application.
Such areas serve to group dependent bundles into separate directories (e.g., Apache Tomcat bundles are grouped under tomcat, logging bundles are grouped under logging, etc.). The way these areas or <conf> elements are translated into directories is tied directly to the <ivy:retrieve pattern="lib/[conf]/[artifact]-[revision].[ext]" > element declared in the main Apache Ant file (Listing 7-16). Notice the [conf] value in the pattern attribute, which indicates to perform the retrieval process on directories based on <conf> element values.
Since ivy.xml declares five <conf> values, there will be five directories used to group dependencies: lib/build, lib/logging, lib/db, lib/springcore, and lib/tomcat, all present in the Hello Wrld "playground." The remaining [artifact]-[revision].[ext] values in the <ivy:retrieve> pattern attribute represent the bundle's notation.
So now the interesting question is, what bundles get copied where? This is determined based on the conf attribute of each <dependency> element, which takes us to dependencies themselves.
First of all, notice each project <dependency> element needs to be nested inside the <dependencies> element. It's inside a <dependency> element that an application's dependencies are defined. Each dependency is defined on a bundle's organization, name, and revision values. Notice how the org, name, and rev conventions for defining a dependency are in line with the pattern values used to define repositories (Listing 7-17). Besides the org, name, and rev attributes, the <dependency> element also relies on the conf attribute, which is used to specify where to a copy a bundle's dependencies.
For example, a value like conf="build->*" tells Apache Ivy to copy a bundle and its dependencies to the build conf value (which maps to the physical directory lib/build of the Hello World "playground" on account of the <ivy:retrieve> pattern). The * assigned to the conf attribute is a wildcard notation indicating to copy every bundle related to the dependency.
Another variation of the conf attribute is a value like conf="logging->runtime". This tells Apache Ivy to copy a bundle's dependencies to the logging conf value (which maps to the physical directory lib/logging of the Hello World "playground"), but only those dependencies required for runtime level, as defined in its Ivy dependency file.
Before discussing the remaining section of the ivy.xml file to fulfill an application's dependencies, it is important that you don't confuse Apache Ivy's <conf> elements (directories) in ivy.xml with the cache directory <cache> element in ivysettings.xml. These values can be confusing at first since they both deal with physical directories and copying bundles (JARs). Figure 7-3 illustrates the entire retrieval and copying process for Apache Ivy.
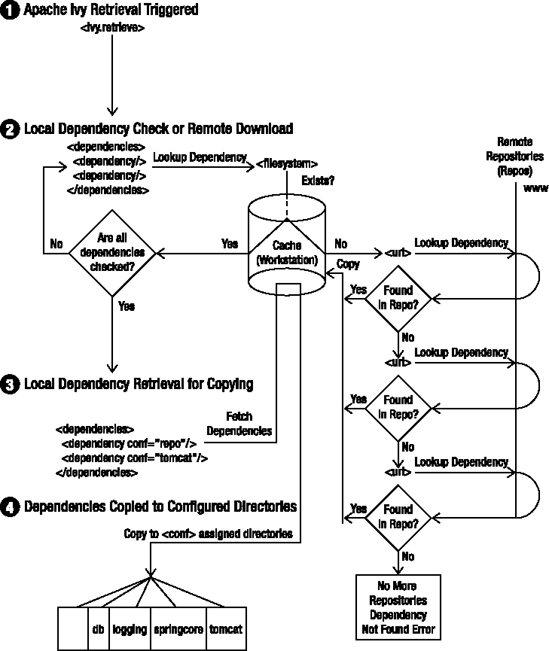
Notice that when the <ivy:retrieve> element is triggered, all dependencies are first checked against the cache directory. If the cache directory does not have them, a remote download is attempted from the repository chain configured in the ivysettings.xml file.
Once all <dependency> elements have been verified and are available locally, the conf attribute for each <dependency> element is inspected, and the corresponding dependencies are copied in accordance with the conf value. For example, conf="build->*" copies all dependencies to the build conf value (physical directory lib/build), and conf="*" copies all dependencies to every available conf value (physical directories lib/build, lib/db, lib/logging, lib/springcore, and lib/tomcat).
Now that you have a firmer understanding of Apache Ivy's retrieval and copying process, Listing 7-19 illustrates the remaining dependencies for the application's ivy.xml file.
Example 7-19. Apache Ivy ivy.xml File (Complete)
<ivy-module version="2.0">
    <info organisation="apache" module="hello-ivy"/>

    <configurations>
         <conf name="build"/>
         <conf name="logging"/>
         <conf name="db"/>
         <conf name="springcore"/>
         <conf name="tomcat" />
    </configurations>

    <dependencies>
       <!-- Download compile bundle dependencies for application build -->
       <dependency org="javax.persistence" name="persistence-api" rev="1.0"
  conf="build->*"/>
       <dependency org="org.springframework"
 name="org.springframework.web.servlet" rev="2.5.4.A" conf="build->*"/>
       <dependency org="org.springframework" name="org.springframework.jdbc"
 rev="2.5.4.A" conf="build->*"/>

       <!-- Download runtime bundle dependencies for application logging -->
       <dependency org="org.slf4j"
 name="com.springsource.slf4j.org.apache.commons.logging"
rev="1.5.0" conf="logging->runtime"/>
       <dependency org="org.slf4j"
name="com.springsource.slf4j.org.apache.log4j" rev="1.5.0" conf="logging->runtime"/>
       <dependency org="ch.qos.logback"
 name="com.springsource.ch.qos.logback.classic" rev="0.9.9"
conf="logging->runtime"/>

        <!-- Download runtime bundle dependencies for application database -->
          <dependency org="com.mysql.jdbc" name="com.springsource.com.mysql.jdbc"
rev="5.1.6" conf="db->runtime"/>
        <dependency org="org.springframework" name="org.springframework.orm"
rev="2.5.4.A" conf="db->runtime"/><dependency org="org.apache.commons"name="com.springsource.org.apache.commons.dbcp" rev="1.2.2.osgi"conf="db->runtime"/><dependency org="javax.persistence"name="com.springsource.javax.persistence" rev="1.0.0" conf="db->runtime"/><dependency org="javax.transaction"name="com.springsource.javax.transaction" rev="1.1.0" conf="db->runtime"/><!-- Download runtime bundle dependencies for application springcore--><dependency org="org.springframework" name="org.springframework.core"rev="2.5.4.A" conf="springcore->runtime"/><dependency org="org.springframework"name="org.springframework.web.servlet" rev="2.5.4.A"conf="springcore->runtime"/><dependency org="org.springframework"name="org.springframework.context.support" rev="2.5.4.A"conf="springcore->runtime"/><dependency org="org.apache.commons"name="com.springsource.org.apache.commons.collections" rev="3.2.0"conf="springcore->runtime"/><dependency org="net.sourceforge.cglib"name="com.springsource.net.sf.cglib" rev="2.1.3" conf="springcore->runtime"/><dependency org="edu.emory.mathcs.backport"name="com.springsource.edu.emory.mathcs.backport" rev="3.0.0"conf="springcore->runtime"/><dependency org="javax.annotation"name="com.springsource.javax.annotation" rev="1.0.0"conf="springcore->runtime"/><dependency org="org.springframework.osgi"name="spring-osgi-io" rev="1.2.0-m1" conf="springcore->*"/><dependency org="org.springframework.osgi"name="spring-osgi-core" rev="1.2.0-m1" conf="springcore->*"/><dependency org="org.springframework.osgi"name="spring-osgi-extender" rev="1.2.0-m1" conf="springcore->*"/><dependency org="org.springframework.osgi"name="spring-osgi-web" rev="1.2.0-m1" conf="springcore->*"/><dependency org="org.springframework.osgi"name="spring-osgi-web-extender" rev="1.2.0-m1" conf="springcore->*"/><!-- Download runtime bundle dependencies for application tomcat--><dependency org="javax.servlet"
name="com.springsource.javax.servlet.jsp.jstl" rev="1.1.2" conf="tomcat->*"/><dependency org="javax.el"name="com.springsource.javax.el" rev="1.0.0" conf="tomcat->*"/><dependency org="org.apache.commons"name="com.springsource.org.apache.commons.el" rev="1.0.0" conf="tomcat->*"/><dependency org="org.springframework"name="jasper-pholder" rev="5.5.23-20080305.122359-4" conf="tomcat->*"><artifact name="jasper.osgi" type="jar"url="http://s3.amazonaws.com/maven.springframework.org/osgi/org/springframework/osgi/jasper.osgi/5.5.23-SNAPSHOT/jasper.osgi-5.5.23-20080305.122359-4.jar"/></dependency><dependency org="catalina.osgi"name="catalina-pholder" rev="5.5.23-SNAPSHOT" conf="tomcat->*"><artifact name="catalina.osgi" type="jar"url="http://s3.amazonaws.com/maven.springframework.org/osgi/org/springframework/osgi/catalina.osgi/5.5.23-SNAPSHOT/catalina.osgi-5.5.23-20080425.154256-4.jar"/></dependency><dependency org="catalina.start.osgi"name="catalina.start-pholder" rev="1.0-20080425.161832-4" conf="tomcat->*"><artifact name="catalina.start.osgi" type="jar"url="http://s3.amazonaws.com/maven.springframework.org/osgi/org/springframework/osgi/catalina.start.osgi/1.0-SNAPSHOT/catalina.start.osgi-1.0-20080425.161832-4.jar"/></dependency></dependencies> </ivy-module>
The first new section corresponds to the database dependencies that will be copied to the lib/db directory of the Hello World "playground." Notice these dependencies also rely on the conf="db->runtime" value, guaranteeing that only runtime dependencies be copied from Apache Ivy's cache.
In addition, notice that certain database bundles like org.apache.commons.pool are not declared even though they are used by the earlier versions of the application. This is precisely the purpose of a dependency management tool like Apache Ivy: it automatically figures out for you what you need to run a particular bundle.
Since a dependency on org.apache.commons.dbcp is declared, Apache Ivy will automatically download this bundle and its dependencies—which includes the org.apache.commons.pool bundle—along with any other dependent bundles.
The next section corresponds to the Spring libraries placed in the lib/springcore directory of the Hello World "playground." The <dependency> declarations are practically the same with the exception of those belonging to Spring-DM, which use the conf="springcore->*" qualifier.
Since the declared Spring-DM dependency versions are release candidates, the Ivy dependency file for each of these bundles does not have a runtime -level definition; therefore, it's necessary to use the wildcard (*) notation, which indicates to copy a bundle's full dependencies.
Finally come the Apache Tomcat library dependencies that will be placed in the lib/tomcat directory of the Hello World's playground. For Tomcat's dependencies, only those with a nested <artifact> element are different. The reason three of Apache Tomcat's dependencies rely on this notation is because the application relies on bundle snapshot versions.
Notice all bundle snapshot versions have a long string in the form of a date (e.g., 20080425.161832). This type of bundle name does not match any particular pattern. So instead of trying to create a logical pattern, which doesn't exist for snapshot version naming, with a repository address in Apache Ivy's ivysettings.xml, an easier route is to include the exact location (URL) for a snapshot bundle.
By embedding the <artifact> element with the exact location (URL) of a bundle's location, Apache Ivy immediately attempts to download the bundle from this location, instead of relying on a repository chain.
Having reviewed the application's ivy.xml and ivysettings.xml file, you can now start the build process. If you place these two files in the root directory of the Hello World "playground" alongside Apache Ant's build.xml file and execute ant ch7, the entire build process will kick off with the retrieval of numerous bundles from remote repositories.
Each downloaded bundle will be placed inside the ivylib directory of the Hello World "playground." Once this download process is complete, all the application's dependencies will be prepped and colocated inside the subdirectories within the lib directory (lib/build,lib/db,lib/logging, lib/springcore, and lib/tomcat*).
Next, with the build bundles in place, Apache Ant will compile the application classes and create the application bundles.
Finally, it is only a matter of creating the necessary config.ini file for Eclipse Equinox to bootstrap the application, including db,logging, spring, and tomcat bundles, followed by the application itself. And since Apache Ivy aided in creating a layout structure for these dependency bundles, it is only a matter of placing the Eclipse Equinox file config.ini inside the appropriate directory of the Hello World "playground" to make the application work in a few simple steps.
In this chapter you learned how to create an OSGi bundle to access an RDBMS using JDBC, relying on the Spring Framework to ease the creation of a class based on this data access mechanism. In addition, you saw the requirements that need to be taken into account for deploying OSGi bundles using either JDBC or JPA without the aid of SpringSource dm Server.
You then explored BND, a tool that aids in the migration of standard JARs to OSGi-compliant bundles. You learned how to use BND functions like inspecting and determining a JARs dependency structure, automatically creating an OSGi-compliant bundle from a standard JAR, and more advanced transformation techniques relying on BND properties files containing regular expressions and macros.
Then you went on to rework the applications created in Chapters 2 and 5, only now to use an RDBMS in the context of OSGi and without the aid of the SpringSource dm Server. In the process you were introduced to Apache Ivy, a dependency management tool tightly integrated with Apache Ant to aid in fulfilling an application's dependencies.
Finally, you explored in detail how it is Apache Ivy performs its dependency management tasks, including how to define repositories and dependencies in its primary configuration files, ivysetting.xml and ivy.xml. You capped everything off by creating the necessary Apache Ivy configuration files to download the application's dependency bundles.