
The focus of this chapter is a core set of procedural flow control activities that are included with Windows Workflow Foundation (WF). These are some of the most frequently used activities that implement branching and looping. The If and Switch<T> activities are first discussed, followed by examples that demonstrate the While and DoWhile activities. The Parallel activity is then discussed, followed by several examples that demonstrate its use.
Understanding the Procedural Modeling Style
WF includes support for two different workflow modeling styles out of the box: procedural and flowchart. The modeling style determines how the flow of control between individual activities is modeled. Microsoft may provide other modeling styles in the future (for example, state machine), or you can implement activities that support your own modeling style. However, the two styles that are included with WF are both flexible enough to tackle most workflow tasks.
The procedural modeling style (the focus of this chapter) uses familiar programming constructs to control the flow of execution. Standard activities are included that mimic C# branching and looping keywords such as if and while. You control the flow of execution by placing child activities into the appropriate control activity. In contrast with this, the flowchart modeling style uses direct links between activities to control the flow of execution. The procedural modeling style could be thought of as rigid, structured, and precise while the flowchart style is free-form.
![]() Note Chapter 7 discusses the activities that are used to implement the flowchart modeling style.
Note Chapter 7 discusses the activities that are used to implement the flowchart modeling style.
The modeling styles are implemented as activities along with the designer support for those activities. They are not implemented as fixed workflow or project types that must be selected up front and are difficult to change later. This enables you to mix and match the two styles by simply including the activities for either style. Your choice for the original root activity does not force you to exclusively use that modeling style for the entire workflow or activity.
Making Decisions
I think that the most common requirement of any programming language is the ability to make branching decisions. It would be difficult to write any useful code if you couldn’t test a condition and then do something based on the results of the test. WF supports two commonly used decision-making constructs that I discuss next: If and Switch<T>.
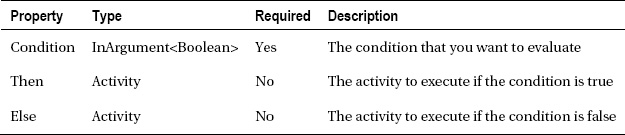
Understanding the If Activity
The If activity allows you to model an if-then-else condition. You use it by supplying a Boolean value, usually in the form of an expression. You can reference arguments, variables, and literal values in the expression. You can also declare an activity that you want to execute if the condition evaluates to true and another activity to execute if the condition is false. You can decide to declare one or both of these activities depending on your needs. Here are the most important properties of the If activity:
![]() Tip Many activities, including this one, allow you to declare a single activity as a child. While support for only a single activity may seem like a major shortcoming, please remember that the single activity that you declare may itself be a container for other activities. For example, the activity that you declare for the
Tip Many activities, including this one, allow you to declare a single activity as a child. While support for only a single activity may seem like a major shortcoming, please remember that the single activity that you declare may itself be a container for other activities. For example, the activity that you declare for the If.Then property may be a Sequence activity containing its own child activities.
The If activity is pervasive and can be seen in examples that are presented later in this chapter (as well as throughout this book). You can also refer to the examples in Chapter 3 that use this activity.
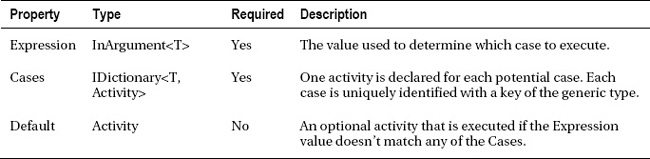
Understanding the Switch<T> Activity
If you need to make a branching decision based on a single Boolean condition, the If activity does the trick. However, often you’re not dealing with a binary true or false decision. You might need the ability to take one of several branches depending on a single value. For example, if you were declaring a calculator workflow, you would need to branch the flow of execution based on the requested operation (add, subtract, multiply, divide, and so on). You could model that using several instances of the If activity, but it’s a much cleaner design to use a Switch<T> activity.
The Switch<T> activity models the C# switch statement. You use this activity by setting a single value to evaluate using the Switch.Expression property. Since this is a generic activity, you must also supply a type for the activity. The type you specify determines the type for the Switch.Expression property. When the activity is executed, the Switch.Expression property is evaluated, and the current value of the property is used to branch execution to one of the defined cases. Each case is uniquely identified with a value of the specified type.
Using the calculator example, the Switch<T> activity might be constructed with a type of string as the generic type parameter. The individual cases might use string literals of add, subtract, multiply, and divide as their key values. If a case has been defined for the current value of the Switch.Expression property, the activity defined for that case is executed. You can also define an activity for a default case. This default activity is executed when a matching key is not found for any of the other cases.
Here are the most important properties of the Switch<T> activity:
You have already seen the Switch<T> activity used in Chapter 1 and Chapter 3. Please refer to the examples in those chapters to see the Switch<T> activity in action.
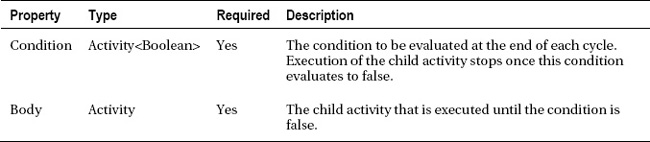
Understanding the While and DoWhile Activities
Looping is also a common workflow construct. There are many times when you need the ability to repeatedly execute an activity while a condition is true. Two of the procedural activities that support looping are While and DoWhile.
The While activity repeatedly executes a child activity while a condition is true. You use it by first providing a Boolean value for the While.Condition property. This is usually done by providing an expression that evaluates to a Boolean value. The While.Body property is where you declare the activity that you want to repeatedly execute.
The While activity checks the condition at the top of the loop, before the While.Body activity is executed. Therefore, if the condition is initially false, it is possible that the activity specified for While.Body is never executed.
The While activity is also one of the activities that supports the declaration of variables. Here are the most important properties of the While activity:

Like the While activity, the DoWhile activity repeatedly executes a child activity. The difference between the two activities is when the condition is evaluated. The While activity evaluates the condition at the beginning of each cycle. In contrast with this, the DoWhile activity evaluates the condition at the end of each cycle.
Because of this difference, the child activity that is declared for the DoWhile.Body property is always executed at least once. After it is executed, the DoWhile.Condition property is evaluated. If it evaluates to true, another cycle of execution begins, and the DoWhile.Body activity is executed once again. If the condition evaluates to false, no further execution of the activity takes place, and the work of the DoWhile activity is completed.
Like the While activity, DoWhile supports the definition of variables. Here are the most important properties of the DoWhile activity:
![]() Note These activities construct a single instance of the activity that you specify for the
Note These activities construct a single instance of the activity that you specify for the Body property and reuse it for each iteration. The variable and argument values may change with each iteration, but the activity is constructed only once.
In the following section, I present an example that demonstrates the use of the While activity. Later, the example will be modified to replace all instances of the While activity with the DoWhile activity to achieve the same results.
Using the While and DoWhile Activities
To demonstrate the use of these activities, I’ve chosen an inventory lookup scenario. Prior to placing an order for an item, the inventory for the item must be checked to determine whether sufficient inventory exists to fill the order. However, the inventory may be distributed across multiple warehouses, and each one may need to be checked to determine whether the entire order can be filled. The While activity is used to loop through all warehouses until the requested item quantity can be filled or all warehouses have been checked.
Here are the steps that you will follow to implement this example:
- Implement a custom
InventoryLookupactivity.- Declare the
GetItemInventoryworkflow.- Implement the code to execute the workflow.
Implementing the InventoryLookup Activity
To begin this example, create a new project named ActivityLibrary using the Activity Library template. Add it to a new solution that is named for this chapter. You can delete the Activity1.xaml file since it won’t be needed.
![]() Tip For most of the examples in this book, you can delete the activity or workflow file that is created for you when you add a new project. In this example, the file to delete is named
Tip For most of the examples in this book, you can delete the activity or workflow file that is created for you when you add a new project. In this example, the file to delete is named Activity1.xaml since this is an activity library. If you prefer, you can choose to rename the file to the name that I specify for a new activity or workflow. In my opinion, it just seems easier to add a new item rather than to rename the existing one. In addition, renaming the source file is not sufficient to actually change the name. The Xaml file contains a class name that must also be changed.
This example uses a custom activity to simulate the lookup of the warehouse inventory. To create this activity, add a new custom activity to the ActivityLibrary project that you just created, and name it InventoryLookup. Use the Code Activity new item template. Here is the code that you need to implement this activity:
using System;

using System.Activities;

using System.Collections.Generic;


namespace ActivityLibrary

{
This activity uses the CodeActivity<TResult> generic class as its base. A type of Int32 is provided to set the type of the Result property to OutArgument<Int32>. Three additional input arguments are defined. The ItemId will identify the item to look up. The WarehouseId determines which warehouse the activity should use when retrieving the current inventory. The RequestedQty is the quantity being requested for the item.
After declaring the arguments, a dictionary of test data is created. Normally the inventory data would be retrieved from a database or perhaps from another system via messaging. But in this case, a set of hard-coded test data suffices to demonstrate this particular scenario. Separate test data is loaded for each warehouse that is identified with a simple sequential integer. The actual test data consists of an item identifier and the current quantity on hand for that item.
    public class InventoryLookup : CodeActivity<Int32>

    {

        public InArgument<Int32> ItemId { get; set; }

        public InArgument<Int32> WarehouseId { get; set; }

        public InArgument<Int32> RequestedQty { get; set; }


        private Dictionary<Int32, Dictionary<Int32, Int32>> _warehouses

            = new Dictionary<Int32, Dictionary<Int32, Int32>>();


        public InventoryLookup()

        {

            //load some test data

            _warehouses.Add(1, new Dictionary<int, int>

            {

                {100, 5},

                {200, 0},

                {300, 0},

            });


            _warehouses.Add(2, new Dictionary<int, int>

            {

                {100, 10},

                {200, 0},

                {300, 0},

            });


            _warehouses.Add(3, new Dictionary<int, int>

            {

                {100, 50},

                {200, 75},

                {300, 0},

            });

        }
The Execute method contains the code to look up the inventory for the requested item. After locating the correct warehouse, the inventory for the item is retrieved and compared to the requested quantity. The lower of the requested quantity or the available inventory is returned in the Result property.
        protected override int Execute(CodeActivityContext context)

        {

            Int32 availableInventory = 0;

            Int32 warehouseId = WarehouseId.Get(context);

            Dictionary<Int32, Int32> warehouse = null;

            if (_warehouses.TryGetValue(warehouseId, out warehouse))

            {

                Int32 itemId = ItemId.Get(context);

                if (warehouse.TryGetValue(itemId, out availableInventory))

                {

                    Int32 requestedQty = RequestedQty.Get(context);

                    if (availableInventory > requestedQty)

                    {

                        availableInventory = requestedQty;

                    }

                }

            }

            return availableInventory;

        }

    }

}
Build the solution before you continue to the next step. This ensures that the custom activity builds without any problems and is added to the Visual Studio Toolbox.
Declaring the GetItemInventory Workflow
To declare the example workflow and an application to test it, add a new project named GetItemInventory to the solution. Use the Workflow Console Application template. You can delete the Workflow1.xaml file that was generated for you since it won’t be needed. Add a project reference to the ActivityLibrary project, which should be in the same solution.
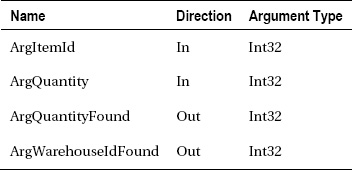
Add a new workflow named GetItemInventory to the project using the Activity template. The job of this workflow is to execute the custom InventoryLookup activity repeatedly until the requested quantity is found for the requested item. Start the workflow declaration by adding these arguments to the workflow:
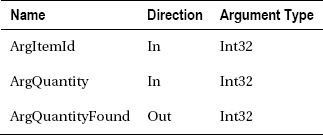
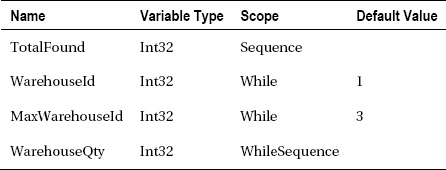
The workflow also requires four variables that are scoped at different levels. You can’t enter all of these variables now, since many of them are scoped by activities that are yet to be added. In the step-by-step instructions that follow, I’ll tell you when to add each variable. But I’ve included this summary of all the variables that you will need to add:
Please follow these steps to declare the remainder of the workflow:
- Add a
Sequenceactivity as the root activity of the workflow.- Add a new
Int32variable to theSequenceactivity namedTotalFound.- Add a
Whileactivity as a child of theSequenceactivity.- Add the two
Int32variables that are scoped at theWhileactivity level:WarehouseIdandMaxWarehouseId.WarehouseIdshould have a default value of1, andMaxWarehouseIdhas a default value of3.- Set the
While.Conditionproperty to this expression:TotalFound < ArgQuantity And WarehouseId <= MaxWarehouseId.- Add a
Sequenceactivity to theWhile.Bodyproperty. Change theSequence.DisplayNameproperty toWhileSequence. This makes it easier to distinguish thisSequenceactivity from the topmost root activity of the workflow.- Add the final variable named
WarehouseQtyto theWhileSequenceactivity.- Add an
InventoryLookupactivity to theWhileSequenceactivity. Set theItemIdproperty toArgItemId,RequestedQtytoArgQuantity – TotalFound,ResulttoWarehouseQty, andWarehouseIdtoWarehouseId. Figure 5-1 shows the Properties window for this activity after the properties have been set.- Add an
Assignactivity directly under theInventoryLookupactivity. Set theAssign.Toproperty toTotalFoundand theAssign.Valueproperty toTotalFound + WarehouseQty.- Add another
Assignactivity under the previous one. Set theAssign.Toproperty toWarehouseIdand theAssign.Valueproperty toWarehouseId + 1. Figure 5-2 shows the completedWhileSequenceactivity.- After navigating back to the root
Sequenceactivity, add anAssignactivity directly under theWhileactivity. Set theAssign.Toproperty toArgQuantityFoundand theAssign.Valueproperty toTotalFound. Figure 5-3 is the completed top-level view of the workflow.
![]() Note The solution will likely not build at this point since the code in the
Note The solution will likely not build at this point since the code in the Program.cs file is referencing the Workflow1.xaml file that you deleted. That will be remedied in the next step.

Figure 5-1. InventoryLookup properties
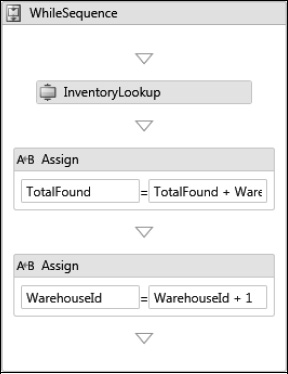
Figure 5-2. Completed WhileSequence activity
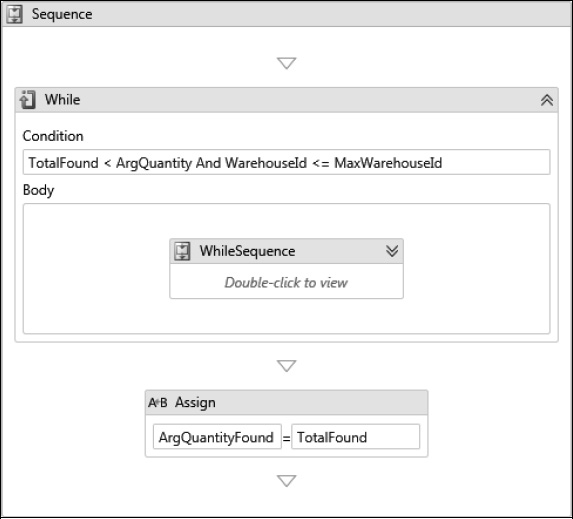
Figure 5-3. Completed GetItemInventory workflow
Hosting the Workflow
Next you will implement the code to host and execute this workflow. Open the Program.cs file in the GetItemInventory project, and replace it with the following code:
using System;

using System.Activities;

using System.Collections.Generic;


namespace GetItemInventory

{

    class Program

    {

        static void Main(string[] args)

        {
The workflow is executed a number of times, each time with a different combination of itemId and requested quantity. After each test completes, the actual quantity found is written to the console.
            RunWorkflow(new GetItemInventory(), 100, 2);

            RunWorkflow(new GetItemInventory(), 100, 8);

            RunWorkflow(new GetItemInventory(), 100, 20);

            RunWorkflow(new GetItemInventory(), 100, 100);

            RunWorkflow(new GetItemInventory(), 200, 10);

            RunWorkflow(new GetItemInventory(), 300, 15);


            Console.WriteLine("Press any key to exit");

            Console.ReadKey();

        }


        private static void RunWorkflow(Activity wf,

            Int32 itemId, Int32 quantity)

        {

            IDictionary<String, Object> output = WorkflowInvoker.Invoke(

                wf, new Dictionary<string, object>

                {

                    {"ArgItemId", itemId},

                    {"ArgQuantity", quantity}

                });


            Console.WriteLine("Item: {0} Requested: {1} Found: {2}",

                itemId, quantity, output["ArgQuantityFound"]);

        }

    }

}
Testing the Workflow
You should now be able to build the solution and verify that everything builds correctly. After running this example code, I see these results:
Item: 100 Requested: 2 Found: 2


Item: 100 Requested: 8 Found: 8


Item: 100 Requested: 20 Found: 20


Item: 100 Requested: 100 Found: 65


Item: 200 Requested: 10 Found: 10


Item: 300 Requested: 15 Found: 0


Press any key to exit
The results show that the looping logic of the While activity works correctly. For example, the requested quantity of 8 for the second test case couldn’t be filled by only the first warehouse because it has a quantity of only 5 available. A combination of the first two warehouses was necessary. A requested quantity of 100 for that same item could not be filled. Instead, the total quantity available for all warehouses was shown (65).
Using the DoWhile Activity
To see the DoWhile activity in action, you could create another workflow using the instructions that were given for the While activity example in the previous section. But all that you really need to do is to replace all While activity references with DoWhile. It’s not really worth the effort to use the workflow designer for that. The easiest way to do this is to make a copy of the GetItemInventory.xaml file and edit the copy outside of the designer.
You can follow these steps:
- Make a copy of the
GetItemInventory.xaml filein the sameGetItemInventoryproject. Name the copyGetItemInventoryDoWhile.xaml.- Open the copied
GetItemInventoryDoWhile.xamlin Code View, which should open the XML editor.- Edit the
x:Classattribute of the root element to provide the new name for the activity:x:Class="GetItemInventory.GetItemInventoryDoWhile". Make sure you don’t change the namespace, which should remain asGetItemInventory.- Change all
Whileactivity references toDoWhile. If you decide to do a global change, make sure you don’t change thex:Classattribute that you already changed.
![]() Caution This particular workflow works equally well using either the
Caution This particular workflow works equally well using either the While or DoWhile activity. However, you can’t make the assumption that these two activities are completely interchangeable in all cases. For example, if you changed the default value of the WarehouseId variable, the expression in the Condition property, or the location of the Assign activity that increments the WarehouseId, the two activities might not produce the same results.
Here’s an abbreviated list of the revised GetItemInventoryDoWhile.xaml file:
<Activity x:Class="GetItemInventory.GetItemInventoryDoWhile">
…
<Sequence>
…
<DoWhile>
<DoWhile.Variables>
<Variable x:TypeArguments="x:Int32" Name="WarehouseId" />
<Variable x:TypeArguments="x:Int32" Default="3" Name="MaxWarehouseId" />
</DoWhile.Variables>
<DoWhile.Condition>
[TotalFound < ArgQuantity And WarehouseId <= MaxWarehouseId]
</DoWhile.Condition>
…
</DoWhile>
…
</Sequence>
</Activity>
That’s all that you should have to change in the workflow declaration. You also need to modify the class name that the code creates in the Program.cs file. Change the statements that create a GetItemInventory instance to create a GetItemInventoryDoWhile instance instead. When you execute the application, you should see the same results as you saw for the While example.
![]() Note Instead of creating a copy of the existing workflow, you could have modified the original workflow to use
Note Instead of creating a copy of the existing workflow, you could have modified the original workflow to use DoWhile instead of While. However, I wanted to use this opportunity to show you just how easy it is to copy and modify an existing workflow. In this example, it made sense to change the value of the x:Class attribute using the XML editor since you were making other changes to the file. But be aware that you can also change the class name of an activity or workflow using the Properties window. To accomplish this, open the Xaml file in designer view, and make sure that none of the individual activities is highlighted. You should see the Name property in the Properties window. The value of this property contains the namespace and class name. Changing this value modifies the x:Class attribute within the Xaml file.
Understanding the Parallel Activity
The Parallel activity is used to schedule two or more child activities for execution at the same time. You declare the activities to execute using the Parallel.Branches property. Each child activity that you add to this property represents a separate branch of execution. The branch activities can be composite activities such as Sequence that contain other children. The Parallel activity is also one of the standard activities that support the definition of variables.
Here are the most important properties of the Parallel activity:

The Parallel activity continues to execute until all of its branches have completed their work. However, it supports an optional CompletionCondition property that can be used to short-circuit the normal completion logic. This is a Boolean condition that is evaluated each time a branch completes. If the condition evaluates to true, all remaining branches are canceled, and the Parallel activity immediately completes.
Understanding Parallel Execution
At first glance, you might think that the Parallel activity is an easy way to simultaneously execute any activities. The truth is that while the Parallel activity is very useful, it doesn’t work exactly as you might expect.
The Parallel activity doesn’t really execute multiple branches simultaneously on multiple threads. Each workflow instance executes on a single thread, so true parallel execution of multiple activities isn’t possible unless the activities are written to support asynchronous execution. Instead of true parallel execution, the Parallel activity is designed to interleave work that is defined in multiple child activities. It schedules all the branches for immediate execution, and scheduling an activity for execution is not the same as immediately executing it. If one of the branches of execution become idle (for example, an activity is waiting for some external input), execution can resume with another branch that is not idle.
All activities are executed by the workflow runtime, not directly by their parent activity. The job of a composite activity such as Parallel or Sequence is to schedule their children for execution. Scheduling for execution means telling the workflow runtime a particular activity should be executed. The runtime queues those requests and executes them one at a time.
The scheduling algorithm that each composite activity implements is what makes it unique. For example, the Sequence activity is designed to execute each child activity in the defined order. It schedules the first child for execution and then waits for it to complete. When the first child has completed, the second child is scheduled for execution and so on. In contrast with this, the Parallel activity immediately schedules all branch activities for execution. It doesn’t wait for the first branch to complete before it schedules the next.
This means that the actual order in which the child activities are executed greatly depends on the kind of work that they perform. For example, consider the Parallel activity illustrated in Figure 5-4.
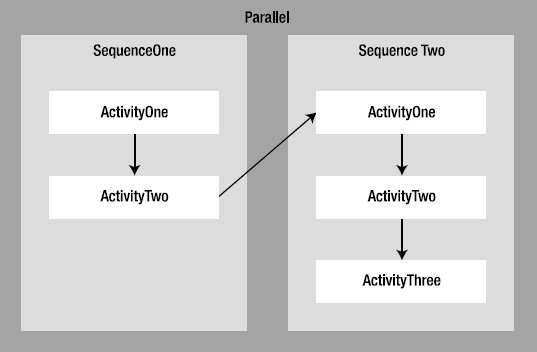
Figure 5-4. Parallel activity
In this illustration, a Parallel activity has two child Sequence activities defined. The SequenceOne activity has two child activities, and SequenceTwo has three. When the Parallel activity begins to execute, it immediately schedules the two Sequence activities for execution. As the arrows indicate, the SequenceOne activity begins execution by scheduling its first child activity (ActivityOne) for execution. When it completes, ActivityTwo is scheduled for execution. When ActivityTwo completes, the work of SequenceOne is complete, and SequenceTwo (which was already scheduled for execution) begins execution. SequenceTwo can begin execution only once SequenceOne yields control over the workflow thread. In this example, that occurs only once SequenceOne has completed the processing of all of its children. Once it begins execution, SequenceTwo continues to schedule its remaining children for execution until all of them have been processed.
In this example, the Parallel activity didn’t provide any real benefit. Because the work that was performed by these child activities never caused them to yield control of the workflow thread (become idle), no real parallel (interleaved) behavior can be observed. The Sequence activities don’t relinquish control of the workflow thread until they have completed their work or are idle and waiting for input.
In contrast with this, Figure 5-5 illustrates the same set of activities with the addition of a Delay activity in SequenceOne. A Delay activity does exactly what you might expect based on its name. It introduces a configurable amount of delay to the execution. The most important feature of the Delay activity is that it causes the current branch of execution to relinquish control of the workflow thread. In essence, it informs the workflow runtime that it’s idle for a short period of time and that the runtime can go ahead and execute any other work that has been scheduled.
![]() Note The
Note The Delay activity is used here to illustrate what happens when a branch of execution becomes idle. There are other activities that can cause a workflow to become idle. As a rule of thumb, any time a workflow is waiting on some external input, it is idle. Examples of other activities are the WCF messaging activities that are discussed in Chapter 9.
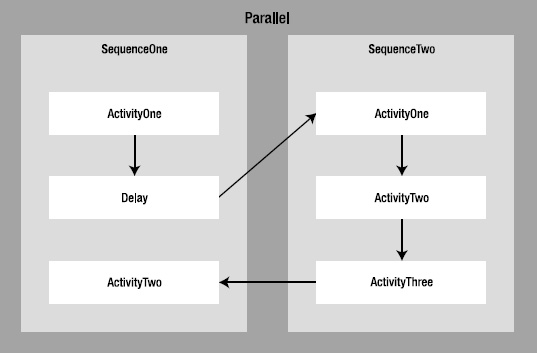
Figure 5-5. Parallel activity with Delay
As shown in Figure 5-5, the execution path is very different once the Delay activity is introduced. After executing ActivityOne, a short delay for SequenceOne begins when the Delay activity is executed. Since SequenceOne is now considered idle, control of the workflow thread is relinquished, and execution continues with the activities in SequenceTwo. Once all the activities in SequenceTwo have completed their work, execution returns to the remaining activity in SequenceOne.
In this example, the Parallel activity made a difference. Because the SequenceOne branch became idle, execution continued with the other branch of the Parallel activity. Without the Parallel activity, the entire workflow would have been idle for a short period of time when the Delay activity was executed.
![]() Caution The actual execution sequence within a
Caution The actual execution sequence within a Parallel activity is not guaranteed. Because an execution branch may be required to wait for an external event, the actual execution sequence is unpredictable.
Creating the ParallelDemo Project
The purpose of this short example is to demonstrate the Parallel activity behavior that was just discussed. This example uses a Parallel activity that has two branches of execution, each defined by a Sequence activity. Each Sequence activity contains a set of WriteLine activities that each write a message to the console.
To implement this example, create a new project named ParallelDemo, and add it to the solution for this chapter. Use the Workflow Console Application template for the new project. For this example, you can use the Workflow1.xaml file that was created with the project.
Declaring the ParallelDemo Workflow
Follow these steps to declare the activities for this workflow:
- Add a
Parallelactivity as the root of the workflow.- Add two
Sequenceactivities as branches of theParallelactivity.- Add two
WriteLineactivities to theSequenceactivity on the left side. Set theTextproperty of the two activities to"Seq 1 Activity 1"and"Seq 1 Activity 2", respectively.- Add three
WriteLineactivities to theSequenceactivity on the right side. Set theTextproperty to"Seq 2 Activity 1","Seq 2 Activity 2", and"Seq 2 Activity 3", respectively.
Figure 5-6 is the top-level view of the Workflow1 workflow.

Figure 5-6. Workflow1
Hosting the Workflow
Here is the code for the Program.cs file in the ParallelDemo project that you need in order to execute this workflow. The code is similar to the default code that is generated when you create a new project.
using System;

using System.Activities;


namespace ParallelDemo

{

    class Program

    {

        static void Main(string[] args)

        {

            WorkflowInvoker.Invoke(new Workflow1());


            Console.WriteLine("Press any key to exit");

            Console.ReadKey();

        }

    }

}
Testing the Workflow
After building the ParallelDemo project, you should be able to run it and see these results:
Seq 1 Activity 1


Seq 1 Activity 2


Seq 2 Activity 1


Seq 2 Activity 2


Seq 2 Activity 3


Press any key to exit
These results mirror those illustrated in Figure 5-4.
Adding a Delay Activity
To complete the example, you will add a Delay activity to the workflow. Please follow these steps to modify the Workflow1 workflow:
- Open the
Workflow1workflow in the designer, and navigate to theSequenceactivity on the left side.- Add a
Delayactivity between the first and secondWriteLineactivities.- The
Delay.Durationproperty is used to set the amount of delay and is defined as aTimeSpan. Set this property toTimeSpan.FromSeconds(1)to create a one-second delay.
Figure 5-7 shows the Sequence activity on the left side after the Delay has been added.
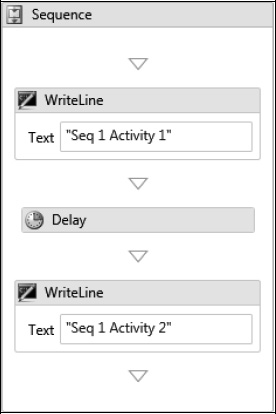
Figure 5-7. Workflow1 with Delay
Testing the Revised Workflow
Build and run the project to see these results:
Seq 1 Activity 1


Seq 2 Activity 1


Seq 2 Activity 2


Seq 2 Activity 3


Seq 1 Activity 2


Press any key to exit
These results correspond to the illustration in Figure 5-5.
Using the Parallel Activity
Now that you have an understanding of how the Parallel activity works, it’s time to use it in a slightly more realistic example. In this example, you will revisit the InventoryLookup custom activity that you implemented earlier in the chapter. You will create a new workflow that uses the InventoryLookup within a Parallel activity instead of a While activity.
The purpose of this workflow also changes slightly. Earlier in the chapter, the purpose of the GetItemInventory workflow was to determine whether the requested quantity was available for an item using any combination of warehouses. In this new example, the purpose is to find a single warehouse that can satisfy the requested quantity for an item. The assumption in this scenario is that the order must be shipped from a single warehouse.
Creating the GetItemLocation Project
Begin this example by creating a new project named GetItemLocation. Use the Workflow Console Application project template, and add the new project to the solution for this chapter. Delete the Workflow1.xaml file, and add a project reference to the ActivityLibrary project, which should be in the same solution. Add a new workflow named GetItemLocation to the project using the Activity add item template.
Declaring the GetItemLocation Workflow
This workflow uses three branches of execution within a Parallel activity. Each branch is represented by a Sequence activity that contains the activities to query a single warehouse. Each Sequence activity contains an InventoryLookup instance and an If activity. The If.Then property contains another Sequence that has two Assign activity instances. The Parallel activity is used to query the inventory for an item from all three warehouses in parallel. The first warehouse that can fill the requested quantity for the item wins.
Begin the workflow declaration by adding these arguments:
In the steps that follow, you will declare the first branch of execution and then copy it to create a total of three branches. Please follow these steps to declare the workflow:
- Add a
Parallelactivity as the root of the workflow.- Add a single
Sequenceactivity to theParallelactivity. Change theSequence.DisplayNameproperty toWarehouse1.- Add two
Int32variables to theWarehouse1Sequenceactivity. The first variable is namedWarehouseQtyand does not require a default value. The second variable is namedWarehouseIdand should have a default value of1. The scope for both variables is theWarehouse1activity.- Add a
WriteLineactivity to theSequenceactivity. Set theTextproperty toString.Format("Warehouse {0} InventoryLookup", WarehouseId).- Add an
InventoryLookupactivity under theWriteLineactivity. Set the properties of theInventoryLookupto the values shown here:
- Add another
WriteLineactivity under theInventoryLookupactivity. Set theTextproperty toString.Format("Warehouse {0} If", WarehouseId).- Add an
Ifactivity under theWriteLineactivity. Set theIf.ConditiontoWarehouseQty = ArgQuantity And ArgQuantityFound = 0.- Add a
Sequenceactivity to theIf.Thenproperty.- Add an
Assignactivity to theSequenceactivity. Set theAssign.Toproperty toArgQuantityFoundand theAssign.Valueproperty toWarehouseQty.- Add another
Assignactivity to theSequenceactivity. Set theAssign.Toproperty toArgWarehouseIdFoundand theAssign.Valueproperty toWarehouseId.- Navigate back to the
Parallelactivity. Copy theWarehouse1Sequenceactivity and paste the copy as a second branch to theParallelactivity. Change theDisplayNameproperty of the copiedSequenceactivity toWarehouse2.- The copied
Sequenceactivity should have its own set of copied variables that are now scoped byWarehouse2. Change the default value of theWarehouseIdvariable from1to2.- Make another copy of the
Warehouse1Sequenceactivity, and add it as a third branch to theParallelactivity. Change theDisplayNametoWarehouse3, and change theWarehouseIdvariable from1to3.- Set the
Parallel.CompletionConditionproperty toArgQuantityFound = ArgQuantity. This condition is evaluated each time a branch of execution completes. If the condition is true, all other branches of execution are canceled. In this case, when the requested quantity has been found, there is no need to check the other warehouses.
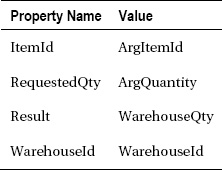
Figure 5-8 is the completed Warehouse1 Sequence activity. The other branches under the Parallel activity should look structurally the same.

Figure 5-8. Warehouse1 Sequence activity
Hosting the Workflow
To host this workflow, modify the Program.cs file in the GetItemLocation project to look like this:
using System;

using System.Activities;

using System.Collections.Generic;


namespace GetItemLocation

{

    class Program

    {

        static void Main(string[] args)

        {

            RunWorkflow(new GetItemLocation(), 100, 2);

            RunWorkflow(new GetItemLocation(), 100, 8);

            RunWorkflow(new GetItemLocation(), 100, 20);

            RunWorkflow(new GetItemLocation(), 100, 100);

            RunWorkflow(new GetItemLocation(), 200, 10);

            RunWorkflow(new GetItemLocation(), 300, 15);


            Console.WriteLine("Press any key to exit");

            Console.ReadKey();

        }


        private static void RunWorkflow(Activity workflow,

            Int32 itemId, Int32 quantity)

        {

            IDictionary<String, Object> output = WorkflowInvoker.Invoke(

                workflow, new Dictionary<string, object>

                {

                    {"ArgItemId", itemId},

                    {"ArgQuantity", quantity}

                });


            Console.WriteLine(

                "Item: {0} Requested: {1} Found: {2} Warehouse: {3}",

                    itemId, quantity, output["ArgQuantityFound"],

                    output["ArgWarehouseIdFound"]);

        }

    }

}
Just as you did previously for the While activity example, the workflow is executed a number of times. Each time a different combination of itemId and requested quantity are passed as input arguments.
Testing the Workflow
You should now be able to successfully build the GetItemLocation project and run it. When I execute it, I see these results:
Warehouse 1 InventoryLookup


Warehouse 1 If


Item: 100 Requested: 2 Found: 2 Warehouse: 1


Warehouse 1 InventoryLookup


Warehouse 1 If


Warehouse 2 InventoryLookup


Warehouse 2 If


Item: 100 Requested: 8 Found: 8 Warehouse: 2


Warehouse 1 InventoryLookup


Warehouse 1 If


Warehouse 2 InventoryLookup


Warehouse 2 If


Warehouse 3 InventoryLookup


Warehouse 3 If


Item: 100 Requested: 20 Found: 20 Warehouse: 3


Warehouse 1 InventoryLookup


Warehouse 1 If


Warehouse 2 InventoryLookup


Warehouse 2 If


Warehouse 3 InventoryLookup


Warehouse 3 If


Item: 100 Requested: 100 Found: 0 Warehouse: 0


Warehouse 1 InventoryLookup


Warehouse 1 If


Warehouse 2 InventoryLookup


Warehouse 2 If


Warehouse 3 InventoryLookup


Warehouse 3 If


Item: 200 Requested: 10 Found: 10 Warehouse: 3


Warehouse 1 InventoryLookup


Warehouse 1 If


Warehouse 2 InventoryLookup


Warehouse 2 If


Warehouse 3 InventoryLookup


Warehouse 3 If


Item: 300 Requested: 15 Found: 0 Warehouse: 0


Press any key to exit
The results are a bit noisy because of the WriteLine activities. But they do serve a purpose. They show that each Sequence activity under the Parallel activity was executed to full completion before moving on the next Sequence activity. This example doesn’t exhibit any parallel behavior because none of the activities yields control of the workflow thread. Knowing how the Parallel activity works, these are the results that you should have expected. The results for each requested item and quantity are also correct.
Please note that the first test execution processed only the first warehouse. This is due to the CompletionCondition that was set for the Parallel activity. Since the first warehouse satisfied the requested quantity for the item, there was no need to continue processing with the other warehouses. Likewise, the second test execution was satisfied by the second warehouse, and processing stopped before the third warehouse was processed.
This workflow obviously doesn’t take full advantage of the Parallel activity. The problem is that the InventoryLookup activity isn’t implemented to perform its work asynchronously. That problem is solved in the next example.
Obtaining Asynchronous Execution with the Parallel Activity
If you do want true asynchronous parallel execution, you need an activity that was written to perform its work asynchronously. In this example, you will revisit the InventoryLookup activity. You will rewrite the activity using the AsyncCodeActivity<TResult> base class to take advantage of the capabilities of the Parallel activity. The goal is to perform the same work as before but to allow the query against all three warehouses to take place simultaneously.
Implementing the InventoryLookupAsync Activity
Add a new activity to the ActivityLibrary project using the Code Activity new item template. Name this new activity InventoryLookupAsync. The code that you need for this new activity is shown next.
![]() Tip Much of the code for this activity can be copied from the original
Tip Much of the code for this activity can be copied from the original InventoryLookup activity that was presented earlier in the chapter.
using System;

using System.Activities;

using System.Collections.Generic;


namespace ActivityLibrary

{
The code first defines an internal class that is used to pass the arguments to a worker thread. The activity class itself is derived from the AsyncCodeActivity<TResult> base class and specifies Int32 as the type for the Result OutArgument. As was the case with the original version of this activity, a set of test data is populated during construction of the class.
    internal class InventoryLookupAsyncArgs

    {

        public Int32 ItemId { get; set; }

        public Int32 WarehouseId { get; set; }

        public Int32 RequestedQty { get; set; }

    }


    public class InventoryLookupAsync : AsyncCodeActivity<Int32>

    {

        public InArgument<Int32> ItemId { get; set; }

        public InArgument<Int32> WarehouseId { get; set; }

        public InArgument<Int32> RequestedQty { get; set; }


        private Dictionary<Int32, Dictionary<Int32, Int32>> _warehouses

            = new Dictionary<Int32, Dictionary<Int32, Int32>>();


        public InventoryLookupAsync()

        {

            //load some test data

            _warehouses.Add(1, new Dictionary<int, int>

            {

                {100, 5},

                {200, 0},

                {300, 0},

            });


            _warehouses.Add(2, new Dictionary<int, int>

            {

                {100, 10},

                {200, 0},

                {300, 0},

            });


            _warehouses.Add(3, new Dictionary<int, int>

            {

                {100, 50},

                {200, 75},

                {300, 0},

            });

        }
The BeginExecute method follows the same pattern that you first saw in Chapter 3. An instance of the InventoryLookupAsyncArgs class is populated with the input arguments since they can only be retrieved on the workflow thread. A Func delegate is defined that takes an instance of the arguments class and returns an Int32. This delegate is assigned to a private Lookup method of this class that matches the delegate definition. After assigning the delegate to the UserState property of the activity context, the delegate is asynchronously executed with a call to the BeginInvoke method.
        protected override IAsyncResult BeginExecute(

            AsyncCodeActivityContext context,

            AsyncCallback callback, object state)

        {

            InventoryLookupAsyncArgs parameters = new InventoryLookupAsyncArgs

            {

                ItemId = ItemId.Get(context),

                WarehouseId = WarehouseId.Get(context),

                RequestedQty = RequestedQty.Get(context),

            };


            Func<InventoryLookupAsyncArgs, Int32> asyncWork =

                args => Lookup(args);

            context.UserState = asyncWork;

            return asyncWork.BeginInvoke(parameters, callback, state);

        }
The Lookup method is executed on a thread pool thread. It uses the arguments to look up the inventory for the requested item and quantity. The available inventory for the requested item is returned from the method.
        private Int32 Lookup(InventoryLookupAsyncArgs args)

        {

            Int32 availableInventory = 0;

            Dictionary<Int32, Int32> warehouse = null;

            if (_warehouses.TryGetValue(args.WarehouseId, out warehouse))

            {

                if (warehouse.TryGetValue(args.ItemId, out availableInventory))

                {

                    if (availableInventory > args.RequestedQty)

                    {

                        availableInventory = args.RequestedQty;

                    }

                }

            }

            return availableInventory;

        }
The EndExecute method is invoked when the asynchronous work (the Lookup method) completes. This is your opportunity to complete the asynchronous processing of the delegate with a call to EndInvoke. The available inventory is returned from the EndInvoke method and is, in turn, returned from EndExecute. The value that is returned from this method is used to set the Result OutArgument of the activity.
        protected override int EndExecute(

            AsyncCodeActivityContext context, IAsyncResult result)

        {

            return ((Func<InventoryLookupAsyncArgs, Int32>)

                context.UserState).EndInvoke(result);

        }

    }

}
Modifying the GetItemLocation Workflow
To test this new asynchronous version of the custom activity, you need to make only a few changes to the existing GetItemLocation workflow (in the GetItemLocation project). You simply need to change all InventoryLookup activity references to InventoryLookupAsync. The easiest way to do this is by directly editing the Xaml file instead of using the designer. Please follow these steps:
- Open the
GetItemLocation.xamlfile in Code View. This should open the XML editor rather than the designer.- Change all
InventoryLookupreferences toInventoryLookupAsync. This will change the actual activity declarations as well as the string literals for three of theWriteLineactivities.
Testing the Revised Workflow
After building the solution, you should be ready to execute the GetItemLocation project. Here are my results:
Warehouse 1 InventoryLookupAsync


Warehouse 2 InventoryLookupAsync


Warehouse 3 InventoryLookupAsync


Warehouse 1 If


Item: 100 Requested: 2 Found: 2 Warehouse: 1


Warehouse 1 InventoryLookupAsync


Warehouse 2 InventoryLookupAsync


Warehouse 3 InventoryLookupAsync


Warehouse 1 If


Warehouse 2 If


Item: 100 Requested: 8 Found: 8 Warehouse: 2


Warehouse 1 InventoryLookupAsync


Warehouse 2 InventoryLookupAsync


Warehouse 3 InventoryLookupAsync


Warehouse 1 If


Warehouse 2 If


Warehouse 3 If


Item: 100 Requested: 20 Found: 20 Warehouse: 3


Warehouse 1 InventoryLookupAsync


Warehouse 2 InventoryLookupAsync


Warehouse 3 InventoryLookupAsync


Warehouse 1 If


Warehouse 2 If


Warehouse 3 If


Item: 100 Requested: 100 Found: 0 Warehouse: 0


Warehouse 1 InventoryLookupAsync


Warehouse 2 InventoryLookupAsync


Warehouse 3 InventoryLookupAsync


Warehouse 1 If


Warehouse 2 If


Warehouse 3 If


Item: 200 Requested: 10 Found: 10 Warehouse: 3


Warehouse 1 InventoryLookupAsync


Warehouse 2 InventoryLookupAsync


Warehouse 3 InventoryLookupAsync


Warehouse 1 If


Warehouse 2 If


Warehouse 3 If


Item: 300 Requested: 15 Found: 0 Warehouse: 0


Press any key to exit
The results indicate that the warehouse that was chosen for each item and quantity are the same as the previous results. But clearly there is a significant difference in how those results were obtained. In this test, all three instances of the InventoryLookupAsync activity were started immediately, even though they were in three separate branches under the Parallel activity. Once the asynchronous work of each InventoryLookupAsync activity was completed, the corresponding If activity within the same branch was executed.
Since the work of looking up the inventory for a warehouse was executing asynchronously on another thread, the workflow thread was available to process other branches of execution. In this case, the combination of the Parallel activity and an activity that is capable of asynchronous work accomplishes much more than either activity can by itself.
As you saw in the original version of this workflow, the CompletionCondition of the Parallel activity was used to cancel additional processing once a satisfactory warehouse was found.
![]() Tip You will receive the most significant benefit from the
Tip You will receive the most significant benefit from the Parallel activity when its child activities yield control of the workflow thread. The child activities could be asynchronous activities that perform work on a separate thread, or they could be other activities that become idle because they are waiting for external input.
Summary
This chapter focused on the procedural activities that are most frequently used for branching and looping. The If and Switch<T> activities were discussed first. They are used to make decisions that affect the flow of execution within a workflow. The While and DoWhile activities implement looping patterns and were demonstrated next. The chapter concluded with a discussion of the Parallel activity, which supports parallel scheduling and interleaved execution of multiple branches. The Delay activity allows you to introduce a short delay into the execution of a workflow. This activity was used in the Parallel activity examples.
In the next chapter, you will learn about additional procedural activities that are used for data driven flow control and collection management.