
This chapter continues coverage of the Windows Communication Foundation (WCF) support that is provided by Windows Workflow Foundation (WF). Chapter 9 began the discussion with an introduction to workflow services and WCF in general. In that chapter, you declared a simple request/response service operation, hosted it using Internet Information Services (IIS), developed a self-hosting application, and developed two client applications to test it.
The chapter expands on this basic example from Chapter 9 by implementing additional workflow services that are consumed by the original workflow. One additional service demonstrates how to use context-based and content-based correlation to route messages to the correct service instance. Another example service uses the duplex message exchange pattern to invoke callback operations of the calling service. The final example demonstrates how to use workflow extensions with services.
The chapter concludes with a discussion of exception and fault processing, flowing transactions into a workflow service, and the use of standard WF behaviors to fine-tune workflow service performance.
![]() Note This chapter assumes that the examples presented in Chapter 9 are used as the starting point for this chapter. In particular, the
Note This chapter assumes that the examples presented in Chapter 9 are used as the starting point for this chapter. In particular, the ServiceLibrary, ServiceHost, and WorkflowClient projects that were first developed in Chapter 9 will be used in this chapter. Any new workflows or activities that you develop in this chapter should be added to one of these existing projects.
Using Context-Based Correlation
In this section, you will declare a workflow service that relies upon context-based correlation to route messages to the correct workflow instance. The ProcessOrder operation that you declared and used in Chapter 9 is a simple request/response operation. When a client application invokes the operation, a new instance of the workflow service is created (because of the Receive.CanCreateInstance property with a value of true). When the service sends a reply to the caller (using the SendReply activity), the workflow is complete, and the instance is disposed.
In contrast with this, you will now declare a workflow service (named ShipOrder) that is stateful and supports multiple operations. This new workflow extends the previous example scenario by implementing a set of service operations related to the shipment of the order. These operations will be invoked by the ProcessOrder operation of the OrderProcessing workflow service.
Here are the operations that you will declare in the ShipOrder workflow service:
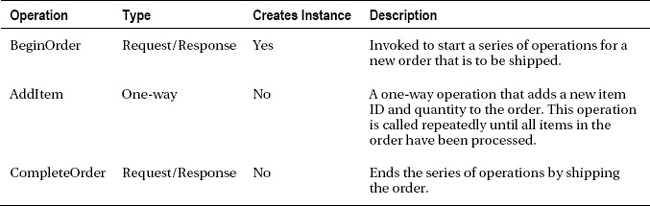
The BeginOrder operation is the only one that is capable of creating a new instance of the workflow service. It is invoked first, followed by one or more calls to the AddItem operation. Finally, the CompleteOrder operation is invoked to signal that entry of the order is complete and that it can be shipped. The response from the CompleteOrder operation provides the expected date of shipment.
Correlation is required when multiple operations must all use the same workflow instance. Correlation ensures that the messages for each operation are routed to the correct instance. As I mentioned in Chapter 9, there are two ways to implement this type of correlation: context-based and content-based.
In the example that follows, you will implement the ShipOrder workflow service using context-based correlation. This form of correlation relies upon a WCF binding that supports the exchange of context information in the SOAP headers (WSHttpContextBinding, NetTcpContextBinding, BasicHttpContextBinding). Context-based correlation is the easiest of the two correlation types to implement. Later, you will revise the ShipOrder workflow service to use content-based correlation.
Guidelines for Context-Based Correlation
In general, you can follow these guidelines when using context-based correlation:
- At least one service operation must have the
Receive.CanCreateInstanceproperty set to true in order to create a new instance of the workflow.- Service operations that are designed to interact with an existing workflow instance should have their
CanCreateInstanceproperties set to false.- All service operations that are designed to create a new workflow instance must use the request/response message exchange pattern. The response is necessary to return context information to the caller that is used in subsequent operations.
- A binding that supports the exchange of context information must be used.
Declaring the ShipOrder Workflow Service
The basic structure of this workflow service will be a flowchart with a Pick activity. The Pick activity has three PickBranch activities, one for each operation that is supported. The flowchart will continuously loop until the CompleteOrder operation has been invoked. Each time through the loop, the Pick activity is executed again, preparing the workflow to accept any of the three operations.
Add a new WCF Workflow Service to the ServiceLibrary project, and name it ShipOrder. Delete the top-level Sequence activity (along with its child messaging activities) since it won't be used. Set the Name and ConfigurationName properties of the workflow service to ShipOrder.
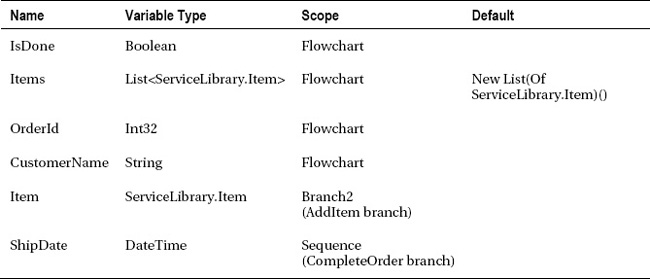
Here is a recap of the workflow variables that you will add to the workflow. Follow the instructions to see when you can add them to the workflow.
Follow these steps to complete the declaration of this workflow:
- Add a
Flowchartactivity to the empty workflow.- Add the four variables that are scoped by the
Flowchart:IsDone,Items,OrderId, andCustomerName.- Add a
Pickactivity as a child of theFlowchart. Connect the starting point of the flowchart to the top of thePickactivity.- Add a
FlowDecisionbelow thePickactivity. Set theConditionproperty toIsDone. Connect thePickactivity to the top of theFlowDecision. Drag a connection from the false side of theFlowDecision(the right side) to the side of thePickactivity. This causes the workflow to execute thePickactivity until theIsDonevariable is true.- Open the
Pickactivity, and add a thirdPickBranch(thePickactivity starts with two branches).- Add a
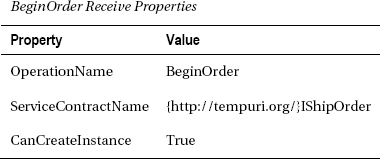
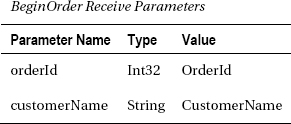
ReceiveAndSendReplyactivity template to theTriggerproperty of the leftmostPickBranch. Use the values shown in the following tables to set the properties and parameters of theReceiveactivity. For this operation, the content type is set toParameters.
- The
SendReplyToReceiveactivity does not require any changes. No individual parameters are returned with the response.- Add a
WriteLineactivity between theReceiveandSendReplyToReceiveactivities. Set theTextproperty toString.Format("BeginOrder OrderId: {0}, Cust: {1}", OrderId, CustomerName). Figure 10-1 shows the completedPickBranchfor theBeginOrderoperation.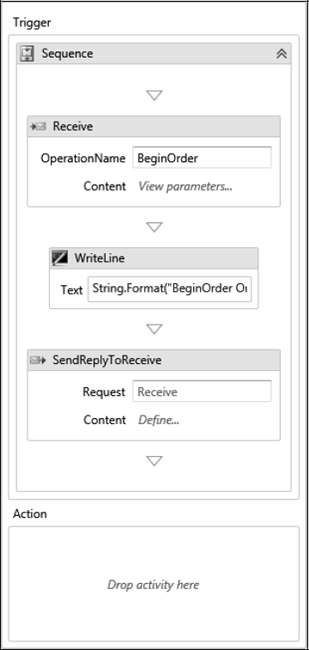
- Add the
Itemvariable that is scoped byBranch2to the middlePickBranch.- Add a
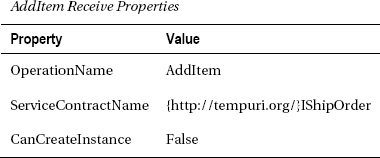
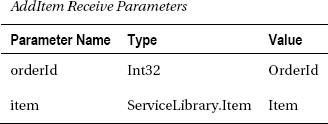
Receiveactivity (not aReceiveAndSendReplyactivity template as you usually do) to theTriggerproperty of the middlePickBranch. Use the values shown in the following tables to set the properties and parameters of thisReceiveactivity. The content type for this activity should be set to Parameters.
- Add a
Sequenceactivity to theActionportion of the middlePickBranch. Add anAddToCollection<T>activity to theSequence. Set the generic type toServiceLibrary.Item. Set theCollectionproperty toItemsand theItemproperty toItem. This adds the newly receivedItemobject to a collection of items for the order.- Add a
WriteLineactivity to theSequenceactivity, directly below theAddToCollection<T>activity. Set theTextproperty toString.Format("AddItem OrderId:{0}, ItemId:{1}, Qty:{2}", OrderId, Item.ItemId, Item.Quantity). Figure 10-2 shows the completedPickBranchfor theAddItemoperation.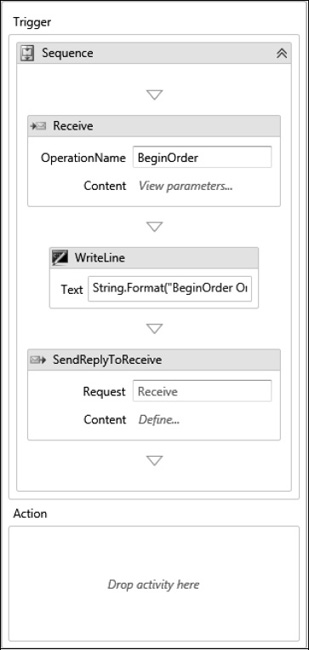
- Add a
ReceiveAndSendReplyactivity template to theTriggerproperty of the rightmostPickBranch.- Add the
ShipDatevariable to theSequenceactivity that was just added with theReceiveAndSendReply.- Set the properties and parameters of the
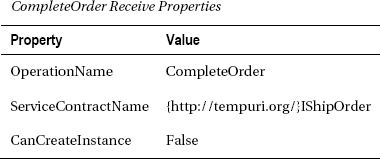
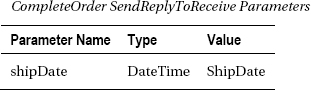
Receiveactivity to the values shown in the following tables.
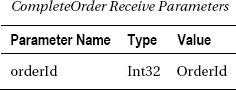
- Set the parameters of the
SendReplyToReceiveactivity (for theCompleteOrderoperation) to the values shown in this table.
- Add an
Assignactivity between theReceiveand theSendReplyToReceive. Set theAssign.Toproperty toShipDateand theAssign.Valueproperty toDate.Now.AddDays(Items.Count).Date.- Add another
Assignactivity below the previous one. Set theAssign.Toproperty toIsDoneand theAssign.Valueto True.- Add a
WriteLineactivity below theAssignactivity, and set theTextproperty toString.Format("CompleteOrder OrderId:{0}, ShipDate:{1:D}", OrderId, ShipDate). Figure 10-3 shows the completedPickBranchfor theCompleteOrderoperation.
![]() Tip It is interesting to note that the
Tip It is interesting to note that the SendReply activity that is associated with the BeginOrder operation (SendReplyToReceive) does not return any parameters. Because of this, you might feel that you can change this to a one-way operation and remove the SendReply completely. Even though no parameters are returned with the reply, the SendReply serves a vital purpose. It returns the context information in the SOAP headers that is used by the subsequent operations to locate the correct workflow instance. If you are using context-based correlation, the first operation must use the request/response message exchange pattern in order to return the context information.
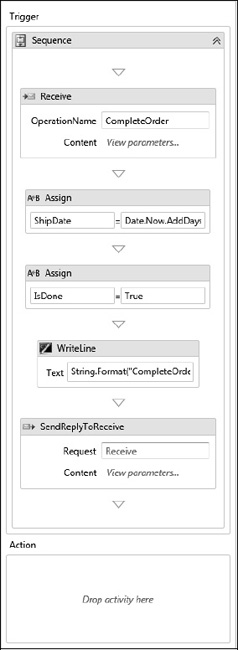
Figure 10-3. CompleteOrder PickBranch
Figure 10-4 shows the completed Pick activity with all three PickBranch instances. Figure 10-5 shows the completed top-level of the ShipOrder workflow.
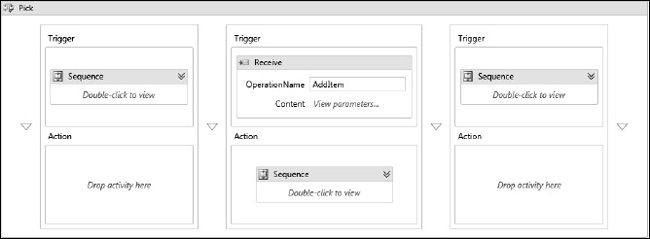
Figure 10-4. Pick activity
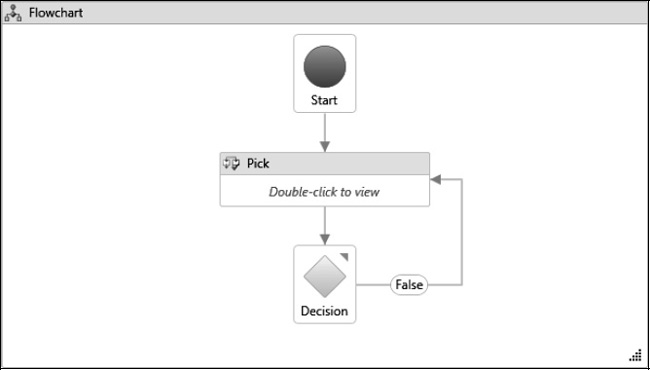
Figure 10-5. ShipOrder workflow
In the next section, you will modify the OrderProcessing workflow to invoke operations of the ShipOrder workflow. For simplicity in testing, both workflow services will be hosted by the ServiceHost application.
If you like, you can first test this new workflow service directly using the WCF Test Client. However, if you do, be aware that you need to add entries to the Web.config file to use wsHttpContextBinding for this service. If you don't use a binding that supports context exchange, the operations will not work correctly.
Modifying the OrderProcessing Service
You will now modify the OrderProcessing workflow to invoke the operations of the new ShipOrder service. This is the workflow service that you implemented in Chapter 9. After opening the OrderProcessing workflow in the designer, you can follow these steps to make the modification:
- Delete the third
Assignstatement that assigns a value toResponse.ShipDate. In its place, add aFlowchartactivity. Change theDisplayNameof the new activity toShipOrderFC.- After opening the new
ShipOrderFCactivity, add aSendAndReceiveReplyactivity template to the empty flowchart. Change theDisplayNameof theSequenceactivity that is added with the template toBeginOrderSequence. Drag a connection from the starting point of the flowchart to this newSequenceactivity.- Set the properties of the
Sendactivity to invoke theBeginOrderoperation. Use the values from the following tables to set the properties and parameters. The value for theEndpointConfigurationNamemust match a client configuration section that you will add to theApp.configfile for theServiceHostproject. The settings in the configuration file identify the endpoint and other settings that allow this workflow service to invoke theShipOrderoperations.
- There are no properties or parameters that need to be set for the
ReceiveReplyForSendactivity.- Add a
ForEach<T>activity below theBeginOrderSequenceactivity. Set the generic type toServiceLibrary.Item. Set theValuesproperty toRequest.Items. Add a connection from theBeginOrderSequenceactivity to the top of this activity.- Add an
Ifactivity as a child of theForEach<T>activity. Set theIf.Conditionproperty toitem IsNot Nothing. This prevents the processing of collection entries that are null.- Add a
Sendactivity to theIf.Thenproperty. The purpose of this activity is to invoke theAddItemservice operation. Set the properties and parameters for theSendactivity according to the values shown in the following tables.
- Add another
SendAndReceiveReplyactivity template below theForEach<T>that you just added. Connect the bottom of theForEach<T>to the top of theSequenceactivity that was added. Change theDisplayNameof theSequenceactivity toCompleteOrderSequence.- Use the values in the following tables to set the properties and parameters for the
Sendactivity that was just added.- Set the content parameters for the
ReceiveReplyForSendactivity for theCompleteOrderoperation using the values shown in the following table.
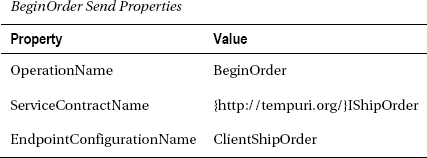
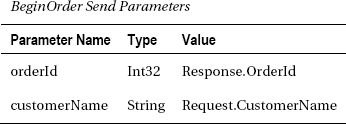
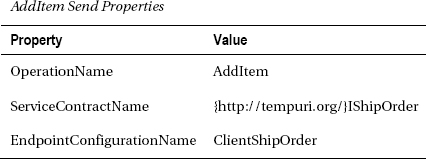
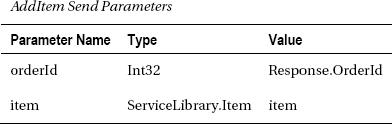

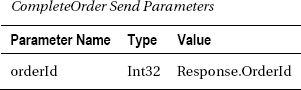
Figure 10-6 shows the completed ShipOrderFC activity. Figure 10-7 shows the updated OrderProcessing workflow.
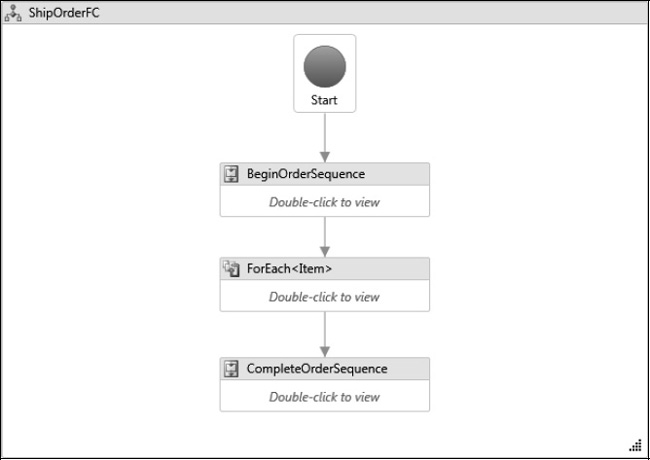
Figure 10-6. ShipOrderFC flowchart
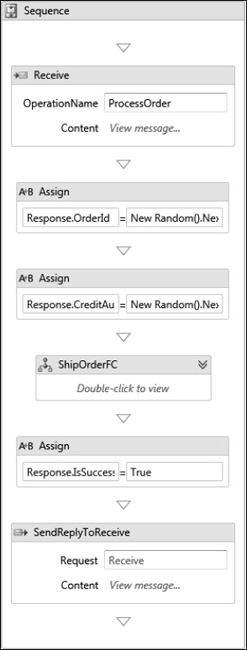
Figure 10-7. Revised OrderProcessing workflow
Hosting the ShipOrder Workflow Service
To host the new ShipOrder workflow service, you have to make only a small addition to the Program.cs file of the ServiceHost project, as shown here:
namespace ServiceHost

{

    class Program

    {

…

        static void Main(string[] args)

        {

            try

            {

                CreateServiceHost("OrderProcessing.xamlx");

                CreateServiceHost("ShipOrder.xamlx");

…

            }

…

        }

…

    }

}
Configuring the ServiceHost Application
The App.config file for the ServiceHost project also requires a few changes. First, you need to add a service entry for the ShipOrder workflow service. Make sure that this service uses the wsHttpContextBinding since context information must be exchanged.
Second, you need to add a client section that identifies the endpoint and binding for the ShipOrder workflow service. These settings are used for client applications that need to access the operations within the ShipOrder workflow service. The client in this case is actually the OrderProcessing workflow. The client endpoint name shown here (ClientShipOrder) must match the EndpointConfigurationName property that was set for the Send activities in the OrderProcessing workflow.
Here is an abbreviated App.config file showing the new entries that need to be added:
<?xml version="1.0"?>

<configuration>

  <system.serviceModel>

    <services>

…

      <service name="ShipOrder">

        <host>

          <baseAddresses>

            <add baseAddress="http://localhost:9031/"/>

          </baseAddresses>

        </host>

        <endpoint contract="IShipOrder"

          address="http://localhost:9031/ShipOrder"

          binding="wsHttpContextBinding" />

      </service>

    </services>

…

    <client>

      <endpoint name="ClientShipOrder"

       contract="IShipOrder" binding="wsHttpContextBinding"

       address="http://localhost:9031/ShipOrder" />

    </client>

…

  </system.serviceModel>

…

</configuration>
Testing the Revised OrderProcessing Workflow
After building the solution, you should be ready to test the revised OrderProcessing workflow and the ShipOrder workflow that it invokes. You'll need to run both the ServiceHost and WorkflowClient projects, so you need to once again make sure that the multiple project startup option is set. Here are my results for the ServiceHost project:
Contract: IOrderProcessing


    at http://localhost:9000/OrderProcessing


Contract: IShipOrder


    at http://localhost:9031/ShipOrder


Press any key to stop hosting and exit


BeginOrder OrderId: 124395128, Cust: Bruce Bukovics


AddItem OrderId:124395128, ItemId:200, Qty:1


AddItem OrderId:124395128, ItemId:300, Qty:2


CompleteOrder OrderId:124395128, ShipDate:Saturday, December 26, 2009
The additional lines are generated by the WriteLine activities of the ShipOrder workflow. The results for the WorkflowClient project should be consistent with previous tests.
Using Content-Based Correlation
In the previous example, you used context-based correlation to invoke the operations of the ShipOrder workflow service from the OrderProcessing workflow. The context information that routed the messages to the correct workflow instance was transmitted by the WCF infrastructure in the SOAP headers.
In this example, you will revise the ShipOrder workflow service to use content-based correlation instead. As the name implies, content-based correlation uses data in the message itself to route the message to the correct instance. You may have noted that all the operations of the ShipOrder workflow service conveniently include an orderId parameter. Since the value of this parameter is unique and is consistent for all calls to the service operations, it can be used for content-based correlation. If necessary, you can also use the values from multiple parameters to control correlation.
The value of the selected parameter is retrieved from each request using an XPath query. Fortunately, the workflow designer enables you to very simply define the query using a drop-down list of available parameters.
Guidelines for Content-Based Correlation
In general, you can follow these guidelines when using content-based correlation:
- At least one service operation must have the
CanCreateInstanceproperty set to true in order to create a new instance of the workflow.- Service operations that are designed to interact with an existing workflow instance should have their
CanCreateInstanceproperties set to false.- All operations that you want to correlate must include a parameter that can be used to consistently and uniquely identify a workflow instance.
- A single
CorrelationHandlevariable should be shared by all service operations that you want to correlate.- Each operation that is capable of creating a new workflow instance should initialize the shared
CorrelationHandleusing aQueryCorrelationInitializer.- All operations that must correlate with an existing workflow instance should reference the shared
CorrelationHandleusing theCorrelatesWithproperty. They should also retrieve the data used for correlation from the current message by setting theCorrelatesOnproperty.
Modifying the ShipOrder Workflow Service
In the steps that follow, you will modify the ShipOrder workflow service to use content-based correlation. Open the ShipOrder.xamlx file in the designer, and follow these steps to make the necessary modifications:
- Add a new variable that is scoped by the topmost
Flowchartactivity. The variable is namedSharedHandle, and the type isCorrelationHandle. This handle must be placed at the top-level of the workflow in order to be shared by all of the service operations.- Locate the
Receiveactivity for theBeginOrderoperation. Modify theCorrelationInitializersproperty by clicking the ellipsis in the Properties window. Delete any correlation initializers that may already exist for the activity. Add a newQueryCorrelationInitializerby selecting Query correlation initializer from the list of available initializers. EnterSharedHandleas the handle variable to be initialized. In the XPath Queries section, select theorderIdparameter from the drop-down list. This initializes theSharedHandleusing the contents of theorderIdrequest parameter. Figure 10-8 shows the completed Add Correlation Initializers dialog.- Locate the
Receiveactivity for theAddItemoperation. Set theCorrelatesWithproperty to theSharedHandlevariable. TheCorrelatesWithproperty specifies the handle that was initialized during the first service operation. TheCorrelatesOnproperty uses an XPath query to retrieve the data to be used for correlation from the request message. Select theorderIdparameter as theCorrelatesOnXPath query.- Locate the
Receiveactivity for theCompleteOrderoperation. Set theCorrelatesWithandCorrelatesOnproperties in the same way as you did for theAddItemoperation.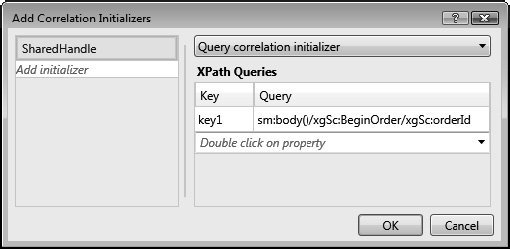
Figure 10-8. Query correlation initializer
Configuring the ServiceHost Application
Since the service contract for the ShipOrder workflow service did not change, there are no changes that are necessary to the OrderProcessing workflow.
However, you can make a minor change to the App.config file for the ServiceHost project. The original context-based version of the ShipOrder workflow service used wsHttpContextBinding since a binding that supported context exchange was required. That requirement is no longer valid, and you can change this workflow service to use basicHttpBinding instead. Here is an abbreviated App.config file showing the section that has changed:
<?xml version="1.0"?>

<configuration>

  <system.serviceModel>

    <services>

…

      <service name="ShipOrder">

        <host>

          <baseAddresses>

            <add baseAddress="http://localhost:9031/"/>

          </baseAddresses>

        </host>

        <endpoint contract="IShipOrder"

          address="http://localhost:9031/ShipOrder"

          binding="basicHttpBinding" />

      </service>

    </services>

…

    <client>

      <endpoint name="ClientShipOrder"

       contract="IShipOrder" binding="basicHttpBinding"

       address="http://localhost:9031/ShipOrder" />

    </client>

…

  </system.serviceModel>

…

</configuration>
Testing the Revised Workflow Service
After building the solution, you should be ready to test the revised ShipOrder workflow service. After running the ServiceHost and WorkflowClient projects in the normal way, the results should be consistent with the previous test.
Implementing a Duplex Message Exchange Pattern
The duplex pattern is another message exchange pattern that is supported by WF. In this pattern, two-way communication is established between two WCF services. The first service invokes a one-way operation on the second service. After completing its work, the second service invokes a one-way operation (a callback) on the first service. The endpoint address for the callback was provided by the infrastructure with the initial operation.
The assumption when using this pattern is that the second service operation may take some extended amount of time to complete. That’s the primary reason why a more typical request/response pattern isn’t used.
In this section, you will once again extend the original order processing scenario by implementing the CreditApproval workflow service. This new service will be invoked by the OrderProcessing workflow to simulate authorization of a credit card as payment for the order. The CreditApproval service uses the duplex message exchange pattern to call back to the OrderProcessing workflow with the result of the credit authorization.
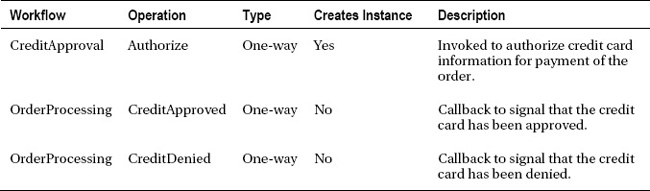
Here is a summary of the operation that you will declare in the CreditApproval workflow as well as additional operations that you will add to the OrderProcessing workflow:
Guidelines for the Duplex Message Exchange Pattern
In general, you can follow these guidelines when implementing the duplex message exchange pattern:
- Use a binding that supports context exchange. More specifically, you need to use a binding that supports the
ClientCallbackAddressproperty of theContextBindingElement.- Declare one or more service operations that are capable of creating a new service instance.
- Any service operations that create a new instance should initialize a
CorrelationHandlewith theCallbackCorrelationInitializer.- Callback operations into the original calling workflow should use the
CorrelatesWithproperty to reference theCorrelationHandlethat was previously initialized.- The calling workflow service must declare one or more operations that are invoked as a callback.
- Do not use the original
ServiceContractNamefor callback operations. A differentServiceContractNameshould be used for all callback operations since these operations require additional binding settings.- Define a unique endpoint for the callback operations.
- The binding configuration used by the first workflow to invoke the second must include the
ClientCallbackAddressproperty. This property must reference the unique endpoint that was established for the callback operations.
Declaring the CreditApproval Workflow Service
Add a new WCF Workflow Service to the ServiceLibrary project, and name it CreditApproval. Delete the top-level Sequence activity (along with its child messaging activities). Set the Name and ConfigurationName properties of the workflow service to CreditApproval.
Here is a recap of the workflow variables that you will add to the workflow:

Follow these steps to complete the declaration of this workflow:
- Add a
Flowchartactivity to the empty workflow, and add all of the variables.- Add a
Receiveactivity to the flowchart. Use the values in the following tables to set the properties and content parameters of this activity. Connect the starting point of the flowchart to the top of thisReceiveactivity.
- Remove any initializers that may already exist for the
Receiveactivity. Add aCallbackCorrelationInitializerto theReceiveactivity. Set theCorrelationHandlefor the initializer to theCallbackHandlevariable. This is an important step since it initializes theCallbackHandlewith the correlation data that is needed to call back into the original calling workflow. Figure 10-9 shows the Add Correlation Initializers dialog.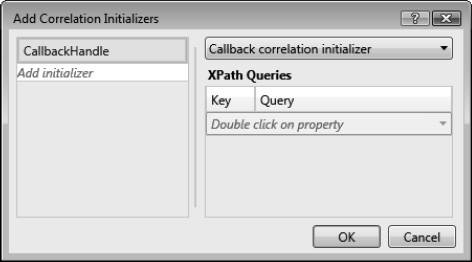
Figure 10-9. Receive activity callback correlation initializer
- Add a
WriteLineto the flowchart, and set theTextproperty toString.Format("Simulate credit auth for {0} {1} {2}", CreditCard, CreditCardExpiration, TotalAmount). Connect theReceiveactivity to this newWriteLineactivity.- Add a
Delayactivity to the flowchart. Set theDurationproperty toTimeSpan.FromSeconds(4). This adds a short delay to simulate the credit authorization process. Connect theWriteLineactivity to theDelayactivity.- Add a
FlowDecisionactivity to the flowchart. Set theConditionproperty toString.IsNullOrEmpty(CreditCard) Or String.IsNullOrEmpty(CreditCardExpiration). This adds a simple rule that is used to determine whether to approve or deny the credit request.- Add a
Sendactivity to the left side of theFlowDecision. The purpose of this activity is to call back to the calling workflow to deny the credit request. Set the properties of this activity using the values in the following table. TheCorrelatesWithproperty is important since it references theCallbackHandlethat was previously initialized. TheEndpoint.Bindingproperty identifies the type of binding that will be used for this callback operation. Add a connection from the left side of theFlowDecision(the true side) to this activity.
- Add an
Assignactivity to the right of theFlowDecisionactivity. Set theAssign.Toproperty toCreditAuthCodeand theAssign.Valueproperty toNew Random().Next(100000).ToString()to assign a random authorization code. Add a connection from the right side of theFlowDecision(the false side) to this activity.- Add a
Sendactivity below theAssignactivity. Set the properties and content parameters using the values shown in the following tables. Add a connection from theAssignactivity to thisSendactivity.
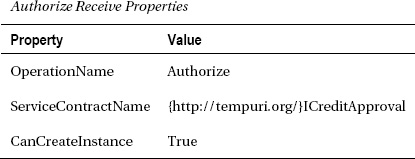
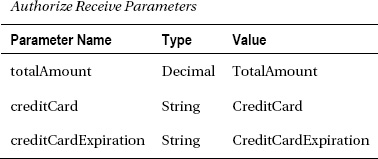
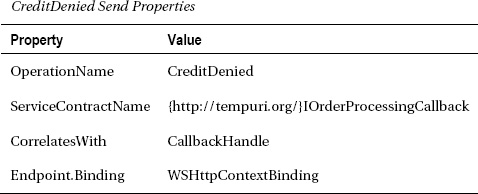
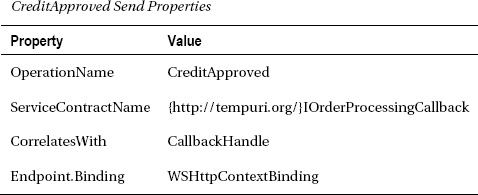
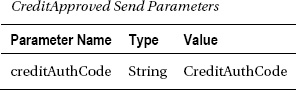
Figure 10-10 shows the completed CreditApproval workflow.
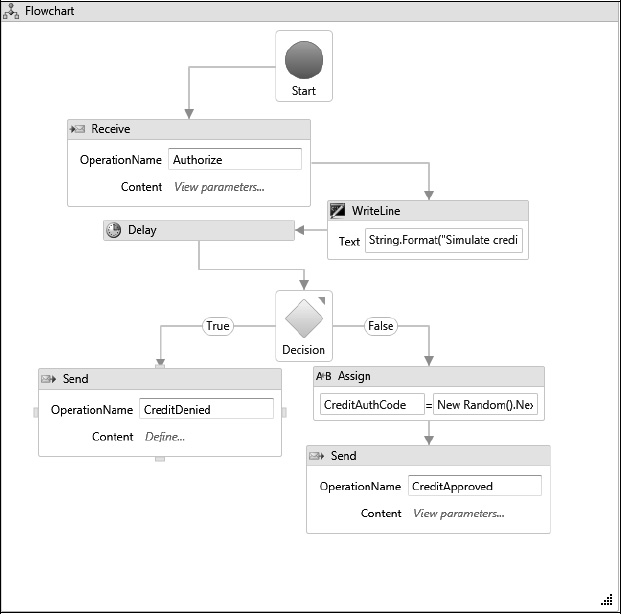
Figure 10-10. CreditApproval workflow
Modifying the OrderProcessing Service
The next step in this example is to modify the OrderProcessing workflow service to invoke the Authorize operation of the CreditApproval workflow service. The CreditApproved and CreditDenied operations must also be added to the OrderProcessing workflow.
You will invoke the Authorize operation using a Send activity. You will also add two Receive activities, one for the CreditApproved and one for the CreditDenied operation. These are the two callback operations that are invoked by the CreditApproval workflow. These activities all need to be correlated with each other. You can do this manually with a CorrelationHandle that is shared by all the activities. Or alternatively, you can place all of these activities into a CorrelationScope activity. This activity manages the correlation of its child activities and removes the need to manage a CorrelationHandle yourself. For this example, I’ve chosen the CorrelationScope approach.
Please follow these steps to modify the OrderProcessing workflow:
- Locate the
Assignactivity that sets theResponse.CreditAuthCodeto a random number. Delete this activity, and replace it with aCorrelationScopeactivity. Change theDisplayNameof theCorrelationScopeactivity toGetCreditApprovalto better identify its purpose.- Add a
Sequenceactivity to the body of theCorrelationScopeactivity, followed by anAssignactivity. Set theAssign.Toproperty toResponse.CreditAuthCodeand theAssign.Valueproperty toNothing.- Add a
Sendactivity under theAssignactivity. The purpose of this activity is to invoke theAuthorizeoperation of theCreditApprovalworkflow service. Use the values shown in the following tables to set the properties of theSendactivity.
- Add a
Pickactivity directly below theSendactivity. After theSendactivity invokes theAuthorizeoperation, the workflow must wait for either theCreditApprovedorCreditDeniedcallback operation to be invoked. ThePickactivity allows you to conveniently model both of those operations. Figure 10-11 shows theGetCreditApprovalactivity after adding thePickactivity.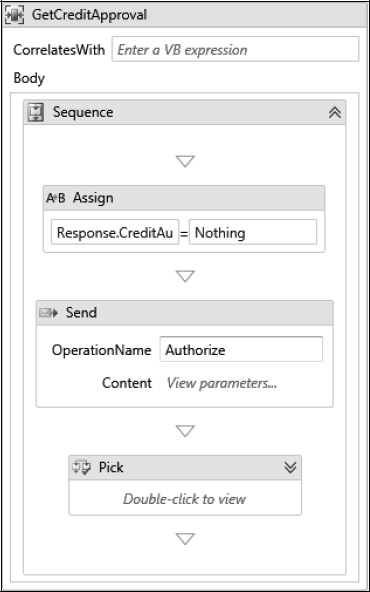
Figure 10-11. GetCreditApproval CorrelationScope activity
- Add a
Receiveactivity to theTriggerof the firstPickBranch. This activity declares theCreditApprovedoperation. Set the properties and parameters of this activity using the values shown in the following tables.
- Add a
WriteLineactivity to theActionof the firstPickBranch. Set theTextproperty toString.Format("Credit approved for {0}: {1}", Response.OrderId, Response.CreditAuthCode).- Add a
Receiveactivity to theTriggerof the secondPickBranch. This activity declares theCreditDeniedoperation. Set the properties of this activity using the values shown in the following table. This operation does not require any content parameters.
- Add a
WriteLineactivity to theActionof the secondPickBranch. Set theTextproperty toString.Format("Credit denied for {0}", Response.OrderId). Figure 10-12 shows the completedPickactivity with the two branches.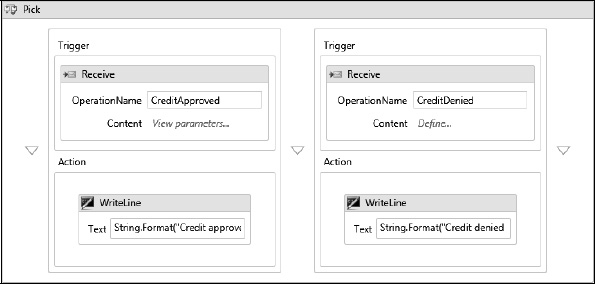
- Return to the topmost level of the workflow, and add an
Ifactivity under theGetCreditApprovalactivity. Set theIf.Conditionproperty toNot String.IsNullOrEmpty(Response.CreditAuthCode). If the condition is true, it means that the credit card was approved; otherwise, it was denied.- Add a
Sequenceactivity to theIf.Thenproperty. Move theShipOrderFCactivity and the finalAssignactivity (the one that sets theResponse.IsSuccessfulproperty) from the top level of the workflow to this newSequenceactivity. This is necessary since you want to ship the order and indicate success only if the credit was approved. Figure 10-13 shows the completedIfactivity.
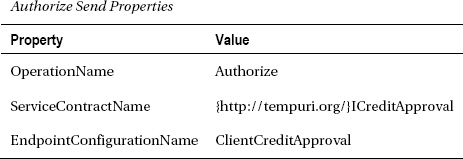

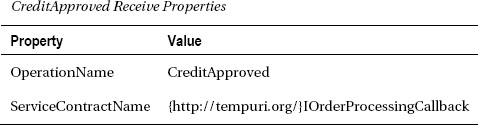
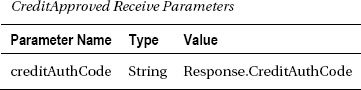
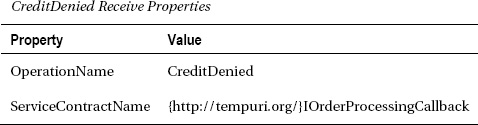
Figure 10-14 shows the revised OrderProcessing workflow.
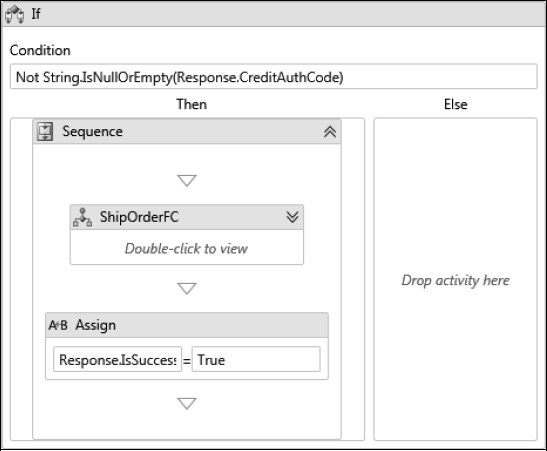
Figure 10-13. If activity with ShipOrderFC
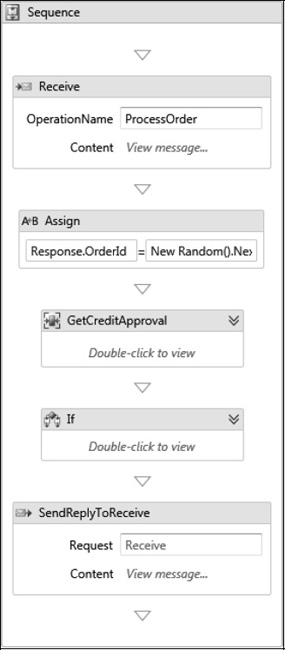
Figure 10-14. Revised OrderProcessing workflow
Hosting the CreditApproval Workflow Service
To host the new CreditApproval workflow service, once again modify the Program.cs file of the ServiceHost project, as shown here:
namespace ServiceHost

{

    class Program

    {

…

        static void Main(string[] args)

        {

            try

            {

                CreateServiceHost("OrderProcessing.xamlx");

                CreateServiceHost("ShipOrder.xamlx");

                CreateServiceHost("CreditApproval.xamlx");

…

            }

…

        }

…

    }

}
Configuring the ServiceHost Application
Before testing these revisions, you need to make several changes to the App.config file for the ServiceHost project. You need to add a service endpoint for the new CreditApproval workflow service. You also need to add a new endpoint to the OrderProcessing service, since it now supports a new set of callback operations. Finally, you need to configure a client section and binding configuration that allows the OrderProcessing service to invoke the CreditApproval service.
![]() Tip Probably the most important section of this
Tip Probably the most important section of this App.config is the definition of the binding that is used by the OrderProcessing service to access the CreditApproval service. That named binding configuration (ClientCreditApprovalBinding) includes an entry that sets the clientCallbackAddress property to the new callback endpoint. Without this entry, the CreditApproval workflow will be unable to successfully invoke the callback operations (CreditApproved or CreditDenied).
Here is a complete revised copy of the App.config file including all of the previous changes:
<?xml version="1.0"?>

<configuration>

  <system.serviceModel>

    <services>

      <service name="OrderProcessing3">

        <host>

          <baseAddresses>

            <add baseAddress="http://localhost:9000/"/>

          </baseAddresses>

        </host>

        <endpoint contract="IOrderProcessing"

          address="http://localhost:9000/OrderProcessing"

          binding="wsHttpBinding"

          bindingConfiguration="OrderProcessingBinding" />

        <endpoint contract="IOrderProcessingCallback"

          address="http://localhost:9000/OrderProcessingCallback"

          binding="wsHttpContextBinding" />

      </service>

      <service name="ShipOrderContent">

        <host>

          <baseAddresses>

            <add baseAddress="http://localhost:9031/"/>

          </baseAddresses>

        </host>

        <endpoint contract="IShipOrder"

          address="http://localhost:9031/ShipOrder"

          binding="basicHttpBinding" />

      </service>

      <service name="CreditApproval">

        <host>

          <baseAddresses>

            <add baseAddress="http://localhost:9033/"/>

          </baseAddresses>

        </host>

        <endpoint contract="ICreditApproval"

          address="http://localhost:9033/CreditApproval"

          binding="wsHttpContextBinding" />

      </service>

    </services>


    <bindings>

      <wsHttpBinding>

        <binding name="OrderProcessingBinding">

          <security mode="Message">

            <message clientCredentialType="Windows"

             algorithmSuite="TripleDesRsa15"

             establishSecurityContext="true"

             negotiateServiceCredential="true" />

          </security>

        </binding>

      </wsHttpBinding>

      <wsHttpContextBinding>

        <binding name="ClientCreditApprovalBinding"

          clientCallbackAddress="http://localhost:9000/OrderProcessingCallback"/>

      </wsHttpContextBinding>

    </bindings>


    <client>

      <endpoint name="ClientShipOrder"

       contract="IShipOrder" binding="basicHttpBinding"

       address="http://localhost:9031/ShipOrder" />

      <endpoint name="ClientCreditApproval"

       contract="ICreditApproval" binding="wsHttpContextBinding"

       bindingConfiguration="ClientCreditApprovalBinding"

       address="http://localhost:9033/CreditApproval" />

    </client>


    <behaviors>

      <serviceBehaviors>

        <behavior>

          <serviceDebug includeExceptionDetailInFaults="True"

           httpHelpPageEnabled="True"/>

          <serviceMetadata httpGetEnabled="True"/>

        </behavior>

      </serviceBehaviors>

    </behaviors>


  </system.serviceModel>


  <startup>

    <supportedRuntime version="v4" sku=".NETFramework,Version=v4"/>

  </startup>

</configuration>
Testing the Revised Workflow Service
You can now build the solution and start the ServiceHost and WorkflowClient projects in the usual way. According to the simple rules of the CreditApproval workflow, the credit card will be approved if the CreditCard and CreditCardExpiration contain some value (the workflow really doesn't care what you enter for those parameters). If either parameter is null or an empty string, the credit card is denied.
The results from the WorkflowClient should be consistent with previous tests. The output from the ServiceHost now includes additional information. Here is the output from the ServiceHost when the credit card has been approved:
Contract: IOrderProcessing


    at http://localhost:9000/OrderProcessing


Contract: IOrderProcessingCallback


    at http://localhost:9000/OrderProcessingCallback


Contract: IShipOrder


    at http://localhost:9031/ShipOrder


Contract: ICreditApproval


    at http://localhost:9033/CreditApproval


Press any key to stop hosting and exit


Simulate credit auth for 4444111122223333 0611 3.98


Credit approved for 1279593577: 30475


BeginOrder OrderId: 1279593577, Cust: Bruce Bukovics


AddItem OrderId:1279593577, ItemId:200, Qty:1


AddItem OrderId:1279593577, ItemId:300, Qty:2


CompleteOrder OrderId:1279593577, ShipDate:Saturday, December 26, 2009
And here are my results when the credit is denied:
Contract: IOrderProcessing


    at http://localhost:9000/OrderProcessing


Contract: IOrderProcessingCallback


    at http://localhost:9000/OrderProcessingCallback


Contract: IShipOrder


    at http://localhost:9031/ShipOrder


Contract: ICreditApproval


    at http://localhost:9033/CreditApproval


Press any key to stop hosting and exit


Simulate credit auth for 4444111122223333  3.98


Credit denied for 1141076803
If the credit is denied, the output from the WorkflowClient project is also slightly different. For example:
Enter the customer name


Bruce Bukovics


Enter the customer email


[email protected]


Enter the customer address


100 Main Street


Enter credit card number


4444111122223333


Enter credit card expiration date (mmyy)


Enter an item ID (enter 0 if done entering items)


200


Enter the quantity of the item


1


Enter an item ID (enter 0 if done entering items)


300


Enter the quantity of the item


2


Enter an item ID (enter 0 if done entering items)


0


Invoking ProcessOrder service method


Back from ProcessOrder


ProcessOrder response:


IsSuccessful: False


ShipDate: Monday, January 01, 0001


OrderId: 1141076803


CreditAuthCode:


Press any key to exit
Using a Custom Workflow Extension
WF allows you to develop custom workflow extensions and then make them available to workflows at runtime. These custom extensions can provide any additional functionality that you see fit to implement. You can use these extensions with nonmessaging workflows, and WF also enables you to use them with workflow services.
![]() Note Chapter 8 discussed the use of custom workflow extensions in a nonmessaging workflow.
Note Chapter 8 discussed the use of custom workflow extensions in a nonmessaging workflow.
To make a workflow extension available to workflow services, you use the WorkflowExtensions property of the WorkflowServiceHost. You have the choice of adding a single extension instance that is shared by all workflow service instances or creating a new extension instance for each service instance. The WorkflowExtensions property (actually a WorkflowInstanceExtensionManager object) provides two overloads of the Add method that support these two instancing scenarios.
In this section, you will modify the OrderProcessing workflow to use a workflow extension to generate the order ID instead of generating it internally.
Implementing the OrderUtilityExtension
The first order of business is to implement the workflow extension. Add a new C# class to the ServiceLibrary project, and name it OrderUtilityExtension. Here is the complete code for this extension:
using System;


namespace ServiceLibrary

{

    public class OrderUtilityExtension

    {

        private Random random = new Random(Environment.TickCount);


        public Int32 GetOrderId()

        {

            return random.Next(Int32.MaxValue);

        }

    }

}
The code doesn't really change the way an order ID is generated. It is assigned a random number just as is currently done within the OrderProcessing workflow. However, this simple example is enough to demonstrate how to access an extension from a workflow service.
Implementing the GetOrderId Activity
You also need a custom activity that retrieves the extension and invokes the GetOrderId method of the extension. Add a new Code Activity to the ServiceLibrary project, and name it GetOrderId. Here is the complete code for this activity:
using System;

using System.Activities;


namespace ServiceLibrary

{

    public sealed class GetOrderId : CodeActivity<Int32>

    {

        protected override int Execute(CodeActivityContext context)

        {

            OrderUtilityExtension extension =

                context.GetExtension<OrderUtilityExtension>();

            if (extension != null)

            {

                return extension.GetOrderId();

            }

            else

            {

                return 0;

            }

        }

    }

}
Modifying the OrderProcessing Workflow Service
To use the new extension within the OrderProcessing workflow service, you need to replace the Assign activity that sets the OrderId to a random number with an instance of the new GetOrderId activity.
After building the solution, open the OrderProcessing workflow service, and locate the Assign activity that populates the Response.OrderId property. Delete the activity, and replace it with an instance of the new GetOrderId activity. Set the GetOrderId.Result property to Response.OrderId. Figure 10-15 shows the revised workflow.
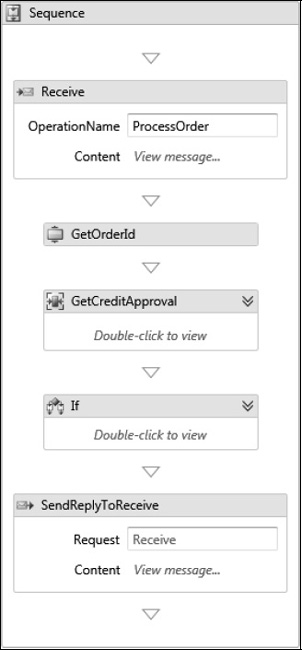
Figure 10-15. Revised OrderProcessing workflow
Adding the Extension
To add the extension and make it available to workflow instances, you need to modify the Program.cs file of the ServiceHost project. Here is an abbreviated copy of the Program.cs file showing only the method that requires the change:
namespace ServiceHost

{

    class Program

    {

…

        private static WorkflowServiceHost CreateServiceHost(String xamlxName)

        {

            WorkflowService wfService = LoadService(xamlxName);

            WorkflowServiceHost host = new WorkflowServiceHost(wfService);


            host.WorkflowExtensions.Add(new ServiceLibrary.OrderUtilityExtension());


            _hosts.Add(host);


            return host;

        }

…

    }

}
In this revised code, the WorkflowExtensions.Add method is called to add the new extension after creating the WorkfowServiceHost. This code adds a single instance of the extension that is shared by all workflow service instances. This should work fine for this particular extension.
However, you may need to create a new instance of an extension for each workflow service instance. If this is the case, you could use an overload of the Add method like this:
host.WorkflowExtensions.Add<ServiceLibrary.OrderUtilityExtension>(

    () => new ServiceLibrary.OrderUtilityExtension());
This version of the Add method requires a Func<T> (a delegate that returns an instance of type T). The code satisfies the requirements of the method with a Lambda expression. The expression creates a new instance of the extension each time it is invoked.
Testing the Revised Workflow Service
After building the solution, you should be able to test these changes by running the ServiceHost and WorkflowClient projects. The results should be consistent with the previous test.
Understanding Exceptions and Faults
You have seen that the contract for a service operation is defined by the properties of the Receive activity. If the operation uses the request/response pattern, the SendReply activity defines the response portion of the contract. In addition, any unhandled exceptions that are thrown by a service operation essentially become part of their contracts.
If an unhandled exception is thrown by a service operation, the exception is converted to a SOAP fault and transmitted as a response to the caller. Assuming that the caller is also a .NET application, the SOAP fault is converted back to a managed exception for consumption by the calling code. This transformation from managed exception to SOAP fault and back to an exception is handled by the WCF infrastructure automatically. On the client side, all SOAP faults are transformed into a FaultException.
![]() Note Detailed fault information such as a stack trace is provided to the client only if the
Note Detailed fault information such as a stack trace is provided to the client only if the ServiceDebugBehavior has been added to the WCF service behaviors and the IncludeExceptionDetailInFaults property of this behavior is set to true. All of the Web.Config and App.config examples in this chapter and the previous one include this behavior.
However, it is sometimes beneficial to explicitly define and send a SOAP fault. You might want to define a fault class that contains just the right amount of data that is appropriate for the client application to receive and process. This is often better (and safer) than simply returning the unhandled exception. The exception might expose implementation details that you shouldn't really expose to the caller.
If the service operation is declared as a workflow service, you can explicitly send a fault using the standard SendReply or Send activity. You first define a class that contains the properties that you want to return as a fault (for example MyServiceFault). Think of this expected fault as just another type of response that can be returned from your service.
You then catch the original exception within the workflow service using the TryCatch activity. Just like a C# try/catch block of code, this activity allows you to catch an exception and handle it declaratively with other WF activities.
![]() Note Chapter 13 discusses the
Note Chapter 13 discusses the TryCatch activity and other topics related to exception handling.
Once the original exception has been caught, you construct an instance of your custom fault class and populate it with the values that you want to return. You send the fault to the caller wrapped in a FaultException<T> instance. The generic type of this class must be the fault type that you defined. For example, if you are declaring a request/response operation, you might set the content of the SendReply activity to New FaultException<MyServiceFault>(myFault). This assumes that a variable named myFault has already been populated with the values that you want to return.
Remember that the fault is an alternate type of response that can be returned to the caller. It doesn't replace the normal response. For this reason, the service operation will require two SendReply activities: one for the normal response and one for the fault. Both of these activities must be associated with the same Receive activity (identified by the SendReply.Request property).
![]() Tip The WF designer does not allow you to manually set the
Tip The WF designer does not allow you to manually set the SendReply.Request property. Therefore, the easiest way to create the additional SendReply needed to send a fault is to copy the original SendReply that returns the normal response. You can make a copy of this activity and paste it into the appropriate Catch of the TryCatch activity. Alternatively, you can right-click the Receive activity and select the option to create a SendReply activity. The new activity is created directly below the Receive activity. You can then move it to the proper location within the workflow.
If you send your own fault as a response, the client code should catch (using TryCatch) a FaultException<T> instead of the more general FaultException. For example, it is preferable to catch FaultException<MyServiceFault> instead of FaultException. The nongeneric FaultException does not provide access to the detail fault object, while the generic version does.
![]() Warning Any custom fault types that you want to handle on the client side must be added to the
Warning Any custom fault types that you want to handle on the client side must be added to the KnownTypes property of the Send activity that invoked the service operation. Doing this identifies the custom fault type as an expected type that should be serialized. If you fail to do this, the custom fault will be returned only as the general FaultException instead of the generic FaultException<T>. Additionally, there is currently no support for the KnownTypes property if you are using a generated Send activity (one that was generated by adding a service reference to the workflow project). For this reason, you will need to use the standard Send activity if you are expecting custom fault types as a response.
Flowing Transactions into a Workflow Service
A transaction guarantees the atomicity of work that is performed using a resource manager (such as SQL Server). It ensures that individual updates are committed as a single unit of work or rolled back completely if there is a problem.
WF provides two activities that enable you to use transactions within a workflow. The TransactionScope activity provides support for transactions that are created within the current process.
![]() Note Chapter 13 discusses the
Note Chapter 13 discusses the TransactionScope activity.
The TransactedReceiveScope activity is similar to the TransactionScope, but it is designed to work with WCF messaging activities. And unlike the TransactionScope activity, TransactedReceiveScope allows you to flow a transaction that was created by the calling application into the service operation. Here are the most important properties of this activity:
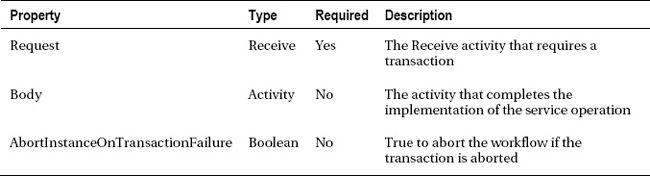
You use a TransactedReceiveScope by placing a Receive activity that requires a transaction into the Request property. The other activities that are needed to implement the service operation are placed into the Body. The Body property must include the SendReply activity if you are modeling a request/response operation.
If the client has an open ambient transaction when the service operation is invoked, the transaction will flow to the service, and any work that you perform will be performed under the transaction. When the service operation successfully completes, the transaction remains open and must be completed by the calling client application. If the service operation throws an unhandled exception, any work performed under the transaction is rolled back.
If a transaction is not provided by the client application, a new local transaction is created for the service operation. The behavior of the activity then becomes similar to that of the TransactionScope activity. If the service operation successfully completes, the locally created transaction is committed; otherwise, it is rolled back.
![]() Tip To flow a transaction into a service, you must use a binding that supports this behavior. For example,
Tip To flow a transaction into a service, you must use a binding that supports this behavior. For example, WSHttpBinding, WSHttpContextBinding, and NetTcpBinding support flowing a transaction. BasicHttpBinding does not. Additionally, you need to set the TransactionFlow property of the binding to true in order to enable the flowing of transactions to the called service.
Using Standard Behaviors
WF provides two standard behaviors that enable you to control aspects of the runtime environment for workflow services.
The WorkflowUnhandledExceptionBehavior determines what action will be taken when a workflow service throws an unhandled exception. The Action property is defined as enum type WorkflowUnhandledExceptionAction with these possible values:
Abandon. The workflow service is immediately abandoned. No additional execution is scheduled.Cancel. The workflow service is scheduled for cancellation. This option allows the workflow service to gracefully transition to the Canceled state.Terminate. The workflow service is scheduled for termination. Termination moves the workflow service into the Faulted state, which prevents it from being resumed or restarted.AbandonAndSuspend. Same asAbandon, but the last persisted state for the instance is suspended. Suspending an instance prevents messages from being delivered to the persisted instance.
The WorkflowIdleBehavior determines when idle workflow service instances are unloaded and persisted. The TimeToPersist property is a TimeSpan value that determines how long the instance must be idle before it is persisted. The TimeToUnload property determines how long the instance must be idle before it is unloaded from memory.
Taken together, these properties enable you to fine-tune how quickly you persist and unload workflow service instances. The default value for TimeToUnload is one minute, which means that an instance will be persisted and unloaded one minute after it becomes idle. If you want to be more aggressive in persisting and removing idle instances from memory, you can reduce the default value for this property. A value of zero means that an idle instance will be persisted and unloaded immediately when it becomes idle.
The TimeToPersist property must be less than the TimeToUnload value; otherwise, it is ignored. It is used to persist an idle instance more quickly without immediately removing it from memory. An idle instance is first persisted according to the value that you set for the TimeToPersist property. Then, once the TimeToUnload TimeSpan has been reached, the idle instance is removed from memory.
You can add these behaviors in code using the Description.Behaviors property of the WorkflowServiceHost. Or you can configure these behaviors with entries in the Web.config or App.config file, as shown here:
    <behaviors>

      <serviceBehaviors>

        <behavior>

          <serviceMetadata httpGetEnabled="true"/>

          <serviceDebug includeExceptionDetailInFaults="false"/>


          <workflowIdle timeToPersist="0" timeToUnload="0"/>

          <workflowUnhandledException action ="Cancel"/>


        </behavior>

      </serviceBehaviors>

    </behaviors>
Summary
The focus of this chapter was several advanced topics related to the WCF and workflow services support provided with WF. This chapter was a continuation of the WCF and workflow services coverage that was first presented in Chapter 9.
The examples in this chapter build upon the workflow service example that was started in Chapter 9. Examples in this chapter demonstrated context-based and content-based correlation, the duplex message exchange pattern, and workflow extensions.
The chapter concluded with a discussion of a few miscellaneous topics related to workflow services. These topics included exception and fault handling, flowing transactions into a workflow service, and the use of standard behaviors provided by WF.
In the next chapter you will learn about workflow persistence.