

The focus of this chapter is the primary building block of all workflows: the activity. Activities are where you place the business logic that is specific to your particular problem domain. In this chapter, you will learn how to develop your own custom activities using the base classes that ship with Windows Workflow Foundation (WF). You can choose to create new activities in code completely from scratch, or you can declaratively assemble existing activities into a new custom activity. This chapter demonstrates both authoring styles.
This chapter also provides a high-level review of the standard activities that are provided with WF. You will become acquainted with the available activities, but you will not learn how to use them in detail. This is the one chapter that provides an overview of all the available activities. Many of the individual activities are difficult to understand unless they are discussed as part of a larger subject area. For this reason, the subsequent chapters in this book each focus on a specific subject area and provide additional detail on the activities that are relevant to that subject.
Understanding Activities
An activity is a discrete, reusable component that is designed to fulfill a defined purpose. WF includes a set of standard activities that you can leverage within your workflows. But those activities should really be viewed as just the starting point. You are encouraged to develop your own custom activities that solve your own specialized business problems. For instance, if you are developing a loan application, you might develop custom activities such as SetupAccount, ReviewCredit, and LoanFunding. For a point-of-sale system, you might need custom activities such as ItemLookup, SellItem, and TenderTransaction. Once you develop a custom activity, it joins your library of activities and is available for reuse in multiple workflows.
![]() Tip The most important take-away point from this chapter is this: don’t be afraid to develop your own custom activities. You might be tempted to try to solve all your workflow problems using only the out-of-the-box activities. Although that might be possible in some cases, doing so severely limits what you can do with WF. Develop your own custom activities to encapsulate the business rules that you need for your particular application.
Tip The most important take-away point from this chapter is this: don’t be afraid to develop your own custom activities. You might be tempted to try to solve all your workflow problems using only the out-of-the-box activities. Although that might be possible in some cases, doing so severely limits what you can do with WF. Develop your own custom activities to encapsulate the business rules that you need for your particular application.
Regardless of the activity’s origin (standard or custom), the design-time experience of working with activities is the same. You start by dragging and dropping an activity onto a workflow or another activity. Then, using the Properties window in Visual Studio, you set properties that are specific to that activity. The properties may control some facet of runtime behavior, or they may be used to wire up the input and output arguments of the activity to variables or workflow arguments.
When you are developing your own custom activities, you should be aware of the dual audience for activities. First and foremost, activities are designed to perform some defined work. If they don’t do anything useful when they are executed, they have no real value. While performing their work, they are expected to behave in a particular way in order to cooperate with other workflow activities and the workflow runtime. The workflow runtime and other activities are the runtime audience for the activity.
But activities also have a design-time audience that is equally important. The design-time audience includes the developers who use the activity as one of the building blocks for their workflows. An additional responsibility of an activity is to cooperate with the workflow designer in order to provide an appealing and productive design experience. An activity that is designed to fully support the design experience is easier to use and helps you become more productive. WF provides you with the ability to develop custom activities and to also develop custom designers for those activities.
![]() Note Enhancing the design experience for custom activities is discussed in Chapter 15.
Note Enhancing the design experience for custom activities is discussed in Chapter 15.
Authoring Activities
There are two approaches to authoring a new custom activity:
- You can declaratively compose a new activity by assembling existing activities.
- You can code a new custom activity from scratch.
Your choice of authoring style depends on your exact needs and the availability of other activities. If there are existing activities (either standard or custom) that you can reuse and compose into a new activity, then that is a viable approach. The process of declaratively creating a custom activity feels just like declaring a workflow—except that it’s typically on a smaller scale.
If you decide to compose a new activity using existing activities, you have another choice to make. You can declare the activity in Xaml using the workflow designer, or you can assemble the tree of activities in code.
On the other hand, the activity may be easier to implement or more concise if you write it in code from scratch. Or the work that the activity must perform is highly specialized and isn’t easily composed from other activities. Or, you may need to migrate an existing nonworkflow application to WF, and you may have large amounts of existing code that can be reused. In these situations, it’s probably easier to develop the activity in code.
Kinds of Work
Developers love to categorize things (at least I do) because it helps them understand how things work. And activities can be categorized in several different ways. One way is to separate them into the standard activities that are included with WF and the custom activities that you build yourself. But you use activities the same way regardless of their origin, so this may not be the best way to understand them.
Since all activities perform some type of work, a better way to understand them is to define categories based on the general kind of work that they perform. Here is the list of work categories:
- Atomic Unit of Work
- Asynchronous Unit of Work
- Long Running Unit of Work
- Control Flow Activities
- Infrastructure
This list was primarily developed with custom activities in mind, but the list also applies equally well to the standard activities that ship with WF. In the sections that follow, I provide a short description of each of these categories.
Atomic Unit of Work
This kind of activity encapsulates the logic to perform an atomic unit of work synchronously on the workflow thread. It is the workhorse activity where you place most of the business logic associated with your application. You will probably implement more activities of this kind than any other.
The unit of work that it performs is atomic in the sense that it is completed entirely during a single execution of the activity. It doesn’t need to suspend execution and wait for external input. It is short-lived and doesn’t perform time-consuming operations such as long-running database queries, file I/O, or exchanging messages with another system. It executes synchronously on the workflow thread and doesn’t create or use other threads.
WF provides a class named CodeActivity that you should use as the base class when you develop custom activities of this kind.
Asynchronous Unit of Work
This kind of activity is similar to the Atomic Unit of Work described earlier. It is designed to perform an atomic unit of work but is capable of doing so asynchronously on a separate thread. This makes it perfect for operations such as database queries and file I/O that benefit from executing on a separate thread.
However, although these activities can use a separate thread for part of their work, that work must still execute in a relatively short period of time. They are not designed for long-running operations that might take days to complete. The work they perform should still be atomic, completing entirely during a single execution of the activity.
WF provides the AsyncCodeActivity that you should use as the base class when you need to develop this kind of custom activity.
Long Running Unit of Work
This kind of activity is designed to perform work that may take a very long time to complete. The best example is any type of work that includes human interaction. The activity may perform part of its work and then have to wait for a response from a real human in order to continue.
While it is waiting, the activity is suspended and is not occupying the workflow thread. Depending on how the workflow is modeled, other activities may now have a chance to execute while this activity is waiting for external input. Or execution of the entire workflow may be suspended and the current state of the workflow persisted. This kind of activity can also be used for long-running database queries, file I/O, and messaging with other systems.
WF supports this long-running behavior using a concept called bookmarks. Just like a real bookmark that you would use in a book, the purpose of a workflow bookmark is to resume execution. When the activity is about to suspend execution and begin waiting, it creates a named bookmark. When the external input is available or the long-running task has completed, the named bookmark is used to resume execution of the activity.
WF provides the NativeActivity that you must use as your base class when you need to develop long-running activities.
![]() Note The use of bookmarks in long-running activities is discussed in Chapter 8.
Note The use of bookmarks in long-running activities is discussed in Chapter 8.
Control Flow Activities
Some activities don’t perform atomic work at all. Sometimes the purpose of an activity is to be a container for other activities. An example of this is the Sequence activity provided with WF. It doesn’t perform any work of its own, but it instead acts as a container for child activities. Its job is to schedule the execution of those child activities. Activities of this kind are also referred to as composite activities.
WF includes a number of activities that fall into this category. Many of them are used to implement the standard procedural execution patterns supported by WF (Sequence, While, Parallel, and so on). You may be excited at the prospect of developing new composite activities. I personally think it’s much more fun to implement a bizarre new execution pattern than to code just one more database query. But the reality is that you probably won’t spend most of your time developing new activities of this kind. When you do, you will need to use the NativeActivity as your base class.
![]() Note Developing new control flow activities is discussed in Chapter 16.
Note Developing new control flow activities is discussed in Chapter 16.
Infrastructure
Included with WF are the activities that act as the glue that holds everything else together. These are the activities that support arguments, variables, expressions, and so on. You may find it necessary to develop your own extensions to the infrastructure already provided by WF, but that won’t be a common situation.
Kinds of Data
The work that an activity does is only half the story. Each activity must also have data that it operates upon to be really useful. And just as there are several general kinds of work that an activity can perform, there are also a few general categories of data that an activity can use. Those categories can be best summarized in this way:
Arguments
Arguments are the inputs and outputs of the activity and define the public contract that the activity supports. Input arguments are passed to the activity when it begins execution. Values for these arguments might be passed from the host application when the workflow is started. Or they might be populated with the current value of workflow variables (see the discussion next) that were set by another activity within the workflow.
Output arguments contain the results from the activity’s work. These output arguments may be assigned to a variable or an output argument of the workflow. The InArgument<T> and OutArgument<T> generic classes are used to define arguments.
Variables
Variables define internal storage within an activity and are always considered private. Within an activity, they are used to store either transient results or longer-lasting state that must be maintained during the lifetime of the activity. They are also used within workflows to maintain state and as temporary storage to pass result data from one activity to another. Within a workflow, variables can be declared only for a select group of activities, typically composites that act as containers for child activities. Table 3-2 later in this chapter identifies the standard activities that support variables. When you use the workflow designer to define a variable for an activity, it is represented by the Variable<T> generic class.
If you are creating a new activity in C# code, there are two ways to define private variables. You can use the Variable<T> generic class to declare your variables, or you can use Common Language Runtime (CLR) data types as either private member or local variables. The difference between the two approaches is subtle but important. The Variable<T> class essentially defines storage for a single runtime instance of an activity. If the activity is executed multiple times (for example as a child of a looping activity such as the While activity), each execution will point to a fresh set of variables. The variables are sensitive to the current runtime context. On the other hand, a variable that is a normal CLR data type defines storage for the activity definition. If an activity using CLR variables is executed multiple times, the value of any CLR member variables is maintained between executions. A Variable<T> class must be used to pass values between existing activities that you are composing in code.
Just like variables that you might define in your everyday C# code, all activity variables have a defined scope. For example, a private member variable that is defined in a normal C# class is visible to all methods within the class and exists until the object instance is disposed. A variable that is defined within a single C# method exists only until the method ends. Likewise, variables that you declare for an activity have a defined scope. They are visible to the activity that declared them as well as any children of that activity. Once the activity where they were declared goes out of scope, they can be disposed.
![]() Caution It is possible that the activity you are developing may be used in a wide variety of workflows. If any of those workflows are capable of being persisted, then the arguments and variables must be serializable. If you are working with nonserializable data, you can apply the
Caution It is possible that the activity you are developing may be used in a wide variety of workflows. If any of those workflows are capable of being persisted, then the arguments and variables must be serializable. If you are working with nonserializable data, you can apply the NonSerialized attribute to indicate that they should not be persisted. Workflow persistence is discussed in Chapter 11.
Activity Class Hierarchy
As I briefly described earlier, several classes can be used as a base for your custom activities. Each class has a distinctive set of features that are designed to assist you in performing a particular kind of work. One of the major differences of these classes is in the amount of access to the workflow runtime that each of them provides.
For example, the CodeActivity provides the least amount of access to the workflow runtime. It is the most restrictive because of the simplicity of the work that it is designed to perform. It provides access to only the minimum set of runtime operations.
On the opposite end of the spectrum, the NativeActivity provides the maximum amount of access to the workflow runtime. It allows you to implement an activity that can take full advantage of all runtime features.
Table 3-1 summarizes the most important features of each base activity class.
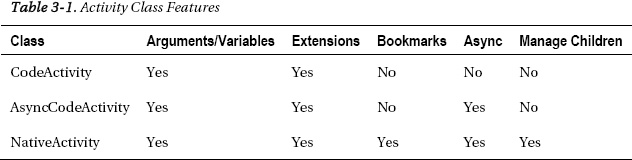
Here is an explanation of the columns in Table 3-1:
- Arguments/Variables: Yes means that the activity has access to argument and variable values.
- Extensions: Yes means that the activity can access and reference workflow extensions. Extensions are custom classes that you add to the workflow runtime to make their functionality available to activities. They are discussed in detail in Chapter 8.
- Bookmarks: Yes means that the activity is capable of creating and resuming bookmarks. Bookmarks are used when implementing long-running workflows.
- Async: Yes means that the activity is capable of asynchronous activity on a separate thread.
- Manage Children: Yes means the activity can schedule child activities and manage their execution.
All of these base classes come in two flavors: generic and nongeneric. The generic version takes a single generic type parameter that represents the return type of the activity. This can be likened to a C# method that returns a single value. When the generic class is used, an OutArgument<T> named Result is defined for you using the type that you specify. For example, if you base your activity on CodeActivity<String>, an OutArgument<String> named Result is available for your use just like any other argument.
The nongeneric version does not define the Result argument for you. This is similar to a C# method that returns void. Of course, you can easily declare an OutArgument<T> yourself. The reason for the generic version is simply as a productivity tool. It saves you the time of declaring that argument yourself. And it comes in especially handy when you require only a single OutArgument from the activity. Using the generic versions also tend to enforce consistency in your activities. If the activity has only a single OutArgument, you know that it will be named Result. If you need additional output arguments, you can define them yourself. Figure 3-1 illustrates the hierarchy of these classes.
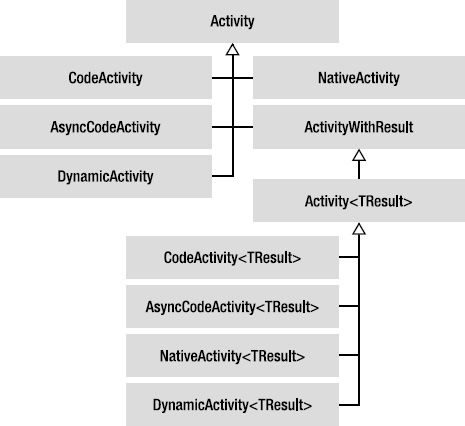
Figure 3-1. Activity class hierarchy
As shown in Figure 3-1, all of these classes derive from the Activity or Activity<TResult> class. Most of the time, you will use one of the derived classes when constructing your own activities in code. But you can also derive directly from Activity or Activity<TResult>. They are used as the base class only when you are declaratively assembling an activity out of existing activities.
![]() Note WF also includes
Note WF also includes DynamicActivity and DynamicActivity<TResult> classes. These classes are used to load and execute activities directly from Xaml files without first compiling them into a CLR type.
Custom Activity Workflow
In general, here is the workflow (the steps) that you should follow when developing custom activities. Not all steps will be needed for each custom activity that you author.
- Determine the authoring style that you will use. Will you declaratively compose the new activity from existing activities, or will you implement it entirely in code?
- Determine the base class to use depending on the feature set that the activity requires.
- Declare input and output arguments.
- Declare private variables.
- Implement the activity’s logic. Develop the code or compose the set of existing activities that will perform the work of the activity.
- Implement custom activity designers and other features to enhance the design experience.
An Example Activity
In the sections that follow, I demonstrate the process of developing a custom activity. I develop the same custom activity using several different authoring styles. As an example problem to solve, I’ve chosen an activity that calculates the shipping charges for an order. Although this is obviously a contrived example, it is a problem that can be readily understood. It’s also easy to envision this type of activity being part of a larger e-commerce shopping cart workflow.
The business rules for this activity are fairly simple. The input arguments to the activity are the weight of the order, shipping method, and total currency amount of the order. The output argument is the calculated shipping amount. There are two shipping methods supported: normal and express. If the normal shipping method is requested, the shipping is calculated as the weight * 1.95. However, if the order total is greater than or equal to 75.00, the shipping is free. If the express shipping method is requested, the shipping is calculated as the weight * 3.50. The free shipping option does not apply to express shipping. Regardless of the shipping method, the minimum shipping amount is 12.95 unless the shipping is free.
This same custom activity will be implemented in these authoring styles:
- Entirely in code
- Composed declaratively from other activities in Xaml
- Composed declaratively from other activities in code
- Asynchronously in code
Implementing an Activity in Code
In this example, you will implement the custom activity to calculate shipping charges entirely in code. The CodeActivity<TResult> class will be the base class for this activity.
Creating the Project
To begin this example, create a new activity library project named ActivityLibrary. You should add it to a new solution named for this chapter. This same project can be used for all the remaining custom activity examples in this chapter. Use the Activity Library project template, which you can find in the Workflow category. This project template creates a file named Activity1.xaml that you can delete since it is not needed.
Implementing the Activity
To implement the custom activity in code, add a new source file named CalcShipping.cs to the project using the Code Activity new item template. This template is used when you want to develop a new custom activity entirely in code. Here is the C# code that you need in order to implement this new activity class:
using System;

using System.Activities;


namespace ActivityLibrary

{
The base class for this activity is CodeActivity<Decimal>. Remember that the generic type parameter that you provide to this class determines the type for the Result OutArgument<T> of the class. The only output from this class is the total shipping amount, so a type of Decimal makes sense.
Input arguments are defined for the weight of the order, the order total, and the shipping method. Several private member variables are also declared that are used later in the code. Many of these variables are used to define simple constant values. This was done to define these values in one place and eliminate any magic numbers within the calculation code itself. In a real-life example, you probably wouldn’t hard-code these values directly in this activity. You might instead retrieve the values from a database based on the destination of the order or obtain them in some other way. But hard-coding them here suffices in order to keep this example as simple as possible.
    public sealed class CalcShipping : CodeActivity<Decimal>

    {

        public InArgument<Int32> Weight { get; set; }

        public InArgument<Decimal> OrderTotal { get; set; }

        public InArgument<String> ShipVia { get; set; }


        private Decimal _normalRate = 1.95M;

        private Decimal _expressRate = 3.50M;

        private Decimal _minimum = 12.95M;

        private Decimal _freeThreshold = 75.00M;

        private Boolean _isFreeShipping = false;
The Execute method is where you place the business logic for this activity. In this example, the code first determines whether the requested shipping method is normal or express. If it is normal, the order total is tested to determine whether it has reached the threshold necessary to receive free shipping. If not, the shipping amount is calculated using the established rate for the normal shipping method. If express shipping is requested, no check for free shipping is performed. Instead, the shipping amount is a simple calculation using the rate for express shipping. Finally, if necessary, a minimum shipping amount is applied.
All of this is implemented as straightforward C# code. The only aspect of this code that is slightly unusual is the use of the Get method when accessing the arguments. This method is passed the CodeActivityContext that is a parameter of the Execute method. This context object identifies the set of arguments that are active for this particular execution of the activity. Passing this context is necessary since it is possible for multiple instances of this activity to be created during the lifetime of workflow. And the argument (and variable) values may change with each execution. For example, if this activity is used within a looping structure such as a While activity, the argument and variable values may be different each time through the loop. The context object always identifies the arguments that are active for the current execution.
Since the generic version of CodeActivity is used as the base class, the Execute method returns the result value directly (the total shipping charge). The value that you return is used to populate the output argument named Result. If you have other output arguments that need to be set, you would use the Set method of each argument to set them to the correct value. The Set method is similar to the Get method in that it requires you to pass the CodeActivityContext as one of the arguments.
        protected override Decimal Execute(CodeActivityContext context)

        {

            Decimal result = 0;

            switch (ShipVia.Get(context))

            {

                case "normal":

                    if (OrderTotal.Get(context) >= _freeThreshold)

                    {

                        _isFreeShipping = true;

                    }

                    else

                    {

                        result = (Weight.Get(context) * _normalRate);

                    }

                    break;


                case "express":

                    result = (Weight.Get(context) * _expressRate);

                    break;

            }


            if ((result < _minimum) && (!_isFreeShipping))

            {

                result = _minimum;

            }


            return result;

        }

    }

}
After entering this code, you should be able to build the project.
Implementing Unit Tests
The focus of this chapter is on developing new custom activities, not declaring complete workflows. For that reason, the most straightforward way to test your new activity is to use the unit testing framework included with Visual Studio.
In the code that follows, you will first implement a set of shared test methods, followed by the actual unit tests that invoke those methods. The tests are implemented in this way in order to reuse the test methods for all versions of the example activity that you will author in this chapter.
To begin developing the unit tests, first add a new Test project to the solution and name it ActivityLibraryTest. Delete the UnitTest1.cs file that was added for you since it won’t be needed. Add an assembly reference to System.Activities, and add a project reference to the ActivityLibrary project, which should be in the same solution.
Select Add New Test for the test project, and select Basic Unit Test as the item template. Name the new class SharedShippingTest. The code for this class follows:
using System;

using System.Activities;

using System.Collections.Generic;

using Microsoft.VisualStudio.TestTools.UnitTesting;


namespace ActivityLibraryTest

{

    public static class SharedShippingTest

    {

        #region shared test method
The code is organized into several static methods that each tests a single condition. I’ve included methods that test the normal shipping method, the minimum amount, free shipping, and express shipping. Although this is far from an exhaustive list of tests for this activity, it’s enough to give you a taste of how this is done.
Notice that these methods do not include the TestMethod attribute that identifies them as a test method. These are the reusable static methods that will be called by other test methods (to be defined in the next step). It is for this reason that they are not identified as test methods.
Instead of creating the activity instance within each method, it is passed as an argument. This allows for maximum reuse of this code since the tests that invoke these methods can create the activity that they want to test.
        public static void NormalTest(Activity activity)

        {

            Dictionary<String, Object> parameters

                = new Dictionary<string, object>();

            parameters.Add("ShipVia", "normal");

            parameters.Add("Weight", 20);

            parameters.Add("OrderTotal", 50M);


            IDictionary<String, Object> outputs = WorkflowInvoker.Invoke(

                activity, parameters);

            Assert.AreEqual(39.00M, outputs["Result"], "Result is incorrect");

        }


        public static void NormalMinimumTest(Activity activity)

        {

            Dictionary<String, Object> parameters

                = new Dictionary<string, object>();

            parameters.Add("ShipVia", "normal");

            parameters.Add("Weight", 5);

            parameters.Add("OrderTotal", 50M);


            IDictionary<String, Object> outputs = WorkflowInvoker.Invoke(

                activity, parameters);

            Assert.AreEqual(12.95M, outputs["Result"], "Result is incorrect");

        }


        public static void NormalFreeTest(Activity activity)

        {

            Dictionary<String, Object> parameters

                = new Dictionary<string, object>();

            parameters.Add("ShipVia", "normal");

            parameters.Add("Weight", 5);

            parameters.Add("OrderTotal", 75M);


            IDictionary<String, Object> outputs = WorkflowInvoker.Invoke(

                activity, parameters);

            Assert.AreEqual(0.00M, outputs["Result"], "Result is incorrect");

        }


        public static void ExpressTest(Activity activity)

        {

            Dictionary<String, Object> parameters

                = new Dictionary<string, object>();

            parameters.Add("ShipVia", "express");

            parameters.Add("Weight", 5);

            parameters.Add("OrderTotal", 50M);


            IDictionary<String, Object> outputs = WorkflowInvoker.Invoke(

                activity, parameters);

            Assert.AreEqual(17.50M, outputs["Result"], "Result is incorrect");

        }


        #endregion

    }

}
Now add another unit test class named CalcShippingTest to the same test project. The purpose of this class is to execute the static methods that you just defined. Here is the code for this file:
using System;

using ActivityLibrary;

using Microsoft.VisualStudio.TestTools.UnitTesting;


namespace ActivityLibraryTest

{

    [TestClass]

    public class CalcShippingTest

    {

        [TestMethod]

        public void NormalTest()

        {

            SharedShippingTest.NormalTest(new CalcShipping());

        }


        [TestMethod]

        public void NormalMinimumTest()

        {

            SharedShippingTest.NormalMinimumTest(new CalcShipping());

        }


        [TestMethod]

        public void NormalFreeTest()

        {

            SharedShippingTest.NormalFreeTest(new CalcShipping());

        }


        [TestMethod]

        public void ExpressTest()

        {

            SharedShippingTest.ExpressTest(new CalcShipping());

        }

    }

}
You should now be able to build the solution that includes this test project.
Testing the Activity
It’s now time to run the unit tests and see whether the custom activity works correctly. You can scroll to the top of the CalcShippingTest.cs file and right-click the class name (CalcShippingTest). Select the Run Tests option to execute all the tests for the class. Figure 3-2 shows the Test Results panel after I run these tests:
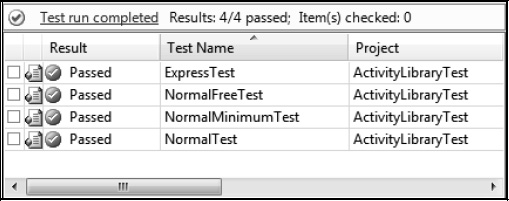
Figure 3-2. Successful unit tests for CalcShipping Activity
Declaring an Activity with Xaml
In this example, you will declaratively create a custom activity by composing it from existing activities. The activity will implement the same set of business rules as the previous example and will be testable using the same set of static test methods.
Creating the Activity Class
To begin, add a new activity named CalcShippingInXaml to the ActivityLibrary project. Use the Activity add item template to create an empty activity. Since the activity is initially empty, you should go ahead and add a Sequence activity to it by dragging that activity to the design surface.
Defining Arguments
Arguments are added to the activity using the Arguments Editor. Click the Arguments button to open the editor, and add these arguments:

Defining Variables
This activity requires a number of variables. Click the Variables button to open the Variables Editor, and enter these variables:
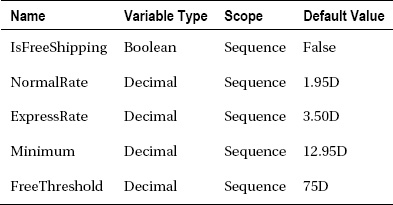
Notice that you are providing default values for all of these variables. Once again the variables are used as a convenient place to define all of the current rates and limits associated with this activity.
![]() Caution Like many of the values that you enter in the designer, the default value is actually an expression. And because the Expression Editor expects the expressions to be entered in VB syntax, you need to use the VB suffix for the decimal type ("D") instead of the suffix used for C# ("M").
Caution Like many of the values that you enter in the designer, the default value is actually an expression. And because the Expression Editor expects the expressions to be entered in VB syntax, you need to use the VB suffix for the decimal type ("D") instead of the suffix used for C# ("M").
Declaring the Activity
The body of this activity will consist of a Switch<T> activity followed by an If activity. The If activity works just like a C# if statement. It provides properties for you to specify the condition to test (If.Condition), the activity to execute when the condition is true (If.Then), and the activity to execute when it is false (If.Else).
Other activities will be added as children of these two activities. The Switch<T> activity is used to branch execution on the requested shipping method (the ShipVia argument). The Switch<T> activity will need two cases, one for each of the possible shipping methods (normal and express). Within each case you will declare the activities needed to calculate the shipping charge for that shipping method. The If activity is used to apply the minimum shipping charge if necessary.
Follow these steps to declare the body of the activity:
- Add a
Switch<T>activity as a child of theSequenceactivity. UseStringas the generic type, and set theSwitch.Expressionproperty to theShipViaargument.- Add a new case to the
Switch<T>activity, and set the key tonormal.- Add an
Ifactivity to the new case.- Enter an expression of
OrderTotal >= FreeThresholdfor theIf.Conditionproperty.- Add an
Assignactivity to theIf.Thenproperty. Set theAssign.Toproperty toIsFreeShippingand theAssign.Valueproperty toTrue.- Add an
Assignactivity to theIf.Elseproperty. Set theAssign.Toproperty toResultand theAssign.Valueproperty to an expression ofWeight * NormalRate.- Add another case to the
Switch<T>activity, and set the key toexpress.- Add an
Assignactivity to the new case. Set theAssign.Toproperty toResultand theAssign.Valueproperty toWeight * ExpressRate.- Add an
Ifactivity to theSequence, directly under theSwitch<T>activity.- Enter an expression of
Result < Minimum And Not IsFreeShippingas theIf.Conditionproperty.- Add an
Assignactivity to theIf.Thenproperty. Set theAssign.Toproperty toResultand theAssign.Valueproperty toMinimum.
Figure 3-3 shows the If activity for the normal shipping method. Figure 3-4 shows the top-level view of the completed custom activity.
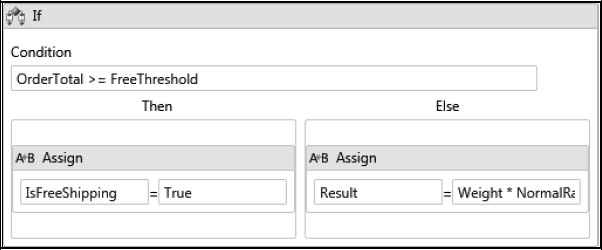
Figure 3-3. Normal shipping method if activity
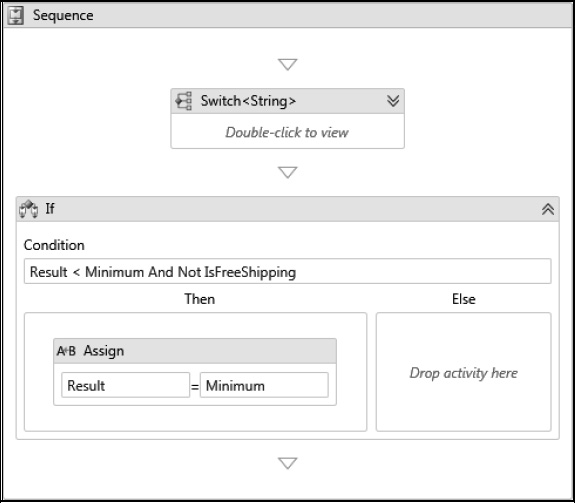
Figure 3-4. Completed CalcShippingInXaml activity
You should be able to build the project at this point.
Implementing Unit Tests
To test this activity, you can use the same set of static test methods that you implemented for the CalcShipping example presented earlier. However, you do need to add a new unit test class named CalcShippingInXamlTest to the ActivityLibraryTest project. The purpose of this class is to execute the static methods, passing an instance of the CalcShippingInXaml activity that you just declared. Here is the code for this file:
using System;

using ActivityLibrary;

using Microsoft.VisualStudio.TestTools.UnitTesting;


namespace ActivityLibraryTest

{

    [TestClass]

    public class CalcShippingInXamlTest

    {

        [TestMethod]

        public void XamlNormalTest()

        {

            SharedShippingTest.NormalTest(new CalcShippingInXaml());

        }


        [TestMethod]

        public void XamlNormalMinimumTest()

        {

            SharedShippingTest.NormalMinimumTest(new CalcShippingInXaml());

        }


        [TestMethod]

        public void XamlNormalFreeTest()

        {

            SharedShippingTest.NormalFreeTest(new CalcShippingInXaml());

        }


        [TestMethod]

        public void XamlExpressTest()

        {

            SharedShippingTest.ExpressTest(new CalcShippingInXaml());

        }

    }

}
Testing the Activity
After building the ActivityLibraryTest project, you should be ready to execute the unit tests. Scroll to the top of the CalcShippingInXamlTest.cs file, and right-click the class name (CalcShippingInXamlTest). Select the Run Tests option to execute all the tests for the class. The results should be similar to those shown in Figure 3-2 for the previous set of tests.
Declaring an Activity with Code
Just as you did in the previous example, you will declaratively create another custom activity by composing it from existing activities. The difference this time is that you will do everything in code. This example demonstrates a hybrid mix of the two authoring styles demonstrated previously. You use code to define the activity instead of Xaml, but you’re not implementing all the logic from scratch. Instead, you assemble existing activities into a finished activity as you did in the Xaml example. The finished activity will implement the same set of business rules that you saw in the previous examples and will be testable using the same set of static test methods.
Creating the Activity Class
To begin, add a new activity named CalcShippingInCode to the ActivityLibrary project. Use the Code Activity add item template to create a code-based activity class.
Implementing the Activity
The code that you need to declare this activity is shown next. The first order of business is to change the base class from CodeActivity to Activity<Decimal>. The Activity<TResult> class is designed for the composition of an activity from a tree of other existing activities. If you look at the Xaml file from the previous example, you will see that the root node is Activity. The only difference is that you are using the generic version of this class.
The usual input arguments are defined as properties of the class. The majority of your work for this activity is done in a new private method named BuildImplementation.
using System;

using System.Activities;

using System.Activities.Statements;


namespace ActivityLibrary

{

    public sealed class CalcShippingInCode : Activity<Decimal>

    {

        public InArgument<Int32> Weight { get; set; }

        public InArgument<Decimal> OrderTotal { get; set; }

        public InArgument<String> ShipVia { get; set; }
During construction of the activity, the private BuildImplementation method is assigned to the Implementation property. This property is a delegate defined as Func<Activity>, meaning that it must be assigned to a method that takes no parameters and returns an Activity. The Implementation property is the extension point that allows you to provide an activity declaration that is implemented in code.
        public CalcShippingInCode()

        {

            this.Implementation = BuildImplementation;

        }


        private Activity BuildImplementation()

        {
Just as you did in the first example in this chapter, variables are defined with default values. The difference this time is the use of the Variable<T> class to define the variables. Previously, normal C# CLR types were used to define them. The Variable<T> class is used because the variables must be of a type that is supported by the workflow infrastructure. As you will see later in the code, instead of using the variables privately in C# code, they are passed as arguments to the various activities.
            Variable<Boolean> isFreeShipping =

                new Variable<Boolean> { Name = "IsFreeShipping" };

            Variable<Decimal> normalRate =

                new Variable<Decimal> { Name = "NormalRate", Default = 1.95M };

            Variable<Decimal> expressRate =

                new Variable<Decimal> { Name = "ExpressRate", Default = 3.50M };

            Variable<Decimal> minimum =

                new Variable<Decimal> { Name = "Minimum", Default = 12.95M };

            Variable<Decimal> freeThreshold =

                new Variable<Decimal> { Name = "FreeThreshold", Default = 75.00M };
The work of composing a tree of existing activities now begins. The Implementation property requires a single Activity that forms the body of this custom activity. Therefore, the goal of this code is to return that single Activity.
At the top of this tree of activities is a Sequence activity, which contains a single Switch<T> activity and an If activity. The Switch<T> activity has two case instances and so on. This structure should be familiar to you since it is the same set of activities that you saw in the previous example. The only difference is that you’re seeing it composed in code instead of in the workflow designer (or Xaml).
The variables that were just defined are added to the Sequence.Variables property.
            return new Sequence

            {

                Variables =

                {

                    isFreeShipping, normalRate, expressRate, minimum, freeThreshold

                },


                Activities =

                {
The code that sets the Switch.Expression property illustrates an important pattern that should be followed. This property is typed as an InArgument<String>. You might be tempted to directly assign the ShipVia input argument to it, but that wouldn’t work. Remember that when you are referencing arguments and variables in code from within an activity, you need to pass the activity context to the Get or Set method. This is necessary in order to retrieve the instance of the argument or variable that is appropriate for the current execution of the activity.
To satisfy this requirement, the code that sets the Switch.Expression property constructs a new InArgument<T> instance instead of directly assigning the ShipVia argument. It uses a constructor overload of the InArgument<T> class that is defined like this: InArgument(Expression<Func<ActivityContext, T>> expression). This constructor requires a Func that expects an ActivityContext as the only parameter and returns an instance of the generic type T. Using this constructor provides the activity context that is necessary to retrieve the argument or variable.
The code shown next uses the Lambda expression syntax to keep the code as concise as possible. For a very brief description of Lambda expressions, please refer to the "Understanding Lambda Expressions" sidebar in this chapter.
                    new Switch<String>

                    {

                        Expression = new InArgument<String>(

                            ac => ShipVia.Get(ac)),

                        Cases =

                        {

                            {"normal", new If

                                {

                                    Condition = new InArgument<Boolean>(ac =>

                                      OrderTotal.Get(ac) >= freeThreshold.Get(ac)),

                                    Then = new Assign<Boolean>

                                    {

                                        To = new OutArgument<Boolean>(ac =>

                                          isFreeShipping.Get(ac)),

                                        Value = true

                                    },

                                    Else = new Assign<Decimal>

                                    {

                                        To = new OutArgument<Decimal>(ac =>

                                          this.Result.Get(ac)),

                                        Value = new InArgument<Decimal>(ac =>

                                          Weight.Get(ac) * normalRate.Get(ac))

                                    }

                                }

                            },

                            {"express", new Assign<Decimal>

                                {

                                    To = new OutArgument<Decimal>(ac =>

                                      this.Result.Get(ac)),

                                    Value = new InArgument<Decimal>(ac =>

                                      Weight.Get(ac) * expressRate.Get(ac))

                                }

                            }

                        }

                    },

                    new If

                    {

                        Condition = new InArgument<bool>(ac =>

                          Result.Get(ac) < minimum.Get(ac) &&

                            (!isFreeShipping.Get(ac))),

                        Then = new Assign

                        {

                            To = new OutArgument<Decimal>(ac => Result.Get(ac)),

                            Value = new InArgument<Decimal>(ac => minimum.Get(ac))

                        }

                    }

                }

            }; //new Sequence

        }

    }

}
Clearly, this is not the easiest way to author new activities. If your plan is to compose your custom activity using existing activities, it is much easier and more intuitive to use the workflow designer or to compose the activity by hand directly in Xaml. But I’ve included this example to demonstrate that there is no real magic behind the scenes when you use Xaml or the workflow designer. Child activities are simply a collection of activities that you construct and add to the appropriate properties of other activities.
Implementing Unit Tests
This activity can be tested in the same way as the previous examples. Add a new unit test class named CalcShippingInCodeTest to the ActivityLibraryTest project. Here is the code that you need for this class:
using System;

using ActivityLibrary;

using Microsoft.VisualStudio.TestTools.UnitTesting;


namespace ActivityLibraryTest

{

    [TestClass]

    public class CalcShippingInCodeTest

    {

        [TestMethod]

        public void CodeNormalTest()

        {

            SharedShippingTest.NormalTest(new CalcShippingInCode());

        }


        [TestMethod]

        public void CodeNormalMinimumTest()

        {

            SharedShippingTest.NormalMinimumTest(new CalcShippingInCode());

        }


        [TestMethod]

        public void CodeNormalFreeTest()

        {

            SharedShippingTest.NormalFreeTest(new CalcShippingInCode());

        }


        [TestMethod]

        public void CodeExpressTest()

        {

            SharedShippingTest.ExpressTest(new CalcShippingInCode());

        }

    }

}
Testing the Activity
At this point, you can build the ActivityLibraryTest project and execute the tests as you have done previously. The test results should be consistent with Figure 3-2.
Understanding Lambda Expressions
Implementing an Asynchronous Activity
The final version of the example activity is one that demonstrates asynchronous execution. The work of the activity will be performed on a separate thread.
Admittedly, this particular example (calculating the shipping charge) doesn’t really lend itself to asynchronous operation. In its current form, it doesn’t do any work (such as accessing a database or file) that would normally benefit from execution on a separate thread. However, rather than developing a completely different example, I think it’s more important to see the same example activity implemented in an asynchronous way. That should make it easier to compare this to the other implementations already presented in this chapter.
Creating the Activity Class
To implement this example, add a new activity named CalcShippingAsync to the ActivityLibrary project. Use the Code Activity add item template to create a code-based activity class.
Implementing the Activity
The code for this activity is shown next. If begins by defining a simple class named CalcShippingAsyncArgs. This class is used later in the code to pass the calculation arguments to the thread that performs the calculations.
using System;

using System.Activities;


namespace ActivityLibrary

{

    internal class CalcShippingAsyncArgs

    {

        public Int32 Weight { get; set; }

        public Decimal OrderTotal { get; set; }

        public String ShipVia { get; set; }

    }
This time, an AsyncCodeActivity<T> is used as the base class. This base class provides the necessary functionality to execute work asynchronously on a separate thread. The usual set of input arguments are defined, followed by the private variables that define the rates and thresholds used during the calculation.
    public sealed class CalcShippingAsync : AsyncCodeActivity<Decimal>

    {

        public InArgument<Int32> Weight { get; set; }

        public InArgument<Decimal> OrderTotal { get; set; }

        public InArgument<String> ShipVia { get; set; }


        private Decimal _normalRate = 1.95M;

        private Decimal _expressRate = 3.50M;

        private Decimal _minimum = 12.95M;

        private Decimal _freeThreshold = 75.00M;
For this example, the work of calculating the shipping charges has been moved to a private method that is executed on a separate thread. Instead of the Execute method that you’ve seen in previous examples, the AsyncCodeActivity class defines BeginExecute and EndExecute methods that you must override. The BeginExecute method is invoked first and is your opportunity to retrieve argument and variable values and to begin the real work on a separate thread. Once the asynchronous work completes, the EndExecute method is invoked. This is your opportunity to set any output arguments and generally complete the work of the activity.
The code for the BeginExecute method retrieves the input argument values and creates an instance of the CalcShippingAsyncArgs class that was defined earlier. The CalcShippingAsyncArgs instance is constructed in order to pass the arguments to the worker thread. The arguments are retrieved here since they can be referenced only on the workflow thread.
Next, a Func delegate is defined that expects an instance of the arguments class and returns a Decimal result. This delegate is assigned a private Calculate method that performs the calculation of the shipping charges. A reference to this Func delegate is saved in the UserState property of the activity context. This allows the code in the EndExecute method to reference this delegate.
Finally, the delegate is executed on a separate thread using the BeginInvoke method. This executes the target of the delegate (in this case the private Calculate method) on a separate thread pool thread.
        protected override IAsyncResult BeginExecute(

            AsyncCodeActivityContext context,

            AsyncCallback callback, object state)

        {

            CalcShippingAsyncArgs parameters = new CalcShippingAsyncArgs

            {

                Weight = Weight.Get(context),

                OrderTotal = OrderTotal.Get(context),

                ShipVia = ShipVia.Get(context),

            };


            Func<CalcShippingAsyncArgs, Decimal> asyncWork = a => Calculate(a);

            context.UserState = asyncWork;

            return asyncWork.BeginInvoke(parameters, callback, state);

        }
The actual calculations are similar to what you’ve already seen in the previous examples. The main difference is that properties of the CalcShippingAsyncArgs object are referenced rather than the input arguments of the activity.
        private Decimal Calculate(CalcShippingAsyncArgs parameters)

        {

            Decimal result = 0;

            Boolean isFreeShipping = false;


            System.Threading.Thread.Sleep(500);  //simulate a short delay


            switch (parameters.ShipVia)

            {

                case "normal":

                    if (parameters.OrderTotal >= _freeThreshold)

                    {

                        isFreeShipping = true;

                    }

                    else

                    {

                        result = parameters.Weight * _normalRate;

                    }

                    break;


                case "express":

                    result = parameters.Weight * _expressRate;

                    break;

            }

            if ((result < _minimum) && (!isFreeShipping))

            {

                result = _minimum;

            }


            return result;

        }
When the Calculate method has completed, the EndExecute method is executed on a workflow thread. The code for this method completes the execution of the asynchronous delegate by calling the EndInvoke method. The Decimal result from EndInvoke is used as a return value for the EndExecute method. This value is used to populate the Result argument of the activity.
        protected override Decimal EndExecute(

            AsyncCodeActivityContext context, IAsyncResult result)

        {

            return ((Func<CalcShippingAsyncArgs, Decimal>)

                context.UserState).EndInvoke(result);

        }

    }

}
Implementing Unit Tests
To test this new activity, add a new unit test class named CalcShippingAsyncTest to the ActivityLibraryTest project. The code for this class is shown here:
using System;

using ActivityLibrary;

using Microsoft.VisualStudio.TestTools.UnitTesting;


namespace ActivityLibraryTest

{

    [TestClass]

    public class CalcShippingAsyncTest

    {

        [TestMethod]

        public void AsyncNormalTest()

        {

            SharedShippingTest.NormalTest(new CalcShippingAsync());

        }


        [TestMethod]

        public void AsyncNormalMinimumTest()

        {

            SharedShippingTest.NormalMinimumTest(new CalcShippingAsync());

        }


        [TestMethod]

        public void AsyncNormalFreeTest()

        {

            SharedShippingTest.NormalFreeTest(new CalcShippingAsync());

        }


        [TestMethod]

        public void AsyncExpressTest()

        {

            SharedShippingTest.ExpressTest(new CalcShippingAsync());

        }

    }

}
Testing the Activity
After building the solution, you can execute the tests defined in the CalcShippingAsyncTest class. The test results should be similar to those shown in Figure 3-2 for the first set of tests.
Using Activities
You’ve now seen that the same custom activity can be implemented in several different ways. All of these authoring styles are valid, and you will likely use most of them at one time or another. Regardless of the style that you use, the message is the same: developing custom activities is the best way to make full use of WF.
Now that you know more about authoring custom activities, you might have a better appreciation of how they act as the reusable building blocks that you compose into finished workflows. In the next few sections, I discuss a few short topics related to using activities within a workflow.
Workflow Building Blocks
The custom activities that you develop work alongside the standard activities provided with WF. Together they form a seamless stack of workflow building blocks. This is illustrated in Figure 3-5.
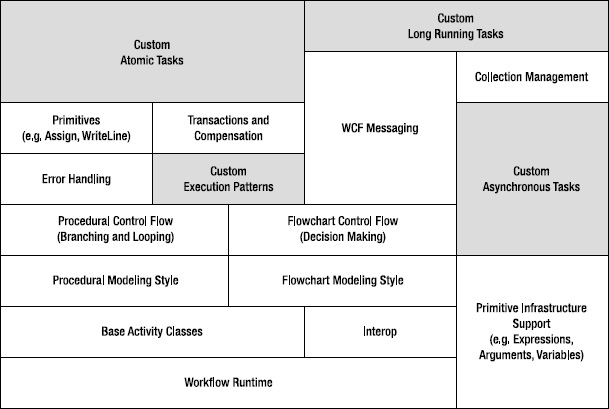
As shown in Figure 3-5, the stack of WF building blocks begins at the bottom with a solid foundation. This foundation consists of the workflow runtime, the base activity classes along with other infrastructure classes such as those that support expressions, arguments, and variables. I’ve also included the classes that support interop with WF 3.x activities at this level.
Moving up in the stack, you find the classes that support workflow modeling styles such as procedural and flowchart. The control flow activities that are associated with each of these modeling styles are shown next. The control flow activities include the standard looping, branching, and decision-making activities. Also included in the stack are standard activities for error handling, transactions, compensation, and collection management. Activities that enable you to leverage WCF messaging as well as some miscellaneous primitives round out the standard activities.
Most of your custom activities will be built upon the foundation of standard activities beneath them. However, you may require custom activities that implement new execution patterns or fill in other missing blocks at any level of the stack.
The key point is that any given workflow requires a number of building blocks from these categories. Many of those blocks are supplied with WF, but many times you need to fill in those empty spaces yourself with custom activities.
![]() Note Don’t read too much into the relative sizes and positions of the blocks in Figure 3-5. My intent is not to suggest that certain categories contain more activities than others or are more important. The relative importance of the activities in any single category will vary based on the requirements of the workflow. I’m also not suggesting that any given block is directly dependent on those under it. Some blocks are clearly foundation pieces (Workflow Runtime and Infrastructure) and must be in place before other blocks are placed above them. But most blocks don’t have a dependency on the blocks that are directly beneath them.
Note Don’t read too much into the relative sizes and positions of the blocks in Figure 3-5. My intent is not to suggest that certain categories contain more activities than others or are more important. The relative importance of the activities in any single category will vary based on the requirements of the workflow. I’m also not suggesting that any given block is directly dependent on those under it. Some blocks are clearly foundation pieces (Workflow Runtime and Infrastructure) and must be in place before other blocks are placed above them. But most blocks don’t have a dependency on the blocks that are directly beneath them.
Activity Data Flow
You’ve already seen how data flows into a workflow or an activity via the arguments that you define. If output arguments from an individual activity are needed elsewhere in the workflow, they are passed to subsequent activities via variables. Since this is an authoring pattern that is repeated quite often, I thought it deserved another look before I move on to other topics. Figure 3-6 illustrates the relationship between arguments, variables, and activities.
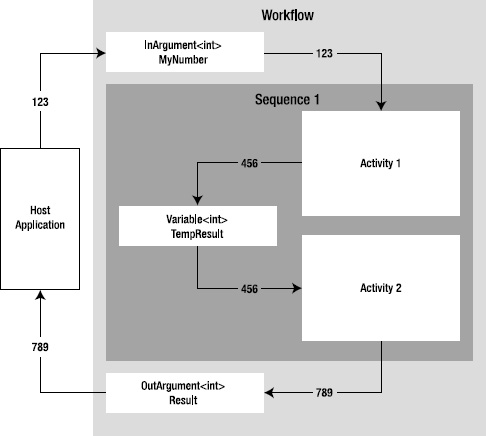
Figure 3-6. Activity data flow
As shown in Figure 3-6, data enters a workflow via an input argument. That initial data is used as input to the first activity that has output of its own. The output from the first activity is stored temporarily in a variable in order to make it available for use by a subsequent activity. Finally, the output from the second activity is assigned to an output argument and is made available to the host application that started the workflow.
The most important point is that the activities generally should not directly reference each other. Instead, variables are used as an intermediate storage location of any values that need to be used elsewhere in the workflow.
Variable Scoping
You have already seen that you must identify the scope of any variables that you define. A variable is visible to the activity that declared it as well as any children of that activity. Obviously this has implications when you are authoring workflows. You need to be conscious of how each variable will be used and which activities will require access to it. This is illustrated in Figure 3-7.
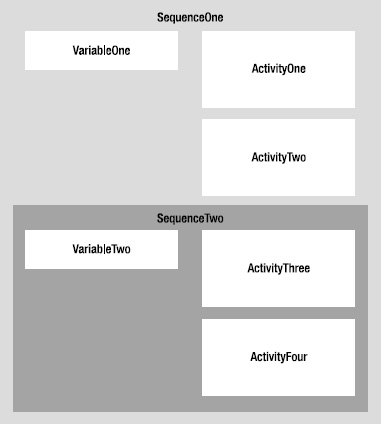
Figure 3-7. Variable scope
Figure 3-7 uses a set of four activities and two variables to illustrate how scoping of variables works. In this figure, VariableOne is defined at the outermost Sequence activity. It is visible to all child activities shown in the figure. On the other hand, VariableTwo is defined one level down in a child Sequence activity (SequenceTwo). Since it is scoped at a lower level, it is visible to only two of the activities (ActivityThree and ActivityFour).
Most importantly, variables go out of scope when the activity that owns them goes out of scope. In this example, once ActivityThree and ActivityFour have completed their execution, the work of their parent (SequenceTwo) is also complete. Once that occurs, SequenceTwo goes out of scope along with any variables (VariableTwo) that were defined within it.
Standard Activities Summary
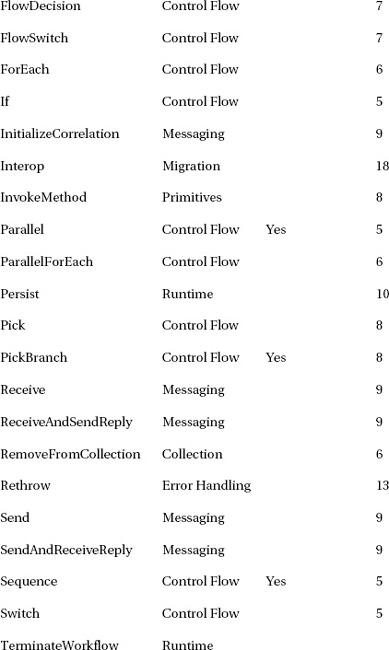
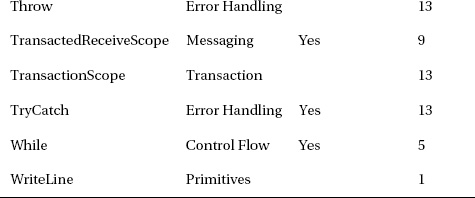
Table 3-2 summarizes the standard activities that are provided with WF. The activities are presented in alphabetical sequence by activity name. A category is included that refers to the activity categories in the following section. The Allows Variables column indicates whether the activity supports the declaration of variables. The final column (Chapter) indicates the primary chapter in which you’ll learn more about the activity.

Standard Activities
In this section I review the standard activities provided with WF. The goal is to provide a short description of each activity without going into the details of how each activity is used. Detailed coverage of each activity is left to the other chapters in this book that target each functional area.
To better understand the purpose of each activity and how it relates to the others, I’ve organized them into these categories. These categories correspond to the Toolbox categories in which you will find these activities:
- Control Flow
- Flowchart
- Messaging
- Runtime
- Primitives
- Transactions
- Collection
- Error Handling
- Migration
The activities in each of these categories are discussed in the following sections.
![]() Note You will notice that many of the activities allow you to declare a single activity as a child. Although support for only a single activity may seem like a major shortcoming, please remember that the single activity that you declare may itself be a container for other activities.
Note You will notice that many of the activities allow you to declare a single activity as a child. Although support for only a single activity may seem like a major shortcoming, please remember that the single activity that you declare may itself be a container for other activities.
Control Flow
The activities in this category control the flow of execution within the workflow. The activities in this style use familiar programming constructs such as if, while, and switch for branching and looping. However, although they can be categorized as procedural control flow activities, they can also be used within workflows that also use flowchart activities.
Sequence
The Sequence activity is a simple container for other activities that implements a sequential execution pattern. Activities that are placed into this container are executed in the sequence in which they are defined.
If
The If activity is used to model an if-then-else condition within a workflow. You use it by supplying an expression that returns a Boolean value. If the value is true, the activity that you declare for the If.Then property is executed. Optionally, you can also declare an activity for the If.Else property. This activity is executed if the condition is false. If you need to implement an if-else-if pattern, you can nest one If activity in the If.Else property of another.
Although these properties accept only a single activity, that activity can be a container for other activities such a Sequence activity.
Switch<T>
The Switch<T> activity models the C# switch statement, which executes one of the declared cases. It is a generic activity; therefore, you must supply the type of the expression that will be evaluated. The expression to evaluate is set using the Switch.Expression property. Multiple cases may be defined that represent the possible values of the Switch.Expression property. The activity defined for a case is executed when the key value defined for the case matches the Switch.Expression property.
While
The While activity executes a child activity while a condition is true. The While.Condition property is used to define a Boolean expression. A single child activity is declared for the While.Body property. Since the condition may initially be false, it is possible that the child activity is never executed.
DoWhile
Like the While activity, the DoWhile continuously executes a child activity. However, the DoWhile evaluates the DoWhile.Condition property after execution of the activity declared for the DoWhile.Body property. This means that the child activity is always executed at least once. Execution of the child activity stops when the condition is no longer true.
Parallel
The Parallel activity schedules simultaneous execution of multiple child activities. The children are declared using the Parallel.Branches property. Execution of this activity completes when all child activities complete. An optional Parallel.CompletionCondition property allows you to declare a condition that causes execution to stop for all child activities. If this condition is true, child activities that are still executing are canceled.
ForEach<T>
The ForEach<T> activity executes a declared activity for each element in a collection. The activity to execute is set using the ForEach.Body property. The collection of values is set using the ForEach.Values property. ForEach<T> is a generic activity; therefore, the type of the elements in the collection must be set.
ParallelForEach<T>
The ParallelForEach<T> activity works like the ForEach activity. It executes an activity for each element in a collection. However, as the name implies, ParallelForEach<T> executes the child activity for each element in the collection in parallel. Parallel in this case means that execution of the child activity is immediately scheduled for all elements in the collection. Execution does not occur simultaneously on multiple threads unless all the child activities are implemented as asynchronous activities.
Pick and PickBranch
The Pick activity executes one of the declared branches based on the receipt of an event. It is similar in concept to the Switch activity, but instead of branching based on the value of an expression, execution of a single branch is determined by the receipt of an event.
To use the Pick activity, you declare multiple instances of the PickBranch activity as children. Each PickBranch has a Trigger and Action property. You set the PickBranch.Trigger property to an activity that waits for a continuation event via resumption of a bookmark. The PickBranch.Action property is used to declare the activity you want to execute when the trigger event is received.
Flowchart
The activities in this category are used to declare workflows using the flowchart style of modeling. This modeling style controls the flow of execution using direct links between node activities. This is in contrast with the procedural style of modeling, which uses more traditional programming constructs for looping and branching.
Flowchart
The Flowchart activity is the basis for the flowchart modeling style. It maintains the collection of child nodes that have been declared as well as a starting point for the flowchart.
FlowDecision
The FlowDecision activity models a simple decision within a workflow that uses the flowchart modeling style. The FlowDecision has a Condition property that allows you to set an expression to evaluate. Two outcomes are possible: the condition is either true or false. Flowchart nodes (paths to other activities) can be defined for one or both of the outcomes.
FlowSwitch and FlowSwitch<T>
The FlowSwitch activity implements the logic in a Switch activity for the flowchart modeling style. A single FlowSwitch.Expression property is used to define the expression to evaluate. Multiple cases are declared, with each one associated with the string representation of one possible value of the expression. Execution continues with the case that evaluates to true. The generic version of this activity identifies the type of the Expression property and supports the definition of cases using the actual values for the type instead of string values.
Messaging
The activities in this category are used to interact with other applications using Windows Communication Foundation (WCF).
ReceiveAndSendReply
This activity template is used to model the service side of a request/response message exchange pattern. The template contains a correlated Receive and SendReply activity. The purpose of this combination of activities is to model a WCF service using a workflow that receives a request and then sends a reply.
SendAndReceiveReply
This activity template models the requesting side of a request/response message exchange pattern. The template contains a correlated Send and ReceiveReply activity. The Send activity sends a request to a WCF endpoint and then waits for a response.
Send
The Send activity is used to send a request to a WCF endpoint. It is a single activity that initiates the request but doesn’t contain the logic necessary to wait for a response. It is suitable for one-way communication (request only) with another system. If you require a request/response message exchange pattern, the SendAndReceiveReply template should be used instead.
Receive
The Receive activity models the receipt of a one-way message from a WCF client. If a request/response message exchange pattern is needed, the ReceiveAndSendReply template should be used instead.
CorrelationScope
The CorrelationScope activity is used to provide management of correlation between messaging activities. The messaging activities to manager are added as children of this activity.
InitializeCorrelation
The InitializeCorrelation activity is used to manually initialize correlation prior to sending or receiving a message. Normally, correlation is automatically initialized when a message is sent or received.
TransactedReceiveScope
The TransactedReceiveScope is used when you need to flow a transaction into a workflow via WCF messaging.
Runtime
Activities in this category are related to miscellaneous runtime operations.
Persist
The Persist activity is used to declaratively request that the workflow persist its current state.
TerminateWorkflow
The TerminateWorkflow activity is used to declaratively terminate execution of the workflow.
Primitives
These activities provide miscellaneous functionality that spans multiple categories.
Assign
The Assign activity allows you to set a variable or argument to a new value. The value is specified as an expression so it can be a literal value or it can reference other arguments or variables.
Delay
The Delay activity is used to set a timer within a workflow. When the timer expires, the Delay activity completes and execution of the remainder of the workflow can continue.
InvokeMethod
The InvokeMethod enables you to call a public method on an object instance or class.
WriteLine
The WriteLine activity writes a string to the console. You can optionally set the WriteLine.TextWriter property to direct the string to that writer instead of the console.
Transactions and Compensation
The activities in this category are used to manage the consistency of any work that is accomplished by a workflow. Transactions are used to guarantee the atomicity and consistency of short-lived units of work. Compensation is the process of undoing work that has already been completed.
TransactionScope
The TransactionScope activity protects the work that is done by a child activity with a transaction. A new transaction is created (if necessary) when this activity begins execution, and it is committed when it completes. Any child activities can enlist their work in the active transaction so that all the work is committed at the same time.
CompensableActivity
The CompensableActivity is a container for child activities that require compensation. The activity supports a CompensableActivity.Body property that is used to set the activity that requires compensation. Properties are also supported that allow you to set the activity to execute when compensation, cancellation, or confirmation is required. Compensation is the undoing of completed work. A confirmation activity would be used to confirm the successful completion of the work.
Compensate
The Compensate activity allows you to explicitly begin the compensation process for an activity.
Confirm
The Confirm activity allows you to explicitly begin the confirmation process.
CancellationScope
The CancellationScope activity allows you to declare an activity to execute if the main activity is canceled. The main activity is declared using the CancellationScope.Body property, while the cancellation activity is declared using CancellationScope.CancelHandler.
Collection Management
The activities in this category allow you to declaratively use and manage data in collections.
AddToCollection
The AddToCollection activity adds a new item to a collection. This is a generic activity, so you need to specify the type of the items in the collection. The AddToCollection.Collection property identifies the collection, and the AddToCollection.Item property is the new item to be added to the collection.
RemoveFromCollection
The RemoveFromCollection activity is similar in usage to AddToCollection. Instead of adding a new item to a collection, this activity removes the item.
ExistsInCollection
The ExistsInCollection activity is used to determine whether a given item is found in a collection.
ClearCollection
The ClearCollection activity clears all items from a collection.
Error Handling
Activities in this category are associated with error handling within a workflow.
TryCatch
The TryCatch activity models the familiar try/catch pattern that is supported in C#. A single activity to execute is declared using the TryCatch.Try property. One or more exceptions to catch are defined using the TryCatch.Catches property. Each catch declaration includes an activity to execute when the exception is caught. If the activity declared for the TryCatch.Try property throws an unhandled exception, the appropriate activity associated with the caught exception is executed. A TryCatch.Finally property is used to define an activity to execute after the Try and any Catches activities are executed.
Throw and Rethrow
The Throw activity allows you to declaratively raise an exception within a workflow. It is similar in usage as the C# throw statement. The Rethrow activity can be used only within the activity declared for the TryCatch.Catch property. It rethrows the exception that was caught.
Migration
Activities in this category are related to migration from an earlier version of WF.
Interop
The Interop activity is used for interoperability with activities that were developed for the 3.x version of WF. This activity acts as a wrapper for the 3.x activity, allowing it to execute in the latest version of WF. You declare the 3.x activity to execute using the Interop.Body property.
Summary
The purpose of this chapter was to help you become better acquainted with workflow activities. You learned about the different categories of work that activities can perform. This chapter also discussed the use of arguments and variables.
You learned that there are several authoring styles that you can use to develop your own custom activities. You can create a new activity in code completely from scratch, or you can assemble it using existing activities. Both of these authoring styles were demonstrated in a series of examples. The examples implemented the same custom activity using each of the available authoring styles.
Following the examples that demonstrated how to create custom activities, the chapter presented a brief overview of the standard activities that are included with WF.
In the next chapter, you will learn more about the options available for hosting workflows in your applications.