
Chapter 13
Events
WHAT’S IN THIS CHAPTER?
- Understanding event flow
- Working with event handlers
- Examining the different types of events
JavaScript’s interaction with HTML is handled through events, which indicate when particular moments of interest occur in the document or browser window. Events can be subscribed to using listeners (also called handlers) that execute only when an event occurs. This model, called the observer pattern in traditional software engineering, allows a loose coupling between the behavior of a page (defined in JavaScript) and the appearance of the page (defined in HTML and CSS).
Events first appeared in Internet Explorer 3 and Netscape Navigator 2 as a way to offload some form processing from the server onto the browser. By the time Internet Explorer 4 and Netscape 4 were released, each browser delivered similar but different APIs that continued for several generations. DOM Level 2 was the first attempt to standardize the DOM events API in a logical way. Internet Explorer 9, Firefox, Opera, Safari, and Chrome all have implemented the core parts of DOM Level 2 Events. Internet Explorer 8 was the last major browser to use a purely proprietary event system.
The browser event system is a complex one. Even though all major browsers have implemented DOM Level 2 Events, the specification doesn’t cover all event types. The BOM also supports events, and the relationship between these and the DOM events is often confusing because of a longtime lack of documentation (something that HTML5 has tried to clarify). Further complicating matters is the augmentation of the DOM events API by DOM Level 3. Working with events can be relatively simple or very complex, depending on your requirements. Still, there are some core concepts that are important to understand.
When development for the fourth generation of web browsers began (Internet Explorer 4 and Netscape Communicator 4), the browser development teams were met with an interesting question: what part of a page owns a specific event? To understand the issue, consider a series of concentric circles on a piece of paper. When you place your finger at the center, it is inside of not just one circle but all of the circles on the paper. Both development teams looked at browser events in the same way. When you click on a button, they concluded, you’re clicking not just on the button but also on its container and on the page as a whole.
Event flow describes the order in which events are received on the page, and interestingly, the Internet Explorer and Netscape development teams came up with an almost exactly opposite concept of event flow. Internet Explorer would support an event bubbling flow, whereas Netscape Communicator would support an event capturing flow.
Event Bubbling
The Internet Explorer event flow is called event bubbling, because an event is said to start at the most specific element (the deepest possible point in the document tree) and then flow upward toward the least specific node (the document). Consider the following HTML page:
<!DOCTYPE html>
<html>
<head>
    <title>Event Bubbling Example</title>
</head>
<body>
    <div id="myDiv">Click Me</div>
</body>
</html>
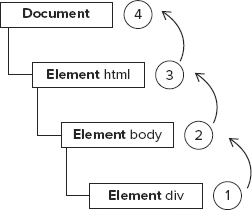
When you click the <div> element in the page, the click event occurs in the following order:
1. <div>
2. <body>
3. <html>
4. document
The click event is first fired on the <div>, which is the element that was clicked. Then the click event goes up the DOM tree, firing on each node along its way until it reaches the document object. Figure 13-1 illustrates this effect.
All modern browsers support event bubbling, although there are some variations on how it is implemented. Internet Explorer 5.5 and earlier skip bubbling to the <html> element (going from <body> directly to document). Internet Explorer 9, Firefox, Chrome, and Safari continue event bubbling up to the window object.
Event Capturing
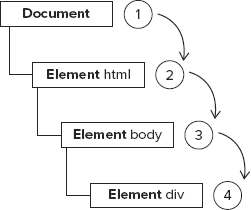
The Netscape Communicator team came up with an alternate event flow called event capturing. The theory of event capturing is that the least specific node should receive the event first and the most specific node should receive the event last. Event capturing was really designed to intercept the event before it reached the intended target. If the previous example is used with event capturing, clicking the <div> element fires the click event in the following order:
1. document
2. <html>
3. <body>
4. <div>
With event capturing, the click event is first received by the document and then continues down the DOM tree to the actual target of the event, the <div> element. This flow is illustrated in Figure 13-2.
Although this was Netscape Communicator’s only event flow model, event capturing is currently supported in Internet Explorer 9, Safari, Chrome, Opera, and Firefox. All of them actually begin event capturing at the window-level event despite the fact that the DOM Level 2 Events specification indicates that the events should begin at document.
Event capturing is generally not used because of a lack of support in older browsers. The general advice is to use event bubbling freely while retaining event capturing for special circumstances.
DOM Event Flow
The event flow specified by DOM Level 2 Events has three phases: the event capturing phase, at the target, and the event bubbling phase. Event capturing occurs first, providing the opportunity to intercept events if necessary. Next, the actual target receives the event. The final phase is bubbling, which allows a final response to the event. Considering the simple HTML example used previously, clicking the <div> fires the event in the order indicated in Figure 13-3.
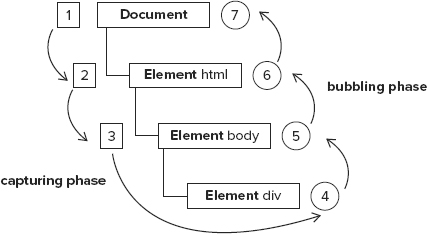
In the DOM event flow, the actual target (the <div> element) does not receive the event during the capturing phase. This means that the capturing phase moves from document to <html> to <body> and stops. The next phase is “at target,” which fires on the <div> and is considered to be part of the bubbling phase in terms of event handling (discussed later). Then, the bubbling phase occurs and the event travels back up to the document.
Most of the browsers that support DOM event flow have implemented a quirk. Even though the DOM Level 2 Events specification indicates that the capturing phase doesn’t hit the event target, Internet Explorer 9, Safari, Chrome, Firefox, and Opera 9.5 and later all fire an event during the capturing phase on the event target. The end result is that there are two opportunities to work with the event on the target.
Internet Explorer 9, Opera, Firefox, Chrome, and Safari all support the DOM event flow; Internet Explorer 8 and earlier do not.
Events are certain actions performed either by the user or by the browser itself. These events have names like click, load, and mouseover. A function that is called in response to an event is called an event handler (or an event listener). Event handlers have names beginning with "on", so an event handler for the click event is called onclick and an event handler for the load event is called onload. Assigning event handlers can be accomplished in a number of different ways.
HTML Event Handlers
Each event supported by a particular element can be assigned using an HTML attribute with the name of the event handler. The value of the attribute should be some JavaScript code to execute. For example, to execute some JavaScript when a button is clicked, you can use the following:
<input type="button" value="Click Me" onclick="alert('Clicked')" />
When this button is clicked, an alert is displayed. This interaction is defined by specifying the onclick attribute and assigning some JavaScript code as the value. Note that since the JavaScript code is an attribute value, you cannot use HTML syntax characters such as the ampersand, double quotes, less-than, or greater-than without escaping them. In this case, single quotes were used instead of double quotes to avoid the need to use HTML entities. To use double quotes, you will change the code to the following:
<input type="button" value="Click Me" onclick="alert("Clicked")" />
An event handler defined in HTML may contain the precise action to take or it can call a script defined elsewhere on the page, as in this example:
<script type="text/javascript">
    function showMessage(){
        alert("Hello world!");
    }
</script>
<input type="button" value="Click Me" onclick="showMessage()" />
HTMLEventHandlerExample01.htm
In this code, the button calls showMessage() when it is clicked. The showMessage() function is defined in a separate <script> element and could also be included in an external file. Code executing as an event handler has access to everything in the global scope.
Event handlers assigned in this way have some unique aspects. First, a function is created that wraps the attribute value. That function has a special local variable called event, which is the event object (discussed later in this chapter):
<!-- outputs "click" -->
<input type="button" value="Click Me" onclick="alert(event.type)">
This gives you access to the event object without needing to define it yourself and without needing to pull it from the enclosing function’s argument list.
The this value inside of the function is equivalent to the event’s target element, for example:
<!-- outputs "Click Me" -->
<input type="button" value="Click Me" onclick="alert(this.value)">
Another interesting aspect of this dynamically created function is how it augments the scope chain. Within the function, members of both document and the element itself can be accessed as if they were local variables. The function accomplishes this via scope chain augmentation using with:
function(){
    with(document){
        with(this){
            //attribute value
        }
    }
}
This means that an event handler can access its own properties easily. The following is functionally the same as the previous example:
<!-- outputs "Click Me" -->
<input type="button" value="Click Me" onclick="alert(value)">
If the element is a form input element, then the scope chain also contains an entry for the parent form element, making the function the equivalent to the following:
function(){
    with(document){
        with(this.form){
            with(this){
                //attribute value
            }
        }
    }
}
Basically, this augmentation allows the event handler code to access other members of the same form without referencing the form element itself. For example:
<form method="post">
    <input type="text" name="username" value="">
    <input type="button" value="Echo Username" onclick="alert(username.value)">
</form>
HTMLEventHandlerExample04.htm
Clicking on the button in this example results in the text from the text box being displayed. Note that it just references username directly.
There are a few downsides to assigning event handlers in HTML. The first is a timing issue: it’s possible that the HTML element appears on the page and is interacted with by the user before the event handler code is ready. In the previous example, imagine a scenario where the showMessage() function isn’t defined until later on the page, after the code for the button. If the user were to click the button before showMessage() was defined, an error would occur. For this reason, most HTML event handlers are enclosed in try-catch blocks so that they quietly fail, as in the following example:
<input type="button" value="Click Me" onclick="try{showMessage();}catch(ex){}">
If this button is clicked before the showMessage() function is defined, no JavaScript error occurs because the error is caught before the browser can handle it.
Another downside is that the scope chain augmentation in the event handler function can lead to different results in different browsers. The rules being followed for identifier resolution are slightly different amongst JavaScript engines, and so the result of accessing unqualified object members may cause errors.
The last downside to assigning event handlers using HTML is that it tightly couples the HTML to the JavaScript. If the event handler needs to be changed, you may need to change code in two places: in the HTML and in the JavaScript. This is the primary reason that many developers avoid HTML event handlers in favor of using JavaScript to assign event handlers.
For more information on the disadvantages of HTML event handlers, please see Event Handler Scope by Garrett Smith (www.jibbering.com/faq/names/event_handler.html).
DOM Level 0 Event Handlers
The traditional way of assigning event handlers in JavaScript is to assign a function to an event handler property. This was the event handler assignment method introduced in the fourth generation of web browsers, and it still remains in all modern browsers because of its simplicity and cross-browser support. To assign an event handler using JavaScript, you must first retrieve a reference to the object to act on.
Each element (as well as window and document) has event handler properties that are typically all lowercase, such as onclick. An event handler is assigned by setting the property equal to a function, as in this example:
var btn = document.getElementById("myBtn");
btn.onclick = function(){
    alert("Clicked");
};
Here, a button is retrieved from the document and an onclick event handler is assigned. Note that the event handler isn’t assigned until this code is run, so if the code appears after the code for the button in the page, there may be an amount of time during which the button will do nothing when clicked.
When assigning event handlers using the DOM Level 0 method, the event handler is considered to be a method of the element. The event handler, therefore, is run within the scope of element, meaning that this is equivalent to the element. Here is an example:
var btn = document.getElementById("myBtn");
btn.onclick = function(){
    alert(this.id);    //"myBtn"
};
DOMLevel0EventHandlerExample01.htm
This code displays the element’s ID when the button is clicked. The ID is retrieved using this.id. It’s possible to use this to access any of the element’s properties or methods from within the event handlers. Event handlers added in this way are intended for the bubbling phase of the event flow.
You can remove an event handler assigned via the DOM Level 0 approach by setting the value of the event handler property to null, as in the following example:
btn.onclick = null; //remove event handler
Once the event handler is set to null, the button no longer has any action to take when it is clicked.
If you’ve assigned an event handler using HTML, the value on the onclick property is a function containing the code specified in the HTML attribute. These event handlers can also be removed by setting the property to null.
DOM Level 2 Event Handlers
DOM Level 2 Events define two methods to deal with the assignment and removal of event handlers: addEventListener() and removeEventListener(). These methods exist on all DOM nodes and accept three arguments: the event name to handle, the event handler function, and a Boolean value indicating whether to call the event handler during the capture phase (true) or during the bubble phase (false).
To add an event handler for the click event on a button, you can use the following code:
var btn = document.getElementById("myBtn");
btn.addEventListener("click", function(){
    alert(this.id);
}, false);
This code adds an onclick event handler to a button that will be fired in the bubbling phase (since the last argument is false). As with the DOM Level 0 approach, the event handler runs in the scope of the element on which it is attached. The major advantage to using the DOM Level 2 method for adding event handlers is that multiple event handlers can be added. Consider the following example:
var btn = document.getElementById("myBtn");
btn.addEventListener("click", function(){
    alert(this.id);
}, false);
btn.addEventListener("click", function(){
    alert("Hello world!");
}, false);
DOMLevel2EventHandlerExample01.htm
Here, two event handlers are added to the button. The event handlers fire in the order in which they were added, so the first alert displays the element’s ID and the second displays the message “Hello world!”
Event handlers added via addEventListener() can be removed only by using removeEventListener() and passing in the same arguments as were used when the handler was added. This means that anonymous functions added using addEventListener() cannot be removed, as shown in this example:
var btn = document.getElementById("myBtn");
btn.addEventListener("click", function(){
    alert(this.id);
}, false);

//other code here

btn.removeEventListener("click", function(){   //won't work!
    alert(this.id);
}, false);
In this example, an anonymous function is added as an event handler using addEventListener(). The call to removeEventListener() looks like it’s using the same arguments, but in reality, the second argument is a completely different function than the one used in addEventListener(). The event handler function passed into removeEventListener() must be the same one that was used in addEventListener(), as in this example:
var btn = document.getElementById("myBtn");
var handler = function(){
    alert(this.id);
};
btn.addEventListener("click", handler, false);

//other code here

btn.removeEventListener("click", handler, false);  //works!
DOMLevel2EventHandlerExample02.htm
This rewritten example works as expected because the same function is used for both addEventListener() and removeEventListener().
In most cases, event handlers are added to the bubbling phase of the event flow since this offers the broadest possible cross-browser support. Attaching an event handler in the capture phase is best done if you need to intercept events before they reach their intended target. If this is not necessary, it’s advisable to avoid event capturing.
DOM Level 2 event handlers are supported in Internet Explorer 9, Firefox, Safari, Chrome, and Opera.
Internet Explorer Event Handlers
Internet Explorer implements methods similar to the DOM called attachEvent() and detachEvent(). These methods accept the same two arguments: the event handler name and the event handler function. Since Internet Explorer 8 and earlier support only event bubbling, event handlers added using attachEvent() are attached on the bubbling phase.
To add an event handler for the click event on a button using attachEvent(), you can use the following code:
var btn = document.getElementById("myBtn");
btn.attachEvent("onclick", function(){
    alert("Clicked");
});
IEEventHandlerExample01.htm
Note that the first argument of attachEvent() is "onclick" as opposed to "click" in the DOM’s addEventListener() method.
A major difference between using attachEvent() and using the DOM Level 0 approach in Internet Explorer is the scope of the event handler. When using DOM Level 0, the event handler runs with a this value equal to the element on which it is attached; when using attachEvent(), the event handler runs in the global context, so this is equivalent to window. Here is an example:
var btn = document.getElementById("myBtn");
btn.attachEvent("onclick", function(){
    alert(this === window);   //true
});
This difference is important to understand when writing cross-browser code.
The attachEvent() method, similar to addEventListener(), can be used to add multiple event handlers to a single element. Consider the following example:
var btn = document.getElementById("myBtn");
btn.attachEvent("onclick", function(){
    alert("Clicked");
});
btn.attachEvent("onclick", function(){
    alert("Hello world!");
});
IEEventHandlerExample01.htm
Here, attachEvent() is called twice, adding two different event handlers to the same button. Unlike the DOM method, though, the event handlers fire in reverse of the order they were added. When the button in this example is clicked, the first alert says "Hello world!" and the second says "Clicked".
Events added using attachEvent() are removed using detachEvent() as long as the same arguments are provided. As with the DOM methods, this means that anonymous functions cannot be removed once they have been added. Event handlers can always be removed as long as a reference to the same function can be passed into detachEvent(). Here is an example:
var btn = document.getElementById("myBtn");
var handler = function(){
    alert("Clicked");
};
btn.attachEvent("onclick", handler);

//other code here

btn.detachEvent("onclick", handler);
IEEventHandlerExample02.htm
This example adds an event handler stored in the variable handler. That same function is later removed using detachEvent().
Internet Explorer event handlers are supported in Internet Explorer and Opera.
Cross-Browser Event Handlers
To accommodate event handling in a cross-browser way, many developers end up either using a JavaScript library that abstracts away the browser differences or writing custom code to use the most appropriate event-handling approach. Writing your own code is fairly straightforward, because it relies on capability detection (covered in Chapter 9). To make sure that the event-handling code works in the most compatible way possible, you will need it to work only on the bubbling phase.
The first method to create is called addHandler(), and its job is to use the DOM Level 0 approach, the DOM Level 2 approach, or the Internet Explorer approach to adding events, depending on which is available. This method is attached to an object called EventUtil that will be used throughout this book to aid in handling cross-browser differences. The addHandler() method accepts three arguments: the element to act on, the name of the event, and the event handler function.
The counterpart to addHandler() is removeHandler(), which accepts the same three arguments. This method’s job is to remove a previously added event handler using whichever means is available, defaulting to DOM Level 0 if no other method is available.
The full code for EventUtil is as follows:
var EventUtil = {

    addHandler: function(element, type, handler){
        if (element.addEventListener){
            element.addEventListener(type, handler, false);
        } else if (element.attachEvent){
            element.attachEvent("on" + type, handler);
        } else {
            element["on" + type] = handler;
        }
    },

    removeHandler: function(element, type, handler){
        if (element.removeEventListener){
            element.removeEventListener(type, handler, false);
        } else if (element.detachEvent){
            element.detachEvent("on" + type, handler);
        } else {
            element["on" + type] = null;
        }
    }

};
EventUtil.js
Both methods first check for the existence of the DOM Level 2 method on the element that was passed in. If the DOM Level 2 method exists, it is used, passing in the event type and the event handler function, along with a third argument of false (to indicate the bubbling phase). If the Internet Explorer method is available, it is used as a second option. Note that the event type must be prefixed with "on" in order for it to work in Internet Explorer 8 and earlier. The last resort is to use the DOM Level 0 method (code should never reach here in modern browsers). Note the use of bracket notation to assign the property name to either the event handler or null.
This utility object can be used in the following way:
var btn = document.getElementById("myBtn");
var handler = function(){
    alert("Clicked");
};
EventUtil.addHandler(btn, "click", handler);

//other code here

EventUtil.removeHandler(btn, "click", handler);
CrossBrowserEventHandlerExample01.htm
The addHandler() and removeHandler() methods don’t equalize all functionality across all browsers, such as the Internet Explorer scope issue, but it does allow the seamless addition and removal of event handlers. Keep in mind, also, that DOM Level 0 support is limited to just one event handler per event. Fortunately, DOM Level 0 browsers are no longer in popular use, so this shouldn’t affect you.
When an event related to the DOM is fired, all of the relevant information is gathered and stored on an object called event. This object contains basic information such as the element that caused the event, the type of event that occurred, and any other data that may be relevant to the particular event. For example, an event caused by a mouse action generates information about the mouse’s position, whereas an event caused by a keyboard action generates information about the keys that were pressed. All browsers support the event object, though not in the same way.
The DOM Event Object
In DOM-compliant browsers, the event object is passed in as the sole argument to an event handler. Regardless of the method used to assign the event handler, DOM Level 0 or DOM Level 2, the event object is passed in. Here is an example:
var btn = document.getElementById("myBtn");
btn.onclick = function(event){
    alert(event.type);    //"click"
};

btn.addEventListener("click", function(event){
    alert(event.type);    //"click"
}, false);
Both event handlers in this example pop up an alert indicating the type of event being fired by using the event.type property. This property always contains the type of event that was fired, such as "click" (it is the same value that you pass into addEventListener() and removeEventListener()).
When an event handler is assigned using HTML attributes, the event object is available as a variable called event. Here’s an example:
<input type="button" value="Click Me" onclick="alert(event.type)">
Providing the event object in this way allows HTML attribute event handlers to perform the same as JavaScript functions.
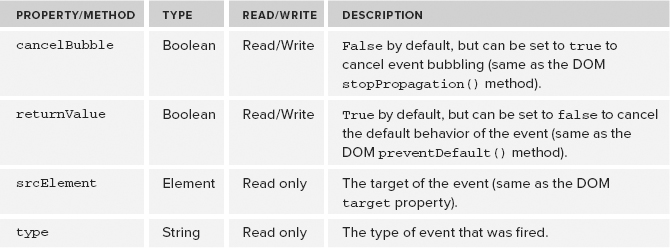
The event object contains properties and methods related to the specific event that caused its creation. The available properties and methods differ based on the type of event that was fired, but all events have the members listed in the following table.

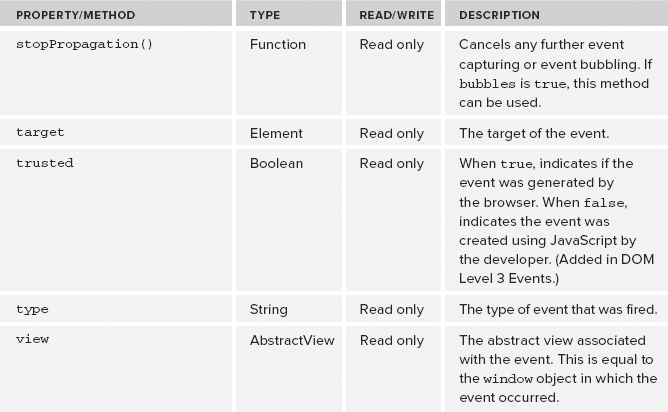
Inside an event handler, the this object is always equal to the value of currentTarget, whereas target contains only the actual target of the event. If the event handler is assigned directly onto the intended target, then this, currentTarget, and target all have the same value. Here is an example:
var btn = document.getElementById("myBtn");
btn.onclick = function(event){
    alert(event.currentTarget === this);   //true
    alert(event.target === this);          //true
};
DOMEventObjectExample01.htm
This code examines the values of currentTarget and target relative to this. Since the target of the click event is the button, all three are equal. If the event handler existed on a parent node of the button, such as document.body, the values would be different. Consider the following example:
document.body.onclick = function(event){
    alert(event.currentTarget === document.body);   //true
    alert(this === document.body);                  //true
    alert(event.target === document.getElementById("myBtn")); //true
};
DOMEventObjectExample02.htm
When the button is clicked in this example, both this and currentTarget are equal to document.body because that’s where the event handler was registered. The target property, however, is equal to the button element itself, because that’s the true target of the click event. Since the button itself doesn’t have an event handler assigned, the click event bubbles up to document.body, where the event is handled.
The type property is useful when you want to assign a single function to handle multiple events. Here is an example:
var btn = document.getElementById("myBtn");
var handler = function(event){
    switch(event.type){
        case "click":
            alert("Clicked");
            break;

        case "mouseover":
            event.target.style.backgroundColor = "red";
            break;

        case "mouseout":
            event.target.style.backgroundColor = "";
            break;
    }
};

btn.onclick = handler;
btn.onmouseover = handler;
btn.onmouseout = handler;
DOMEventObjectExample03.htm
In this example, a single function called handler is defined to handle three different events: click, mouseover, and mouseout. When the button is clicked, it should pop up an alert, as in the previous examples. When the mouse is moved over the button, the background color should change to red, and when the mouse is moved away from the button, the background color should revert to its default. Using the event.type property, the function is able to determine which event occurred and then react appropriately.
The preventDefault() method is used to prevent the default action of a particular event. The default behavior of a link, for example, is to navigate to the URL specified in its href attribute when clicked. If you want to prevent that navigation from occurring, an onclick event handler can cancel that behavior, as in the following example:
var link = document.getElementById("myLink");
link.onclick = function(event){
    event.preventDefault();
};
DOMEventObjectExample04.htm
Any event that can be canceled using preventDefault() will have its cancelable property set to true.
The stopPropagation() method stops the flow of an event through the DOM structure immediately, canceling any further event capturing or bubbling before it occurs. For example, an event handler added directly to a button can call stopPropagation() to prevent an event handler on document.body from being fired, as shown in the following example:
var btn = document.getElementById("myBtn");
btn.onclick = function(event){
    alert("Clicked");
    event.stopPropagation();
};

document.body.onclick = function(event){
    alert("Body clicked");
};
DOMEventObjectExample05.htm
Without the call to stopPropagation() in this example, two alerts would be displayed when the button is clicked. However, the click event never reaches document.body, so the onclick event handler is never executed.
The eventPhase property aids in determining what phase of event flow is currently active. If the event handler is called during the capture phase, eventPhase is 1; if the event handler is at the target, eventPhase is 2; if the event handler is during the bubble phase, eventPhase is 3. Note that even though “at target” occurs during the bubbling phase, eventPhase is always 2. Here is an example:
var btn = document.getElementById("myBtn");
btn.onclick = function(event){
    alert(event.eventPhase);   //2
};

document.body.addEventListener("click", function(event){
    alert(event.eventPhase);   //1
}, true);

document.body.onclick = function(event){
    alert(event.eventPhase);   //3
};
DOMEventObjectExample06.htm
When the button in this example is clicked, the first event handler to fire is the one on document.body in the capturing phase, which pops up an alert that displays 1 as the eventPhase. Next, event handler on the button itself is fired, at which point the eventPhase is 2. The last event handler to fire is during the bubbling phase on document.body when eventPhase is 3. Whenever eventPhase is 2, this, target, and currentTarget are always equal.
The event object exists only while event handlers are still being executed; once all event handlers have been executed, the event object is destroyed.
The Internet Explorer Event Object
Unlike the DOM event object, the Internet Explorer event object is accessible in different ways based on the way in which the event handler was assigned. When an event handler is assigned using the DOM Level 0 approach, the event object exists only as a property of the window object. Here is an example:
var btn = document.getElementById("myBtn");
btn.onclick = function(){
    var event = window.event;
    alert(event.type);    //"click"
};
Here, the event object is retrieved from window.event and then used to determine the type of event that was fired (the type property for Internet Explorer is identical to that of the DOM version). However, if the event handler is assigned using attachEvent(), the event object is passed in as the sole argument to the function, as shown here:
var btn = document.getElementById("myBtn");
btn.attachEvent("onclick", function(event){
    alert(event.type);    //"click"
});
When using attachEvent(), the event object is also available on the window object, as with the DOM Level 0 approach. It is also passed in as an argument for convenience.
If the event handler is assigned by an HTML attribute, the event object is available as a variable called event (the same as the DOM model). Here’s an example:
<input type="button" value="Click Me" onclick="alert(event.type)">
The Internet Explorer event object also contains properties and methods related to the specific event that caused its creation. Many of these either map directly to or are related to DOM properties or methods. Like the DOM event object, the available properties and methods differ based on the type of event that was fired, but all events use the properties and methods defined in the following table.
Since the scope of an event handler is determined by the manner in which it was assigned, the value of this cannot always be assumed to be equal to the event target, so it’s a good idea to always use event.srcElement instead. Here is an example:
var btn = document.getElementById("myBtn");
btn.onclick = function(){
    alert(window.event.srcElement === this);      //true
};

btn.attachEvent("onclick", function(event){
    alert(event.srcElement === this);             //false
});
IEEventObjectExample01.htm
In the first event handler, which is assigned using the DOM Level 0 approach, the srcElement property is equal to this, but in the second event handler, the two values are different.
The returnValue property is the equivalent of the DOM preventDefault() method in that it cancels the default behavior of a given event. You need only set returnValue to false to prevent the default action. Consider the following example:
var link = document.getElementById("myLink");
link.onclick = function(){
    window.event.returnValue = false;
};
IEEventObjectExample02.htm
In this example, using returnValue in an onclick event handler stops a link’s default action. Unlike the DOM, there is no way to determine whether an event can be canceled or not using JavaScript.
The cancelBubble property performs the same action as the DOM stopPropagation() method: it stops the event from bubbling. Since Internet Explorer 8 and earlier don’t support the capturing phase, only bubbling is canceled, whereas stopPropagation() stops both capturing and bubbling. Here is an example:
var btn = document.getElementById("myBtn");
btn.onclick = function(){
    alert("Clicked");
    window.event.cancelBubble = true;
};

document.body.onclick = function(){
    alert("Body clicked");
};
IEEventObjectExample03.htm
By setting cancelBubble to true in the button’s onclick event handler, it prevents the event from bubbling up to the document.body event handler. The result is that only one alert is displayed when the button is clicked.
The Cross-Browser Event Object
Although the event objects for the DOM and Internet Explorer are different, there are enough similarities to allow cross-browser solutions. All of the information and capabilities of the Internet Explorer event object are present in the DOM object, just in a different form. These parallels enable easy mapping from one event model to the other. The EventUtil object described earlier can be augmented with methods that equalize the differences:
var EventUtil = {

    addHandler: function(element, type, handler){
        //code removed for printing
    },

    getEvent: function(event){
        return event ? event : window.event;
    },

    getTarget: function(event){
        return event.target || event.srcElement;

    },

    preventDefault: function(event){
        if (event.preventDefault){
            event.preventDefault();
        } else {
            event.returnValue = false;
        }
    },

    removeHandler: function(element, type, handler){
        //code removed for printing
    },

    stopPropagation: function(event){
        if (event.stopPropagation){
            event.stopPropagation();
        } else {
            event.cancelBubble = true;
        }
    }

};
EventUtil.js
There are four new methods added to EventUtil in this code. The first is getEvent(), which returns a reference to the event object. Since the location of the event object differs in Internet Explorer, this method can be used to retrieve the event object regardless of the event handler assignment approach used. To use this method, you must assume that the event object is passed into the event handler and pass in that variable to the method. Here is an example:
btn.onclick = function(event){
    event = EventUtil.getEvent(event);
};
CrossBrowserEventObjectExample01.htm
When used in a DOM-compliant browser, the event variable is just passed through and returned. In Internet Explorer the event argument will be undefined, so window.event is returned. Adding this line to the beginning of event handlers ensures that the event object is always available, regardless of the browser being used.
The second method is getTarget(), which returns the target of the event. Inside the method, it checks the event object to see if the target property is available and returns its value if it is; otherwise, the srcElement property is used. This method can be used as follows:
btn.onclick = function(event){
    event = EventUtil.getEvent(event);
    var target = EventUtil.getTarget(event);
};
CrossBrowserEventObjectExample01.htm
The third method is preventDefault(), which stops the default behavior of an event. When the event object is passed in, it is checked to see if the preventDefault() method is available and, if so, calls it. If preventDefault() is not available, the method sets returnValue to false. Here is an example:
var link = document.getElementById("myLink");
link.onclick = function(event){
    event = EventUtil.getEvent(event);
    EventUtil.preventDefault(event);
};
CrossBrowserEventObjectExample02.htm
This code prevents a link click from navigating to another page in all major browsers. The event object is first retrieved using EventUtil.getEvent() and then passed into EventUtil.preventDefault()to stop the default behavior.
The fourth method, stopPropagation(), works in a similar way. It first tries to use the DOM method for stopping the event flow and uses cancelBubble if necessary. Here is an example:
var btn = document.getElementById("myBtn");
btn.onclick = function(event){
    alert("Clicked");
    event = EventUtil.getEvent(event);
    EventUtil.stopPropagation(event);
};

document.body.onclick = function(event){
    alert("Body clicked");
};
CrossBrowserEventObjectExample03.htm
Here, the event object is retrieved using EventUtil.getEvent() and then passed into EventUtil.stopPropagation(). Remember that this method may stop event bubbling or both event bubbling and capturing depending on the browser.
There are numerous categories of events that can occur in a web browser. As mentioned previously, the type of event being fired determines the information that is available about the event. DOM Level 3 Events specifies the following event groups:
- User interface (UI) events are general browser events that may have some interaction with the BOM.
- Focus events are fired when an element gains or loses focus.
- Mouse events are fired when the mouse is used to perform an action on the page.
- Wheel events are fired when a mouse wheel (or similar device) is used.
- Text events are fired when text is input into the document.
- Keyboard events are fired when the keyboard is used to perform an action on the page.
- Composition events are fired when inputting characters for an Input Method Editor (IME).
- Mutation events are fired when a change occurs to the underlying DOM structure.
- Mutation name events are fired when element or attribute names are changed. These events are deprecated and not implemented by any browser, so they are intentionally omitted from this chapter.
In addition to these categories, HTML5 defines another set of events, and browsers often implement proprietary events both on the DOM and on the BOM. These proprietary events are typically driven by developer demand rather than specifications and so may be implemented differently across browsers.
DOM Level 3 Events redefines the event groupings from DOM Level 2 Events and adds additional event definitions. All major browsers support DOM Level 2 Events, including Internet Explorer 9. Internet Explorer 9 also supports DOM Level 3 Events.
UI Events
UI events are those events that aren’t necessarily related to user actions. These events existed in some form or another prior to the DOM specification and were retained for backwards compatibility. The UI events are as follows:
- DOMActivate — Fires when an element has been activated by some user action, by either mouse or keyboard (more generic than click or keydown). This event is deprecated in DOM Level 3 Events and is supported in Firefox 2+ and Chrome. Because of cross-browser implementation differences, it’s recommended not to use this event.
- load — Fires on a window when the page has been completely loaded, on a frameset when all frames have been completely loaded, on an <img> element when it has been completely loaded, or on an <object> element when it has been completely loaded.
- unload — Fires on a window when the page has been completely unloaded, on a frameset when all frames have been completely unloaded, or on an <object> element when it has been completely unloaded.
- abort — Fires on an <object> element if it is not fully loaded before the user stops the download process.
- error — Fires on a window when a JavaScript error occurs, on an <img> element if the image specified cannot be loaded, on an <object> element if it cannot be loaded, or on a frameset if one or more frames cannot be loaded. This event is discussed in Chapter 17.
- select — Fires when the user selects one or more characters in a text box (either <input> or <textarea>). This event is discussed in Chapter 14.
- resize — Fires on a window or frame when it is resized.
- scroll — Fires on any element with a scrollbar when the user scrolls it. The <body> element contains the scrollbar for a loaded page.
Most of the HTML events are related either to the window object or to form controls.
With the exception of DOMActivate, these events were part of the HTML Events group in DOM Level 2 Events (DOMActivate was still part of UI Events in DOM Level 2). To determine if a browser supports HTML events according to DOM Level 2 Events, you can use the following code:
var isSupported = document.implementation.hasFeature("HTMLEvents", "2.0");
Note that browsers should return true for this only if they implement these events according to the DOM Level 2 Events. Browsers may support these events in nonstandard ways and thus return false. To determine if the browser supports these events as defined in DOM Level 3 Events, use the following:
var isSupported = document.implementation.hasFeature("UIEvent", "3.0");
The load Event
The load event is perhaps the most often used event in JavaScript. For the window object, the load event fires when the entire page has been loaded, including all external resources such as images, JavaScript files, and CSS files. You can define an onload event handler in two ways. The first is by using JavaScript, as shown here:
EventUtil.addHandler(window, "load", function(event){
    alert("Loaded!");
});
LoadEventExample01.htm
This is the JavaScript-based way of assigning an event handler, using the cross-browser EventUtil object discussed earlier in this chapter. As with other events, the event object is passed into the event handler. The event object doesn’t provide any extra information for this type of event, although it’s interesting to note that DOM-compliant browsers have event.target set to document, whereas Internet Explorer prior to version 8 doesn’t set the srcElement property for this event.
The second way to assign the onload event handler is to add an onload attribute to the <body> element, as in the following example:
<!DOCTYPE html>
<html>
<head>
    <title>Load Event Example</title>
</head>
<body onload="alert('Loaded!')">

</body>
</html>
LoadEventExample02.htm
Generally speaking, any events that occur on the window can be assigned via attributes on the <body> element, because there is no access to the window element in HTML. This really is a hack for backwards compatibility but is still well-supported in all browsers. It is recommended that you use the JavaScript approach whenever possible.
According to DOM Level 2 Events, the load event is supposed to fire on document, not on window. However, load is implemented on window in all browsers for backwards compatibility.
The load event also fires on images, both those that are in the DOM and those that are not. You can assign an onload event handler directly using HTML on any images in the document, using code such as this:
<img src="smile.gif" onload="alert('Image loaded.')">
LoadEventExample03.htm
This example displays an alert when the given image has been loaded. This can also be done using JavaScript as follows:
var image = document.getElementById("myImage");
EventUtil.addHandler(image, "load", function(event){
    event = EventUtil.getEvent(event);
    alert(EventUtil.getTarget(event).src);
});
LoadEventExample04.htm
Here, the onload event handler is assigned using JavaScript. The event object is passed in, though it doesn’t have much useful information. The target of the event is the <img> element, so its src property can be accessed and displayed.
When creating a new <img> element, an event handler can be assigned to indicate when the image has been loaded. In this case, it’s important to assign the event before assigning the src property, as in the following example:
EventUtil.addHandler(window, "load", function(){
    var image = document.createElement("img");
    EventUtil.addHandler(image, "load", function(event){
        event = EventUtil.getEvent(event);
        alert(EventUtil.getTarget(event).src);
    });
    document.body.appendChild(image);
    image.src = "smile.gif";
});
LoadEventExample05.htm
The first part of this example is to assign an onload event handler for the window. Since the example involves adding a new element to the DOM, you must be certain that the page is loaded, because trying to manipulate document.body prior to its being fully loaded can cause errors. A new image element is created and its onload event handler is set. Then, the image is added to the page and its src is assigned. Note that the element need not be added to the document for the image download to begin; it begins as soon as the src property is set.
This same technique can be used with the DOM Level 0 Image object. Prior to the DOM, the Image object was used to preload images on the client. It can be used the same way as an <img> element with the exception that it cannot be added into the DOM tree. Consider the following example:
EventUtil.addHandler(window, "load", function(){
    var image = new Image();
    EventUtil.addHandler(image, "load", function(event){
        alert("Image loaded!");
    });
    image.src = "smile.gif";
});
LoadEventExample06.htm
Here, the Image constructor is used to create a new image and the event handler is assigned. Some browsers implement the Image object as an <img> element, but not all, so it’s best to treat them as separate.
Internet Explorer 8 and earlier versions don’t generate an event object when the load event fires for an image that isn’t part of the DOM document. This pertains both to <img> elements that are never added to the document and to the Image object. This was fixed in Internet Explorer 9.
There are other elements that also support the load event in nonstandard ways. The <script> element fires a load event in Internet Explorer 9+, Firefox, Opera, Chrome, and Safari 3+, allowing you to determine when dynamically loaded JavaScript files have been completely loaded. Unlike images, JavaScript files start downloading only after the src property has been assigned and the element has been added into the document, so the order in which the event handler and the src property are assigned is insignificant. The following illustrates how to assign an event handler for a <script> element:
EventUtil.addHandler(window, "load", function(){
    var script = document.createElement("script");
    script.type = "text/javascript";
    EventUtil.addHandler(script, "load", function(event){
        alert("Loaded");
    });
    script.src = "example.js";
    document.body.appendChild(script);
});
LoadEventExample07.htm
This example uses the cross-browser EventUtil object to assign the onload event handler to a newly created <script> element. The event object’s target is the <script> node in most browsers. Internet Explorer 8 and earlier versions do not support the load event for <script> elements.
Internet Explorer and Opera support the load event for <link> elements, allowing you to determine when a style sheet has been loaded. For example:
EventUtil.addHandler(window, "load", function(){
    var link = document.createElement("link");
    link.type = "text/css";
    link.rel= "stylesheet";
    EventUtil.addHandler(link, "load", function(event){
        alert("css loaded");
    });
    link.href = "example.css";
    document.getElementsByTagName("head")[0].appendChild(link);
});
LoadEventExample07.htm
As with the <script> node, a style sheet does not begin downloading until the href property has been assigned and the <link> element has been added to the document.
The unload Event
A companion to the load event, the unload event fires when a document has completely unloaded. The unload event typically fires when navigating from one page to another and is most often used to clean up references to avoid memory leaks. Similar to the load event, an onunload event handler can be assigned in two ways. The first is by using JavaScript as shown here:
EventUtil.addHandler(window, "unload", function(event){
    alert("Unloaded!");
});
The event object is generated for this event but contains nothing more than the target (set to document) in DOM-compliant browsers. Internet Explorer 8 and earlier versions don’t provide the srcElement property for this event.
The second way to assign the event handler, similar to the load event, is to add an attribute to the <body> element, as in this example:
<!DOCTYPE html>
<html>
<head>
    <title>Unload Event Example</title>
</head>
<body onunload="alert('Unloaded!')">

</body>
</html>
UnloadEventExample01.htm
Regardless of the approach you use, be careful with the code that executes inside of an onunload event handler. Since the unload event fires after everything is unloaded, not all objects that were available when the page was loaded are still available. Trying to manipulate the location of a DOM node or its appearance can result in errors.
According to DOM Level 2 Events, the unload event is supposed to fire on <body>, not on window. However, unload is implemented on window in all browsers for backwards compatibility.
The resize Event
When the browser window is resized to a new height or width, the resize event fires. This event fires on window, so an event handler can be assigned either via JavaScript or by using the onresize attribute on the <body> element. As mentioned previously, it is recommended that you use the JavaScript approach as shown here:
EventUtil.addHandler(window, "resize", function(event){
    alert("Resized");
});
Similar to other events that occur on the window, the event object is created and its target is document in DOM-compliant browsers, whereas Internet Explorer 8 and earlier provide no properties of use.
There are some important differences as to when the resize events fire across browsers. Internet Explorer, Safari, Chrome, and Opera fire the resize event as soon as the browser is resized by one pixel and then repeatedly as the user resizes the browser window. Firefox fires the resize event only after the user has stopped resizing the browser. Because of these differences, you should avoid computation-heavy code in the event handler for this event, because it will be executed frequently and cause a noticeable slowdown in the browser.
The resize event also fires when the browser window is minimized or maximized.
The scroll Event
Even though the scroll event occurs on the window, it actually refers to changes in the appropriate page-level element. In quirks mode, the changes are observable using the scrollLeft and scrollTop of the <body> element; in standards mode, the changes occur on the <html> element in all browsers except Safari (which still tracks scroll position on <body>). For example:
EventUtil.addHandler(window, "scroll", function(event){
    if (document.compatMode == "CSS1Compat"){
        alert(document.documentElement.scrollTop);
    } else {
        alert(document.body.scrollTop);
    }
});
ScrollEventExample01.htm
This code assigns an event handler that outputs the vertical scroll position of the page, depending on the rendering mode. Since Safari prior to 3.1 doesn’t support document.compatMode, older versions fall through to the second case.
- Similar to resize, the scroll event occurs repeatedly as the document is being scrolled, so it’s best to keep the event handlers as simple as possible.
Focus Events
Focus events are fired when elements of a page receive or lose focus. These events work in concert with the document.hasFocus() and document.activeElement properties to give insight as to how the user is navigating the page. There are six focus events:
- blur — Fires when an element has lost focus. This event does not bubble and is supported in all browsers.
- DOMFocusIn — Fires when an element has received focus. This is a bubbling version of the focus HTML event. Opera is the only major browser to support this event. DOM Level 3 Events deprecates DOMFocusIn in favor of focusin.
- DOMFocusOut — Fires when an element has lost focus. This is a generic version of the blur HTML event. Opera is the only major browser to support this event. DOM Level 3 Events deprecates DOMFocusOut in favor of focusout.
- focus — Fires when an element has received focus. This event does not bubble and is supported in all browsers.
- focusin — Fires when an element has received focus. This is a bubbling version of the focus HTML event and is supported in Internet Explorer 5.5+, Safari 5.1+, Opera 11.5+, and Chrome.
- focusout — Fires when an element has lost focus. This is a generic version of the blur HTML event and is supported in Internet Explorer 5.5+, Safari 5.1+, Opera 11.5+, and Chrome.
The two primary events of this group are focus and blur, both of which have been supported in browsers since the early days of JavaScript. One of the biggest issues with these events is that they don’t bubble. This led to the inclusion of focusin and focusout by Internet Explorer and DOMFocusIn and DOMFocusOut by Opera. Internet Explorer’s approach has been standardized in DOM Level 3 Events.
When focus is moved from one element to another on the page, the following order of events is followed:
1. focusout fires on the element losing focus.
2. focusin fires on the element receiving focus.
3. blur fires on the element losing focus.
4. DOMFocusOut fires on the element losing focus.
5. focus fires on the element receiving focus.
6. DOMFocusIn fires on the element receiving focus.
The event target for blur, DOMFocusOut, and focusout is the element losing focus while the event target for focus, DOMFocusIn, and focusin is the element receiving focus.
You can determine if a browser supports these events with the following:
var isSupported = document.implementation.hasFeature("FocusEvent", "3.0");
Even though focus and blur don’t bubble, they can be listened for during the capturing phase. Peter-Paul Koch has an excellent write-up on this topic at www.quirksmode.org/blog/archives/2008/04/delegating_the.html.
Mouse and Wheel Events
Mouse events are the most commonly used group of events on the Web, because the mouse is the primary navigation device used. There are nine mouse events defined in DOM Level 3 Events. They are as follows:
- click — Fires when the user clicks the primary mouse button (typically the left button) or when the user presses the Enter key. This is an important fact for accessibility purposes, because onclick event handlers can be executed using the keyboard and the mouse.
- dblclick — Fires when the user double-clicks the primary mouse button (typically the left button). This event was not defined in DOM Level 2 Events but is well-supported and so was standardized in DOM Level 3 Events.
- mousedown — Fires when the user pushes any mouse button down. This event cannot be fired via the keyboard.
- mouseenter — Fires when the mouse cursor is outside of an element and then the user first moves it inside of the boundaries of the element. This event does not bubble and does not fire when the cursor moves over descendant elements. The mouseenter event was not defined in DOM Level 2 Events but was added in DOM Level 3 Events. Internet Explorer, Firefox 9+, and Opera support this event.
- mouseleave — Fires when the mouse cursor is over an element and then the user moves it outside of that element’s boundaries. This event does not bubble and does not fire when the cursor moves over descendant elements. The mouseleave event was not defined in DOM Level 2 Events but was added in DOM Level 3 Events. Internet Explorer, Firefox 9+, and Opera support this event.
- mousemove — Fires repeatedly as the cursor is being moved around an element. This event cannot be fired via the keyboard.
- mouseout — Fires when the mouse cursor is over an element and then the user moves it over another element. The element moved to may be outside of the bounds of the original element or a child of the original element. This event cannot be fired via the keyboard.
- mouseover — Fires when the mouse cursor is outside of an element and then the user first moves it inside of the boundaries of the element. This event cannot be fired via the keyboard.
- mouseup — Fires when the user releases a mouse button. This event cannot be fired via the keyboard.
All elements on a page support mouse events. All mouse events bubble except mouseenter and mouseleave, and they can all be canceled, which affects the default behavior of the browser. Canceling the default behavior of mouse events can affect other events as well because of the relationship that exists amongst the events.
A click event can be fired only if a mousedown event is fired and followed by a mouseup event on the same element; if either mousedown or mouseup is canceled, then the click event will not fire. Similarly, it takes two click events to cause the dblclick event to fire. If anything prevents these two click events from firing (either canceling one of the click events or canceling either mousedown or mouseup), the dblclick event will not fire. These four mouse events always fire in the following order:
1. mousedown
2. mouseup
3. click
4. mousedown
5. mouseup
6. click
7. dblclick
Both click and dblclick rely on other events to fire before they can fire, whereas mousedown and mouseup are not affected by other events.
Internet Explorer through version 8 has a slight implementation bug that causes the second mousedown and click events to be skipped during a double click. The order is:
1. mousedown
2. mouseup
3. click
4. mouseup
5. dblclick
Internet Explorer 9 fixes this bug so the event ordering is correct.
You can determine if the DOM Level 2 Events (those listed above excluding dblclick, mouseenter, and mouseleave) are supported by using this code:
var isSupported = document.implementation.hasFeature("MouseEvents", "2.0");
To determine if the browser supports all of the events listed above, use the following:
var isSupported = document.implementation.hasFeature("MouseEvent", "3.0")
Note that the DOM Level 3 feature name is just "MouseEvent" instead of "MouseEvents".
There is also a subgroup of mouse events called wheel events. Wheel events are really just a single event, mousewheel, which monitors interactions of a mouse wheel or a similar device such as the Mac trackpad.
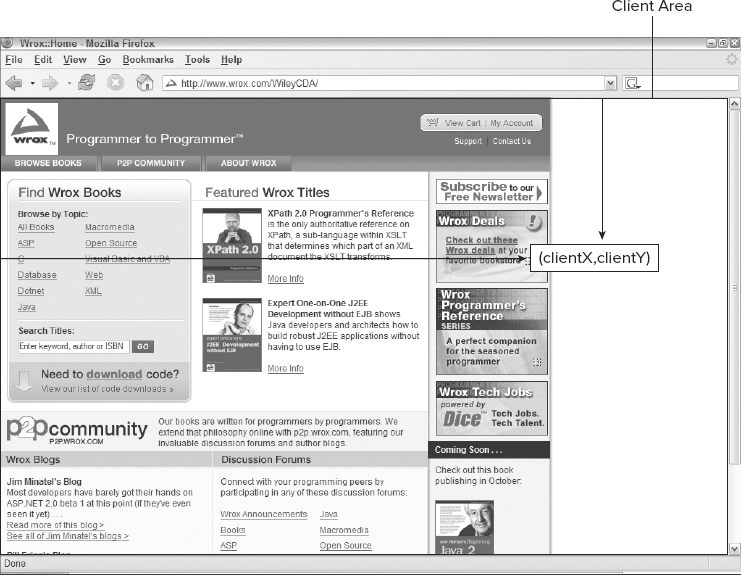
Client Coordinates
Mouse events all occur at a particular location within the browser viewport. This information is stored in the clientX and clientY properties of the event object. These properties indicate the location of the mouse cursor within the viewport at the time of the event and are supported in all browsers. Figure 13-4 illustrates the client coordinates in a viewport.
You can retrieve the client coordinates of a mouse event in the following way:
var div = document.getElementById("myDiv");
EventUtil.addHandler(div, "click", function(event){
    event = EventUtil.getEvent(event);
    alert("Client coordinates: " + event.clientX + "," + event.clientY);
});
ClientCoordinatesExample01.htm
This example assigns an onclick event handler to a <div> element. When the element is clicked, the client coordinates of the event are displayed. Keep in mind that these coordinates do not take into account the scroll position of the page, so these numbers do not indicate the location of the cursor on the page.
Page Coordinates
Where client coordinates give you information about where an event occurred in the viewport, page coordinates tell you where on the page the event occurred via the pageX and pageY properties of the event object. These properties indicate the location of the mouse cursor on the page, so the coordinates are from the left and top of the page itself rather than the viewport.
You can retrieve the page coordinates of a mouse event in the following way:
var div = document.getElementById("myDiv");
EventUtil.addHandler(div, "click", function(event){
    event = EventUtil.getEvent(event);
    alert("Page coordinates: " + event.pageX + "," + event.pageY);
});
PageCoordinatesExample01.htm
The values for pageX and pageY are the same as clientX and clientY when the page is not scrolled.
Internet Explorer 8 and earlier don’t support page coordinates on the event object, but you can calculate them using client coordinates and scrolling information. You need to use the scrollLeft and scrollTop properties on either document.body (when in quirks mode) or document.documentElement (in standards mode). The calculation is done as follows:
var div = document.getElementById("myDiv");
EventUtil.addHandler(div, "click", function(event){
    event = EventUtil.getEvent(event);
    var pageX = event.pageX,
        pageY = event.pageY;

    if (pageX === undefined){
        pageX = event.clientX + (document.body.scrollLeft ||
                document.documentElement.scrollLeft);
    }

    if (pageY === undefined){
        pageY = event.clientY + (document.body.scrollTop ||
                document.documentElement.scrollTop);
    }

    alert("Page coordinates: " + pageX + "," + pageY);
});
PageCoordinatesExample01.htm
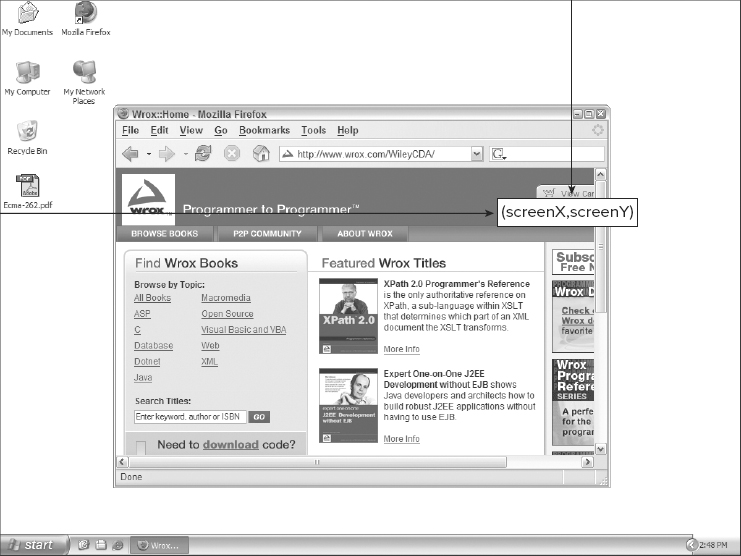
Screen Coordinates
Mouse events occur not only in relation to the browser window but also in relation to the entire screen. It’s possible to determine the location of the mouse in relation to the entire screen by using the screenX and screenY properties. Figure 13-5 illustrates the screen coordinates in a browser.
You can retrieve the screen coordinates of a mouse event in the following way:
var div = document.getElementById("myDiv");
EventUtil.addHandler(div, "click", function(event){
    event = EventUtil.getEvent(event);
    alert("Screen coordinates: " + event.screenX + "," + event.screenY);
});
ScreenCoordinatesExample01.htm
Similar to the previous examples, this code assigns an onclick event handler to a <div> element. When the element is clicked, the screen coordinates of the event are displayed.
Modifier Keys
Even though a mouse event is primarily triggered by using the mouse, the state of certain keyboard keys may be important in determining the action to take. The modifier keys Shift, Ctrl, Alt, and Meta are often used to alter the behavior of a mouse event. The DOM specifies four properties to indicate the state of these modifier keys: shiftKey, ctrlKey, altKey, and metaKey. Each of these properties contains a Boolean value that is set to true if the key is being held down or false if the key is not pressed. When a mouse event occurs, you can determine the state of the various keys by inspecting these properties. Consider the following example:
var div = document.getElementById("myDiv");
EventUtil.addHandler(div, "click", function(event){
    event = EventUtil.getEvent(event);
    var keys = new Array();

    if (event.shiftKey){
        keys.push("shift");
    }

    if (event.ctrlKey){
        keys.push("ctrl");
    }

    if (event.altKey){
        keys.push("alt");
    }

    if (event.metaKey){
        keys.push("meta");
    }

    alert("Keys: " + keys.join(","));

});
ModifierKeysExample01.htm
In this example, an onclick event handler checks the state of the various modifier keys. The keys array contains the names of the modifier keys that are being held down. For each property that is true, the name of the key is added to keys. At the end of the event handler, the keys are displayed in an alert.
Internet Explorer 9, Firefox, Safari, Chrome, and Opera support all four keys. Internet Explorer 8 and earlier versions do not support the metaKey property.
Related Elements
For the mouseover and mouseout events, there are other elements related to the event. Both of these events involve moving the mouse cursor from within the boundaries of one element to within the boundaries of another element. For the mouseover event, the primary target of the event is the element that is gaining the cursor, and the related element is the one that is losing the cursor. Likewise, for mouseout, the primary target is the element that is losing the cursor, and the related element is the one that is gaining the cursor. Consider the following example:
<!DOCTYPE html>
<html>
<head>
    <title>Related Elements Example</title>
</head>
<body>
    <div id="myDiv" style="background-color:red;height:100px;width:100px;"></div>
</body>
</html>
RelatedElementsExample01.htm
This page renders a single <div> on the page. If the mouse cursor starts over the <div> and then moves outside of it, a mouseout event fires on <div> and the related element is the <body> element. Simultaneously, the mouseover event fires on <body> and the related element is the <div>.
The DOM provides information about related elements via the relatedTarget property on the event object. This property contains a value only for the mouseover and mouseout events; it is null for all other events. Internet Explorer 8 and earlier don’t support the relatedTarget property but offer comparable access to the related element using other properties. When the mouseover event fires, Internet Explorer provides a fromElement property containing the related element; when the mouseout event fires, Internet Explorer provides a toElement property containing the related element (Internet Explorer 9 supports all properties). A cross-browser method to get the related element can be added to EventUtil like this:
var EventUtil = {

    //more code here

    getRelatedTarget: function(event){
        if (event.relatedTarget){
            return event.relatedTarget;
        } else if (event.toElement){
            return event.toElement;
        } else if (event.fromElement){
            return event.fromElement;
        } else {
            return null;
        }

    },

    //more code here

};
EventUtil.js
As with the previous cross-browser methods, this one uses feature detection to determine which value to return. The EventUtil.getRelatedTarget() method can then be used as follows:
var div = document.getElementById("myDiv");
EventUtil.addHandler(div, "mouseout", function(event){
    event = EventUtil.getEvent(event);
    var target = EventUtil.getTarget(event);
    var relatedTarget = EventUtil.getRelatedTarget(event);
    alert("Moused out of " + target.tagName + " to " + relatedTarget.tagName);
});
RelatedElementsExample01.htm
This example registers an event handler for the mouseout event on the <div> element. When the event fires, an alert is displayed indicating the place the mouse moved from and the place the mouse moved to.
Buttons
The click event is fired only when the primary mouse button is clicked on an element (or when the Enter key is pressed on the keyboard), so button information isn’t necessary. For the mousedown and mouseup events, there is a button property on the event object that indicates the button that was pressed or released. The DOM button property has the following three possible values: 0 for the primary mouse button, 1 for the middle mouse button (usually the scroll wheel button), and 2 for the secondary mouse button. In traditional setups, the primary mouse button is the left button and the secondary button is the right one.
Internet Explorer through version 8 also provides a button property, but it has completely different values, as described here:
- 0 indicates that no button has been pressed.
- 1 indicates that the primary mouse button has been pressed.
- 2 indicates that the secondary mouse button has been pressed.
- 3 indicates that the primary and secondary buttons have been pressed.
- 4 indicates that the middle button has been pressed.
- 5 indicates that the primary and middle buttons have been pressed.
- 6 indicates that the secondary and middle buttons have been pressed.
- 7 indicates that all three buttons have been pressed.
As you can tell, the DOM model for the button property is much simpler and arguably more useful than the Internet Explorer model since multi-button mouse usage is rare. It’s typical to normalize the models to the DOM way since all browsers except Internet Explorer 8 and earlier implement it natively. The mapping of primary, middle, and secondary buttons is fairly straightforward; all of the other Internet Explorer options will translate into the pressing of one of the buttons, giving precedence to the primary button in all instances. So if Internet Explorer returns either 5 or 7, this converts to 0 in the DOM model.
Since capability detection alone can’t be used to determine the difference (since both have a button property), you must use another method. Browsers that support the DOM version of mouse events can be detected using the hasFeature() method, so a normalizing getButton() method on EventUtil can be written as follows:
var EventUtil = {

    //more code here

    getButton: function(event){
        if (document.implementation.hasFeature("MouseEvents", "2.0")){
            return event.button;
        } else {
            switch(event.button){
                case 0:
                case 1:
                case 3:
                case 5:
                case 7:
                    return 0;
                case 2:
                case 6:
                    return 2;
                case 4:
                    return 1;
            }
        }
    },

    //more code here

};
EventUtil.js
Checking for the feature "MouseEvents" determines if the button property that is already present on event contains the correct values. If that test fails, then the browser is likely Internet Explorer and the values must be normalized. This method can then be used as follows:
var div = document.getElementById("myDiv");
EventUtil.addHandler(div, "mousedown", function(event){
    event = EventUtil.getEvent(event);
    alert(EventUtil.getButton(event));
});
ButtonExample01.htm
In this example, an onmousedown event handler is added to a <div> element. When a mouse button is pressed on the element, an alert displays the code for the button.
Note that when used with an onmouseup event handler, the value of button is the button that was just released.
Additional Event Information
The DOM Level 2 Events specification provides the detail property on the event object to give additional information about an event. For mouse events, detail contains a number indicating how many times a click has occurred at the given location. Clicks are considered to be a mousedown event followed by a mouseup event at the same pixel location. The value of detail starts at 1 and is incremented every time a click occurs. If the mouse is moved between mousedown and mouseup, then detail is set back to 0.
Internet Explorer provides the following additional information for each mouse event as well:
- altLeft is a Boolean value indicating if the left Alt key is pressed. If altLeft is true then altKey is also true.
- ctrlLeft is a Boolean value indicating if the left Ctrl key is pressed. If ctrlLeft is true then ctrlKey is also true.
- offsetX is the x-coordinate of the cursor relative to the boundaries of the target element.
- offsetY is the y-coordinate of the cursor relative to the boundaries of the target element.
- shiftLeft is a Boolean value indicating if the left Shift key is pressed. If shiftLeft is true, then shiftKey is also true.
These properties are of limited value because they are available only in Internet Explorer and provide information that either is not necessary or can be calculated in other ways.
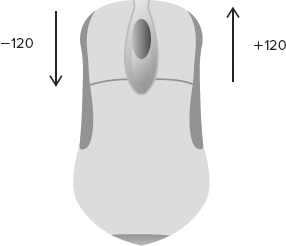
The mousewheel Event
Internet Explorer 6 first implemented the mousewheel event. Since that time, it has been picked up by Opera, Chrome, and Safari. The mousewheel event fires when the user interacts with the mouse wheel, rolling it vertically in either direction. This event fires on each element and bubbles up to document (in Internet Explorer 8) and window (in Internet Explorer 9+, Opera, Chrome, and Safari). The event object for the mousewheel event contains all standard information about mouse events and an additional property called wheelDelta. When the mouse wheel is rolled toward the front of the mouse, wheelDelta is a positive multiple of 120; when the mouse wheel is rolled toward the rear of the mouse, wheelDelta is a negative multiple of 120. See Figure 13-6.
An onmousewheel event handler can be assigned to any element on the page or to the document to handle all mouse wheel interactions. Here’s an example:
EventUtil.addHandler(document, "mousewheel", function(event){
    event = EventUtil.getEvent(event);
    alert(event.wheelDelta);
});
This example simply displays the wheelDelta value when the event is fired. In most cases, you need only know which direction the mouse wheel was turned, which can easily be determined by the sign of the wheelDelta value.
One thing to be careful of: in Opera prior to version 9.5, the values for wheelDelta are reversed. If you plan on supporting earlier versions of Opera, you’ll need to use browser detection to determine the actual value, as shown in the following example:
EventUtil.addHandler(document, "mousewheel", function(event){
    event = EventUtil.getEvent(event);
    var delta = (client.engine.opera && client.engine.opera < 9.5 ?
                 -event.wheelDelta : event.wheelDelta);
    alert(delta);
});
MouseWheelEventExample01.htm
This code uses the client object created in Chapter 9 to see if the browser is an earlier version of Opera.
The mousewheel event was added to HTML5 as a reflection of its popularity and availability in most browsers.
Firefox supports a similar event called DOMMouseScroll, which fires when the mouse wheel is turned. As with mousewheel, this event is considered a mouse event and has all of the usual mouse event properties. Information about the mouse wheel is given in the detail property, which is a negative multiple of three when the scroll wheel is rolled toward the front of the mouse and a positive multiple of three when it’s rolled toward the back of the mouse. See Figure 13-7.

The DOMMouseScroll event can be attached to any element on the page and bubbles up to the window object. You can attach an event handler, as shown in the following example:
EventUtil.addHandler(window, "DOMMouseScroll", function(event){
    event = EventUtil.getEvent(event);
    alert(event.detail);
});
DOMMouseScrollEventExample01.htm
This simple event handler outputs the value of the detail property each time the mouse wheel is scrolled.
For a cross-browser solution, the first step is to create a method that can retrieve a normalized value for the mouse wheel delta. This can be added to the EventUtil object as follows:
var EventUtil = {

    //more code here

    getWheelDelta: function(event){
        if (event.wheelDelta){
            return (client.engine.opera && client.engine.opera < 9.5 ?
                    -event.wheelDelta : event.wheelDelta);
        } else {
            return -event.detail * 40;
        }
    },

    //more code here
};
EventUtil.js
The getWheelDelta() method checks to see if the event object has a wheelDelta property and, if so, uses the browser detecting code to determine the correct value. If wheelDelta doesn’t exist, then it assumes the value is in the detail property. Since Firefox’s value is different, it is first negated and then multiplied by 40 to be certain that its value will be the same as other browsers. With this method complete, you can assign the same event handler to both mousewheel and DOMMouseScroll, as shown here:
(function(){

    function handleMouseWheel(event){
        event = EventUtil.getEvent(event);
        var delta = EventUtil.getWheelDelta(event);
        alert(delta);
    }

    EventUtil.addHandler(document, "mousewheel", handleMouseWheel);
    EventUtil.addHandler(document, "DOMMouseScroll", handleMouseWheel);

})();
CrossBrowserMouseWheelExample01.htm
This code exists within a private scope so as not to pollute the global scope with extra functions. The handleMouseWheel() function is the event handler for both events. (The event handler assignment quietly fails when assigned to an event that doesn’t exist.) Using the EventUtil.getWheelDelta() method allows the event handler to work seamlessly in both cases.
Touch Device Support
Touch devices running iOS or Android have interesting implementations, because, of course, there is no mouse to interact with. When developing for touch devices, keep the following in mind:
- The dblclick event is not supported at all. Double-clicking on the browser window zooms in, and there is no way to override that behavior.
- Tapping on a clickable element causes the mousemove event to fire. If content changes as a result of this action, no further events are fired; if there are no changes to the screen, then the mousedown, mouseup, and click events fire in order. No events are fired when tapping on a nonclickable element. Clickable elements are defined as those that have a default action when clicked (such as links) or elements that have an onclick event handler assigned.
- The mousemove event also fires mouseover and mouseout events.
- The mousewheel and scroll events fire when two fingers are on the screen and the page is scrolled as the result of finger movement.
Accessibility Issues
If your web application or website must be accessible to users with disabilities, specifically those who are using screen readers, you should be careful when using mouse events. As mentioned previously, the click event can be fired using the Enter key on the keyboard, but other mouse events have no keyboard support. It’s advisable not to use mouse events other than click to show functionality or cause code execution, as this will severely limit the usability for blind or sight-impaired users. Here are some tips for accessibility using mouse events:
- Use click to execute code. Some suggest that an application feels faster when code is executed using onmousedown, which is true for sighted users. For screen readers, however, this code is not accessible, because the mousedown event cannot be triggered.
- Avoid using onmouseover to display new options to the user. Once again, screen readers have no way to trigger this event. If you really must display new options in this manner, consider adding keyboard shortcuts to display the same information.
- Avoid using dblclick to execute important actions. The keyboard cannot fire this event.
Following these simple hints can greatly increase the accessibility of your web application or website to those with disabilities.
To learn more about accessibility on web pages, please visit www.webaim.org and http://accessibility.yahoo.com.
Keyboard and Text Events
Keyboard events are fired when the user interacts with the keyboard. DOM Level 2 Events originally specified keyboard events, but that section was removed before the specification became final. As a result, keyboard events are largely supported based on the original DOM Level 0 implementations.
DOM Level 3 Events provides a specification for keyboard events that was first completely implemented in Internet Explorer 9. Other browsers have also started work on implementing the standard, but there are still many legacy implementations.
There are three keyboard events, as described here:
- keydown — Fires when the user presses a key on the keyboard and fires repeatedly while the key is being held down.
- keypress — Fires when the user presses a key on the keyboard that results in a character and fires repeatedly while the key is being held down. This event also fires for the Esc key. DOM Level 3 Events deprecates the keypress event in favor of the textInput event.
- keyup — Fires when the user releases a key on the keyboard.
These events are most easily seen as the user types in a text box, though all elements support them.
There is only one text event and it is called textInput. This event is an augmentation of keypress intended to make it easier to intercept text input before being displayed to the user. The textInput event fires just before text is inserted into a text box.
When the user presses a character key once on the keyboard, the keydown event is fired first, followed by the keypress event, followed by the keyup event. Note that both keydown and keypress are fired before any change has been made to the text box, whereas the keyup event fires after changes have been made to the text box. If a character key is pressed and held down, keydown and keypress are fired repeatedly and don’t stop until the key is released.
For noncharacter keys, a single key press on the keyboard results in the keydown event being fired followed by the keyup event. If a noncharacter key is held down, the keydown event fires repeatedly until the key is released, at which point the keyup event fires.
Keyboard events support the same set of modifier keys as mouse events. The shiftKey, ctrlKey, altKey, and metaKey properties are all available for keyboard events. Internet Explorer 8 and earlier do not support metaKey.
Key Codes
For keydown and keyup events, the event object’s keyCode property is filled in with a code that maps to a specific key on the keyboard. For alphanumeric keys, the keyCode is the same as the ASCII value for the lowercase letter or number on that key, so the 7 key has a keyCode of 55 and the A key has a keyCode of 65, regardless of the state of the Shift key. Both the DOM and the Internet Explorer event objects support the keyCode property. Here’s an example:
var textbox = document.getElementById("myText");
EventUtil.addHandler(textbox, "keyup", function(event){
    event = EventUtil.getEvent(event);
    alert(event.keyCode);
});
KeyUpEventExample01.htm
In this example, the keyCode is displayed every time a keyup event is fired. The complete list of key codes to noncharacter keys is listed in the following table.

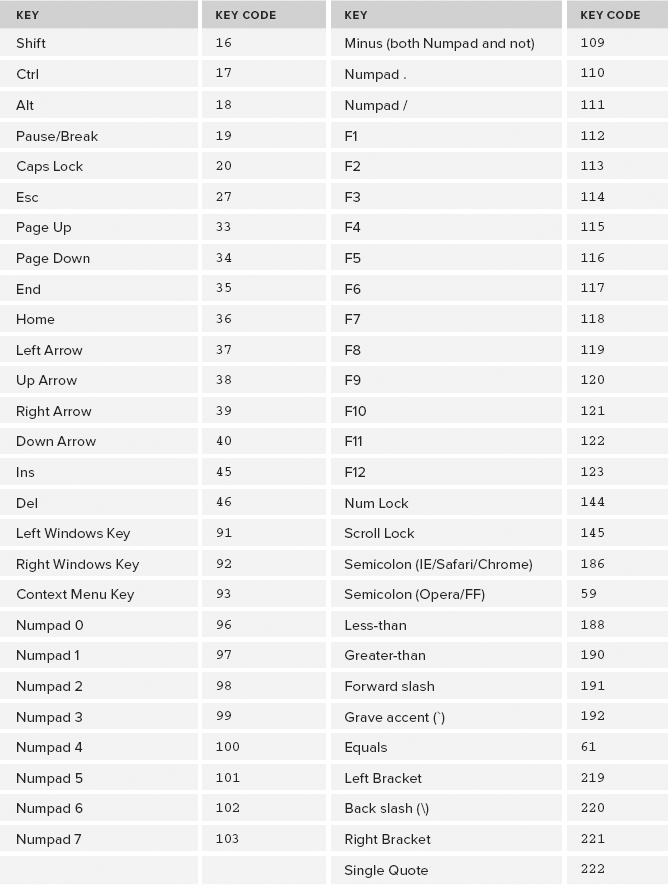
There is one oddity regarding the keydown and keyup events. Firefox and Opera return 59 for the keyCode of the semicolon key, which is the ASCII code for a semicolon, whereas Internet Explorer, Chrome, and Safari return 186, which is the code for the keyboard key.
Character Codes
When a keypress event occurs, this means that the key affects the display of text on the screen. All browsers fire the keypress event for keys that insert or remove a character; other keys are browser-dependent. Since the DOM Level 3 Events specification has only started being implemented, there are significant implementation differences across browsers.
Internet Explorer 9+, Firefox, Chrome, and Safari support a property on the event object called charCode, which is filled in only for the keypress event and contains the ASCII code for the character related to the key that was pressed. In this case, the keyCode is typically equal to 0 or may also be equal to the key code for the key that was pressed. Internet Explorer 8 and earlier and Opera use keyCode to communicate the ASCII code for the character. To retrieve the character code in a cross-browser way, you must therefore first check to see if the charCode property is used and, if not, use keyCode instead, as shown in the following example:
var EventUtil = {

    //more code here

    getCharCode: function(event){
        if (typeof event.charCode == "number"){
            return event.charCode;
        } else {
            return event.keyCode;
        }
    },

    //more code here
};
EventUtil.js
This method checks to see if the charCode property is a number (it will be undefined for browsers that don’t support it) and, if it is, returns the value. Otherwise, the keyCode value is returned. This method can be used as follows:
var textbox = document.getElementById("myText");
EventUtil.addHandler(textbox, "keypress", function(event){
    event = EventUtil.getEvent(event);
    alert(EventUtil.getCharCode(event));
});
KeyPressEventExample01.htm
Once you have the character code, it’s possible to convert it to the actual character using the String.fromCharCode() method.
DOM Level 3 Changes
Although all browsers implement some form of keyboard events, DOM Level 3 Events makes several changes. The charCode property, for instance, isn’t part of the DOM Level 3 Events specification for keyboard events. Instead, the specification defines two additional properties: key and char.
The key property is intended as a replacement for keyCode and contains a string. When a character key is pressed, the value of key is equal to the text character (for example, “k” or “M”); when a noncharacter key is pressed, the value of key is the name of the key (for example, “Shift” or “Down”). The char property behaves the same as key when a character key is pressed and is set to null when a noncharacter key is pressed.
Internet Explorer 9 supports the key property but not the char property. Safari 5 and Chrome support a property called keyIdentifier that returns the same value that key would in the case of noncharacter keys (such as Shift). For character keys, keyIdentifier returns the character code as a string in the format “U+0000” to indicate the Unicode value.
var textbox = document.getElementById("myText");
EventUtil.addHandler(textbox, "keypress", function(event){
    event = EventUtil.getEvent(event);
    var identifier = event.key || event.keyIdentifier;
    if (identifier){
        alert(identifier);
    }
});
DOMLevel3KeyPropertyExample01.htm
Because of the lack of cross-browser support, it’s not recommended to use key, keyIdentifier, or char.
DOM Level 3 Events also adds a property called location, which is a numeric value indicating where the key was pressed. Possible values are 0 for default keyboard, 1 for left location (such as the left Alt key), 2 for the right location (such as the right Shift key), 3 for the numeric keypad, 4 for mobile (indicating a virtual keypad), or 5 for joystick (such as the Nintendo Wii controller). Internet Explorer 9 supports this property. Safari 5 and Chrome support an identical property called keyLocation, but because of a bug, the value is always 0 unless the key is on the numeric keypad (in which case it’s 3); the value is never 1, 2, 4, or 5.
var textbox = document.getElementById("myText");
EventUtil.addHandler(textbox, "keypress", function(event){
    event = EventUtil.getEvent(event);
    var loc = event.location || event.keyLocation;
    if (loc){
        alert(loc);
    }
});
DOMLevel3LocationPropertyExample01.htm
As with the key property, the location property isn’t widely supported and so isn’t recommended for cross-browser development.
The last addition to the event object is the getModifierState() method. This method accepts a single argument, a string equal to Shift, Control, Alt, AltGraph, or Meta, which indicates the modifier key to check. The method returns true if the given modifier is active (the key is being held down) or false if not:
var textbox = document.getElementById("myText");
EventUtil.addHandler(textbox, "keypress", function(event){
    event = EventUtil.getEvent(event);
    if (event.getModifierState){
        alert(event.getModifierState("Shift"));
    }
});
DOMLevel3LocationGetModifierStateExample01.htm
You can retrieve some of this information already using the shiftKey, altKey, ctrlKey, and metaKey properties on the event object. Internet Explorer 9 is the only browser to support the getModifierState() method.
The textInput Event
The DOM Level 3 Events specification introduced an event called textInput that fires when a character is input to an editable area. Designed as a replacement for keypress, a textInput event behaves somewhat differently. One difference is that keypress fires on any element that can have focus but textInput fires only on editable areas. Another difference is that textInput fires only for keys that result in a new character being inserted, whereas keypress fires for keys that affect text in any way (including Backspace).
Since the textInput event is interested primarily in characters, it provides a data property on the event object that contains the character that was inserted (not the character code). The value of data is always the exact character that was inserted, so if the S key is pressed without Shift, data is "s", but if the same key is pressed holding Shift down, then data is "S".
The textInput event can be used as follows:
var textbox = document.getElementById("myText");
EventUtil.addHandler(textbox, "textInput", function(event){
    event = EventUtil.getEvent(event);
    alert(event.data);
});
TextInputEventExample01.htm
In this example, the character that was inserted into the text box is displayed in an alert.
There is another property, on the event object, called inputMethod that indicates how the text was input into the control. The possible values are:
- 0 indicates the browser couldn’t determine how the input was entered.
- 1 indicates a keyboard was used.
- 2 indicates the text was pasted in.
- 3 indicates the text was dropped in as part of a drag operation.
- 4 indicates the text was input using an IME.
- 5 indicates the text was input by selecting an option in a form.
- 6 indicates the text was input by handwriting (such as with a stylus).
- 7 indicates the text was input by voice command.
- 8 indicates the text was input by a combination of methods.
- 9 indicates the text was input by script.
Using this property, you can determine how text was input into a control in order to verify its validity.
The textInput event is supported in Internet Explorer 9+, Safari, and Chrome. Only Internet Explorer supports the inputMethod property.
Keyboard Events on Devices
The Nintendo Wii fires keyboard events when buttons are pressed on a Wii remote. Although you can’t access all of the buttons on the Wii remote, there are several that fire keyboard events. Figure 13-8 illustrates the key codes that indicate particular buttons being pressed.
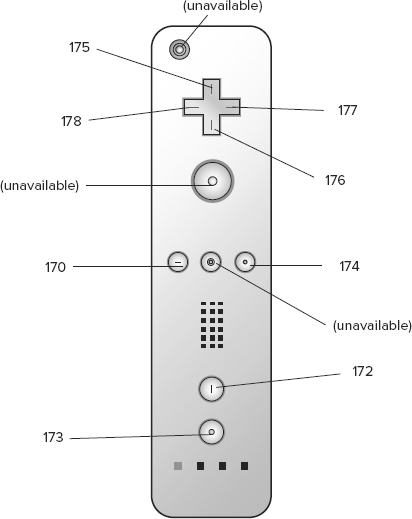
Keyboard events are fired when the crosspad (keycodes 175–178), minus (170), plus (174), 1 (172), or 2 (173) buttons are pressed. There is no way to tell if the power button, A, B, or Home button has been pressed.
Safari on iOS and WebKit on Android fire keyboard events when using the onscreen keyboard.
Composition Events
Composition events were first introduced in DOM Level 3 Events to handle complex input sequences typically found on IMEs. IMEs allow users to input characters not found on the physical keyboard. For example, those using a Latin keyboard can still enter Japanese characters into the computer. IMEs often require multiple keys to be pressed at once while resulting in only a single character being entered. Composition events help to detect and work with such input. There are three composition events:
- compositionstart — Fires when the text composition system of the IME is opened, indicating that input is about to commence.
- compositionupdate — Fires when a new character has been inserted into the input field.
- compositionend — Fires when the text composition system is closed, indicating a return to normal keyboard input.
Composition events are similar to text events in many ways. When a composition event fires, the target is the input field receiving the text. The only additional event property is data, which contains one of the following:
- When accessed during compositionstart, contains the text being edited (for instance, if text has been selected and will now be replaced).
- When accessed during compositionupdate, contains the new character being inserted.
- When accessed during compositionend, contains all of the input entered during this composition session.
As with text events, composition events can be used to filter input where necessary. These events can be used as follows:
var textbox = document.getElementById("myText");
EventUtil.addHandler(textbox, "compositionstart", function(event){
    event = EventUtil.getEvent(event);
    alert(event.data);
});

EventUtil.addHandler(textbox, "compositionupdate", function(event){
    event = EventUtil.getEvent(event);
    alert(event.data);
});

EventUtil.addHandler(textbox, "compositionend", function(event){
    event = EventUtil.getEvent(event);
    alert(event.data);
});
CompositionEventsExample01.htm
Internet Explorer 9+ is the only browser to support composition events as of 2011. Because of this lack of support, composition events are of little use to web developers needing cross-browser support. You can determine if a browser supports composition events by using the following:
var isSupported = document.implementation.hasFeature("CompositionEvent", "3.0");
Mutation Events
The DOM Level 2 mutation events provide notification when a part of the DOM has been changed. Mutation events are designed to work with any XML or HTML DOM and are not specific to a particular language. The mutation events defined in DOM Level 2 are as follows:
- DOMSubtreeModified — Fires when any change occurs to the DOM structure. This is a catchall event that fires after any of the other events fire.
- DOMNodeInserted — Fires after a node is inserted as a child of another node.
- DOMNodeRemoved — Fires before a node is removed from its parent node.
- DOMNodeInsertedIntoDocument — Fires after a node has been inserted either directly or by inserting the subtree in which it exists. This event fires after DOMNodeInserted. This event has been deprecated in DOM Level 3 Events and should not be used.
- DOMNodeRemovedFromDocument — Fires before a node is removed either directly or by having the subtree in which it exists removed. This event fires after DOMNodeRemoved. This event has been deprecated in DOM Level 3 Events and should not be used.
- DOMAttrModified — Fires when an attribute has been modified. This event has been deprecated in DOM Level 3 Events and should not be used.
- DOMCharacterDataModified — Fires when a change is made to the value of a text node. This event has been deprecated in DOM Level 3 Events and should not be used.
You can determine if the browser supports DOM Level 2 mutation events by using the following code:
var isSupported = document.implementation.hasFeature("MutationEvents", "2.0");
Internet Explorer 8 and earlier don’t support any mutation events. The following table describes browser support for the various mutation events that have not been deprecated.
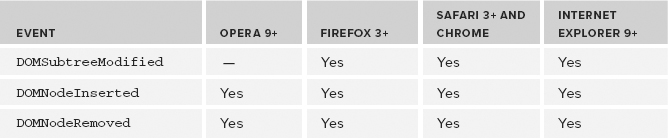
Since many of the mutation events were deprecated in DOM Level 3 Events, this section focuses on only those events that will have continued support moving forward.
Node Removal
When a node is removed from the DOM using removeChild() or replaceChild(), the DOMNodeRemoved event is fired first. The target of this event is the removed node, and the event.relatedNode property contains a reference to the parent node. At the point that this event fires, the node has not yet been removed from its parent, so its parentNode property still points to the parent (same as event.relatedNode). This event bubbles, so the event can be handled at any level of the DOM.
If the removed node has any child nodes, the deprecated DOMNodeRemovedFromDocument event fires on each of those child nodes and then on the removed node. This event doesn’t bubble, so an event handler is called only if it’s attached directly to one of the child nodes. The target of this event is the child node or the node that was removed, and the event object provides no additional information.
After that, the DOMSubtreeModified event fires. The target of this event is the parent of the node that was removed. The event object provides no additional information about this event.
To understand how this works in practice, consider the following simple HTML page:
<!DOCTYPE html>
<html>
<head>
    <title>Node Removal Events Example</title>
</head>
<body>
    <ul id="myList">
        <li>Item 1</li>
        <li>Item 2</li>
        <li>Item 3</li>
    </ul>
</body>
</html>
In this example, consider removing the <ul> element. When that happens, the following sequence of events fire:
1. DOMNodeRemoved is fired on the <ul> element. The relatedNode property is document.body.
2. DOMNodeRemovedFromDocument is fired on <ul>.
3. DOMNodeRemovedFromDocument is fired on each <li> element and each text node that is a child of the <ul> element.
4. DOMSubtreeModified is fired on document.body, since <ul> was an immediate child of document.body.
You can test this by running the following JavaScript code in the page:
EventUtil.addHandler(window, "load", function(event){
    var list = document.getElementById("myList");

    EventUtil.addHandler(document, "DOMSubtreeModified", function(event){
        alert(event.type);
        alert(event.target);
    });
    EventUtil.addHandler(document, "DOMNodeRemoved", function(event){
        alert(event.type);
        alert(event.target);
        alert(event.relatedNode);
    });
    EventUtil.addHandler(list.firstChild, "DOMNodeRemovedFromDocument",
         function(event){
           alert(event.type);
           alert(event.target);
       });

    list.parentNode.removeChild(list);
});
This code adds event handlers for DOMSubtreeModified and DOMNodeRemoved to the document so they can handle all such events on the page. Since DOMNodeRemovedFromDocument does not bubble, its event handler is added directly to the first child of the <ul> element (which is a text node in DOM-compliant browsers). Once the event handlers are set up, the <ul> element is removed from the document.
Node Insertion
When a node is inserted into the DOM using appendChild(), replaceChild(), or insertBefore(), the DOMNodeInserted event is fired first. The target of this event is the inserted node, and the event.relatedNode property contains a reference to the parent node. At the point that this event fires, the node has already been added to the new parent. This event bubbles, so the event can be handled at any level of the DOM.
Next, the deprecated DOMNodeInsertedIntoDocument event fires on the newly inserted node. This event doesn’t bubble, so the event handler must be attached to the node before it is inserted. The target of this event is the inserted node, and the event object provides no additional information.
The last event to fire is DOMSubtreeModified, which fires on the parent node of the newly inserted node.
Considering the same HTML document used in the previous section, the following JavaScript code indicates the order of events:
EventUtil.addHandler(window, "load", function(event){
    var list = document.getElementById("myList");
    var item = document.createElement("li");
    item.appendChild(document.createTextNode("Item 4"));

    EventUtil.addHandler(document, "DOMSubtreeModified", function(event){
        alert(event.type);
        alert(event.target);
    });
    EventUtil.addHandler(document, "DOMNodeInserted", function(event){
        alert(event.type);
        alert(event.target);
        alert(event.relatedNode);
    });
    EventUtil.addHandler(item, "DOMNodeInsertedIntoDocument", function(event){
        alert(event.type);
        alert(event.target);
    });

    list.appendChild(item);
});
This code begins by creating a new <li> element containing the text "Item 4". The event handlers for DOMSubtreeModified and DOMNodeInserted are added to the document since those events bubble. Before the item is added to its parent, an event handler for DOMNodeInsertedIntoDocument is added to it. The last step is to use appendChild() to add the item, at which point the events begin to fire. The DOMNodeInserted event fires on the new <li> item, and the relatedNode is the <ul> element. Then DOMNodeInsertedIntoDocument is fired on the new <li> item, and lastly the DOMSubtreeModified event is fired on the <ul> element.
HTML5 Events
The DOM specification doesn’t cover all events that are supported by all browsers. Many browsers have implemented custom events for various purposes based on either user need or a specific use case. HTML5 has an exhaustive list of all events that should be supported by browsers. This section discusses several events in HTML5 that are well supported by browsers. Note that this is not an exhaustive list of all events the browser supports. (Other events will be discussed throughout this book.)
The contextmenu Event
Windows 95 introduced the concept of context menus to PC users via a right mouse click. Soon, that paradigm was being mimicked on the Web. The problem developers were facing was how to detect that a context menu should be displayed (in Windows, it’s a right click; on a Mac, it’s a Ctrl+click) and then how to avoid the default context menu for the action. This resulted in the introduction of the contextmenu event to specifically indicate when a context menu is about to be displayed, allowing developers to cancel the default context menu and provide their own.
The contextmenu event bubbles, so a single event handler can be assigned to a document that handles all such events for the page. The target of the event is the element that was acted on. This event can be canceled in all browsers, using event.preventDefault() in DOM-compliant browsers and setting event.returnValue to false in Internet Explorer 8 and earlier. The contextmenu event is considered a mouse event and so has all of the properties related to the cursor position. Typically, a custom context menu is displayed using an oncontextmenu event handler and hidden again using the onclick event handler. Consider the following HTML page:
<!DOCTYPE html>
<html>
<head>
    <title>ContextMenu Event Example</title>
</head>
<body>
    <div id="myDiv">Right click or Ctrl+click me to get a custom context menu.
        Click anywhere else to get the default context menu.</div>
    <ul id="myMenu" style="position:absolute;visibility:hidden;background-color:
        silver">
        <li><a href="http://www.nczonline.net">Nicholas' site</a></li>
        <li><a href="http://www.wrox.com">Wrox site</a></li>
        <li><a href="http://www.yahoo.com">Yahoo!</a></li>
    </ul>
</body>
</html>
ContextMenuEventExample01.htm
In this code, a <div> is created that has a custom context menu. The <ul> element serves as the custom context menu and is initially hidden. The JavaScript to make this example work is as follows:
EventUtil.addHandler(window, "load", function(event){
    var div = document.getElementById("myDiv");

    EventUtil.addHandler(div, "contextmenu", function(event){
        event = EventUtil.getEvent(event);
        EventUtil.preventDefault(event);

        var menu = document.getElementById("myMenu");
        menu.style.left = event.clientX + "px";
        menu.style.top = event.clientY + "px";
        menu.style.visibility = "visible";
    });

    EventUtil.addHandler(document, "click", function(event){
        document.getElementById("myMenu").style.visibility = "hidden";
    });
});
ContextMenuEventExample01.htm
Here, an oncontextmenu event handler is defined for the <div>. The event handler begins by canceling the default behavior, ensuring that the browser’s context menu won’t be displayed. Next, the <ul> element is placed into position based on the clientX and clientY properties of the event object. The last step is to show the menu by setting its visibility to "visible". An onclick event handler is then added to the document to hide the menu whenever a click occurs (which is the behavior of system context menus).
Though this example is very basic, it is the basis for all custom context menus on the Web. Applying some additional CSS to the context menu in this example can yield great results.
The contextmenu event is supported in Internet Explorer, Firefox, Safari, Chrome, and Opera 11+.
The beforeunload Event
The beforeunload event fires on the window and is intended to give developers a way to prevent the page from being unloaded. This event fires before the page starts to unload from the browser, allowing continued use of the page should it ultimately not be unloaded. You cannot cancel this event outright because that would be the equivalent of holding the user hostage on a page. Instead, the event gives you the ability to display a message to the user. The message indicates that the page is about to be unloaded, displays the message, and asks if the user would like to continue to close the page or stay (see Figure 13-9).
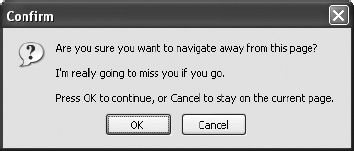
In order to cause this dialog box to pop up, you must set event.returnValue equal to the string you want displayed in the dialog (for Internet Explorer and Firefox) and also return it as the function value (for Safari and Chrome), as in this example:
EventUtil.addHandler(window, "beforeunload", function(event){
    event = EventUtil.getEvent(event);
    var message = "I'm really going to miss you if you go.";
    event.returnValue = message;
    return message;
});
BeforeUnloadEventExample01.htm
Internet Explorer, Firefox, Safari, and Chrome support the beforeunload event and pop up the dialog box to confirm that the user wants to navigate away. Opera as of version 11 does not support beforeunload.
The DOMContentLoaded Event
The window’s load event fires when everything on the page has been completely loaded, which may take some time for pages with lots of external resources. The DOMContentLoaded event fires as soon as the DOM tree is completely formed and without regard to images, JavaScript files, CSS files, or other such resources. As compared to the load event, DOMContentLoaded allows event handlers to be attached earlier in the page download process, which means a faster time to interactivity for users.
To handle the DOMContentLoaded event, you can attach an event handler either on the document or on the window (the target for the event actually is document, although it bubbles up to window). Here’s an example:
EventUtil.addHandler(document, "DOMContentLoaded", function(event){
    alert("Content loaded");
});
DOMContentLoadedEventExample01.htm
The event object for DOMContentLoaded doesn’t provide any additional information (target is document).
The DOMContentLoaded event is supported in Internet Explorer 9+, Firefox, Chrome, Safari 3.1+, and Opera 9+ and is typically used to attach event handlers or perform other DOM manipulations. This event always fires before the load event.
For browsers that don’t support DOMContentLoaded, it has been suggested that a timeout should be set during page loading with a millisecond delay of 0, as in this example:
setTimeout(function(){
    //attach event handlers here
}, 0);
This code essentially says, “Run this function as soon as the current JavaScript process is complete.” There is a single JavaScript process running as the page is being downloaded and constructed, so the timeout will fire after that. Whether or not this coincides directly with the timing of DOMContentLoaded relates to both the browser being used and other code on the page. To work properly, this must be the first timeout set on the page, and even then, it is not guaranteed that the timeout will run prior to the load event in all circumstances.
The readystatechange Event
Internet Explorer first defined an event called readystatechange on several parts of a DOM document. This somewhat mysterious event is intended to provide information about the loading state of the document or of an element, though its behavior is often erratic. Each object that supports the readystatechange event has a readyState property that can have one of the following five possible string values:
- uninitialized — The object exists but has not been initialized.
- loading — The object is loading data.
- loaded — The object has finished loading its data.
- interactive — The object can be interacted with but it’s not fully loaded.
- complete — The object is completely loaded.
Even though this seems straightforward, not all objects go through all readystate phases. The documentation indicates that objects may completely skip a phase if it doesn’t apply but doesn’t indicate which phases apply to which objects. This means that the readystatechange event often fires fewer than four times and the readyState value doesn’t always follow the same progression.
When used on document, a readyState of "interactive" fires the readystatechange event at a time similar to DOMContentLoaded. The interactive phase occurs when the entire DOM tree has been loaded and thus is safe to interact with. Images and other external resources may or may not be available at that point in time. The readystatechange event can be handled like this:
EventUtil.addHandler(document, "readystatechange", function(event){
    if (document.readyState == "interactive"){
        alert("Content loaded");
    }
});
The event object for this event doesn’t provide any additional information and has no target set.
When used in conjunction with the load event, the order in which these events fire is not guaranteed. In pages with numerous or large external resources, the interactive phase is reached well before the load event fires; in smaller pages with few or small external resources, the readystatechange event may not fire until after the load event.
To make matters even more confusing, the interactive phase may come either before or after the complete phase; the order is not constant. In pages with more external resources, it is more likely that the interactive phase will occur before the complete phase, whereas in pages with fewer resources, it is more likely that the complete phase will occur before the interactive phase. So, to ensure that you are getting the earliest possible moment, it’s necessary to check for both the interactive and the complete phases, as in this example:
EventUtil.addHandler(document, "readystatechange", function(event){
    if (document.readyState == "interactive" || document.readyState == "complete"){
        EventUtil.removeHandler(document, "readystatechange", arguments.callee);
        alert("Content loaded");
    }
});
When the readystatechange event fires in this code, the document.readyState property is checked to see if it’s either the interactive or the complete phase. If so, the event handler is removed to ensure that it won’t be executed for another phase. Note that because the event handler is an anonymous function, arguments.callee is used as the pointer to the function. After that, the alert is displayed indicating that the content is loaded. This construct allows you to get as close as possible to the DOMContentLoaded event.
The readystatechange event on the document is supported in Internet Explorer, Firefox 4+, and Opera.
Even though you can get close to mimicking DOMContentLoaded using readystatechange, they are not exactly the same. The order in which the load event and readystatechange events are fired is not consistent from page to page.
The readystatechange event also fires on <script> (Internet Explorer and Opera) and <link> (Internet Explorer only), allowing you to determine when external JavaScript and CSS files have been loaded. As with other browsers, dynamically created elements don’t begin downloading external resources until they are added to the page. The behavior of this event for elements is similarly confusing, because the readyState property may be either "loaded" or "complete" to indicate that the resource is available. Sometimes the readyState stops at "loaded" and never makes it to "complete", and other times it skips "loaded" and goes straight to "complete". As a result, it’s necessary to use the same construct used with the document. For example, the following loads an external JavaScript file:
EventUtil.addHandler(window, "load", function(){
    var script = document.createElement("script");

    EventUtil.addHandler(script, "readystatechange", function(event){
        event = EventUtil.getEvent(event);
        var target = EventUtil.getTarget(event);

        if (target.readyState == "loaded" || target.readyState == "complete"){
            EventUtil.removeHandler(target, "readystatechange", arguments.callee);
            alert("Script Loaded");
        }
    });
    script.src = "example.js";
    document.body.appendChild(script);
});
ReadyStateChangeEventExample01.htm
This example assigns an event handler to a newly created <script> node. The target of the event is the node itself, so when the readystatechange event fires, the target’s readyState property is checked to see if it’s either "loaded" or "complete". If the phase is either of the two, then the event handler is removed (to prevent it from possibly being executed twice) and then an alert is displayed. At this time, you can start executing functions that have been loaded from the external file.
The same construct can be used to load CSS files via a <link> element, as shown in this example:
EventUtil.addHandler(window, "load", function(){
    var link = document.createElement("link");
    link.type = "text/css";
    link.rel= "stylesheet";

    EventUtil.addHandler(script, "readystatechange", function(event){
        event = EventUtil.getEvent(event);
        var target = EventUtil.getTarget(event);

        if (target.readyState == "loaded" || target.readyState == "complete"){
            EventUtil.removeHandler(target, "readystatechange", arguments.callee);
            alert("CSS Loaded");
        }
    });

    link.href = "example.css";
    document.getElementsByTagName("head")[0].appendChild(link);
});
ReadyStateChangeEventExample02.htm
Once again, it’s important to test for both readyState values and to remove the event handler after calling it once.
The pageshow and pagehide Events
Firefox and Opera introduced a feature called the back-forward cache (bfcache) designed to speed up page transitions when using the browser’s Back and Forward buttons. The cache stores not only page data but also the DOM and JavaScript state, effectively keeping the entire page in memory. If a page is in the bfcache, the load event will not fire when the page is navigated to. This usually doesn’t cause an issue since the entire page state is stored. However, Firefox decided to provide some events to give visibility to the bfcache behavior.
The first event is pageshow, which fires whenever a page is displayed, whether from the bfcache or not. On a newly loaded page, pageshow fires after the load event; on a page in the bfcache, pageshow fires as soon as the page’s state has been completely restored. Note that even though the target of this event is document, the event handler must be attached to window. Consider the following:
(function(){
    var showCount = 0;

    EventUtil.addHandler(window, "load", function(){
        alert("Load fired");
    });

    EventUtil.addHandler(window, "pageshow", function(){
        showCount++;
        alert("Show has been fired " + showCount + " times.");
    });
})();
This example uses a private scope to protect the showCount variable from being introduced into the global scope. When the page is first loaded, showCount has a value of 0. Every time the pageshow event fires, showCount is incremented and an alert is displayed. If you navigate away from the page containing this code and then click the Back button to restore it, you will see that the value of showCount is incremented each time. That’s because the variable state, along with the entire page state, is stored in memory and then retrieved when you navigate back to the page. If you were to click the Reload button on the browser, the value of showCount would be reset to 0 because the page would be completely reloaded.
Besides the usual properties, the event object for pageshow includes a property called persisted. This is a Boolean value that is set to true if the page is stored in the bfcache or false if the page is not. The property can be checked in the event handler as follows:
(function(){
    var showCount = 0;

    EventUtil.addHandler(window, "load", function(){
        alert("Load fired");
    });

    EventUtil.addHandler(window, "pageshow", function(){
        showCount++;
        alert("Show has been fired " + showCount +
              " times. Persisted? " + event.persisted);
    });
})();
PageShowEventExample01.htm
The persisted property lets you determine if a different action must be taken depending on the state of the page in the bfcache.
The pagehide event is a companion to pageshow and fires whenever a page is unloaded from the browser, firing immediately before the unload event. As with the pageshow event, pagehide fires on the document even though the event handler must be attached to the window. The event object also includes the persisted property, though there is a slight difference in its usage. Consider the following:
EventUtil.addHandler(window, "pagehide", function(event){
    alert("Hiding. Persisted? " + event.persisted);
});
PageShowEventExample01.htm
You may decide to take a different action based on the value of persisted when pagehide fires. For the pageshow event, persisted is set to true if the page has been loaded from the bfcache; for the pagehide event, persisted is set to true if the page will be stored in the bfcache once unloaded. So the first time pageshow is fired, persisted is always false, whereas the first time pagehide is fired, persisted will be true (unless the page won’t be stored in the bfcache).
The pageshow and pagehide events are supported in Firefox, Safari 5+, Chrome, and Opera. Internet Explorer through version 9 does not support these events.
Pages that have an onunload event handler assigned are automatically excluded from the bfcache, even if the event handler is empty. The reasoning is that onunload is typically used to undo what was done using onload, and so skipping onload the next time the page is displayed could cause it to break.
The hashchange Event
HTML5 introduced the hashchange event as a way to notify developers when the URL hash (everything following a pound sign (#) in a URL) changed. This came about as developers frequently used the URL hash to store state information or navigational information in Ajax applications.
The onhashchange event handler must be attached to the window, and it is called whenever the URL hash changes. The event object should have two additional properties: oldURL and newURL. These properties hold the complete URL including the hash before the change and after the change. For example:
EventUtil.addHandler(window, "hashchange", function(event){
    alert("Old URL: " + event.oldURL + "
New URL: " + event.newURL);
});
HashChangeEventExample01.htm
The hashchange event is supported in Internet Explorer 8+, Firefox 3.6+, Safari 5+, Chrome, and Opera 10.6+. Of those browsers, only Firefox 6+, Chrome, and Opera support the oldURL and newURL properties. For that reason, it’s best to use the location object to determine the current hash:
EventUtil.addHandler(window, "hashchange", function(event){
    alert("Current hash: " + location.hash);
});
You can detect if the hashchange event is supported using the following code:
var isSupported = ("onhashchange" in window); //buggy
Internet Explorer 8 has a quirk where this code returns true even when running in Internet Explorer 7 document mode, even though it doesn’t work. To get around this, use the following as a more bulletproof detection:
var isSupported = ("onhashchange" in window) && (document.documentMode ===
                  undefined || document.documentMode > 7);
Device Events
With the introduction of smartphones and tablet devices came a new set of ways for users to interact with a browser. As such, a new class of events was invented. Device events allow you to determine how a device is being used. A new draft for device events was started in 2011 at the W3C (http://dev.w3.org/geo/api/spec-source-orientation.html) to cover the growing number of devices looking to implement device-related events. This section covers both the API defined in the draft and vendor-specific events.
The orientationchange Event
Apple created the orientationchange event on mobile Safari so that developers could determine when the user switched the device from landscape to portrait mode. There is a window.orientation property on mobile Safari that contains one of three values: 0 for portrait mode, 90 for landscape mode when rotated to the left (the Home button on the right), and -90 for landscape mode when rotated to the right (the Home button on the left). The documentation also mentions a value of 180 if the device is upside down, but that configuration is not supported to date. Figure 13-10 illustrates the various values for window.orientation.
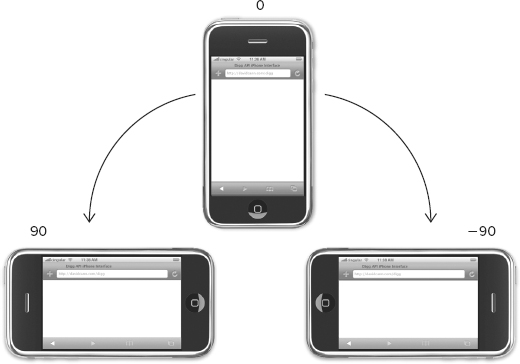
Whenever the user changes from one mode to another, the orientationchange event fires. The event object doesn’t contain any useful information, since the only relevant information is accessible via window.orientation. Typical usage of this event is as follows:
EventUtil.addHandler(window, "load", function(event){
    var div = document.getElementById("myDiv");
    div.innerHTML = "Current orientation is " + window.orientation;

    EventUtil.addHandler(window, "orientationchange", function(event){
        div.innerHTML = "Current orientation is " + window.orientation;
    });
});
OrientationChangeEventExample01.htm
In this example, the initial orientation is displayed when the load event fires. Then, the event handler for orientationchange is assigned. Whenever the event fires, the message on the page is updated to indicate the new orientation.
All iOS devices support both the orientationchange event and the window.orientation property.
Since orientationchange is considered a window event, you can also assign an event handler by adding the onorientationchange attribute to the <body> element.
The MozOrientation Event
Firefox 3.6 introduced a new event called MozOrientation to detect device orientation. (The prefix Moz indicates that it’s a vendor-specific event instead of a standard event.) This event fires periodically as the device accelerometer detects changes in how the device is oriented. Note that this is different from orientationchange in iOS, which provides only one dimension of movement. The MozOrientation event fires on the window object and so can be handled with the following code:
EventUtil.addHandler(window, "MozOrientation", function(event){
    //respond to event
});
The event object has three properties with accelerometer data: x, y, and z. Each value is a number between 1 and –1 and represents a different axis. When at rest, x is 0, y is 0, and z is 1 (indicating the device is upright). Tilting to the right decreases the value of x, while tilting to the left increases the value. Likewise, tilting away from you decreases the value of y, while tilting toward you (as if to read a paper) increases it. The z value is the vertical acceleration, and so is 1 at rest, and decreases when the device is in motion. (It would be 0 with no gravity.) Here’s a simple example that outputs the three values:
EventUtil.addHandler(window, "MozOrientation", function(event){
    var output = document.getElementById("output");
    output.innerHTML = "X=" + event.x + ", Y=" + event.y + ", Z=" + event.z +
                       "<br>";
});
MozOrientationEventExample01.htm
The MozOrientation event is supported only on devices with accelerometers, including Macbook laptops, Lenovo Thinkpad laptops, and both Windows Mobile and Android devices. It should be noted that this is an experimental API and may or may not change in the future. (It is likely that it may be superseded by another event.)
The deviceorientation Event
The deviceorientation event is defined in the DeviceOrientation Event specification and is similar in nature to the MozOrientation event. The event is fired on window when accelerometer information is available and changes and, as such, has the same support limitations as MozOrientation. Keep in mind that the purpose of deviceorientation is to inform you of how the device is oriented in space and not of movement.
A device is said to exist in three-dimensional space along an x-axis, a y-axis, and a z-axis. These all start at zero when the device is at rest on a horizontal surface. The x-axis goes from the left of the device to the right, the y-axis goes from the bottom of the device to the top, and the z-axis goes from the back of the device to the front (see Figure 13-11).
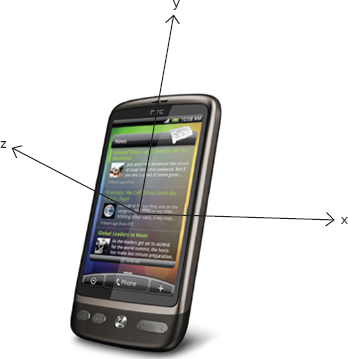
When deviceorientation fires, it returns information about how the values of each axis have changed relative to the device at rest. The event object has five properties:
- alpha — The difference in y-axis degrees as you rotate around the z-axis (side-to-side tilt); a floating point number between 0 and 360.
- beta — The difference in z-axis degrees as you rotate around the x-axis (front-to-back tilt); a floating point number between –180 and 180.
- gamma — The difference in the z-axis degrees as you rotate around the y-axis (twisting tilt); a floating point number between –90 and 90.
- absolute — A Boolean value indicating if the device is returning absolute values or not.
- compassCalibrated — A Boolean value indicating if the device’s compass is properly calibrated or not.
Figure 13-12 shows how the values of alpha, beta, and gamma are calculated.
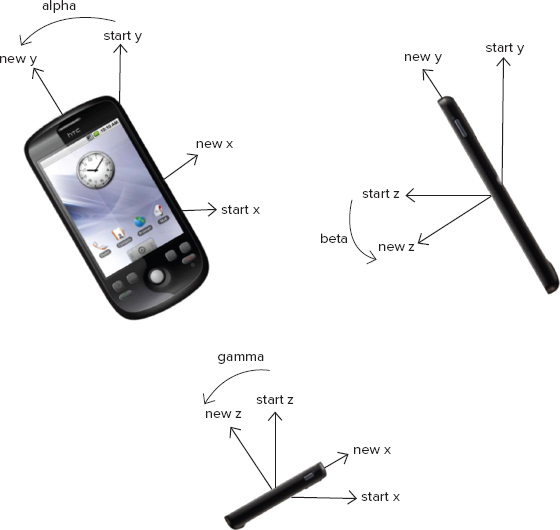
Here’s a simple example that outputs the values for alpha, beta, and gamma:
EventUtil.addHandler(window, "deviceorientation", function(event){
    var output = document.getElementById("output");
    output.innerHTML = "Alpha=" + event.alpha + ", Beta=" + event.beta +
                       ", Gamma=" + event.gamma + "<br>";
});
DeviceOrientationEventExample01.htm
You can use this information to rearrange or otherwise alter elements on the screen in reaction to the device changing its orientation. For example, this code rotates an element in reaction to the device orientation:
EventUtil.addHandler(window, "deviceorientation", function(event){
    var arrow = document.getElementById("arrow");
    arrow.style.webkitTransform = "rotate(" + Math.round(event.alpha) + "deg)";
});
DeviceOrientationEventExample01.htm
This example works only on mobile WebKit browsers because of the use of the proprietary webkit Transform property (the temporary version of the CSS standard transform property). The element “arrow” is rotated along with the value of event.alpha, giving it a compass-like feel. The CSS3 rotation transformation is used with a rounded version of the value to ensure smoothness.
As of 2011, Safari for iOS 4.2+, Chrome, and WebKit for Android are the only implementations of the deviceorientation event.
The devicemotion Event
The DeviceOrientation Event specification also includes a devicemotion event. This event is designed to inform you when the device is actually moving, not just when it has changed orientation. For instance, devicemotion is useful to determine that the device is falling or is being held by someone who is walking.
When the devicemotion event fires, the event object contains the following additional properties:
- acceleration — An object containing x, y, and z properties that tells you the acceleration in each dimension without considering gravity.
- accelerationIncludingGravity — An object containing x, y, and z properties that tells you the acceleration in each dimension, including the natural acceleration of gravity in the z-axis.
- interval — The amount of time, in milliseconds, that will pass before another devicemotion event is fired. This value should be constant from event to event.
- rotationRate — An object containing the alpha, beta, and gamma properties that indicate device orientation.
If acceleration, accelerationIncludingGravity, or rotationRate cannot be provided, then the property value is null. Because of that, you should always check that the value is not null before using any of these properties. For example:
EventUtil.addHandler(window, "devicemotion", function(event){
    var output = document.getElementById("output");
    if (event.rotationRate !== null){
        output.innerHTML += "Alpha=" + event.rotationRate.alpha + ", Beta=" +
                            event.rotationRate.beta + ", Gamma=" +
                            event.rotationRate.gamma;
    }
});
DeviceMotionEventExample01.htm
As with deviceorientation, Safari for iOS 4.2+, Chrome, and WebKit for Android are the only implementations of the devicemotion event.
Touch and Gesture Events
Safari for iOS introduced several proprietary events designed to inform developers when specific events occur. Since iOS devices are mouseless and keyboardless, the regular mouse and keyboard events simply aren’t enough to create a completely interactive web page designed with mobile Safari in mind. With the introduction of WebKit for Android, many of the proprietary events became de facto standards and led to the beginning of a Touch Events specification from the W3C (found at https://dvcs.w3.org/hg/webevents/raw-file/tip/touchevents.html). The following events work only on touch-based devices.
Touch Events
When the iPhone 3G was released with iOS 2.0 software, a new version of Safari was included. This new mobile Safari exposed several new events relating to touch interactions. The Android browser later implemented these same events. Touch events are fired when a finger is placed on the screen, dragged across the screen, or removed from the screen. The touch events are as follows:
- touchstart — Fires when a finger touches the screen even if another finger is already touching the screen.
- touchmove — Fires continuously as a finger is moved across the screen. Calling preventDefault() during this event prevents scrolling.
- touchend — Fires when a finger is removed from the screen.
- touchcancel — Fires when the system has stopped tracking the touch. It’s unclear in the documentation as to when this can occur.
Each of these events bubbles and can be canceled. Even though touch events aren’t part of the DOM specification, they are implemented in a DOM-compatible way. So the event object for each touch event provides properties that are common to mouse events: bubbles, cancelable, view, clientX, clientY, screenX, screenY, detail, altKey, shiftKey, ctrlKey, and metaKey.
In addition to these common DOM properties, touch events have the following three properties to track touches:
- touches — An array of Touch objects that indicate the currently tracked touches.
- targetTouches — An array of Touch objects specific to the event’s target.
- changedTouches — An array of Touch objects that have been changed in the last user action.
Each Touch object, in turn, has the following properties:
- clientX — The x-coordinate of the touch target in the viewport.
- clientY — The y-coordinate of the touch target in the viewport.
- identifier — A unique ID for the touch.
- pageX — The x-coordinate of the touch target on the page.
- pageY — The y-coordinate of the touch target on the page.
- screenX — The x-coordinate of the touch target on the screen.
- screenY — The y-coordinate of the touch target on the screen.
- target — The DOM node target for the touch.
These properties can be used to track the touch around the screen. For example:
function handleTouchEvent(event){

    //only for one touch
    if (event.touches.length == 1)

        var output = document.getElementById("output");
        switch(event.type){
            case "touchstart":
                output.innerHTML = "Touch started (" + event.touches[0].clientX +
                                   "," + event.touches[0].clientY + ")";
                break;
            case "touchend":
                output.innerHTML += "<br>Touch ended (" +
                                    event.changedTouches[0].clientX + "," +
                                    event.changedTouches[0].clientY + ")";
                break;
            case "touchmove":
                event.preventDefault();  //prevent scrolling
                output.innerHTML += "<br>Touch moved (" +
                                    event.changedTouches[0].clientX + "," +
                                    event.changedTouches[0].clientY + ")";
                break;
        }
    }
}

EventUtil.addHandler(document, "touchstart", handleTouchEvent);
EventUtil.addHandler(document, "touchend", handleTouchEvent);
EventUtil.addHandler(document, "touchmove", handleTouchEvent);
TouchEventsExample01.htm
This code tracks a single touch around the screen. To keep things simple, it outputs information only when there’s a single active touch. When the touchstart event occurs, it outputs the location of the touch into a <div>. When a touchmove event fires, its default behavior is canceled to prevent scrolling (moving touches typically scroll the page) and then it outputs information about the changed touch. The touchend event outputs the last information about the touch. Note that there is nothing in the touches collection during the touchend event, because there is no longer an active touch; the changedTouches collection must be used instead.
These events fire on all elements of the document, so you can manipulate different parts of the page individually. The order of events (including mouse events) when you tap on an element are:
1. touchstart
2. mouseover
3. mousemove (once)
4. mousedown
5. mouseup
6. click
7. touchend
Safari for iOS, WebKit for Android, Dolfin for bada, BlackBerry WebKit for OS6+, Opera Mobile 10.1+, and Phantom browser for LG-proprietary OSs all support touch events. Only Safari on iOS can support multiple touches at once. Both Firefox 6+ and Chrome on the desktop also support touch events.
Gesture Events
The iOS 2.0 version of Safari also introduced a class of events for gestures. A gesture occurs when two fingers are touching the screen and typically causes a change in the scale of the displayed item or the rotation. There are three gesture events, as described here:
- gesturestart — Fires when a finger is already on the screen and another finger is placed on the screen.
- gesturechange — Fires when the position of either finger on the screen has changed.
- gestureend — Fires when one of the fingers has been removed from the screen.
These events fire only if the two fingers are touching the recipient of the event. Setting event handlers on a single element means that both fingers must be within the bounds of the element in order for gesture events to fire (this will be the target). Since these events bubble, you can also place event handlers at the document level to handle all gesture events. When you are using this approach, the target of the event will be the element that has both fingers within its boundaries.
There is a relationship between the touch and the gesture events. When a finger is placed on the screen, the touchstart event fires. When another finger is placed on the screen, the gesturestart event fires first and is followed by the touchstart event for that finger. If one or both of the fingers are moved, a gesturechange event is fired. As soon as one of the fingers is removed, the gestureend event fires, followed by touchend for that finger.
As with touch events, each gesture event object contains all of the standard mouse event properties: bubbles, cancelable, view, clientX, clientY, screenX, screenY, detail, altKey, shiftKey, ctrlKey, and metaKey. The two additions to the event object are rotation and scale. The rotation property indicates the degrees of rotation that the fingers have changed, where negative numbers indicate a counterclockwise rotation and positive numbers indicate clockwise rotation (the value begins as 0). The scale property indicates how much of a distance change occurred between the fingers (making a pinch motion). This starts out as 1 and will either increase as the distance increases or decrease as the distance decreases.
These events can be used as follows:
function handleGestureEvent(event){
    var output = document.getElementById("output");
    switch(event.type){
        case "gesturestart":
            output.innerHTML = "Gesture started (rotation=" + event.rotation +
                               ",scale=" + event.scale + ")";
            break;
        case "gestureend":
            output.innerHTML += "<br>Gesture ended (rotation=" + event.rotation +
                                ",scale=" + event.scale + ")";
            break;
        case "gesturechange":
            output.innerHTML += "<br>Gesture changed (rotation=" + event.rotation +
                                ",scale=" + event.scale + ")";
            break;
    }
}

document.addEventListener("gesturestart", handleGestureEvent, false);
document.addEventListener("gestureend", handleGestureEvent, false);
document.addEventListener("gesturechange", handleGestureEvent, false);
GestureEventsExample01.htm
As with the touch events example, this code simply wires up each event to a single function and then outputs information about each event.
Touch events also return rotation and scale properties, but they change only when two fingers are in contact with the screen. Generally, it is easier to use gesture events with two fingers than to manage all interactions with touch events.
Since event handlers provide the interaction on modern web applications, many developers mistakenly add a large number of them to the page. In languages that create GUIs, such as C#, it’s customary to add an onclick event handler to each button in the GUI, and there is no real penalty for doing so. In JavaScript, the number of event handlers on the page directly relates to the overall performance of the page. This happens for a number of reasons. The first is that each function is an object and takes up memory; the more objects in memory, the slower the performance. Second, the amount of DOM access needed to assign all of the event handlers up front delays the interactivity of the entire page. There are a number of ways that you can improve performance by minding your use of event handlers.
Event Delegation
The solution to the “too many event handlers” issue is called event delegation. Event delegation takes advantage of event bubbling to assign a single event handler to manage all events of a particular type. The click event, for example, bubbles all the way up to the document level. This means that it’s possible to assign one onclick event handler for an entire page instead of one for each clickable element. Consider the following HTML:
<ul id="myLinks">
    <li id="goSomewhere">Go somewhere</li>
    <li id="doSomething">Do something</li>
    <li id="sayHi">Say hi</li>
</ul>
EventDelegationExample01.htm
The HTML in this example contains three items that should perform actions when clicked. Traditional thinking simply attaches three event handlers like this:
var item1 = document.getElementById("goSomewhere");
var item2 = document.getElementById("doSomething");
var item3 = document.getElementById("sayHi");

EventUtil.addHandler(item1, "click", function(event){
    location.href = "http://www.wrox.com";
});

EventUtil.addHandler(item2, "click", function(event){
    document.title = "I changed the document's title";
});

EventUtil.addHandler(item3, "click", function(event){
    alert("hi");
});
If this scenario is repeated for all of the clickable elements in a complex web application, the result is an incredibly long section of code that simply attaches event handlers. Event delegation approaches this problem by attaching a single event handler to the highest possible point in the DOM tree, as in this example:
var list = document.getElementById("myLinks");

EventUtil.addHandler(list, "click", function(event){
    event = EventUtil.getEvent(event);
    var target = EventUtil.getTarget(event);

    switch(target.id){
        case "doSomething":
            document.title = "I changed the document's title";
            break;

        case "goSomewhere":
            location.href = "http://www.wrox.com";
            break;

        case "sayHi":
            alert("hi");
            break;
    }
});
EventDelegationExample01.htm
In this code, event delegation is used to attach a single onclick event handler to the <ul> element. Since all of the list items are children of this element, their events bubble up and are handled by this function. The event target is the list item that was clicked, so you can check the id property to determine the appropriate action. In comparison with the previous code that didn’t use event delegation, this code has less of an up-front cost, because it just retrieves one DOM element and attaches one event handler. The end result is the same for the user, but this approach requires much less memory. All events that use buttons (most mouse events and keyboard events) are candidates for this technique.
If it’s practical, you may want to consider attaching a single event handler on document that can handle all of the page events of a particular type. This has the following advantages compared to traditional techniques:
- The document object is immediately available and can have event handlers assigned at any point during the page’s life cycle (no need to wait for DOMContentLoaded or load events). This means that as soon as a clickable element is rendered, it can function appropriately without delay.
- Less time is spent setting up event handlers on the page. Assigning one event handler takes fewer DOM references and less time.
- Lower memory usage is required for the entire page, improving overall performance.
The best candidates for event delegation are click, mousedown, mouseup, keydown, keyup, and keypress. The mouseover and mouseout events bubble but are complicated to handle properly and often require calculating element position to appropriately handle (since mouseout fires when moving from an element to one of its child nodes and when moving outside of the element).
Removing Event Handlers
When event handlers are assigned to elements, a connection is formed between code that is running the browser and JavaScript code interacting with the page. The more of these connections that exist, the slower a page performs. One way to handle this issue is through event delegation to limit the number of connections that are set up. Another way to manage the issue is to remove event handlers when they are no longer needed. Dangling event handlers, those that remain in memory after they are necessary, are a major source of memory and performance issues in web applications.
This problem occurs at two specific points during a page’s life cycle. The first is when an element is removed from the document while it has event handlers attached. This can be due to a true DOM manipulation involving removeChild() or replaceChild(), but it happens most often when using innerHTML to replace a section of the page. Any event handlers assigned to an element that was eliminated by the call to innerHTML may not be properly garbage collected. Consider the following example:
<div id="myDiv">
    <input type="button" value="Click Me" id="myBtn">
</div>
<script type="text/javascript">
    var btn = document.getElementById("myBtn");
    btn.onclick = function(){

        //do something

        document.getElementById("myDiv").innerHTML = "Processing...";  //Bad!!!
    };
</script>
Here, a button exists inside of a <div> element. When the button is clicked, it is removed and replaced with a message to prevent double-clicking, which is a very common paradigm on websites. The issue is that the button still had an event handler attached when it was removed from the page. Setting innerHTML on the <div> removed the button completely, but the event handler remains attached. Some browsers, especially Internet Explorer 8 and earlier, will have trouble in this situation, and most likely, references to both the element and the event handler will remain in memory. If you know that a given element is going to be removed, it’s best to manually remove the event handlers yourself, as in this example:
<div id="myDiv">
    <input type="button" value="Click Me" id="myBtn">
</div>
<script type="text/javascript">
    var btn = document.getElementById("myBtn");
    btn.onclick = function(){

        //do something

        btn.onclick = null;   //remove event handler

        document.getElementById("myDiv").innerHTML = "Processing...";
    };
</script>
In this rewritten code, the button’s event handler is removed before setting the <div> element’s innerHTML. This ensures that the memory will be reclaimed and the button can safely be removed from the DOM.
Note also that removing the button in the event handler prevents bubbling of the event. An event will bubble only if its target is still present in the document.
Event delegation also helps solve this problem. If you know that a particular part of the page is going to be replaced using innerHTML, do not attach event handlers directly to elements within that part. Instead, attach event handlers at a higher level that can handle events in that area.
The other time that dangling event handlers are a problem is when the page is unloaded. Once again, Internet Explorer 8 and earlier have a lot of problems with this situation, though it seems to affect all browsers in some way. If event handlers aren’t cleaned up before the page is unloaded, they remain in memory. Each time the browser loads and unloads the page after that (as a result of navigating away and back or clicking the Reload button), the number of objects in memory increases, since the event handler memory is not being reclaimed.
Generally speaking, it’s a good idea to remove all event handlers before the page is unloaded by using an onunload event handler. This is another area where event delegation helps, because it is easier to keep track of the event handlers to remove when there are fewer of them. A good way to think about this technique is that anything done using an onload event handler must be reversed using onunload.
Keep in mind that assigning an onunload event handler means that your page will not be stored in the bfcache. If this is of concern, you may want to use onunload to remove event handlers only in Internet Explorer.
Events are designed to indicate particular moments of interest in a web page. These events are often fired based on user interaction or other browser functionality. It’s a little-known fact that JavaScript can be used to fire specific events at any time, and those events are treated the same as events that are created by the browser. This means that the events bubble appropriately and cause the browser to execute event handlers assigned to deal with the event. This capability can be extremely useful in testing web applications. The DOM Level 3 specification indicates ways to simulate specific types of events, and Internet Explorer 9, Opera, Firefox, Chrome, and Safari all support it. Internet Explorer 8 and earlier versions have their own way to simulate events.
DOM Event Simulation
An event object can be created at any time by using the createEvent() method on document. This method accepts a single argument, which is a string indicating the type of event to create. In DOM Level 2, all of these strings were plural, while DOM Level 3 changed them to singular. The string may be one of the following:
- UIEvents — Generic UI event. Mouse events and keyboard events inherit from UI events. For DOM Level 3, use UIEvent.
- MouseEvents — Generic mouse event. For DOM Level 3, use MouseEvent.
- MutationEvents — Generic DOM mutation event. For DOM Level 3, use MutationEvent.
- HTMLEvents — Generic HTML event. There is no equivalent DOM Level 3 Event (HTML events were dispersed into other groupings).
Note that keyboard events are not specifically described in DOM Level 2 Events and were only later introduced in DOM Level 3 Events. Internet Explorer 9 is currently the only browser to support DOM Level 3 keyboard events. There are, however, ways to simulate keyboard events using methods that are available in other browsers.
Once an event object is created, it needs to be initialized with information about the event. Each type of event object has a specific method that is used to initialize it with the appropriate data. The name of the method is different, depending on the argument that was used with createEvent().
The final step in event simulation is to fire the event. This is done by using the dispatchEvent() method that is present on all DOM nodes that support events. The dispatchEvent() method accepts a single argument, which is the event object representing the event to fire. After that point, the event becomes “official,” bubbling and causing event handlers to execute.
Simulating Mouse Events
Mouse events can be simulated by creating a new mouse event object and assigning the necessary information. A mouse event object is created by passing "MouseEvents" into the createEvent() method. The returned object has a method called initMouseEvent() that is used to assign mouse-related information. This method accepts 15 arguments, one for each property typically available on a mouse event. The arguments are as follows:
- type (string) — The type of event to fire, such as "click".
- bubbles (Boolean) — Indicates if the event should bubble. This should be set to true for accurate mouse event simulation.
- cancelable (Boolean) — Indicates if the event can be canceled. This should be set to true for accurate mouse event simulation.
- view (AbstractView) — The view associated with the event. This is almost always document.defaultView.
- detail (integer) — Additional information for the event. This is used only by event handlers, though it’s typically set to 0.
- screenX (integer) — The x-coordinate of the event relative to the screen.
- screenY (integer) — The y-coordinate of the event relative to the screen.
- clientX (integer) — The x-coordinate of the event relative to the viewport.
- clientY (integer) — The y-coordinate of the event relative to the viewport.
- ctrlKey (Boolean) — Indicates if the Ctrl key is pressed. The default is false.
- altKey (Boolean) — Indicates if the Alt key is pressed. The default is false.
- shiftKey (Boolean) — Indicates if the Shift key is pressed. The default is false.
- metaKey (Boolean) — Indicates if the Meta key is pressed. The default is false.
- button (integer) — Indicates the button that was pressed. The default is 0.
- relatedTarget (object) — An object related to the event. This is used only when simulating mouseover or mouseout.
As should be obvious, the arguments for initMouseEvent() map directly to the event object properties for a mouse event. The first four arguments are the only ones that are critical for the proper execution of the event, because they are used by the browser; only event handlers use the other arguments. The target property of the event object is set automatically when it is passed into the dispatchEvent() method. As an example, the following simulates a click on a button using default values:
var btn = document.getElementById("myBtn");

//create event object
var event = document.createEvent("MouseEvents");

//initialize the event object
event.initMouseEvent("click", true, true, document.defaultView, 0, 0, 0, 0, 0,
                     false, false, false, false, 0, null);

//fire the event
btn.dispatchEvent(event);
SimulateDOMClickExample01.htm
All other mouse events, including dblclick, can be simulated using this same technique in DOM-compliant browsers.
Simulating Keyboard Events
As mentioned previously, keyboard events were left out of DOM Level 2 Events, so simulating keyboard events is not straightforward. Keyboard events were included in draft versions of DOM Level 2 Events and were removed before finalization. Firefox implements the draft version of keyboard events. It’s worth noting that keyboard events in DOM Level 3 are drastically different from the draft version originally included in DOM Level 2.
The DOM Level 3 way to create a keyboard event is by passing "KeyboardEvent" into the create Event() method. Doing so creates an event object with a method called initKeyboardEvent(). This method has the following parameters:
- type (string) — The type of event to fire, such as "keydown".
- bubbles (Boolean) — Indicates if the event should bubble. This should be set to true for accurate mouse event simulation.
- cancelable (Boolean) — Indicates if the event can be canceled. This should be set to true for accurate mouse event simulation.
- view (AbstractView) — The view associated with the event. This is almost always document.defaultView.
- key (string) — String code for the key that was pressed.
- location (integer) — The location of the key that was pressed. 0 for default keyboard, 1 for the left location, 2 for the right location, 3 for the numeric keypad, 4 for mobile (indicating a virtual keypad), or 5 for joystick.
- modifiers (string) — A space-separated list of modifiers such as "Shift".
- repeat (integer) — The number of times this key has been pressed in a row.
Keep in mind that DOM Level 3 Events deprecates the keypress event, so you can simulate only the keydown and keyup events using this technique:
var textbox = document.getElementById("myTextbox"),
    event;

//create event object the DOM Level 3 way
if (document.implementation.hasFeature("KeyboardEvents", "3.0")){
    event = document.createEvent("KeyboardEvent");

    //initialize the event object
    event.initKeyboardEvent("keydown", true, true, document.defaultView, "a",
                            0, "Shift", 0);
}

//fire the event
textbox.dispatchEvent(event);
SimulateDOMKeyEventExample01.htm
This example simulates keydown of the A key while Shift is being held. You should always check for DOM Level 3 keyboard events support before attempting to use document.createEvent("KeyboardEvent"); other browsers return a nonstandard KeyboardEvent object.
Firefox allows you to create a keyboard event by passing "KeyEvents" into the createEvent() method. This returns an event object with a method called initKeyEvent(), which accepts the following 10 arguments:
- type (string) — The type of event to fire, such as "keydown".
- bubbles (Boolean) — Indicates if the event should bubble. This should be set to true for accurate mouse event simulation.
- cancelable (Boolean) — Indicates if the event can be canceled. This should be set to true for accurate mouse event simulation.
- view (AbstractView) — The view associated with the event. This is almost always document.defaultView.
- ctrlKey (Boolean) — Indicates if the Ctrl key is pressed. The default is false.
- altKey (Boolean) — Indicates if the Alt key is pressed. The default is false.
- shiftKey (Boolean) — Indicates if the Shift key is pressed. The default is false.
- metaKey (Boolean) — Indicates if the Meta key is pressed. The default is false.
- keyCode (integer) — The key code of the key that was pressed or released. This is used for keydown and keyup. The default is 0.
- charCode (integer) — The ASCII code of the character generated from the key press. This is used for keypress. The default is 0.
A keyboard event can then be fired by passing this event object to dispatchEvent(), as in this example:
//for Firefox only
var textbox = document.getElementById("myTextbox");

//create event object
var event = document.createEvent("KeyEvents");

//initialize the event object
event.initKeyEvent("keydown", true, true, document.defaultView, false, false,
                   true, false, 65, 65);

//fire the event
textbox.dispatchEvent(event);
SimulateFFKeyEventExample01.htm
This example simulates keydown for the A key with the Shift key held down. You can also simulate keyup and keypress events using this technique.
For other browsers, you’ll need to create a generic event and assign keyboard-specific information to it. Here is an example:
var textbox = document.getElementById("myTextbox");

//create event object
var event = document.createEvent("Events");

//initialize the event object
event.initEvent(type, bubbles, cancelable);
event.view = document.defaultView;
event.altKey = false;
event.ctrlKey = false;
event.shiftKey = false;
event.metaKey = false;
event.keyCode = 65;
event.charCode = 65;

//fire the event
textbox.dispatchEvent(event);
This code creates a generic event, initializes it by using initEvent(), and then assigns keyboard event information. It’s necessary to use a generic event instead of a UI event because the UI event prevents new properties from being added to the event object (except in Safari). Simulating an event in this way causes the keyboard event to fire, but no text will be placed into the text box because this doesn’t accurately simulate a keyboard event.
Simulating Other Events
Mouse events and keyboard events are the ones most often simulated in the browser, though it is possible to simulate mutation and HTML events as well. To simulate a mutation event, use createEvent("MutationEvents") to create a new mutation event object with an initMutationEvent() method. The arguments of this event are type, bubbles, cancelable, relatedNode, prevValue, newValue, attrName, and attrChange. Simulating a mutation event takes the following form:
var event = document.createEvent("MutationEvents");
event.initMutationEvent("DOMNodeInserted", true, false, someNode, "","","",0);
target.dispatchEvent(event);
This code simulates a DOMNodeInserted event. All other mutation events can be simulated using the same basic code and changing the arguments.
HTML events are simulated by creating an event object, using createEvent("HTMLEvents"), and then initializing the event object using initEvent(). Here’s an example:
var event = document.createEvent("HTMLEvents");
event.initEvent("focus", true, false);
target.dispatchEvent(event);
This example fires the focus event on a given target. Other HTML events may be simulated the same way.
Mutation events and HTML events are rarely used in browsers because they are of limited utility.
Custom DOM Events
DOM Level 3 specifies a class of events called custom events. Custom events don’t get fired natively by the DOM but are provided so that developers can create their own events. You create a new custom event by calling createEvent("CustomEvent"). The returned object has a method called initCustomEvent(), which takes four arguments:
- type (string) — The type of event to fire, such as "keydown".
- bubbles (Boolean) — Indicates if the event should bubble.
- cancelable (Boolean) — Indicates if the event can be canceled.
- detail (object) — Any value. This fills in the detail property of the event object.
The created event can then be dispatched in the DOM just like any other event. For example:
var div = document.getElementById("myDiv"),
    event;

EventUtil.addHandler(div, "myevent", function(event){
    alert("DIV: " + event.detail);
});
EventUtil.addHandler(document, "myevent", function(event){
    alert("DOCUMENT: " + event.detail);
});

if (document.implementation.hasFeature("CustomEvents", "3.0")){
    event = document.createEvent("CustomEvent");
    event.initCustomEvent("myevent", true, false, "Hello world!");
    div.dispatchEvent(event);
}
SimulateDOMCustomEventExample01.htm
This example creates a bubbling event called "myevent". The value of event.detail is set to a simple string and is then listened for both on a <div> element and at the document level. Because the event is specified as bubbling using initCustomEvent(), the browser takes care of bubbling the event up to the document.
Custom DOM events are supported only in Internet Explorer 9+ and Firefox 6+.
Internet Explorer Event Simulation
Event simulation in Internet Explorer 8 and earlier follows a similar pattern as event simulation in the DOM: you create an event object, assign the appropriate information, and then fire the event using the object. Of course, Internet Explorer has different ways of doing each step.
The createEventObject() method of document creates an event object. Unlike the DOM, this method accepts no arguments and returns a generic event object. After that, you must manually assign all of the properties that you want to have on the object. (There is no method to do this.) The last step is to call fireEvent() on the target, which accepts two arguments: the name of the event handler and the event object. When fireEvent() is called, the srcElement and type properties are automatically assigned to the event object; all other properties must be manually assigned. This means that all events that Internet Explorer supports are simulated using the same algorithm. For example, the following fires a click event on a button:
var btn = document.getElementById("myBtn");

//create event object
var event = document.createEventObject();

//initialize the event object
event.screenX = 100;
event.screenY = 0;
event.clientX = 0;
event.clientY = 0;
event.ctrlKey = false;
event.altKey = false;
event.shiftKey = false;
event.button = 0;

//fire the event
btn.fireEvent("onclick", event);
SimulateIEClickExample01.htm
This example creates an event object and then initializes it with some information. Note that property assignment is free-form, so you can assign any properties you’d like, including those not normally supported by Internet Explorer 8 and earlier. The property values are of no consequence to the event, because only event handlers use them.
The same algorithm can be used to fire a keypress event as well, as shown in this example:
var textbox = document.getElementById("myTextbox");

//create event object
var event = document.createEventObject();

//initialize the event object
event.altKey = false;
event.ctrlKey = false;
event.shiftKey = false;
event.keyCode = 65;

//fire the event
textbox.fireEvent("onkeypress", event);
SimulateIEKeyEventExample01.htm
Since there is no difference between event objects for mouse, keyboard, or other events, a generic event object can be used to fire any type of event. Note that, as with DOM keyboard event simulation, no characters will appear in a text box as the result of a simulated keypress event even though the event handler will fire.
Events are the primary way that JavaScript is tied to web pages. Most common events are defined in the DOM Level 3 Events specification or in HTML5. Even though there is a specification for basic events, many browsers have gone beyond the specification and implemented proprietary events to give developers greater insight into user interactions. Some proprietary events are directly related to specific devices, such as the mobile Safari orientationchange event that is specific to iOS devices.
There are some memory and performance considerations surrounding events. For example:
- It’s best to limit the number of event handlers on a page, since they can take up more memory and make the page feel less responsive to the user.
- Event delegation can be used to limit the number of event handlers by taking advantage of event bubbling.
- It’s a good idea to remove all event handlers that were added before the page is unloaded.
It’s possible to simulate events in the browser using JavaScript. The DOM Level 2 and 3 Events specifications provide for the simulation of all events, making it easy to simulate all defined events. It’s also possible to simulate keyboard events to a point by using a combination of other techniques. Internet Explorer 8 and earlier also support event simulation, albeit through a different interface.
Events are one of the most important topics in JavaScript, and a good understanding of how they work and their performance implications is critical.