
Chapter 21
Ajax and Comet
WHAT’S IN THIS CHAPTER?
- Using the XMLHttpRequest object
- Working with XMLHttpRequest events
- Cross-domain Ajax restrictions
In 2005, Jesse James Garrett penned an online article titled “Ajax: A New Approach to Web Applications” (www.adaptivepath.com/ideas/essays/archives/000385.php). This article outlined a technique that he referred to as Ajax, short for Asynchronous JavaScript+XML. The technique consisted of making server requests for additional data without unloading the web page, resulting in a better user experience. Garrett explained how this technique could be used to change the traditional click-and-wait paradigm that the Web had been stuck in since its inception.
The key technology pushing Ajax forward was the XMLHttpRequest (XHR) object, first invented by Microsoft and then duplicated by other browser vendors. Prior to the introduction of XHR, Ajax-style communication had to be accomplished through a number of hacks, mostly using hidden frames or iframes. XHR introduced a streamlined interface for making server requests and evaluating the responses. This allowed for asynchronous retrieval of additional information from the server, meaning that a user click didn’t have to refresh the page to retrieve more data. Instead, an XHR object could be used to retrieve the data and then the data could be inserted into the page using the DOM. And despite the mention of XML in the name, Ajax communication is format-agnostic; the technique is about retrieving data from the server without refreshing a page, not necessarily about XML.
The technique that Garrett referred to as Ajax had, in fact, been around for some time. Typically called remote scripting prior to Garrett’s article, such browser-server communication has been possible since 1998 using different techniques. Early on, server requests could be made from JavaScript through an intermediary, such as a Java applet or Flash movie. The XHR object brought native browser communication capabilities to developers, reducing the amount of work necessary to achieve the result.
Renamed as Ajax, the popularity of browser-server communication exploded in late 2005 and early 2006. A renewed interest in JavaScript and the Web in general brought new techniques and patterns for using these capabilities. Therefore, the XHR object is now a necessary tool in every web developer’s tool kit.
Internet Explorer 5 was the first browser to introduce the XHR object. It did so through the use of an ActiveX object included as part of the MSXML library. As such, three versions of the XHR object may be used in the browser: MSXML2.XMLHttp, MSXML2.XMLHttp.3.0, and MXSML2.XMLHttp.6.0. Using an XHR object with the MSXML library requires a function similar to the one used for creating XML documents in Chapter 18, as shown in the following example:
//function for IE versions prior to 7
function createXHR(){
    if (typeof arguments.callee.activeXString != "string"){
        var versions = ["MSXML2.XMLHttp.6.0", "MSXML2.XMLHttp.3.0",
                        "MSXML2.XMLHttp"],
            i, len;

        for (i=0,len=versions.length; i < len; i++){
            try {
                new ActiveXObject(versions[i]);
                arguments.callee.activeXString = versions[i];
                break;
            } catch (ex){
                //skip
            }
        }
    }

    return new ActiveXObject(arguments.callee.activeXString);
}
This function tries to create the most recent version of the XHR object that is available on Internet Explorer.
Internet Explorer 7+, Firefox, Opera, Chrome, and Safari all support a native XHR object that can be created using the XMLHttpRequest constructor as follows:
var xhr = new XMLHttpRequest();
If you need only support Internet Explorer versions 7 and later, then you can forego the previous function in favor of using the native XHR implementation. If, on the other hand, you must extend support to earlier versions of Internet Explorer, the createXHR() function can be augmented to check for the native XHR object, as shown here:
function createXHR(){
    if (typeof XMLHttpRequest != "undefined"){
        return new XMLHttpRequest();
    } else if (typeof ActiveXObject != "undefined"){
        if (typeof arguments.callee.activeXString != "string"){
            var versions = ["MSXML2.XMLHttp.6.0", "MSXML2.XMLHttp.3.0",
                            "MSXML2.XMLHttp"],
                i, len;

            for (i=0,len=versions.length; i < len; i++){
                try {
                    new ActiveXObject(versions[i]);
                    arguments.callee.activeXString = versions[i];
                    break;
                } catch (ex){
                    //skip
                }
            }
        }

        return new ActiveXObject(arguments.callee.activeXString);
    } else {
        throw new Error("No XHR object available.");
    }
}
XHRExample01.htm
The new code in this function first checks for the native XHR object and, if found, returns a new instance. If the native object isn’t found, then it checks for ActiveX support. An error is thrown if neither option is available. You can then create an XHR object using the following code in all browsers:
var xhr = createXHR();
Since the XHR implementation in each browser is compatible with the original Internet Explorer version, you can use the created xhr object the same way in all browsers.
XHR Usage
To begin using an XHR object, you will first call the method open(), which accepts three arguments: the type of request to be sent ("get", "post", and so on), the URL for the request, and a Boolean value indicating if the request should be sent asynchronously. Here’s an example:
xhr.open("get", "example.php", false);
This line opens a synchronous GET request for example.php. There are a couple of things to note about this code. First, the URL is relative to the page on which the code is called, although an absolute path can be given as well. Second, the call to open() does not actually send the request; it simply prepares a request to be sent.
You can access only URLs that exist on the same origin, which means the same domain, using the same port, and with the same protocol. If the URL specifies any of these differently than the page making the request, a security error is thrown.
To send the specified request, you must call the send() method as follows:
xhr.open("get", "example.txt", false);
xhr.send(null);
XHRExample01.htm
The send() method accepts a single argument, which is data to be sent as the body of the request. If no body data needs to be sent, you must pass in null, because this argument is required for some browsers. Once send() is called, the request is dispatched to the server.
Since this request is synchronous, the JavaScript code will wait for the response to return before continuing execution. When a response is received, the XHR object properties are filled with data. The relevant properties are as follows:
- responseText — The text that was returned as the body of the response.
- responseXML — Contains an XML DOM document with the response data if the response has a content type of "text/xml" or "application/xml".
- status — The HTTP status of the response.
- statusText — The description of the HTTP status.
When a response is received, the first step is to check the status property to ensure that the response was returned successfully. Generally, HTTP status codes in the 200s are considered successful and some content will be available in responseText and possibly in responseXML if the content type is correct. In addition, the status code of 304 indicates that a resource hasn’t been modified and is being served from the browser’s cache, which also means a response is available. To ensure that a proper response was received, you should check for all of these statuses, as shown here:
xhr.open("get", "example.txt", false);
xhr.send(null);

if ((xhr.status >= 200 && xhr.status < 300) || xhr.status == 304){
    alert(xhr.responseText);
} else {
    alert("Request was unsuccessful: " + xhr.status);
}
XHRExample01.htm
This code displays either the content returned from the server or an error message, depending on the status code that was returned. It’s recommended to always check the status property to determine the best course of action and to avoid using statusText for this purpose, because the latter has proven to be unreliable across browsers. The responseText property is always filled with the body of the response, regardless of the content type, whereas responseXML will be null for non-XML data.
Several browsers incorrectly report a 204 status code. ActiveX versions of XHR in Internet Explorer set status to 1223 when a 204 is retrieved, and native XHR objects in Internet Explorer normalize 204 to 200. Opera reports a status of 0 when a 204 is retrieved.
Although it’s possible to make synchronous requests such as this one, most of the time it’s better to make asynchronous requests that allow JavaScript code execution to continue without waiting for the response. The XHR object has a readyState property that indicates what phase of the request/response cycle is currently active. The possible values are as follows:
- 0 — Uninitialized. The open() method hasn’t been called yet.
- 1 — Open. The open() method has been called but send() has not been called.
- 2 — Sent. The send() method has been called but no response has been received.
- 3 — Receiving. Some response data has been retrieved.
- 4 — Complete. All of the response data has been retrieved and is available.
Whenever the readyState changes from one value to another, the readystatechange event is fired. You can use this opportunity to check the value of readyState. Generally speaking, the only readyState of interest is 4, which indicates that all of the data is ready. The onreadystatechange event handler should be assigned prior to calling open() for cross-browser compatibility. Consider the following example:
var xhr = createXHR();
xhr.onreadystatechange = function(){
    if (xhr.readyState == 4){
        if ((xhr.status >= 200 && xhr.status < 300) || xhr.status == 304){
            alert(xhr.responseText);
        } else {
            alert("Request was unsuccessful: " + xhr.status);
        }
    }
};
xhr.open("get", "example.txt", true);
xhr.send(null);
XHRAsyncExample01.htm
Note that this code uses the DOM Level 0 style of attaching an event handler to the XHR object, because not all browsers support the DOM Level 2 style of event attachment. Unlike other event handlers, no event object is passed into the onreadystatechange event handler. Instead you must use the XHR object itself to determine what to do next.
This example uses the xhr object inside the onreadystatechange event handler instead of the this object because of scoping issues with the onreadystatechange event handler. Using this may cause the function to fail or cause an error, depending on the browser being used, so it’s safer to use the actual XHR object-instance variable.
You can cancel an asynchronous request before a response is received by calling the abort() method like this:
xhr.abort();
Calling this method makes the XHR object stop firing events and prevents access to any of the response-related properties on the object. Once a request has been aborted, the XHR object should be dereferenced. Because of memory issues, it’s not recommended to reuse an XHR object.
HTTP Headers
Every HTTP request and response sends along with it a group of header information that may or may not be of interest to the developer. The XHR object exposes both types of headers — those on the request and those on the response — through several methods.
By default, the following headers are sent when an XHR request is sent:
- Accept — The content types that the browser can handle.
- Accept-Charset — The character sets that the browser can display.
- Accept-Encoding — The compression encodings handled by the browser.
- Accept-Language — The languages the browser is running in.
- Connection — The type of connection the browser is making with the server.
- Cookie — Any cookies set on the page.
- Host — The domain of the page making the request.
- Referer — The URI of the page making the request. Note that this header is spelled incorrectly in the HTTP specification and so must be spelled incorrectly for compatibility purposes. (The correct spelling of this word is “referrer”.)
- User-Agent — The browser’s user-agent string.
Although the exact request headers sent vary from browser to browser, these are the ones that are generally sent. You can set additional request headers by using the setRequestHeader() method. This method accepts two arguments: the name of the header and the value of the header. For request headers to be sent, setRequestHeader() must be called after open() but before send(), as in the following example:
var xhr = createXHR();
xhr.onreadystatechange = function(){
    if (xhr.readyState == 4){
        if ((xhr.status >= 200 && xhr.status < 300) || xhr.status == 304){
            alert(xhr.responseText);
        } else {
            alert("Request was unsuccessful: " + xhr.status);
        }
    }
};
xhr.open("get", "example.php", true);
xhr.setRequestHeader("MyHeader", "MyValue");
xhr.send(null);
XHRRequestHeadersExample01.htm
The server can read these custom request headers to determine an appropriate course of action. It’s advisable to always use custom header names rather than those the browser normally sends, because using the default ones may affect the server response. Some browsers will allow overwriting default headers, but others will not.
You can retrieve the response headers from an XHR object by using the getResponseHeader() method and passing in the name of the header to retrieve. It’s also possible to retrieve all headers as a long string by using the getAllResponseHeaders() method. Here’s an example of both methods:
var myHeader = xhr.getResponseHeader("MyHeader");
var allHeaders  xhr.getAllResponseHeaders();
Headers can be used to pass additional, structured data from the server to the browser. The getAllResponseHeaders() method typically returns something along the lines of the following:
Date: Sun, 14 Nov 2004 18:04:03 GMT
Server: Apache/1.3.29 (Unix)
Vary: Accept
X-Powered-By: PHP/4.3.8
Connection: close
Content-Type: text/html; charset=iso-8859-1
This output allows you to parse the response headers to find all of the header names that were sent rather than check for the existence of each one individually.
GET Requests
The most common type of request to execute is a GET, which is typically made when the server is being queried for some sort of information. If necessary, query-string arguments can be appended to the end of the URL to pass information to the server. For XHR, this query string must be present and encoded correctly on the URL that is passed into the open() method.
One of the most frequent errors made with GET requests is to have an improperly formatted query string. Each query-string name and value must be encoded using encodeURIComponent() before being attached to the URL, and all of the name-value pairs must be separated by an ampersand, as in this example:
xhr.open("get", "example.php?name1=value1&name2=value2", true);
The following function helps to add query-string arguments to the end of an existing URL:
function addURLParam(url, name, value) {
    url += (url.indexOf("?") == -1 ? "?" : "&");
    url += encodeURIComponent(name) + "=" + encodeURIComponent(value);
    return url;
}
The addURLParam() function takes three arguments: the URL to add the parameters to, the parameter name, and the parameter value. First, the function checks to see if the URL already contains a question mark (to determine if other parameters already exist). If it doesn’t, then the function appends a question mark; otherwise it adds an ampersand. Next the name and value are encoded and appended to the end of the URL. The last step is to return the updated URL.
This function can be used to build up a URL for a request, as shown in the following example:
var url = "example.php";

//add the arguments
url = addURLParam(url, "name", "Nicholas");
url = addURLParam(url, "book", "Professional JavaScript");

//initiate request
xhr.open("get", url, false);
Using the addURLParam() function here ensures that the query string is properly formed for use with the XHR object.
POST Requests
The second most frequent type of request is POST, which is typically used to send data to the server that should save data. Each POST request is expected to have data submitted as the body of the request, whereas GET requests traditionally do not. The body of a POST request can contain a very large amount of data, and that data can be in any format. You can initiate a POST request by specifying post as the first argument to the open() method. For example:
xhr.open("post", "example.php", true);
The second part is to pass some data to the send() method. Since XHR was originally designed to work primarily with XML, you can pass in an XML DOM document that will be serialized and submitted as the request body. You can also pass in any string to send to the server.
By default, a POST request does not appear the same to the server as a web-form submission. Server logic will need to read the raw post data to retrieve your data. You can, however, mimic a form submission using XHR. The first step is to set the Content-Type header to application/x-www-form-urlencoded, which is the content type set when a form is submitted. The second step is to create a string in the appropriate format. As discussed in Chapter 14, post data is sent in the same format as a query string. If a form already on the page should be serialized and sent to the server via XHR, you can use the serialize() function from Chapter 14 to create the string, as shown here:
function submitData(){
    var xhr = createXHR();
    xhr.onreadystatechange = function(){
        if (xhr.readyState == 4){
            if ((xhr.status >= 200 && xhr.status < 300) || xhr.status == 304){
                alert(xhr.responseText);
            } else {
                alert("Request was unsuccessful: " + xhr.status);
            }
        }
    };

    xhr.open("post", "postexample.php", true);
    xhr.setRequestHeader("Content-Type", "application/x-www-form-urlencoded");
    var form = document.getElementById("user-info");
    xhr.send(serialize(form));
}
XHRPostExample01.htm
In this function, form data from a form with the ID "user-info" is serialized and sent to the server. The PHP file postexample.php can then retrieve the posted data via $_POST. Consider this example:
<?php
    header("Content-Type: text/plain");
    echo <<<EOF
Name: {$_POST['user-name']}
Email: {$_POST['user-email']}
EOF;
?>
postexample.php
Without including the Content-Type header, the data will not appear in the $_POST superglobal — you’d need to use $HTTP_RAW_POST_DATA to access it.
POST requests have more overhead associated with them than do GET requests. In terms of performance, GET requests can be up to two times faster than POST requests sending the same amount of data.
The popularity of the XHR object as a de facto standard led to the creation of official specifications from the W3C to govern its behavior. XMLHttpRequest Level 1 simply defined the already existing implementation details of the XHR object. XMLHttpRequest Level 2 went on to evolve the XHR object further. Not all browsers have implemented all parts of the Level 2 specification, but all browsers have implemented some of the functionality.
The FormData Type
The serialization of form data is frequently needed in modern web applications, and so the XMLHttpRequest Level 2 specification introduces the FormData type. The FormData type makes it easy to both serialize existing forms and create data in the same format as a form for easy transmission via XHR. The following creates a FormData object and populates it with some data:
var data = new FormData();
data.append("name", "Nicholas");
The append() method accepts two arguments, a key and a value, essentially the name of a form field and the value that the field contains. You can add as many of these pairs as you would like. It’s also possible to prepopulate the key-value pairs with data that exists in a form element by passing in the form element to the FormData constructor:
var data = new FormData(document.forms[0]);
Once you have an instance of FormData, it can be passed directly into the XHR send() method, as in this example:
var xhr = createXHR();
xhr.onreadystatechange = function(){
    if (xhr.readyState == 4){
        if ((xhr.status >= 200 && xhr.status < 300) || xhr.status == 304){
            alert(xhr.responseText);
        } else {
            alert("Request was unsuccessful: " + xhr.status);
        }
    }
};

xhr.open("post", "postexample.php", true);
var form = document.getElementById("user-info");
xhr.send(new FormData(form));
XHRFormDataExample01.htm
One of the conveniences of the FormData type is that you don’t need to explicitly set any request headers on the XHR object. The XHR object recognizes the passed-in data type as an instance of FormData and configures the headers appropriately.
The FormData type is supported in Firefox 4+, Safari 5+, Chrome, and WebKit for Android 3+.
Timeouts
In Internet Explorer 8, the XHR object was augmented to include a timeout property that indicates the number of milliseconds the request should wait for a response before aborting. When the timeout property is set to a number and the response is not received within that number of milliseconds, a timeout event is fired and the ontimeout event handler is called. This functionality was later added into the XMLHttpRequest Level 2 specification. Here’s an example:
var xhr = createXHR();
xhr.onreadystatechange = function(){
    if (xhr.readyState == 4){
        try {
            if ((xhr.status >= 200 && xhr.status < 300) || xhr.status == 304){
                alert(xhr.responseText);
            } else {
                alert("Request was unsuccessful: " + xhr.status);
            }
        } catch (ex){
            //assume handled by ontimeout
        }
    }
};


xhr.open("get", "timeout.php", true);
xhr.timeout = 1000;  //set timeout for 1 second (IE 8+ only)
xhr.ontimeout = function(){
    alert("Request did not return in a second.");
};
xhr.send(null);
XHRTimeoutExample01.htm
This example illustrates the use of the timeout property. Setting it equal to 1000 milliseconds means that if the request doesn’t return in 1 second or less, the request is aborted. When that happens, the ontimeout event handler is called. The readyState is still changed to 4, which means the onreadystatechange event handler is called. However, an error occurs if you try to access the status property after a timeout has occurred. To protect against this, encapsulate the code that checks the status property in a try-catch statement.
Internet Explorer 8+ is still, as of the time of this writing, the only browser to support timeouts.
The overrideMimeType() Method
Firefox first introduced overrideMimeType() as a way to override the MIME type of an XHR response. This was later added to XMLHttpRequest Level 2. Since the returned MIME type for a response determines how the response is handled by the XHR object, having a way to override the type returned by the server is a useful addition.
Consider the case where the server sends a MIME type of text/plain that actually contains XML. This would result in the responseXML property being null even though the data is actually XML. By calling overrideMimeType(), you can ensure the response is treated as XML instead of plain text:
var xhr = createXHR();
xhr.open("get", "text.php", true);
xhr.overrideMimeType("text/xml");
xhr.send(null);
This example forces the XHR object to treat the response as XML instead of plain text. The call to overrideMimeType() must happen before the call to send() in order to correctly override the response MIME type.
The overrideMimeType() method is supported in Firefox, Safari 4+, Opera 10.5+, and Chrome.
The Progress Events specification is a W3C Working Draft defining events for client-server communication. These events were first targeted at XHR explicitly but have now also made their way into other similar APIs. There are six progress events:
- loadstart — Fires when the first byte of the response has been received.
- progress — Fires repeatedly as a response is being received.
- error — Fires when there was an error attempting the request.
- abort — Fires when the connection was terminated by calling abort().
- load — Fires when the response has been fully received.
- loadend — Fires when the communication is complete and after firing error, abort, or load.
Each request begins with the loadstart event being fired; followed by one or more progress events; then one of error, abort, or load; finally ending with loadend.
The first five events are supported in Firefox 3.5+, Safari 4+, Chrome, Safari for iOS, and WebKit for Android. Opera, as of version 11, and Internet Explorer 8+ support only the load. No browsers currently support the loadend event.
Most of these events are straightforward, but there are two that have some subtleties to be aware of.
The load Event
When Firefox first implemented a version of the XHR object, it sought to simplify the interaction model. To that end, the load event was introduced as a replacement for the readystatechange event. The load event fires as soon as the response has been completely received, eliminating the need to check the readyState property. The onload event handler receives an event object whose target property is set to the XHR object instance, and all of the XHR object properties and methods are available from within. However, not all browsers properly implement the event object for this event, necessitating the use of the XHR object variable itself, as shown in the following example:
var xhr = createXHR();
xhr.onload = function(){
    if ((xhr.status >= 200 && xhr.status < 300) || xhr.status == 304){
        alert(xhr.responseText);
    } else {
        alert("Request was unsuccessful: " + xhr.status);
    }
};
xhr.open("get", "altevents.php", true);
xhr.send(null);
XHRProgressEventExample01.htm
As long as a response is received from the server, regardless of the status, the load event will fire. This means you must check the status property to determine if the appropriate data is available. The load event is supported by Firefox, Opera, Chrome, and Safari.
The progress Event
Another XHR innovation from Mozilla is the progress event, which fires periodically as the browser receives new data. The onprogress event listener receives an event object whose target is the XHR object and contains three additional properties: lengthComputable, a Boolean indicating if progress information is available; position, which is the number of bytes that have already been received; and totalSize, which is the total number of expected bytes as defined by the Content-Length response header. With that information, you can provide a progress indicator to the user. The following code includes an example of how this is done:
var xhr = createXHR();
xhr.onload = function(event){
    if ((xhr.status >= 200 && xhr.status < 300) ||
            xhr.status == 304){
        alert(xhr.responseText);
    } else {
        alert("Request was unsuccessful: " + xhr.status);
    }
};
xhr.onprogress = function(event){
    var divStatus = document.getElementById("status");
    if (event.lengthComputable){
        divStatus.innerHTML = "Received " + event.position + " of " +
            event.totalSize +
" bytes";
    }
};

xhr.open("get", "altevents.php", true);
xhr.send(null);
XHRProgressEventExample01.htm
For proper execution, the onprogress event handler must be attached prior to calling open(). In the preceding example, an HTML element is filled with status information every time the progress event is fired. Assuming that the response has a Content-Length header, you can also use this information to calculate the percentage of the response that has already been received.
One of the major limitations of Ajax communication via XHR is the cross-origin security policy. By default, XHR objects can access resources only on the domain from which the containing web page originates. This security feature prevents some malicious behavior. However, the need for legitimate cross-origin access was great enough for solutions to begin appearing in browsers.
Cross-Origin Resource Sharing (CORS) is a W3C Working Draft that defines how the browser and server must communicate when accessing sources across origins. The basic idea behind CORS is to use custom HTTP headers to allow both the browser and the server to know enough about each other to determine if the request or response should succeed or fail.
For a simple request, one that uses either GET or POST with no custom headers and whose body is text/plain, the request is sent with an extra header called Origin. The Origin header contains the origin (protocol, domain name, and port) of the requesting page so that the server can easily determine whether or not it should serve a response. An example Origin header might look like this:
Origin: http://www.nczonline.net
If the server decides that the request should be allowed, it sends an Access-Control-Allow-Origin header echoing back the same origin that was sent or "*" if it’s a public resource. For example:
Access-Control-Allow-Origin: http://www.nczonline.net
If this header is missing, or the origins don’t match, then the browser disallows the request. If all is well, then the browser processes the request. Note that neither the requests nor the responses include cookie information.
CORS in Internet Explorer
Microsoft introduced the XDomainRequest (XDR) type in Internet Explorer 8. This object works in a manner similar to XHR but in a way that is safe and secure for cross-domain communication. The XDR object implements part of the CORS specification. Here are some of the ways that XDR differs from XHR:
- Cookies are neither sent with requests nor received with responses.
- There is no access to set request headers other than Content-Type.
- There is no access to response headers.
- Only GET and POST requests are supported.
These changes mitigate issues related to cross-site request forgery (CSRF) and cross-site scripting (XSS) attacks. The resource being requested can dynamically decide whether to set the Access-Control-Allow-Origin header based on any data it deems appropriate: user-agent, referrer, and so on. As part of the request, an Origin header is sent with a value indicating the origin domain of the request, allowing the remote resource to recognize an XDR request explicitly.
XDR object usage looks very similar to XHR object use. You create a new instance of XDomainRequest, call the open() method, and then call the send() method. Unlike the open() method on XHR objects, the one on XDR objects accepts only two arguments: the request type and the URL.
All XDR requests are executed asynchronously, and there is no way to create a synchronous request. When a request has returned, a load event fires and the responseText property is filled with the response, as follows:
var xdr = new XDomainRequest();
xdr.onload = function(){
    alert(xdr.responseText);
};
xdr.open("get", "http://www.somewhere-else.com/page/");
xdr.send(null);
XDomainRequestExample01.htm
When the response is received, you have access to only the raw text of the response; there is no way to determine the status code of the response. The load event is fired for all valid responses and an error event is fired for all failures, including the lack of an Access-Control-Allow-Origin header on the response. Unfortunately, you receive no additional information about the error that occurred, so just knowing that the request was unsuccessful must be enough. To detect an error, assign an onerror event handler, as shown in this example:
var xdr = new XDomainRequest();
xdr.onload = function(){
    alert(xdr.responseText);
};
xdr.onerror = function(){
    alert("An error occurred.");
};
xdr.open("get", "http://www.somewhere-else.com/page/");
xdr.send(null);
XDomainRequestExample01.htm
Because there are so many ways an XDR request can fail, you should always use an onerror event handler to capture the occurrence; otherwise it will fail silently.
You can stop a request before it returns by calling abort() as follows:
xdr.abort(); //stop the request
Also similar to XHR, the XDR object supports the timeout property and the ontimeout event handler. Here’s an example:
var xdr = new XDomainRequest();
xdr.onload = function(){
    alert(xdr.responseText);
};
xdr.onerror = function(){
    alert("An error occurred.");
};
xdr.timeout = 1000;
xdr.ontimeout = function(){
    alert("Request took too long.");
};
xdr.open("get", "http://www.somewhere-else.com/page/");
xdr.send(null);
This example times out after one second, at which point the ontimeout event handler is called.
To allow for POST requests, the XDR object exposes a contentType property that can be used to indicate the format of the posted data, as shown in this example:
var xdr = new XDomainRequest();
xdr.onload = function(){
    alert(xdr.responseText);
};
xdr.onerror = function(){
    alert("An error occurred.");
};
xdr.open("post", "http://www.somewhere-else.com/page/");
xdr.contentType = "application/x-www-form-urlencoded";
xdr.send("name1=value1&name2=value2");
This property is the only access to header information through the XDR object.
CORS in Other Browsers
Firefox 3.5+, Safari 4+, Chrome, Safari for iOS, and WebKit for Android all support CORS natively through the XMLHttpRequest object. When attempting to open a resource on a different origin, this behavior automatically gets triggered without any extra code. To make a request to a resource on another domain, the standard XHR object is used with an absolute URL specified in open(), such as this:
var xhr = createXHR();
xhr.onreadystatechange = function(){
    if (xhr.readyState == 4){
        if ((xhr.status >= 200 && xhr.status < 300) || xhr.status == 304){
            alert(xhr.responseText);
        } else {
            alert("Request was unsuccessful: " + xhr.status);
        }
    }
};
xhr.open("get", "http://www.somewhere-else.com/page/", true);
xhr.send(null);
Unlike the XDR object in Internet Explorer, the cross-domain XHR object allows access to the status and statusText properties and allows synchronous requests. There are some additional limitations on a cross-domain XHR object that are necessary for security purposes. They are as follows:
- Custom headers cannot be set using setRequestHeader().
- Cookies are neither sent nor received.
- The getAllResponseHeaders() method always returns an empty string.
Since the same interface is used for both same- and cross-domain requests, it’s best to always use a relative URL when accessing a local resource, and an absolute URL when accessing a remote resource. This disambiguates the use case and can prevent problems such as limiting access to header and/or cookie information for local resources.
Preflighted Requests
CORS allows the use of custom headers, methods other than GET or POST, and different body content types through a transparent mechanism of server verification called preflighted requests. When you try to make a request with one of the advanced options, a “preflight” request is made to the server. This request uses the OPTIONS method and sends the following headers:
- Origin — Same as in simple requests.
- Access-Control-Request-Method — The method that the request wants to use.
- Access-Control-Request-Headers — (Optional) A comma-separated list of the custom headers being used.
Here’s an example assuming a POST request with a custom header called NCZ:
Origin: http://www.nczonline.net
Access-Control-Request-Method: POST
Access-Control-Request-Headers: NCZ
During this request, the server can determine whether or not it will allow requests of this type. The server communicates this to the browser by sending the following headers in the response:
- Access-Control-Allow-Origin — Same as in simple requests.
- Access-Control-Allow-Methods — A comma-separated list of allowed methods.
- Access-Control-Allow-Headers — A comma-separated list of headers that the server will allow.
- Access-Control-Max-Age — The amount of time in seconds that this preflight request should be cached for.
For example:
Access-Control-Allow-Origin: http://www.nczonline.net
Access-Control-Allow-Methods: POST, GET
Access-Control-Allow-Headers: NCZ
Access-Control-Max-Age: 1728000
Once a preflight request has been made, the result is cached for the period of time specified in the response; you’ll only incur the cost of an extra HTTP request the first time a request of this type is made.
Firefox 3.5+, Safari 4+, and Chrome all support preflighted requests; Internet Explorer through version 10 does not.
Credentialed Requests
By default, cross-origin requests do not provide credentials (cookies, HTTP authentication, and client-side SSL certificates). You can specify that a request should send credentials by setting the withCredentials property to true. If the server allows credentialed requests, then it responds with the following HTTP header:
Access-Control-Allow-Credentials: true
If a credentialed request is sent and this header is not sent as part of the response, then the browser doesn’t pass the response to JavaScript (responseText is an empty string, status is 0, and onerror() is invoked). Note that the server can also send this HTTP header as part of the preflight response to indicate that the origin is allowed to send credentialed requests.
Firefox 3.5+, Safari 4+, and Chrome all support the withCredentials property. Internet Explorer through version 10 still does not.
Cross-Browser CORS
Even though all browsers don’t natively support the same level of CORS, all supporting browsers do support simple (nonpreflighted, noncredentialed) requests, so it makes sense to have a cross-browser solution. The easiest way to determine if the XHR object supports CORS is to check for the existence of the withCredentials property. You can then couple with the existence of the XDomainRequest object to cover all browsers:
function createCORSRequest(method, url){
    var xhr = new XMLHttpRequest();
    if ("withCredentials" in xhr){
        xhr.open(method, url, true);
    } else if (typeof XDomainRequest != "undefined"){
        xhr = new XDomainRequest();
        xhr.open(method, url);
    } else {
        xhr = null;
    }
    return xhr;
}

var request = createCORSRequest("get", "http://www.somewhere-else.com/page/");
if (request){
    request.onload = function(){
        //do something with request.responseText
    };
    request.send();
}
CrossBrowserCORSRequestExample01.htm
The XMLHttpRequest object in Firefox, Safari, and Chrome has similar enough interfaces to the Internet Explorer XDomainRequest object that this pattern works fairly well. The common interface properties/methods are:
- abort() — Use to stop a request that’s already in progress.
- onerror — Use instead of onreadystatechange to detect errors.
- onload — Use instead of onreadystatechange to detect successes.
- responseText — Use to get contents of response.
- send() — Use to send the request.
Each of these can be used on the object returned from createCORSRequest() and will work the same in each browser.
ALTERNATE CROSS-DOMAIN TECHNIQUES
Before CORS came about, achieving cross-domain Ajax communication was a bit trickier. Developers came to rely on parts of the DOM that could perform cross-domain requests as a simple way to make certain types of requests without using the XHR object. Despite the ubiquity of CORS, these techniques are still popular because they don’t involve changes on the server.
Image Pings
One of the first techniques for cross-domain communication was through the use of the <img> tag. Images can be loaded cross-domain by any page without worrying about restrictions. This is the main way that online advertisements track views. As discussed in Chapter 13, you can also dynamically create images and use their onload and onerror event handlers to tell you when the response has been received.
Dynamically creating images is often used for image pings. Image pings are simple, cross-domain, one-way communication with the server. The data is sent via query-string arguments and the response can be anything, though typically it’s a pixel image or a 204 response. The browser can’t get any specific data back from an image ping but it can tell when the response has been received by listening for the load and error events. Here’s a simple example:
var img = new Image();
img.onload = img.onerror = function(){
    alert("Done!");
};
img.src = "http://www.example.com/test?name=Nicholas";
ImagePingExample01.htm
This example creates a new instance of Image and then assigns both the onload and the onerror event handlers to the same function. This ensures that regardless of the response, you’ll be notified when the request has completed. The request begins when the src property is set and this example is sending along a name parameter.
Image pings are frequently used for tracking user clicks on a page or dynamic ad impressions. The two main downsides to image pings are that you can only send GET requests and you cannot access the response text from the server. This is why image pings are best used for one-way communication between the browser and the server.
JSONP
JSONP is short for “JSON with padding” and is a special variant of JSON that has become popular for web services. JSONP looks just like JSON except that the data is wrapped within what looks like a function call. For example:
callback({ "name": "Nicholas" });
The JSONP format is made up of two parts: the callback and the data. The callback is the function that should be called on the page when the response has been received. Typically the name of the callback is specified as part of the request. The data is simply the JSON data to pass to the function. A typical JSONP request looks like this:
http://freegeoip.net/json/?callback=handleResponse
This URL is for a JSONP geolocation service. It’s quite common to have the callback parameter specified as query-string argument for JSONP services, and in this case, I’ve specified the callback function name to be handleResponse().
JSONP is used through dynamic <script> elements (see Chapter 13 for details), assigning the src to a cross-domain URL. The <script> element, similar to <img>, is capable of loading resources from other domains without restriction. Because JSONP is valid JavaScript, the JSONP response gets pulled into the page and executed immediately upon completion. Here’s an example:
function handleResponse(response){
    alert("You're at IP address " + response.ip + ", which is in " +
          response.city + ", " + response.region_name);
}

var script = document.createElement("script");
script.src = "http://freegeoip.net/json/?callback=handleResponse";
document.body.insertBefore(script, document.body.firstChild);
JSONPExample01.htm
This example displays your IP address and location information from the geolocation service.
JSONP is very popular for web developers because of its simplicity and ease of use. Its advantage over image pings is that you can access the response text directly, allowing bidirectional communication between browser and server. There are, however, a couple of downsides to using JSONP.
First, you’re pulling executable code into your page from another domain. If that domain isn’t trusted, it could very easily swap the response for something more malicious, and you would have no recourse aside from removing the JSONP call altogether. When using a web service that you don’t operate, make sure that it comes from a trusted source.
The second downside is that there is no easy way to determine that a JSONP request has failed. Although HTML5 has specified an onerror event handler for <script> elements, it hasn’t yet been implemented by any browser. Developers frequently used timers to see if a response has or has not been received within a set amount of time, but even this is tricky because not every user has the same connection speed and bandwidth.
Comet
Comet is a term coined by Alex Russell to describe a more advanced Ajax technique sometimes referred to as server push. Whereas Ajax is described as the page requesting data from the server, Comet is described as the server pushing data to the page. This approach allows information to come into the page in a manner closer to real time, making it ideal for information such as sports scores or stock market prices.
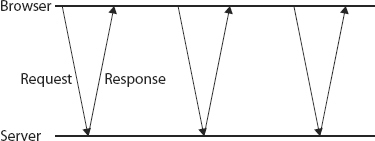
There are two popular approaches to Comet: long polling and streaming. Long polling is a new spin on traditional polling (also called short polling) where the browser sends a request to the server in regular intervals to see if there’s any data. Figure 21-1 shows a timeline of how short polling works.
Long polling flips short polling around. The page initiates a request to the server and the server holds that connection open until it has data to send. Once the data is sent, the connection is closed by the browser and a new connection is immediately opened up to the server. This process continues for as long as the page is open in the browser. Figure 21-2 shows a timeline of how long polling works.
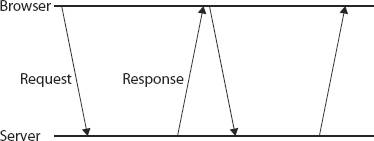
In both short polling and long polling, the browser needs to initiate the connection to the server before data can be received. The big difference is how the server handles sending data back. Short polling sends a response immediately regardless of the data availability, while long polling waits to send a response. The advantage of polling techniques is that all browsers support this through the XHR object and using setTimeout(). You just need to manage when the requests are sent.
The second popular approach for Comet is HTTP streaming. Streaming is different than either polling technique, because it uses a single HTTP connection for the entire lifetime of the page. The browser sends a request to the server and the server holds that connection open, periodically sending data through the connection to the server. For example, a PHP server might have a script that looks like this:
<?php
    $i = 0;
    while(true){

        //output some data and then flush the output buffer immediately
        echo "Number is $i";
        flush();

        //wait a few seconds
        sleep(10);

        $i++;
    }
All server-side languages support the notion of printing to the output buffer and then flushing (sending the contents of the output buffer to the client). This is the core of HTTP streaming.
The XHR object can be used to achieve HTTP streaming in Firefox, Safari, Opera, and Chrome by listening for the readystatechange event and focusing on readyState 3. A readyState of 3 will fire periodically in all of these browsers as data is being received from the server. At that point, the responseText property contains all of the data received, which means you need to slice off the newest piece by keeping track of what was sent previously. An HTTP streaming implementation using XHR looks like this:
function createStreamingClient(url, progress, finished){

    var xhr = new XMLHttpRequest(),
        received = 0;

    xhr.open("get", url, true);
    xhr.onreadystatechange = function(){
        var result;

        if (xhr.readyState == 3){

            //get only the new data and adjust counter
            result = xhr.responseText.substring(received);
            received += result.length;

            //call the progress callback
            progress(result);

        } else if (xhr.readyState == 4){
            finished(xhr.responseText);
        }
    };
    xhr.send(null);
    return xhr;
}

var client = createStreamingClient("streaming.php", function(data){
                alert("Received: " + data);
             }, function(data){
                alert("Done!");
             });
HTTPStreamingExample01.htm
The createStreamingClient() function accepts three arguments: the URL to connect to, the function to call when more data has been received, and the function to call when the connection has closed. You may or may not want to restart a connection once it has been closed, so it’s good to keep track of that.
Whenever the readystatechange event is fired and the readyState is 3, the responseText is sliced to return only the most recent data. The received variable keeps track of how many characters have already been processed, incrementing each time readyState 3 is processed. Then, the progress callback function is executed and the new data is passed in. When the readyState is 4, the finished callback is executed and the entire content of the response is passed in.
Even though this example is relatively simple and works in most browsers (Internet Explorer being the exception), the management of connections for Comet patterns is easy to get wrong and requires time to perfect. The browser community believes that Comet is an important part of the Web’s future, and so two new interfaces were created to make Comet easier.
Server-Sent Events
Server-Sent Events (SSE) is an API and pattern for read-only Comet interactions. The SSE API creates a one-way HTTP connection to the server through which the server can pass as much or as little information as necessary. The server response must have a MIME type of text/event-stream and outputs the information in a specific format that the browser API consumes and makes available through JavaScript. SSE supports short polling, long polling, and HTTP streaming and, as such, automatically determines when to reconnect to the server if it gets disconnected. The result is an extremely simple and useful API that makes Comet easy.
Server-Sent Events are supported in Firefox 6+, Safari 5+, Opera 11+, Chrome, and Safari for iOS 4+.
The API
The JavaScript API for SSE is similar to other recent JavaScript messaging APIs. To subscribe to a new event stream, you start by creating a new EventSource object and pass in the entry point:
var source = new EventSource("myevents.php");
Note that the referenced URL must be on the same origin (scheme, domain, and port) as the page in which the object is created. The EventSource instance has a readyState property that is set to 0 to indicate it’s connecting to the server, 1 to indicate an open connection, and 2 to indicate a closed connection.
There are also three events:
- open, which is fired when the connection is established
- message, which is fired when a new event is received from the server
- error, which is fired when no connection can be made
In general usage, the onmessage event handler is likely the one you’ll use the most:
source.onmessage = function(event){
    var data = event.data;
    //do something with the data
};
Information sent back from the server is returned via event.data as a string.
By default, the EventSource object will attempt to keep the connection alive with the server. If the connection is closed, a reconnect is attempted. This means that Server-Sent Events work with long polling and HTTP streaming. You can force the object to disconnect immediately and stop attempting to reconnect by calling the close() method:
source.close();
The Event Stream
The server events are sent along a long-lasting HTTP response with a MIME type of text/event-stream. The format of the response is plain text and, in its simplest form, is made up of the prefix data: followed by text, such as:
data: foo

data: bar

data: foo
data: bar
The first part of this stream fires a message event with event.data set to “foo”; the second part fires a message event with event.data set to “bar”; the third fires a message event with event.data set to “foo bar” (note the newline character in between). When there are two or more consecutive lines beginning with data:, it is interpreted as a multiline piece of data and the values are concatenated together with a newline character. The message event is never fired until a blank line is encountered after a line containing data:, so be certain to include that extra newline when generating the event stream on the server.
You can also associate an ID with a particular event by including an id: line before or after the data: line(s):
data: foo
id: 1
By setting an ID, the EventSource object keeps track of the last event fired. If the connection is dropped, a special HTTP header called Last-Event-ID is sent along with the request so that the server can determine which event is appropriate to fire next. This is important for keeping sequential pieces of data in the correct order over multiple connections.
Web Sockets
Web Sockets is one of the most talked-about new browser APIs. The goal of Web Sockets is to provide full-duplex, bidirectional communication with the server over a single, long-lasting connection. When a Web Socket is created in JavaScript, an HTTP request is sent to the server to initiate a connection. When the server responds, the connection uses HTTP upgrade to switch from HTTP to the Web Socket protocol. This means that Web Sockets cannot be implemented with a standard HTTP server and must use a specialized server supporting the protocol to work properly.
Since Web Sockets uses a custom protocol, the URL scheme is slightly different. Instead of using the http:// or https:// schemes, there are ws:// for an unsecured connection and wss:// for a secured connection. When specifying a Web Socket URL, you must include the scheme since other schemes may be supported in the future.
The advantage of using a custom protocol over HTTP is that very small amounts of data, unencumbered by the byte overhead of HTTP, can be sent between the client and the server. Using smaller data packets makes Web Sockets ideal for mobile applications where bandwidth and latency are a problem. The disadvantage of using a custom protocol is that it has taken longer to define protocol than the JavaScript API. Web Sockets has been stalled repeatedly as people have found issues with the protocol, in terms of both consistency and security. Firefox 4 and Opera 11 both had Web Sockets enabled by default but disabled it just before release because of security concerns. Web Sockets are now supported in Firefox 6+, Safari 5+, Chrome, and Safari for iOS 4+.
The API
To create a new Web Socket, instantiate a WebSocket object and pass in the URL that will provide the connection:
var socket = new WebSocket("ws://www.example.com/server.php");
Note that you must pass in an absolute URL to the WebSocket constructor. The same-origin policy does not apply to Web Sockets, so you can open a connection to any site. It is completely up to the server whether or not it will communicate with a page from a particular origin. (It can determine from where the request originated using information in the handshake.)
The browser attempts to create the connection as soon as the WebSocket object is instantiated. Similar to XHR, WebSocket has a readyState property that indicates the current state. The values, however, are different from those for XHR and are as follows:
- WebSocket.OPENING (0) — The connection is being established.
- WebSocket.OPEN (1) — The connection has been established.
- WebSocket.CLOSING (2) — The connection is beginning to close.
- WebSocket.CLOSE (3) — The connection is closed.
There is no readystatechange event for WebSocket; however, there are other events that correspond to the various states. The readyState always starts at 0.
You can close a Web Socket connection at any time using the close() method:
socket.close();
Upon calling close(), the readyState immediately changes to 2 (closing) and will transition to 3 when complete.
Sending/Receiving Data
Once a Web Socket is open, you can both send data over and receive data from the connection. To send data to the server, use the send() method and pass in any string, for example:
var socket = new WebSocket("ws://www.example.com/server.php");
socket.send("Hello world!");
Since Web Sockets can only send plain text over the connection, you’ll need to serialize more complex data structures before sending them over the connection. The following serializes data into a JSON string and then sends the string to the server:
var message = {
    time: new Date(),
    text: "Hello world!",
    clientId: "asdfp8734rew"
};

socket.send(JSON.stringify(message));
The server would then need to parse the returned JSON to access the data.
When the server sends a message to the client, a message event is fired on the WebSocket object. The message event works similar to other messaging protocols, with the payload available through the event.data property:
socket.onmessage = function(event){
    var data = event.data;

    //do something with data
};
As with data that is sent to the server via send(), data returned in event.data is always a string. If you are expecting another data format, then you must manually parse the data.
Other Events
The WebSocket object has three more events that fire during the lifetime of the connection:
- open — Fires when the connection has been successfully made.
- error — Fires when an error occurs. The connection is unable to persist.
- close — Fires when the connection is closed.
The WebSocket object doesn’t support DOM Level 2 event listeners, so you need to use DOM Level 0 style event handlers for each:
var socket = new WebSocket("ws://www.example.com/server.php");

socket.onopen = function(){
    alert("Connection established.");
};

socket.onerror = function(){
    alert("Connection error.");
};

socket.onclose = function(){
    alert("Connection closed.");
};
Of these three events, only the close event has additional information on the event object. There are three additional properties on the event object: wasClean, a Boolean indicating if the connection was closed cleanly; code, a numeric status code sent from the server; and reason, a string containing a message sent from the server. You may want to use this information either to display to the user or to log for analytics:
socket.onclose = function(event){
    console.log("Was clean? " + event.wasClean + " Code=" + event.code + " Reason="
                + event.reason);
};
SSE versus Web Sockets
When determining whether to use SSE or Web Sockets for a particular use case, you can take several factors into account. First, do you have the flexibility to set up a Web Socket server? Since the Web Socket protocol is not HTTP, your existing web servers may not be capable of Web Socket communication. SSE works over normal HTTP, so you may be able to use your existing web servers to perform this type of communication.
The second question to ask is whether you need bidirectional communication. If the use case requires only read-only access to server data (such as sports scores), then SSE may be easier to implement. If the use case requires full bidirectional support (such as a chat room), then Web Sockets may be a better choice. Keep in mind that you can still implement bidirectional communication with a combination of XHR and SSE should Web Sockets not be an option for you.
There has been a lot published about Ajax and Comet security; in fact, there are entire books dedicated to the topic. Security considerations for large-scale Ajax applications are vast, but there are some basic things to understand about Ajax security in general.
First, any URL that can be accessed via XHR can also be accessed by a browser or a server. For example, consider the following URL:
/getuserinfo.php?id=23
If a request is made to this URL, it will presumably return some data about a user whose ID is 23. There is nothing to stop someone from changing the URL to a user ID of 24 or 56 or any other value. The getuserinfo.php file must know whether the requestor actually has access to the data that is being requested; otherwise you have left the server wide open to relay data about anyone.
When an unauthorized system is able to access a resource, it is considered a cross-site request forgery (CSRF) attack. The unauthorized system is making itself appear to be legitimate to the server handling the request. Ajax applications, large and small, have been affected by CSRF attacks ranging from benign proof-of-vulnerability attacks to malicious data-stealing or data-destroying attacks.
The prevailing theory of how to secure URLs accessed via XHR is to validate that the sender has access to the resource. This can be done in the following ways:
- Requiring SSL to access resources that can be requested via XHR.
- Requiring a computed token to be sent along with every request.
Please recognize that the following are ineffective against CSRF attacks:
- Requiring a POST instead of a GET — This is easily changed.
- Using the referrer as a determination of origin — Referrers are easily spoofed.
- Validating based on cookie information — Also easily spoofed.
The XHR object offers something that seems secure at first glance but ultimately is quite insecure. The open() method actually has two more arguments: a username and a password that should be sent along with the request. This can be used to send requests to pages via SSL on a server, as in this example:
xhr.open("get", "example.php", true, "username", "password"); //AVOID!!!!!
Even though this username/password feature is possible, you should avoid using this feature. Storing usernames and passwords in JavaScript is highly insecure, because anyone with a JavaScript debugger can view what is stored in the variables, exposing your username and password in plain text.
Ajax is a method for retrieving data from the server without refreshing the current page. Ajax has the following characteristics:
- The central object responsible for the growth of Ajax is the XMLHttpRequest (XHR) object.
- This object was created by Microsoft and first introduced in Internet Explorer 5 as a way to retrieve XML data from the server in JavaScript.
- Since that time, Firefox, Safari, Chrome, and Opera have all duplicated the implementation, and the W3C has written a specification defining the XHR behavior, making XHR a Web standard.
- Though there are some differences in implementations, the basic usage of the XHR object is relatively normalized across all browsers and can therefore safely be used in web applications.
One of the major constraints on XHR is the same-origin policy that limits communication to the same domain, using the same port, and with the same protocol. Any attempts to access resources outside of these restrictions cause a security error, unless an approved cross-domain solution is used. The solution is called Cross-Origin Resource Sharing (CORS) and is supported in Internet Explorer 8+ through the XDomainRequest object and other browsers natively through the XHR object. Image pings and JSONP are other techniques for cross-domain communication, though they are less robust than CORS.
Comet is an extension of Ajax where the server is able to push data to the client almost in real time. There are two primary approaches to Comet: long polling and HTTP streaming. All browsers support long polling, while only some natively support HTTP streaming. Server-Sent Events (SSE) is a browser API for Comet interactions that supports both long polling and HTTP streaming.
Web Sockets are a full-duplex, bidirectional communication channel with the server. Unlike other solutions, Web Sockets do not use HTTP but rather use a custom protocol designed to deliver small pieces of data quickly. This requires a different web server but gives a speed advantage.
The buzz around Ajax and Comet encouraged more developers to learn JavaScript and helped usher in a resurgence of interest in web development. Ajax-related concepts are still relatively new and will undoubtedly continue to evolve.
The topic of Ajax is substantial, and a full discussion is beyond the scope of this book. For further information on this topic, read Professional Ajax, 2nd Edition (Wiley, 2007; ISBN: 978-0-470-10949-6).