
Chapter 8
Storyboarding
What's in this chapter?
- Using the PowerPoint Storyboarding add-in to create storyboards
- Using layouts, custom shapes, and animations to create and maintain storyboards to capture requirements from your stakeholders
- Linking storyboards with Team Foundation Server work items
In Chapter 7 you discovered that, with Visual Studio 2012, Microsoft is extending its application lifecycle management tooling to better address the needs and feedback of project stakeholders throughout the lifecycle. In this chapter, you learn more about one of these new tools, PowerPoint Storyboarding, which adds a form of lightweight requirements elicitation to Microsoft's offerings. After reading this chapter you will have a better understanding of how to use these new tools to create user interface designs and workflows that you can socialize with your project stakeholders to collect feedback and signoff early in the process.
Why Storyboarding?
Chapter 7 explained that storyboarding is a technique that has its roots in the cartoon and film industry. Disney is credited with inventing and refining the technique in the early twentieth century for animation, and the technique quickly found its way into film and eventually software development. Figure 8.1 shows an example of a storyboard used for a film. A storyboard for a film is created and refined by a team of creative professionals, including writers, directors, and storyboard artists. During this process, storyboards typically undergo several iterative changes before filming begins. The finished storyboard then becomes a design artifact that helps to inform set designers, camera crews, actors, editors, and others who are responsible for ultimately converting the creative and artistic direction into a finished film.
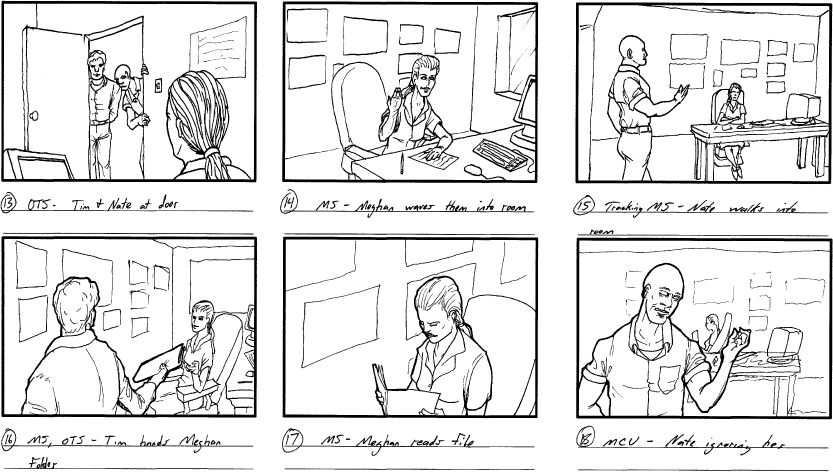
By Sam Garland, used with permission.
Creating a storyboard is similar to sketching an idea on a whiteboard or the back of a napkin, and these activities all share a collection of common benefits that make them popular:
- Storyboards are visual, and humans are visual creatures. The saying “a picture is worth a thousand words” is especially true when you consider the additional level of detail that can be quickly conveyed through a picture or a series of pictures that might otherwise be incredibly time consuming or error-prone to communicate over, say, a telephone discussion or e-mail exchange. In this way, you can say that a good storyboard is worth a thousand-page spec.
- Storyboards are cheap to create. “Pixel-perfect” precision is rarely expected during the storyboarding phase, and anybody with a pencil and paper can create a storyboard.
- Storyboards convey motion. By sequencing together multiple panels of a storyboard you can convey the flow expected as you move from one state to the next. In film, this can convey action or plot; in software, you might use this to represent a workflow, such as an accountant interacting with tax filing software to calculate an income tax return.
- More importantly, storyboards are quick and easy to iterate on. Chapter 7 covers the importance of being able to respond quickly to stakeholder feedback in order to best ensure that your team delivers great software. Unfortunately, software is relatively slow to change, and it only gets slower and more expensive to change the more complex it becomes. Consequently, any time you can spend up front proposing a storyboard design, listening to your stakeholders give you feedback, and reacting to that feedback before you start writing code is ultimately going to help you create better software with less time and effort.
It's clear that a storyboard can help immensely with the task of creating a great user interface for a software project. Just as a storyboard for a film can help inform the set designer and camera crew, a storyboard for a software project can help graphic designers and user interface programmers collaborate to turn ideas into reality. Software testers can use them to begin to author test cases to validate what a piece of software should (and shouldn't) do. Documentation teams can begin to outline their help topics. Even the marketing team can use storyboards to convey to a set of prospective customers what your software will do when finished, even before the team has written a single line of code.
Microsoft's new PowerPoint Storyboarding tool was built to make it easy for software development teams to quickly create and iterate on storyboard designs. Whiteboards and napkins may work well for simple designs that need to be collaborated on by team members who are all in the same location. But with project stakeholders often located around the world in different time zones, and software becoming increasingly more complicated with branching workflows, the art of storyboarding has needed to evolve beyond whiteboards and napkins.
There are other storyboarding tools on the market already, such as Balsamiq. Microsoft even has two other tools that many teams already use for storyboarding: Microsoft Visio and Microsoft Expression SketchFlow. So why do we need yet another storyboarding solution? As the name indicates, PowerPoint Storyboarding is based on Microsoft PowerPoint. In their research for Visual Studio 2012, Microsoft observed that an overwhelming number of software developers and the stakeholders they serve already own PowerPoint and know how to use it for creating at least basic presentations. As it turns out, many of the features needed to create storyboards are already included in PowerPoint (such as 2-D graphics, animations, layouts, linking, and collaboration features such as notes and review comments). Hence, Microsoft concluded that a storyboarding tool built on PowerPoint would be comfortable and familiar to the set of users who care most about storyboarding. In the rest of this chapter you learn how to use PowerPoint Storyboarding to create rich storyboards.
PowerPoint Storyboarding
To work with PowerPoint Storyboarding you need to first install Visual Studio Test Professional 2012, Visual Studio Premium 2012, or Visual Studio Ultimate 2012. PowerPoint Storyboarding is compatible with Microsoft PowerPoint 2007 and 2010 and is expected to remain compatible with future versions of PowerPoint as well. Screenshots and instructions in this chapter are based on PowerPoint 2010 but are similar in other versions.
Launch PowerPoint Storyboarding by clicking Start ⇒ All Programs ⇒ Visual Studio 2012 ⇒ PowerPoint Storyboarding. You can also launch PowerPoint from the Office menu or by opening an existing PowerPoint file. Because PowerPoint Storyboarding is just an add-in for PowerPoint, you can work with this functionality any time you are using PowerPoint.
The PowerPoint Storyboarding add-in introduces a new tab to your PowerPoint ribbon (see Figure 8.2). Several of the buttons exposed on this tab are existing capabilities you may already be familiar with in PowerPoint, such as the Align button that enables you to easily align shapes. These capabilities are generally useful when working with storyboards, and as such are surfaced on the Storyboarding ribbon tab for convenience. Some other capabilities, such as the Storyboard Shapes and Storyboard Links buttons, are new with the add-in and you learn about them in this chapter.
Storyboard Shapes
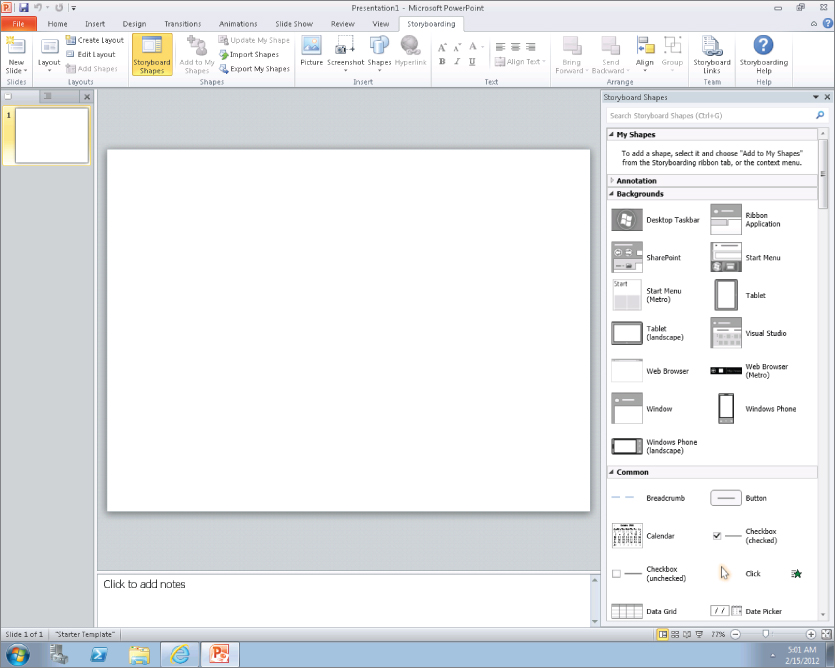
Much of the value in the PowerPoint Storyboarding add-in is found in the rich set of shapes available for easily modeling Windows applications, web applications, and even phone and tablet applications. The Storyboard Shapes pane pictured in Figure 8.3 shows just a few of these shapes. If Storyboard Shapes is not open, you can click the Storyboard Shapes button from the Storyboarding ribbon tab. Spend a few minutes exploring the shapes you can work with.
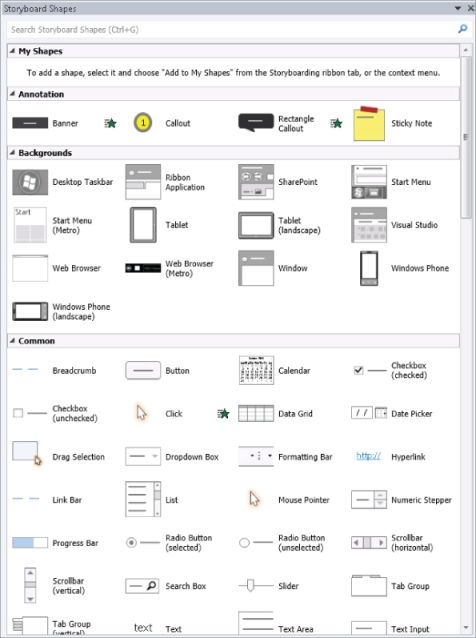
Notice that there are backgrounds that provide templates for representing the class of application you are developing, such as tablet, web, phone, traditional desktop apps, SharePoint applications, and so on. Annotations such as sticky notes and callouts give you the ability to convey additional meaning about a storyboard to stakeholders. The Storyboarding add-in also includes a large collection of icons and all of the standard controls you expect for applications, such as buttons, lists, dropdowns, dialogs, media controls, and so on.
Some shapes, such as the Click shape, are even animated by default, but you can add animations to any shape. The Search box can be helpful for quickly finding a shape you are looking for. Finally, the My Shapes category is a place for you to store your own custom shapes. You learn how to work with in the My Shapes section later in this chapter.
Spend some time familiarizing yourself with some shapes by dragging them from the Storyboard Shapes pane onto an empty PowerPoint slide. Notice that these shapes are not simply images; many are complex shapes consisting of several sub-elements. For example, try adding a Calendar control to your storyboard. You can click the individual elements to customize the month, day, and selected date. Most of the time you won't need to do this in your storyboards, but the flexibility is there if you need it.
Layouts
The ability to work with layouts is a core capability of PowerPoint and is very valuable for the practice of storyboarding. Layouts provide a hierarchical manner of defining templates that each of the slides in your storyboard can inherit from. By embedding common elements in your layout, you save yourself time later when you need to create a new storyboard that uses that layout. You also save time in maintaining your storyboard if you need to update core elements, such as your company's logo in the header or a copyright date in the footer.
If you added shapes to your blank slide in the previous section, clean up that slide by deleting those shapes. From the Storyboarding Shapes pane, find the Web Browser shape under the Backgrounds category and drop that onto your empty slide. Position it so that the corners of the shape match the corners of your slide. In the address box of the Web Browser shape, type the base URL for your web application, such as http://www.fabrikam.com. This is the template that you will use for multiple slides in your storyboard, so you should turn it into a layout.
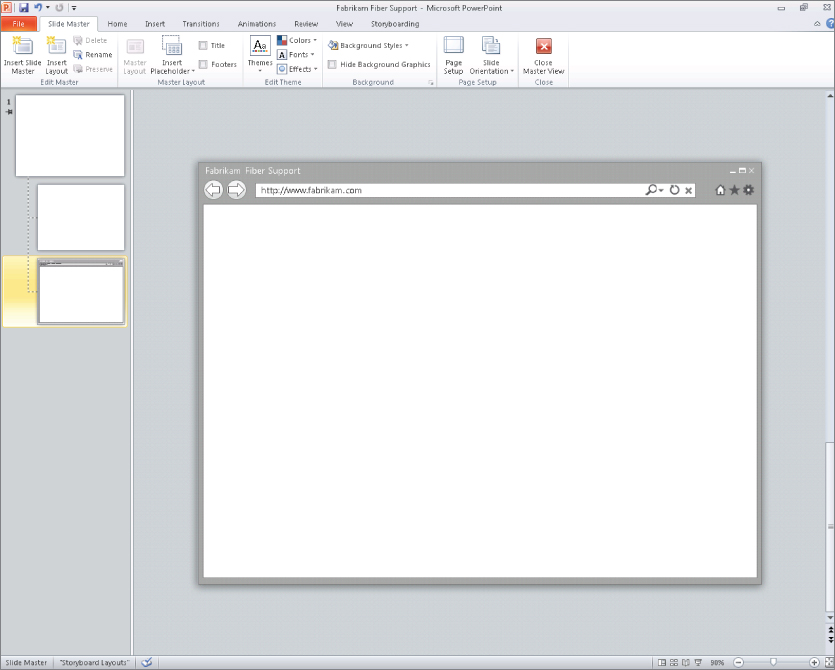
From the Storyboarding ribbon tab click Create Layout. Provide a name for this layout, such as Fabrikam Fiber Intranet. Open the Slide Master view, pictured in Figure 8.4, by clicking on Edit Layout. Your new layout, Fabrikam Fiber Intranet, is represented as the second child node in this hierarchy. The first child node is an empty slide and can be useful if you need to create a storyboarding slide that should not use your new layout.
Screenshots
Many applications use common elements across multiple pages or screens in the application, such as a common masthead, footer, and menus. If this is a greenfield (brand new) application, you can use the Storyboard Shapes and other graphical tools (such as Photoshop) to create a look and feel for your application. But often, you might be creating a storyboard to represent new functionality that you want to add to an existing application. The Screenshot capability of PowerPoint makes it easy to import these existing visual elements into your storyboard.
In a web browser, open an existing web application that you want to import design elements from. This can be any web application for now, such as Microsoft.com. Maximize the window for your web browser and position it so that you can see the visual elements that you want to import. Now switch back to PowerPoint and click the Storyboarding ribbon tab. Click the Screenshot button.
The Screenshot button expands to display thumbnails that represent the other windows you have open, including the web browser you just opened. You can import the entire window, but doing so also includes the chrome from the browser (menus, address bar, and so on). Instead, you can click Screen Clipping to briefly minimize PowerPoint and click and drag a rectangle that captures the section of the web application that you want to import. Figure 8.5 shows the screen clipping capability being used to select the masthead from the existing Fabrikam Fiber web application.
After you've imported an image, you can select it and use the Format ribbon tab to crop it or make other adjustments. For example, you may want to use the Color button to set the saturation to 0%. This makes the shape plain grayscale, which is sometimes a useful technique for getting stakeholders to focus on providing feedback on the functionality of an application, instead of focusing on design elements such as color selection. You can always revisit the Color button later to restore the image to its original saturation.
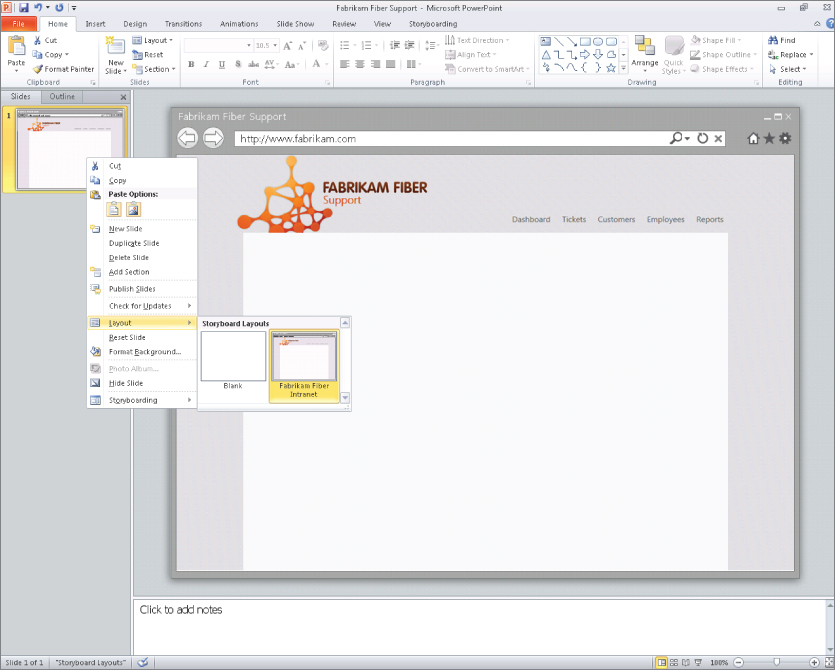
You can now add any other common elements, such as sidebars or footers. When you are finished building your layout, click the Slide Master ribbon tab and click Close Master View. You have just created your first layout, which you can apply to any slide in your storyboard as shown in Figure 8.6. To select a layout for a slide, you can right-click that slide and select the Layouts fly-out menu, or use the Layout pull-down menu from the Storyboarding ribbon tab. You can repeat this process to create as many layouts as you wish.
Note that outside of the Slide Master view you cannot edit any of the shapes you added to this layout, so if you need to edit them again you need to visit the Storyboarding ribbon tab and click Edit Layout to return to the Slide Master. Be thoughtful about what you put in your layouts. When used correctly they can save you a lot of time. For example, if a logo changes you can easily update it in the layout and the change is automatically inherited by all slides that use that layout.
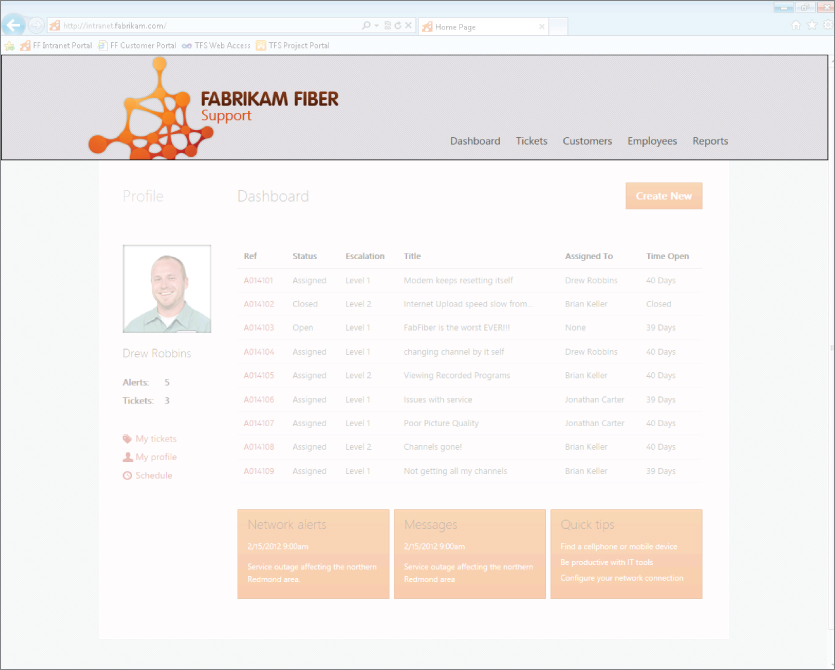
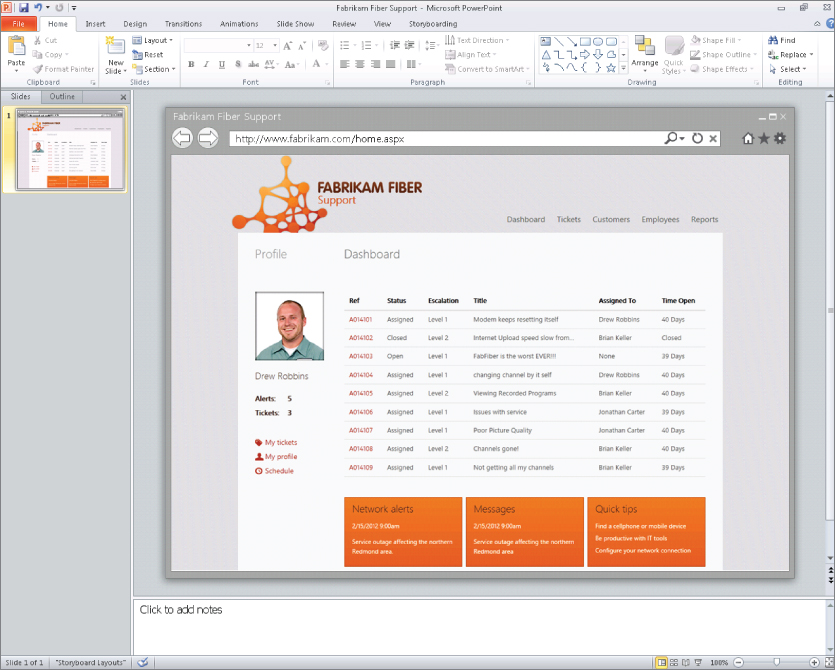
You can now use a combination of Storyboard Shapes, screen clippings, and other sources available from the Insert ribbon tab to construct the first web page you want to model in your storyboard. Figure 8.7 shows an example of a finished page that you might want to present to your users. In this way you can continue to create new slides for each page or dialog in your application that you want to storyboard.
My Shapes
The My Shapes category of the Storyboard Shapes pane makes it possible to create your own private library of shapes that you might want to reuse. An illustration of how My Shapes works can be achieved by creating a stylized button. Add a button from the Storyboard Shapes pane to your storyboard slide. Right-click this button and click Format Shape to access advanced properties that enable you to adjust the visual style of this button. Try changing the fill color and adding a shadow. Click OK when finished. Change the default text for the button and set a custom color for the text using the Font Color button in the Storyboarding ribbon tab (the Font Color selector is represented by the icon of the letter A with a colored bar underneath it).
The exact customizations you make to this button are not important. The point is that sometimes you may invest in styling shapes to meet requirements you have for the look and feel of your application, but individually making these customizations from scratch takes time. Instead, you can use the My Shapes category to store your customized shapes for future reuse. Select your finished shape and click Add to My Shapes from the Storyboarding ribbon tab. This adds your shape to the My Shapes category of the Storyboard Shapes pane as shown in Figure 8.8. You can give your shape a meaningful name, such as the Fabrikam Button in this example. Now, when you drag this shape back onto the slide you have a copy of the button that already includes your custom style applied to it.

This was a simple example, but you can apply the same technique to advanced composite shapes you might create, such as a menu bar or a panel consisting of multiple controls. Just select the group of shapes you want to include in your custom shape and then click Add to My Shapes.
Finally, you can share your custom shapes with others by using the Import Shapes and Export My Shapes buttons on the Storyboarding ribbon tab.
Animations
The ability to program animations in PowerPoint is another capability which is incredibly useful when working with storyboards. You can use animations to make your storyboard come to life for a stakeholder by illustrating the way that a user is expected to interact with an application.
Two of the most useful animations you can add to a storyboard are to show mouse movement and text entry. To see how this works, start by adding a Click shape from the Storyboard Shapes pane. The Click shape is programmed with a custom animation. You can press F5 (or Shift–F5 to start on the current slide) to start presentation mode and see this animation in action. Press the space bar or click your mouse button to trigger the animation. When you are finished, press the Escape key to return to the PowerPoint editor.
To understand how this default animation was programmed for the Click shape, click the Animations ribbon tab and enable the Animation Pane. From here you can see that this is a Custom Path animation triggered to start with a mouse click (which means that the animation starts whenever the presenter clicks the mouse or by pressing most keys on the keyboard, such as the space bar). You can change the timing to be faster or slower, or you can simply click the endpoints of the animation path to change the start and end locations.
You can select another shape and click Add Animation to apply a new animation for that shape. Notice that in the Animation Pane you can change the order in which animations should be triggered, timed, and so on.
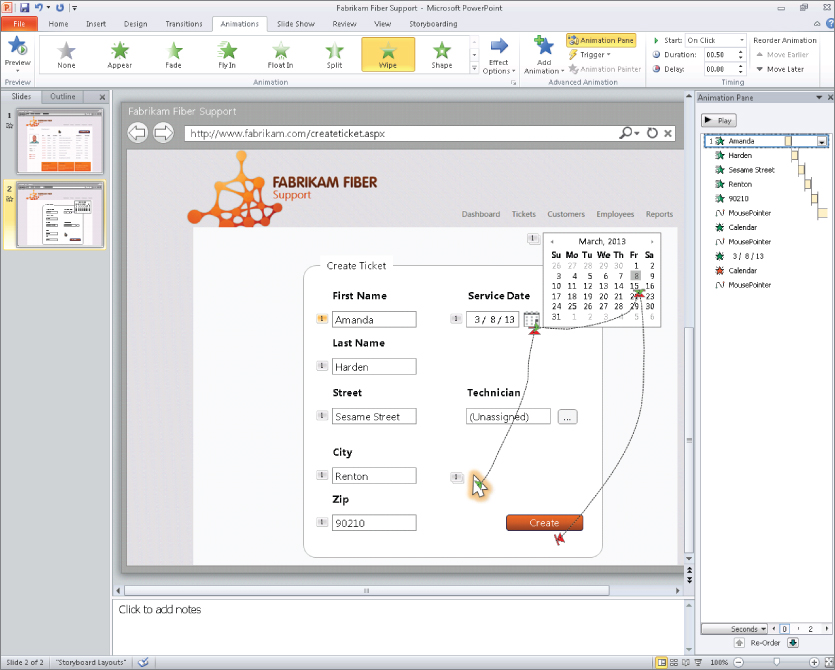
Animations in PowerPoint are fairly powerful, and you can use them to model almost any set of user interactions you can imagine for your storyboard. For full details on working with animations please consult the PowerPoint documentation. Figure 8.9 shows a bit of what is possible by using animations with a storyboard. This example animates in the following sequence:
In this manner you can easily string together multiple slides and animation sequences to represent a full end-to-end interaction that a user might have with your application.
Hyperlinks
You might decide that you want to allow your stakeholders to click through your storyboard in a non-linear fashion to access various pieces of functionality you are designing. Hyperlinks provide a way for you to do this. For example, in Figure 8.9 you might want to allow the stakeholder who is viewing this storyboard to click the Reports link in the menu to see the storyboard for your reporting capabilities. To program this, simply select a shape and use the Hyperlink button. You can then select another slide by clicking Place In This Document, or you can hyperlink to external resources, such as a detailed spec or a working prototype on a staging server.
Another use for hyperlinks is to create a table of contents slide at the beginning of the presentation, to allow somebody viewing the presentation to select individual requirements he wants to view. For example, the User Story that describes how a user signs up for a new account might be represented by slides 5 through 8, whereas the section of your storyboard that describes how a user pays with a credit card is represented on slides 28 through 34. Hyperlinks enable you to make it easy for stakeholders to jump directly to the section of the storyboard document they are most interested in reviewing. At the end of each section you can then direct the user back to the original table of contents.
Storyboard Links
None of the capabilities mentioned in this chapter to this point require Team Foundation Server. You can create and share storyboards with stakeholders by using traditional mechanisms such as e-mail, SharePoint, or file shares. But if you are using Team Foundation Server to manage your application development, you might want to link the storyboard artifacts you are creating to a work item in Team Foundation Server that represents the functionality being storyboarded.
To achieve this, you first need to save your storyboard file on either a network share (such as \MyTeamServerFabrikamStoryboards) or a SharePoint document library. This should be a location that is accessible by the stakeholders whom you plan to interact with as you create and get feedback on this storyboard. Ideally, this location is also backed up on a regular basis so that you don't accidentally lose your work.
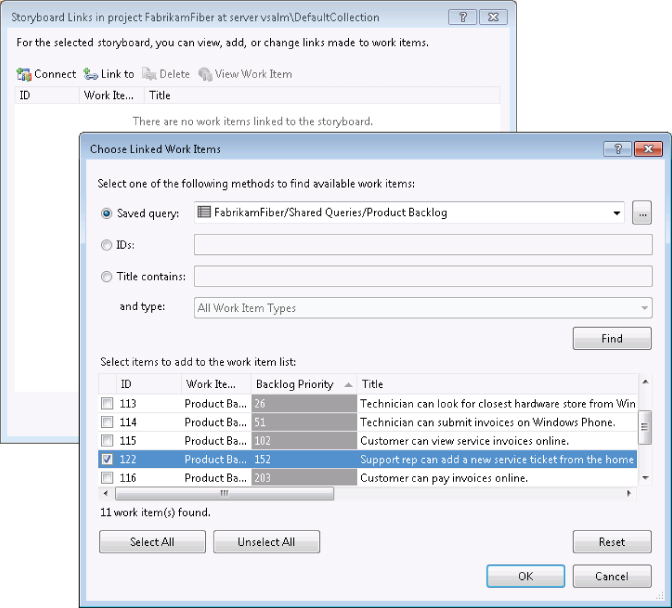
After you have saved the document to one of these valid locations, select Storyboard Links from the Storyboarding ribbon tab. If this is your first time opening this dialog you may need to click Connect to specify the location of the Team Foundation Server instance you are using. Next, click Link To and find the work item or work items you want to link to. Usually this is a User Story or a Requirement work item, but it can really be any work item you want to link to. The dialog shown in Figure 8.10 shows a storyboard being linked to a work item from the Product Backlog query.
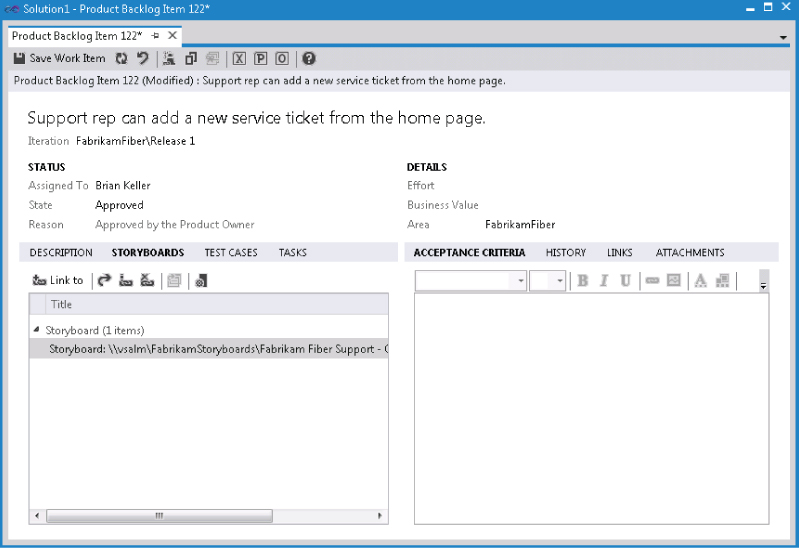
After it is linked it can be opened from the work item as shown in Figure 8.11. This helps to ensure that you get full end-to-end traceability across all of the artifacts that go into defining, developing, and testing your software.
Summary
In this chapter, you learned about how storyboarding can be a valuable part of the requirements elicitation phase of your software project's lifecycle. You learned about the new PowerPoint Storyboarding add-in from Microsoft that enables you to quickly create storyboards, seek feedback, and iterate on them before turning them over to the designers and programmers who make them into working software.
The next chapter covers how the new Microsoft Feedback Client enables development teams to continue to get feedback from stakeholders about the working software being developed. By continuously seeking stakeholder feedback throughout the development process, you can again ensure that the stakeholders' wants and needs are adequately represented in the high-quality software you are delivering.