2.2. Getting and Installing BlazeDS
So far, you know of the core parts of BlazeDS and understand the context within which it is most relevant. Now it's time for you to roll your sleeves up and start seeing it in action. The first step, of course, is to get hold of it.
2.2.1. Downloading BlazeDS
BlazeDS is an open source project. Its source and compiled distributions are available online for anyone to download. Go to http://opensource.adobe.com/wiki/display/blazeds/BlazeDS/, and navigate through the links on the "Download" section of the page to download either the compiled or source versions of the code.
When you click on the "Download BlazeDS now" link, you will be taken to the download page, which is also accessible directly at: http://opensource.adobe.com/wiki/display/blazeds/Downloads. On that page, you will find two types of downloads available for you, namely:
Release Builds
Nightly Builds
The release builds are the ones that are stable, tested, and ready for consumption, without fear of the code breaking in a catastrophic manner. Release builds can be of two types, milestone releases and stable builds. Stable builds are typically well tested and have worked without trouble for a considerable amount of time. Milestone releases are also well tested like stable builds but possibly are less time tested than stable builds. A milestone release typically includes a significant new feature or an important bug fix as compared to an earlier release version.
The nightly builds on the other hand are recent compilations from the source. The nightly builds are typically more unstable and flaky and can sometimes even break existing functionality. As a rule of thumb, a rookie or a developer not necessarily wanting to be at the bleeding edge of the evolution of BlazeDS should go with the latest version of the release build.
The BlazeDS project makes three types of release builds available for download. These are:
Turnkey — BlazeDS deployed within an Apache Tomcat Servlet container, configured and ready to run
Binary or Compiled Distribution — BlazeDS available as a compiled WAR (Web ARchive) file
Source Distribution — BlazeDS source with the build scripts to compile it from source
Each release type, that is, Stable, Milestone, and Nightly, include these three types of distributions. Apart from these, which provide plenty of choices among the different types of distributions, there is an additional choice related to the software version.
The current development version of BlazeDS is 4.x, whereas the latest release version is 3.x. Therefore, you will have a choice of downloading the 3.x or 4.x version as far as the nightly builds go. Version 4.x builds may slowly also start showing up in milestone releases and will subsequently be available as stable releases.
As of now, all the new features are coming in the 4.x version, which resides in the repository trunk, while bug fixes and enhancements continue to evolve the stable 3.x version code in an independent repository branch.
If you are simply trying out BlazeDS or don't have the patience to configure it, then go with the "Turnkey" download option. It's the easiest and the fastest way to start using BlazeDS. Remember though, that you will have to move your server-side code within this new instance of Tomcat if you desire to access the server components locally within the same web components container.
All three release builds are available in .zip archive file format. On the Windows platform, WinZip can be used to unzip such files. If you don't have WinZip on your machine, then get 7Zip from http://www.7-zip.org/. 7Zip is also available as a command-line utility called p7zip for the Mac OSX and many of the Linux/UNIX platforms, so it works well for unzipping files in most situations.
You know that BlazeDS is an open source project. Its source code repository hosted in a subversion version control system instance is accessible to public. Therefore, while builds are one way of getting BlazeDS, checking code directly out of the repository is also an option.
Subversion, popularly known as SVN, is a feature-rich open source version control system. If you know nothing or little about it, then consider reading the free book, available online at http://svnbook.red-bean.com/, to understand how it works.
Subversion's core architecture is based on a client/server model. The code repository lies at the server and clients connect to this server to access and modify this code base. Free and open source SVN clients exist for most platforms. Clients come in various forms, including the following:
Stand-alone clients
Desktop integrated clients
Plug-in to an IDE client
Client programs can have a command-line interface or a graphical user interface (GUI). An entire list of available SVN client programs is accessible at http://subversion.tigris.org/links.html#all-clients.
I prefer to use TortoiseSVN on Windows, SmartSVN on Mac OS X, Linux, and UNIX and Subclipse within the Eclipse IDE. In addition, I recommend using the command-line client, especially when the command or the operation on SVN is resource intensive. Almost always, the svn command-line client runs faster than its GUI counterparts.
The BlazeDS repository is accessible at http://opensource.adobe.com/svn/opensource/blazeds. This URL takes you to the root of the repository. Avoid checking out code at this level, as you will end up downloading a rather large bundle of code, much of which would be redundant. This is because checking out from the repository root will lead to getting all the code from the trunk, the branches and the tags. It's highly unlikely that you need all of the code at once.
To check out the latest source from the trunk to a local folder, invoke the following SVN command:
svn checkout http://opensource.adobe.com/svn/opensource/blazeds/trunk <path-to-the-
desired-local-folder>
You may recall that, as of now, the trunk code is the version 4.x code. If you want to check out the latest version of the evolving 3.x branch instead, then you invoke a command like this:
svn checkout http://opensource.adobe.com/svn/opensource/blazeds/branches/3.x/<path-
to-the-desired-local-folder>
In addition, you will be able to check out the source for a previous release using a subversion client. Previous releases in the repository are tagged using their version numbers. This is a usual convention with source control management, especially when using subversion. Read more about this convention in the side note titled: Trunk, Branches, and Tags. To check out source using a tag, invoke a svn command as follows:
svn checkout http://opensource.adobe.com/svn/opensource/blazeds/tags/<tag-name>/
<path-to-the-desired-local-folder>
Trunk, Branches, and TagsSubversion, by default, has three folders in a code repository. These are: trunk, branches, and tags. The main destination of the code repository is the trunk. It's the primary code base where active development goes on. As the code evolves, the development team may decide to release a piece of it. At that stage, it makes sense to fork this code out into a separate branch of its own. By doing this, the evolution on the trunk continues per the larger plan, and progress on bug fixes and enhancements continues on the released code within the specific branch. Release and branching out of code is usually accompanied with tagging releases. Tags make it easy to access particular release builds and provide a way to bundle an aggregation of different versions of relevant constituent files in one bundle. |
It's most beneficial to check out source instead of downloading the source of a release build when you have either trouble dealing with .zip archive files or you want to import the code straight into your IDE.
By now, you know all the ways of getting BlazeDS, both in compiled and source editions. Next, let's delve into installing the binary versions and compiling the source.
2.2.2. Installing the Compiled Distributions
Installing the compiled distributions involves expanding the archive files and deploying the web application. In the case of the turnkey distribution, things get even easier, as the step of deploying the web application is also skipped.
Installing the turnkey bundle implies merely unzipping it to a folder on the file system.
Figure 2-4 shows the top-level directory of the expanded folder structure of the turnkey distribution. There are three .war files listed in that directory, namely:
blazeds.war
ds-console.war
samples.war
Figure 2.4. Figure 2-4
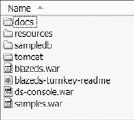
blazeds.war is the web application that contains BlazeDS. Technically, this is the only piece of software that's necessary as far as BlazeDS goes. You get only this archive file when you choose to download a binary distribution that's not labeled as "turnkey."
The turnkey distribution contains a set of sample applications and an administrative console. The administrative console helps view and monitor BlazeDS and the sample application services, endpoints, channels, destinations, and the logging facility. Sample applications are bundled in samples.war, and the administrative console is bundled in ds-console.war.
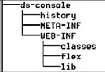
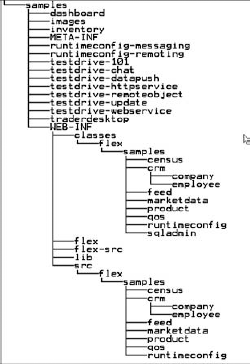
I mentioned earlier that the turnkey distribution is the easiest and fastest way to get started with BlazeDS. That is because not only does this distribution come with an instance of the Apache Tomcat 6.x server, but the BlazeDS distribution, the samples application, and the console application are predeployed and configured in it. Figures 2-NaN, and 2-7, respectively, peek into the webapps/blazeds, webapps/ds-console and webapps/samples directories of the included Apache Tomcat server. What you see in these figures are the deployed application folders.
Figure 2.5. Figure 2-5

Figure 2.6. Figure 2-6
Installing stable or nightly compiled distributions, which aren't bundled like the turnkey option, involves an additional step of deploying blazeds.war to an application server or a Servlet container. I will quickly describe how the BlazeDS web application is deployed in Apache Tomcat 6.x, JBoss AS 5.0.0.GA, and Jetty 7 (Prerelease 5). In each of these situations, I assume that you have the respective application server installed and ready for web application deployment.
If you don't use any of the above-mentioned Servlet containers or application servers, then you may still be able to deploy BlazeDS fairly effortlessly. After all, BlazeDS is just another web application, and it is only as complex to deploy it as it is to deploy any other web application.
Figure 2.7. Figure 2-7
2.2.2.1. Deploying BlazeDS in Apache Tomcat 6.x
Deploying an application in Apache Tomcat 6.x involves only two simple steps, namely:
Unzipping the downloaded archive file to a folder on the file system.
Dropping blazeds.war, from the download, in the webapps folder of Tomcat and starting Tomcat.
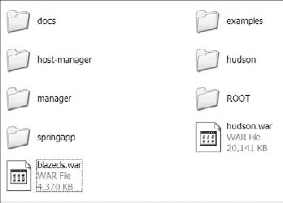
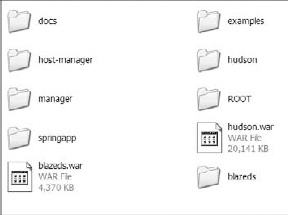
Figure 2-8 shows the webapps folder after blazeds.war is copied in it. Once this war file is copied over, start up Tomcat and the deployment is automatic. Figure 2-9 shows the folder snapshot after BlazeDS is deployed. You will notice that the war file has been exploded as a part of the deployment process.
Figure 2.8. Figure 2-8
This type of deployment, which is triggered on Tomcat startup, is referred to as "static" deployment. Sometimes, it may not be possible to restart Tomcat, and you may want BlazeDS to be deployed while it's still running.
Figure 2.9. Figure 2-9
You can achieve "dynamic" deployment in a running Tomcat instance by any of the following three methods:
Set autoDeploy to true in the "conf/server.xml" configuration file and do the same steps as in the case of static deployment
Use the Tomcat manager utility
Use Tomcat Client Deployer (TCD)
Setting autoDeploy to true is undoubtedly the easiest of the three options. I would just go with it. Tomcat manager, on the other hand, is a web-based utility that could be equally easy. You can read more about the Tomcat manager at http://tomcat.apache.org/tomcat-6.0-doc/manager-howto.html.
TCD is the most complex and involved of the three choices. TCD comes as a separate download and is a feature-rich program that can do more than just runtime deployment. Among other things it can validate, compile, and compress web application builds to .war format. TCD needs Apache ANT to run successfully. More information on TCD can be obtained at http://tomcat.apache.org/tomcat-6.0-doc/deployer-howto.html#Deploying using the Client Deployer Package.
Now you are almost ready to start using BlazeDS, except that if you need to use JMS with the data service, then make sure to install and configure an independent open source JMS provider like ActiveMQ (http://activemq.apache.org/), Open MQ (https://mq.dev.java.net/), OpenJMS (http://openjms.sourceforge.net/) or JORAM (http://joram.objectweb.org/) with Tomcat. Apache Tomcat does not come with an in-built JMS provider. You will learn more about JMS setup, configuration, and usage with BlazeDS in Chapter 6.
Besides these, you could set up custom authentication, which will be brought up later in Chapter 4.
Next, we explore deploying BlazeDS in JBoss AS.
2.2.2.2. Deploying BlazeDS in JBoss AS 5.0.0.GA
Deploying the BlazeDS web application in JBoss AS is elementary. It's a simple two-step process:
Unzip the distribution
Copy blazeds.war to the server/default/deploy folder in the JBoss AS 5.0.0.GA installation
JBoss AS scans the deploy directory frequently, so it will automatically deploy blazeds.war soon after it's copied to the deploy folder. Instead of the default profile, you could also use the all or the minimal profile. JBoss AS does not need a restart for BlazeDS to successfully deploy.
Read the JBoss AS 5.0.0.GA Administration and Configuration Guide available online at https://www.jboss.org/community/docs/DOC-12927 for additional details that pertain to deployment and configuration.
Next, you will learn to install BlazeDS in Jetty.
2.2.2.3. Deploying BlazeDS in Jetty 7
Jetty 7, which is still in a prerelease version at the time of writing this chapter, is a small footprint, lightweight web server. It's written entirely in Java.
Deploying BlazeDS in Jetty 7 often only involves two simple steps, which are:
Unzip the binary distribution
Copy blazeds.war to the webapps folder within the Jetty 7 installation
These steps are quite similar to those used to deploy web applications in Apache Tomcat or JBoss AS.
One could statically deploy BlazeDS, which means deploy and restart Jetty, or dynamically deploy it in a running Jetty 7 instance. Jetty 7 defines two classes, WebAppDeployer and ConetxtDeployer, to carry out static and dynamic deployments. Both these deployers are configured in Jetty's configuration file, jetty.xml. Both these deployers are added to the Jetty server life cycle, thereby starting and stopping with the server. More information on WebAppDeployer can be obtained at http://docs.codehaus.org/display/JETTY/WebAppDeployer. More information on ContextDeployer can be obtained at http://docs.codehaus.org/display/JETTY/ContextDeployer.
With these four different short illustrations on deploying BlazeDS in Servlet containers and application servers, you must be convinced that the task is fairly straightforward and simple. Except for customizations around specific authentication schemes, some specific extensions to BlazeDS channels, and usage of custom adapters and factories, deploying BlazeDS remains a simple task. In other words, for all standard deployments things are straightforward.
2.2.3. Compiling from Source
In the last few sections, you learned to deploy the compiled BlazeDS distributions. Those sections assumed that you downloaded the compiled versions, which were available in a .zip file. You could also download the BlazeDS source instead of a binary compiled distribution. When you download the source, you need to compile it first so that it's ready to be deployed. Once it is compiled, deploying it is the same as deploying any readily available compiled version.
In this section you, will learn how to compile BlazeDS from the source. BlazeDS source comes with Apache ANT (a Java-based build tool) build scripts to compile the source with minimal effort. Before you start calling the script to start the compilation, you need to get a hold of a few external libraries and set up a few environment variables.
First of all you need to download and install JDK 5 or higher. You probably already have that on your machine. If not, go get it from http://java.sun.com/javase/downloads/index.jsp.
The next necessary piece of software is Apache ANT. You can get a copy of the latest build at http://ant.apache.org/. Make sure to get a version equal to or greater than 1.7.0. Version 1.7.1 is the latest version as of this writing. Unzipping ANT to a folder is all that is required to install ANT.
In addition to Apache ANT, also download ANT-Contrib Tasks from http://ant-contrib.sourceforge.net/. ANT-Contrib Tasks are a collection of tasks for Apache ANT. ANT-Contrib Tasks extend ANT beyond simple dependencies management and make it function somewhat like a programming language. At the download site on SourceForge, you will see cpptasks downloads side by side with ant-contrib downloads. Just get the latest version of ant-contrib, which at this time is 1.0b2. ANT-Contrib can be installed in two ways. You can either copy ant-contrib-1.0b2.jar to the lib directory of the ANT folder or you can copy it anywhere else and specify the path to it in the build scripts. To keep things simple just copy the jar to the ANT lib folder.
Last of all, download JUnit from www.junit.org and copy over the jar file to the ANT/lib directory.
That's all as far as getting external pieces of software goes. Now you need to set up a few environment variables. Set up ANT_HOME to point to the root of your ANT installation and JAVA_HOME to point to the root of your JDK installation. Also, add the bin folders of both ANT and Java to the PATH environment variable.
That's all as far as the setup goes. Now you are ready to invoke the build scripts. Just call ant main, and the compilation is done. That was simple, wasn't it? When running ant main the next time, precede it with an ant clean run to make sure that all cleanup is done and you are ready to build again. Last of all, you can also run all unit tests on the new build to make sure that everything built correctly. You invoke this task by calling ant checkintests.
The output is the compiled war file, which can be deployed in an application server of your choice.