
3.1. HTTP Service Proxy
Rich Flash platform applications built using Flex are deployed as swf format files on a web server. When a client accesses such an application, the swf is downloaded to the client's local Flash Player instance. These swf format files are compiled binary files that can use local components to invoke remote URL(s) using the HTTP method. If the domains that these remote URL(s) point to define appropriate security policy, then the Flex application can make these calls without any trouble. If the security policy is not defined, then these HTTP calls can be routed through a server-side proxy.
BlazeDS defines such a server-side proxy for easy and flexible routing. The Apache HttpClient is actually baked right into BlazeDS. So, when you route an HTTP call through the proxy, the call is actually invoked and completed by an HttpClient instance at the server, and the response is relayed back to the Flex application.
Apache HttpClientApache HttpClient is a full-featured standards-complaint Java-based HTTP client that allows invocation of URI(s) using the HTTP methods. It's a user agent and so can be used to make calls in a manner similar to what a web browser does. Its latest release version is 3.x. It's available under the Apache open source license. More information about the HttpClient can be obtained from the Apache HttpComponents site at http://hc.apache.org/httpcomponents-client/index.html. |
When using a server-side proxy, BlazeDS needs appropriate configuration, which as you learned in the previous chapter, takes place in services-config.xml. For proper organization and clear separation, the configuration is distributed in four separate files, remoting-config.xml, proxy-services.xml, messaging-config.xml, and services-config.xml. The first three of these four configuration files are included in the fourth one, services-config.xml, by reference. Most proxy-related configurations, besides those that are common across the board such as channel and protocol definitions, reside in proxy-services.xml.
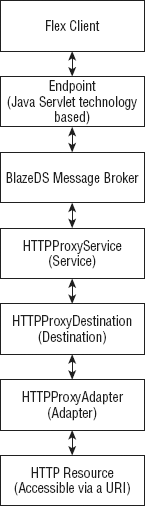
You need to define an HTTP proxy service configuration in proxy-services.xml. Before you start doing that, you may benefit from viewing Figure 3-1, which shows the various layers in our communication stack.
Sitting right on top of this stack is the Flex client itself. Next is the endpoint on which the client communicates with the BlazeDS server. The communication between a Flex client and a remoting server like BlazeDS is established with the help of a channel-endpoint pair, where the channel represents the client side of the communication pipe and the endpoint represents the server side of the communication gateway.
At the heart of BlazeDS is a message broker, which coordinates most of its activities. You were introduced to this in the last chapter and will continue to learn more about it throughout this book. The endpoints communicate with the message broker.
Next come three layers: service, destination, and adapter. This trio is the defining set of layers as far as the proxy service goes. At the end of the stack is the HTTP resource.
The HTTPProxyService is the proxy service class that accepts a message of the HTTPMessage type. This facilitates a loosely coupled association between the Flex client and the message broker and allows it to use any of the channels to communicate and still use the same proxy class. The default channel is the AMFChannel, which transmits messages as binary Action Message Format (AMF) over HTTP. You already know of AMF from Chapter 1, where it was introduced to you. If binary transmission is not preferred and text-based communication is necessary, then an alternative channel, called the HTTPChannel, can be used. This might be possible when a common server-side program serves data, in a unified format, to multiple types of clients: Flex, legacy page based clients, and Ajax. HTTPChannel uses AMF in XML over HTTP.
Figure 3.1. Figure 3-1
An HTTPMessage object abstracts an HTTP or an HTTPS resource destination. Its properties hold the values for the URL, HTTP method, headers, and content type. The proxy service supports all HTTP methods, namely, GET, POST, HEAD, TRACE, PUT, DELETE, and OPTIONS. When calling an HTTP resource directly, without a proxy, you are restricted to the GET and POST methods only. Read the note "HTTP Methods" to review the purpose of these methods.
The HTTPProxyDestination abstracts the remote proxy destination, and the HTTPProxyAdapter is the piece of code that makes the HTTP call using the HttpClient. The HTTP proxy service and destination classes are also relevant for web services, which use these same classes. Web services use a SOAPProxyAdapter, instead of the HTTPProxyAdapter class, to make the web service operation invocations via the server.
At this stage, working out a simple example may reinforce and illustrate the fundamentals of using an HTTP proxy service, so let's engage in that exercise.
3.1.1. An HTTP Proxy Service Example
You can access a list of my public presentations, in an XML format, at http://shanky.org/publish-and-present/present/list.xml. There is a crossdomain.xml file defined at the root of this domain, but let's use the proxy service to get this list. Once you have the list, simply bind this output to a Flex data grid.
Since the focus is on how one can access this list, using the proxy service, the HTTPService client-side component, instead of the DataGrid, makes a good starting point for the example. Let's create a simple HTTPService component using MXML as follows:
<mx:HTTPService
        id="presentationList"
        useProxy="true"
        destination="presentationAll"/>
One of the most important properties defined on the preceding HTTPService component is the useProxy property. By default, its value is false and that implies that HTTP calls are made directly to the resource. Setting its value to true acts as the vital switch that directs the calls through an associated proxy service.
The other two properties defined are id and destination. As always, id provides the handle for future reference to the instance. The destination property value corresponds to a server-side destination configuration, within the services-config.xml file. As mentioned earlier, the main configuration file, that is, services-config.xml, is distributed in multiple configuration files for organization and clarity. Therefore, the proxy service destination definition lies in a file called proxy-config.xml. The proxy configuration file is included in the main configuration file by reference.
In the proxy configuration file, a configuration entry appears as follows:
<service id="proxy-service"
    class="flex.messaging.services.HTTPProxyService">
<destination id="presentationAll">
        <properties>
            <!-- The HTTP endpoint available to the http proxy service -->
            <url>http://shanky.org/publish-and-present/present/list.xml</url>
        </properties>
    </destination>
</service>
The preceding configuration creates a service instance based on the flex.messaging.services.HTTPProxyService class. This service instance has a destination property that includes a URL that points to the resource we set out to access.
Now it's possible that you may desire to also access the list of all my publications (and not presentations as you did earlier), and that is accessible at http://shanky.org/publish-and-present/publish/list.xml. This can be done in one of two ways. Either you can add another static url property within a destination and pass the fully qualified URL as its property value or replace the existing static url element with a dynamic-url property. For both the lists to be accessible, set the value of dynamic-url property to http://shanky.org/publish-and-present/*, like so:
<dynamic-url>http://shanky.org/publish-and-present/*</dynamic-url>
Now on the client-side, the HTTPService object that fetches the list of presentations is like so:
<mx:HTTPService url="http://shanky.org/publish-and-present/
    present/list.xml"
    useProxy="true" />
Similarly, the HTTPService object that retrieves the list of publications is like so:
<mx:HTTPService url="http://shanky.org/publish-and-present/
    publish/list.xml"
    useProxy="true" />
That's all it takes to get a proxy in action. Next, we explore a few more nuances of the proxy service, especially those that relate to the configuration of the adapter.
3.1.2. Advanced Configuration Options of an HTTP Proxy Adapter
A fair amount of advanced configuration for a proxy service pertains to its adapter. You may recall that the HTTP calls to real destinations are made using the Apache HttpClient user agent. The HttpClient connections are established and influenced by the HTTPProxyAdapter. A number of properties can be set to define the characteristics of the Apache HTTP components connection manager (HTTPConnectionManager) that the HttpClient uses. These properties are specified in proxy-config.xml within the connection-manager property of an HTTP proxy service configuration. The connection-manager property includes a number of attributes, which are:
max-total-connections
default-max-connections-per-host
connection-timeout
socket-timeout
stale-checking-enabled
send-buffer-size
receive-buffer-size
tcp-no-delay
linger
max-per-host
The max-total-connections attribute governs the number of concurrent connections. BlazeDS uses a multi-threaded connection manager for the HttpClient instances, except when the value of max-total-connections is set to 0.
The default-max-connections-per-host attribute sets the default maximum number of connections allowed per host. This attribute is relevant in the context of clustering, which will be brought up later in Chapter 10. Definitions of connection attributes per host can be defined in the max-per-host attribute, which takes a collection of host configuration settings (defined within the BlazeDS HostConfigurationSettings class). The host configuration settings include all the parameters that relate to an HTTP connection. They are:
host
port
protocol
protocol-factory
max-connections
proxy
local-address
virtual-host
The two timeout attributes for the connection manager, connection-timeout and socket-timeout, specify the number of milliseconds to wait before timing out. The connection-timeout is the amount of time to wait for a connection to be established before it's timed out. The default value is 0, which means that it doesn't time out at all. socket-timeout is the amount of time to wait for data to come before the connection is timed out. Again, the default is 0, which again means that it doesn't time out at all.
If stale-checking-enabled is set to true, which is the default case, connections are checked to ensure that they are working. Enabling this property has a slight performance overhead, but it minimizes the I/O errors emerging out of failed requests over stale connections, which falsely show as active locally but are closed at the remote server.
Data is sent and received over the socket. The two buffer-size-related parameters, send-buffer-size and receive-buffer-size, act as suggested buffer sizes for the data interchange over the socket. The underlying buffer size may not be the same as that set through these parameters.
In addition to suggesting buffer sizes, you can choose to use John Nagle's algorithm to make the TCP/IP communication over sockets more efficient. Nagle's algorithm combines and coalesces a few outgoing packets and reduces the number of packet transmissions. You can read more about Nagle's algorithm at http://en.wikipedia.org/wiki/Nagle's_algorithm. Setting the tcp-no-delay to false (which by default is true) activates Nagle's algorithm on your TCP/IP packets.
Last, but not least, you can also control how the sockets handle queued data when they close. When linger-on-close is set to true, a Java socket allows queued data to be sent to its peer when the close method is called. You can set the linger property on the connection manager to either 0 or −1. 0 deactivates the property, and −1 delegates the linger-on-close behavior to the JRE default.
Besides the connection manager settings, you can set the cookie-limit, allow-lax-ssl, and content-chunked properties on the adapter. The cookie-limit defaults to 200. Settings allow-lax-ssl allows self-signed certificates when using SSL. Content, by default, is not chunked. The Flash Player does not chunk content.
Sometimes, a user-agent cannot access the Internet directly and needs to route its requests through an external proxy. If such a situation arises for the HttpClient that the HTTPProxyAdapter uses, then you could configure the adapter with the external proxy settings, which include:
server
port
nt-domain
username
password
Looking at all the configuration options listed in the last couple of pages, it's fairly obvious that the adapter can be customized for specific cases.
Towards the beginning of this chapter, I alluded to the control and management benefits accrued from passing HTTP requests through a server proxy. Let's clearly list those here:
Easy applicability of cross-cutting concerns
Central control of all outgoing requests
Access control of the HTTP traffic
Logging of all traffic information on the server
Handling of HTTP errors gracefully
Application of business logic on intercepted requests and responses
In the next subsection, let's elaborate on a few of these points to see how BlazeDS enhances the plain and simple HTTPService client-side component.
3.1.3. Intercepting for Control and Management
In this section, I will illustrate three different scenarios that show the benefits of intercepting proxy calls on the server. By no means is this an exhaustive list, but it is fairly indicative of the possible benefits of interception and central control. The three use cases include:
Access control to proxy destinations
Logging of all proxy traffic
Handling of HTTP errors
3.1.3.1. Access Control to Proxy Destinations
For illustration, an HTTP proxy destination is shielded behind an authentication scheme and an authorization scheme. Flex clients using this proxy service destination to access remote data need to pass in appropriate credentials to interact with it successfully. For simplicity, Tomcat is used as the server-side container for BlazeDS.
BlazeDS provides a way to authenticate, that is, validate, a user's identity. It also provides a way to restrict operations based on a user's credentials or entitlements, which is termed "authorization."
An interface, flex.messaging.security.LoginCommand, defines the contract for carrying out the processes of authentication and authorization through its doAuthentication and doAuthorization methods. Readily available and prepackaged implementations of this interface exist for many of the popular application servers, namely:
Tomcat
JBoss (which uses Tomcat)
BEA (now Oracle) Weblogic
IBM Websphere
Oracle Application Server
Adobe JRun
Each of these implementations leverages the underlying server-specific Java EE security for authentication and authorization. In addition, you can define your own custom authentication and authorization scheme and plug it into BlazeDS by implementing the LoginCommand interface.
If you want to delegate the security aspects to Tomcat, then you just wire up the available implementation in services-config.xml as follows:
<login-command class="flex.messaging.security.TomcatLoginCommand"
      server="Tomcat">
This piece of configuration lies within a security element in services-config.xml. It says that authentication will use the TomcatLoginCommand implementation. In Tomcat, users and their roles are defined in a file called tomcat-users.xml, which lies in the conf folder of the Tomcat installation. The entries in this file (for my instance of Tomcat) are shown in Listing 3-1.
Example 3.1. Contents of conf/tomcat-users.xml
<?xml version='1.0' encoding='utf-8'?> <tomcat-users> <role rolename="manager"/> <role rolename="regularusers"/> <user username="tomcat" password="secret" roles="manager"/> <user username="auser" password="apassword" roles="regularusers"/> </tomcat-users> |
If you choose to use the Tomcat security implementation, then you need to use the same roles in the services-config.xml that are defined in the tomcat-users.xml file.
Roles can be defined within the configuration files using the security-constraint definitions. Two types of authentication methods can be defined within the security constraints. These are:
Basic — Uses basic HTTP authentication. The browser throws up the login screen for username and password input when connecting, and on authentication failure an HTTP 401 error is returned.
Custom — Uses a custom authentication method. The credentials, username and password, need to be passed in explicitly and programmatically. The ChannelSets.login method can be used to pass in the credentials.
For the sake of avoiding complexity, let's just use the Basic authentication method. After this decision, our security definition is as follows:
<services-config>
    <security>
        <login-command class="flex.messaging.security.TomcatLoginCommand"server="Tomcat">
            <per-client-authentication>false</per-client-authentication>
        </login-command>

        <security-constraint id="trusted">
            <auth-method>Basic</auth-method>
            <roles>
                <role>regularusers</role>
                <role>manager</role>
            </roles>
        </security-constraint>
    </security>
    ....

</services-config>
Setting the per-client-authentication to false sets the authentication on a per session basis. This means that two copies of a Flex client running in two different tabs of a browser window are authenticated using one set of credentials, as both these clients share a session.
Now you can add the defined security constraint to a definition as follows:
<destination id="presentationAll">
        ...
        <security>
            <security-constraint ref="trusted"/>
        </security>
    </destination>
This will ensure that only authenticated principals will be able to access data using this HTTP proxy destination.
That's all as far as access control of destinations go. The topic of access control will be revisited again in the later chapters. By the end of the book, you will learn everything about access control in BlazeDS, including how to write your own custom authentication scheme.
Like security constraints, you can easily setup server-side logging levels to record all activities in BlazeDS. This could be helpful both for application monitoring and external data sources access analytics.
3.1.3.2. Logging All Proxy Traffic
The BlazeDS logging framework provides for logging of messages on the server side. What is to be logged is determined by the set level, which can take the following possible values:
All — Log everything.
Debug — Log all Error, Info, Warn, and Debug messages. Some Flex internal messages also qualify as debug messages.
Error — Log all Error messages. Errors arise when an important part of the application stops working, and such messages are logged at this level.
Info — Log all Info and Error messages. Info messages usually communicate a desired piece of information.
None — Log nothing.
Warn — Log all Warn and Error messages. Warnings are problems that don't bring the system down and are not the same as errors, but nonetheless need to be attended to.
Messages by default are logged out to the console using ConsoleTarget.
The logging framework can be customized to include date, time, a prefix, and the category. Log messages can be filtered by categories.
Setting the logging level to "All" will catch all the communication on all endpoints and interaction with all services. With the possible overhead of too much information, this level will log all HTTP proxy service–related activity on the server. You will learn more about server side logging and its extensions in many of the later chapters in this book.
The last of the three use cases is about enhanced functionality that's missing from the client-only access option.
3.1.3.3. Handling of HTTP Errors
When using HTTPService to invoke a remote HTTP resource directly, that is, without a proxy service, one only receives the HTTP response bodies for success cases, where the HTTP response code is between 200 and 299. For all other status codes the Flash Player cannot access any data in the body of the response. So, for example, the common status code of 404, which represents the situation where the resource is not found, just ends up in a failure the same way that status code 400, which is caused by bad syntax, does.
When using the proxy service, you have the flexibility to access the body of these messages and process them appropriately. Appropriate handling could mean retries, alternative calls, passing up of the status messages, or any other action that's suitable for your particular case.
A fault message is dispatched as a FaultEvent to the HTTPService component. A fault handler function, wired to the HTTPService component, can handle a fault event and process it as desired.
So far, you have seen most of the features of the HTTP proxy service, learned to configure it, and perceived the potential value it can add. Now we move to the second topic of this chapter: the web service proxy.