
7.2. Introducing JPA
Java Persistence API (JPA) defines an easy and standard way to manage persistence in the Java EE and Java SE environments. The lightweight API defines a central coordinating persistence manager, called the EntityManager. Each persistence context, which essentially consists of a set of managed persistent entities that exist in a particular data store, has an EntityManager. The EntityManager API allows interaction with the persistence context and provides for the creation, persistence, and removal of entities.
Entities that are persistent have their defining classes annotated with the javax.persistence.Entity annotation. Classes can define their attributes as fields or properties. Sometimes both fields and properties can coexist in a single class. When a class adheres to the Java bean–style accessor pairs for its attributes, they are referred to as properties. In general, all but transient fields and properties are persisted to the data store.
7.2.1. Primary Key
Each persistent object is identified by a unique identifier, referred to as the primary key. If a single field or property is the primary key, then such a field or property is annotated with the javax.persistence.Id annotation. An example is:
@Entity
public class Person {
  ....

  String personId;

  @Id
  public String getPersonId{
    return personId;
  }
  ....

}
A String type property is the primary key in the preceding example. Other data types, namely the following, are also possible types for a primary key field or property:
Java primitive types (example: int)
Java primitive wrapper types (example: Integer)
java.util.Date
java.sql.Date
Avoid using a floating point type for primary key type and, as far as possible, stick to integers for generated IDs. Only generated integer IDs are portable.
Sometimes, the primary key is complex and can involve multiple fields or properties. In such cases, an external class defines the primary key. Such a class can be referred with the help of either of the following annotations:
javax.persistence.IdClass
javax.persistence.EmbeddedId
For example, you could have the Person class from the last example define a primary key basis as a person's first and last name. Then the example, using the @EmbeddedId annotation, would look like this:
@Embeddable
public class PersonId implements Serializable {
    private String firstName;
    private String lastName;
    ....
}
@Entity
public class Person implements Serializable {
private PersonId id;
@EmbeddedId public PersonId getId() {
return id;
}
....
}Alternatively, using the @IdClass annotation, the example would be as follows:
public class PersonId implements Serializable {
    private String firstName;
    private String lastName;
    ....

}


@IdClass(PersonId.class)
@Entity
public class Person implements Serializable {
    private PersonId id;

    @EmbeddedId public PersonId getId() {
        return id;
    }
    ....

}
The unique identifier, the primary key, is used to query for a specific entity instance.
Entities hardly ever exist in isolation and often have relationships with other entities in a persistence context. Therefore, in the context of entity persistence, managing relationships becomes almost as important as making use of an appropriate identifier or a primary key.
7.2.2. Entity Relationships
The relationship between entities can be defined using two characteristics:
Multiplicity
Directionality
Multiplicity in relationships can be of four types:
One-to-one
One-to-many
Many-to-one
Many-to-many
Annotations with names corresponding to the type of relationship multiplicity decorate the appropriate fields, properties, or methods that either specify or utilize a relationship to access the persistent objects. You will learn more about relationships in the context of queries, which you will come across later in this section.
Apart from multiplicity, the relationship between objects also has a sense of directionality. The directionality value can be:
Unidirectional
Bidirectional
In the earlier discussion on the object relational mismatch, I had pointed to relationship directionality in the subsection that focused on entity relationships. There, I mentioned that, unlike relational tables, which always set up a bidirectional relationship, objects need to specify a relational pointer on both entities if you desire the relationship to be bidirectional.
For bidirectional relationships, an owning side and an inverse side of the relationship are identified. This helps manage the data integrity during any data modification. The inverse side specifies the owning side with the mappedBy element. The mappedBy element is used with the @OneToOne, @OneToMany, and @ManyToMany relational annotations. @ManyToOne annotation does not define the mappedBy element, as the many side always owns the relationship.
The relationship annotations define a number of elements that affect their behavior. mappedBy is one such element. Another important element is cascade. For those who are conversant with SQL, this word may immediately remind them of the "cascade delete" operations, which deletes all dependent entities when a primary entity is deleted. JPA relationship annotations define five valid CascadeType enumerations as values, which are:
ALL—Cascade all operations.
MERGE—Cascade merge operations. Merge operations occur when regular objects are merged back as managed entities.
PERSIST—Cascade persist or "save to data store" operations.
REFRESH—Cascade synchronization and refresh operations.
REMOVE—Cascade remove or delete operations.
For example, a @OneToMany annotation could specify a "cascade persist" preference so that all related entities are persisted as the primary or owning entity is persisted to the data store. To illustrate this, consider a customer entity that has multiple addresses. If this customer entity defines a "cascade persist" relationship to the set of addresses it owns, then on persisting a customer entity, its related addresses are also persisted. The definition of such a cascade relationship might look like this:
public class Customer
{
    private int customerID;
    private String name;
    private String email;
private Set<Address> addresses;
//additional fields and properties
//accessor methods
@OneToMany(cascade=PERSIST, mappedBy="customer")
public Set<Address> getAddresses() {
return addresses;
}
}
public class Address
{
private String street;
private String state;
private String zip;
private String country;
//accessor methods
}With entities defined and their relationships established, you are ready to start interacting with a persistence context.
7.2.3. Interacting with a Persistence Context
An EntityManager defines the API to interact with a persistence context. How you get hold of an EntityManager depends on the way it's configured. If you choose to go with container-managed entity manager, then the container manages the lifecycle of the entity manager. All you have to do then is declare a variable of the EntityManager type in your application component and annotate it with the @PersistenceContext annotation. The container injects an EntityManager instance into this variable.
In contrast, going with application-managed entity manager implies that you have to instantiate the entity manager yourself. You first inject an entity manager factory, using the @PersistenceUnit annotation, like this:
@PersistenceUnit EntityManagerFactory emf;
Then use the createEntityManager method of the EntityManagerFactory to create an instance of an EntityManager.
In either case, once you get hold of an entity manager instance, you are ready to interact with the persistent entities in that context.
Persistent objects can be in any of the following four states:
New—Has a persistence identity but is not (yet) attached to a persistence context
Managed—Has a persistence identity and is attached to a persistence context
Detached—Has a persistence identity but is not attached to a persistence context (anymore)
Removed—Has a persistence identity and is attached to a persistence context but is marked for removal
You use the entity manager to interact with entities to carry out any of the following operations:
Create
Read
Update
Delete
In addition, you would likely query a particular data store and synchronize the entities between your persistence context and the data store.
Persistence operations are best described with the help of an example. To keep things simple and focus on the operations themselves, I chose an elementary application that catalogs open source software products and keeps a record of its contributors.
I created the example application as a standalone JPA application, which gets bundled as a JAR. JPA works in the context of both a simple web application and an enterprise Java EE application. It also works in Java SE environments. In any of these three target environments, you could use the created JPA example application JAR and leverage the managed entities within that setup.
For this JPA example, the following pieces of software are used:
Hibernate EntityManager 3.4.0.GA and associated libraries—The JPA implementation (see the note on Hibernate EntityManager distribution to learn more about the associated libraries)
Eclipse Ganymede 3.4.1 with support for JPA projects—The IDE (Support for JPA projects is built-in and bundled as a part of the Java EE support in Eclipse Ganymede 3.4.1)
MySQL Connector/J 5.1.7—The JDBC driver
Apache-Tomcat 6.0.18—The target Servlet container (application server)
You will be able to replace many of these listed software products and libraries with their appropriate substitutes. For example, you could use IntelliJ IDEA instead of Eclipse as the IDE and deploy the web application in a JBoss application server as opposed to Tomcat. Also, if you do not want to take the overhead of administering a database, then you could go with the embedded HSQLDB database.
Hibernate EntityManager 3.4.0.GA DistributionHibernate EntityManager is a Hibernate-based JPA implementation for Java SE and Java EE environments. The current general availability release version of Hibernate EntityManager is 3.4.0.GA. You can download a copy of the software from www.hibernate.org/6.html. The software is packaged and distributed in tar.gz and .zip archive file formats. When you unpack the distribution to a folder on the file system, you will find hibernate-entitymanager.jar at the root of a newly created subfolder called hibernate-entitymanager-3.4.0.GA. This jar file is the primary JPA implementation library. The main JPA implementation jar file requires a few additional archive files to function properly. The archive files are all available in the lib directory of the expanded subfolder. The jar files in the lib directory are as follows:
Add all these jar files to your classpath. In Eclipse, add them as referenced library files. |
7.2.4. Set Up the Database
As a first step install MySQL. When configuring the instance, remember the administrator password that you set. You will use it shortly to log in and create a database. Once installed, start and log in to the instance, using the command line prompt. Then create a new database. I name my database oss_catalog_db as the application maintains a catalog of Open Source Software (OSS) products and its contributors. The command to create a database, named, oss_catalog_db, in MySQL is:
create database oss_catalog_db;
Don't create the tables yet. The persistence infrastructure will generate them on the basis of entity definitions and the object/relational mapping metadata. Next, create an Eclipse project so that you can start programming your application.
7.2.5. Create an Eclipse JPA project
Start up the Eclipse IDE, which I assume is installed and set up. Create a new JPA application project. Figure 7-1 to 7-9 show screenshots of the Eclipse JPA Application Project Creation Wizard.
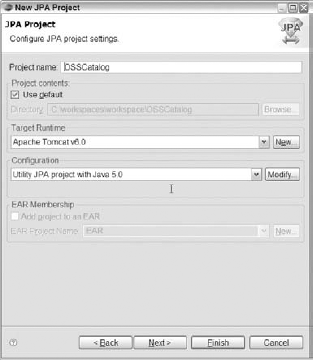
Once you choose to create a JPA project, as illustrated in Figure 7-1, you will be prompted, as shown in Figure 7-2, to specify a name for the project, a target runtime, and some basic configuration. All configured server runtime environments are listed in the target runtime drop-down list. I selected Apache Tomcat as the target runtime. As a result of this selection, the option to be a member of an enterprise Java archive file, an EAR file, is grayed out. Apache Tomcat does not support EAR file formats.
Figure 7.1. Figure 7-1
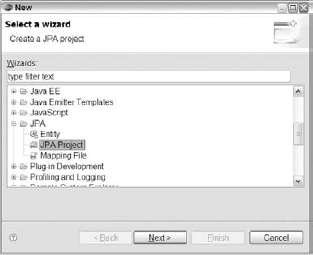
Figure 7.2. Figure 7-2
As you move to the next screen in the wizard, you come to the screen that defines the JPA facets. Figure 7-3 shows the screen when no information has been filled yet, and Figure 7-8 shows the same screen after all the necessary information is provided.
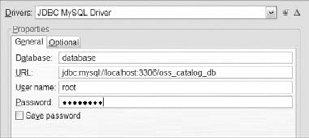
Database connection and JPA implementation are the two most important JPA facets. You can add a new database connection or use an existing one. I added a new MySQL named connection. Figure 7-4 depicts the screen where the database credentials are provided.
Figure 7.3. Figure 7-3

Figure 7.4. Figure 7-4
Then a JPA Implementation is configured. Look at Figure 7-5 to Figure 7-7 to view the steps involved in creating a Hibernate EntityManager-based JPA Implementation configuration.
Finally, you are ready with a configured set of JPA facets, as shown in Figure 7-8. The next and last screen in the wizard completes the process and creates an Eclipse Ganymede JPA project.
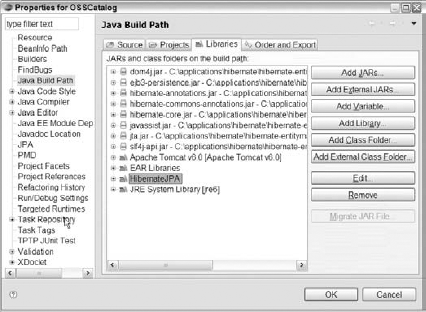
After creating a new project, add the following JAR files to your project:
dom4j.jar
ejb3-persistence.jar
hibernate-annotations.jar
hibernate-commons-annotations.jar
hibernate-core.jar
javassist.jar
jta.jar
slf4j-api.jar
Figure 7.5. Figure 7-5
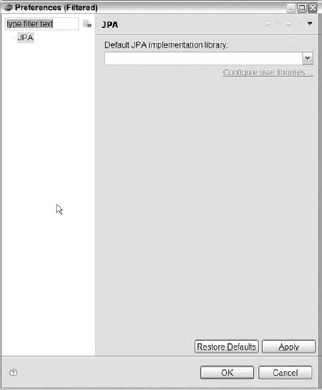
Figure 7.6. Figure 7-6

Once the external JAR files are added, your Java Build Path should be as illustrated in Figure 7-9.
Next, the entities and the persistence configuration need to be created.
Figure 7.7. Figure 7-7
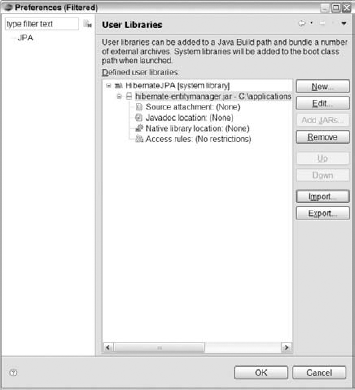
Figure 7.8. Figure 7-8
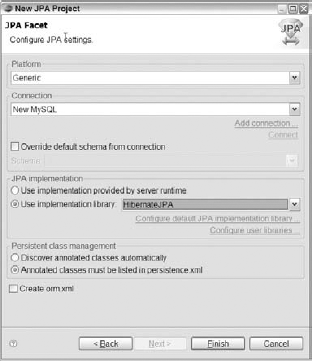
Figure 7.9. Figure 7-9
7.2.6. Program the Entities and specify metadata
The sample JPA application involves only two entities: OSSProduct and Contributor. The source code for the OSSProduct class, stripped of all the comments and import statements, is available in Listing 7-1. The source for the Contributor class is available in code download available for the book.
Example 7.1. OSSProduct.java
package problazeds.ch07;
//import statements

@SuppressWarnings("unused")
@Entity
@Table(name = "ossproducts")
@NamedQueries({
    @NamedQuery(name = "ossproducts.findAll", query = "from OSSProduct"),
    @NamedQuery(name = "ossproducts.findById", query = "Select ossp from
        OSSProduct ossp
" +
            "where ossp.oSSProductId  = :oSSProductId") })
public class OSSProduct {

    public OSSProduct() {

    }

    public int getOSSProductId() {
        return oSSProductId;
    }

    public void setOSSProductId(int productId) {
oSSProductId = productId;
}
public String getName() {
return name;
}
public void setName(String name) {
this.name = name;
}
public String getLicenseType() {
return licenseType;
}
public void setLicenseType(String licenseType) {
this.licenseType = licenseType;
}
@ManyToMany(fetch=FetchType.EAGER, cascade=CascadeType.ALL )
@JoinTable(
name="ossproduct_contributor",
joinColumns=@JoinColumn(name="ossproduct_id",
referencedColumnName="ossproduct_id"),
inverseJoinColumns=@JoinColumn(name="contributor_id",
referencedColumnName="contributor_id")
)
public Set<Contributor> getContributors() {
return contributors;
}
public void setContributors(Set<Contributor> contributors) {
this.contributors = contributors;
}
@Id
@GeneratedValue(strategy = GenerationType.AUTO)
@Column(name = "ossproduct_id", nullable = false)
private int oSSProductId;
@Column(name = "name", nullable = false)
private String name;
@Column(name = "license_type", nullable = true, unique = false)
private String licenseType;
private Set<Contributor> contributors;
} |
The OSSProduct class listed here is decorated with a large number of annotations. These annotations act as the necessary and valuable metadata for JPA to appropriately persist and manage the entity.
Some of the most important set of annotations look like this:
@Entity: Marks the class as an JPA entity.
@Table: Maps the class to the underlying table.
@NamedQuery: Defines a named query. There can be two types of queries:
Dynamic—Those that are generated on the fly, which are analogous to ad hoc SQL statements.
Static—Named queries, which are analogous to Java prepared statements or database stored procedures.
@ManyToMany—Defines a many-to-many relationship between OSSProduct and Contributor in the example. In the listing above, the many-to-many annotation has two attributes:
fetch—The fetch attribute defines the fetch strategy, which can be eager or lazy.
cascade—The cascade attribute defines how the operations should cascade from the owning entity to the related entities.
@Id—Marks a field or a property as a primary key.
@GeneratedValue—Defines the primary key generation logic.
@Column—Maps a field or property to the table column name.
JPA allows you to query entities and their collections using the JPA query language, which resembles SQL in its style and structure. For example, from OSSProduct, gives you a list of all OSSProduct entities in the data store. This query is already defined as a NamedQuery, so getting a list of all OSSProduct(s) simply involves invoking this query as follows:
Query findAllQuery = em.createNamedQuery("ossproducts.findAll");
List<OSSProduct> ossproducts = findAllQuery.getResultList();
Each set of managed JPA entities forms a persistence unit. If the application is bundled as a JAR, a configuration file called persistence.xml, which resides in the META-INF directory, specifies the core configuration parameters for a JPA implementation. The configuration parameters are specific to a persistence unit. The contents of the persistence.xml file for the example application are shown in Listing 7-2.
Example 7.2. persistence.xml for the Sample Application
<?xml version="1.0" encoding="UTF-8"?>
<persistence version="1.0" xmlns="http://java.sun.com/xml/ns/persistence" xmlns:xsi
="http://www.w3.org/2001/XMLSchema-instance" xsi:schemaLocation=
"http://java.sun.com/xml/ns/persistence http://java.sun.com/xml/ns/
persistence/persistence_1_0.xsd">
      <persistence-unit name="oss_catalog_db">
          <properties>
            <property name="hibernate.connection.driver_class" value="com.mysql.
               jdbc.Driver" />
<property name="hibernate.connection.url" value="jdbc:mysql://
localhost/oss_catalog_db" />
<property name="hibernate.connection.username" value="root" />
<property name="hibernate.connection.password" value="<specify the
password here>" />
<property name="hibernate.dialect" value="org.hibernate.dialect.
MySQL5Dialect" />
<property name="hibernate.connection.pool_size" value="6" />
<property name="hibernate.connection.autoReconnect" value="true" />
<property name="hibernate.generate_statistics" value="false" />
<property name="hibernate.show_sql" value="true" />
<property name="hibernate.use_sql_comments" value="false" />
<property name="hibernate.hbm2ddl.auto" value="update" />
</properties>
</persistence-unit>
</persistence> |
This JPA application that serves as the persistence layer for the OSSProduct and Contributor entities can be made part of a Java web application. Entities can be queried using named queries or ad hoc JPA QL queries. A small snippet for calling a named query that fetches all the OSSProduct(s) was exhibited a couple of paragraphs back.
You could access, modify, and save an OSSProduct property, say licenseType, for a particular instance that represents a row in the database table, using a code like this:
@PersistenceContext
EntityManager em;
...
public OSSProduct modifyOSSProductLicense(OSSProduct ossproduct, String licenseType) {
    ossproduct.setLicenseType(licenseType);
    em.persist(ossproduct);
    return ossproduct;
}
Although a discussion on JPA could go a lot further than our coverage so far, I will stop right here. The objective of this section was to introduce JPA, and that goal has been accomplished.
Next, I will introduce the essentials of Hibernate. The core Hibernate object/relational mapping and persistence framework has been around longer than the JPA specification. In addition, it is a major source of inspiration for JPA.