8.1. Testing
Testing Flex and BlazeDS applications involves testing applications both sides of the wire and also testing the connector in the middle. Flex and Java support unit testing frameworks that can automate and streamline the testing activity.
JUnit (http://junit.sourceforge.net/), which belongs to the xUnit testing framework family, provides an easy way to implement repeatable unit tests in Java. JUnit is not the only unit testing framework for Java. Alternatives like TestNG (http://testng.org/) exist. This chapter uses JUnit 4.7 to illustrate Java code testing strategies and methodology.
Like JUnit, FlexUnit (http://opensource.adobe.com/wiki/display/flexunit/FlexUnit) provides a way to implement repeatable tests for Flex and AS3 applications. The latest version, FlexUnit 4, is a major improvement over its original FlexUnit 1.0 release. The testing idioms used in FlexUnit and JUnit are similar.
To explain testing strategies and the necessary tools, I first fork the discussion along two independent lines, following JUnit and FlexUnit, respectively. Once I explain each of these individually, I merge the discussion to consider testing client- and server-side technologies together. I will start with FlexUnit.
8.1.1. FlexUnit
FlexUnit 1.0 is the current stable release. FlexUnit 4 beta was launched in May 2009 and will be the next release candidate. FlexUnit has evolved and changed substantially from version 1.0 to version 4, so it is prudent to understand both the versions.
I'll first demonstrate the use of FlexUnit 1.0 through an example.
8.1.1.1. A Simple FlexUnit 1.0 Example
First, using Flash Builder or another application, create a new Flex project and add FlexUnit1Lib.swc as a referenced archive file. Once you have the project set up, create a simple AS3 class, called NumericalValue, that allows you to add and subtract a number to and from an initial value of 0. Then, create a class that tests the methods of the NumericalValue class. Finally, add the test class to a test suite and run it using a test harness.
NumericalValue.as is written like this:
package test
{
    public class NumericalValue
    {
        private var value:Number=0;

        public function add(addedValue:Number){
            value = value + addedValue;
        }

        public function subtract(subtractedValue:Number){
            value = value - subtractedValue;
        }

        public function getValue():Number{
            return value;
        }
    }
}
Using FlexUnit version 1, define a test class by extending the framework TestCase class. Then, you define a number of methods in this class whose names begin with the word "test". This is a requirement. Only methods starting with the words "test" are included by the runner. The test class for NumericalValue is called NumericalValueTest. A test class name is not required to follow any particular nomenclature system or pattern. By convention, such classes are named by appending "Test" to the name of the class they are trying to test. The source for NumericalValueTest is shown in Listing 8-1.
Example 8.1. NumericalValueTest Source
package test
{
    import flexunit.framework.TestCase;

    public class NumericalValueTest extends TestCase
    {
        public function testAdd():void {
            var numericalValue:NumericalValue = new NumericalValue();
            numericalValue.add(50);
            assertTrue("Value after adding 50 to the
                initial 0 value is 50",
                numericalValue.getValue() == 50);
            numericalValue.add(50);
            assertEquals("Value after adding 50 to
                50 is 100",
                100, numericalValue.getValue());
        }

        public function testSubtract():void {
            var numericalValue:NumericalValue = new NumericalValue();
            numericalValue.subtract(100);
            assertTrue("Value after subtracting 100 from the
                inital 0 values is −100",
                numericalValue.getValue() == −100);
        }
    }
} |
Now to run the tests included in the test class, you instantiate a test suite and add the test class to a test suite, before running the test suite using a test harness. Following is a simple illustration of how you can set the test suite and the runner:
<?xml version="1.0" encoding="utf-8"?>
<mx:Application xmlns:mx="http://www.adobe.com/2006/mxml"
    xmlns:flexunit="flexunit.flexui.*"
    creationComplete="onCreationComplete()">

    <mx:Script>
        <![CDATA[
            import flexunit.framework.TestSuite;
            import test.NumericalValueTest;

            /**
             * Function called on creationComplete.
             * Set the test suite as the test property of
             * the TestRunnerBase and then run it.
             */
            private function onCreationComplete():void
            {
testRunner.test = createSuite();
testRunner.startTest();
}
private function createSuite():TestSuite {
var testSuite:TestSuite = new TestSuite();
testSuite.addTestSuite(NumericalValueTest);
return testSuite;
}
]]>
</mx:Script>
<!-- FlexUnit GUI Component -->
<flexunit:TestRunnerBase id="testRunner" width="100%" height="100%" />
</mx:Application>Once you run this test runner Flex application, you will see a user interface with the test results, as shown in Figure 8-1.
Figure 8.1. Figure 8-1
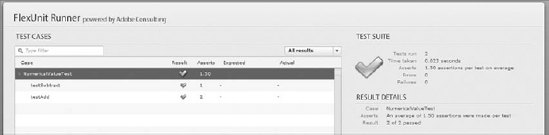
That completes an elementary example, which uses FlexUnit 1. As mentioned earlier, a substantially modified and improved version of FlexUnit (version 4) is now available as a beta release. The next section covers FlexUnit 4.
8.1.1.2. Exploring FlexUnit 4
FlexUnit 4 is a thoroughly revised and improved version of FlexUnit 1. It includes the following features:
Annotations or metadata decorations mark test cases and test suites. Requirements to extend specific classes are avoided.
Multiple functions can be defined to help set up and tear down the environment or fixtures for testing for each individual test run.
Static classes that are executed before any test run starts and after all of them are run can be included.
Test cases that should not run need only to be annotated with the "Ignore" metadata term.
Test cases can expect exceptions and assert success when such exceptions are thrown.
Hamcrest assertions, which are based on the idea of matchers, offer newer assertion types.
Support is available for multiple asynchronous events and asynchronous setup and teardown.
Multiple test runners can exist. The RunWith metadata term can associate test suites with specific runners
Theories or insights can be created and assumptions can be checked against these theories.
Custom parameters can be passed into the testing framework and displayed later with an indication of their success or failure.
Sequences of user interface interactions can be run using the automated FlexUnit testing infrastructure.
It includes UIComponent testing façade to add and remove components to and from the display list. This serves as an extension point for integration and functional testing.
To show FlexUnit 4 features in action, I will re-create the example from the earlier section on FlexUnit 1, using the new framework.
As a first step, create a Flex project, using Flash Builder. Then copy the following library files to the libs folder of the project:
FlexUnit1Lib.swc
FlexUnit4.swc
FlexUnit4UIRunner.swc
Hamcrest-as3.swc
Next, create the NumericalValue class with its add and subtract methods, exactly as in the last section.
In the last section, the NumericalValueTest class was created immediately after this stage. Listing 8-1 includes the source for that class. In this second take on the example, you create the NumericalValueTest class again, but this time things are done a bit differently.
Before I highlight the differences, you may want to glance at the modified source of the NumericalValueTest class, which is shown in Listing 8-2.
Example 8.2. NumericalValueTest FlexUnit4 Source
package test
{
    import flexunit.framework.Assert;
    public class NumericalValueTest
    {
        [Test(order=2)]
        public function checkAdd():void {
            var numericalValue:NumericalValue = new NumericalValue();
            numericalValue.add(50);
            Assert.assertTrue("Value after adding 50 to
                the initial 0 value is 50",
numericalValue.getValue() == 50);
numericalValue.add(50);
Assert.assertEquals("Value after adding 50 to
50 is 100", 100, numericalValue.getValue());
}
[Test(order=1)]
public function checkSubtract():void {
var numericalValue:NumericalValue = new NumericalValue();
numericalValue.subtract(100);
Assert.assertTrue("Value after subtracting 100 from
the inital 0 values is −100",
numericalValue.getValue() == −100);
}
}
} |
There are a few differences in the two versions of NumericalValueTest. Since both the classes implement identical functionality, comparing these two versions highlights the change in style and semantics between the old and the upcoming versions of FlexUnit. The things that are different are:
With FlexUnit 4, the test class does not extend the framework TestCase class.
In FlexUnit 1, test method names start with the word "test". In FlexUnit 4, test method names do not need to have "test" prefixed to their names. Instead such test methods are annotated with the [Test] metadata.
If you want the tests to run in a particular order, you can do so by assigning a value to the order attribute of the [Test] metadata.
In FlexUnit 4, the assert statements are accessed as methods of the static Assert class. In the earlier version of FlexUnit, these methods were accessible as local methods because the test class inherited them by virtue of extending the TestCase class.
Now, to run the tests defined in the test class, NumericalValueTest, create a test suite and add the test class to it, and finally run the test suite using a test runner. There a few changes in the way how this is done in FlexUnit 4 as opposed to how it's done in Flex Unit 1. Again, to understand the changes let's first scan the test suite and test runner code. A test suite, FlexUnit4ExampleTestSuite, that I use to run the simple tests is shown here:
package test
{
    [Suite]
    [RunWith("org.flexunit.runners.Suite")]
    public class FlexUnit4ExampleTestSuite
    {
        public var numericalValueTest:NumericalValueTest;
    }
}
Instead of extending TestSuite or creating an instance of a built-in framework TestSuite, as was done in FlexUnit 1, in FlexUnit 4 you merely annotate the test suite class with the [Suite] metadata. In addition, you specify a runner using the [RunWith] metadata.
FlexUnit 4 allows you to configure and use multiple runners to run your tests. A runner finds a test, executes it, and reports the results of such a test. By default, the FlexUnit 4 framework attempts to assign the most appropriate runner for a test class. However, you can override the default behavior and explicitly define a runner by using the [RunWith] metadata. A number of built-in runners come with the framework for the following:
FlexUnit 1
FlexUnit 4
Fluint (http://code.google.com/p/fluint/), an open source Flex testing framework that has inspired some of the new features in FlexUnit 4
Structured Log Testing (SLT) (http://structuredlogs.com/), a testing framework that uses structured log statements and visually advanced tools
In addition, the framework allows you to plug in a custom runner of your own. The API provides a way for you to write custom runners that leverage the framework and return the results using the same interface that built-in runners use.
The org.flexunit.runners.Suite runner used in the example instructs the framework to use an appropriate runner for each of the test classes.
Once a runner is defined, add a GUI as a test result listener and run the test suite like so:
<?xml version="1.0" encoding="utf-8"?>
<mx:Application xmlns:mx="http://www.adobe.com/2006/mxml"
    xmlns:flexUnitUIRunner="http://www.adobe.com/2009/flexUnitUIRunner"
        creationComplete="creationCompleteHandler(event)">

        <mx:Script>
            <![CDATA[
                import test.NumericalValueTest;
                import test.FlexUnit4ExampleTestSuite;
                import mx.events.FlexEvent;

                import org.flexunit.listeners.UIListener;
                import org.flexunit.runner.FlexUnitCore;

                private var flexUnitCore:FlexUnitCore;

                protected function creationCompleteHandler(event:FlexEvent):void
                {
                    flexUnitCore = new FlexUnitCore();
                    flexUnitCore.addListener( new UIListener( testRunner )
                    flexUnitCore.run( FlexUnit4ExampleTestSuite );
                }
            ]]>
</mx:Script>
<flexUnitUIRunner:TestRunnerBase id="testRunner" width="100%" height="100%" />
</mx:Application>When compared with FlexUnit 1, there are a few big changes in the way a test is run. Instead of directly starting the test run on a GUI test runner, the responsibilities of running tests and displaying the results are decoupled. A FlexUnitCore instance now acts as the test harness, which allows a GUI to register itself as a UIListener. This FlexUnitCore instance runs the test suite.
Our example under the new framework is now fully ready. Next, you edit the test class a bit and add a couple of extra test cases to demonstrate a few of the newer features.
The first set of additions are two methods, one runs before every test and the other after every test. These methods are:
[Before]
public function runBeforeEveryTest():void {
    numericalValue.setValue(50);
}

[After]
public function runAfterEveryTest():void {
    numericalValue.setValue(0);
}
After adding these two methods, you will see your tests fail. The tests were written with an initial value of zero in mind. The new method runBeforeEveryTest sets the initial value to 50, which obviously makes the tests fail.
Apart from these methods, you could add additional tests that utilize hamcrest assertions and verify theories. A hamcrest assertion involves the concept of a matcher, which allows for flexible expressions as test conditions. Verifying a theory, on the other hand, is based on the concept of testing an insight or a set of assumptions. You consider a few data points, which you pass in as parameters to the test and then verify your theory. You can learn more about the concept of "theories" from a white paper titled "The Practice of Theories: Adding 'For-all' Statements to 'There-Exists' Tests." This white paper on "theories" is authored by David Saff and Marat Boshernitsan and is accessible online at http://shareandenjoy.saff.net/tdd-specifications.pdf.
A simple hamcrest assertion could be added as shown in Listing 8-3. This new test class can be added to a test suite, which could possibly be named FlexUnit4TestSuiteHamcrest, and then passed in as a parameter to the run method of a FlexUnitCore instance.
Example 8.3. NumericalValueTestHamcrest Source
package test
{
    import org.hamcrest.number.between;
    import flexunit.framework.Assert;
import org.hamcrest.Description;
import org.hamcrest.StringDescription;
public class NumericalValueTestHamcrest
{
var numericalValue:NumericalValue = new NumericalValue();
var numbers:Array;
[Before]
public function runBeforeEveryTest():void {
numericalValue.setValue(50);
numbers = new Array( −250, −200, −150, −100,
−50, 0, 50, 100, 150,
200, 250, 300 );
}
[After]
public function runAfterEveryTest():void {
numericalValue.setValue(0);
numbers = null;
}
[Test(order=2)]
public function checkBetweenRangeExclusive():void {
numericalValue.add(50);
Assert.assertTrue("Value after adding 50 to the
initial 50 value is 100",
between(numbers[5],numbers[11],true)
.matches(numericalValue));
numericalValue.add(50);
Assert.assertFalse("Value after adding 50 to 100
is 150",
between(numbers[8],numbers[11],true)
.matches(numericalValue));
}
[Test(order=1)]
public function checkBetweenRangeInclusive():void {
numericalValue.subtract(100);
Assert.assertTrue("Value after subtracting 100
from the inital 50 values is −50",
between(numbers[3],numbers[5],true)
.matches(numericalValue));
var description:Description
= new StringDescription();
description.appendDescriptionOf
(between(numbers[0], numbers[11]));
Assert.assertEquals("Expected mismatch description",
"a Number between <-250> and <300>",
description.toString());
}
}
} |
Next, an elementary example of testing theories is explained. Say that you assume a particular numerical value is greater than a given number, for example 150. You could test this insight by checking if your data point passes a "greater than 150" test or not. The "greater than 150" test then becomes a theory, and you run tests to establish if your assumption is correct or not. Part of code that defines [DataPoint] and [Theory] for this elementary example is:
[DataPoint]
public static var number:Number = 200;

[Theory]
public function testGreaterThanTheory( number:Number ):void
{
    assumeThat( number, greaterThan( 150 ) );
}
Theories are RunWith a special theory runner, org.flexunit.experimental.theories.Theories.
Apart from all the newer assertion types, FlexUnit 4 supports concurrent processing of multiple asynchronous events. Test methods are annotated with the [Test] metadata. This metadata has optional async and timeout properties. Methods that need asynchronous processing need to simply specify the async property in their metadata. In addition, such methods could have a timeout property that defines the maximum time after which the method does not wait for the asynchronous processing to complete.
So far, you have learned a lot about FlexUnit and the ways of unit testing in Flex applications. Next, attention is turned to JUnit and the unit testing facility for the Java code. The server-side code in BlazeDS runs in a JVM and is Java.
8.1.2. JUnit
FlexUnit draws inspiration and ideas from JUnit, both being xUnit testing framework types. You have learned a fair bit about FlexUnit. So now as you discover JUnit, things will, not surprisingly, look very familiar.
Let's first see JUnit in use. Once again consider a class that holds a numerical value and allows for values to be added to and subtracted from it. Let the class and method names be the same as in the AS3 class of the Flex application. That way, you will get a chance to compare and contrast the two.
Start by downloading the latest release of JUnit from http://sourceforge.net/projects/junit/. The latest stable release version is 4.6, but the exact version number could vary depending on when you finally get down to downloading JUnit. Just make sure that you have version 4 or higher. Versions of JUnit 4.x leverage Java annotations. Annotation support was introduced with Java 5. So, also make sure to have a version of JRE equal to or greater than 5.
JUnit is distributed as a JAR archive file. Once the download is complete, add the JAR file to the Java CLASSPATH environment variable. All classes specified in the CLASSPATH can be loaded by the JVM and are, therefore, available for an application to use.
After downloading JUnit and setting it up on the classpath, create the NumericalValue class. The NumericalValue class is a simple class that has only one property, named value. The class defines a getter and a setter method for this property. In addition, it has two methods, called add and subtract, that facilitate the addition and subtraction operations between the value and a passed in numerical parameter. The source for NumericalValue.java is:
package test;

public class NumericalValue
{
    private int value = 0;

    public int getValue()
    {
        return value;
    }
    public void setValue(int value)
    {
        this.value = value;
    }

    public void add(int addedValue){
        value = value + addedValue;
    }

    public void subtract(int subtractedValue){
        value = value - subtractedValue;
    }

}
Next, create a test class to verify the results of the addition and subtraction operations. The source of this test class, named NumericalValueTest, is shown in Listing 8-4.
Example 8.4. NumericalValueTest Source
package test;

import static org.junit.Assert.*;
import org.junit.After;
import org.junit.Before;
import org.junit.Test;

import junit.framework.Assert;

public class NumericalValueTest
{

    @Before
    public void setUp() throws Exception
{
}
@After
public void tearDown() throws Exception
{
}
@Test
public void testAdd()
{
NumericalValue numericalValue = new NumericalValue();
numericalValue.add(50);
Assert.assertTrue("Value after adding 50 to the
Initial 0 value is 50",
numericalValue.getValue() == 50);
numericalValue.add(50);
Assert.assertEquals("Value after adding 50 to 50 is 100",
100, numericalValue.getValue());
}
@Test
public void testSubtract()
{
NumericalValue numericalValue = new NumericalValue();
numericalValue.subtract(100);
Assert.assertTrue("Value after subtracting 100 from the
inital 0 values is −100",
numericalValue.getValue() == −100);
}
} |
Compile both NumericalValue and NumericalValueTest and then run the JUnit tests using the following command:
java org.junit.runner.JUnitCore test.NumericalValueTest
You can, alternatively, make the test part of a test suite and run it with a test runner of your choice, in a manner similar to that shown in the example for FlexUnit 4.
There are plenty of books and online resources on JUnit, and I leave if for you to explore those resources. However, before I move on to the next topic, let me quickly summarize the key features, which are:
Test classes do not need to extend a specific class but only need to be annotated with the @Test metadata term.
Methods can be run before and after every test. The methods that run before every test are annotated with the @Before metadata term, while the methods that are run after every test are annotated with the @After metadata term.
The setting up and tearing down of fixtures can be done not only before and after every test method run but before any test runs and after all tests are run. A class that contains code to run before any test is run is annotated with the @BeforeClass metadata term, while a class that runs after all tests are run is annotated with the @AfterClass metadata term.
Tests to be ignored during a test run need to be annotated with the @Ignore metadata term.
Tests that are expected to throw exceptions should include the expected property in their @Test annotation. For example: @Test(expected = ArithmeticException.class).
Multiple test suites can be included in a @Suite.SuiteClasses annotation.
A runner could be defined for the suite by using the @RunWith annotation.
A timeout property can be defined for the @Test annotation. The test fails if it doesn't complete before the timeout.
Hamcrest assertions, assumptions, and theories can be checked.
Junit4Adapter can be used to run JUnit 4 tests with JUnit 3
So far, you have been exposed to the fundamentals of unit testing using FlexUnit and JUnit. You can use the two frameworks in tandem to write and run tests for both the client- and server-side code. Such test runs can be automated using Apache ANT and can be integrated into continuous integration tools like CruiseControl. You will learn about both ANT-based automation and CruiseControl integration later in this chapter.
While unit tests give a developer power to test and fortify one's code, its often imperative that user interfaces and systems as a whole be subject to testing. Often the individual pieces could work well, but they have trouble working together.
This is where functional testing and integration testing come into play, which is what you learn about next.
8.1.3. Functional and Interface Testing
Functional testing or integration testing tests a system as a whole against its requirements. It's a form of black box testing. In applications that involve a graphical user interface, user interface interaction testing also plays a critical role in system testing.
In this section, I will illustrate the following:
FlexMonkey — An open source testing framework for Flex applications that provides capture, replay, and verification functionality for UI testing.
FunFx — An open source Ruby-based tool for functional testing of Flex applications.
Although xUnit testing frameworks and its extensions can be used for system testing, I will not indulge in that discussion here.
Further, although I discuss system testing, especially UI testing, with Flex in perspective, I do try to bring in the BlazeDS aspects when relevant. After all, we are trying to test the entire application and that includes both Flex and BlazeDS.
Let's start with FlexMonkey.
8.1.3.1. Flex Monkey
FlexMonkey is a testing framework that automates the process of capturing, replaying, and verifying Flex user interfaces. It leverages the Flex automation API and builds on top of the sample automation adapter, AutoQuick.
The Flex automation framework consists of four distinct parts, namely:
Core Flex API — The SystemManager class parents all display components in Flex. It calls the init method of all instantiated mixins. The SystemManager class is the parent of the automation framework components and calls the init method of the AutomationManager mixin.
Automation API — At the heart of the automation framework is a singleton called the AutomationManager, which facilitates the recording of interactions. Each UI component has a delegate that facilitates manipulation of these components by the automation framework. Components that don't have a delegate of their own use their parent's delegate to work with the automation framework. A third important part of the automation framework is a static class, called Automation, that stores and manages the map between components and their delegates.
Agent or Adapter — This is the intermediary that facilitates communication between a Flex application and the automation tools.
Tool — The automation tool itself that implements the recording and playback features.
To understand FlexMonkey better, it would be useful to walk through a simple usage scenario. As a first step download and install FlexMonkey. The FlexMonkey project is hosted online at http://code.google.com/p/flexmonkey/. Download the latest version of the distribution. Currently, the latest release version is 0.8a. The testing framework has not reached the version 1.0 milestone, but it is fairly ready for serious use. The distribution is available in a .zip archive file format. Expand the .zip archive file to a folder on your file system. When you expand the archive file, you should see the following files and subfolder(s):
lib — External .swc files that FlexMonkey uses.
src — The source code for the MonkeyContacts sample application and the associated tests.
FlexMonkey.swc — A library that contains the FlexMonkey recording and playback API, the FlexMonkey user interface, and a FlexUnit test runner.
FlexMonkeyLauncher.swf — Launches Flex applications to be used with FlexMonkey. Recorded tests are also loaded using this launcher.
MonkeyContacts.swf — A sample application that uses FlexMonkey.
FlexMonkeyTests.swf — A set of unit tests for the MonkeyContacts application. The FlexMonkeyTests application shows how unit test scaffolding and test methods can be generated. It also illustrates how custom tests can be added to the script generated by the FlexMonkey recorder.
MonkeyContactsTest.html — An HTML wrapper that includes a FlexMonkeyLanucher instance that launches the MonkeyContacts sample application.
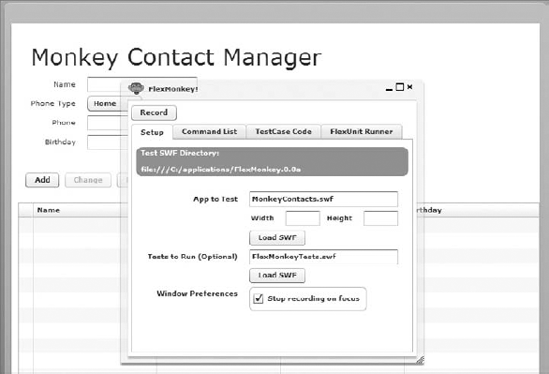
If you are impatient to see how FlexMonkey works, then simply open MonkeyContactsTest.html in a web browser, and you will see a screen come up, as shown in Figure 8-2. In this figure, you will notice input controls labeled: App to Test and Tests to Run (Optional). App to Test is where you specify the .swf application file you would like FlexMonkey to load. Once you have loaded a .swf and recorded and played back a few interactions with it, you have the choice to extend and customize the generated test scripts and package it off as a separate Flex application. This test application .swf is specified in the Tests to Run field.
Figure 8.2. Figure 8-2
FlexMonkey provides a unobtrusive way to record and play back target Flex applications. To prove this point and to explain how to include FlexMonkey with your existing Flex application, I will indulge in a small exercise.
The turnkey version of BlazeDS comes with a set of sample applications, which are bundled together in a web application, called Samples. This web application is distributed in a WAR archive file format. You can deploy this archive file, samples.war, to an application server of your choice. In many application servers, such as Apache Tomcat and JBoss AS, dropping this WAR file in the deployment folder and possibly restarting the application server is all that's required. In Apache Tomcat, deploy the application in its webapps folder. The turnkey distribution comes with an instance of Apache Tomcat server, so all you need to run and access the samples is to simply start the server instance. In JBoss AS, samples.war can be deployed in the server/default/deploy folder.
In order to enable FlexMonkeyLauncher to load and launch a Flex application .swf, you need to copy FlexMonkeyLauncher.swf file in the same directory as the compiled Flex application. My intention is to run FlexMonkey against an example that uses BlazeDS remoting, so I add FlexMonkeyLauncher.swf to the folder that contains the compiled .swf for such an application.
Remoting example applications are available in the BlazeDS samples.war. The simplest of the remoting examples in this bundle is testdrive-remoteobject. The compiled .swf for testdrive-remoteobject, called main.swf, resides in samples/testdrive-remoteobject. In order to add FlexMonkeyLauncher.swf to samples.war, you follow a three-step process like so:
Unpack samples.war to any folder in the file system. You could use jar xvf samples.war to unpack samples.war.
Copy FlexMonkeyLauncher.swf to the testdrive-remoteobject within the unpacked samples application folder.
Re-create a samples.war file out of the folder content. FlexMonkeyLauncher.swf will now be included. You could use jar cvf samples.war *, when in the folder where the contents of the expanded samples.war reside, to create samples.war.
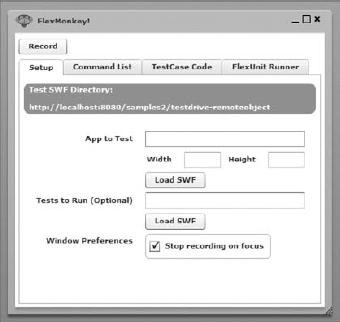
Next, redeploy the modified samples.war file to the application server of your choice. I deploy it to JBoss AS. Finally, access the FlexMonkey Laucher.swf file using the appropriate URL. In my case, it's accessible at http://localhost:8080/samples/testdrive-remoteobject/FlexMonkeyLauncher.swf. You will see a screen like that depicted in Figure 8-3.
Figure 8.3. Figure 8-3
Load the testdrive-remoteobject application, main.swf, using this Flex Monkey launcher. A screen like that depicted in Figure 8-4 will appear.
Click the Get Data button. That will populate the application data grid. Remember to start the sampledb by going to the sampledb folder in the BlazeDS turnkey distribution and running the startdb script file, before you click the Get Data button, or you will end up with in error. The sampledb is a small-footprint database to populate sample data in the sample BlazeDS applications. This database is distributed as a part of the BlazeDS sample applications bundle.
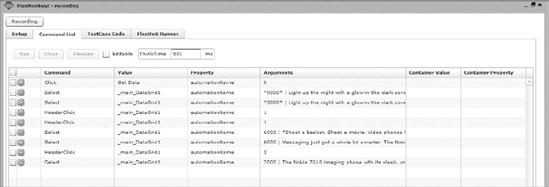
You know that FlexMonkey lets you record your interactions and user interface gestures with a Flex application. Once the interactions are recorded, this allows you to play back these recordings. It also generates test case code for these interactions. To start recording interactions, click the Record button on the FlexMonkey user interface. The Record button is a toggle button, so alternate clicks cause recording to start and stop. Figure 8-5 shows a recording of a series of interactions with the application.
Figure 8.4. Figure 8-4
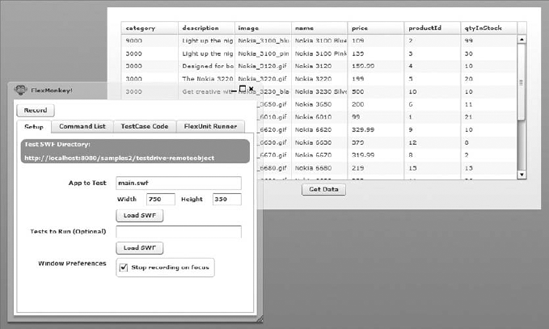
Figure 8.5. Figure 8-5
Next, click on the TestCase Code tab to view the generated test case code. In my case the code is:
// Test test method
    public function testSomething():void {
        var cmdRunner:CommandRunner = new CommandRunner();
        cmdRunner.addEventListener(MonkeyEvent.READY_FOR_VALIDATION,
addAsync(verifySomething, 10000));
cmdRunner.runCommands([
new FlexCommand("Get Data", "Click", ["0"], "automationName"),
new FlexCommand("_main_DataGrid1", "Select", ["*9000* | Light up
the night with a glow-in-the-dark cover - when it is charged with light you can
easily find your phone in the dark. When you get a call, the Nokia 3100 phone
flashes in tune with your ringing tone. And when you snap on a Nokia Xpress-on
gaming cover, you will get luminescent light effects in time to the gaming
action. | Nokia_3100_blue.gif | Nokia 3100 Blue | 109 | 2 | 99", "1", "0"],
"automationName"),
new FlexCommand("_main_DataGrid1", "Select", ["*3000* | Light up
the night with a glow-in-the-dark cover - when it is charged with light you can
easily find your phone in the dark. When you get a call, the Nokia 3100 phone
flashes in tune with your ringing tone. And when you snap on a Nokia Xpress-on
gaming cover, you will get luminescent light effects in time to the gaming
action. | Nokia_3100_pink.gif | Nokia 3100 Pink | 139 | 3 | 30", "1", "0"],
"automationName"),
new FlexCommand("_main_DataGrid1", "HeaderClick", ["1"], "automationName"),
new FlexCommand("_main_DataGrid1", "HeaderClick", ["1"], "automationName"),
new FlexCommand("_main_DataGrid1", "Select", ["6000 | *Shoot a basket.
Shoot a movie. Video phones from Nokia... the perfect way to save and share life's playful
moments. Feel connected.* | Nokia_6620.gif | Nokia 6620 | 329.99 | 9 | 10", "1", "0"],
"automationName"),
new FlexCommand("_main_DataGrid1", "Select", ["6000 | Messaging just got a
whole lot smarter. The Nokia 6820 messaging device puts the tools you need for rich
communication - full messaging keyboard, digital camera, mobile email, MMS, SMS, and
Instant Messaging - right at your fingertips, in a small, sleek device. | *Nokia_6820.gif* |
Nokia 6820 | 299.99 | 7 | 8", "1", "0"], "automationName"),
new FlexCommand("_main_DataGrid1", "HeaderClick", ["3"], "automationName"),
new FlexCommand("_main_DataGrid1", "Select", ["7000 | The Nokia 7610
imaging phone with its sleek, compact design stands out in any crowd. Cut a cleaner
profile with a megapixel camera and 4x digital zoom. Quality prints are all the
proof you need of your cutting edge savvy. | Nokia_7610_black.gif | *Nokia 7610
Black* | 450 | 13 | 20", "1", "0"], "automationName")]);
}
// Called after commands have been run
private function verifySomething(event:MonkeyEvent):void {
var comp:UIComponent = MonkeyUtils.findComponentWith("someAutomationName")
Assert.assertEquals("value",comp.prop);
}The generated source will be different for you and will depend on what interface interactions you indulge in. The generated code, like the preceding sample, is the starting point for incorporating test cases. testSomething uses a command runner to rerun recorded user interactions for testing purposes. Once the command runner runs the command, a READY_FOR_VALIDATION event is dispatched. To handle this event and run assertions, add the verifySomething method as the event listener for this event. Make sure to add this using FlexUnit's addAsync method. verifySomething is the method in which you can include the test assertions to verify the logic. FlexMonkey generates scaffolding to retrieve a generic UIComponent using the automation name, which provides a reference to the UIComponent in the context of the Flex automation framework. If you assign a specific ID to a UIComponent it is assigned as its automation name. If no explicit ID is provided by the developer, the system generates an automation name. Once you get a reference to a UIComponent, you can run assertions on the component's property values. Generic UIComponents can be cast to strongly typed components and then run through assertions. So the generated statement:
var comp:UIComponent = MonkeyUtils.findComponentWith("someAutomationName");can be replaced with:
var comp:DataGrid=
MonkeyUtils.findComponentWith("_main_DataGrid1") as DataGrid;
in this example, since we know the component referenced with _main_DataGrid1 automation name is the DataGrid of our application. In this particular situation, you can make an assertion that the first item in the collection belongs to the category identified by the value of 9000. Such an assertion can be included as follows:
Assert.assertEquals("9000", ArrayCollection(comp.dataProvider).getItemAt(0).category);After you have created the test cases, include and compile them as a separate Flex application. Doing this allows unobtrusive test running. Test cases can easily be added to the FlexMonkey test suite using FlexMonkey.addTestSuite method. The test Flex application can be launched using FlexMonkeyLauncher.swf.
You learned earlier that the recorded user interaction sequence is run with the help of a series of corresponding FlexCommand instances. These instances are run with a default gap of 5 seconds between them. You can explicitly control this delay by adding the PauseCommand and specifying the required delay in milliseconds as an argument to the method. You can also call external AS3 methods and modify the recording run by adding a CallCommand method at the appropriate point in the sequential run. External methods can be called by passing them as arguments to the CallCommand method.
FlexMonkey can be extended and customized using AS3 alone, and that makes it more attractive than alternatives that require the use of custom scripting languages. Sometimes the use of an external language can be advantageous, especially if the external language makes the testing experience more robust or provides easier idioms and syntax for productivity enhancement. The next open source tool I will consider for functional testing of Flex and BlazeDS applications is FunFX, which leverages the popular Ruby programming language.
8.1.3.2. FunFX
FunFX is an open source, functional testing tool for Flex applications. It is built on Ruby, a popular dynamic language. The tool leverages the Flex automation API to implement a user interface, but exposes its own API in Ruby to enable developers to write user interface interactions and user gestures. The tool works only with a Flex application working in an Internet Explorer (IE) browser instance, which may be a showstopper for IT shops that develop applications on Linux or MAC OS computers.
You can download FunFX from its RubyForge site at http://funfx.rubyforge.org/. The current release version is 0.0.4, indicating that the tool is very new and still in its alpha release phase. Although the tool is in its alpha phase, it appears promising and that is why I talk about it in this book. Besides making it possible for a developer or tester to walk through a user interaction scenario, the tool allows the inclusion of both unit testing and behavior-driven testing frameworks.
FunFX is available in a .zip archive file. After you download and expand the archive file to a folder on your file system, you will find the following files in it:
AutomationGenericEnv.xml
FunFXAdapter.swc
FunFX-0.0.4.gem
I mentioned earlier that FunFX leverages the automation API. Therefore, to get FunFX to work you need to have access to the .swc files that contain the automation framework classes. For Flex 3, the automation framework is part of Flex Builder 3. Flex Builder (which is now renamed Flash Builder) is a licensed tool, although it's inexpensive and 30-day trial versions of this IDE IS available.
To run FunFX, you need the following automation-related .swc library files:
automation_agent.swc (in the Flex Builder 3 Plug-insdks3.2.0frameworkslibs folder)
automation_agent_rb.swc (in the Flex Builder 3 Plug-insdks3.2.0frameworkslocaleen_US folder)
automation.swc (in the Flex Builder 3 Plug-insdks3.2.0frameworkslibs folder)
Before you start using FunFX with your Flex application, download and install Ruby and its gems infrastructure. Steps on getting and installing Ruby or its libraries are beyond the scope of this book. However, it's easy to find plenty of information on this subject by simply googling for it. Also, the following online resources could help you download, install, and set up Ruby and RubyGems:
Once Ruby and RubyGems are installed and ready for use, install the FunFX gem. FunFX gem is available in the .zip file that you download from the FunFX RubyForge site. You can install the FunFX gem with the help of a simple command, like so:
gem install FunFX-0.0.4.gem
FunFX provides a way to walk through a set of interactions in a Flex application. These interactions are specified in Ruby. The Ruby program interacts with the Flex application with the help of two key connectors:
Win32OLE — This helps drive the IE browser interactions.
ExternalInterface — This helps the Ruby scripts connect with a Flex application.
On the Flex side, a library that serves the purpose of an adapter interfaces with the automation API. This library is FunFXAdapter.swc. The Ruby API and framework for FunFX itself is dynamically built from an XML file, named AutomationGenericEnv.xml. This XML file declares and defines all the display objects and their properties.
In order to leverage FunFX to write automated interaction use cases and associate them with tests, first create a new Flex project. Then pass in the following command line parameters to the Flex compiler:
--include-libraries
    "C:Program FilesAdobeFlex Builder 3 Plug-insdks3.2.0frameworkslibs
      automation.swc"
    "C:Program FilesAdobeFlex Builder 3 Plug-insdks3.2.0frameworkslibs
      automation_agent.swc"
    "C:Program FilesAdobeFlex Builder 3 Plug-insdks3.2.0frameworkslocale
      en_USautomation_agent_rb.swc"
Now you are ready to start writing your Ruby scripts to drive user interaction scenarios.
For example, you can click the Get Data button of the BlazeDS distribution testdrive-remoteobject sample application using FunFX ruby scripts, like so:
@ie = Funfx.instance
@ie.start(true)
@ie.speed = 1
@ie.goto("http://localhost:8080/samples2/testdrive-remoteobject/index.html", "main")
@ie.button("Get Data").click
FunFX does not have a means of testing the application. For that, you could leverage Test::Unit or RSpec. Together with the testing frameworks, FunFX provides a complete automated functional testing facility.
Next, I will illustrate a rudimentary example of using RSpec with FunFX. The purpose of this illustration is only to provide you with a sample usage pattern of a functional testing scenario. It is advisable that you learn the xUnit framework, Test::Unit, and the behavior-driven testing framework, RSpec, in detail if you are interested in leveraging Ruby for Flex and BlazeDS application functional testing.
To start using RSpec, first install it using Ruby Gems simply by typing gem install rspec on your command line. RSpec will be installed, and you will be prompted with a nice thank you note on your command line.
Next, create three important files to use RSpec (with FunFX). These three files will contain the following:
Story — This allows the definition of test scenarios using simple text. It provides a way for a business user to understand the test case as well.
Steps — This provides the steps that need to run so that the story translates to the underlying code.
Test runner — This is a file that brings the story and the steps together and uses the RSpec's rBehave to run the behavior-driven tests.
Your sample story file, which only covers the trivial usage scenario of clicking a Get Data button to retrieve a list of products is:
Story: Get Product List

As a user
I want to be able to get a list of all products,
which in this case is a list of Nokia phones
So that I can see what is available

Scenario: Get product
Given the user is logged into the application
When the user clicks the Get Data button
Then the product list view is visible in the data grid

Then close the application
A corresponding steps file for this story can be like so:
require 'funfx'

steps_for :product do
Given "the user is logged into the application" do
@ie = Funfx.instance
@ie.start(true)
@ie.speed = 1
@ie.goto("http://localhost:8080/samples2/testdrive-remoteobject/index.html", "main")
end

When "the user click the $button_name button" do |button_name|
@ie.button(button_name).click
end

Then "the product list view is visible in the data grid" do
@ie.data_grid().visible == "true"
end

Then "close the application" do
@ie.unload
end
end
Finally, create a file that runs this RSpec test scenario. The runner file can be written like this:
require 'rubygems'
require 'spec/story'
$:.unshift(File.dirname(__FILE__) + '/lib')
require 'steps/product'

with_steps_for :product do
run File.dirname(__FILE__) + '/stories/get_products'
end
For this trivial example, that is all you need to do to run a RSpec test case. You will obviously need to do a lot more work for real-life, complicated Flex and BlazeDS applications. However, the general approach would be the same as that taken in this trivial case.
Having seen FlexMonkey and FunFX, you now know the automated functional testing possibilities for Flex and BlazeDS applications. Beyond these tools, you do have commercial offerings like QTP and SilkTest that perform such tasks and provide a bunch of bells and whistles over and above the basic testing. If you don't like any of these, then you also have the choice to use the automation API and write a tool of your own.
Next, we look at automating the task of running the unit tests and functional tests using Apache ANT. An important aspect of thorough testing is the automation of repeatable test runs. This allows for continuous checks after every new function implementation and refactoring.
8.1.3.3. Automating with ANT
In this section, you will learn to use Apache ANT to automate the tasks of running your tests. Apache ANT is a Java-based build tool that aims to provide a flexible, robust, and extensible build system across all platforms that support Java. You can download the software and learn more about it at http://ant.apache.org/.
To run FlexUnit tests using ANT, it is prudent to leverage the FlexAntTasks, a freely available utility for this purpose. FlexAntTasks is now bundled with the Flex SDK and available to you if you have a Flex SDK greater than version 3 installed on your machine. FlexAntTasks extends the ideas of the JUnit ANT task. JUnit, as you already know from an earlier section in this chapter, is a xUnit testing framework for Java.
FlexAntTasks runs a test Flex application using an ANT script. In addition, it starts up a socket server, which is used by the test runner to connect back to relay the test results. After the application is launched, the flex unit test runner opens a connection back to the socket server that is part of the flex unit ANT task. As the test runs complete, results are sent back over the socket connection. The result is sent back in an XML format. Toward the end of the test suite run, the different XML pieces, the test run results, are combined into a useful report. The aggregated and structured test results reports follow the same style and format as the JUnitReport. You can read more about the off-the-shelf report format, named JUnitReport, which aggregates the individual XML files into one, at http://ant.apache.org/manual/OptionalTasks/junitreport.html.
I mentioned that FlexUnit ANT tasks are derived from the corresponding JUnit ANT tasks. Therefore, it's obvious that JUnit ANT tasks follow a similar pattern of communication and results aggregation. You can use the FlexUnit and JUnit ANT tasks together to automate your test runs for a Flex application and its BlazeDS remote service objects.
FlexAntTasks can be downloaded from http://weblogs.macromedia.com/pmartin/archives/2007/01/flexunit_for_an_1.html. The binary compiled versions of the FlexAntTasks are distributed as a JAR file. Make sure to add this JAR file to Apache ANT's classpath. At this stage, the assumption is that you have downloaded, installed, and set up Apache ANT.
If you haven't installed ANT yet or are having trouble getting it up and running, then you will benefit from reading the ANT documentation on the steps involved in downloading, installing, and setting up ANT. Usually, the installation and setup only involves downloading and unpacking the compiled distribution, setting the ANT_HOME environment variable to point to the folder where ANT is unpacked, and adding the bin directory of the unpacked ANT folder to the PATH environment variable.
As mentioned earlier, the FlexUnit ANT task is assisted by a test runner that formats the results in a desired XML format and sends it up to the socket server, started by the FlexUnit ANT task. The test runner can be downloaded from http://weblogs.macromedia.com/pmartin/archives/2007/01/flexunit_for_an_1.html. It is distributed as a .swc archive file, named FlexUnitOptional.swc.
Next, to explain the usage of FlexAntTasks I will walk you through a simple example. FlexAntTasks and the test runner come with a sample application that illustrates a usage scenario. You certainly have the option to look that up. However, to keep things consistent with what you have learned in this chapter, I use FlexAntTasks to run the NumericalValueTest class from the section titled "FlexUnit."
Using Flash Builder, first create a new Flex application. Add the following .swc files to the libs folder:
flexUnit.swc — The FlexUnit core features are located in this archive file.
FlexUnitOptional.swc — The JUnitTestRunner that formats and sends XML result messages to the Flex unit ANT tasks–initiated socket server is contained in this archive file.
The tests are already defined. So, the only real change is the use of flexunit.junit.JUnitTestRunner to run the tests. This change can be incorporated by replacing the earlier test runner method with the following:
[Bindable]
    private var runner : JUnitTestRunner;
    private function onCreationComplete() : void {
        runner = new JUnitTestRunner();
        runner.run( createSuite(),
            function():void {
                fscommand("quit");
            } );
    }

    private function createSuite() : TestSuite {
        var testSuite : TestSuite = new TestSuite();
        testSuite.addTestSuite( NumericalvalueTest );

        return testSuite;
    }
Besides the new test runner method, you can define additional classes to receive and parse the resulting XML files. The preceding illustration describes test runs of individual hand-coded unit tests. However, the same approach can be used to run FlexMonkey-generated tests.
Next, the XML result files will be used to integrate the FlexUnit test runs with "CruiseControl," which is a popular continuous integration software.
8.1.3.4. Continuous Integration
Continuous integration is a software development practice in which each developer in a team frequently integrates his or her work into the overall application. Usually, developers integrate their work on a daily basis and utilize automated scripts to build and run tests after integration. Many agile developers follow the practice of continuous integration. Continuous integration helps in significantly reducing integration problems.
CruiseControl and Hudson are two popular continuous integration management and monitoring tools. In addition, Maven and ANT build systems could be leveraged for continuous integration. You can read more about CruiseControl at http://cruisecontrol.sourceforge.net/. More about Hudson can be explored from its website accessible at https://hudson.dev.java.net/.
8.1.3.5. Using CruiseControl
CruiseControl comes in three forms:
A binary distribution in a .zip archive file, which you can simply expand and start using
A source distribution that needs to be compiled before it is ready for use
A Windows installer that allows you to install CruiseControl with the help of a wizard on the windows platform
CruiseControl is built on Java but has a version for Ruby as well. If you prefer to use the Ruby version, then download the required software, named CruiseControl.rb, from http://cruisecontrolrb.thoughtworks.com/.
FlexUnit ANT tasks and CruiseControl can be integrated using any of the following two strategies:
Consume the XML output from the FlexAntTasks
Run an AIR application side by side with your Flex application for running your tests and generating XML-format-based results
After you have created the ANT build scripts to build your application from source and run the tests, getting them to work under CruiseControl does not require any special effort. The only complications come up in the following scenarios:
Running tests in a headless mode, where the user interface is not brought up
Running network calls from within the local Flash Player security sandbox
When you launch Flex applications to test, an instance of the Flash Player is started and the application is run within that Player's virtual machine. However, there may be situations in which you do not desire or have the flexibility to launch a Flash Player instance. One such case could be a Linux server that does not have a local display. In such cases, it is advisable to launch the application using a virtual display within a VNC server instance. CruiseControl and Hudson, the alternative continuous integration tools, have hooks to launch VNC displays.
When running within a local Flash player instance, remember to specify the SWF and assets as trusted sources.
I don't cover all the procedural details of configuring and running the continuous integration software tools here, but none of the steps, apart from the ones mentioned previously, are any different for Flex applications than for other standard cases, such as Java server-side applications.
Next, I briefly survey an open source code coverage tool, Flexcover.
8.1.3.6. Code Coverage
An open source tool, called Flexcover, is a code coverage tool for Flex, AIR, and AS3 applications. Code coverage is a measure used in software testing. It helps find out how much of the code has been tested. There are multiple ways to find out the amount of code that has been tested, namely:
Statement coverage — Tests and measures if each line of code has been executed
Decision coverage or branch coverage — Tests and measures if each control structure has been evaluated for true and false conditions
Function coverage — Tests and measures if each function has been called
Condition coverage — Tests and measures if each subexpression has been evaluated for true and false conditions
Path coverage — Tests and measures if every possible path of execution has been executed
Flexcover provides for statement and branch coverage. In order to provide the code coverage instrumentation and help collect the coverage data, the tool defines a custom version of the AS3 compiler. This modified compiler inserts extra function calls in the code within the SWF and SWC outputs. These functions help assess the code coverage at runtime and report this information to a separate part of the tool that prints the output as a structured report.
To use Flexcover, all you need to do is use the Flexcover SDK to compile your code. The function calls will be implicitly injected. Download a copy of Flexcover from http://code.google.com/p/flexcover/.
The next and last topic on testing is load testing.
8.1.3.7. Load Testing
When you build a Flex application, you often want to know how your application would scale and work when multiple users access the application concurrently. When it's a Flex and BlazeDS application, these scalability constraints also go to how the server handles the service requests under load. In this section, I focus exclusively on BlazeDS and show you how to test load conditions to find out how your application scales.
The first requirement is to intercept the Flex application's call to the remote service and explore if such calls can be made programmatically or using a tool that helps generate load. A good way to intercept the request from a Flex application to a server is to set up a proxy in the middle. There are many proxies available in the market, but there are three that I would like to recommend:
Charles — A very well-known web proxy among Flex and Flash developers can be leveraged to intercept requests. Charles is a commercial tool and details about this tool can be found online at www.charlesproxy.com.
Fiddler — A free web proxy for Windows platform users, it works well and is completely free. You can download a copy from www.fiddler2.com/fiddler2.
Wireshark — A network protocol analyzer that works well to intercept requests and provide details on the request URL and parameters. Wireshark is open source and available for Windows, Linux, and OS X. You can download a copy from www.wireshark.org.
Once you have a web proxy or a network protocol analyzer in place you can determine the server-side URL, request parameters, and mime type for the request a Flex application makes to its BlazeDS-based remote services.
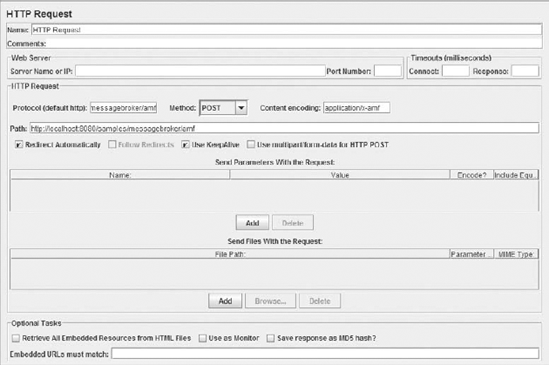
Once again, let's take the BlazeDS sample testdrive-remoteobject application to find out the request details. As soon as I click on the Get Data button, I can see that this button invokes a server-side service that is accessible at http://localhost:8080/samples/messagebroker/amf. The request made is a POST HTTP method request, and the content-type is set to application/x-amf.
Now I need a tool that can make this request multiple times and tell me how much time and resources each of these of requests consumed. It would tell me if successive requests were slower in responding and if there is a point beyond which the server cannot handle a request at all.
Load- or stress-testing tools usually are most appropriate for making multiple requests and assessing how the requests performed. I recommend the use of Apache JMeter, available online at http://jakarta.apache.org/jmeter/, for load testing. JMeter is an open source Java desktop tool that is very flexible and provides for load-testing configuration in a variety of situations.
To generate multiple requests to the BlazeDS server using JMeter, first create a new ThreadGroup in JMeter. You will be prompted with a screen like that shown in Figure 8-6.
Figure 8.6. Figure 8-6
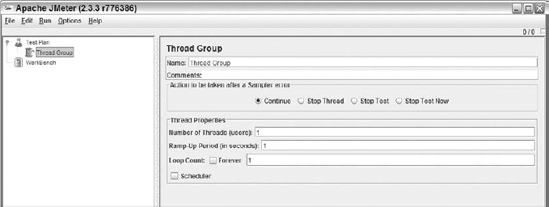
I named my thread group "BlazeDS Load Thread Group" and specified the following configuration parameters:
Number of Threads — I choose initially to go with 5 to imply 5 users
Ramp-Up Period — I choose 0, which means all threads start up at once. You could set up a delay between thread starts using this parameter.
Loop Count — I chose to go with the Forever option to imply that there will be continuous requests till I choose to stop.
Next, I add an HTTP Request sampler to the thread group. Then, I specify the URL, HTTP method, and content type to the HTTP sampler. Look at Figure 8-7 for details.
Figure 8.7. Figure 8-7
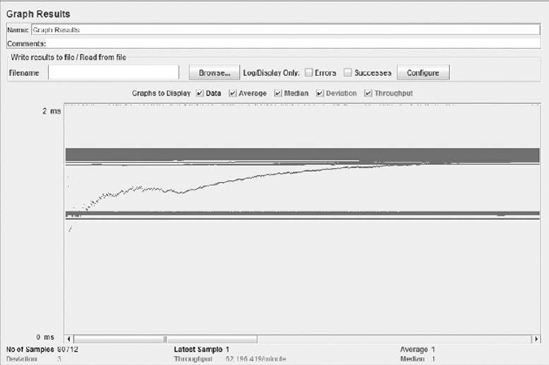
Then, I add a Graph Results listener and specify how I would like to aggregate and view data. See Figure 8-8 for details.
Finally, I run the test and see the results in real time. That's it as far as load testing goes. This also brings us to the end of the discussion on testing. Next, it's the topic of debugging.
Figure 8.8. Figure 8-8