
Remotely controlling a robot is one of the most common robotics scenarios. It is usually necessary because the robot is too small to carry an onboard PC, or the cost of an onboard PC would be prohibitive. For example, teaching robotics in a classroom requires a lot of robots, so they need to be relatively inexpensive.
This chapter covers how to connect real robots to Microsoft Robotics Developer Studio and make them perform simple tasks. Two different robots are used in the examples: the LEGO NXT Tribot and the Parallax Boe-Bot. There are differences between the examples due to different hardware capabilities, which has the benefit of demonstrating different tasks. Regardless of which type of robot you have, you should read the entire chapter.
Subsequent chapters explain how you can build your own mobile robot with an onboard PC so that it can operate autonomously.
The previous chapter explains how remote control of a robot works and points out that the robot does not run MRDS but instead runs a small monitor program. In this case the MRDS service sends commands to the robot and receives sensor information back from the robot. The robot then operates without human intervention. The complexity of the task that the robot can perform depends on the capabilities of the robot and the sophistication of the MRDS service. This chapter shows you how you can write a simple service to remotely control a robot.
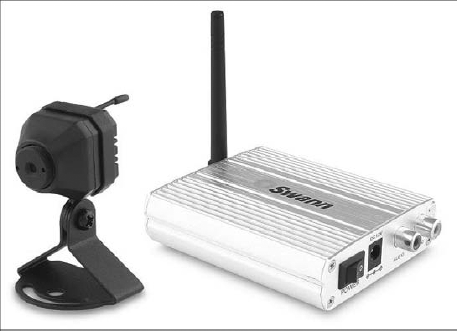
Teleoperation refers to a human controlling a robot remotely. This is possible using the Simple Dashboard that comes with MRDS or the enhanced Dashboard that is supplied with this book. A joystick or game controller can be used in conjunction with the Dashboard so that you can easily drive your robot around. However, this assumes that you can see your robot. If you cannot see the robot, you need to rely on the sensor readings, or install a camera that can provide a video feed in real time. Small wireless cameras are available that can easily be attached to a robot and run off a 9V battery. They come with a wireless receiver with a composite video output, and might even provide audio. A Swann MicroCam is shown in Figure 14-1. Smaller "spy" cameras are also available from other manufacturers.
MRDS supports webcams, and the enhanced Dashboard can display the video from a webcam so you don't have to write any code. All you need to do is buy a suitable camera and a video capture device that is compatible with DirectX. There are many USB video capture devices available on the market. Attach the camera to your robot, plug the capture device to the wireless receiver, and you have a live video feed that you can use to drive your robot when it is out of sight.
The first step is obviously to build your robot! The instructions provided with each of the robots are quite clear. The time required to build the robot depends on your past experience, but it would be wise to allow at least a day to build it and get it working with MRDS.
Remote control requires a communications link. For both the LEGO NXT and the Parallax Boe-Bot, this link is provided via a virtual serial port over Bluetooth. The instructions for setting up Bluetooth are basically the same in both cases. You should read the LEGO NXT section even if you have a Boe-Bot because the Boe-Bot section is abbreviated.
Note that the examples in this chapter assume that you have set up the software for this book, available from the website (www.wrox.com and www.proMRDS.com). The files are copied into a folder called ProMRDS under your MRDS installation. These files are necessary to complete the examples in this chapter.
The LEGO NXT Tribot can be built straight out of the box with a LEGO Mindstorms NXT kit using the instructions supplied with the kit. It has a two-wheel differential drive and a third castor, or jockey wheel, for balance. It should only take about an hour to build the robot.
If you have read the section on simulation, then you will already have seen the Tribot in the simulator. The simulated version has only a touch sensor at the front. However, the NXT kit comes with a range of sensors, and you can build onto the Tribot to create much more complex robots, as shown in Figure 14-2, which shows a Tribot loaded with sensors.
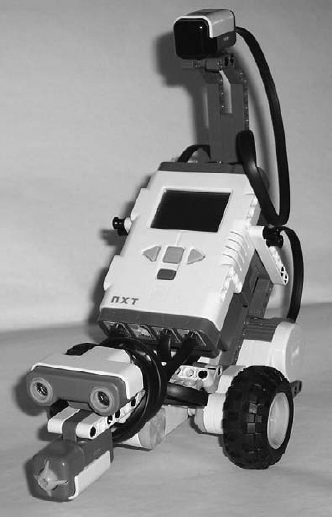
The NXT "brick" is a large block with an LCD display and buttons that contains an ARM processor and runs its own operating system. (Microsoft uses the term brick to refer to the central intelligence onboard any robot.) It takes six AA batteries, for a total of 9V. Fully loaded with sensors, it will chew through these batteries in a couple of hours. However, do not use rechargeable batteries because they only provide 1.2V (not 1.5V) even when fully charged.
The brick can accept up to four sensors that plug into the bottom and three motors that plug into the top. The black cables are clearly visible in Figure 14-2.
The robot in Figure 14-2 has an ultrasonic sonar sensor in the front that is used to detect obstacles. (It looks like two eyes and is often used as part of a face in LEGO designs.) A touch sensor pokes out from underneath the ultrasonic sensor and is a last resort in case the ultrasonic sensor fails to see an obstacle.
On top of the robot, mounted on a stalk, is a HiTechnic Compass sensor. It should be well away from the motors and brick to avoid magnetic interference. It works indoors but is a little slow to respond, so it is a good idea to turn slowly or stop and wait after a turn before using the compass direction.
Support for the LEGO NXT was included in the original version of MRDS because of the popularity of LEGO. MRDS is not directly supported by LEGO because they sell their own Mindstorms software, which is effectively a competitor to VPL.
Create a Bluetooth connection between your PC and the LEGO NXT Tribot so that you can control the robot. This is a one-time task—once you have set it up you will not need to do it again. This process is called pairing and it involves establishing the necessary security credentials—in this case a passkey—so that the Bluetooth device can talk to your PC.
You first need to install your Bluetooth device on your PC according to the manufacturer's instructions. If Bluetooth was built into the PC when you bought it, this has probably been done for you. However, if you do not have Bluetooth, then you need to buy a suitable device. LEGO sells a USB-to-Bluetooth device (commonly called a dongle), but many other devices are available.
Note that Windows XP and Vista come with Bluetooth drivers from Microsoft, although problems have been reported in the past using these drivers. If your hardware came with a CD, install the software from the CD and don't rely on the Microsoft drivers. In some cases this might result in two Bluetooth items in your Control Panel—one from the hardware manufacturer and the other from Microsoft—and you will probably find that the Microsoft control panel applet won't work.
If you have trouble getting Bluetooth to work, one brand of software that has worked successfully for many people was written by WIDCOMM. This company was purchased by Broadcom in 2004, but the name was retained. You can download the latest version of the BTW software from Broadcom's website (www.broadcom.com/products/bluetooth_update.php). Note that this should be a last resort because there is no guarantee that this software will work with your device.
The instructions here are based on using an Anycom Blue USB-240 Adapter. (For more information see www.anycom.com.) This is a Class-1 device, which means that it should have a range of up to 100m. It comes with a CD and installation of the software is very simple, so it is not covered here.
Once you have a Bluetooth icon in your taskbar, you can set up the connection:
Plug in your Bluetooth USB dongle or turn on Bluetooth on your PC or laptop.
Turn on your Tribot and set it up as follows:
On the main menu, scroll through the options using the gray arrow buttons on the brick until you find Bluetooth and then select it by pressing the orange Enter button.
In the Bluetooth menu, find the option labeled On/Off and select it.
Select the On option.
Now that you have done this, Bluetooth will always be enabled when you turn on your Tribot, unless you replace the batteries—there is no need to repeat this step every time you use the Tribot.
Either from the icon in the system tray or from the Windows Control Panel, start the Bluetooth Devices applet (see Figure 14-3).
Click the Add button in the Devices panel. This starts the Add Bluetooth Device Wizard, shown in Figure 14-4. Enable the checkbox "My device is set up and ready to be found."
When you click Next, the wizard will start looking for Bluetooth devices. After a short delay, the LEGO NXT should appear in the list. Select it and click the Next button.
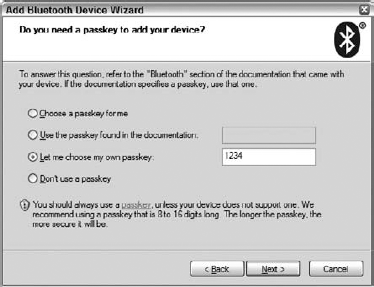
The next Wizard screen asks you for a passkey. Before Bluetooth devices can communicate with each other, they must be paired. The passkey is used as a security measure. Without it, you could sit at a curbside cafe and read information off every Bluetooth-enabled phone or PDA that passed by! The LEGO NXT has a default passkey of 1234. Therefore, you should select the option to enter a passkey as shown in Figure 14-5 and ignore the warning that it should be at least eight digits long.
When you click the Next button, the LEGO NXT will make a sound and display a message asking you to enter a passkey. You can simply click the Enter (orange) button on the NXT because you are using the default passkey. Note that this pairing process will time out if you are not quick enough. In that case, you can back up in the wizard and try again.
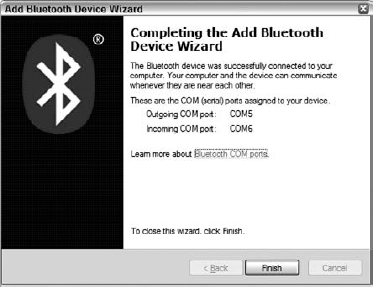
After the Bluetooth device has been installed (which takes a few seconds), the wizard displays one final screen, shown in Figure 14-6. This lists the COM ports that have been set up for you. Figure 14-6 indicates that there is an outgoing port COM5 and an incoming port COM6. Make a note of the outgoing port number because you will need it later. If you forget, you can open the Bluetooth Devices applet and look in the COM Ports panel.
Click Finish. You have now paired your LEGO NXT with your PC. This pairing will be remembered in the future unless you delete it in the Bluetooth Devices applet on the PC or in the Bluetooth Connections menu on the LEGO NXT.


Now that you have a working Bluetooth connection, it is time to establish a link using MRDS. You might want to turn your LEGO NXT off and on again just to be sure that you are starting from scratch.
The LEGO NXT brick runs the monitor program that controls the Tribot. MRDS downloads this program automatically when the Brick service connects to the NXT.
The monitor code for V1.5 is available in samplesPlatformsLEGONXTResources. (This code is no longer used by the V2 services.) If you want to change it, you have to use the Mindstorms software from LEGO to modify it and recompile. This process is specific to the LEGO NXT and is outside the scope of this book.
The following instructions apply to using the V1.5 services. The V2 services are covered later.
Start a MRDS command prompt by clicking Start

At the command prompt, enter the following command to start the LEGO NXT Brick service:
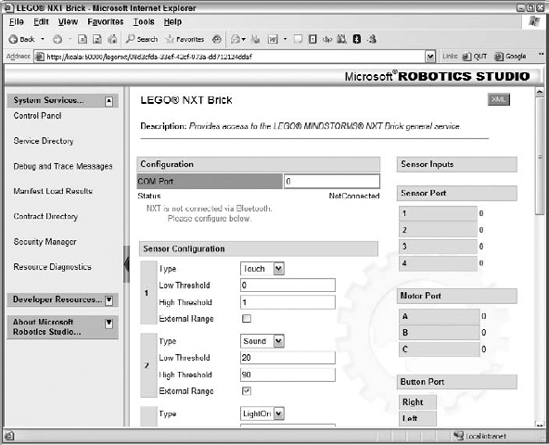
dsshost /p:50000 /t:50001 /m:"ProMRDSConfigLEGO.NXT.Brick.manifest.xml"In the Command Prompt window you will see the DSS node starting up. A web browser window should also appear and display the LEGO NXT Brick service, as shown in Figure 14-7. Notice that there is an error message saying that the NXT is not connected, and the COM port is shown as 0 (zero).
Enter the COM port number for the outgoing port that you made a note of when you set up the Bluetooth connection. Scroll down to the bottom of the web page and click the Connect button. The NXT will display "Microsoft Robotics Studio" and an hourglass. After a couple of seconds, the hourglass should disappear and the NXT will beep. It is now ready to be controlled via MRDS.
You can close down the MRDS command prompt and browser windows and turn off the NXT. (Press the dark gray Cancel button on the brick to exit the MRDS program, and then a couple more times until you get to the "Turn off?" prompt.)
After successfully connecting to the LEGO NXT, MRDS writes the COM port number into the config file so that you won't have to enter it in the future. You can look in ProMRDSConfigLEGO.NXT.Brick.Config.xml to find the ComPort setting. If you have problems with your NXT and need to start again from the beginning, you can always edit this config file and put 0 (zero) in as the ComPort setting and run the Brick service again to reconfigure it.
If you upgrade the firmware in your NXT, you will lose the configuration information in the brick. In this case, you should set the
ComPortback to 0 and repeat the preceding steps.
Although you have made a connection between MRDS and the NXT brick, you need a suitable service to be able to control the Tribot. The Dashboard is a good starting point (it is covered later in the chapter). If you can't wait and want to jump ahead, you can run the following command:
dsshost /p:50000 /t:50001 /m:"ProMRDSConfigTribot.manifest.xml"
/m: "ProMRDSConfigDashboard.xml"
Make sure you type this all on one line, not on two lines as it appears here.
At this stage you have successfully configured your LEGO NXT using the original LEGO services and you can quite happily continue to use these services. However, you have not configured the sensors on your NXT, which can be done on the Brick web page. This needs to be done before you can use the sensors, but you will come back to that later when you set up the V2 services, which are much better. Please continue on to the next section.
When you download the LEGO NXT V2 services (available from the MRDS Downloads web page) and run the installation, the source code will be copied into the following folder:
samplesPlatformsLEGONXTV2
Source code is provided for all of the supported platforms. The original LEGO NXT services will not be overwritten when you install the V2 services.
There is a solution file in this directory called nxtbrick.sln that you can open in Visual Studio. This contains all of the services in four different projects.
To use the V2 services, you simply need to set up the appropriate config files and a manifest. The way that V2 works is quite different from V1.5. In particular, the individual sensors have their own config files, which specify where the sensors are connected on the brick. (In V1.5 the sensor configuration was attached to the brick as shown in Figure 14-7.)
Initially, it is not important to get the sensor configuration correct. You can change it later using the Manifest Editor or simply by editing the config files. However, as with V1.5, you have to specify the correct COM port for the Bluetooth serial connection.
Look in the ProMRDSConfig directory. You will find several config files related to the LEGO NXT V2 configuration:
Lego.Nxt.v2.Brick.Config.xmlLego.Nxt.v2.Drive.Config.xmlLego.Nxt.v2.TouchSensor.Config.xml(Sensor1)Lego.Nxt.v2.UltrasonicSensor.Config.xml(Sensor4)HiTechnicCompassSensor.Config.xml(Sensor3)
There are also several manifests in the directory, but the two of interest are TriBotV2.manifest.xml and MyTriBotV2.manifest.xml. The first one is a simple manifest that just loads the basic Tribot with a differential drive. The second manifest includes all of the sensors listed above (assuming they are attached to the sensor ports as specified in the list).
Unlike the V1.5 services, if you run the LEGO NXT V2 services with no serial port specified, then the browser window does not allow you to edit the setting.
If you open Lego.Nxt.v2.Brick.Config.xml in Notepad, you will see that it is only a short file:
<?xml version="1.0" encoding="utf-8"?>
<NxtBrickState xmlns:s="http://www.w3.org/2003/05/soap-envelope"
xmlns:wsa="http://schemas.xmlsoap.org/ws/2004/08/addressing"
xmlns:d="http://schemas.microsoft.com/xw/2004/10/dssp.html"
xmlns="http://schemas.microsoft.com/robotics/2007/07/lego/nxt/brick.html">
  <Configuration>
    <SerialPort>5</SerialPort>
    <BaudRate>115200</BaudRate>
    <ConnectionType>Bluetooth</ConnectionType>
    <ShowInBrowser>true</ShowInBrowser>
  </Configuration>
</NxtBrickState>
The SerialPort is specified as number 5 in the preceding code. You need to change this to the same outgoing port that you used previously to configure the LEGO NXT Brick service in the web browser. That is the only change required. You can then run your LEGO NXT Tribot using the manifests listed above. For example,
dsshost /p:50000 /t:50001 /m:"ProMRDSConfigTribotV2.manifest.xml"
starts the Tribot and launches the Dashboard (because it is in the manifest). The Dashboard is covered later in this chapter. The LEGO NXT should beep, and then you can use the Dashboard to drive it around.
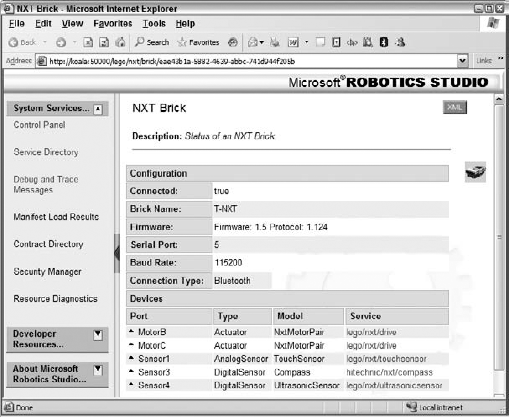
An interesting point about this configuration is that ShowInBrowser is set to true, so a web browser is displayed showing the details of the brick. An example of the main LEGO NXT V2 Brick service is shown in Figure 14-8 for MyTribotV2.manifest.xml, which includes several sensors.
If you have not used the web browser interface before, you should poke around and become familiar with it. In particular, look in the Service Directory and click some of the services. Figure 14-9 shows thumbnails of the new V2 Touch Sensor, HiTechnic Compass, Ultrasonic Sensor, and Differential Drive. These interfaces update dynamically and are quite impressive.

Building a Parallax Boe-Bot is relatively easy but it is time consuming. It is not necessary to work through the entire book Robotics with the Boe-Bot that comes with the robot, so it will not take you the 40 hours indicated on the front of the book. The relevant chapters are as follows:
If you are not familiar with breadboarding, you should read Appendix D in the Parallax book as well.
The instructions in the Parallax book will assist you in building the basic robot, and you can start driving it around immediately, but it will be blind because it has no sensors.
In order to use the Boe-Bot with MRDS, you need to download the relevant instructions from the Parallax website and then build the sensor package on the breadboard area. At the time of writing, this document was available from the Boe-Bot Kit for Microsoft Robotics Developer Studio page on the Parallax website, and it was called MRDS-Bluetooth-Boe-Bot-v1.5.pdf.
Note that some of the I/O port assignments for MRDS do not match those used in the Robotics with the Boe-Bot book, but you might find Chapter 5 (about the whiskers) helpful, as well as Chapter 7 (about the infrared "headlights").
Once you have completed your Boe-Bot, it should look like the image in Figure 14-10.
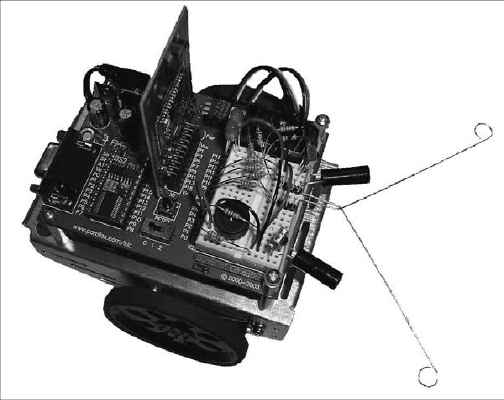
Notice that the Boe-Bot in Figure 14-10 has the eb500 Bluetooth module installed (standing up in the middle of the Board of Education) and a lot of circuits in the breadboard area. The BASIC Stamp 2 has 16 I/O pins, allocated to the various devices as indicated in the following table:
function | |
|---|---|
0 | eb500 Do Not Use (Serial In) |
1 | eb500 Do Not Use (Serial Out) |
2 | Right IR Detector |
3 | Right IR LED |
4 | Piezoelectric Speaker |
5 | eb500 Do Not Use (Connected Flag) |
6 | eb500 Do Not Use |
7 | Left Whisker |
8 | Right Whisker |
9 | Left IR LED |
10 | Left IR Detector |
11 | (No connection—available for use) |
12 | Right Servo Motor |
13 | Left Servo Motor |
14 | LED |
15 | LED |
As well as building the robot, you must download the monitor program into it. You can do this using the BASIC Stamp Editor that is supplied with the kit.
A revised version of the Parallax software is supplied with the code for this book in the Parallax folder under Chapter14. This updated version has some additional features that you might like to use. It can be found in the directory ProMRDSChapter14ParallaxBoe-Bot and the file is BoeBotControlForMRDS.bs2.
When you double-click the .bs2 file in Windows Explorer, it launches the BASIC Stamp Editor. You do not need to make any changes to the code. Just plug your Boe-Bot into a serial port on your PC and download the program by selecting Run from the menu. If you don't have a serial port, then you can buy a USB-to-Serial device from Parallax.
Once you have downloaded the program, the Boe-Bot will reset itself and start running the program. It will beep once and flash the LED on pin 15. From then on, every time you turn on the Boe-Bot, it will beep and flash. This indicates that the monitor program has started running successfully.
Connecting the Boe-Bot to MRDS via Bluetooth is quite easy and is very similar to the procedure described earlier in the chapter for the LEGO NXT:
Plug in your Bluetooth USB dongle or turn on Bluetooth on your PC or laptop.
Turn on your Boe-Bot, with the eb500 module plugged into it. No setup is required.
Open the Bluetooth applet from the Control Panel or the system tray. It should be called Bluetooth Devices or Bluetooth Configuration.
In the Devices tab, click the Add button (refer to Figure 14-3). The Add Bluetooth Device Wizard will appear (refer to Figure 14-4).
Click the checkbox that says "My device is set up and ready to be found" and then click Next. Your PC will search for Bluetooth devices in range and should find the eb500. The wizard will display a dialog asking for a passkey.
Enter the passkey for the eb500, which is 0000 (see Figure 14-5 for an example, but make sure you enter 0000).
After entering the passkey, there will be a slight delay while the PC determines what services are offered by the eb500 and creates the necessary virtual devices. Eventually the final dialog of the wizard will be displayed, showing the COM ports that have been allocated. (See Figure 14-6 for an example.)
Make a note of the outgoing COM port number. You will need this to configure your Boe-Bot. Then click Finish.
If you have installed both a LEGO NXT and a Boe-Bot, then the Devices tab in the Bluetooth applet should look something like the left-hand diagram in Figure 14-11. The eb500 is the new device and the T-NXT is the existing LEGO NXT.
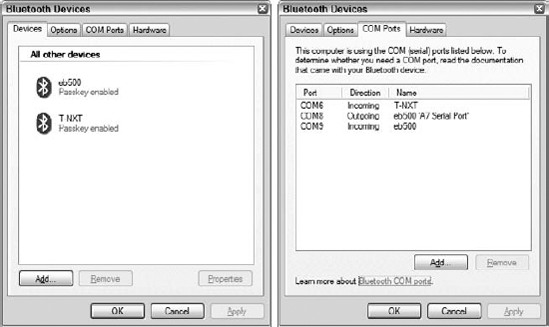
The right side of Figure 14-11 shows the COM Ports tab. Note that there are two ports for the Boe-Bot: COM8 and COM9. The outgoing port, COM8, is connected to an A7 serial port. So port number 8 is the one that should be used when setting the Boe-Bot configuration. The ports that you see will probably be different from these. It depends on the hardware installed on your PC.
In order to use a Boe-Bot, you must set up the COM port number. Open the configuration file, Parallax.BoeBot.Config.xml, which is in the ProMRDSConfig directory. It should look like the following:
<?xml version="1.0" encoding="utf-8"?>
<BasicStampState xmlns:s="http://www.w3.org/2003/05/soap-envelope"
xmlns:wsa="http://schemas.xmlsoap.org/ws/2004/08/addressing"
xmlns:d="http://schemas.microsoft.com/xw/2004/10/dssp.html"
xmlns="http://schemas.microsoft.com/robotics/2007/06/basicstamp2.html">
  <Configuration>
    <Delay>0</Delay>
    <SerialPort>8</SerialPort>
  </Configuration>
  <AutonomousMode>false</AutonomousMode>
  <Connected>false</Connected>
  <FrameCounter>0</FrameCounter>
  <ConnectAttempts>0</ConnectAttempts>
  <MotorSpeed>
    <LeftSpeed>0</LeftSpeed>
    <RightSpeed>0</RightSpeed>
  </MotorSpeed>
  <Sensors>
    <IRLeft>false</IRLeft>
    <IRRight>false</IRRight>
    <WhiskerLeft>false</WhiskerLeft>
    <WhiskerRight>false</WhiskerRight>
  </Sensors>
</BasicStampState>
You can change the SerialPort (which is shown as 8 in the preceding code) to the correct outgoing port that you recorded when you set up Bluetooth.
MRDS comes with a service called the Simple Dashboard. This is useful for getting started with your robot because it enables you to move it around manually and confirm that the communications link is working.
An enhanced version of the Dashboard is provided in the code for Chapter 4 of this book. It has extra features that you might find useful. This Dashboard is shown in Figure 14-12 controlling a LEGO NXT using an Xbox 360 gamepad. Unnecessary parts of the dialog can be collapsed so that only the driving controls are visible. It also remembers its location on the screen. There are controls (the large arrow buttons) that use the DriveDistance and RotateDegrees requests (more on these later), which enable you to control your robot more precisely, and it won't run away from you. One of the best features might be that it remembers the name of the remote node. This means that all you have to do when you start up is click Connect and select the services you want to use, without typing a thing.
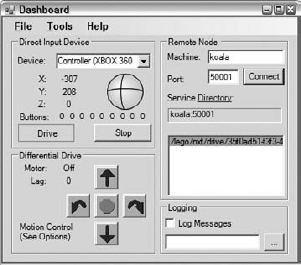
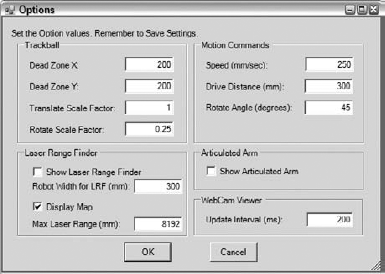
Figure 14-13 shows the options dialog (in the Tools menu) for the Dashboard. The dead zone has been set quite large to allow for some "slop" on the gamepad thumbstick. (This also prevents one of the bugs from the Simple Dashboard whereby the robot spins in the opposite direction if the vertical crosshair is not exactly centered.) Rotation speed is also scaled down. Notice that the Laser Range Finder and Articulated Arm displays are turned off in Figure 14-13. In addition, the DriveDistance and RotateDegrees parameters are set here.
Starting the LEGO NXT Tribot service and the Dashboard service at the same time is an example of orchestration. This can be done by creating an appropriate manifest file. Manifests were discussed in earlier chapters, but a brief explanation is given here again because it is good to know how things work "under the hood."
A manifest is an XML file that contains a list of services to run and the relationships between the services (partners). All services should have a manifest. If you look in the MRDS directory under samplesConfig you will find dozens of manifests supplied by Microsoft. You will also see a lot of config files, which are discussed later.
Manifests are read by the Manifest Loader service when you start a DSS node. The basic structure of a manifest is as follows:
Service List
    Service Record
        Contract
        Partner List
            Partner
            . . .
    . . .
For more information, refer to Service Manifests in the MRDS documentation.
To set up a new manifest, follow these steps:
Make sure that you have a folder for it. Assuming that you have installed the ProMRDS samples from the book's website, there should be a folder under
Microsoft Robotics Studio (1.5)calledProMRDSConfig.Take a copy of the manifest file called
ProMRDSConfigLEGO.NXT.TriBot.manifest.xmland name itMyTribot.manifest.xml.Open the manifest in Notepad. (You can edit a manifest in Visual Studio, but it is a plain-text file so you can just use Notepad). It should look like the following. Note that whitespace in an XML file is ignored, so the layout of the following code has been rearranged slightly to fit on the page:
<?xml version="1.0"?>
<!--
//  This file is part of the Microsoft Robotics Studio Code Samples.
//
//  Copyright (C) Microsoft Corporation.  All rights reserved.
//
//  $File: LEGO.NXT.TriBot.manifest.xml $ $Revision: 11 $
-->
<Manifest
xmlns:legonxt="http://schemas.microsoft.com/robotics/2006/05/legonxt.html"
xmlns:bumper="http://schemas.microsoft.com/2006/06/lego.nxt.bumper.html"
xmlns:legonxtdrive="http://schemas.microsoft.com/robotics/2006/10/legonxtdrive.
html"
xmlns:this="urn:uuid:e7401b21-b3c2-4a80-bb72-29204083cf87"
xmlns:dssp="http://schemas.microsoft.com/xw/2004/10/dssp.html"
xmlns="http://schemas.microsoft.com/xw/2004/10/manifest.html">
The first part of the manifest specifies the different contracts that will be used and gives them short names, like legonxtdrive, for ease of reference later in the manifest.
Next in the manifest is the service list. The first service in the list is the Brick service, which is the basic LEGO NXT. It partners with a DSSP State service and specifies a configuration file (called lego.nxt.brick.config.xml) that is loaded when the service starts. This config file is assumed to be in the same folder as the manifest because no path is specified. If it doesn't exist, the service creates it the first time the manifest is run:
<CreateServiceList>
    <ServiceRecordType>
      <dssp:Contract>http://schemas.microsoft.com/robotics/2006/05/legonxt.html
      </dssp:Contract>
      <dssp:PartnerList>
        <dssp:Partner>
          <dssp:Contract>http://schemas.microsoft.com/robotics/2006/05/legonxt.html
          </dssp:Contract>
          <dssp:Service>lego.nxt.brick.config.xml</dssp:Service>
          <dssp:PartnerList />
          <dssp:Name>dssp:StateService</dssp:Name>
        </dssp:Partner>
      </dssp:PartnerList>
      <Name>this:Brick</Name>
    </ServiceRecordType>
The drive service has to partner with the brick. Note that the LEGO NXT drive implements the generic Differential Drive contract so that it can be controlled by services that know nothing about the specifics of the LEGO NXT, such as the Dashboard:
<ServiceRecordType>
<dssp:Contract>http://schemas.microsoft.com/robotics/2006/10/legonxtdrive.html
</dssp:Contract>
      <dssp:PartnerList>
        <dssp:Partner>
<dssp:Contract>http://schemas.microsoft.com/robotics/2006/10/legonxtdrive.html
</dssp:Contract>
          <dssp:Service>lego.nxt.tribot.drive.config.xml</dssp:Service>
          <dssp:PartnerList />
          <dssp:Name>dssp:StateService</dssp:Name>
        </dssp:Partner>
        <dssp:Partner>
          <dssp:Contract>http://schemas.microsoft.com/robotics/2006/05/legonxt.html
          </dssp:Contract>
          <dssp:PartnerList />
          <dssp:Name>legonxtdrive:Nxt</dssp:Name>
          <dssp:ServiceName>this:Brick</dssp:ServiceName>
        </dssp:Partner>
      </dssp:PartnerList>
      <Name>this:legonxtdrive</Name>
    </ServiceRecordType>
Lastly, the bumper service is added to the manifest and the service list, and the manifest tags are closed. Notice that the bumper also partners with the brick:
<ServiceRecordType>
      <dssp:Contract>http://schemas.microsoft.com/2006/06/lego.nxt.bumper.html
</dssp:Contract>
<dssp:PartnerList>
<dssp:Partner>
<dssp:Contract>http://schemas.microsoft.com/2006/06/lego.nxt.bumper.html
</dssp:Contract>
<dssp:Service>lego.nxt.tribot.bumper.config.xml</dssp:Service>
<dssp:PartnerList />
<dssp:Name>dssp:StateService</dssp:Name>
</dssp:Partner>
<dssp:Partner>
<dssp:Contract>http://schemas.microsoft.com/robotics/2006/05/legonxt.html
</dssp:Contract>
<dssp:PartnerList />
<dssp:Name>bumper:LegoNxt</dssp:Name>
<dssp:ServiceName>this:Brick</dssp:ServiceName>
</dssp:Partner>
</dssp:PartnerList>
<Name>this:bumper</Name>
</ServiceRecordType>
</CreateServiceList>
</Manifest>Go to the bottom of the manifest. Just before the closing tag </CreateServiceList> insert the following code to start the Simple Dashboard supplied by Microsoft:
<!-- Dashboard -->
    <ServiceRecordType>
        <dssp:Contract>http://www.promrds.com/contracts/2007/01/
simpledashboard.html</dssp:Contract>
    </ServiceRecordType>
</CreateServiceList>
As you can see, this code adds a new ServiceRecordType to the manifest. The first line is a comment, and obviously it is not required for the code to work. The format for comments is the same as for HTML. This can be useful for temporarily removing part of a manifest, or if you want to store different options in a manifest, such as running your service with the simulator or a real robot.
If you want to use the Dashboard from the website for this book (www.proMRDS.com or www.wrox.com), then the contract is slightly different:
<dssp:Contract>http://www.promrds.com/contracts/2007/10/dashboard.html
</dssp:Contract>
Notice that the name is dashboard.html and that the month and year are different. You must have installed the software from the book's website in order to use this service. It might be necessary to recompile the service as well.
Alternative Approach for Running the Dashboard
This example shows you how to add the Dashboard to a manifest. However, because the Dashboard establishes its partnerships dynamically at runtime, there is no need to put it in the manifest. In fact, it would be wrong to specify partnerships in the manifest.
You can therefore just use a separate Dashboard manifest on the command line in addition to the manifest for the robot that you want to control. Here is an example:
dsshost /p:50000 /t:50001/m:"ProMRDSConfigTribot.manifest.xml"/m:"ProMRDSDashboard.manifest.xml"
Note that the preceding command must be typed all on one line.
An example that uses this approach is provided in the MRDS bin folder for the Boe-Bot. It is called BoeBot.cmd. See the discussion below on creating shortcuts to run your robots.
Save the manifest you have been editing and exit from Notepad. You can verify that the manifest is okay by loading it with the Manifest Editor. Select Microsoft DSS Manifest Editor from the Microsoft Robotics Studio (1.5) folder in the Start menu. Open the manifest that you have created. It should look like Figure 14-14.

The Manifest Editor is the preferred way to create and edit manifests because it understands the format and syntax of manifests, and lists all of the available services. If you enter a string, such as LEGO, into the textbox at the top of the Services panel on the left-hand side, you can search for just the related services.
In the future, you might prefer to use the Manifest Editor. For example, you can try creating a manifest for the LEGO NXT V2 by using only V2 services. It should look very similar to Figure 14-12, but you will need to do some configuration. If you are not comfortable building your own manifests yet, there is a manifest already supplied as ProMRDSConfigMyTribotV2.manifest.xml. This manifest includes all of the sensors for the robot shown in Figure 14-2 and the web browser in Figure 14-9.
If you are using a Boe-Bot, then you can start with the Parallax.BoeBot.manifest.xml and add the Dashboard to it by following the instructions given earlier. Call your new manifest whatever you like. If you are feeling lazy, just use the MyBoeBot.manifest.xml file already provided for you.
Now that you have created an appropriate manifest, you can use it in a dsshost command. However, typing long command lines to start up a DSS node is painful and prone to error, so you will probably want to create a batch command file that does it for you.
The following instructions are for the LEGO NXT. If you have a Boe-Bot, then you can read through the instructions and simply use the Boe-Bot version of the code that is supplied on the book's website, or you can try to figure it out for yourself. There is a BoeBot.cmd batch file in the MRDS bin folder that corresponds to the RunLego.cmd file in the following paragraphs (which is also supplied if you don't like typing). In the example that follows, the batch file is created in the top-level MRDS folder. However, the sample files in the bin folder are designed to run from there and are a little different.
Using Notepad, create a new file called RunLego.cmd and place it into the top-level MRDS folder. It should contain the following commands:
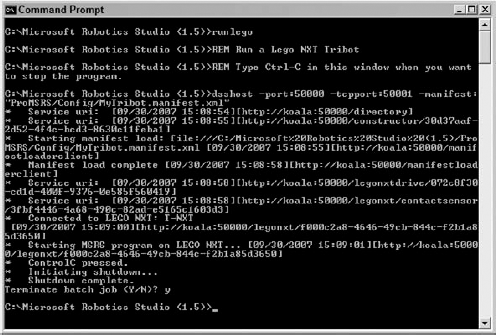
@ECHO ON
REM Run a Lego NXT Tribot
REM Type Ctrl-C in this window when you want to stop the program.
dsshost -port:50000 -tcpport:50001 -manifest:"ProMRDS/Config/MyTribot.manifest.xml"
Now open an MRDS Command Prompt window and run the command procedure by typing RunLego. Figure 14-15 shows what the command window should look like. (This figure shows a complete test run. Note that when you press Ctrl+C to cancel the program, a prompt asks whether you want to terminate the batch job. You should enter y, but don't do this right now!)
If you want to use the LEGO NXT V2 services, then you can use
TribotV2.manifest.xml, which is provided for you.
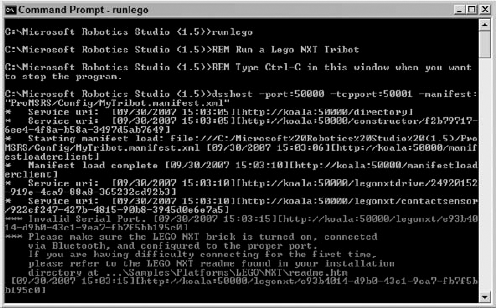
If the NXT is turned off, or MRDS cannot establish a connection, you will see a red error message in the Command Prompt window. Figure 14-16 shows an example of this error message (without the color, of course). In this case, the LEGO NXT Brick service web page is also displayed. This is a roundabout way to do it, but it's one way to change the configuration of your NXT.
The LEGO NXT V2 services will not generate red error messages if the LEGO NXT is not turned on. Instead, it simply waits for a connection.
If you made any typing errors when you created the manifest, then red error messages will also appear in the Command Prompt window from the Manifest Loader. You will also see errors appear if you turn off the LEGO NXT before shutting down the service.
Assuming that you did everything correctly, a Dashboard window will appear, as well as a LEGO NXT Brick window. You will have to enter the COM port number again. This happens because you have copied the original manifest into a different folder, but you did not copy the config files. Look in the ProMRDSConfig folder now and you will see a set of config files.
If you continue to run the Tribot from this batch command file, then this will not be a problem. However, if you start your Tribot by running the original manifest, you will have two sets of config files and things can very rapidly get confusing. This is why it is a good idea to place all of your manifests together in a single Config directory.
In the Dashboard, enter localhost for the machine name and click Connect. (The machine name will change to the actual computer name.) Double-click the LEGO drive in the service list to select it, and then click the Drive button. You can now drive the robot around. When you drag the mouse on the "trackball" (just above the Stop button), the Tribot should drive around. Try it out.
The port you use in the Dashboard should be 50001, which is the TCP port. Remember that two ports are specified on the command line. If you mistakenly enter 50000, you will be waiting a long time because there won't be any response.
At this stage you will probably want to click File ? Save Settings to remember your remote node, the window position, and so on. When you get tired of playing with the Tribot, press Ctrl+C in the Command Prompt window. Note that closing the Dashboard window does not terminate DssHost.
Driving a robot using the "trackball" in the Dashboard is a little tricky. It is much easier to use a control that is designed specifically for the purpose. If you have a joystick or an Xbox 360 GamePad, then you can use that to drive the robot. The only requirement is that the controller must be supported by DirectX. Simply plug in the joystick or gamepad and run a robot manifest that includes the Dashboard.
The example in Figure 14-17 shows a Logitech Attack 3 USB joystick being used to drive a LEGO NXT Tribot using the Simple Dashboard.
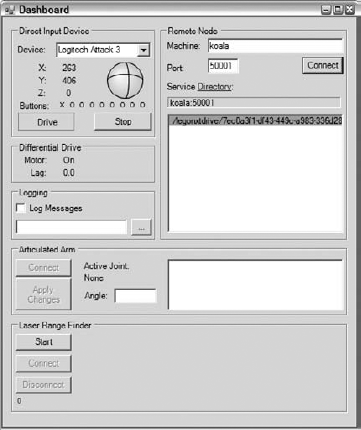
If you look carefully at the dialog, you will notice that there is an "x" for the leftmost button in the row of "o" symbols. This indicates that the trigger button on the joystick is depressed (and none of the other buttons on the joystick are currently pressed). You can use the trigger so that the robot will only move when the trigger is depressed and the joystick is off-center. Some of the other buttons also have functions, but they are not described here—look in the code for the Dashboard.
If you have an Xbox 360 USB GamePad and a joystick, then it will appear in the drop-down list for Direct Input Devices. Simply select it instead of your joystick. You can use the left-hand thumbstick to drive the robot.
Although the dsshost command is now safely embedded in a command procedure, you can't double-click the command procedure in Windows Explorer to run the program. If you watch the screen carefully, you will see a DOS Command Prompt window appear and then quickly disappear again.
The problem is that the environment for running DSS has not been set up. This is easily fixed by a small modification to the command file. Edit RunLego.cmd by adding the two extra lines shown here:
@ECHO ON
REM Run a LEGO NXT Tribot
REM Type Ctrl-C in this window when you want to stop the program.
setlocal
call "%~dp0sdkenv.cmd"
dsshost -port:50000 -tcpport:50001 -manifest:"ProMRDS/Config/MyTribot.manifest.xml"
The purpose of these extra commands is to run sdkenv.cmd, which sets up the MRDS environment. This creates the necessary environment variables. When you open an MRDS Command Prompt window from the Start menu, these variables are already defined.
From Windows Explorer, double-click RunLego.cmd. This should start the program just as if you had run it from an MRDS command prompt.
Taking this one step further, right-click RunLego.cmd in Windows Explorer and click Create Shortcut from the pop-up menu. This will create a shortcut called Shortcut to RunLego.cmd. You can rename this to whatever you like. For example, you might call it just RunLego. If you right-click this shortcut and then click Properties, you can change the icon. A batch file does not contain any icons, but you can select from the default set of icons in Shell32.DLL.
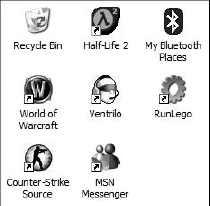
Finally, you can copy or move the shortcut anywhere you like, such as onto your Desktop. This gives you immediate access to the LEGO NXT Tribot right next to all your other important business applications (see Figure 14-18).
Obviously, you can create other command procedures and icons this way for the Boe-Bot or for the LEGO NXT V2 services. Even more complex command procedures can be used to select among a variety of robots.
Now that you have your robot working, it would be good to make it do something on its own without requiring a human to drive it around. The first step is to get it to perform some pre-programmed tasks, which might be referred to as a behavior.
The code for the final version of this example is available in the ProMRDSChapter14Dance directory once you have installed the sample software from the book's website (www.proMRDS.com or www.wrox.com). You do not have to type in all of the code.
The initial example aims to get the robot to drive around the sides of a square. This might sound like a very simple task, but it actually introduces some real-world problems. How can you determine how far the robot has driven or how far it has turned? The simplest approach is to use timers. For example, you can run the robot for a short period of time and measure how far it travels. If you do this for several different time periods, you can plot a graph of distance versus time. This is a very scientific approach. (See the example with the Hemisson robot in Chapter 17.)
The steps that follow do not assume that you are experienced in MRDS. If you have followed through the chapters on simulation you will have created a new service before. Therefore, this chapter repeats all of the steps but with a little less explanation.
This section contains instructions for building a new service from scratch. The completed service, with several additional features, is available in the ProMRDSChapter14Dance folder.
An extra service called SynchronizedDance was added late in the development of this book. This service controls multiple robots and makes them all perform the same dance. It is not discussed here.
Create a new directory called ProMRDSDance and then create a new service as per the commands below. Once the service has been created, open the solution called Dance.sln. To open this in Visual Studio, you can either type the filename at the command prompt as in the following example, or double-click it in Windows Explorer:
C:Microsoft Robotics Studio (1.5)>cd ProMRDSC:Microsoft Robotics Studio (1.5)ProMRDS>mkdir DanceC:Microsoft Robotics Studio (1.5)ProMRDS>cd DanceC:Microsoft Robotics Studio (1.5)ProMRDSDance>dssnewservice /service:"Dance"/namespace:"ProMRDS.Robotics.Dance" /year:"2007" /month:"10"C:Microsoft Robotics Studio (1.5)ProMRDSDance>cd DanceC:Microsoft Robotics Studio (1.5)ProMRDSDanceDance>Dance.sln
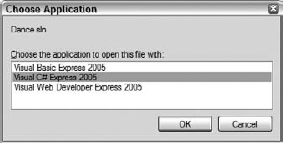
If you are using Visual Studio Express Edition and you have multiple languages installed, make sure that you select C# in the Choose Application dialog, as shown in Figure 14-19.
Open Dance.cs and add the following using statement at the bottom of the list:
using drive = Microsoft.Robotics.Services.Drive.Proxy;
In order to actually use the drive proxy, you must also add a reference to the appropriate DLL, which in this case is RoboticsCommon.Proxy. You can right-click the Solution Explorer panel and then click Add Reference. Alternatively, click Project Add Reference. It might take a little while to display the list of DLLs, so be patient. Set the Local Copy and Specific Version properties on the Reference to false.
Scroll down in the code to just below the main port declaration and insert a drive partner as shown here:
[ServicePort("/dance", AllowMultipleInstances=false)]
private DanceOperations _mainPort = new DanceOperations();

#region partners
[Partner("Drive", Contract = drive.Contract.Identifier, CreationPolicy =
PartnerCreationPolicy.UseExisting)]
drive.DriveOperations _drivePort = new drive.DriveOperations();
#endregion
It is a good idea to use regions in the code so that you can collapse sections of code to make it easier to find your way around. It also helps to make the code self-documenting.
This code sets up a generic differential drive partner, which means that you can connect to a specific type of robot at runtime by specifying the appropriate contract in the manifest. Notice that the CreationPolicy is set to UseExisting. This causes the Dance service to wait until the partner becomes available. It would not make sense to create a new instance of the drive partner because there is no way to tell which of the many different robot drive services should be used. It is the responsibility of the Manifest Loader to associate a real differential drive with the generic one at runtime.
Add some constants at the top of the class definition as shown:
public class DanceService: DsspServiceBase
    {
        #region constants
        // Constants for motor speeds and timing
        const int repeatCount = 2;         // Number of times to repeat dance
        const float driveSpeed = 0.5f;     // Speed driving forward
        const float rotateSpeed = 0.25f;   // Speed during rotation
        const int driveTime = 1200;        // Time to drive forward (millisec)
        const int rotateTime = 920;        // Time to rotate
        const int settlingTime = 500;      // Time to wait after each move
        #endregion
The purpose of these constants should be obvious from their names and the comments. Basically, the robot will drive around the sides of a square by driving forward for a certain amount of time, turning for a different amount of time, and repeating this three times. An overall repeatCount enables the entire "square dance" to be repeated.
Because some robots are quite primitive, using timers to control motions is the only option that you have. More expensive robots have wheel encoders that can be used to monitor how much the wheels have turned. The LEGO NXT motors do actually have encoders, but they are not used in this example. This is discussed later.
The numbers listed in the preceding code were determined by trial an error. They are not exact, so the robot will not necessarily traverse a perfect square. They also depend on whether you have fresh batteries in the robot because motor speed can decrease considerably as the battery voltage drops.
The settlingTime is a period of time between moves to enable the robot to settle down. Robots cannot instantaneously change speed and/or direction. Without this settling period, driving forward and turning tend to blend into one another, reducing accuracy.
Go to the bottom of the class now and add the following method called Behavior:
#region behavior

// Iterator to execute the Behavior
IEnumerator<ITask> Behavior()
{
    // Wait for the Lego NXT to initialize, otherwise it will
    // miss the initial command
    yield return Arbiter.Receive(
        false,
        TimeoutPort(10000),
        delegate(DateTime timeout) { });

    LogInfo(LogGroups.Console, "Starting now .");

    // Make sure that the drive is enabled first!
    _drivePort.EnableDrive(true);

    for (int times = 0; times < repeatCount; times++)
    {
        // Drive along the four sides of a square
        for (int side = 0; side < 4; side++)
        {
            LogInfo(LogGroups.Console, "Side " + side);

            // Start driving and then wait for a while
            _drivePort.SetDrivePower(driveSpeed, driveSpeed);
            yield return Arbiter.Receive(
                false,
                TimeoutPort(driveTime),
                delegate(DateTime timeout) { });
            // Stop the motors and wait for robot to settle
            _drivePort.SetDrivePower(0, 0);
            yield return Arbiter.Receive(
                false,
                TimeoutPort(settlingTime),
                delegate(DateTime timeout) { });

            // Now turn left and wait for a different amount of time
            _drivePort.SetDrivePower(-rotateSpeed, rotateSpeed);
            yield return Arbiter.Receive(
                false,
                TimeoutPort(rotateTime),
                delegate(DateTime timeout) { });
            // Stop the motors and wait for robot to settle
            _drivePort.SetDrivePower(0, 0);
            yield return Arbiter.Receive(
                false,
                TimeoutPort(settlingTime),
                delegate(DateTime timeout) { });
        }
    }
// And finally make sure that the robot is stopped!
_drivePort.SetDrivePower(0, 0);
LogInfo(LogGroups.Console, "Finished");
}
#endregionThe Behavior method is an iterator. It periodically yields control of the running thread using yield return. When an Arbiter.Receive has received a message, the CCR resumes execution of the task at the point where it yielded. This means that the code is executed sequentially, but not necessarily by the same thread.
The first step is to wait for 10 seconds (10,000 milliseconds). This ensures that the partner service has started. It is not a reliable or efficient way to wait for a partner, but it is used here for simplicity.
Notice the calls to LogInfo(LogGroups.Console, "...") in the code, which are there for debugging and to monitor progress. Various logging methods are available for use with DSS, including LogError, LogWarning, LogInfo, and LogVerbose. In this case, the output will be sent to the console (the MRDS Command Prompt window) just as if you had used Console.WriteLine("..."). If you omit the LogGroups.Console parameter, then the output is sent to the log, not the console. Either way, the output appears in the Console Output web page.
The drive must be enabled before it will respond to any other commands.
Next are two nested loops. The outermost loop simply repeats the "dance" pattern, while the innermost loop executes the four sides of the square that make up the basic behavior. The code consists of a series of calls to SetDrivePower followed by a wait.
The last piece of code you need to add is to execute the Behavior from the Start method:
protected override void Start()
{
    base.Start();
    // Add service specific initialization here.
    SpawnIterator(Behavior);
}
Try building the service to ensure that you have not made any mistakes. There is no point in running it yet because it needs a drive service for a robot as a partner.
You now have a service that can control a robot, but you need to associate it with an actual robot so that it can run.
Open Dance.manifest.xml, which DssNewService created for you. You should see it in the Solution Explorer panel in Visual Studio and you can open it from there. Visual Studio understands XML and will color-code it for you. Add a new Service Record just above the existing Service Record for the Dance service:
<!-- Use a Simulated robot -->
<ServiceRecordType>
    <dssp:Contract>http://schemas.tempuri.org/2006/06/simulationtutorial2.html
    </dssp:Contract>
</ServiceRecordType>
Notice that the additional service is Simulation Tutorial 2 that comes with MRDS. This creates two robots: a Pioneer 3DX and a LEGO NXT Tribot. Save the manifest. (A complete copy of the manifest is supplied as ProMRDSConfigDance.SimTut2.manifest.xml.)
You can now run this new service by simply starting the Dance program in the debugger in Visual Studio.
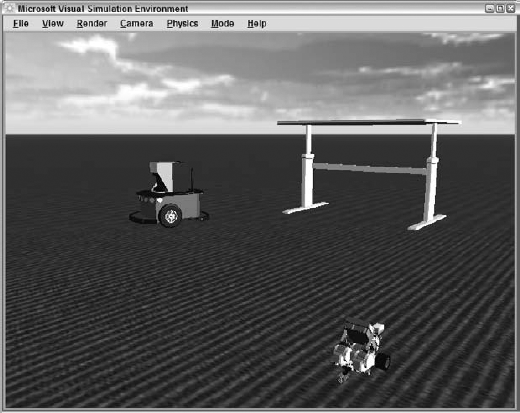
After the simulator starts, there is a short delay and then the Pioneer robot will start doing the "dance." Figure 14-20 shows the Pioneer partway through its behavior. The LEGO NXT Tribot (in the foreground) will not move.
When the Pioneer robot has finished, the MRDS window will look like Figure 14-21. Notice the status messages as it progresses through each side of the square; they include a timestamp and the name of the service. Dance, dance, dance!

You might be wondering why the Pioneer robot did the dance when this chapter has been dealing with LEGO NXT robots. The reason is that Simulation Tutorial 2 creates the Pioneer robot first. Because the Pioneer has a differential drive, the Dance service immediately partners with it. It is possible to enumerate the available services and select the LEGO service, but that's far too complicated for this simple example. Look in the code of the Dashboard for details about how to list the available services.
If you only want to play with the LEGO NXT simulation, then you can use a saved simulation state and start up the necessary simulation services by running the manifest from the book's website. Located in
ProMRDSConfigDance.Simulation.manifest.xml, this manifest is an example of how to use saved simulator state, a topic that is not covered in this part of the book.
Now it is time to switch to a real robot so you can see the power of MRDS. The same code you have just used in the simulator will work on a LEGO NXT Tribot.
Go back to the Dance.manifest.xml in Visual Studio and either remove the service record for Simulation Tutorial 2 or comment it out. In its place, insert the code for the LEGO NXT V2, which is highlighted in the following manifest listing. (The complete manifest is supplied with the name Dance.LegoV2.manifest.xml if you want to check your work.) The simulated robot has been commented out in the following code:
<?xml version="1.0" ?>
<Manifest
    xmlns="http://schemas.microsoft.com/xw/2004/10/manifest.html"
    xmlns:dssp="http://schemas.microsoft.com/xw/2004/10/dssp.html"
>
  <CreateServiceList>
    <!-- Create a new Lego NXT service -->
    <ServiceRecordType>

        <dssp:Contract>http://schemas.microsoft.com/robotics/2007/07/lego/
nxt/brick.html</dssp:Contract>
        <dssp:PartnerList>
            <dssp:Partner>
                <dssp:Contract>http://schemas.microsoft.com/robotics/2007/07/
lego/nxt/brick.html</dssp:Contract>
                <dssp:Service>legov2.nxt.brick.config.xml</dssp:Service>
                <dssp:PartnerList />
                <dssp:Name>dssp:StateService</dssp:Name>
            </dssp:Partner>
        </dssp:PartnerList>
        <Name>Brick</Name>
    </ServiceRecordType>
    <ServiceRecordType>

        <dssp:Contract>http://schemas.microsoft.com/robotics/2007/07/lego/
nxt/drive.html</dssp:Contract>
        <dssp:PartnerList>
            <dssp:Partner>
                <dssp:Contract>http://schemas.microsoft.com/robotics/2007/07/
lego/nxt/drive.html</dssp:Contract>
                <dssp:Service>legov2.nxt.drive.config.xml</dssp:Service>
                <dssp:PartnerList />
                <dssp:Name>dssp:StateService</dssp:Name>
</dssp:Partner>
<dssp:Partner>
<dssp:Contract>http://schemas.microsoft.com/robotics/2007/07/
lego/nxt/brick.html</dssp:Contract>
<dssp:PartnerList />
<dssp:Name>Nxt</dssp:Name>
<dssp:ServiceName>Brick</dssp:ServiceName>
</dssp:Partner>
</dssp:PartnerList>
<Name>legonxtdrive</Name>
</ServiceRecordType>
<!-- Use a Simulated robot -->
<!--
<ServiceRecordType>
<dssp:Contract>http://schemas.tempuri.org/2006/06/
simulationtutorial2.html</dssp:Contract>
</ServiceRecordType>
-->
<ServiceRecordType>
<dssp:Contract>http://www.promrds.com/contracts/2007/10/
dance.html</dssp:Contract>
<dssp:PartnerList>
<dssp:Partner>
<dssp:Contract>http://www.promrds.com/contracts/2007/10/
dance.html</dssp:Contract>
<dssp:Service>dance.config.xml</dssp:Service>
<dssp:PartnerList />
<dssp:Name>dssp:StateService</dssp:Name>
</dssp:Partner>
</dssp:PartnerList>
</ServiceRecordType>
</CreateServiceList>
</Manifest>Make sure that you save the manifest.
There is one last step before you can try out the program using a real LEGO NXT Tribot: Make sure that you have the appropriate config files. Otherwise, you will have to configure your Tribot yet again. You can get all of the config files from the ProMRDSConfig directory and copy them into your solution folder along with the manifest. Alternatively, you could copy your new manifest to the Config directory and run it from there.
Rebuild the Dance service just to be sure everything is okay, and then run the Dance service in the debugger again. Make sure that your LEGO NXT is turned on first and that you have a couple of meters of clear space around the robot. You don't want it running into anything!
If you have a Boe-Bot, then you need to create a different manifest. You can copy the necessary code from Parallax.BoeBot.manifest.xml. It has a similar pattern to the LEGO NXT, including a brick service (BASICStamp2) and a drive (BSDrive). Copy the service records that are highlighted below and paste them into Dance.manifest.xml in place of the LEGO code (if you did the previous section) or the Simulation Tutorial 2 (if you skipped the previous section):
<?xml version="1.0" encoding="utf-8"?>
<Manifest
    xmlns="http://schemas.microsoft.com/xw/2004/10/manifest.html"
    xmlns:dssp="http://schemas.microsoft.com/xw/2004/10/dssp.html"
    >

  <CreateServiceList>

    <!-- Start BasicStamp2 Brick -->
    <ServiceRecordType>
      <dssp:Contract>http://schemas.microsoft.com/robotics/2007/06/
basicstamp2.html</dssp:Contract>
      <dssp:PartnerList>
        <!-- Initial BasicStamp2 config file -->
        <dssp:Partner>
          <dssp:Service>Parallax.BoeBot.Config.xml</dssp:Service>
          <dssp:Name>dssp:StateService</dssp:Name>
        </dssp:Partner>
      </dssp:PartnerList>

    </ServiceRecordType>

    <!-- Start the BoeBot drive service -->
    <ServiceRecordType>
      <dssp:Contract>http://schemas.microsoft.com/robotics/2007/06/
bsdrive.html</dssp:Contract>
      <dssp:PartnerList>
        <!-- Initial Drive Configuration File -->
        <dssp:Partner>
          <dssp:Service>Parallax.BoeBot.Drive.Config.xml</dssp:Service>
          <dssp:Name>dssp:StateService</dssp:Name>
        </dssp:Partner>
      </dssp:PartnerList>

    </ServiceRecordType>

  </CreateServiceList>

</Manifest>
Save the manifest. Make sure that you copy the necessary config files from the ProMRDSConfig folder into your solution folder so that they are with the manifest. Run the Dance service in the Visual Studio debugger.
In the previous sections, you were told to copy the config files into your solution folder so that they can be found when the manifest is started. However, it is preferable to keep all of your config files and manifests together because this makes maintenance easier.
Copy Dance.manifest.xml from the solution folder to ProMRDSConfig. Then, in Visual Studio, click Project ⇒ Dance Properties. Select the Debug tab in the Properties window. In the command-line arguments, you should see the parameters that will be passed to DssHost.exe in order to start the Dance service. You need to change the manifest parameter as shown here:
-port:50000 -tcpport:50001 -manifest:"ProMRDS/Config/Dance.manifest.xml"
Notice that the path points to the ProMRDSConfig folder (and there is no slash at the beginning). Because you have previously run the Tribot and/or Boe-Bot from manifests in this directory, appropriate config files are already in the directory.
Having to copy your manifest to ProMRDS/Config every time you change it is a little inconvenient if you are likely to change it often (although usually you would set it up and leave it alone). To avoid getting out of sync, you can add a pre-build command in the Project Properties in the Build Events tab. The command line to add is as follows:
copy "$(ProjectDir)dance.manifest.xml" "$(ProjectDir)....Config"
An alternative to constantly changing the manifest is to create different manifests for different robots. Five manifests are provided in the ProMRDSConfig directory:
In addition, there is a batch file in the MRDS bin folder called Dance.cmd that can be used to run any of these five manifests using a command-line parameter. This might seem a little excessive, but it is intended to illustrate different ways to handle manifests.
Watch carefully as the robot attempts to inscribe a square on the floor. If you have fresh batteries and you are lucky enough to have a well-matched pair of motors, then the robot might do a reasonably good job. However, most people find that the robot does not drive around a square at all.
Stop the debugger and run the program again. Do this several times. What do you notice? It is quite probable that each time you run the program you get a different result. Even though it only does two iterations of the square, it is unlikely that your robot will end up where it started or even be facing in exactly the same direction. (Of course, you have not tuned the values of timing parameters, but that isn't the point.)
If you look closely, you will notice that when the robot is supposed to be driving forward it often veers slightly to one side—usually the same side—every time it moves forward. This consistent error in the motion of the robot accumulates into larger and larger errors in the pose (position and orientation) of the robot the more times it dances around the square. Welcome to the real world.
There are many reasons for these errors—motors that are not exactly matched in terms of their performance; wheel slippage; slightly different wheel diameters; motors or axles that are not aligned squarely; and so on. You cannot avoid these problems. The best you can do is try to design your application so that the errors are reduced, compensated for, or not relevant.
What you have seen here is an open-loop control system—there is no feedback to help the robot perform its task correctly. If anything goes wrong, the robot has no way to determine that. Contrast this with the PID controller described in the previous chapter.
Many robots rely on reactive behaviors. This means that the robot constantly reacts to what it sees and acts accordingly. For example, following a wall and even wandering around a maze can be done via reactive behavior. In this case, it does not matter much if the robot can drive straight or not because the control program continually adjusts the robot's heading and speed so that it does not bump into walls.
Conversely, if your objective is to build an accurate map of the environment, then you will want the robot to know exactly where it is at all times. Otherwise, the information in the map will be wrong. This task is known as simultaneous localization and mapping, or SLAM. (In Europe it is also known as concurrent mapping and localization, or CML). It is an active area of research.
Localization refers to the process of finding where you are on a map. Unfortunately, if your objective is to build a map, then you don't have a map to begin with! This is a "chicken or the egg" situation, i.e., which comes first? This is why SLAM includes the word "simultaneous."
Without putting too fine a point on it, performing SLAM with the limited capabilities of the LEGO NXT or the Boe-Bot is not really possible. One of the requirements for SLAM that is often overlooked is the information content necessary to produce reliable localization. A laser range finder typically has a 180-degree field of view, with measurements taken every degree or even half a degree and distances measured to an accuracy of about 1cm or 2 cm out to a range of 20 meters. Contrast this with the LEGO NXT Ultrasonic Sonar, which is one single data point (not 180 measurements) with a maximum range of 255cm and an accuracy of only ±3 cm. If you were planning to have your robot map your house, you might want to reconsider.
However, if your robot is operating in a fairly small environment and you already have a map, then you might be able to localize by taking a series of readings. Provided that the robot can turn around accurately, even half a dozen distance readings might be sufficient to localize itself against an existing map.
If you are using a Boe-Bot, however, there is more bad news. The IR sensors on the Boe-Bot are not range sensors—they cannot provide reliable distance measurements. Therefore, it is almost impossible to localize a Boe-Bot or build a reasonable map. Of course, none of this matters if your objective is to learn about robotics and have some fun.
Part of the problem with the original "square dance" is that it is highly unlikely to be square. Using timers to control motions is not very accurate for several reasons:
The timers under Windows are not very reliable, and the CCR doesn't really improve on them. If the PC suddenly performs garbage collection or flushes the disk cache, then a timer might run for longer than you requested.
Motor speed varies depending on the battery level and it is not linear. For very short time periods, the motor might not have enough time to get up to full speed. Conversely, once you reach a certain power level the motor is rotating at its top speed, so increasing the power will have no effect.
These problems mean that there is no simple relationship between the running time of the motors and the distance traveled.
This is where wheel encoders might seem like a good solution. A wheel encoder measures a wheel's amount of rotation. This is usually specified as a number of "ticks per revolution." In the case of the LEGO NXT motors, for example, the encoder can be set to either 6 or 360 ticks per revolution.
Unfortunately, the Boe-Bot does not have wheel encoders, so it has no option except to use timers. This leaves you with two options: let the PC do the timing or let the robot do the timing. It is more accurate to get the robot to time the moves, but there are disadvantages as well, as discussed in Chapter 16.
There are two methods defined by the generic Differential Drive that are designed to take advantage of wheel encoders: DriveDistance and RotateDegrees. As its name suggests, DriveDistance can be used to drive the robot forwards or backwards a specified distance (in meters, with negative values meaning backwards). RotateDegrees rotates the robot by turning the wheels in opposite directions. Counterclockwise rotations are positive, and clockwise is negative.
The
RotateDegreesandDriveDistancemethods are not implemented for the LEGO NXT, and they throw an exception that will crash your program. At least you will know they are not implemented! However, the newer LEGO NXT V2 services do implementRotateDegreesandDriveDistanceusing the wheel encoders. You can actually see the encoders in operation if you view the Drive service in a web browser (refer to Figure 14-9).The Parallax BoeBot services that come with MRDS do not implement
RotateDegreesorDriveDistanceeither, but two implementations are provided in Chapter 16 and are included in the Parallax BoeBot services from the website for this book (www.proMRDS.com. orwww.wrox.com).
It is easy to modify the Dance service to use these new methods:
Insert a
usingstatement at the top of the code:using drive = Microsoft.Robotics.Services.Drive.Proxy; // Added for the Fault class using W3C.Soap;
The
using W3C.Soapis not essential, but it introduces theFaultclass, which can be returned if there is an error, or if aDriveDistanceorRotateDegreesrequest is interrupted by another request (and therefore cancelled).In the Constants region, add the following values:
// Values for "exact" movements using DriveDistance and RotateDegrees
const bool controlledMoves = true;  // Use controlled (not timed) moves
const bool waitForMoves = true;     // Wait for response messages
const float driveDistance = 0.30f;  // Drive 30cm
const float rotateAngle = 90.0f;    // Turn 90 degrees to the left
The purpose of these constants is as follows:
controlledMovesdetermines whetherDriveDistanceandRotateDegreesare called or the simple approach of using timed moves is used instead.waitForMovesindicates whether the code should wait forDriveDistanceandRotateDegreesto send a response message indicating that the motion is complete.driveDistanceis the actual distance to drive forwards expressed in meters.rotateAngleis the amount to rotate by (with positive values being to the left).
Now find the
Behaviormethod and replace the code inside the innermostforloop as shown in the following code. The first section of code uses theDriveDistanceandRotateDegreesrequests, but calls them inside anArbiter.Choicein order to wait for the response message that is sent when the motion completes. This means that timers are not used. Note that these requests might return aFaultinstead of the default response. The error handling isn't good but it illustrates how a local variable, calledsuccess, can be accessed inside a delegate:// Drive along the four sides of a square for (int side = 0; side < 4; side++) { LogInfo(LogGroups.Console, "Side " + side); if (controlledMoves && waitForMoves) { bool success = true; // Drive straight ahead yield return Arbiter.Choice( _drivePort.DriveDistance(driveDistance, driveSpeed), delegate(DefaultUpdateResponseType response) { }, delegate(Fault f) { success = false; } ); // Wait for settling time yield return Arbiter.Receive( false, TimeoutPort(settlingTime), delegate(DateTime timeout) { }); // Now turn left yield return Arbiter.Choice( _drivePort.RotateDegrees(rotateAngle, rotateSpeed), delegate(DefaultUpdateResponseType response) { }, delegate(Fault f) { success = false; } ); if (!success) LogError("Error occurred while attempting to drive robot"); }
If the world worked perfectly, then the preceding code would be all that you need. However, there is a problem with the LEGO NXT V2 services: Sometimes the robot stalls before reaching its target destination. This happens because the motor speed is ramped down as the target is approached in order to avoid overshooting it. However, below a certain power level, there is not enough torque to keep the robot moving and it stalls. This is why the waitForMoves flag was added to the code—to turn off this behavior.
To overcome this problem but still take advantage of the wheel encoders on the LEGO NXT, the following section of code is a hybird of the timed moves and the exact moves. If you look carefully, you will see that it is the same code that was originally used for the timed moves except that now the DriveDistance and RotateDegrees requests replace the SetDrivePower requests if controlledMoves is set to true:
else
        {
            // Start driving and then wait for a while
            if (controlledMoves)
                _drivePort.DriveDistance(driveDistance, driveSpeed);
            else
                _drivePort.SetDrivePower(driveSpeed, driveSpeed);

            yield return Arbiter.Receive(
                false,
                TimeoutPort(driveTime),
                delegate(DateTime timeout) { });

            // Stop the motors and wait for robot to settle
            _drivePort.SetDrivePower(0, 0);
            yield return Arbiter.Receive(
                false,
                TimeoutPort(settlingTime),
                delegate(DateTime timeout) { });

            // Now turn left and wait for a different amount of time
            if (controlledMoves)
                _drivePort.RotateDegrees(rotateAngle, rotateSpeed);
            else
                _drivePort.SetDrivePower(-rotateSpeed, rotateSpeed);

            yield return Arbiter.Receive(
                false,
                TimeoutPort(rotateTime),
                delegate(DateTime timeout) { });

            // Stop the motors and wait for robot to settle
            _drivePort.SetDrivePower(0, 0);
            yield return Arbiter.Receive(
                false,
                TimeoutPort(settlingTime),
                delegate(DateTime timeout) { });
        }
    }
The time delays in this new code are simply to wait for the motions to complete. You need to make sure that they are long enough. For example, change both time delays to 1500. That way, the settling period between driving and turning might be unnecessary. However, stopping the motors after each motion is still a good idea in case the motor was stalled.
Try out this new code and see if it improves the square-drawing ability of your robot. Sometimes it might draw close to a perfect square, but if you run it often enough, you will probably see that it draws some misshapen squares as well, so using wheel encoders is not the perfect solution you might have expected.
Children love lights and sounds. The Boe-Bot has two LEDs (and you could add a third one using the spare I/O pin) as well as a speaker. The LEGO NXT brick has a speaker but no lights. (Although you can display text messages with the LEGO NXT V2 services, they are hard to read on the LCD display.)
Unfortunately, MRDS does not define a generic service that can be used to manipulate digital I/O ports or play tones on a robot. Therefore, you have to use the Brick services directly.
To connect to a Brick, you need to establish a partnership. The process for this is quite simple:
Open the Dance service in Visual Studio. You need to add a reference (see Chapter 3) to the appropriate brick. Depending on the robot that you have, you will need either of the following:
nxtbrick.y07.m07.proxy  (for LEGO NXT V2)
BASICStamp2.Y07.M06.Proxy  (for Boe-Bot)
It does no harm to add references to both of these, but it is clearly not necessary if you only have one of these robots. The sample code has both references.
Once you have added the references, insert the corresponding
usingstatement at the top ofDance.cs. The two statements are shown here:using legonxt = Microsoft.Robotics.Services.Sample.Lego.Nxt.Brick.Proxy; using stamp = Microsoft.Robotics.Services.BasicStamp2.Proxy;
The LEGO NXT V2 services have departed from the previous pattern and are located under the
Samplebranch of the namespace. Also notice that each of them uses an alias to make it easier to reference methods and properties.Locate the region called
partnersand expand it. The Dance service needs to partner with the correct Brick service. Because the code will be specific to the particular brick, it doesn't make sense to put the partnership in the manifest. At this point you start to lose the hardware independence.If you are using a LEGO NXT, then insert the following code:
// Add a LEGO NXT V2 partner to allow direct access to its methods
        [Partner("LegoNxtV2", Contract = legonxt.Contract.Identifier,
CreationPolicy = PartnerCreationPolicy.UseExisting)]
        legonxt.NxtBrickOperations _legonxtPort = new legonxt.NxtBrickOperations();
If you are using a Boe-Bot, insert this code instead:
// Add a BASICStamp2 partner to allow direct access to its methods
        [Partner("Stamp", Contract = stamp.Contract.Identifier, CreationPolicy = PartnerCreationPolicy.UseExisting)]
        stamp.BasicStamp2Operations _stampPort = new stamp.BasicStamp2Operations();
Do not add both of these to the service at the same time! It makes no sense to partner with two different bricks (unless you want to control two robots simultaneously). If you check the code supplied on the book's website (
www.proMRDS.comorwww.wrox.com), you will find that conditional compilation has been used to enable the same source code to be used for the LEGO NXT, the Boe-Bot, and Simulation. This conditional code is omitted here for clarity.
The
PartnerCreationPolicyfor the brick is set toUseExisting. This is important because your manifest will be creating the brick anyway, and you don't want the service to create a second instance of the Brick service, which would happen if you used a different policy.When a service partner is specified this way,
dsshostwill try to establish the partnership for a short period of time before giving up. This enables all of the services enough time to start up and add themselves to the service directory. The code also creates a new port that can be used for sending requests to the Brick service (and receiving responses).With the partnership established, you can call the appropriate brick method to play a tone:
For the LEGO NXT V2, the following code should be added at the top of the innermost for loop in the Behavior method:
for (int side = 0; side < 4; side++)
        {
            LogInfo(LogGroups.Console, "Side " + side);

            // Make a beep (no lights to flash on a LEGO brick!)
            _legonxtPort.PlayTone(3500 + side * 250, 50);
The
PlayTonerequest takes a frequency (in hertz) and a duration (in milliseconds) as its parameters. This causes the LEGO NXT brick to "beep." Notice that the frequency increases for each side of the square just to make it a little more interesting.For the Boe-Bot, there is a little more code:
for (int side = 0; side < 4; side++)
        {
            LogInfo(LogGroups.Console, "Side " + side);

            byte op1, op2;

            // Toggle the lights to make it pretty and beep as well:-)
            op1 = ((side & 1) != 0) ? (byte)stamp.PinOperations.OUTPUT_HIGH:
(byte)stamp.PinOperations.OUTPUT_LOW;
             op2 = ((side & 2) != 0) ? (byte)stamp.PinOperations.OUTPUT_HIGH:
(byte)stamp.PinOperations.OUTPUT_LOW;
            // Pins 14 and 15 are LEDs
            _stampPort.SetPins(14, op1, 15, op2);
            // The speaker is on pin 4, but we don't need to know this because
            // the firmware does the tone
            _stampPort.PlayTone(3500 + side * 250, 50);
The code for the Parallax Boe-Bot on the book's website has been enhanced so that it supports some additional functions. The
SetPinsandPlayTonerequests are two of these functions. You must use the Parallax services from the book's website (www.proMRDS.comorwww.wrox.com) in order for this code to work. It will not work with the MRDS V1.5 Parallax services.
The first step in the Boe-Bot code is to figure out the binary pattern for the two LEDs so that they display the side number for the square (as well as look pretty).
The Boe-Bot uses a microcontroller called a BASIC Stamp 2 to control the robot. Microcontrollers typically have several digital I/O ports that are grouped together in bytes or words. The BASIC Stamp 2 on the Boe-Bot has 16 I/O pins. These can be configured as either inputs or outputs. In theory, you should set pins 14 and 15 to output mode before using them, but this is the default mode.
The SetPins request accepts two pin numbers and the operations to perform on those pins. (It is modeled directly on an internal function that already existed in the Parallax service). The operations that can be performed are defined in an enum called PinOperations, as shown in the following table:
Value | Function |
|---|---|
NO_OP | No operation |
SET_OUTPUT | Set pin to output mode |
SET_INPUT | Set pin to input mode |
OUTPUT_HIGH | Set pin to logic High (5V) |
OUTPUT_LOW | Set pin to logic Low (0V) |
The NO_OP value enables the manipulation of a single pin. The others are self-explanatory.
Be careful if you update the pins directly because all of them except pin 11 have specific purposes. In particular, pins 0, 1, 5, and 6 are connected to the eb500 Bluetooth module and you should leave them alone!
The last step in the Boe-Bot code is to call PlayTone. This has been deliberately designed to have the same parameters as the PlayTone request for the LEGO NXT, i.e., frequency and duration. Recall that there are no standards yet for bricks (see Chapter 17). Using the same signature, however, enables the code to be the same regardless of which brick is used. However, due to the protocol used by the Boe-Bot, these values are down-sampled by a factor of 50 before being sent to the robot.
You might want to add some code to play a final parting tone and turn the LEDs off when the robot has finished its dance. See if you can figure this out yourself, and then check the sample code.
Now run your new service. It is not exactly musical. The LEGO NXT does a reasonable job of playing tones, but the Boe-Bot is not very good at it. The Boe-Bot speaker volume varies with the frequency, which is not something that you can control. However, you now have a way to warn people to get out of the way or for your robot to express its emotions.
Although you now have a working service that can exercise your robot, the robot is still effectively blind. To make it interact with its environment, you need to add some code that uses the sensors.
Because the sensors on the LEGO NXT Tribot and the Parallax Boe-Bot are quite different, this section develops two separate services. You should read through both of them because they illustrate different aspects of MRDS.
You built a service from scratch at the beginning of this chapter, so to save time, this section steps you through code supplied on the book's website. You can create a new service if you want the practice, but it isn't necessary. These services can be found in the ProMRDSChapter14 folder and are called WanderLegoV2 and WanderBoeBot.
First, you must know what type of sensors you are going to use so that you can include the appropriate reference in your project.
If you have created a new service, you should add a reference to RoboticsCommon.proxy. This contains definitions for the differential drive and for generic sensors like the contact sensor array. For other sensors, you will have to reference the appropriate DLL as explained below.
Once you have added a reference, insert a using statement at the top of your code with a short alias. This is not essential, but it saves a lot of typing.
Second, you need to know how the sensors are connected to the robot, i.e., to which ports they are attached. You probably won't be rebuilding your robot every day, so the assignment of sensors to ports on the robot will most likely remain fixed. The port assignments have to be entered into config files for the LEGO NXT V2, but for the Boe-Bot the pin connections are hard-coded into the services.
To read from a sensor, you must first subscribe to it. You do this by issuing a Subscribe request specifying both the name of the handler routine that you want called whenever a new update arrives, and which notification port to use. The handler receives information from the sensor inside the Body of an Update or Replace message (depending on the particular implementation).
When you subscribe to a sensor, it sends updates either on a regular basis or whenever the state of the sensor changes. In the case of a bump sensor, for example, you will only receive an update when the sensor is pressed or released. As long as it remains in the same state, there won't be any notification messages. A sonar sensor, however, tends to send updates fairly frequently because the distance it measures is constantly changing unless the robot is standing still, in which case you might not see any notifications.
Open the solution from ProMRDSChapter14WanderLegoV2. This solution is for the LEGO NXT using the V2 services.
If you look in the References, you will see NXTCommon and NXTBrick, as well as RoboticsCommon. The corresponding using statements appear at the top of WanderLegoV2.cs:
// References to the required services
using drive = Microsoft.Robotics.Services.Drive.Proxy;
using sonarsensor = Microsoft.Robotics.Services.Sample.Lego.Nxt.SonarSensor.Proxy;
using touchsensor = Microsoft.Robotics.Services.Sample.Lego.Nxt.TouchSensor.Proxy;
Notice that the sonar sensor and the touch sensor are referenced explicitly. Because of this, the WanderLegoV2 service cannot be used with other types of robots. However, for most people this isn't a problem because they only have one robot!
The constants region contains a variety of different constants used in the code. The names and comments should be self-explanatory:
#region constants

const float drivePower = 0.5f;  // Power driving forward
const float rotatePower = 0.25f; // Power during rotation
const float veerPower = 0.6f;   // Power during veering away
const float rotateAngle = 45.0f; // Angle for Left turns
const int driveTime = 1200;     // Time to drive forward (millisec)
const int rotateTime = 920;     // Time to rotate

const float backupPower = 0.5f; // Power while backing up
const int backupTime = 1000;    // Time to back up on physical contact

#endregion
The connections to the service partners are made in the partners region. Notice that two ports are defined for each of the sensors—one to send requests to the sensor and the other for receiving notification messages containing updated sensor information. As usual, the partner creation policy is specified as UseExisting and the actual connections are established via the manifest and config files:
#region partners

// Partner: NxtDrive, Contract: http://schemas.microsoft.com/robotics/2006/05/drive.html
[Partner("NxtDrive", Contract = drive.Contract.Identifier, CreationPolicy =
PartnerCreationPolicy.UseExisting)]
drive.DriveOperations _nxtDrivePort = new drive.DriveOperations();

// Partner: NxtUltrasonicSensor, Contract:
http://schemas.microsoft.com/robotics/2007/07/lego/nxt/sonarsensor.html
[Partner("NxtUltrasonicSensor", Contract = sonarsensor.Contract.Identifier,
CreationPolicy = PartnerCreationPolicy.UseExisting)]
sonarsensor.UltrasonicSensorOperations _nxtUltrasonicSensorPort =
new sonarsensor.UltrasonicSensorOperations();
sonarsensor.UltrasonicSensorOperations _nxtUltrasonicSensorNotify =
new sonarsensor.UltrasonicSensorOperations();
// Partner: NxtTouchSensor, Contract:
http://schemas.microsoft.com/robotics/2007/07/lego/nxt/touchsensor.html
[Partner("NxtTouchSensor", Contract = touchsensor.Contract.Identifier,
CreationPolicy = PartnerCreationPolicy.UseExisting)]
touchsensor.TouchSensorOperations _nxtTouchSensorPort =
new touchsensor.TouchSensorOperations();
touchsensor.TouchSensorOperations _nxtTouchSensorNotify =
new touchsensor.TouchSensorOperations();
#endregionYou need to add some code to the Start method to set up the subscriptions to the sensors. Subscribe requests are made to both of the sensors, and the handlers are set up as well:
protected override void Start()
{
    base.Start();
    // Add service specific initialization here.

    // Subscribe to partners
    _nxtUltrasonicSensorPort.Subscribe(_nxtUltrasonicSensorNotify);
    _nxtTouchSensorPort.Subscribe(_nxtTouchSensorNotify);

    // Add notifications to the main interleave
    base.MainPortInterleave.CombineWith(
        new Interleave(
            new ExclusiveReceiverGroup(
               Arbiter.ReceiveWithIterator<sonarsensor.SonarSensorUpdate>(true,
_nxtUltrasonicSensorNotify, NxtUltrasonicSensorUpdateHandler),
               Arbiter.ReceiveWithIterator<touchsensor.TouchSensorUpdate>(true,
_nxtTouchSensorNotify, NxtTouchSensorUpdateHandler)
            ),
        new ConcurrentReceiverGroup()
        )
    );

}
Note that the handlers are added to the ExclusiveReceiverGroup, and this is combined with the existing handlers using MainPortInterleave.CombineWith.
The handler for the sonar updates receives a SonarSensorUpdate as its parameter. The current distance can be obtained from the message Body:
IEnumerator<ITask> NxtUltrasonicSensorUpdateHandler(sonarsensor.SonarSensorUpdate message)
{
    if (message.Body.Distance < 35)
    {
        LogInfo(LogGroups.Console, "Turn Left");
drive.RotateDegreesRequest request = new drive.RotateDegreesRequest();
request.Power = rotatePower;
request.Degrees = (double)rotateAngle;
_nxtDrivePort.RotateDegrees(request);
}
else if (message.Body.Distance < 60)
{
LogInfo(LogGroups.Console, "Veer Left");
drive.SetDrivePowerRequest powerRequest = new drive.SetDrivePowerRequest();
powerRequest.RightWheelPower = veerPower;
powerRequest.LeftWheelPower = veerPower/2;
_nxtDrivePort.SetDrivePower(powerRequest);
}
else
{
drive.SetDrivePowerRequest powerRequest = new drive.SetDrivePowerRequest();
powerRequest.RightWheelPower = drivePower;
powerRequest.LeftWheelPower = drivePower;
_nxtDrivePort.SetDrivePower(powerRequest);
}
yield break;
}The algorithm is quite simple. When the robot gets too close to an obstacle, it turns to the left. If there is an obstacle farther away, it veers to the left (drives in an arc); otherwise, it drives straight ahead. When you run it, the robot tends to get quite close to obstacles before it reacts. This is dependent on how fast it is moving and how well it can see the obstacle. If the obstacle tends to absorb sound, then it is not as "visible" as a hard object that reflects sound well.
The last piece of code is a safety measure. The touch sensor detects a collision with an obstacle and backs the robot away:
IEnumerator<ITask> NxtTouchSensorUpdateHandler(touchsensor.TouchSensorUpdate message)
{
    if (message.Body.TouchSensorOn)
    {
        LogInfo(LogGroups.Console, "Bump!");

        // Back up to get away from the obstacle
        _nxtDrivePort.SetDrivePower(-backupPower, -backupPower);
        LogInfo(LogGroups.Console, ">>> Backing Up");
        yield return Arbiter.Receive(
            false,
            TimeoutPort(backupTime),
            delegate(DateTime timeout) { });
        _nxtDrivePort.SetDrivePower(0, 0);

    }

    yield break;
}
Messages are written to the console in various places in the code just so you can see what is happening. They slow down the running of the program, however, so when you are satisfied that your code is working, you should remove them or comment them out. The logging facility in MRDS enables you to set the trace level so that messages can be selectively filtered out.
Note that the reaction to a bump (when the touch sensor is pressed) involves moving backwards for a short period of time. During this time, the robot is not watching the sensors. However, it doesn't have any sensors facing backwards, so there is not much point.
If you run this program with the manifest and config files supplied, then the touch sensor should be plugged into sensor port 1 and the sonar sensor should be in port 4.
The robot will wander around trying to avoid obstacles. You can wave your hands in front of it and shepherd it around. You can also push the touch sensor if you want to see it react.
Open the solution located in ProMRDSChapter14WanderBoeBot. This solution is for the Parallax Boe-Bot using the updated Parallax services supplied on the book's website.
Have a look in the References. The only additional DLL is RoboticsCommon because this example only requires the generic Contact Sensor Array to work. The Parallax services implement a Contact Sensor Array using the two infrared sensors and the two whiskers.
It is possible to use the Contact Sensor Array with the LEGO NXT as well. However, the NXT services attempt to use every possible sensor as a bumper, including the ultrasonic sonar sensor, sound sensor, and light sensor. Under the V2 services, the sonar sensor is further divided into virtual "near" and "far" bumpers. This makes dealing with the NXT Contact Sensor Array much more complicated. Furthermore, the sonar bumpers do not always issue release messages, which makes the logic very convoluted.
The following
usingstatements are at the top of the file:// Add a reference to a generic Bumper (in Robotics.Common.Proxy) using bumper = Microsoft.Robotics.Services.ContactSensor.Proxy; // Add a reference to the Differential Drive using drive = Microsoft.Robotics.Services.Drive.Proxy; // Required for Fault class using W3C.Soap;
As usual, there is a
constantsregion:#region constants const float drivePower = 0.5f; // Speed driving forward const float rotatePower = 0.25f; // Speed during rotation const int driveTime = 1200; // Time to drive forward (millisec) const int rotateTime = 920; // Time to rotate const float backupPower = 0.5f; // Power while backing up const int backupTime = 1000; // Time to back up on physical contact #endregion
By now you should be familiar with setting up partners. Notice that there are two bumper ports:
#region partners

// Partner with a Bumper (Contact Sensor) service
[Partner("bumper", Contract = bumper.Contract.Identifier,
     CreationPolicy = PartnerCreationPolicy.UseExisting)]
// Create a port to send requests
private bumper.ContactSensorArrayOperations _bumperPort =
new bumper.ContactSensorArrayOperations();
// Create the bumper notification port
private bumper.ContactSensorArrayOperations _bumperNotificationPort =
new bumper.ContactSensorArrayOperations();

// Partner with a Differential Drive service
[Partner("drive", Contract = drive.Contract.Identifier,
    CreationPolicy = PartnerCreationPolicy.UseExisting)]
// Create a port to talk to the diff drive
drive.DriveOperations _drivePort = new drive.DriveOperations();

#endregion
The
Startmethod is modified so that it subscribes to the contact sensor array:protected override void Start() { base.Start(); // Add service specific initialization here. // Allocate the necessary storage for the bumper state // The size of this array will depend on the particular robot _state.bumperStates = new bool[4]; _state.bumperNames = new string[4]; for (int i = 0; i < 4; i++) { _state.bumperStates[i] = false; _state.bumperNames[i] = null; } // Now subscribe to bumper notifications SpawnIterator(SubscribeToBumpers); SpawnIterator(Countdown); }This example takes a different approach to handling the bumpers. Additional fields are added to the service state to remember the latest logic states of the various bumpers, including their names. This makes the values visible in a web browser via the service directory. However, this is not the reason for adding them to the state. When you receive a notification from the Contact Sensor Array, it is for a single sensor. The logic for wandering around needs to keep track of the current state of all of the bumpers.
The additions to the state are made in
WanderBoeBotTypes.cs.[DataContract()] public class WanderState { [DataMember] public bool[] bumperStates; [DataMember] public string[] bumperNames; }Notice that the new properties are marked with the
[DataMember]attribute and declared aspublic. This is important for making them visible outside the service.During initialization, a subscription is made to the bumpers. This is done in an iterator, although it does not have to be:
IEnumerator<ITask> SubscribeToBumpers()
{
    // Subscribe to the bumper service
    // Receive notifications on the bumperNotificationPort
    _bumperPort.Subscribe(_bumperNotificationPort);

    // Start listening for updates from the bumper service
    // Note that we use the Exclusive Receiver Group so that
    // two bumper messages cannot be processed at the same time
    Activate(
        Arbiter.Interleave(
            new TeardownReceiverGroup(),
            new ExclusiveReceiverGroup(
                Arbiter.ReceiveWithIterator<bumper.Update>
                    (true, _bumperNotificationPort, BumperHandler)
            ),
            new ConcurrentReceiverGroup()
        )
    );

}
To finish off the initialization, the
Countdownmethod is called. This delays starting the robot for 10 seconds. In this case it does have to be an iterator because it usesyield returnto wait for timeouts:IEnumerator<ITask> Countdown() { // Wait for the robot to initialize, otherwise it will // miss the initial command for (int i = 10; i > 0; i--) { LogInfo(LogGroups.Console, i.ToString()); yield return Arbiter.Receive( false, TimeoutPort(1000), delegate(DateTime timeout) { }); }LogInfo(LogGroups.Console, "Starting now ..."); // Make sure that the drive is enabled first! _drivePort.EnableDrive(true); // Start the robot on its way! _drivePort.SetDrivePower(drivePower, drivePower); }The drive must be enabled before sending commands to it, and finally the robot sets off driving forwards.
The code that handles the bumper notifications needs to know which bumper is which. Although it is possible to look at the names of the contact sensors, they will never change so an
enumis used:private enum BumperIDs { IR_LEFT = 0, IR_RIGHT, WHISKER_LEFT, WHISKER_RIGHT };Finally, the bumper handler is responsible for adjusting the motor power based on the combination of active bumpers. The first part of the code simply displays a message indicating which bumper has changed and its state:
IEnumerator<ITask> BumperHandler(bumper.Update notification)
{
    string message;
    string bumperName;

    // Find out which bumper this is
    // BoeBot numbers from 1 to 4
    int num = notification.Body.HardwareIdentifier—1;

    if (string.IsNullOrEmpty(notification.Body.Name))
        bumperName = "NO NAME";
    else
        bumperName = notification.Body.Name.ToLowerInvariant();

    if (!notification.Body.Pressed)
    {
        message = "Bumper " + num.ToString() + " (" + bumperName +
") was released.";
        LogInfo(LogGroups.Console, message);
    }
    else
    {
        message = "Bumper " + num.ToString() + " (" + bumperName +
") was pressed.";
        LogInfo(LogGroups.Console, message);
    }
If the hardware identifier is between 1 and 4, then the new state of the bumper is recorded, including the name if it has not been seen before:
The LEGO NXT V2 issues release messages for each bumper initially. The Parallax services do not do this.
if (num >= 0 && num < _state.bumperStates.Length)
    {
        _state.bumperStates[num] = notification.Body.Pressed;
        if (_state.bumperNames[num] == null)
            _state.bumperNames[num] = bumperName;
    }
    else
    {
        message = "Invalid Hardware ID: " + num.ToString();
        LogInfo(LogGroups.Console, message);
    }
The whiskers are physical contact sensors. If one of them is triggered, then the robot has either collided with an object or it is going to very soon! Therefore, the whiskers are checked first. If either of them is depressed, then the robot backs up for a little while and then turns to the left or right, depending on which of the whiskers was depressed:
// Handle the physical touch sensors first because these are the
    // most important
    if (_state.bumperStates[(int)BumperIDs.WHISKER_LEFT] || _state.bumperStates[(int)BumperIDs.WHISKER_RIGHT])
    {
        // Back up to get away from the obstacle
        _drivePort.SetDrivePower(-backupPower, -backupPower);
        LogInfo(LogGroups.Console, ">>> Backing Up");
        yield return Arbiter.Receive(
            false,
            TimeoutPort(backupTime),
            delegate(DateTime timeout) { });
        _drivePort.SetDrivePower(0, 0);

        if (_state.bumperStates[(int)BumperIDs.WHISKER_LEFT])
        {
            // Turn right
            LogInfo(LogGroups.Console, ">>> Turn Right");
            _drivePort.SetDrivePower(rotatePower, -rotatePower);
        }
        else
        {
            // Turn left
            LogInfo(LogGroups.Console, ">>> Turn Left");
            _drivePort.SetDrivePower(-rotatePower, rotatePower);
        }
// Wait a while
yield return Arbiter.Receive(
false,
TimeoutPort(rotateTime),
delegate(DateTime timeout) { });
// Stop the motors and wait for robot to settle
_drivePort.SetDrivePower(0, 0);
}Next, the code checks the infrared sensors. If both of them see an obstacle, then the robot backs up. However, if only one of them can see something, then the robot turns in the appropriate direction. If no obstacles are visible, it simply charges straight ahead:
// Now that everything has settled down
    if (_state.bumperStates[(int)BumperIDs.IR_LEFT] && _state.bumperStates[(int)BumperIDs.IR_RIGHT])
    {
        // Both IRs see something so back up
        // Eventually one of them must lose sight of the obstacle
        LogInfo(LogGroups.Console, ">>> Reverse");
        _drivePort.SetDrivePower(-drivePower, -drivePower);
    }
    else if (_state.bumperStates[(int)BumperIDs.IR_LEFT] && !_state.bumperStates[(int)BumperIDs.IR_RIGHT])
    {
        // Obstacle on the left, so turn right until gone
        LogInfo(LogGroups.Console, ">>> Veer Right");
        _drivePort.SetDrivePower(rotatePower, -rotatePower);
    }
    else if (!_state.bumperStates[(int)BumperIDs.IR_LEFT] && _state.bumperStates[(int)BumperIDs.IR_RIGHT])
    {
        // Obstacle on the right, so turn left until gone
        LogInfo(LogGroups.Console, ">>> Veer Left");
        _drivePort.SetDrivePower(-rotatePower, rotatePower);
    }
    else
    {
        // No obstacles so drive forwards
        LogInfo(LogGroups.Console, ">>> Forward");
        _drivePort.SetDrivePower(drivePower, drivePower);
    }
}
That completes this section on wandering around. Try out the code if you have a Boe-Bot. It is more fun to play with than the LEGO NXT.
Setting up and programming a LEGO NXT Tribot and a Parallax Boe-Bot are covered in detail in this chapter. It should be apparent that a lot of real-world challenges affect the operation of a robot, and even seemingly simple tasks might not be easy.
You now know how to create manifests to orchestrate services, and you should understand how to use config files. The last part of the chapter explained how to subscribe to sensors and use the information to make simple steering decisions. Along the way, you played with the Dashboard and created a shortcut so that you can easily run your robot.
This chapter has used the services that come with MRDS. The next couple of chapters explain how to write your own services and develop more complex applications.