
2.1. The Solution Explorer
Whenever you create or open an application, or for that matter just a single file, Visual Studio 2008 uses the concept of a solution to tie everything together. Typically, a solution is made up of one or more projects, each of which in turn can have multiple items associated with it. In the past these items were typically just files, but increasingly projects are made up of items that may consist of multiple files, or in some cases no files at all. Chapter 6 will go into more detail about projects, the structure of solutions, and how items are related.
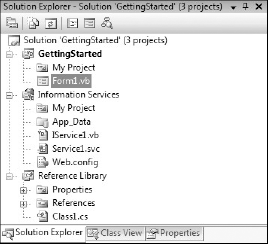
The Solution Explorer tool window (Ctrl+Alt+L) provides a convenient visual representation of the solution, projects, and items, as shown in Figure 2-1. In this figure you can see that there are three projects presented in a tree: a Visual Basic .NET Windows application, a WCF service library, and a C# class library.
Figure 2.1. Figure 2-1
Each project has an icon associated with it that typically indicates the type of project and the language it is written in. There are some exceptions to this rule, such as setup projects that don't have a language.
One node is particularly noticeable, as the font is boldfaced. This indicates that this project is the startup project — in other words, the project that is launched when you select Debug ![]() Start Debugging or press F5. To change the startup project, right-click the project you want to nominate and select "Set as Startup Project." It is also possible to nominate multiple projects as startup projects via the Solution Properties dialog, which you can reach by selecting Properties from the right-click menu of the solution node.
Start Debugging or press F5. To change the startup project, right-click the project you want to nominate and select "Set as Startup Project." It is also possible to nominate multiple projects as startup projects via the Solution Properties dialog, which you can reach by selecting Properties from the right-click menu of the solution node.
With certain environment settings (see "Let's Get Started" in Chapter 1), the solution node is not visible when only a single project exists. The problem with this is that it becomes difficult to access the Solution Properties window. To get the solution node to appear you can either add another project to the solution or check the "Always show solution" item from the Projects and Solutions node in the Options dialog, accessible via Tools
Options.
The toolbar across the top of the Solution Explorer enables you to customize the way the contents of the window appear to you, as well as giving you shortcuts to the different views for individual items. For example, the first button accesses the Properties window for the currently selected node, with the exception of the solution node, which opens the Solution Properties dialog. The second button, "Show All Files," expands the solution listing to display the additional files and folders, shown in Figure 2-2. You can see that even a simple item, such as a form, can be made up of multiple files. In this case Form1 has Form1.vb, which is where your code goes, Form1.designer.vb, which is where the generated code goes, and Form1.resx, an XML document where all the resources used by this form are captured.
Figure 2.2. Figure 2-2

In this expanded view you can see all the files and folders contained under the project structure. Unfortunately, if the file system changes, the Solution Explorer will not automatically update to reflect these changes. The third button, "Refresh," can be used to make sure you are seeing the correct list of files and folders.
The Solution Explorer toolbar is contextually aware, with different buttons displayed depending on what type of node is selected. This is shown in Figure 2-2, where a folder not contained in the project (as indicated by the faded icon color) is selected and the remaining buttons from Figure 2-1 are not visible. In short, these buttons when visible can be used to view code (in this case the Form1.vb file), open the designer, which displays a visual representation of the Form1.designer.vb file, and lastly see the Class Diagram.
If you don't already have a class diagram in your project, clicking the "View Class Diagram" button will insert one and automatically add all the classes. For a project with a lot of classes this can be quite time-consuming and will result in a large and unwieldy class diagram. It is generally a better idea to manually add one or more class diagrams, which gives you total control.
2.1.1. Common Tasks
In addition to providing a convenient way to manage projects and items, the Solution Explorer has a dynamic context menu that gives you quick access to some of the most common tasks, such as building the solution or individual projects, accessing the build configuration manager, and opening files. Figure 2-3 shows how the context menu varies depending on which item is selected in the Solution Explorer.
Figure 2.3. Figure 2-3
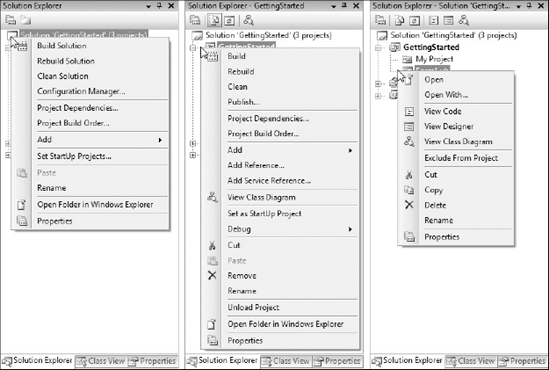
The first items in the left-hand and center menus relate to building either the entire solution or the selected project. In most cases selecting "Build" will be the most efficient option, as it will only build projects that have changed. However, in some cases you may need to force a rebuild, which will build all dependent projects regardless of their states. If you just want to remove all the additional files that are created during the build process, you can invoke "Clean." This option can be useful if you want to package your solution in order to e-mail it to someone — you wouldn't want to include all the temporary or output files that are created by the build.
For most items in the Solution Explorer, the first section of the context menu is similar to the right-hand menu in Figure 2-3: there is a default "Open," and "Open With . . .", item that allows you to determine how the item will be opened. This is of particular use when you are working with XML resource files. Visual Studio 2008 will open this file type using the built-in resource editor, but this prevents you from making certain changes and doesn't support all data types you might want to include (Chapter 40 goes into how you can use your own data types in resource files.) Using the "Open With . . ." menu item, you can instead use the Visual Studio 2008 XML editor.
A notable addition to the context menu is the "Open Folder in Windows Explorer" item. This enables you to open Windows Explorer quickly to the location of the selected item, saving you the hassle of having to navigate to where your solution is located and then find the appropriate sub-folder.
2.1.1.1. Adding Projects and Items
The most common activities carried out in the Solution Explorer are the addition, removal, and renaming of projects and items. In order to add a new project to an existing solution, you select Add ![]() New Project from the context menu off the solution node. This will invoke the dialog in Figure 2-4, which has undergone a few minor changes since previous versions of Visual Studio. Frequently requested features, such as the ability to resize the dialog, have now been implemented, making it much easier to locate the project type you want to add.
New Project from the context menu off the solution node. This will invoke the dialog in Figure 2-4, which has undergone a few minor changes since previous versions of Visual Studio. Frequently requested features, such as the ability to resize the dialog, have now been implemented, making it much easier to locate the project type you want to add.
Figure 2.4. Figure 2-4
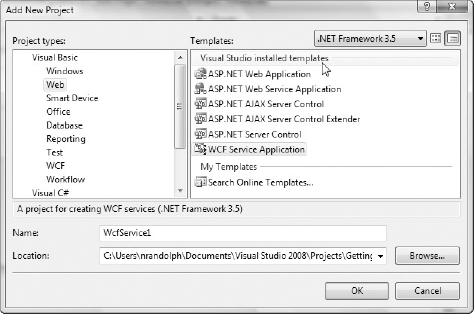
In the Project types hierarchy on the left of the Add New Project dialog, the types are primarily arranged by language, and then by technology. The types include Office project types, enabling you to build both application- and document-level add-ins for most of the Office products. While the Office add-ins still make use of Visual Studio Tools for Office (VSTO), this is now built into Visual Studio 2008 instead of being an additional installer. You will see in Chapter 33 how you can use these project types to build add-ins for the core Office applications.
The other thing you will notice in this dialog is the ability to select different Framework versions. This is a significant improvement for most development teams. If you have existing projects that you don't want to have to migrate forward to the new version of the .NET Framework, you can still immediately take advantage of the new features, such as improved IntelliSense. The alternative would have been to have both Visual Studio 2008 and a previous version installed in order to build projects for earlier Framework versions.
In fact, this is still the case if you have any applications that require version 1.0 or 1.1 of the .NET Framework. However, in this case you can still get away without having to install Visual Studio 2005.
One warning about this feature is that when you open your existing solutions or projects in Visual Studio 2008, they will still go through the upgrade wizard (see Chapter 44 for more information) but will essentially make only minor changes to the solution and project files. Unfortunately, these minor changes, which involve the inclusion of additional properties, will break your existing build process if you are using a previous version of MSBuild. For this reason, you will still need to migrate your entire development team across to using Visual Studio 2008 and the new version of MSBuild.
One of the worst and most poorly understood features that was added to Visual Studio 2005 was the concept of a Web Site project. This is distinct from a Web Application project, which can be added via the aforementioned Add New Project dialog (this is covered in detail in Chapter 31). To add a Web Site project you need to select Add ![]() Web Site . . . from the context menu off the solution node. This will display a dialog similar to the one shown in Figure 2-5, where you can select the type of web project to be created. In most cases, this simply determines the type of default item that is to be created in the project.
Web Site . . . from the context menu off the solution node. This will display a dialog similar to the one shown in Figure 2-5, where you can select the type of web project to be created. In most cases, this simply determines the type of default item that is to be created in the project.
Figure 2.5. Figure 2-5

It is important to note that the types of web project listed in Figure 2-5 are the same as the types listed under the Web node in the Add New Project dialog. However, understand that they will not generate the same results, as there are significant differences between Web Site projects (created via the Add New Web Site dialog) and Web Application projects (created via the Add New Project dialog).
Once you have a project or two, you will need to start adding items. This is done via the "Add" context menu item off the project node in the Solution Explorer. The first sub-menu, "New Item . . .", will launch the Add New Item dialog, as seen in Figure 2-6.
Figure 2.6. Figure 2-6
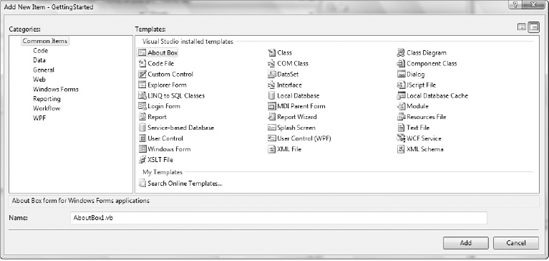
Returning to the Add context menu, you will notice that there are a number of predefined shortcuts such as Windows Form, User Control, and Class. These do little more than bypass the stage of locating the appropriate template within the Add New Item dialog. This dialog is still displayed, since you need to assign a name to the item being created.
It is important to make the distinction that you are adding items rather than files to the project. While a lot of the templates contain only a single file, some, like the Windows Form, will add multiple files to your project.
2.1.1.2. Adding References
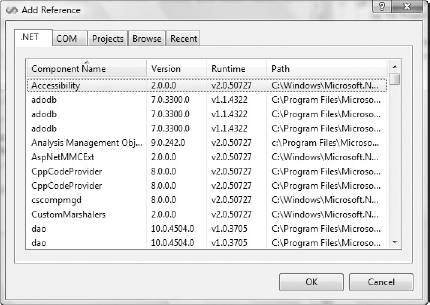
Each new software development technology that is released promises better reuse, but few are able to actually deliver on this promise. One way that Visual Studio 2008 supports reusable components is via the references for a project. If you expand out any project you will observe that there are a number of .NET Framework libraries, such as System and System.Core, that need to be referenced by a project in order to be built. Essentially, a reference enables the compiler to resolve type, property, field, and method names back to the assembly where they are defined. If you want to reuse a class from a third-party library, or even your own .NET assembly, you need to add a reference to it via the "Add Reference . . ." context menu item on the project nodes of the Solution Explorer.
When you launch the Add Reference dialog, shown in Figure 2-7, Visual Studio 2008 will interrogate the local computer, the global assembly cache, and your solution in order to present a list of known libraries that can be referenced. This includes both .NET and COM references that are separated into different lists, as well as project and recently used references. If the component you need to reference isn't present in the appropriate list, you can choose the Browse tab, which enables you to locate the file containing the component directly in the file system.
Figure 2.7. Figure 2-7
As in other project-based development environments going back as far as the first versions of Visual Basic, you can add references to projects contained in your solution, rather than adding the compiled binary components. The advantage to this model is that it's easier to debug into the referenced component, but for large solutions this may become unwieldy.
Where you have a solution with a large number of projects (large can be relevant to your computer but typically anything over 20), you should consider having multiple solutions that reference subsets of the projects. This will continue to give you a nice debugging experience throughout the entire application while improving Visual Studio performance during both loading and building of the solution.
2.1.1.3. Adding Service References
The other type of reference that the Solution Explorer caters to is service references. In previous versions these were limited to web references, but with the advent of the Windows Communication Foundation (WCF) there is now a more generic "Add Service Reference . . ." menu item. This invokes the Add Service Reference dialog, which you can see in Figure 2-8. In this example the drop-down feature of the "Discover" button has been used to look for Services in Solution.
Unfortunately, this dialog is another case of Microsoft not understanding the usage pattern properly. While the dialog itself is resizable, the status response message area is not. Luckily, if any errors are thrown while Visual Studio 2008 attempts to access the service information, it will provide a hyperlink that will open the Add Service Reference Error dialog. This will generally give you enough information to resolve the problem.
Figure 2.8. Figure 2-8

In the lower left-hand corner of Figure 2-8 is an "Advanced . . ." button. The Service Reference Settings dialog that this launches enables you to customize which types are defined as part of the service reference. By default, all local system types are assumed to match those being published by the service. If this is not the case, you may want to adjust the values in the Data Type area of this dialog. There is also an "Add Web Reference" button in the lower left-hand corner of the Service Reference Settings dialog, which enables you to add more traditional .NET Webservice references. This might be important if you have some limitations or are trying to support intersystem operability.