
21.2. Binding
The most common type of application is one that retrieves data from a database, displays the data, allows changes to be made, and then persists those changes back to the database. The middle steps that connect the in-memory data with the visual elements are what is referred to as DataBinding. DataBinding often becomes the bane a of developer's existence because it has been difficult to get right. Most developers at some stage or another have resorted to writing their own wrappers to ensure that data is correctly bound to the controls on the screen. Visual Studio 2008 dramatically reduces the pain of getting two-way DataBinding to work. The examples used in the following sections work with the AdventureWorks Lite sample database, and you saw earlier in this chapter that you will need to add this as a data source to your application. For simplicity, you'll work with a single Windows application, but the concepts discussed here can be extended over multiple tiers.
In this example, you build an application to assist you in managing the customers for AdventureWorks. To begin, you need to ensure that the AdventureWorksDataSet contains the Customer, SalesTerritory, Individual, Contact, and SalesOrderHeader tables. (You can reuse the AdventureWorksDataSet from earlier by clicking the "Configure Dataset with Wizard" icon in the Data Source window and editing which tables are included in the DataSet.) With the form designer (any empty form in your project will do) and Data Sources window open, set the mode for the Customer table to Details using the drop-down list. Before creating the editing controls, tweak the list of columns for the Customer table. You're not that interested in the CustomerID or rowguid fields, so set them to None (again using the drop-down list for those nodes in the Data Sources window). AccountNumber is a generated field, and ModifiedDate should be automatically set when changes are made, so both of these fields should appear as labels, preventing them from being edited.
Now you're ready to drag the Customer node onto the form design surface. This will automatically add controls for each of the columns you have specified. It will also add a BindingSource, a BindingNavigator, an AdventureWorksDataSet, a CustomerTableAdapter, and a TableAdapterManager to the form as shown in Figure 21-7.
Figure 21.7. Figure 21-7

At this point you can build and run this application and navigate through the records using the navigation control, and you can also take the components apart to understand how they interact. Start with the AdventureWorksDataSet and the CustomerTableAdapter, because they carry out the background grunt work of retrieving information and persisting changes to the database. The AdventureWorksDataSet that is added to this form is actually an instance of the AdventureWorksDataSet class that was created by the Data Source Configuration Wizard. This instance will be used to store information for all the tables on this form. To populate the DataSet, call the Fill method. If you open the code file for the form, you will see that the Fill command has been added to the form's Load event handler. There is no requirement for this to occur while the form is loading — for example, if parameters need to be passed to the SELECT command, then you might need to input values before clicking a button to populate the DataSet.
Private Sub Form1_Load(ByVal sender As System.Object, _
                       ByVal e As System.EventArgs) Handles MyBase.Load
     Me.CustomerTableAdapter.Fill(Me.AdventureWorksDataSet.Customer)
End Sub
As you add information to this form, you'll also add TableAdapters to work with different tables within the AdventureWorksDataSet.
21.2.1. BindingSource
The next item of interest is the CustomerBindingSource that was automatically added to the nonvisual part of the form designer. This control is used to wire up each of the controls on the design surface with the relevant data item. In fact, this control is just a wrapper for the CurrencyManager. However, using a BindingSource considerably reduces the number of event handlers and custom code that you have to write. Unlike the AdventureWorksDataSet and the CustomerTableAdapter — which are instances of the strongly typed classes with the same names — the CustomerBindingSource is just an instance of the regular BindingSource class that ships with the .NET Framework.
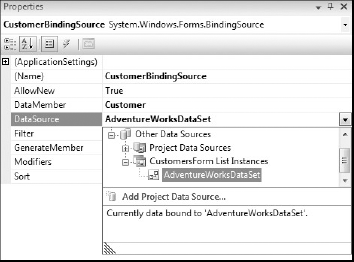
Take a look at the properties of the CustomerBindingSource so you can see what it does. Figure 21-8 shows the Properties window for the CustomerBindingSource. The two items of particular interest are the DataSource and DataMember properties. The drop-down list for the DataSource property is expanded to illustrate the list of available data sources. The instance of the AdventureWorksDataSet that was added to the form is listed under CustomerForm List Instances. Selecting the AdventureWorksDataSet type under the Project Data Sources node creates another instance on the form instead of reusing the existing DataSet. In the DataMember field, you need to specify the table to use for DataBinding. Later, you'll see how the DataMember field can be used to specify a foreign key relationship so you can show linked data.
Figure 21.8. Figure 21-8
So far you have specified that the CustomerBindingSource will bind data in the Customer table of the AdventureWorksDataSet. What remains is to bind the individual controls on the form to the BindingSource and the appropriate column in the Customer table. To do this you need to specify a DataBinding for each control. Figure 21-9 shows the Properties grid for the TerritoryID textbox, with the DataBindings node expanded to show the binding for the Text property.
Figure 21.9. Figure 21-9

From the drop-down list you can see that the Text property is being bound to the TerritoryID field of the CustomerBindingSource. Because the CustomerBindingSource is bound to the Customer table, this is actually the TerritoryID column in that table. If you look at the designer file for the form, you can see that this binding is set up using a new Binding, as shown in the following snippet:
Me.TerritoryIDTextBox.DataBindings.Add( _
                    New System.Windows.Forms.Binding("Text", _
   Me.CustomerBindingSource, _
   "TerritoryID", True) _
                                       )
A Binding is used to ensure that two-way binding is set up between the Text field of the TerritoryID textbox and the TerritoryID field of the CustomerBindingSource. The controls for AccountNumber, CustomerType, and ModifiedDate all have similar bindings between their Text properties and the appropriate fields on the CustomerBindingSource.
Running the current application you will notice that the Modified Date value is displayed as in the default string representation of a date, for example, "13/10/2004 11:15." Given the nature of the application, it might be more useful to have it in a format similar to "Friday, 13 October 2004." To do this you need to specify additional properties as part of the DataBinding. In the Properties tool window, expand the DataBindings node and select the Advanced item. This will open up the Formatting and Advanced Binding dialog as shown in Figure 21-10.
Figure 21.10. Figure 21-10
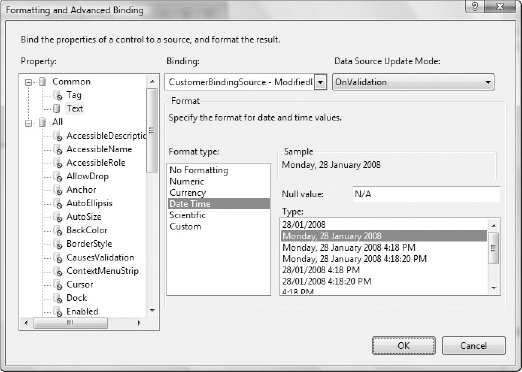
In the lower portion of Figure 21-10 you can see that we have selected one of the predefined formatting types, Date Time. This then presents another list of formatting options in which "Monday, 28 January 2008" has been selected — this is an example of how the value will be formatted. In this dialog we have also provided a Null value, "N/A," which will be displayed if there is no Modified Date value for a particular row. In the following code you can see that there are now three additional parameters that have been added to create the DataBinding for the Modified Date value:
Me.ModifiedDateLabel1.DataBindings.Add( _
             New System.Windows.Forms.Binding("Text", _
   Me.CustomerBindingSource, _
   "ModifiedDate", True, _
   DataSourceUpdateMode.OnValidation, _
                                               "N/A", "D") _
                                       )
The OnValidation value simply indicates that the data source will be updated when the visual control has been validated. This is actually the default and is only specified here so that the next two parameters can be specified. The "N/A" is the value you specified for when there was no Modified Date value, and the "D" is actually a shortcut formatting string for the date formatting you selected.
21.2.2. BindingNavigator
Although the CustomerBindingNavigator component, which is an instance of the BindingNavigator class, appears in the nonvisual area of the design surface, it does have a visual representation in the form of the navigation toolstrip that is initially docked to the top of the form. As with regular toolstrips, this control can be docked to any edge of the form. In fact, in many ways the BindingNavigator behaves the same way as a toolstrip in that buttons and other controls can be added to the Items list. When the BindingNavigator is initially added to the form, a series of buttons are added for standard data functionality, such as moving to the first or last item, moving to the next or previous item, and adding, removing, and saving items.
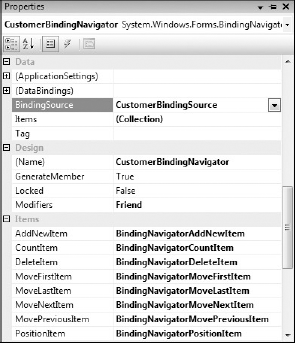
What is neat about the BindingNavigator is that it not only creates these standard controls, but also wires them up for you. Figure 21-11 shows the Properties window for the BindingNavigator, with the Data and Items sections expanded. In the Data section you can see that the associated BindingSource is the CustomerBindingSource, which will be used to perform all the actions implied by the various button clicks. The Items section plays an important role, because each property defines an action, such as AddNewItem. The value of the property defines the ToolStripItem to which it will be assigned — in this case, the "BindingNavigatorAddNewItem" button.
Figure 21.11. Figure 21-11
Behind the scenes, when this application is run and this button is assigned to the AddNewItem property, the OnAddNew method is wired up to the Click event of the button. This is shown in the following snippet, extracted using Reflector from the BindingNavigator class. The AddNewItem property calls the WireUpButton method, passing in a delegate to the OnAddNew method:
Public Property AddNewItem As ToolStripItem
    Get
        If ((Not Me.addNewItem Is Nothing) AndAlso Me.addNewItem.IsDisposed) Then
            Me.addNewItem = Nothing
        End If
        Return Me.addNewItem
    End Get
    Set(ByVal value As ToolStripItem)
        Me.WireUpButton(Me.addNewItem, value, _
                                           New EventHandler(AddressOf Me.OnAddNew))
    End Set
End Property
Private Sub OnAddNew(ByVal sender As Object, ByVal e As EventArgs)
If (Me.Validate AndAlso (Not Me.bindingSource Is Nothing)) Then
Me.bindingSource.AddNew
Me.RefreshItemsInternal
End If
End Sub
Private Sub WireUpButton(ByRef oldButton As ToolStripItem, _
ByVal newButton As ToolStripItem, _
ByVal clickHandler As EventHandler)
If (Not oldButton Is newButton) Then
If (Not oldButton Is Nothing) Then
RemoveHandler oldButton.Click, clickHandler
End If
If (Not newButton Is Nothing) Then
AddHandler newButton.Click, clickHandler
End If
oldButton = newButton
Me.RefreshItemsInternal
End If
End SubThe OnAddNew method performs a couple of important actions. First, it forces validation of the active field, which is examined later in this chapter. Second, and the most important aspect of the OnAddNew method, it calls the AddNew method on the BindingSource. The other properties on the BindingNavigator also map to corresponding methods on the BindingSource, and it is important to remember that the BindingSource, rather than the BindingNavigator, does the work when it comes to working with the data source.
21.2.3. Data Source Selections
Now that you have seen how the BindingSource works, it's time to improve the user interface. At the moment, the TerritoryID is being displayed as a textbox, but this is in fact a foreign key to the SalesTerritory table. This means that if a user enters random text, an error will be thrown when you try to commit the changes. Because the list of territories is defined in the database, it would make sense to present a drop-down list that enables users to select the territory, rather than specify the ID. To add the drop-down, replace the textbox control with a ComboBox control, and bind the list of items in the drop-down to the SalesTerritory table in the database.
Start by removing the TerritoryID textbox. Next, add a ComboBox control from the toolbar. With the new ComboBox selected, note that a smart tag is attached to the control. Expanding this tag and checking the "Use data bound items" checkbox will open the Data Binding Mode options, as shown in Figure 21-12. Take this opportunity to rearrange the form slightly so the controls line up.
Figure 21.12. Figure 21-12

You need to define four things to get the DataBinding to work properly. The first is the data source. In this case, select the existing AdventureWorksDataSet that was previously added to the form, which is listed under Other Data Sources, CustomersForm List Instances. Within this data source, set the Display Member, the field that is to be displayed, to be equal to the Name column of the SalesTerritory table. The Value Member, which is the field used to select which item to display, is set to the TerritoryID column of the same table. These three properties configure the contents of the drop-down list. The last property you need to set determines which item will be selected and what property to update when the selected item changes in the drop-down list. This is the SelectedValue property; in this case, set it equal to the TerritoryID field on the existing CustomerBindingSource object.
In the earlier discussion about the DataSet and the TableAdapter, recall that to populate the Customer table in the AdventureWorksDataSet, you need to call the Fill method on the CustomerTableAdapter. Although you have wired up the TerritoryID drop-down list, if you run what you currently have, there would be no items in this list, because you haven't populated the DataSet with any values for the SalesTerritory table. To retrieve these items from the database, you need to add a TableAdapter to the form and call the Fill method when the form loads. When you added the AdventureWorksDataSet to the data source list, it not only created a set of strongly typed tables, it also created a set of table adapters. These are automatically added to the Toolbox under the Components tab. In this case, drag the SalesTerritoryTableAdapter onto the form and add a call to the Fill method to the Load event handler for the form. You should end up with the following:
Private Sub Form1_Load(ByVal sender As System.Object, _
                       ByVal e As System.EventArgs) Handles MyBase.Load
    Me.SalesTerritoryTableAdapter.Fill(Me.AdventureWorksDataSet.SalesTerritory)
    Me.CustomerTableAdapter.Fill(Me.AdventureWorksDataSet.Customer)
End Sub
Now when you run the application, instead of having a textbox with a numeric value, you have a convenient drop-down list from which to select the Territory.
New in Visual Studio 2008 generated code is the TableAdapterManager that was automatically added to your form. This component is designed to simplify the loading and saving of data using table adapters. To simplify your example you can replace the data loading code with the following:
Private Sub Form1_Load(ByVal sender As System.Object, _
                       ByVal e As System.EventArgs) Handles MyBase.Load
    Me.TableAdapterManager.SalesTerritoryTableAdapter.Fill _
                                          (Me.AdventureWorksDataSet.SalesTerritory)
    Me.TableAdapterManager.CustomerTableAdapter.Fill _
                                          (Me.AdventureWorksDataSet.Customer)
End Sub
21.2.4. BindingSource Chains
At the moment, you have a form that displays some basic information about a customer, such as Account Number, Sales Territory ID, and Customer Type. This information by itself is not very interesting, because it really doesn't tell you who the customer is or how to contact this person or entity. Before adding more information to this form, you need to limit the customer list. There are actually two types of customers in the database, Individuals and Stores, as indicated by the Customer Type field. For this example, you are only interested in Individuals, because Stores have a different set of information stored in the database. The first task is to open the AdventureWorksDataSet in the design window, click the CustomerTableAdapter, select the SelectCommand property, and change the query to read as follows:
SELECT    CustomerID, CustomerType, TerritoryID, rowguid,
          ModifiedDate, AccountNumber
FROM      Sales.Customer
WHERE     (CustomerType = 'I')
Now that you're dealing only with individual customers, you can remove the Customer Type information from the form.
To present more information about the customers, you need to add information from the Individual and Contact tables. The only column of interest in the Individual table is Demographics. From the Data Sources window, expand the Customer node, followed by the Individual node. Set the Demographics node to Textbox using the drop-down and then drag it onto the form. This will also add an IndividualBindingSource and an IndividualTableAdapter to the form.
When you run the application in this state, the demographics information for each customer is displayed. What is going on here to automatically link the Customer and Individual tables? The trick is in the new BindingSource. The DataSource property of the IndividualBindingSource is the CustomerBindingSource. In the DataMember field, you can see that the IndividualBindingSource is binding to the FK_Individual_Customer_CustomerID relationship, which of course is the relationship between the Customer table and the Individual table. This relationship will return the collection of rows in the Individual table that relate to the current customer. In this case, there will only ever be a single Individual record, but, for example, if you look at the relationship between an order and the OrderDetails table, there might be a number of entries in the OrderDetails table for any given order.
As you probably have noticed, the Individual table is actually a many-to-many joining table for the Customer and Contact tables. On the Customer side, this is done because a customer might be either an Individual or a Store; and similarly on the Contact side, not all contacts are individual customers. The Data Sources window doesn't handle this many-to-many relationship very well, because it can only display parent-child (one-to-many) relationships in the tree hierarchy. Under the Contact node there is a link to the Individual table, but this won't help because dragging this onto the form will not link the BindingSources correctly. Unfortunately, there is no out-of-the-box solution to this problem within Visual Studio 2008. However, the following paragraphs introduce a simple component that you can use to give you designer support for many-to-many table relationships.
Begin by completing the layout of the form. For each of the fields under the Contact node, you need to specify whether or not you want it to be displayed. Then set the Contact node to Details, and drag the node onto the form. This will again add a ContactBindingSource and a ContactTableAdapter to the form.
To establish the binding between the IndividualBindingSource and the ContactBindingSource, you need to trap the ListChanged and BindingComplete events on the IndividualBindingSource. Then, using the current record of the IndividualBindingSource, apply a filter to the ContactBindingSource so only related records are displayed. Instead of manually writing this code every time you have to work with a many-to-many relationship, it's wise to create a component to do the work for you, as well as give you design-time support. The following code is divided into three regions. The opening section declares the fields, the constructor, and the Dispose method. This is followed by the Designer Support region, which declares the properties and helper methods that will be invoked to give you design-time support for this component. Lastly, the remaining code traps the two events and places the filter on the appropriate BindingSource:
Imports System.ComponentModel
Imports System.Drawing.Design

Public Class ManyToMany
    Inherits Component

    Private WithEvents m_LinkingBindingSource As BindingSource
    Private m_Relationship As String
    Private m_TargetBindingSource As BindingSource


    Public Sub New(ByVal container As IContainer)
        MyBase.New()
        container.Add(Me)
    End Sub

    Protected Overrides Sub Dispose(ByVal disposing As Boolean)
        If disposing Then
            Me.TargetBindingSource = Nothing
            Me.Relationship = Nothing
        End If
        MyBase.Dispose(disposing)
    End Sub

#Region "Designer Support"
    Public Property LinkingBindingSource() As BindingSource
        Get
            Return m_LinkingBindingSource
        End Get
Set(ByVal value As BindingSource)
If Not m_LinkingBindingSource Is value Then
m_LinkingBindingSource = value
End If
End Set
End Property
<RefreshProperties(RefreshProperties.Repaint), _
Editor("System.Windows.Forms.Design.DataMemberListEditor, System.Design,
Version=2.0.0.0, Culture=neutral, PublicKeyToken=b03f5f7f11d50a3a", _
GetType(UITypeEditor)), DefaultValue("")> _
Public Property Relationship() As String
Get
Return Me.m_Relationship
End Get
Set(ByVal value As String)
If (value Is Nothing) Then
value = String.Empty
End If
If Me.m_Relationship Is Nothing OrElse _
Not Me.m_Relationship.Equals(value) Then
Me.m_Relationship = value
End If
End Set
End Property
<AttributeProvider(GetType(IListSource)), _
RefreshProperties(RefreshProperties.Repaint), _
DefaultValue(CType(Nothing, String))> _
Public Property TargetBindingSource() As BindingSource
Get
Return Me.m_TargetBindingSource
End Get
Set(ByVal value As BindingSource)
If (Me.m_TargetBindingSource IsNot value) Then
Me.m_TargetBindingSource = value
Me.ClearInvalidDataMember()
End If
End Set
End Property
<Browsable(False)> _
Public ReadOnly Property DataSource() As BindingSource
Get
Return Me.TargetBindingSource
End Get
End Property
Private Sub ClearInvalidDataMember()
If Not Me.IsDataMemberValid Then
Me.Relationship = ""End If
End Sub
Private Function IsDataMemberValid() As Boolean
If String.IsNullOrEmpty(Me.Relationship) Then
Return True
End If
Dim collection1 As PropertyDescriptorCollection = _
ListBindingHelper.GetListItemProperties(Me.TargetBindingSource)
Dim descriptor1 As PropertyDescriptor = collection1.Item(Me.Relationship)
If (Not descriptor1 Is Nothing) Then
Return True
End If
Return False
End Function
#End Region
#Region "Filtering"
Private Sub BindingComplete(ByVal sender As System.Object, _
ByVal e As System.Windows.Forms.BindingCompleteEventArgs) _
Handles m_LinkingBindingSource.BindingComplete
BindNow()
End Sub
Private Sub ListChanged(ByVal sender As System.Object, _
ByVal e As System.ComponentModel.ListChangedEventArgs) _
Handles m_LinkingBindingSource.ListChanged
BindNow()
End Sub
Private Sub BindNow()
Dim src as DataView
If Me.DesignMode Then Return
If Me.TargetBindingSource Is Nothing Then Return
Try
src = CType(Me.TargetBindingSource.List, DataView)
Catch ex as Exception
'We can simply disable filtering if this isn't a List
Return
End Try
Dim childColumn As String = _
src.Table.ChildRelations(Me.Relationship).ChildColumns(0).ColumnName
Dim parentColumn As String = _
src.Table.ChildRelations(Me.Relationship).ParentColumns(0).ColumnName
Dim filterString As String = ""
For Each row As DataRowView In LinkingBindingSource.List
If Not IsDBNull(row(parentColumn)) Then
If Not filterString = "" Then filterString &= " OR "
filterString &= childColumn & "= '" & row(parentColumn) & "'"End If
Next
Me.m_TargetBindingSource.Filter = filterString
Me.m_TargetBindingSource.EndEdit()
End Sub
#End Region
End ClassAdding this component to your solution will add it to the Toolbox, from which it can be dragged onto the nonvisual area on the designer surface. You now need to set the LinkingBindingSource property to be the BindingSource for the linking table — in this case, the IndividualBindingSource. You also have designer support for selecting the TargetBindingSource — the ContactBindingSource — and the Relationship, which in this case is FK_Individual_Contact_ContactId. The events on the LinkingBindingSource are automatically wired up using the Handles keyword, and when triggered they invoke the BindNow method, which sets the filter on the TargetBindingSource.
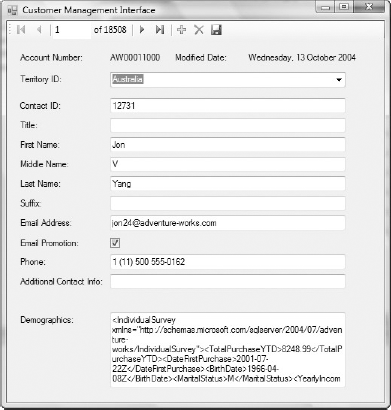
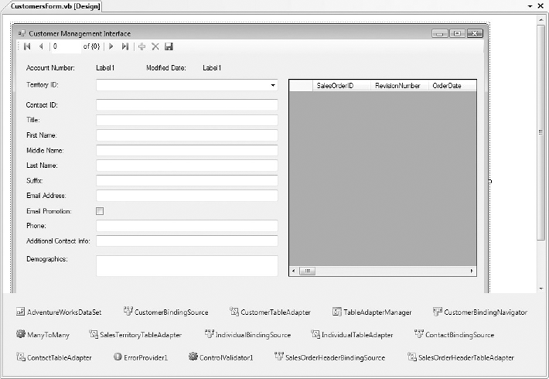
When you run this application, you can easily navigate between customer records. In addition, not only is the data from the Customer table displayed; you can also see the information from both the Individual table and the Contact table, as shown in Figure 21-13. Notice that the textbox for the Email Promotion column has been replaced with a checkbox. This can be done the same way that you replaced the TerritoryID textbox: by dragging the checkbox from the Toolbox and then using the DataBindings node in the Properties window to assign the EmailPromotion field to the checked state of the checkbox.
Figure 21.13. Figure 21-13
21.2.5. Saving Changes
Now that you have a usable interface, you need to add support for making changes and adding new records. If you double-click the Save icon on the CustomerBindingNavigator toolstrip, the code window opens with a code stub that would normally save changes to the Customer table. Unlike earlier, when the generated code didn't use the TableAdapterManager, the generated portion of this method does. As you can see in the following snippet, there are essentially three steps: the form is validated, each of the BindingSources have been instructed to end the current edit (you will need to add the lines of code for the Contact and Individual BindingSources), and then the Update method is called on the TableAdapterManager table adapters. Unfortunately the default UpdateAll method doesn't work with this example because it isn't intelligent enough to know that because Individual is a linking table between Customer and Contact, it needs to be saved last to ensure that there are no conflicts when changes are sent to the database:
In the following code, the lines
Me.TableAdapterManager.CustomerTableAdapter.Update(Me.AdventureWorksDataSet
.Customer)
and
Me.TableAdapterManager.IndividualTableAdapter.Update(Me.AdventureWorksDataSet
.Individual)
appear on separate lines to allow for the width of the book page, but they must be entered as one line in your editor or the code will fail.
Private Sub CustomerBindingNavigatorSaveItem_Click(ByVal sender As System.Object, _
                                                   ByVal e As System.EventArgs) _
                                     Handles CustomerBindingNavigatorSaveItem.Click
    Me.Validate()
    Me.ContactBindingSource.EndEdit()
    Me.CustomerBindingSource.EndEdit()
    Me.IndividualBindingSource.EndEdit()
    Me.TableAdapterManager.CustomerTableAdapter.Update( _
                                              Me.AdventureWorksDataSet.Customer)
Me.TableAdapterManager.ContactTableAdapter.Update( _
                                              Me.AdventureWorksDataSet.Contact)
Me.TableAdapterManager.IndividualTableAdapter.Update( _
                                              Me.AdventureWorksDataSet.Individual)
End Sub
If you run this, make changes to a customer, and click the Save button, an exception will be thrown because you're currently trying to update calculated fields. You need to correct the Update and Insert methods used by the CustomerTableAdapter to prevent updates to the Account Number column, because it is a calculated field, and to automatically update the Modified Date field. Using the DataSet Designer, select the CustomerTableAdapter, open the Properties window, expand the UpdateCommand node, and click the ellipsis button next to the CommandText field. This opens the Query Builder dialog that you used in the previous chapter. Uncheck the boxes in the Set column for the rowguid and AccountNumber rows. In the New Value column, change @ModifiedDate to getdate(), to automatically set the modified date to the date on which the query was executed. This should give you a query similar to the one shown in Figure 21-14.
Figure 21.14. Figure 21-14
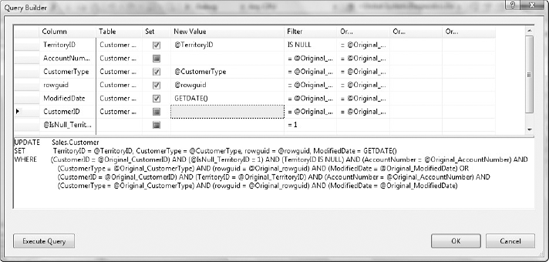
Unfortunately, the process of making this change to the Update command causes the parameter list for this command to be reset. Most of the parameters are regenerated correctly except for the IsNull_TerritoryId parameter, which is used to handle cases where the TerritoryID field can be null in the database. To fix this problem, open the Parameter Collection Editor for the Update command and update the settings for the @IsNull_TerritoryId parameter as outlined in Table 21-1.
| Property | Value |
|---|---|
| AllowObNull | True |
| ColumnName | |
| DbType | Int32 |
| Direction | Input |
| ParameterName | @IsNull_TerritoryID |
| Precision | 0 |
| ProviderType | Int |
| Scale | 0 |
| Size | 0 |
| SourceColumn | TerritoryID |
| SourceColumnNullMapping | False |
| SourceVersion | Original |
Now that you've completed the Update command, not only can you navigate the customers, you can also make changes.
You also need to update the Insert command so it automatically generates both the modification date and the rowguid. Using the Query Builder, update the Insert command to match Figure 21-15.
Figure 21.15. Figure 21-15

Unlike the Update method, you don't need to change any of the parameters for this query. Both the Update and Insert queries for the Individual and Customer tables should work without modifications.
21.2.6. Inserting New Items
You now have a sample application that enables you to browse and make changes to an existing set of individual customers. The one missing piece is the capability to create a new customer. By default, the Add button on the BindingNavigator is automatically wired up to the AddNew method on the BindingSource, as shown earlier in this chapter. In this case, you actually need to set some default values and create entries in both the Individual and Contact tables in addition to the record that is created in the Customer table. To do this, you need to write your own logic behind the Add button.
The first step is to double-click the Add button to create an event handler for it. Make sure that you also remove the automatic wiring by setting the AddNewItem property of the CustomerBindingNavigator to (None); otherwise, you will end up with two records being created every time you click the Add button. You can then modify the default event handler as follows to set initial values for the new customer, as well as create records in the other two tables:
Private Const cCustomerType As String = "I"
Private Sub BindingNavigatorAddNewItem_Click(ByVal sender As System.Object, _
                                             ByVal e As System.EventArgs) _
                                           Handles BindingNavigatorAddNewItem.Click
    Dim drv As DataRowView

    'Create record in the Customer table
    drv = TryCast(Me.CustomerBindingSource.AddNew, DataRowView)
    Dim customer = TryCast(drv.Row, AdventureWorksDataSet.CustomerRow)
customer.rowguid = Guid.NewGuid
customer.CustomerType = cCustomerType
customer.ModifiedDate = Now
Me.CustomerBindingSource.EndEdit
'Create record in the Contact table
drv = TryCast(Me.ContactBindingSource.AddNew, DataRowView)
Dim contact = TryCast(drv.Row, AdventureWorksDataSet.ContactRow)
contact.FirstName = "<first name>"
contact.LastName = "<last name>"
contact.EmailPromotion = 0
contact.NameStyle = True
contact.PasswordSalt = ""
contact.PasswordHash = ""
contact.rowguid = Guid.NewGuid
contact.ModifiedDate = Now
contact.rowguid = Guid.NewGuid
Me.ContactBindingSource.EndEdit
'Create record in the Individual table
drv = TryCast(Me.IndividualBindingSource.AddNew, DataRowView)
Dim individual = TryCast(drv.Row, AdventureWorksDataSet.IndividualRow)
individual.CustomerRow = cr
individual.ContactRow = ct
individual.ModifiedDate = Now
Me.IndividualBindingSource.EndEdit
End SubFrom this example, it seems that you are unnecessarily setting some of the properties — for example, PasswordSalt and PasswordHash being equal to an empty string. This is necessary to ensure that the new row meets the constraints established by the database. Because these fields cannot be set by the user, you need to ensure that they are initially set to a value that can be accepted by the database. Clearly, for a secure application, the PasswordSalt and PasswordHash would be set to appropriate values.
Running the application with this method instead of the automatically wired event handler enables you to create a new Customer record using the Add button. If you enter values for each of the fields, you can save the changes.
21.2.7. Validation
In the previous section, you added functionality to create a new customer record. If you don't enter appropriate data upon creating a new record — for example, if you don't enter a first name — this record will be rejected when you click the Save button. In fact, an exception will be raised if you try to move away from this record. The schema for the AdventureWorksDataSet contains a number of constraints, such as FirstName can't be null, which are checked when you perform certain actions, such as saving or moving between records. If these checks fail, an exception is raised. You have two options. One, you can trap these exceptions, which is poor programming practice, because exceptions should not be used for execution control. Alternatively, you can pre-empt this by validating the data prior to the schema being checked. Earlier in the chapter, when you learned how the BindingNavigator automatically wires the AddNew method on the BindingSource, you saw that the OnAddNew method contains a call to a Validate method. This method propagates up and calls the Validate method on the active control, which returns a Boolean value that determines whether the action will proceed. This pattern is used by all the automatically wired events and should be used in the event handlers you write for the navigation buttons.
The Validate method on the active control triggers two events — Validating and Validated — that occur before and after the validation process, respectively. Because you want to control the validation process, add an event handler for the Validating event. For example, you could add an event handler for the Validating event of the FirstNameTextBox control:
Private Sub FirstNameTextBox_Validating(ByVal sender As System.Object, _
                                ByVal e As System.ComponentModel.CancelEventArgs) _
                                                Handles FirstNameTextBox.Validating
        Dim firstNameTxt As TextBox = TryCast(sender, TextBox)
        If firstNameTxt Is Nothing Then Return
        e.Cancel = firstNameTxt.Text = ""
End Sub
Though this prevents users from leaving the textbox until a value has been added, it doesn't give them any idea why the application prevents them from proceeding. Luckily, the .NET Framework includes an ErrorProvider control that can be dragged onto the form from the Toolbox. This control behaves in a manner similar to the tooltip control. For each control on the form, you can specify an Error string, which, when set, causes an icon to appear alongside the relevant control, with a suitable tooltip displaying the Error string. This is illustrated in Figure 21-16, where the Error string is set for the FirstNameTextBox.
Figure 21.16. Figure 21-16

Clearly, you want only to set the Error string property for the FirstNameTextBox when there is no text. Following from the earlier example in which you added the event handler for the Validating event, you can modify this code to include setting the Error string:
Private Sub FirstNameTextBox_Validating(ByVal sender As System.Object, _
                                ByVal e As System.ComponentModel.CancelEventArgs) _
                                                Handles FirstNameTextBox.Validating
    Dim firstNameTxt As TextBox = TryCast(sender, TextBox)
    If firstNameTxt Is Nothing Then Return
    e.Cancel = firstNameTxt.Text = ""
    If firstNameTxt.Text = "" Then
        Me.ErrorProvider1.SetError(firstNameTxt, "First Name must be specified")
    Else
        Me.ErrorProvider1.SetError(firstNameTxt, Nothing)
    End If
End Sub
You can imagine that having to write event handlers that validate and set the error information for each of the controls can be quite a lengthy process, so the following component, for the most part, gives you designer support:
Imports System.ComponentModel
Imports System.Drawing.Design

<ProvideProperty("Validate", GetType(Control))> _
Public Class ControlValidator
    Inherits Component
    Implements IExtenderProvider

#Region "Rules Validator"
    Private Structure Validator
        Public Rule As Predicate(Of IRulesList.RuleParams)
        Public Information As ValidationAttribute
        Public Sub New(ByVal r As Predicate(Of IRulesList.RuleParams), _
                       ByVal info As ValidationAttribute)
            Me.Rule = r
            Me.Information = info
        End Sub
    End Structure
#End Region

    Private m_ErrorProvider As ErrorProvider
    Private rulesHash As New Dictionary(Of String, Validator)
    Public controlHash As New Dictionary(Of Control, Boolean)

    Public Sub New(ByVal container As IContainer)
        MyBase.New()
        container.Add(Me)
    End Sub

#Region "Error provider and Rules"

    Public Property ErrorProvider() As ErrorProvider
Get
Return m_ErrorProvider
End Get
Set(ByVal value As ErrorProvider)
m_ErrorProvider = value
End Set
End Property
Public Sub AddRules(ByVal ruleslist As IRulesList)
For Each rule As Predicate(Of IRulesList.RuleParams) In ruleslist.Rules
Dim attributes As ValidationAttribute() = _
TryCast(rule.Method.GetCustomAttributes _
(GetType(ValidationAttribute), True), _
ValidationAttribute())
If Not attributes Is Nothing Then
For Each attrib As ValidationAttribute In attributes
rulesHash.Add(attrib.ColumnName.ToLower, _
New Validator(rule, attrib))
Next
End If
Next
End Sub
#End Region
#Region "Extender Provider to turn validation on"
Public Function CanExtend(ByVal extendee As Object) As Boolean _
Implements System.ComponentModel.IExtenderProvider.CanExtend
Return TypeOf (extendee) Is Control
End Function
Public Sub SetValidate(ByVal control As Control, _
ByVal shouldValidate As Boolean)
If shouldValidate Then
AddHandler control.Validating, AddressOf Validating
End If
controlHash.Item(control) = shouldValidate
End Sub
Public Function GetValidate(ByVal control As Control) As Boolean
If controlHash.ContainsKey(control) Then
Return controlHash.Item(control)
End If
Return False
End Function
#End Region
#Region "Validation"
Private ReadOnly Property ItemError(ByVal ctrl As Control) As String
Get
Try
If ctrl.DataBindings.Count = 0 Then Return ""
Dim key As String = ctrl.DataBindings.Item(0).BindingMemberInfo
.BindingField
Dim bs As BindingSource =
TryCast(ctrl.DataBindings.Item(0).DataSource, BindingSource)If bs Is Nothing Then Return ""
Dim drv As DataRowView = TryCast(bs.Current, DataRowView)
If drv Is Nothing Then Return ""
Dim valfield As String = ctrl.DataBindings.Item(0).PropertyName
Dim val As Object = ctrl.GetType.GetProperty(valfield, _
New Type() {}).GetValue(ctrl, Nothing)
Return ItemError(drv, key, val)
Catch ex As Exception
Return ""
End Try
End Get
End Property
Private ReadOnly Property ItemError(ByVal drv As DataRowView, ByVal columnName
As String, ByVal newValue As Object) As String
Get
columnName = columnName.ToLower
If Not rulesHash.ContainsKey(columnName) Then Return ""
Dim p As Validator = rulesHash.Item(columnName)
If p.Rule Is Nothing Then Return ""
If p.Rule(New IRulesList.RuleParams(drv.Row, newValue)) Then Return ""
If p.Information Is Nothing Then Return ""
Return p.Information.ErrorString
End Get
End Property
Private Sub Validating(ByVal sender As Object, ByVal e As CancelEventArgs)
Dim err As String = InternalValidate(sender)
e.Cancel = Not (err = "")
End Sub
Private Function InternalValidate(ByVal sender As Object) As String
If Me.m_ErrorProvider Is Nothing Then Return ""
Dim ctrl As Control = TryCast(sender, Control)
If ctrl Is Nothing Then Return ""
If Not Me.controlHash.ContainsKey(ctrl) OrElse Not Me.controlHash.Item(ctrl)
Then Return ""
Dim err As String = Me.ItemError(ctrl)
Me.m_ErrorProvider.SetError(ctrl, err)
Return err
End Function
Private Sub ChangedItem(ByVal sender As Object, ByVal e As EventArgs)
InternalValidate(sender)
End Sub
#End Region
#Region "Validation Attribute"
<AttributeUsage(AttributeTargets.Method)> _Public Class ValidationAttribute
Inherits Attribute
Private m_ColumnName As String
Private m_ErrorString As String
Public Sub New(ByVal columnName As String, ByVal errorString As String)
Me.ColumnName = columnName
Me.ErrorString = errorString
End Sub
Public Property ColumnName() As String
Get
Return m_ColumnName
End Get
Set(ByVal value As String)
m_ColumnName = value
End Set
End Property
Public Property ErrorString() As String
Get
Return m_ErrorString
End Get
Set(ByVal value As String)
m_ErrorString = value
End Set
End Property
End Class
#End Region
#Region "Rules Interface"
Public Interface IRulesList
Structure RuleParams
Public ExistingData As DataRow
Public NewData As Object
Public Sub New(ByVal data As DataRow, ByVal newStuff As Object)
Me.ExistingData = data
Me.NewData = newStuff
End Sub
End Structure
ReadOnly Property Rules() As Predicate(Of RuleParams)()
End Interface
#End Region
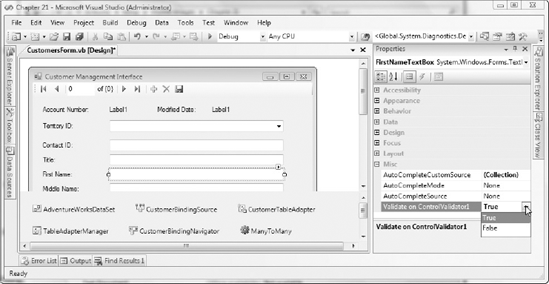
End ClassThe ControlValidator has a number of parts that work together to validate and provide error information. First, to enable validation of a control, the ControlValidator exposes an Extender Provider, which allows you to indicate whether the ControlValidator on the form should be used for validation. The right pane in Figure 21-17 shows the Properties window for the FirstNameTextBox, in which the Validate property has been set to True. When the FirstNameTextBox is validated, the ControlValidator1 control will be given the opportunity to validate the FirstName property.
Figure 21.17. Figure 21-17
The ControlValidator has an ErrorProvider property that can be used to specify an ErrorProvider control on the form. This is not a requirement, however, and validation will proceed without one being specified. If this property is set, the validation process will automatically set the Error string property for the control being validated.
What you're currently missing is a set of business rules to use for validation. This is accomplished using a rules class that implements the IRulesList interface. Each rule is a predicate — in other words, a method that returns true or false based on a condition. The following code defines a CustomerValidationRules class that exposes two rules that determine whether the First Name and TerritoryID fields contain valid data. Each rule is attributed with the ValidationAttribute, which determines the column that the rule validates, and the Error string, which can be displayed if the validation fails. The column specified in the Validation attribute needs to match the field to which the control is data-bound:
Imports System
Imports CustomerBrowser.ControlValidator
Public Class CustomerValidationRules
    Implements IRulesList

    Public Shared ReadOnly Property Instance() As CustomerValidationRules
        Get
            Return New CustomerValidationRules
        End Get
End Property
Public ReadOnly Property Rules() As Predicate(Of IRulesList.RuleParams)() _
Implements IRulesList.Rules
Get
Return New Predicate(Of IRulesList.RuleParams)() { _
AddressOf TerritoryId, _
AddressOf FirstName}
End Get
End Property
<Validation("TerritoryID", "TerritoryID must be >0")> _
Public Function TerritoryId(ByVal data As IRulesList.RuleParams) As Boolean
Try
If Not TypeOf (data.NewData) Is Integer Then Return False
Dim newVal As Integer = CInt(data.NewData)
If newVal > 0 Then Return True
Return False
Catch ex As Exception
Return False
End Try
End Function
<Validation("FirstName", "First Name must be specified")> _
Public Function FirstName(ByVal data As IRulesList.RuleParams) As Boolean
Try
Dim newVal As String = TryCast(data.NewData, String)
If newVal = "" Then Return False
Return True
Catch ex As Exception
Return False
End Try
End Function
End ClassThe last task that remains is to add the following line to the form's Load method to associate this rules class to the ControlValidator:
Me.ControlValidator1.AddRules(CustomerValidationRules.Instance)
To add more rules to this form, all you need to do is add the rule to the CustomerValidationRules class and enable validation for the appropriate control.
21.2.8. DataGridView
So far you've been working with standard controls, and you've seen how the BindingNavigator enables you to scroll through a list of items. Sometimes it is more convenient to display a list of items in a grid. This is where the DataGridView is useful, because it enables you to combine the power of the BindingSource with a grid layout.
Extending the Customer Management interface, add the list of orders to the form using the DataGridView. Returning to the Data Sources window, select the SalesOrderHeader node from under the Customer node. From the drop-down list, select DataGridView and drag the node into an empty area on the form. This adds the appropriate BindingSource and TableAdapter to the form, as well as a DataGridView showing each of the columns in the SalesOrderHeader table, as shown in Figure 21-18.
Figure 21.18. Figure 21-18
Unlike working with the Details layout, when you drag the DataGridView onto the form it ignores any settings you might have specified for the individual columns. Instead, every column is added to the grid as a simple text field. To modify the list of columns that are displayed, you can either use the smart tag for the newly added DataGridView or select Edit Columns from the right-click context menu. This will open the Edit Columns dialog (shown in Figure 21-19), in which columns can be added, removed, and reordered.
Figure 21.19. Figure 21-19

After specifying the appropriate columns, the finished application can be run, and the list of orders will be visible for each customer in the database.