
25.1. LINQ to SQL
You may be thinking that we are about to introduce you to yet another technology for doing data access. In fact, what you will see is that everything covered in this chapter extends the existing ADO.NET data access model. LINQ to SQL is much more than just the ability to write LINQ statements to query information from a database. It provides a true object to a relational mapping layer, capable of tracking changes to existing objects and allowing you to add or remove objects as if they were rows in a database.
Let's get started and look at some of the features of LINQ to SQL and the associated designers on the way. For this chapter we're going to use the AdventureWorksLT sample database (downloadable from the MSFTDBProdSamples project at www.codeplex.com). We're going to end up performing a similar query to that used in Chapter 23, which was researching customers with a first name greater than or equal to five characters and the average order size for a particular product. In Chapter 23 the product was Milk, but because we are dealing with a bike company we will use the "HL Road Frame — Red, 44" product instead.
25.1.1. Creating the Object Model
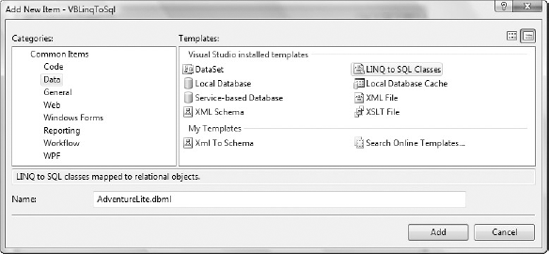
For the purpose of this chapter we will be using a normal Visual Basic Windows Forms application from the New Project dialog. You will also need to create a Data Connection to the AdventureWorksLT database (covered in Chapter 21), which for this example is drnick.AdventureWorksLT.dbo. The next step is to add a LINQ to SQL Classes item from the Add New Item dialog shown in Figure 25-1.
Figure 25.1. Figure 25-1
After providing a name, in this case AdventureLite, and accepting this dialog, three items will be added to your projects. These are AdventureLite.dbml, which is the mapping file; AdventureLite.dbml.layout, which like the class designer is used to lay out the mapping information to make it easier to work with; and finally AdventureLite.designer.vb, which contains the classes into which data is loaded as part of LINQ to SQL.
These items may appear as a single item, AdventureLite.dbml, if you don't have the Show All Files option enabled. Select the project and click the appropriate button at the top of the Solution Explorer tool window.
Unfortunately, unlike some of the other visual designers in Visual Studio 2008 that have a helpful wizard to get you started, the LINQ to SQL designer initially appears as a blank design surface, as you can see in the center of Figure 25-2.
Figure 25.2. Figure 25-2

On the right side of Figure 25-2, you can see the properties associated with the main design area, which actually represents a DataContext. If you were to compare LINQ with ADO.NET, then a LINQ statement equates approximately to a command, whereas a DataContext roughly equates to the connection. It is only roughly because the DataContext actually wraps a database connection in order to provide object lifecycle services. For example, when you execute a LINQ to SQL statement it is the DataContext that ends up executing the request to the database, creating the objects based on the return data and then tracking those objects as they are changed or deleted.
If you have worked with the class designer you will be at home with the LINQ to SQL designer. As the instructions in the center of Figure 25-2 indicate, you can start to build your data mappings by dragging items from the Server Explorer (or manually creating them by dragging the item from the Toolbox). In our case we want to expand the Tables node, select the Customer, SalesOrderHeader, SalesOrderDetail, and Product tables, and drag them onto the design surface. You will notice from Figure 25-3 that a number of the classes and properties have been renamed to make the object model easier to read when we are writing LINQ statements. This is a good example of the benefits of separating the object model (for example, Order or OrderItem) from the underlying data (in this case, the SalesOrderHeader and SalesOrderDetail tables). Because we don't need all the properties that are automatically created, it is recommended that you select them, in the designer, and delete them. The end result should look like Figure 25-3.
Figure 25.3. Figure 25-3

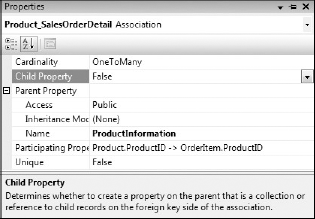
It is also worth noting that you can modify the details of the association between objects. Figure 25-4 shows the Properties tool window for the association between Product and OrderItem. Here we have set the generation of the Child Property to False because we won't need to track back from a Product to all the OrderItems. We have also renamed the Parent Property to ProductInformation to make the association more intuitive (although note that the name in the drop-down at the top of the Properties window uses the original SQL Server table names).
Figure 25.4. Figure 25-4
As you can see, you can control whether properties are created that can be used to navigate between instances of the classes. Though this might seem quite trivial, if you think about what happens if you attempt to navigate from an Order to its associated OrderItems, you can quickly see that there will be issues if the full object hierarchy hasn't been loaded into memory. For example, in this case if the OrderItems aren't already loaded into memory, LINQ to SQL intercepts the navigation, goes to the database, and retrieves the appropriate data in order to populate the OrderItems.
The other property of interest in Figure 25-4 is the Participating Properties. Editing this property will launch the Association Editor window (see Figure 25-5). You can also reach this dialog by right-clicking the association on the design surface and selecting Edit Association.
Figure 25.5. Figure 25-5
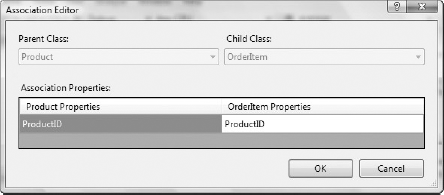
If you drag items from Server Explorer onto the design surface, you are unlikely to need the Association Editor. However, it is particularly useful if you are manually creating a LINQ to SQL mapping, because you can control how the object associations align to the underlying data relationships.
25.1.2. Querying with LINQ to SQL
In the previous chapters you will have seen enough LINQ statements to understand how to put together a statement that filters, sorts, aggregates, and projects the relevant data. With this in mind, examine the following LINQ to SQL snippet:
Using aw As New AdventureLiteDataContext
    Dim custs = From c In aw.Customers, o In c.Orders, oi In o.OrderItems _
                Where c.FirstName.Length >= 5 And _
                      oi.ProductInformation.Name = "HL Road Frame - Red, 44" _
                Group By c Into avg = Average(oi.Quantity) _
                Let Name = c.FirstName & " " & c.LastName _
                Order By Name _
                Select New With {Name, .AverageOrder = avg}

    For Each c In custs
        MsgBox(c.Name & " = " & c.AverageOrder)
    Next
End Using
The biggest difference here is that instead of the Customer and Order objects existing in memory before the creation and execution of the LINQ statement, now all the data objects are loaded at the point of execution of the LINQ statement. The AdventureLiteDataContext is the conduit for opening the connection to the database, forming and executing the relevant SQL statement against the database, and loading the return data into appropriate objects.
You will also note that the LINQ statement has to navigate through the Customers, Orders, OrderItems, and Product tables in order to execute the LINQ statement. Clearly if this were to be done as a series of SQL statements, it would be horrendously slow. Luckily the translation of the LINQ statement to SQL commands is done as a single unit.
There are some exceptions to this; for example, if you call ToList in the middle of your LINQ statement this may result in the separation into multiple SQL statements. Though LINQ to SQL does abstract you away from having to explicitly write SQL commands, you still need to be aware of the way your query will be translated and how it might affect your application performance.
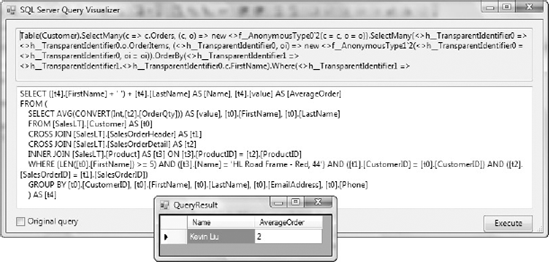
In order to view the actual SQL that is generated, we can use a debugging visualizer that was published by Scott Gutherie. Entitled the LINQ to SQL Debug Visualizer, you can download it from Scott's blog (http://weblogs.asp.net/scottgu and search for SQL Visualizer). The download includes both the source and the built visualizer dll. The latter should be dropped into your visualizers folder (typically c:Users<username>DocumentsVisual Studio 2008Visualizers). When you restart Visual Studio 2008 you will be able to make use of this visualizer to view the actual SQL that is generated by LINQ to SQL for your LINQ statement. Figure 25-6 illustrates the default datatip for the same LINQ to SQL statement in C# (VB.NET is the same, except you don't see the generated SQL in the first line of the datatip).
Figure 25.6. Figure 25-6

After adding the visualizer you will see the magnifying glass icon in the first line of the datatip, as in Figure 25-6. Clicking this will open up the LINQ to SQL Debug Visualizer so that you can see the way your LINQ to SQL statement is translated to SQL. Figure 25-7 illustrates this visualizer showing the way that the query is parsed by the compiler in the top half of the screen, and the SQL statement that is generated in the lower half of the screen. Clicking the "Execute" button will display the QueryResults window (inset into Figure 25-7) with the output of the SQL statement. Note that you can modify the SQL statement, allowing you to tweak it until you get the correct results set. This can quickly help you correct any errors in your LINQ statement.
Figure 25.7. Figure 25-7
25.1.2.1. Inserts, Updates, and Deletes
You can see from the earlier code snippet that the DataContext acts as the conduit through which LINQ to SQL queries are processed. To get a better appreciation of what the DataContext does behind the scenes, let's look at inserting a new product category into the AdventureWorksLT database. Before you can do this you will need to add the ProductCategory table to your LINQ to SQL design surface. In this case you don't need to modify any of the properties. Then to add a new category to your database, all you need is the following code:
Using aw As New AdventureLiteDataContext
    Dim cat As New ProductCategory
    cat.Name = "Extreme Bike"
    aw.ProductCategories.InsertOnSubmit(c)
    aw.SubmitChanges()
End Using
The highlighted lines insert the new category into the collection of product categories held in memory by the DataContext. When you then call SubmitChanges on the DataContext it is aware that you have added a new product category so it will insert the appropriate records. A similar process is used when making changes to existing items. In the following example we retrieve the product category we just inserted using the Like syntax. Because there is likely to be only one match, we can use the FirstOrDefault extension method to give us just a single product category to work with:
Using aw As New AdventureLiteDataContext
    Dim cat = (From pc In aw.ProductCategories _
               Where pc.Name Like "*Extreme*").FirstOrDefault
    cat.Name = "Extreme Offroad Bike"
    aw.SubmitChanges()
End Using
Once the change to the category name has been made, you just need to call SubmitChanges on the DataContext in order for it to issue the update on the database. Without going into too much detail the DataContext essentially tracks changes to each property on a LINQ to SQL object so that it knows which objects need updating when SubmitChanges is called. If you wish to delete an object, you simply need to obtain an instance of the LINQ to SQL object, in the same way as for doing an update, and then call DeleteOnSubmit on the appropriate collection. For example, to delete a product category you would call aw.ProductCategories.DeleteOnSubmit(categoryToDelete).
25.1.2.2. Stored Procedures
One of the questions frequently asked about LINQ to SQL is whether you can use your own stored procedures in place of the runtime-generated SQL. The good news is that for inserts, updates, and deletes you can easily specify the stored procedure that should be used. You can also use existing stored procedures for creating instances of LINQ to SQL objects. Let's start by adding a simple stored procedure to the AdventureWorksLT database. To do this, right-click the Stored Procedures node under the database connection in the Server Explorer tool window and select Add New Stored Procedure. This will open a code window with a new stored procedure template. In the following code we have selected to return the five fields that are relevant to our Customer object:
CREATE PROCEDURE dbo.GetCustomers
AS
BEGIN
    SET NOCOUNT ON
    SELECT c.CustomerID, c.FirstName, c.LastName, c.EmailAddress, c.Phone
    FROM SalesLT.Customer AS c
END;
Once you have saved this stored procedure it will appear under the Stored Procedures node. If you now open up the AdventureLite LINQ to SQL designer, you can drag this stored procedure across into the right-hand pane of the design surface. In Figure 25-8 you can see that the return type of the GetCustomers method is set to Auto-generated Type. This means that you will only be able to query information in the returned object. Ideally we would want to be able to make changes to these objects and be able to use the DataContext to persist those changes back to the database.
Figure 25.8. Figure 25-8
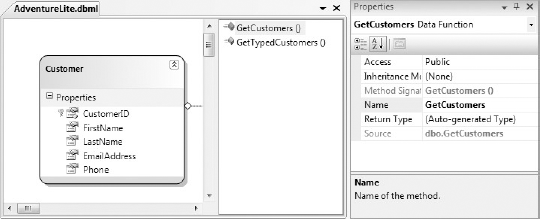
The second method, GetTypedCustomers, actually has the Return Type set as the Customer class. To create this method you can either drag the GetCustomers stored procedure to the right pane, and then set the Return Type to Customer, or you can drag the stored procedure onto the Customer class in the left pane of the design surface. The latter will still create the method in the right pane, but it will automatically specify the return type as the Customer type.
Note that you don't need to align properties with the stored procedure columns, because this mapping is automatically handled by the DataContext. This is a double-edged sword: clearly it works when the column names map to the source columns of the LINQ to SQL class but it may cause a runtime exception if there are missing columns or columns that don't match.
Once you have defined these stored procedures as methods on the design surface, calling them is as easy as calling the appropriate method on the DataContext:
Using aw As New AdventureLiteDataContext
    Dim customers = aw.GetCustomers

    For Each c In customers
        MsgBox(c.FirstName)
    Next
End Using
Here you have seen how you can use a stored procedure to create instances of the LINQ to SQL classes. If you instead want to update, insert, or delete objects using stored procedures, you follow a similar process except you need to define the appropriate behavior on the LINQ to SQL class. To begin with, let's create an insert stored procedure for a new product category:
CREATE PROCEDURE dbo.InsertProductCategory
(
@categoryName nvarchar(50),
@categoryId int OUTPUT
)
AS
BEGIN
INSERT INTO SalesLT.ProductCategory (Name) VALUES (@categoryName)
SELECT @categoryId=@@identity
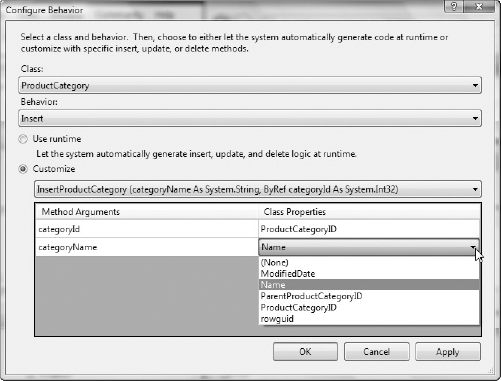
END;Following the same process as before, you need to drag this newly created stored procedure from the Server Explorer across into the right pane of the LINQ to SQL design surface. Then in the Properties tool window for the ProductCategory class, modify the Insert property. This will open the dialog shown in Figure 25-9. Here you can select whether you want to use the runtime-generated code or customize the method that is used. In Figure 25-9 the InsertProductCategory method has been selected. Initially the Class Properties will be unspecified, because Visual Studio 2008 wasn't able to guess at which properties mapped to the method arguments. It's easy enough to align these to the id and name properties. Now when the DataContext goes to insert a ProductCategory it will use the stored procedure instead of the runtime-generated SQL statement.
Figure 25.9. Figure 25-9
25.1.3. Binding LINQ to SQL Objects
The important thing to remember when using DataBinding with LINQ to SQL objects is that they are in fact normal .NET objects. This means that you can create a new object data source via the Data Sources tool window. In the case of the examples you have seen so far, you would go through the Add New Data Source Wizard, selecting just the Customer object. Because the Order and OrderItem objects are accessible via the navigation properties Orders and then OrderItems, you don't need to explicitly add them to the Data Source window.
Once you have created the object data source (see the left side of Figure 25-10), you can then proceed to drag the nodes onto your form to create the appropriate data components. Starting with the Customer node, use the drop-down to specify that you want a DataGridView, then drag it onto your form. Next you need to specify that you want the Orders (a child node under Customer) to appear as details and then drag this to the form as well. You will notice that you don't get a binding navigator for this binding source, so from the Toolbox add a BindingNavigator to your form and set its BindingSource property to be the OrdersBindingSource that was created when you dragged over the Orders node. Lastly we want to display all the OrderItems in a DataGridView, so use the drop-down to set this and then drag the node onto the form. After doing all this you should end up with something similar to Figure 25-10. Note that we have also included a button that we will use to load the data and we have laid the Order information out in a panel to improve the layout.
Figure 25.10. Figure 25-10

One of the things you will have noticed is that the columns on your OrderItems data grid don't match those in Figure 25-10. By default you will get Quantity, Order, and ProductInformation columns. Clearly the last two columns are not going to display anything of interest, but we don't really have an easy way to display the Name of the product in the order with the current LINQ to SQL objects. Luckily there is an easy way to effectively hide the navigation from OrderItem to ProductInformation so that the name of the product will appear as a property of OrderItem.
We do this by adding our own property to the OrderItem class. Each LINQ to SQL class is generated as a partial class, which means that extending the class is as easy as right-clicking on the class in the LINQ to SQL designer and selecting View Code. This will generate a custom code file, in our case AdventureLite.vb, and will include the partial class definition. You can then proceed to add your own code. In the following snippet we have added the Product property that will simplify access to the name of the product being ordered:
Partial Class OrderItem
    Public ReadOnly Property Product() As String
        Get
            Return Me.ProductInformation.Name
        End Get
    End Property
End Class
For some reason this property, perhaps because it is added to a second code file, will not be detected by the Data Sources tool window. However, you can still bind the Product column to this property by manually setting the DataPropertyName field in the Edit Columns dialog for the data grid.
The last thing to do is to actually load the data when the user clicks the button. To do this we can use the following code:
Private Sub btnLoad_Click(ByVal sender As System.Object, _
                          ByVal e As System.EventArgs) Handles btnLoad.Click
    Using aw As New AdventureLiteDataContext
        Dim custs = From c In aw.Customers
        Me.CustomerBindingSource.DataSource = custs
    End Using
End Sub
You will notice that your application will now run and when the user clicks the button the customer information will be populated in the top data grid. However, no matter which customer you select, no information will appear in the Order information area. The reason for this is that LINQ to SQL uses lazy loading to retrieve information as it is required. Using the data visualizer you were introduced to earlier, if you inspect the query in this code you will see that it contains only the customer information:
SELECT [t0].[CustomerID], [t0].[FirstName], [t0].[LastName], [t0].[EmailAddress],
[t0].[Phone]
FROM [SalesLT].[Customer] AS [t0]
There are two ways to resolve this issue. The first is to force LINQ to SQL to bring back all the Order, OrderItem, and ProductInformation data as part of the initial query. To do this, modify the button click code to the following:
Private Sub btnLoad_Click(ByVal sender As System.Object, _
                          ByVal e As System.EventArgs) Handles btnLoad.Click
    Using aw As New AdventureLiteDataContext
        Dim loadOptions As New System.Data.Linq.DataLoadOptions
        loadOptions.LoadWith(Of Customer)(Function(c As Customer) c.Orders)
        loadOptions.LoadWith(Of Order)(Function(o As Order) o.OrderItems)
        loadOptions.LoadWith(Of OrderItem)(Function(oi As OrderItem) _
                          oi.ProductInformation)
        aw.LoadOptions = loadOptions

        Dim custs = From c In aw.Customers
        Me.CustomerBindingSource.DataSource = custs
    End Using
End Sub
Essentially what this code tells the DataContext is that when it retrieves Customer objects it should forcibly navigate to the Orders property. Similarly for the Order objects navigate to the OrderItems property, and so on. One thing to be aware of is that this solution could perform really badly if there are a large number of customers. In fact as the number of customers and orders increases, this will perform progressively worse, so this is not a great solution; but it does illustrate how you can use the LoadOptions property of the DataContext.
The other alternative is to not dispose of the DataContext. You need to remember what is happening behind the scenes with DataBinding. When you select a customer in the data grid, this will cause the OrderBindingSource to refresh. It tries to navigate to the Orders property on the customer. If you have disposed of the DataContext, there is no way that the Orders property can be populated. So the better solution to this problem is to change the code to the following:
Private aw As New AdventureLiteDataContext
Private Sub btnLoad_Click(ByVal sender As System.Object, _
                          ByVal e As System.EventArgs) Handles btnLoad.Click
    Dim custs = From c In aw.Customers
    Me.CustomerBindingSource.DataSource = custs
End Sub
Because the DataContext will still exist, when the binding source navigates to the various properties, LINQ to SQL will kick in, populating these properties with data. This is much more scalable than attempting to populate the whole customer hierarchy when the user clicks the button.