
3.1. Window Layout
If you are unfamiliar with Visual Studio, the behavior of the numerous tool windows may strike you as erratic, because they seem to appear in random locations and then come and go when you move from writing code (design time) to running code (runtime) and back again. Visual Studio 2008 will remember the locations of tool windows in each of these modes separately. This way you can optimize the way you write and debug code.
As you open different items from the Solution Explorer, you'll see that the number of Toolbars across the top of the screen varies depending on the type of file being opened. Each Toolbar has a built-in association to specific file extensions so that Visual Studio knows to display the Toolbar when a file with one of those extensions is opened. If you close a Toolbar when a file is open that has a matching file extension, Visual Studio will remember this when future files with the same extension are opened.
You can reset the association between Toolbars and the file extensions via the Customize dialog (Tools
Customize). Select the appropriate Toolbar and click the "Reset" button.
3.1.1. Viewing Windows and Toolbars
Once a tool window or Toolbar has been closed it can be difficult to locate it again. Luckily most of the most frequently used tool windows are accessible via the View menu. Other tool windows, mainly related to debugging, are located under the Debug menu.
All the Toolbars available in Visual Studio 2008 are listed under the View ![]() Toolbars menu item. Each Toolbar that is currently visible is marked with a tick against the appropriate menu item. You can also access the list of Toolbars by right-clicking in any empty space in the Toolbar area at the top of the Visual Studio window.
Toolbars menu item. Each Toolbar that is currently visible is marked with a tick against the appropriate menu item. You can also access the list of Toolbars by right-clicking in any empty space in the Toolbar area at the top of the Visual Studio window.
Once a Toolbar is visible you can customize which buttons are displayed, either via View ![]() Toolbars
Toolbars ![]() Customize or under the Tools menu. Alternatively, as shown in Figure 3-1, if you select the down arrow at the end of a Toolbar you will see a list of all Toolbars that are on the same line in the Toolbar area. Selecting a Toolbar presents a list of all the buttons available on that Toolbar, from which you can check the buttons you want to appear on the Toolbar.
Customize or under the Tools menu. Alternatively, as shown in Figure 3-1, if you select the down arrow at the end of a Toolbar you will see a list of all Toolbars that are on the same line in the Toolbar area. Selecting a Toolbar presents a list of all the buttons available on that Toolbar, from which you can check the buttons you want to appear on the Toolbar.
Figure 3.1. Figure 3-1

3.1.2. Navigating Open Items
After opening multiple items you'll notice that you run out of room across the top of the editor space and that you can no longer see the tabs for all the items you have open. Of course you can go back to the Solution Explorer window and select a specific item. If the item is already open it will be displayed without reverting to its saved state. However, it is still inconvenient to have to find the item in the Solution Explorer.
Luckily, Visual Studio 2008 has a number of shortcuts to the list of open items. As with most document-based applications, Visual Studio has a Windows menu. When you open an item its title is added to the bottom section of this menu. To display an open item just select the item from the Windows menu, or click the generic Windows item, which will display a modal dialog from which you can select the item you want.
Another alternative is to use the drop-down menu at the end of the tab area of the editor space. Figure 3-2 shows the drop-down list of open items from which you can select the item you want to access.
Figure 3.2. Figure 3-2

Figure 3-2 (right) is the same as Figure 3-2 (left) except for the drop-down icon. This menu also displays a down arrow, but this one has a line across the top. This line indicates that there are more tabs than can fit across the top of the editor space.
Another way to navigate through the open items is to press Ctrl+Tab, which will display a temporary window, as shown in Figure 3-3. It is a temporary window because when you release the Ctrl key it will disappear. However, while the window is open you can use the arrow keys or press Tab to move among the open windows.
Figure 3.3. Figure 3-3
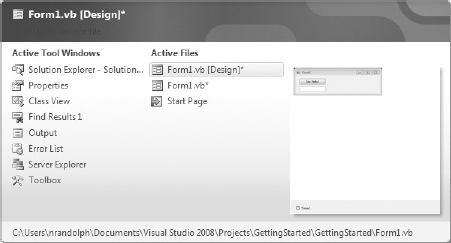
The Ctrl+Tab window is broken into three sections, which include the active tool windows, active files (this should actually be active items because it contains some items that don't correspond to a single file), and a preview of the currently selected item. As the number of either active files or active tool windows increases, the windows will expand vertically until there are 15 items, at which point an additional column will be formed.
If you get to the point where you are seeing multiple columns of active files, you might consider closing some or all of the unused files. The more files Visual Studio 2008 has open, the more memory it uses and the more slowly it performs.
3.1.3. Docking
Each tool window has a default position, which it will resume when it is opened from the View menu. For example, View ![]() Toolbox will open the Toolbox docked to the left edge of Visual Studio. Once a tool window is opened and is docked against an edge, it has two states, pinned and unpinned. As you saw in Chapter 1, you can toggle between these states by clicking on the vertical pin to unpin the tool window or on the horizontal pin to pin the tool window.
Toolbox will open the Toolbox docked to the left edge of Visual Studio. Once a tool window is opened and is docked against an edge, it has two states, pinned and unpinned. As you saw in Chapter 1, you can toggle between these states by clicking on the vertical pin to unpin the tool window or on the horizontal pin to pin the tool window.
You will notice that as you unpin a tool window it will slide back against the edge of the IDE, leaving visible a tag displaying the title of the tool window. This animation can be annoying and time-consuming when you have tool windows unpinned. On the Environment node of the Options dialog you can control whether Visual Studio should "Animate environment tools." If you uncheck the box, the tool windows will simply appear in their expanded state when you click the minimized tab. Alternatively, you can adjust the speed at which the animation occurs.
For most people the default location will suffice, but occasionally you'll want to adjust where the tool windows appear. Visual Studio 2008 has one of the most advanced systems for controlling the layout of tool windows. In Chapter 1 you saw how you could use the drop-down, next to the "pin" and "close" buttons at the top of the tool window, to make the tool window floating, dockable, or even part of the main editor space (using the Tabbed Document option).
When a tool window is dockable, you have a lot of control over where it is positioned. In Figure 3-4 you can see the top of the Properties window, which has been dragged away from its default position at the right of the IDE. To begin dragging you need to make sure the tool window is pinned and then click on either the title area at the top of the tool window or the tab at the bottom of the tool window and drag the mouse in the direction you want the window to move. If you click in the title area you'll see that all tool windows in that section of the IDE will also be moved. Clicking the tab will result in only the corresponding tool window moving.
Figure 3.4. Figure 3-4

As you drag the tool window around Visual Studio 2008, you'll see that translucent icons appear at different locations around the IDE. These icons are a useful guide to help you position the tool window exactly where you want. In Figure 3-5, the Properties window has been dragged over the left icon of the center image. The blue shading indicates where the Properties will be located when you release the "mouse" button. (In the case shown in the figure, the effect will be the same regardless of whether we use the left icon of the center image or the icon on the far left of the IDE.) In Figure 3-5, similarly, the Server Explorer tool window has been pinned against the left side. Now when the Properties window is positioned over the left icon of the center image, the blue shading again appears on the inside of the existing tool window. This indicates that both the Server Explorer and Properties tool windows will be pinned and visible if this layout is chosen.
Figure 3.5. Figure 3-5

Figure 3.6. Figure 3-6

Alternatively, if the Properties tool window is dragged over the left icon of Figure 3-6, the center image will move over the existing tool window. This indicates that the Properties tool window will be positioned within the existing tool window area. As you drag the window over the different quadrants, you will see that the blue shading again indicates where the tool window will be positioned when the mouse is released. In Figure 3-6 it indicates that the Properties tool window will appear below the existing tool windows.
It should be noted that if you have a large screen, or multiple screens, it is worth spending time laying out the tool windows you use frequently. With multiple screens, using floating tool windows means that you can position them away from the main editor space, maximizing your screen real estate. If you have a small screen you may find that you continually have to adjust which tool windows are visible, so becoming familiar with the docking and layout options is essential.